Dare to Be Different Quilt
Does your cat have a lot of “cattitude”? This quilt celebrates the unique and diverse personalities of our feline friends.

Skill Level
Confident Beginner
Specifications
Quilt Size: 33" × 40½"
Block Size: 7" × 9½" finished
Number of Blocks: 9
Dare to Be Different
7" × 9½" Finished Block Make 9
Materials
• 18 approximately 10"-square pieces of assorted colors and prints for blocks
• Scraps of yellow, red and orange solid
• ⅛ yard black solid
• ½ yard white-with-black circles
• 1 yard gray-with-multicolored dots
• Backing to size
• Batting to size
• 1 ![]() black button
black button
• 9 (⅜") black buttons
• 18 (⅝") white buttons
• 9 (⅝") cover button kits
• Thread
• Fusible web with paper release
• Template material
• Basic sewing tools and supplies
Project Notes
Read all instructions before beginning this project.
Stitch right sides together using a ¼" seam allowance unless otherwise specified.
Refer to General Instructions for specific construction and appliqué tips and techniques.
Materials and cutting lists assume 40" of usable fabric width.
Here’s a Tip
If you use a lot of buttons in your work, be on the lookout for inexpensive and unique buys. I find buttons in secondhand stores, garage sales (Grandma’s button jar), in scrapbooking aisles and sometimes even on used clothing. The cover buttons are wonderful because you can make a button to match anything!
Cutting
From each of 9 assorted colors & prints:
• Cut 1 (7½" × 10") A rectangle.
• Cut 2 (2¼" × 3½") H rectangles.
• Cut 1 (1¼") I circle.
From black solid:
• Cut 1 (2" by fabric width) strip.
Subcut strip into 16 (2") D squares.
From white-with-black circles:
• Cut 4 (3½" by fabric width) strips.
Subcut strips into 2 each 3½" × 35" E and 3½" × 27½" F strips.
From gray-with-multicolored dots:
• Cut 6 (2" by fabric width) strips.
Subcut strips into 12 each 2" × 10" B and 2" × 7½" C strips.
• Cut 1 (3½" by fabric width) strip.
Subcut strip into 4 (3½") G squares.
• Cut 4 (2¼" by fabric width) binding strips.
Completing the Blocks
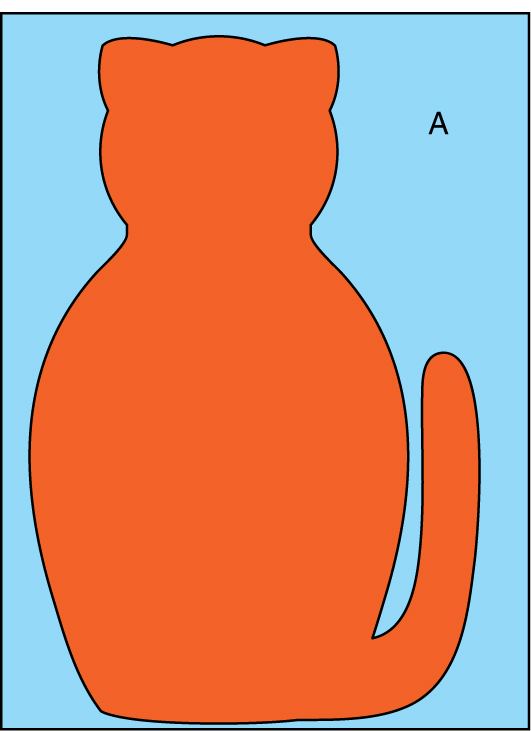
1. Prepare templates using patterns listed and provided on the insert for this quilt: Cat, Bird Body With Beak and Bird Wing.
2. Trace appliqué shapes onto paper side of fusible web referring to list below for kind and number to trace; cut out shapes. Apply shapes to wrong side of fabrics as listed below.
• Remaining 9 assorted colors and print: 9 cats
• Yellow solid: 1 bird body
• Orange solid: 1 beak
• Red solid: 1 bird wing
3. Cut out appliqué shapes and remove paper backing.
4. Position a cat appliqué on an A rectangle with the bottom of the cat ⅜" up from the bottom edge. Fuse in place. Repeat to make a total of nine blocks.
5. Machine blanket-stitch around each appliqué shape using matching thread.
Assembling the Quilt
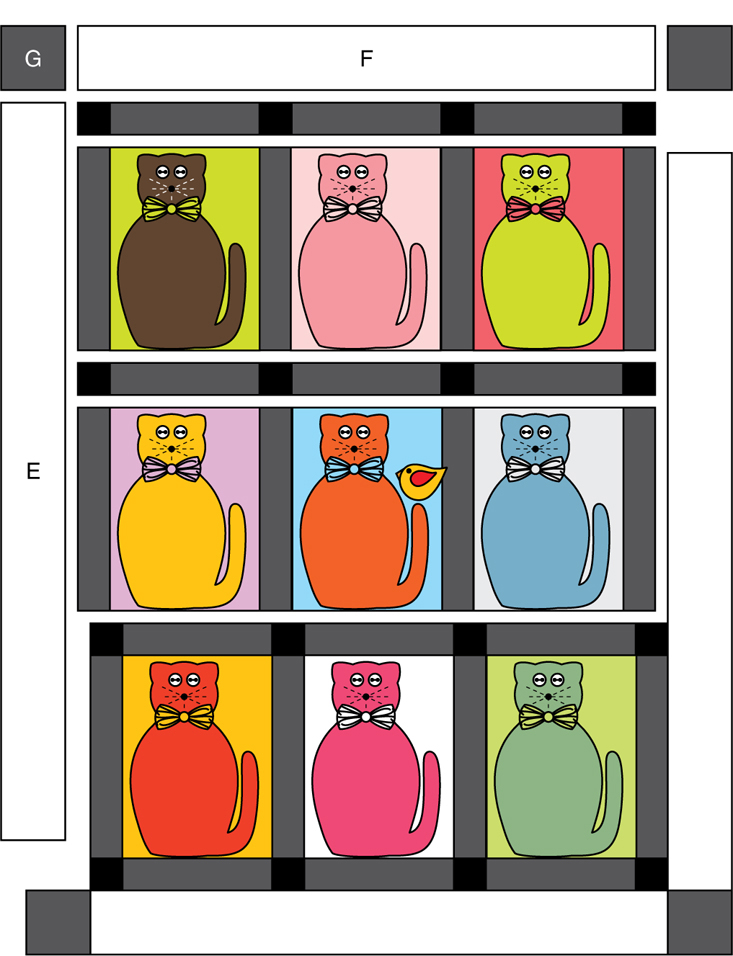
Refer to the Assembly Diagram and project photo throughout for positioning of pieces.
1. Alternately stitch four B strips and 3 blocks to make a block row as shown in Figure 1; press seam allowances toward B. Repeat to make a total of three block rows.
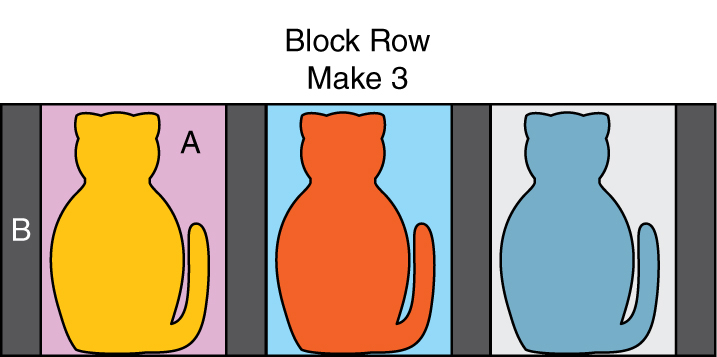
Figure 1
2. Referring to Figure 2, alternately join three C strips and four D squares to make a sashing row; press seam allowances toward C. Repeat to make four sashing rows.

Figure 2
3. Select one block row for the center row. Position the bird body appliqué ⅜" above the tip of the tail on the center block, overlapping onto the B strip at the right edge as shown in Figure 3.
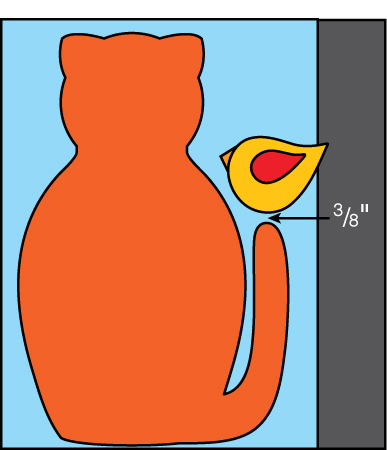
Figure 3
4. Slip the end of the beak under the edge of the head and place the wing on the body. Fuse shapes in place.
5. Machine blanket-stitch around the bird shapes using matching thread.
6. Alternately stitch sashing and block rows together to complete the quilt center; press.
7. Sew E strips to opposite sides of the quilt center; press seams toward E.
8. Sew a G square to each end of the F strips to make F-G strips; press seams toward F.
9. Sew F-G strips to the top and bottom of the quilt; press.
10. Refer to instructions for Quilting Basics to layer and baste the quilt. Stitch around each appliqué and add other quilting as desired. Double-stitch the cats’ whiskers and mouth and the bird legs using black thread. To make the cats’ legs, stitch a vertical line 3½" up from the center bottom of each cat body as shown in Figure 4.

Figure 4
11. Prepare binding strips referring to instructions for Quilting Basics and bind the quilt.
12. To make a bow tie, sew two matching H rectangles together, right sides facing, leaving a 1½" opening along one edge as shown in Figure 5. Trim corners and turn right side out. Fold in the seam allowance of the opening and slip-stitch closed. Press. Repeat to make a total of nine bow ties.
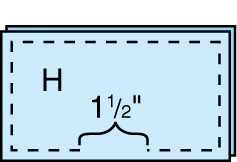
Figure 5
13. Following the manufacturer’s instructions, cover nine buttons with I circles.
14. Using a doubled length of matching thread, sew a gathering stitch up the center of a bow tie as shown in Figure 6a. Pull thread to gather (Figure 6b).
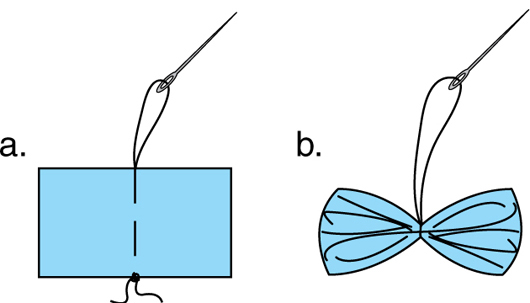
Figure 6
15. Knot thread and bring needle to the front center of the bow tie and pick up the matching covered button. Push the shank into the gathered center and wrap the thread around the center several times, going through the button shank. Knot thread and use the same thread to attach the bow tie to the neck of the cat with the background that matches the bow tie.
16. Repeat steps 14 and 15 for each block.
17. Sew two white buttons to each cat face for eyes and a black ⅜" button to each cat face for a nose.
18. Sew the ![]() black button to the bird for an eye to complete the quilt.
black button to the bird for an eye to complete the quilt. ![]()
Dare to Be Different Quilt
Assembly Diagram 33" × 40½"