Love My Pets Tea Towel Set
You can make this towel set in a jiffy starting with purchased tea towels. Add a fabric band, stick-figure cat and dog appliqués, and yo-yo flowers to make this cute kitchen set.

Skill Level
Confident Beginner
Specifications
Tea Towel Size: Size varies
Materials
Materials listed make 1 of each style of tea towel.
• Scraps brown and red tonals
• ½ yard green mini floral
• Thread
• 2 purchased white tea towels
• 6 (⅜") yellow buttons
• 8 ![]() tan buttons
tan buttons
• 6 ![]() black buttons
black buttons
• Template material
• Fusible web with paper release
• Nonpermanent marker
• Basic sewing tools and supplies
Project Notes
Read all instructions before beginning this project.
Stitch right sides together using a ¼" seam allowance unless otherwise specified.
Refer to General Instructions for specific construction and appliqué tips and techniques.
Materials and cutting lists assume 40" of usable fabric width.
Cutting
From red tonal:
• Cut 6 (2½") B circles.
From green mini floral:
• Cut 2 (8" by fabric width) strips.
Subcut strips into 2 (8" by width of tea towel plus ½") A strips.
Completing the Tea Towels
Refer to the Placement Diagram and project photo throughout for positioning of pieces and stitching.
1. Prewash, dry and press tea towels. Cut off the bottom hemmed end of each tea towel.
2. Fold and press a ½" hem to the wrong side on one long edge of an A strip.
3. Referring to Figure 1, center and sew the other long side of A to the cut end of a tea towel with ¼" extending on both sides beyond the tea towel; press A away from tea towel.

Figure 1
4. Fold the A strip in half lengthwise, with right sides facing, so the folded edge meets the seam as shown in Figure 2. Stitch the short ends of the strip with a scant ¼" seam, being careful not to catch the edge of the tea towel in the seam.

Figure 2
5. Trim the corners and turn the strip right side out so the side with the folded hem is in the back as shown in Figure 3. Whipstitch the folded edge to the back of the tea towel to make a banded tea towel.

Figure 3
6. Repeat steps 2–5 to make a second banded tea towel.
7. Prepare templates using patterns listed and provided on the insert for these tea towels: Cat & Dog Body, Dog Ear, Dog Head, Cat Head, Cat Tail, Dog Tail and Leaf.
8. Trace appliqué shapes onto paper side of fusible web referring to list below for kind and number to trace; cut out shapes. Apply shapes to wrong side of fabrics as listed below.
• Brown tonal: 2 bodies, 1 each cat head and tail, 1 each dog head and tail, and 2 dog ears (1 reversed)
9. Cut out appliqué shapes and remove paper backing.
10. Position a body in the center of the tea towel, 1½" above the seam line. Place the cat head on one body with the tail at the opposite end, tucking the straight edge of tail under the body. Place the dog head on the other body with an ear on each side, tucking the ear straight edges under the head. Place the tail at the opposite end, tucking the straight edge under the body. Fuse appliqués in place.
11. Machine blanket-stitch around each appliqué shape using matching thread. With the same thread, double-stitch four straight lines for legs from the body to the seam line.
12. Using black thread, double-stitch whiskers and mouth on cat face.
13. Referring to Figure 4, use green thread to double-stitch three straight lines 1½", 1" and 2" tall up from the seam line of the band for stems.
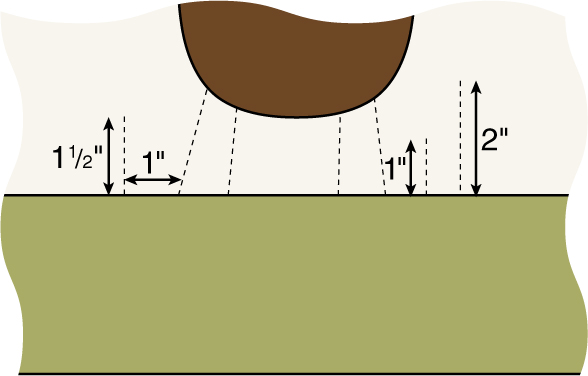
Figure 4
14. Use the leaf template to draw two leaves on each tea towel and double-stitch over the lines with green thread.
15. Referring to Making Yo-Yo’s, make six yo-yo’s using B circles to represent flowers. Hand-stitch flowers to the end of each stem.
16. Sew a yellow button to the center of each flower.
17. Sew a tan button to the end of each stitched cat and dog leg for paws.
18. Sew two black buttons to the cat and dog faces for eyes and one to each for a nose. ![]()
Love My Pets Tea Towel Set
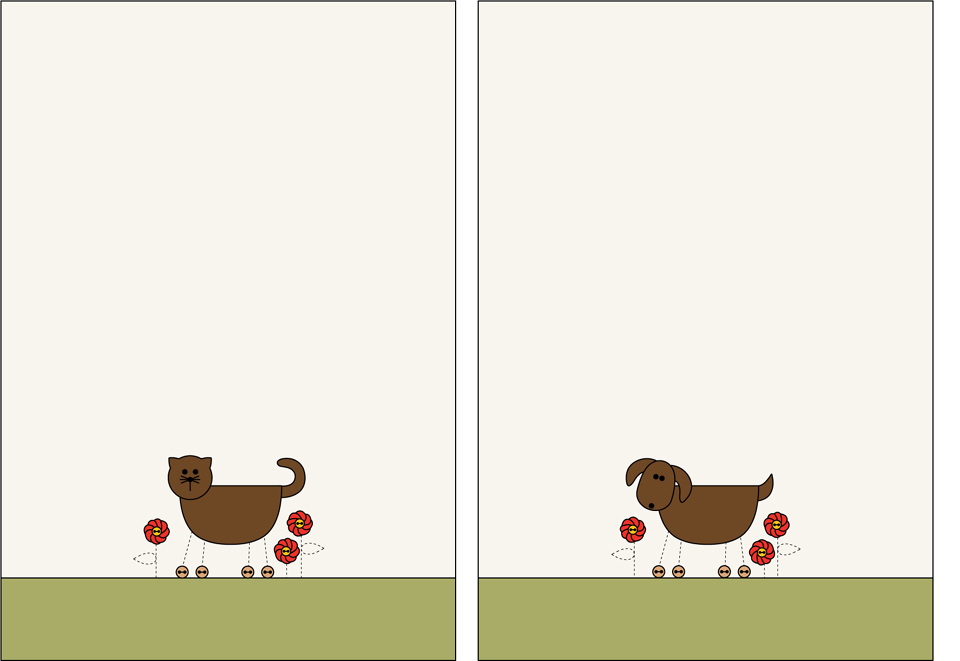
Placement Diagrams, Finished Sizes Vary
Making Yo-Yo’s
To make any size yo-yo:
1. Trace size circle desired or indicated on pattern using a template on wrong side of fabric.
2. Cut a length of thread in a color to match fabric; double thread and knot ends together.
3. Working with wrong side of yo-yo circle facing you, turn fabric under ¼" to wrong side and insert needle near the folded edge as shown in Figure A.

Figure A
4. Stitch a running stitch, using approximately ⅜"-long stitches, around the edge of the circle, turning fabric edge under as you sew referring to Figure B. Stop stitching when you reach the beginning knot.

Figure B
5. Pull thread to gather the circle as tightly as you can (or as desired) and move the hole to the center of the circle as seen in Figure C.
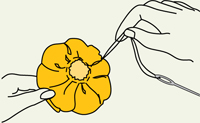
Figure C
6. Insert needle between two gathers to the back of the yo-yo and make several small knots to secure; clip thread.