Kitty Ditty Bag
The term “ditty bag” comes from the days of sailing ships when each man had a little canvas bag to store his thimble, thread, needles, etc., for those inevitable mending needs. So it is only fitting that we quilters have a special ditty bag for our odds and ends too!

Skill Level
Confident Beginner
Specifications
Bag Size: 12" × 14½" × 3", excluding ribbon
Materials
• Small piece each orange and lime tonals and cream-with-black dots
• 1 fat quarter light blue plaid
• ½ yard each medium blue plaid and cream print
• ½ yard black baby rickrack
• 3/8 yard fusible fleece (optional)
• 2 (⅝") black buttons
• 1 (⅞") black button
• 1 (¾") lime button
• 1½ yards ⅞" cream grosgrain ribbon
• Fusible web with paper release
• Template material
• Fabric glue
• No-fray solution
• Thread
• Basic sewing tools and supplies
Project Notes
Read all instructions before beginning this project.
Stitch right sides together using a ¼" seam allowance unless otherwise specified.
Refer to General Instructions for specific construction and appliqué tips and techniques.
Materials and cutting lists assume 40" of usable fabric width for yardage and 20" for fat quarter.
Cutting
From orange tonal:
• Cut 2 (3" × 11½") E strips.
From light blue plaid:
• Cut 2 (4½" × 20") strips.
Subcut strips into 2 (4½" × 12½") B strips.
From medium blue plaid:
• Cut 1 (12½" by fabric width) strip.
Subcut strip into 2 (12½") A squares.
From cream print:
• Cut 1 (12½" by fabric width) strip.
Subcut strip into 2 (12½" × 16¼") C rectangles.
From fusible fleece (optional):
• Cut 2 (12¼" × 16¼") D rectangles.
From rickrack:
• Cut 6 (2½") lengths for whiskers. Apply no-fray solution to the ends and let dry.
Assembling the Bag
Refer to the Placement Diagram and project photo for positioning of pieces and stitching lines.
1. Prepare appliqué templates using patterns listed and provided on the insert for this bag: Cat Head and Ribbon With Bow.
2. Trace appliqué shape onto paper side of fusible web referring to list below for kind and number to trace; cut out shapes. Apply shapes to wrong side of fabric as listed below.
• Cream-with-black dots: 1 cat head
• Lime tonal: 1 ribbon with bow
3. Cut out appliqué shapes and remove paper backing.
4. Center the cat head on the bottom edge of one of the A squares. Fuse appliqué in place.
5. Sew a B strip to the bottom edge of each A square as shown in Figure 1 to make A-B front and back units. Press one seam up and one seam down so they will nest later when the front and back are sewn together.

Figure 1
6. Position the ribbon with bow appliqué on the cat’s neck about ½" up from the seam and fuse in place.
7. If desired, center the fusible fleece D rectangles on the wrong side of the A-B front and back units; fuse in place.
8. Machine blanket-stitch around the appliqués using matching thread.
9. Double-stitch the cat’s mouth using black thread.
10. Position rickrack whiskers on each side of the cat’s face. Use tiny dots of glue to hold the rickrack pieces in place. If desired, use black thread to make stitches through the center of the rickrack to secure the placement.
11. Quilt the A-B front and back as desired. Model is stitched around the appliqués and with a large grid in the background.
12. Sew the ⅞" black button to the cat’s face for a nose and the ⅝" black buttons to the face for eyes.
13. Sew the lime button to the bow.
14. To make the casing for the ribbon tie, press and stitch a ¼" hem on the short ends of the E strips.
15. Fold the strips in half lengthwise as shown in Figure 2, wrong sides facing, and sew a ¼" seam on the long raw edges. Press the seam open and center the seam on the back of each strip.

Figure 2
16. Referring to Figure 3, center a casing strip near the top of the A-B front, 1½" down from the top edge with seam on back side. Attach by stitching close to the long edges. Repeat for the A-B back.

Figure 3
17. Pin the A-B front and back together, right sides facing, and sew the side and bottom edges together with a ¼" seam allowance. Press seam allowances open.
18. To form the bag bottom, cut a 1½" square out of the bottom corners as shown in Figure 4.

Figure 4
19. Referring to Figure 5, fold the raw edges of one cut-out corner to match the side and bottom seams and sew across with a ¼" seam to make a square corner. Repeat on the opposite bottom corner. Do not turn bag right side out.

Figure 5
20. To make the lining sew the C rectangles together, leaving a 3" opening in the center of one side to turn the bag later.
21. Repeat steps 18 and 19 to make square bottom corners; turn lining right side out.
22. Slip the lining inside the bag with right sides of bag and lining facing, matching side seams as shown in Figure 6. Pin the top edges and sew all around. Turn right side out through the opening in the side of the lining. Hand-stitch opening closed. Press bag well and topstitch ¼" from top edge.
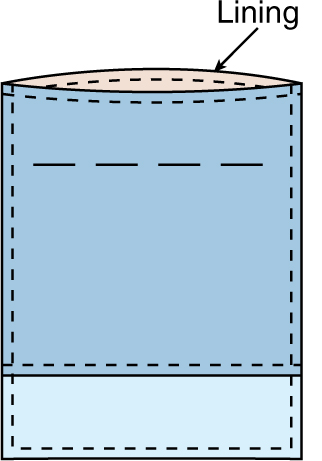
Figure 6
23. Insert the ribbon into the casing at one side of the bag front, going through the front and back casings. Pull the ribbon ends and tie in a bow. ![]()

Kitty Ditty Bag
Placement Diagram 12" × 14½" × 3", excluding ribbon