All who wander are not lost.
Whether you think this well-worn phrase comes from Shakespeare or Tolkien, you can be certain it didn’t come from a mountaineer. Mountaineers know that the truth is that many wanderers are indeed lost. I’ll cover basic and intermediate navigation skills that will ensure that if you happen to wander, being lost won’t be the reason.
Wilderness navigation has many facets:
Navigation refers broadly to the process of finding your way to your objective. Sometimes you’ll be able to do this using nothing more than signposts along the trail, referring to your map from time to time for reassurance and confirmation that you aren’t committing a giant blunder. On rare occasions, perhaps after you recognize that giant blunder, you’ll have to use your compass, topo map, and well-honed skills to bring your navigation actions and your navigation intentions into agreement.
Routefinding is more an art than science. It refers to evaluating the terrain (“reading the mountain”) in order to judge the best course to follow and then making lesser decisions along the way in order to follow your intended course safely and efficiently—sometimes right down to finding places to put your hands and feet. Routefinding may mean choosing from among several options for attaining your objective—a snowfield, a scree slope, or a pitch of technical rock; whether to climb a gully or a ridge; whether to follow a trail or go cross-country. The best route may depend on the season and weather, the condition of your party, the amount of daylight available, the equipment you’re carrying, and the consequences of misjudgment.
Orientation is the whole business of locating your position on a map. Many times you don’t particularly care precisely where you are, so long as you’re in the correct drainage or on the expected ridge and are headed in the right direction. Other situations may demand considerable precision; a capable wilderness navigator can, under hospitable conditions, confidently establish location well within a few hundred feet using no electronics beyond the synapses in her brain.
Orienteering means finding a specific, arbitrary location. The skills required to do this quickly have been turned into sports (orienteering, geocaching), but those skills are also valuable to the mountaineer who needs to find a particular campsite, locate a cache, or return expeditiously to a hidden trailhead.
The way wilderness navigation is usually taught is excessively academic. It’s based on military map and compass use; artillery shells may travel long distances on a single bearing, but backcountry travelers seldom do. I hardly ever use a compass, because it’s usually too much trouble and because I keep track of where I am by staying aware of the terrain around me and exploiting more fundamental skills.
Neophytes often approach map and compass skills as if the compass were the more important of the pair, perhaps because it has moving parts and appears more complex. The opposite is true; a rare glance at the compass to reaffirm your sense of direction is often all that’s required, but maintaining constant correlation between your location in your surroundings and your position on your map is crucial to avoiding the wanderer’s pitfall in unfamiliar terrain. Key to doing that is getting your head around the basic concepts of topographic maps. This is easy for some people, while others struggle, but one day it will click for everyone who persists.
The real world is complex and three-dimensional. It’s made up not just of land features but of vegetation, rivers and streams, snowfields and glaciers, roads and trails, and man-made structures. In addition, maps feature intangible devices that help interpret and locate features; these include political boundaries, section survey lines, and UTM grids, which are covered later. Selecting and representing all the important features is a significant challenge. The amount of information on USGS quad maps is far more than wilderness navigators require, but they’re the only widely available option. Part of the challenge in using these maps is mentally simplifying the information presented and focusing on just the basic terrain information you need.
TOPOGRAPHIC MAPS
The fundamental navigational reference for mountaineers in the United States is a system of topographical maps produced by the United States Geological Survey (USGS); Canada and Mexico have similar systems. I’ll stick to the most common for wilderness navigation in the United States (except for Alaska): the 7½-minute USGS quadrangle, commonly called a “quad.” These maps divide up the surface of the globe using latitude (the angle from the center of the earth north or south of the equator, reaching maxima of 90° at the poles) and longitude (the angle heading east or west from the Greenwich meridian, reaching maxima of 180° near the international date line in the Pacific). At the equator, a degree of longitude spans 60 nautical miles (a nautical mile is 6,076 feet, 1,852 meters, or 1.151 miles). USGS 7½-minute quads divide the earth’s surface into curvilinear rectangles that are  of a degree of latitude and longitude on each side, typically (in the middle latitudes) covering an area roughly 6 miles east to west by 9 miles north to south; they’d be almost squares at the equator. Away from the equator, their curved sides and narrower tops become more evident but are significant only in higher latitudes such as Alaska. The standard scale is 1:24,000, or roughly 2½ inches on the map for a mile on the ground (42 mm per km); some quads are metric, displaying elevations in meters. There are also 15-minute maps at 1:62,500, no longer printed, or 1:63,360 (inch = mile) for Alaska. Canada and Mexico maps use metric dimensions and a scale of 1:50,000. Topo maps report the date on which their underlying data were collected; mountains seldom change, so maps of wild areas may be updated less frequently than those showing urban areas. This could mean your map’s depictions of man-made objects, such as trails, roads, bridges, and buildings, are 30 years out of date.
To follow along, get your hands on any old USGS 7½-minute quad, because the colors are important.
Brown is used to represent contour lines, except on snowfields or glaciers, where blue is used. The usual elevation difference between adjacent contour lines is 40 feet or 20 meters, sometimes less in flat regions, and rarely is more than one value used on a single map; the interval used is shown in the map’s margin. Every fifth contour line is made heavier, and the elevations of heavy contour lines may be printed along them in brown text.
Blue is used to represent water-related features, such as streams, lakes, and glaciers. Contour lines and elevation data on glaciers and permanent snowfields will also be printed in blue.
Green is used to represent vegetation, from heavy forest to scattered scrub. Grass, low brush, or widely scattered scrub won’t be indicated. The actual margins of vegetation may be indistinct and may vary considerably from when the map was created.
Black shows trails and lesser roads, using dashed lines, and other man-made objects. Think of black as a tip-off that the physical thing represented may be absent when you look for it or that another similar object may have appeared in the terrain but isn’t yet shown on the map.
Red shows larger roads and highways, and survey boundaries and data.
Purple is used to show updates of previous versions of the map that have not yet been confirmed by physical survey and fully incorporated.
Fundamental to topographic (topo) maps is the representation of terrain by lines of constant elevation, called contour lines. The key to using topo maps effectively is learning to associate contour lines with the terrain they depict. There are many analogies intended to help grasp the concept. To some, contour lines are like rings in a bathtub that show where the waterline was. (You’re a mountaineer, right? I’m assuming you have rings in your bathtub—if you have a bathtub.) If you had a nice little mountain sitting in the middle of your bathtub, as some mountaineers do, each water ring formed on it would trace a single elevation level all around the mountain, no matter how complex its shape. For more fastidious mountaineers, I’ve shown four views of a bit of terrain.
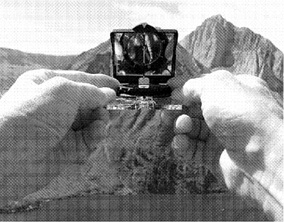
The first of these figures is a section of the Convict Lake 7½-minute quad around and to the southwest of Convict Lake, California. I’ve highlighted terrain features, so you can compare their representations from figurative to literal. The next illustration is computer generated from microwave radar data overlaid with the digitized quad, showing the same region. Then I show a view of Mini Morrison from across Convict Lake using the same digital data. Finally, I show a photograph I took of Mini Morrison from the same location as the previous computer-generated perspective.
If these figures don’t make the concept come together for you, keep working at it. There’s a real benefit, some would say a necessity, to being able to look at a topo map and readily visualize the terrain it represents. Here are some hints that might help:
Contour lines closer together depict steeper terrain. To get a sense of this, consider the map’s scale. At 1:24,000, five contour lines spaced at 40-foot intervals amount to 200 feet or 2,400 inches of elevation difference in the terrain. Two hundred feet on the ground is a tenth of an inch on the map. When you see five contour intervals, identified by heavier lines, about 0.1 inch apart, you know that the vertical distance and the horizontal distance are the same, meaning that the slope grade is about 100 percent or the slope angle is 45°. A rock slope that steep would likely present a climbing challenge requiring a rope. If the separation of five contour lines is twice that, 400 feet or 0.2 map inches, the slope would be 50 percent, or about 27°; that’s steep, but not intimidating. Use the scales in the map’s margin to measure such distances, using the scale that matches the units in which elevation is shown (feet or meters). Measuring the percent grade of a slope (rise divided by run) is easy on a topo map, but you’ll need trigonometry to convert grade to slope angle. It’s common to switch back and forth between these two ways to say the same thing. Following is a chart of common grades and slopes. I’ve included an overlay navigation tool in the Resources appendix that will allow you to read slope angles directly from maps; it was designed for ski mountaineers because slope angle is so important to them, but anyone can use its features.
In very flat places there will be no contour lines, and at cliffs the contour lines will come together, or nearly so. Forty-foot intervals may conceal many unpleasantries. A 79-foot cliff might not be shown at all; a field of 50-foot boulders might appear smooth and seduce the unwary into considering cross-country travel; an innocent looking creek might turn out to have steep, high banks; and what appears to be pleasantly open terrain may prove to be impassible brush. Learning to anticipate such unwelcome possibilities comes from experience, nearly all of which will be bad.
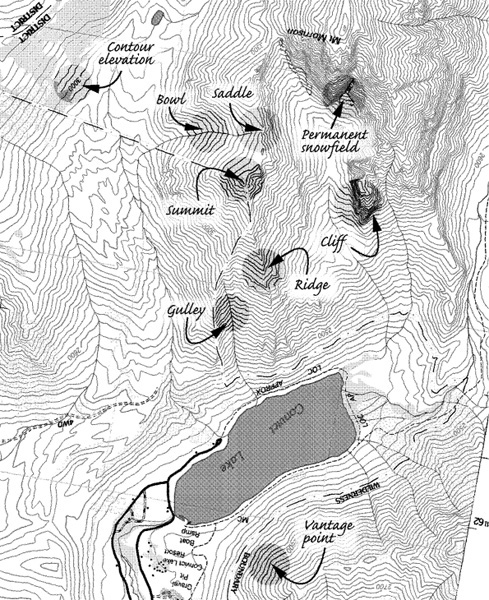
Section of USGS 7½-minute quad “Convict Lake” showing terrain features.
Now zoom your brain out and get a lay of the land. If you see a blue line on the map running through the apexes of V-shaped contour lines, that’s a stream, and the contour lines are showing a valley, not a ridge. Closed contour lines that don’t enclose others indicate summits, not depressions (which are much more rare and are indicated with closed contour lines having little downward pointing ticks). Many summits have a black X printed on them, an elevation indication, a benchmark indication (BM), or a triangle symbol. Ponds and lakes are always at the bottom of depressions, never on summits. The V’s of valleys and chutes point uphill, whereas V’s or U’s representing ridges point to lower elevations. Gullies invariably result in creeks, but ridges never do. Gullies tend to come together (converge) to end up as river valleys. Ridges come together at summits. Saddles are easy to distinguish from crests. A dashed blue line, indicating an intermittent stream, is a gully giveaway, but don’t expect to find water when you reach the symbol—it seems that intermittent stream indications are a cartographer’s inside joke. Sometimes you’ll have to follow a contour line until it becomes part of a feature that you can confidently associate with terrain; rarely you may have to follow two heavy contour lines until you can find elevation numbers that will tell you which lies above the other.
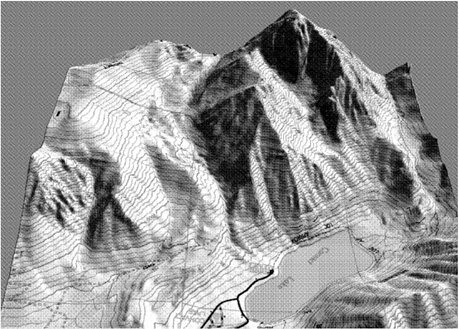
Computer-generated “aerial” view of the same region.

Computer-generated view of “Mini Morrison” with Mt. Morrison behind.
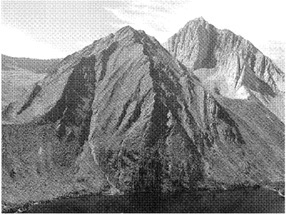
A photograph of “Mini Morrison.”
Features with special utility for wilderness navigators include handrails. A handrail is a feature that’s easy to identify, easy to notice if you’ve crossed it or lost it, and easy to follow. Examples include ridges, streambeds, large bodies of water, cliff bands, and trails. Wilderness navigators seldom have the luxury of man-made handrails, but sometimes a railroad track or power line will serve if it can be identified with confidence; beware: man-made objects are highly generic. Even a contour line might serve, if it leads where you want to go and you can travel at a fixed elevation, though traversing in the mountains is usually inadvisable. You don’t have to be on the handrail, just keeping track of it at a distance may give enough guidance as you travel.
GRADES, ANGLES, AND GRADIENTS OF SLOPES, AND THEIR MAP REPRESENTATIONS

An attack point is a feature that you expect will be visible throughout an entire leg of your route, so that you can head for it without hesitation even if your travel is forced to become circuitous. When you approach your attack point, verify your position; then use your map to select the next attack point and assure yourself that it will lead where you intend to go. A distant summit may work; you don’t have to actually reach an attack point for it to be useful, you just have to know where your actual objective is with respect to the attack point.
A collecting feature is a feature, usually near your route, that’s easy to identify and will help you establish where you are on your route. Examples are bridges, trail junctions, stream crossings, and passes. A collecting feature that prompts an action, such as taking a side trail, turning left or right, or heading cross-country, is what I call a decision point.
A catching feature is something that lets you know that you’ve overshot your intended decision point. This can be as simple as a change in direction of the trail or slope of the terrain, or as obvious as a road or river. Catch features don’t have to be relegated to cross-country travel; especially where new trails are numerous or in winter when there are no visible trails, establishing a catch feature, and keeping an eye out for it, can help you avoid becoming an accidental wanderer.
What navigators call pace counting is a last resort; counting inches is especially difficult off trail. Mountaineers do better with a good judgment of distance and hiking speed. Estimate where you should be and see if you can identify confirming terrain features. Your accurate sense that you’ve traveled a particular distance will help reduce the number of possible locations that you must evaluate.
Bearing off or aiming off refers to the sensible decision not to head directly, or what you think is directly, toward an objective. Rather than take the chance of missing the target in featureless terrain, or terrain where features are obscured by trees or by a whiteout, you may conclude that you’ll save time by heading for a catching feature of which you can be confident. If you’re heading for your car parked along a road in forest, for example, you may want to be confident that when you reach the road you’ll turn left to find your car. If you head directly to where you think your car is parked, but you arrive at the road and don’t see it, you have a 50 percent chance of wandering. Could be worse if you’ve parked at the end of a road and you realize, as darkness falls, that you should have come upon your car hours ago.
Zoom in and take a look at the contour lines that lie near or across your route; especially those within a hundred feet or so. Every terrain feature may not be represented on the map, but you can be certain that any little wiggle in a contour line has some corresponding feature in the terrain. If you’re doing critical navigation, it’s important to look for these wiggles on your map as you move along your route and to associate them with the features they depict; you may even want to trace your progress with a pencil. If the features you expect aren’t visible, it’s likely you’ve wandered. If you do a good job with this, you’ll always know your location within a few dozen feet, terrain permitting, and you may seldom find a compass necessary. If you want to become a capable wilderness navigator, this is a skill you’ll need to practice.
A constant theme in this book. Identifying terrain features as I’ve just discussed will allow you to move at maximum speed when that’s feasible, such as on a good trail where coarse navigation by keeping track of collecting features is sufficient. As you approach a decision point, you may slow your pace and look for more details to confirm your location. Finally, you may revert to micro-navigation to locate the cache you left before the snowstorm. Don’t use slow micro-navigation on the trail if there’s a catching feature that will give warning should you overshoot your decision point.
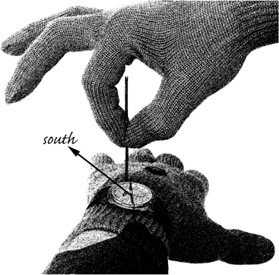
When you actually stand in the terrain with your map in hand, you’ll want to orient the map to match the terrain. Open your compass, set its declination-corrected bezel to 0°, and lay the edge of its baseplate along the edge of the map. Now rotate the pair together until the compass and the map point north. Even if you end up looking to the south, making the map’s text upside down, associating the map and terrain is difficult if they aren’t aligned; confusion lurks nearby. If you’ll be doing a lot of comparisons between your map and the terrain, scratch a north-south line in the ground to give yourself a constant reference. In all of this, keep your head screwed on: note the sun’s position, think about the direction you’re facing, and ask yourself if things really make sense.
You may be surprised that this question has an answer—three answers really: The angle of the slope is either steeper than 35°, equal to 35°, or not as steep as 35°. What’s with 35°? It’s so special that it has a name: the angle of repose. It turns out that should you attempt to pile up similar irregular objects, the steepness of the pile reaches a limit depending mostly on the size of the objects. Try to pile them steeper, and they just roll down. That steepest angle possible is called the angle of repose. You can see it in the pile of highway maintenance gravel under the end of the conveyor belt. For smaller dry talus, scree, and coarse sand, the angle of repose is between 30 and 40°; 35° is close enough, or you could use 34°—a slope with a ratio of rise to run of 2:3 and a 67 percent grade. Bigger talus and boulders can be piled more steeply than scree or sand, but often only temporarily.
If you’re standing on a scree slope pitched at the angle of repose, you’ll feel reasonably secure even if the slope extends far below. That’s because if you slip, you’ll only slide down a bit, just like the other objects around you. On the other hand, if you attempt to hike up, you’ll also slide down—along with a lot of the material you’re standing on. Secure, but a miserable way to gain altitude, as mountaineers come to know. Descending a slope at the angle of repose can be very quick and safe; a boot glissade on scree or sand is almost as facile as glissading on snow.
The sense of security you feel when standing on a 35° talus slope vanishes when the slope is covered with snow or ice. A 35° slope makes for an easy snow climb, but looking down that frozen slope wearing skis, boots, or crampons definitely increases the fear factor—you have the acute sense that a slip could lead uncontrollably to a nasty fall, and you’re right. The steepest black runs at ski areas are 35° because they’re basically snow-covered talus slopes. For a snow slope to be steeper, the underlying terrain must be rocky, or the snow must have been piled up by wind deposition. Permanent snowfields, storm-plastered rock, icy couloirs or gullies, and glaciers are not bound by this rule; these can be quite steep.
What’s the utility of this factoid? If you see a distant peak and notice a scree-filled gully running up it, you can be sure that the steepest part of the gully, usually right at the top, cannot possibly be steeper than the angle of repose. Steeper slopes can only get that way if they contain material that’s more solid than talus or sand. This will help you evaluate the grade, even when foreshortening distance makes things appear more vertiginous. Knowing that a snow-covered scree slope is about 35° is also handy because this angle is prime terrain for deadly slab avalanches. Reviewing your topo and knowing that a climbing route is steeper than the angle of repose tell you that it must at a minimum have some rocky sections; that could be good or bad.
So far we’ve done a lot of navigation, but we’ve barely touched a compass; that’s good. There will come a time, however, when there are no handrails, no good attack points, no catching features, and micro-navigation draws a blank. Time to take out that compass and know how to use it.
The compass is very simple, as befits a wilderness tool, but its uses can be very sophisticated. It has two primary functions: taking a bearing in the field and plotting a bearing on a map. Taking a bearing means measuring the angle from your nose to a terrain feature with respect to north; this bearing can be corrected to geographic north, or true north, by applying the local declination. Plotting a bearing uses the compass solely as drawing tools (protractor and straightedge), and the needle is totally ignored; bearings are expressed as the angle with respect to true north and may be drawn between any two points on the map.
Point the hour hand at the sun using the shadow of a twig; south is halfway to 12.
Conveniently, the earth has magnetic poles near its geographic poles, which allow simple instruments to be used for basic navigation. Inconveniently, the magnetic poles are not exactly at the north and south poles, so error (declination) corrections must be made that depend on your location on the planet. The declination that applies in a topo map’s area is printed in its margin and indicated by a little diagram. Magnetic north is in arctic northern Canada, about 800 miles south of the geographic north pole at approximately 83°N by 114°W; it’s drifting toward Siberia, decreasing declination in California by about a degree every 25 years. It even wanders around a bit during the day. The location of the magnetic pole means that mountaineers in the Mississippi valley (about 114°W) will see their compass needle point directly to the north pole. Mountaineers elsewhere are not so lucky (except for having mountains). On the West Coast, compass needles will point to northern Canada, but true north lies at an angle to the left; in Seattle, the difference is about 19°. This angle is referred to as an easterly declination. The situation will be reversed on the East Coast, where the Canadian pole will result in an error to the west. In Alaska the declination is over 20° east.
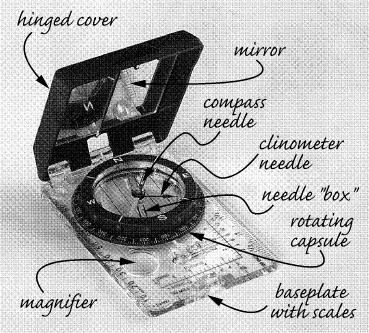
THE BASEPLATE COMPASS WITH MIRRORED COVER
When it comes to selecting a compass, consider your needs. If you expect to be practicing the level of navigation skills taught in this section, you’ll want a baseplate compass with a mirrored cover and a means of adjusting the declination. It will have a bezel with 2-degree calibration marks and a clinometer to measure slope angles. Slightly down market would be a similar compass with no declination adjustment feature. This is the type that I always carry in my “ten essentials,” though I also carry a more sophisticated compass when I expect to need it. Don’t expect much satisfaction using a lesser instrument, such as a compass without a mirror or one having 15° calibrations. Still, any compass is better than none when you need to remind yourself of the general direction of north.
When taking bearings, deal with declination by using a compass that compensates by offsetting its needle box from true north. If you must opt for a simpler compass, don’t try to compensate for declination arithmetically (arithmetic in the backcountry is a recipe for trouble). Instead, apply a strip of tape to the underside of the needle capsule, angled for the declination where you will use the compass, to serve as a “box” for the needle. If you can’t manage even this, get into the habit of applying the declination correction to the bearing once it has been taken by rotating the capsule while counting degrees of correction. This is easier than doing mental arithmetic, especially if the declination adjustment crosses 0 = 360°.
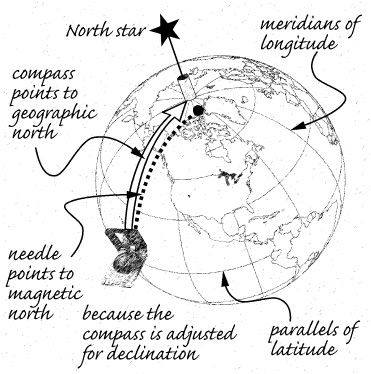
The magnetic north pole isn’t at the geographic north pole.
But wait, there’s more. Since compass needles actually follow the flux lines of the earth’s magnetic field, as a compass approaches a magnetic pole its needle will point increasingly downward; right at the magnetic pole (it’s actually a small region) the needle would attempt to point vertically into the earth. This effect might cause needles to hang up in their capsules, so compasses are manufactured with imbalanced needles to compensate. Six cryptically labeled regions around the world have been defined, and compasses intended for a particular region may not work well elsewhere; some compasses have needles mounted with tiny gimbals in fat capsules and claim to be universal.
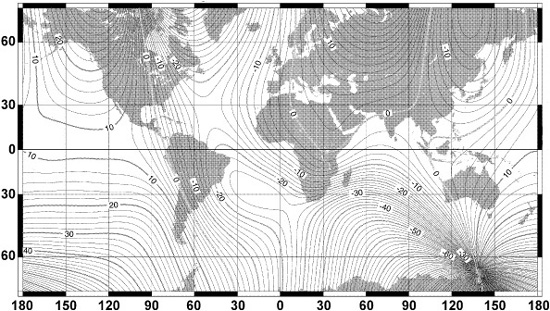
World magnetic declination chart, 2000. (Data from the National Oceanic and Atmospheric Administration.)
The main use for a compass, apart from establishing the direction of north, is determining your location on your map. Unfortunately, navigation geeks leap to this use before exhausting the simpler means I’ve just discussed. Using a compass this way is called resection (or commonly, triangulation); it’s based on bearings you take of terrain features and then plot on your map. If you already know that you are somewhere on a particular feature, such as a trail, stream, or ridge, a single bearing to a known point tells you where you are along the feature. That simplicity is seductive, but there are a number of problems with triangulation, even apart from the errors in taking a bearing. In a forest, your restricted line of sight will leave you hard-pressed to get a good sighting on a distinguishable feature; same story in unfamiliar alpine terrain where summits may be unrecognizable, obscured, or indistinct. In open areas, features may be so distant that they are useless. And inclement weather may hide even nearby terrain. Think of triangulation as a last resort.
Taking a bearing is straightforward, but a bit of technique will allow you to approach an accuracy of about 2°. Start by identifying a target that you can locate on your map. Face the target and hold the compass in front of you at arm’s length with the mirror cover opened about 60° so that you can look over the cover at your target and simultaneously use the mirror to look down on the needle capsule. Hold the compass with both hands, and use your fingertips to rotate the bezel easily without changing your grip. If your new compass bezel is balky, a tiny drop of silicone oil on the capsule bearing surfaces makes the movement smoother. Align the various marks on the compass with your target; these alignment marks include the line down the center of the mirror and the pivot point of the needle. Rotate the capsule to align the north, or red end of the needle to approximately match the box marks in the needle capsule; then carefully rotate the bezel to make those marks exactly parallel to the needle (a process called boxing the needle). Be sure the compass is horizontal and that no iron objects are nearby (especially no magnetized objects, such as another compass or your iPod headphones). Fine-tune the bezel rotation as you bring everything into exact alignment. The bezel now reads the bearing from you to your target. If you need better precision, take a few more readings and average them.
The first time you deploy your compass, you may be confused about which mark to use as the pointer to the bearing angle; compasses with hinged covers resolve this confusion (it’s the mark at the hinge), but take care not to use the opposite mark when plotting bearings—a blunder easily made.
The targets you select can be any readily identifiable feature. The ideal feature is a sharp summit that’s closer than a mile. Be cautious about man-made features, as water tanks and antenna towers come and go, and they all look alike. Features more than a mile distant will introduce more error. A 2° error taking a bearing on a distinct feature a mile distant represents 180 feet (about 35 m on a feature 1 km distant). More distant features increase the error, so check your map for possible candidates within a mile radius (2½ inches on the quad) of where you think you are. Summits aren’t essential; a cliff band or a narrow chute that you can confidently associate with a representation on your map will do as well. Always give your conclusions a reality check: check your topo map for squiggles in contour lines indicating terrain features near where your plotting puts you, and then look around to see if you can identify those features in the expected locations nearby.
Taking a bearing on Mini Morrison.
One useful bearing that may not be obvious is the bearing of the slope on which you’re standing. It’s the most direct way down the slope, a line that perpendicularly intersects the slope’s contour lines. A skier might refer to it as the slope’s fall line. You can use this targetless bearing to distinguish the slope you’re on from others on your map. This can help you eliminate candidate locations. For example, when you know you’re on a trail, the bearing of the slope can help decide where on the trail you are—or aren’t. Slope bearing is a clue that could be useful when few clues are available.
A back bearing is the exact opposite direction of a conventional bearing, useful to confirm your travel direction by checking your starting point. Rather than adding or subtracting 180°, simply use the alignment mark on your compass that’s opposite the direction-of-travel mark (the one you always use otherwise), or use the white end of the compass needle instead of the red end.
With a bit of practice you can visually estimate bearings within about 15°, so you may not even need a compass once you’ve established a true north reference; this also helps with a reality check of your plotting. Take a guess at the bearing and see if your compass comes close. For me, 15° is the width of my outstretched first and little finger; 15° is also the angle the sun and moon move in an hour—handy for estimating remaining daylight.
Transfer the bearing you’ve just taken to your map. You don’t even have to read the bezel to do it. What you do need are north-south lines on your map to serve as references. If you have a map printed after 1989, and it indicates a small UTM grid declination (see the section on GPS and UTM later in the chapter for an explanation), you’re in luck, because you can use the UTM grid. Otherwise you might be lucky if the target is near the edge of your map, and you can use the margin. If you’re intent on precision navigation, you should have ruled your map with lines parallel to the sides and spaced about an inch apart. Don’t be easily seduced by red section lines; these are not guaranteed to be orthogonal to meridians and parallels, though many are. Certainly don’t invite chaos by attempting to deal with declination by ruling reference lines along magnetic north instead of true north; use a quality compass and deal with declination in your compass.
When plotting bearings you’ve taken, completely ignore the compass needle. The map doesn’t even need to be horizontal. Lay your compass on the map with the cover opened fully. Locate your target on the map and position the compass edge on it. Now fiddle with the alignment of the compass baseplate until the meridian lines of the needle capsule align with true north-south lines on your map (you don’t need to refer to or even know the actual bearing angle, just don’t rotate the capsule). You now know that your position is somewhere on the bearing line that lies along the side of your compass (the dotted line in the illustration). If you’re on a handrail or known trail, the intersection of that feature and the bearing line shows you your location. If you need to take another bearing, hopefully about 90° to the first, do so and plot both bearings. Your location is near where the two lines intersect, with an error proportional to the quality of your targets and skill of your bearing taking and plotting—hopefully within a few degrees or a few hundred feet. The more bearings you can take and plot, the more confident you can become of your exact location.
If you’ve drawn a line on your map connecting two features, you can use your compass to measure the bearing of the line (just be sure to keep your direction-of-travel arrow pointing from the “from” point to the “to” point as you measure the angle from the first point to the second). Lay the edge of your compass along the line and rotate the needle capsule until the meridian lines on the capsule align exactly with true north-south lines on the map. When everything lines up, the compass bezel will indicate the line’s bearing. Declination doesn’t figure in, because adjusting your compass’s declination only rotates the capsule’s needle box (which you’re ignoring) with respect to the bezel; it doesn’t rotate the capsule’s meridian lines.
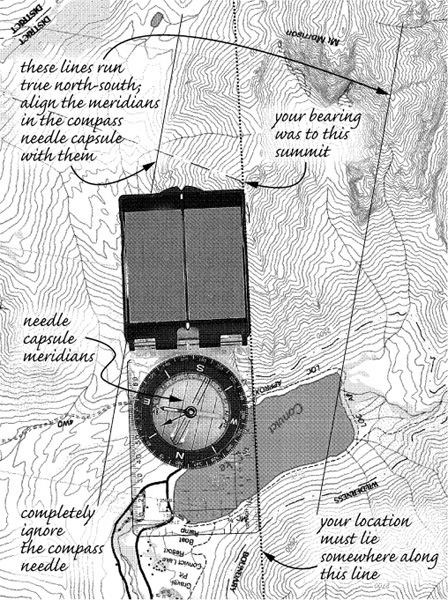
Plotting the bearing on your map.
When you take a bearing in the field, you must be physically at the “from” point; the “to” point is your target. But when you plot bearings on your map, this isn’t necessary. For example, you may plot in advance a bearing to a target you’re sure will be recognizable from a decision point on your map. As you travel the route, you keep taking bearings to the target until you match the one you plotted; you are then at the decision point.
The most common error in both taking and plotting bearings is to flip the compass by 180°. Everyone does it once in a while. Be sure to keep straight what is the “from” point and what is the “to” point as you plot or take bearings. Good advice for every navigator is to take a deep breath, check the sun, and give your plotting an idiot test to confirm that it actually makes sense.
Following a bearing means—after determining your location and intended direction of travel—setting that bearing on your compass and using it to guide your travel. The most effective way of doing this is to select a suitable attack point. If that isn’t feasible, select a general direction that provides a handrail and catching feature; a drainage without complexity would be an example. If none of these sensible methods are feasible, you could be forced to simply hike while holding your compass with the needle boxed and hope to move consistently in the direction it indicates. This is lame. An example might be finding yourself in a forest where you’re unable to see suitable terrain features for guidance or taking bearings, or when caught in a whiteout on featureless terrain. In such circumstances you can easily become a lost wanderer despite your map and compass, so be sure to establish catching features if at all possible. In extreme cases, you may find it necessary to spread out your party ahead of you along a line in the direction of your bearing, yelling or whistling at the lead person to tell them to move right or left as you consult your compass. By leapfrogging party members while you navigate from the rear, it’s possible to maintain a reasonably straight course of travel, terrain permitting, but this is a painfully slow exercise, as anyone who has been fogged out on a glacier can tell you.
As you travel in the field there are many subtle techniques that you may need to invoke when you leave the trail—like navigating around obstacles, following intermittent handrails, and aiming off unseen objectives. These more advanced skills use the techniques I’ve already discussed in combination with plenty of practice and common sense—all critical to becoming an accomplished wilderness navigator. The most valuable skills are learning to use terrain features to guide your travel so you never have to resort to using a compass.
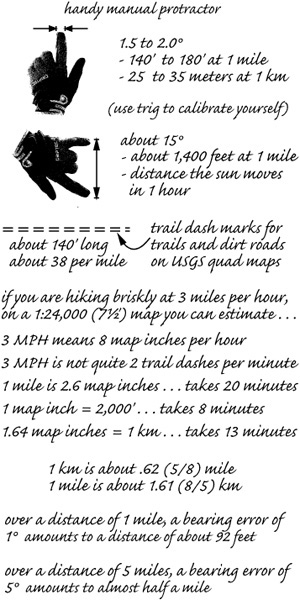
Handy rules of thumb (and finger).
The availability of inexpensive electronic pressure (and temperature) gauges has resulted in the appearance of altimeters in more and more gadgets, including wrist watches, radios, bicycle computers, and GPS receivers. The quality of such instruments varies considerably and unpredictably. To use one proficiently you need to understand why it might go wrong.
A barometric altimeter is an air-pressure gauge calibrated in elevation. This calibration is possible because atmospheric air pressure (essentially the weight of the column of air above the instrument) decreases in a regular, roughly exponential manner as altitude increases. It does so according to a complex model of the atmosphere called the International Standard Atmosphere. There are many factors in addition to altitude that affect air pressure; the grace with which a particular instrument deals with these sources of error strongly impacts the accuracy of its readings. Price is not a good predictor of grace.
The accuracy of an altimeter can be stated in terms of the number of contour lines of uncertainty in its reading. Topo maps themselves have 90 percent of their tested elevations accurate to within a single contour line interval (±20 feet). The factor that most affects altimeter accuracy is weather; this makes the instrument a great aid in weather forecasting, but it plays havoc with its use as an altimeter. Sea-level air pressure ranges from about 950 to 1,050 millibars (normal is 1,013.25 mbar, 101.325 kPa, 760 mm-Hg, or 29.93 in-Hg); even on a stable day, variations of ±1 mb are common. This corresponds to an apparent altitude change of ±30 feet—more than a contour line. It’s not uncommon for mountaineers’ altimeters to show an apparent change of altitude of 100 feet (two or three contour lines) in the course of a day of camping in stable weather. If the weather is changing, a common 1 percent barometric change amounts to over 300 feet of apparent altitude change. In major storms an anomalous change of 1,000 feet is possible. Chapter 6, Mountain Weather, has more detail on using an altimeter as a weather forecasting tool, but suffice it to say that your altimeter has no way to distinguish whether you have carried it up the mountain or whether a low-pressure system has arrived; only you can make that interpretation.
Temperature also has a significant, if recondite, impact on altimeter accuracy. The manufacturers of most instruments claim to have compensated for the temperature of the instrument itself (actually, of its sensor chip). You can test this by putting your altimeter in the freezer compartment and seeing if your refrigerator relocates to your roof or basement. If an altimeter is truly temperature compensated, you can keep it on your wrist or inside your jacket without concern about affecting its readings. Compensation for air temperature, however, is another matter altogether.
Part of the International Standard Atmosphere is a profile of the temperature of the atmosphere at various elevations; there are many complexities, but the profile comes down to the average environmental lapse rate, about 3.6 F° per 1,000 feet (6.5 C° per 1,000 meters). This is a handy number to remember, for many reasons. The ISA profile calls for a temperature of 59 °F at sea level and 30 °F at 8,000 feet. That might be true over the ocean at night (the most common condition throughout the world), but it won’t apply to mountains on a summer day. Specifying a temperature profile is necessary, because temperature affects air density, and that affects the weight of the column of air above the altimeter. If air in that column is warmer than what the ISA calls for, it will be less dense; that means that movement up or down within the column of air will result in less pressure difference—the altimeter will be less sensitive than it expects to be, based on the ISA. Here’s an example: Let’s say you’re leaving Mammoth Lakes for a climb of Bloody Mountain on a summer day when the temperature is 70 °F. You set your altimeter to read Mammoth’s 8,000-foot elevation (an offset adjustment of about 600 feet lower than what it would read if the temperature were 30 °F). The air temperature is 40 F° higher than the ISA expects, so your altimeter will be significantly less sensitive than it’s calibrated for. If you climb only 1,000 feet, your altimeter will read about 88 feet—more than two contour lines—too low, with proportionally more error as you climb higher. If on such a day you were to leave a summit after resetting your altimeter to the known elevation of 14,000 feet, and then descend toward 10,000 feet, your altimeter will tell you that you reached 10,000 feet about 350 feet (eight contour lines) after you actually pass it. Establishing the correct air temperature requires keeping the altimeter in free air, not on your wrist or inside your clothing. Temperature inversions are common in mountains and can be 25 F° in winter. There’s no easy way for a mountaineer to correct for nonstandard air temperature and inversions, and there’s no way the altimeter can know if the temperature above it is higher or lower than the ISA profile expects; manufacturers are little help sorting this out. You can guess at the effect by thinking that if the air seems warm, your altimeter will be less sensitive, maybe by 5 to 10 percent; if you think it’s unusually cold, your altimeter may be more sensitive than it should be. Air temperature effects could be a serious problem if you rely on your altimeter to make critical routefinding decisions.
Another factor that influences air pressure, and therefore the readings of barometric altimeters, is wind. Higher air speed over mountains causes a decrease in air pressure (due to the Bernoulli effect—the same thing that gives airplanes lift). As air masses move across mountain ranges, the air velocity increases at saddles and summits and along crests; this produces orographic pressure waves. High winds can cause an increase in altitude readout of as much as two contour lines, depending on terrain. Keep this in mind if you reset your altimeter on an especially windy saddle or summit.
There are other factors that affect altimeter accuracy in lesser ways. The standard approach to dealing with all these sources of error is to reset your altimeter any time you’re at a known altitude by reference to your topo map, such as at a lake, summit, or trail juncture. For example, to maintain a one-contour-line accuracy during your Bloody Mountain climb, you’d have to reset your altimeter at every dozen contour lines of gain or loss. This should make you wonder: if you can accurately ascertain your exact elevation that frequently, why do you need an altimeter for navigation?
As a navigational tool, altimeters should be viewed only as an adjunct to skilled use of map and compass. It’s possible to estimate altitude using the clinometer feature of your compass, by checking whether you are higher or lower than features around you whose distance and elevation you can determine from your map. Tip the compass on its side and use the mirror to view the clinometer as you sight along the baseplate. Commit to memory the factoid that a 1° angle spans 92 feet at a mile distance. For example, if your clinometer tells you that a known summit two miles away (according to your map) is 2° higher than you (according to your compass clinometer), you have determined that you are about 370 feet lower. This is probably as accurate as using an altimeter, and the clinometer’s error sources are consistent and free of unknown influences.
Because of the variety of factors that affect altimeters and the variability of success of different models in dealing with them, a group of mountaineers carrying altimeters will be provided with hours of harmless fun discussing why their readings differ. If you want an instrument primarily for weather forecasting, a special-purpose model that measures and records wind speed, humidity, dew point, and air temperature, as well as altitude and barometric pressure (and of course date and time), would be a better choice at a price and weight that compares favorably to fancy but less accurate wristwatch altimeters. I admit that I often carry a gadget that has an electronic compass, thermometer, altimeter/barometer, and alarm clock. My reasons are that the quality of such instruments has gotten very good, the readout is easy to see even at night, I need the alarm function anyhow, and the cost and weight are no more than for a watch. Plus it even stores data snapshots, plots data, and uses trends to forecast weather; what’s not to like?
Old-school navigators learned to fold their quads to leave the names visible and to carry all those needed to cover their routes, sometimes carefully cutting them up and taping them together. New-schoolers use mapping software to print only the areas they need. With that capability, however, comes peril. First, there’s a lot of potentially useful information printed in the margins of USGS topos—I strongly recommend against cutting them off. Most of this information is lost by software. You’ll likely find that the elevations your software reports as you move the mouse over a displayed map do not coincide exactly with elevations in the map image; this happens because the elevation data comes from a separate database, not directly from the digitized map, and the data often align imperfectly. Computerized map printing also opens the door to software mischief, most notably the “fit to page” printing feature, which results in non-standard scaling. Not only will this negate your developing sense of scale and terrain, but it will render useless most navigation tools, such as the scales on your compass, your UTM romer, and the tools I’ve included in the Resources appendix. Always use 1:24,000 scale and check from time to time to ensure that your software hasn’t found a clandestine means of being helpful.
I’ve described ruling north-south lines on USGS quads, but software may allow such grids to be printed automatically. You must decide whether you want lat/long lines or UTM grid lines; they are seldom orthogonal, or perpendicular (see the section on Grid North).
Mapping software can do more than just print maps and draw grids. You can draw your proposed route over the screen image and then analyze its length and grades. Old-school navigators twiddled little wheeled gadgets along routes to estimate length, or attempted to trace routes with their compass lanyards and then transfer the lengths to the scales printed on map margins, followed by application of squiggle factors based on experience. New-schoolers can zoom in to add enough detail to route tracing that, on a 7½-minute quad, errors become insignificant. Not only is this easier, but most software can report both distance on the flat map and the greater distance along the ground. Determining altitude at any point is simple. Software makes it easy to determine the grade of route sections and to assess whether selected terrain features will be visible or obscured at particular vantage points (they’ll be visible if the grade of their sight line to the observer is greater than that of intervening features). It’s possible to establish waypoints on the electronic map that can be transferred into GPS receivers; such data will transfer in the other direction, too, making it possible to draw routes on software maps from GPS waypoints collected in the field or from other mountaineers.
By the way, you’ll discover that the maps you print at home (or at work when the boss isn’t looking) are vulnerable to the slightest amount of water, due to the inks in most color inkjet printers. Keep yours safe in a waterproof map pouch from Watchful Eye Designs (and I mean really waterproof, not a flimsy zip seal bag).
The Global Positioning System can be made extremely complicated, but let’s not, because the simple basics are all you need. GPS has three components: the constellation of military-run satellites orbiting the earth each day, a few ground stations that talk to the satellites and keep them honest, and millions of receivers like yours that use signals from the satellites to establish their locations on the surface of the earth, their altitudes a little less accurately, and high-precision time. The Europeans operate a supplemental system called EGNOS, to be followed by an independent GPS-like system called Galileo starting operation in 2008. Modern handheld receivers are capable of receiving up to 12 GPS satellites at once (for better reception in dense forests and narrow canyons); positional error is usually “less than ±15 meters (±49 feet) RMS, 95% of the time.” Many receivers are chock full of fascinating features and readouts, such as crude electronic compasses and basic barometric altimeters that compliment their GPS altimeters. GPS receivers run on batteries that last up to a dozen hours when all features are being used.
To set your GPS receiver to provide helpful information you must first select the datum that corresponds to that of your map (yes, you must be adept at using topo maps, even if you supplement with GPS). A datum is a mathematical model of the earth, which isn’t precisely spherical. Select from a built-in list of hundreds. Most handheld GPS receivers default to datums called NAD83 (North American Datum of 1983) or WGS84 (World Geodetic System of 1984), which are essentially equivalent. USGS maps use the older NAD27 (some use NGV29 for vertical coordinates—ignore this); Canadian maps may use either NAD83 or NAD27. The USGS has flirted with NAD83, 1:25,000 scale, and metric measure, so be sure to refer to the marginal notes of the map you use. Set your receiver correctly, because the difference can be hundreds of meters—yes, GPS and UTM use metric measurement. Topo maps usually show the offset between NAD27 and NAD83 by little crosses near their corners. If you’re a new-school navigator using mapping software (no little crosses for you), you’ll have to set your software to your datum of choice and ensure that it prints at 1:24,000, even if the contour lines on the maps you print are metric.
Next, you’ll want to set your GPS receiver to display location in your favorite coordinate system. Latitude-longitude (lat-long) could be used. Then you’ll have to select degrees, minutes, seconds as used on many maps; degrees and decimal minutes as used in aircraft navigation; or decimal degrees, which are seldom used but which make calculations easiest and might be the default. Using lat-long can be a real head scratcher in the field, so for short distances, spanning less than a few quads for example, mountaineers should select UTM.
Universal Transverse Mercator is a mapping projection. Projections are schemes for representing the surface of the three-dimensional earth on a flat, two-dimensional map—there are many varieties, each a compromise in some ways. A mercator projection, named after the 16th-century dude who conceived it, depicts the earth on the surface of a cylinder that’s parallel to the earth’s polar axis. It makes Greenland look bigger than South America though it’s actually a fourth the size, but sailors like it because it makes lat-long lines perpendicular everywhere; you can see an example in the previous map of declination. A transverse mercator depicts the earth on a cylinder that’s perpendicular to the earth’s polar axis. This is useless information, but it’s fun to try to get your head around the concept and imagine how lat-long lines would be drawn. That bizarre distortion is avoided by the UTM scheme of depicting only narrow slices of the spherical earth.
Knowledge of UTM is important even if you don’t own a GPS receiver, because it’s becoming increasingly common for mountaineering trip reports or guide books to locate key points using unambiguous GPS coordinates as a supplement to highly ambiguous descriptions of surrounding terrain. Hopefully, the person writing the trip report will be familiar with UTM, uses it in preference to whatever default comes up on their GPS receiver, and reports the datum. If you have the UTM coordinates, you can readily plot the points on your map. You can also make a simple calculation of the flat distance between two points using the Pythagorean theorem, even without plotting anything. Things are not so simple if coordinates are reported in lat-long, even if the reporting scheme matches the degrees-minutes-seconds scheme used on USGS quads. (You do remember the Pythagorean Theorem, don’t you?)
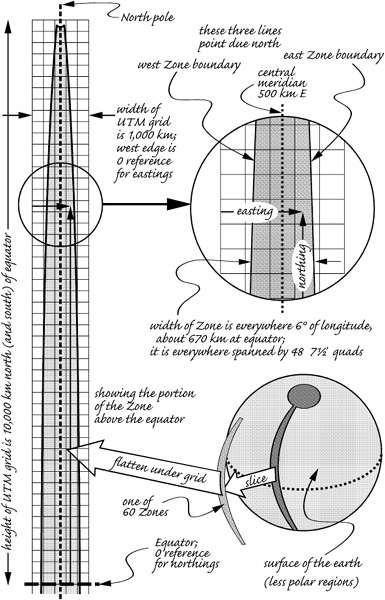
To get a sense of how UTM is designed, imagine the surface of the earth as being like an orange. Now slice the orange from pole to pole, making 60 tall, narrow slices. These 6° slices are numbered 1 to 60, beginning at the international dateline in the Pacific and heading east all the way around the globe, er, orange. Whack off the ends, which represent polar regions—they use another type of projection. Now peel and flatten each slice to make it two-dimensional; some distortion of latitude lines (called parallels) will result—no biggie. Each slice will be about 674 km wide at the equator and 100 km wide at the truncated ends; each slice is called a zone. Now center the slice under a grid of 1 km squares that is 1,000 km wide and 20,000 km tall; the grid will completely overlap the slice. Points on the slice are described by their x location, measured to the east from the western edge of the grid (not from the edge of the slice). This dimension is called an easting. The slice of terrain and the overlaying grid are centered, so the middle of the zone will be at an easting of 500 km (500,000 meters); there will be no eastings less than about 160 km or greater than about 840 km, reflecting the grid’s overlap. The y (vertical) coordinate is measured from the equator (at 0 meters) and increases toward the north pole; it’s called a northing. In the southern hemisphere, southings start from the equator at 10,000 km and decrease toward the south pole. Coordinates everywhere will always be positive and are based on easy, consistent metric measurements (because the system was designed for soldiers).
If the zone number and hemisphere are specified, it’s possible to unambiguously describe the location of any point on the globe. To remove the need for a hemisphere label, each zone is further divided into 20 horizontal bands, all but the northmost band spanning 8° of latitude. Bands are labeled alphabetically from C at the south end of the zone to X at the north end, skipping I and O (to avoid confusion with numbers 1 and 0). Global locations are completely specified by their zone, band, easting, and northing (or southing). UTM is used with many applications and mapping systems, not just USGS topo map quads. I’ve thrown a whole lot of info at you; fortunately you don’t have to memorize any of it once the basic concepts soak in. Besides, you’ll know if you’re in the southern hemisphere because the sun will arc strangely to the north, and familiar constellations will be upside down—and there’s the Southern Cross.
First, let’s look at the longhand specification of a point using UTM, taking the location of Mt. Whitney as an example. In geographic degrees-minutes-seconds coordinates it’s located at 36° 34′ 45″ N latitude and -118° 17′ 33″ W longitude. In UTM coordinates it’s in zone 11, band S. With the NAD83 datum, the easting of Mt. Whitney is 384,356 meters, and its northing is 4,048,961 meters; using the NAD27 datum its easting is 384,436 meters, and its northing is 4,048,764 meters. The summit would appear to be displaced 180 meters (590 feet) if the wrong datum is used, dropping that little stone house right down the Mountaineer’s Route; more significantly, this amount of error is certainly enough to cause you to go off route in tricky terrain.
A complete representation of the location of Mt. Whitney, according to the NAD83 datum, would be
11S 384356 mE 4048961 mN
The easting, reading to the right, is always given before the northing, reading up. Some GPS receivers omit the band, let you specify the hemisphere in your receiver setup, and then display Mt. Whitney’s location as
11 3 84 356
40 48 961
In some representations, the final digits, representing single meters, will be dropped to indicate that the precision is being given only to 10 meters. Two digits would be dropped if the requisite precision is 100 meters.
USGS topo maps simplify the coordinate expressions when no confusion would result (for example, when referring to a single, specific 7½-minute quad map). Two numbers in the easting and northing specify a particular UTM 1,000-meter (1 km) grid line; these are the “principal digits”:
11S 384436 mE and
4048764 mN
The Mt. Whitney quad would show a fine black grid line or blue ticks along the edge of the map area at the 384th 1,000-meter easting grid line and at the 4,048th 1,000-meter northing grid line in the zone, among others. (Most USGS maps also show ticks, usually labeled in feet, associated with State Plane Coordinate Systems; the details are too complex and useless to mention, just ignore them.) Principal digit UTM ticks on this map would be marked
384 and 4048
The superscripted initial numerals deemphasize resolution that is too coarse to be of importance on this particular map. If these ticks happen to be cardinal on a particular topo map, in the SE and NW corners, they would be marked more completely as
384000 mE and
4048000 mN
Even more information can be removed from UTM coordinates by conjoining eastings and northings, omitting the superscripted prefixes that are unneeded if you stick to a specific single quad, and dropping digits representing unwanted precision. In this manner the summit of Mt. Whitney at 384436 mE and 4048764 mN would be described as being at UTM 844488, to a precision of 100 meters (about 328 feet). This representation is diabolically cryptic, but now you know how to decode it when you find it in a route description or guide book. Without the name of the USGS quad to which you are referring, such representations are ambiguous and indecipherable. My personal opinion is that ink is cheap and confusion is not, so complete longhand UTM coordinate representations are to be preferred.
Here’s where the UTM system shows its convenience compared to lat-long. On the Mt. Whitney quad, the summit of Mt. Whitney, with an easting of 384436 meters, will be located to the east (right) of the 384 grid line, a little more than one-third of the way to the 385 grid line further right. That establishes its east-west location. With a northing of 4048764, its north-south position will be above the 4048 grid line, about three-quarters of the way to the 4049 grid line next up. Transparent overlay scales or grids, called romers or roamers, in 1:24,000 or 1:25,000 (metric) scale, are available to help plot UTM coordinates on maps, and I’ve included a pattern for one in the Resources appendix that you can print yourself. The meter scale in map margins may be all you need. If the 1,000-meter grid lines are printed or drawn on the map, you might get close enough just by visual estimation.
Gird your grid: there’s another subtlety in the relationship of UTM grid lines and lat-long meridians and parallels on quad maps; it arises because they are based on different projections. On the flattened slice of terrain (orange peel) with which we started, the longitude lines (meridians) converge at the poles. On our UTM projection and grid overlay, meridians above the equator on the west side of the zone (slice) appear to curve toward the east, and on the east side of the zone they appear to curve westerly. UTM grid lines, on the other hand, are everywhere parallel and perpendicular, which is a big appeal for using UTM. However, this also means the UTM grid only aligns with longitude meridians (all of which lead true north) near the center of zones, at an easting of 500,000 meters—a grid line that would be marked 500000 mE on a USGS map. If you zoom in on the six-degree wide zone away from its center and examine one of the forty-eight 7½-minute quads that span the zone, you find that the conic projection used for USGS quads results in maps—bounded as they are by lat-long parallels and meridians—that are more or less (but not exactly) rectangular and square to the page. This implies that UTM grid lines will not be square to the page, especially for quads near the east and west edges of the zone. The UTM grid that covers the quad will appear tilted but not distorted. Getting your head around this concept admittedly takes effort, which may be unjustifiable in practice. The offset angle of the UTM grid with respect to meridians depicted on a particular quad is called Grid North, and newer USGS maps add a GN declination arrow to the marginal diagram that shows the declination angle of magnetic north (MN) with respect to true north (TN or  ). The greatest east or west GN declination on any 7½-minute quad will be a couple of degrees.
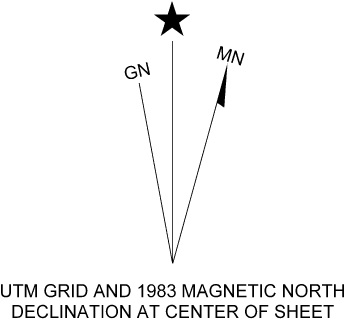
A quad map’s depiction of geographic north, magnetic north, and grid north.
Now that you’re convinced that a GPS receiver is a world of wondrous complexity, you might ask, “But what good is it?” The answer depends on whom you ask. If you ask me, I’d say that for most mountaineering, you can better spend your money and weight budget elsewhere. Sure, a GPS receiver is barrels of fun to play with, but it mainly tells you where it is (or was); it’s a position instrument whereas a compass is mainly a direction instrument. You wouldn’t use a GPS receiver to follow a route instruction such as “From the summit, the only descending ridge that doesn’t cliff out is the one at 58°.” A GPS receiver determines its position with amazing precision, but in most cases precision is not required beyond that obtainable with thoughtful observation of your surroundings and maybe a compass—you still need a real map and map skills to take advantage of your GPS. Knowing the coordinates of a location tells you little about how to get there or even how far away it is. There are exceptions, of course, where a GPS receiver could be handy. Finding a cache or retracing your route in a whiteout or finding your location in a deep forest (or at night) where compass navigation is problematic would be examples, as would be the person who chronically becomes lost—just be sure that if you depend on your GPS receiver you don’t let its batteries go dead. Pick a receiver that uses rechargeable AA batteries or allows easy battery swapping and get at least one spare (most units won’t lose data when you replace batteries); be sure the unit has a backlight display and is water resistant. Worry more about weight than about a big, flashy display. Software and hardware can add fun features, of course, but for most outings I’d suggest that you simply learn to use your map and compass, and pay more attention to the world around you. That’s what draws you to the mountains in the first place.
The best means of estimating the time required to travel a particular route is based on experience, yours or others’, including trip reports of previous parties. Still, wouldn’t it be handy if there were a simple way to calculate an estimate? Turns out that for simple routes, there is such a calculation. The basic idea behind this family of calculations, called Naismith Rules, is to figure hiking speed on trails, hiking speed cross-country, and time to add to account for altitude gain.
When hiking on easy, flat trails, reasonably fit and moderately loaded backpackers move along at about 2.5 miles (that’s about an inch on a quad map) per hour, or about 25 minutes per mile, 3 to 5 km per hour. This corresponds to an energy consumption around 600 calories per hour. Determined, athletic backpackers do better; figure 3 mph or more. Speed drops significantly if the trail is rough and more significantly if the terrain is so rough that the trail disappears altogether. You might figure 1 mph through boulders and half that if things are really awkward, but Naismith formulas are intended mainly for trails. To your trail travel estimate you add additional time if the easy trail ascends—an additional hour for every 1,000 feet or so, maybe more if you don’t follow my guidance and you’re carrying a heavy pack. To such an estimate you would add more time for rest stops, large group inefficiency of about 1 percent for each additional person, and other delays. Above 10,000 feet your performance will drop more, depending on your degree of acclimation.
Expressing these rules of thumb mathematically results in the approximation
T = R/3 + C + H
where the time, T, in hours, will be given by adding the road or trail travel distance, R, in miles (figuring 3 mph) to the cross-country distance, C, in miles figured at 1 mph, to the altitude gain in thousands of feet, H. This is a very crude estimate, so H is omitted (not subtracted) for segments involving downhill travel, even though the difference over rough terrain may be nil. You can easily modify this formula based on your own hiking speeds; I find it gives times that are too long by at least 50 percent for a small group of conditioned and motivated mountaineers.
Another approach to estimating travel time is based on the energy consumption required and available. In Performance Nutrition for Mountaineers, Chapter 19, I point out that, depending on level of fitness, mountaineers may burn 600 to 800 or more calories per hour when working hard. If the caloric requirements of a route could be estimated, the travel time could be calculated based on nominal calorie burn rate. As a gross estimate, figure on burning 100 calories per trail mile, 200 calories per cross-country mile, and 400 calories for every 1,000 feet of elevation gain. To that sum, add about 65 calories per hour of estimated travel time for basal metabolism. The sum will estimate the energy required for the route; divide that by the rate you can, or would want to, put out, and the result will estimate the travel time for you that the route requires.
If you’re planning a trip well in advance or for a remote location, you can find calculators on the Internet that will give you sunrise and sunset data for any place at any time of year, and by digging further you can find the corresponding angle of the sun above the horizon (architects use this all the time). If you really want to get fancy, you can use your topo map to see at what time your camp might receive sunshine or when your snow slope descent might see the sun recede behind the local crest, with attendant temperature drop. The sun appears to move 360° per day or 15° per hour, so you can use the grade of the occluding terrain to determine how many hours after sunrise the sun might strike your frosty little tent.
Getting lost means that you or your party comes to the realization that the certainty of your location has somehow wandered away. It can happen gradually, as your hiking trail turns progressively into a rabbit track, or suddenly, as you encounter an unexpected feature. The usual reaction to this conclusion consists of stopping immediately and taking out map and compass to reorient. Occasionally this works. In the worst case, becoming lost could mean retracing your path back to the last place where you knew your location with certainty, even if that’s the trailhead. It never means stumbling ahead in hopes of rejoining your intended route. Travelers who proceed ahead hoping to come across the route invariably become wanderers who are most certainly lost. For mountaineers, becoming lost can be more serious because it could imply that you’re in terrain that all looks the same; for example, you’re ascending a gully and develop the deep suspicion that it isn’t the gully you had intended. Or you’re descending a ridge, and that little voice in the back of your head that’s been nagging you for half an hour finally gets your attention. Or you’re skiing down a most excellent run and realize near the bottom that you’re no longer heading homeward. You consult your map and can’t determine for sure if you’re on the correct route or the one that ends at an impassable cliff. Reversing your path is exquisitely unattractive and could result in an unplanned bivouac. You’re lost.
The cure for all cases of being lost is the same: stay found. Maintain constant association between your location in the terrain and your intended route on your map. Start with reviewing your route by spreading out the topo maps on the kitchen table and uploading the terrain into your brain, along with potential handrails, attack points, catching features, and, yes, bailout options. Be sure all members of your party are acquainted with the intended route, even if that comes only at the trailhead as you point it out on the map before heading off. And always let someone who won’t be coming along know your intentions. If you’re the leader of a more serious outing, you may decide to prepare a formal route card, with enough detail and identified decision points to make you confident of successful navigation. Leave a copy with your significant other unless he’s in the party.
Then, as you travel, maintain confidence that you’re proceeding according to plan, in terms of both route and timetable. Encourage everyone in your group to chat up the route and voice any suspicions that something could be wrong. Turn around often, especially at decision points, to get an idea of what the return route will look like. If you really anticipate problems returning along your route, because of the possibility of bad weather perhaps, mark your route with wands or strips of surveyors’ tape from your ten essentials (see Chapter 18); toilet paper also works until it rains—just be sure to remove any of these forms of trash as you return. An alert party is unlikely to become lost unless beset by unexpected events. A weather change is such an event, or the realization that travel in a green area on your topo map means that you’re unable to see terrain features you hoped to use for navigation. The implication is that some objective hazard threatens the group; dealing with that hazard and ensuring the safety of the group is more important than adherence to a route plan or timetable. Rockfall or avalanche avoidance, for example, can result in the necessity to travel on unplanned routes. Running out of daylight in combination with positional uncertainty is a very good reason to resign yourself to a comfortable camp (or uncomfortable bivouac) and cease compounding your troubles until the next morning.
If you’re traveling solo, you must assess whether you’re truly lost, or whether you’re just uncertain of your specific location and a bit of reconnaissance will resolve doubt. Factor in whether you believe that a search for you will be initiated. The worst possible things to do are travel in darkness, wander out of the sensible search area, cross barriers such as rivers or passes where searchers will expect you to stop, fail to leave clues in obvious spots, or find yourself trapped by a terrain feature, such as a dry waterfall in a gully, that maroons you in an unlikely place of hiding. Searchers look for clues, not persons, so leave plenty, such as deliberate foot prints showing your direction of travel, bits of surveyor’s tape, arrows and your initials scratched into the dirt or made by lining up pebbles on larger rocks, bundles of grass bent over in your direction of travel and wrapped with more grass, or even written notes. Most of the material written about what to do after realizing you’re lost relates to hikers lost in the woods; travelers in high mountains may enjoy more visible landmarks, but should they become lost their predicaments require unique solutions. For example, building a smoky fire may be impossible above tree line, on snow, or in strong winds; there may be no one close enough to see it or to reach you in a reasonable amount of time if they do see it. As I write, thousands of firefighters are battling a nearby 250,000-acre fire that has destroyed thousands of homes and cost a dozen lives; it was started as a signal by a lost hunter. Instead of pyromania, avoid becoming lost in the first place.
If you’re new to mountaineering, you might wonder how it’s possible for a small party of mountaineers to become separated in broad daylight. Actually, it’s ever so easy and happens all the time. If everyone knows the route, there’s usually no problem, but should a member of the party become truly lost, there must be a clearly understood assessment and response plan. Absent that, don’t allow the party to become widely separated for fear of a tremendous waste of time reuniting a lost member. At a minimum, reunite at every decision point. For the lost member, who’s most often trailing the others, the first thing to do is to stop, even though you’re behind. If that lost person is you, and you can figure out where you are, then continue ahead to rejoin the group, but frequently consult a map to test your hypothesis. If you’re mapless and clueless, stay put or move only a short distance to a location where you’ll be more visible. It’s remarkable how invisible a person becomes in the scale of mountainous terrain, even back in the unmissed days when Day-Glo clothing was in fashion.
If you’re among the searchers, you should rely on the plan your party has formed for the route, or even route segment, in question. You did make an if-lost plan, didn’t you? The first attempt at reunion involves group shouting and group listening. I’ve never known shouting to work (for anything), but three blasts on one of those deafeningly loud whistles will reach out better than you might expect. Most parties have an understanding that if darkness intervenes, safety of the searchers requires that efforts will be discontinued at nightfall. The next morning, searching won’t resume until some understood time, such as two or three hours after first light. This gives lost members enough time to find their way back to the group or at least to make themselves more findable, and prevents them from being overcome by guilt and desperation at being unfound, as they know that no one will maintain a night search or set out first thing next morning.
When I was just a tyke my grandfather would take me into the forest and try to teach me about wild things. He’d point out animal tracks that I could barely see, yet he was able to tell the sex of the animal, how fast it was moving, and what it was doing when it made the tracks. I was amazed, so I’d beg him to show me these things every chance I got. I once asked my granddad how he could walk so much in dense forests and never become lost, seemingly without any effort at all and certainly without map or compass. He responded with a story told in a very matter-of-fact way. He said that for thousands of years our ancestors (my family is Native American) had been walking over the land, over all of America, to the top of every mountain and down every river. (My father joked that they “turned over every rock and looked under every bush.”) My grandfather said that our ancestors left their spirits in special places to guide future generations, so that we wouldn’t become lost. He said that if I found one of those special places and listened for the spirit voices, they would guide me. Wow, was I impressed! I nagged him with queries about how to find such places and what the spirit voices might say and every other silly question. He answered that these were things that could be learned, but not taught. That was his answer for a lot of my questions. Ever since then, throughout my life, I’ve looked for special places, and I’ve tried to hear the spirit voices of my ancestors. Never in my life have I ever been lost.
Well, of course, you might say. That’s just a story to teach common sense to impressionable kids: pay attention to things around you; maintain a sense of where you are and where you’re going; be comforted by your environment, not fearful; calm down and make sensible decisions; come up with a plan and follow it. Certainly good advice, and I’m passing it on to my daughter. My grandfather became one with his ancestors long ago; I give you his story for what you care to make of it. Trust his counsel, and the spirits may speak to you, too.