

COOKIE CUTTERS

STAMP OUT CROUTONS
I try to take every opportunity to make meals more fun. That’s where cookie cutters come in handy! Instead of cutting bread into plain old squares for croutons, I use decorative cutters to stamp out different shapes: clovers for St. Patrick’s Day, hearts for Valentine’s Day and stars for just about every other occasion. Kids especially love these designer croutons.

Stamp out bread shapes with decorative cookie cutters. Sprinkle with cheese and bake.
Tomato Soup with Cheesy Croutons
Active
30 min;
Total
1 hr 30 min;
Serves
4

3 lbs. plum tomatoes, cored and halved lengthwise
6 unpeeled shallots, halved lengthwise
6 unpeeled garlic cloves, crushed
2 basil sprigs, plus leaves for garnish
3 thyme sprigs
¼ cup extra-virgin olive oil
Kosher salt and black pepper
One 14-oz. can diced tomatoes
4 Tbsp. unsalted butter, cubed
1 cup chicken stock or low-sodium broth
Pinch each of cayenne pepper and sugar
Four ½-inch-thick slices of sourdough boule
Shredded Gruyère cheese, for sprinkling
1. Preheat the oven to 400°. On a large rimmed baking sheet, toss the plum tomatoes with the shallots, garlic, basil and thyme sprigs and olive oil. Season generously with salt and black pepper and toss again. Bake for about 45 minutes, stirring halfway through, until the tomatoes are tender. Leave the oven on.
2. Discard the tomato, shallot and garlic skins as well as the herb sprigs. Scrape the tomato mixture into a blender. Add the canned tomatoes and butter and puree until very smooth. Transfer the pureed tomatoes to a large saucepan, then whisk in the chicken stock, cayenne and sugar. Cook over moderate heat, stirring occasionally, until hot, about 8 minutes. Season with salt and black pepper. Keep warm over very low heat.
3. Meanwhile, using decorative cookie cutters, stamp out sourdough shapes. Reserve the crusts and any scraps for bread crumbs. Transfer the bread to a baking sheet and sprinkle each shape with a little shredded Gruyère. Bake for about 12 minutes, until golden and crisp.
4. Ladle the tomato soup into bowls, top with the cheesy croutons and basil leaves and serve.
MAKE AHEAD The soup can be refrigerated for up to 3 days. Reheat gently.
VARIATION For a toad-in-the-hole, stamp out the center of a slice of bread. Melt butter in a skillet. Add the bread slice and the stamped-out shape. Crack an egg into the hole in the bread and cook for about 2 minutes. Carefully flip the bread and the stamped-out shape, add more butter and cook for another 2 minutes. Transfer to a plate and serve.
DECORATE CAKES
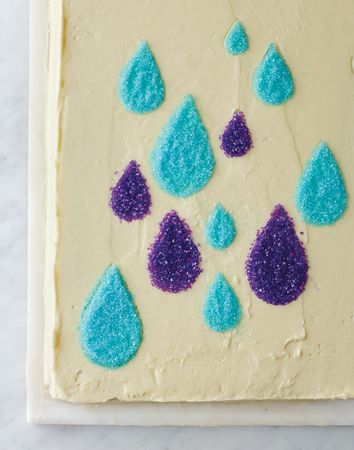
If you don’t have a pastry bag (or aren’t a pro with one), this is my foolproof way to decorate cakes. I like to play with different shapes and colors to create a striking dessert. Tag me with yours on Instagram!

Gently press cookie cutters onto a freshly frosted cake. Fill each cutter with sprinkles. Remove the cutters to reveal a gorgeous decoration.
Rainy Day Carrot Cake
Active
50 min;
Total
3 hr;
Serves
12

CAKE
2 sticks unsalted butter, softened, plus more for greasing
1 cup walnuts
2 cups all-purpose flour
2 tsp. cinnamon
2 tsp. baking powder
1½ tsp. kosher salt
1 tsp. baking soda
1 tsp. ground ginger
¼ tsp. freshly grated nutmeg
2 cups granulated sugar
4 large eggs
1 cup buttermilk
¼ cup canola oil
1 Tbsp. pure vanilla extract
2½ cups shredded carrots (about 8 oz.)
FROSTING
1½ lbs. cream cheese, at room temperature
1½ sticks unsalted butter, at room temperature
2¼ cups confectioners’ sugar
¾ tsp. pure vanilla extract Finely ground toasted walnuts or sprinkles, for decorating
1. Make the cake Preheat the oven to 350°. Butter a 9-by-13-inch metal baking pan. Line the pan with foil. Spread the walnuts in a pie plate and toast for 8 to 10 minutes, until golden and fragrant. Let cool, then coarsely chop.
2. In a medium bowl, whisk the flour with the cinnamon, baking powder, salt, baking soda, ginger and nutmeg. In a stand mixer fitted with the paddle or in a large bowl using a hand mixer, beat the 2 sticks of butter with the granulated sugar at medium speed until fluffy, about 2 minutes. Beat in the eggs one at a time, then beat in the buttermilk, oil and vanilla until incorporated. Beat in the dry ingredients at low speed until just incorporated, then stir in the carrots and toasted walnuts. Scrape the batter into the prepared pan and bake for about 45 minutes, until a toothpick inserted in the center of the cake comes out clean. Let cool completely in the pan.
3. Meanwhile, make the frosting In a stand mixer fitted with the paddle or in a large bowl using a hand mixer, beat the cream cheese with the butter until smooth. Beat in the confectioners’ sugar and vanilla at low speed until nearly incorporated, then beat at medium speed until smooth.
4. Invert the cake onto a large baking sheet, peel off the foil, then invert the cake onto a platter. Spread the frosting evenly on the top and sides of the cake. Gently press decorative cookie cutters on top. Fill each cutter with a thin layer of ground toasted walnuts or sprinkles. Carefully remove the cookie cutters, cut the cake into squares and serve.
MAKE AHEAD The cake can be refrigerated in an airtight container for 5 days.
SHAPE WHIPPED CREAM
I love a dollop of fresh whipped cream in my hot cocoa, but the problem is that it melts right away. With my tip for frozen whipped cream shapes, you get an unexpected garnish that stays intact while you sip.

Freeze whipped cream on a foil-lined rimmed baking sheet. Stamp out shapes with decorative cookie cutters.
Rich and Creamy Hot Chocolate with Frozen Whipped Cream
Active
15 min;
Total
1 hr 15 min;
Serves
4

1¾ cups heavy cream
2 Tbsp. confectioners’ sugar
¼ tsp. pure vanilla extract
2½ cups whole milk
½ cup granulated sugar
Pinch of kosher salt
7 oz. bittersweet chocolate, finely chopped
1. In a large bowl, using a hand mixer, beat 1 cup of the heavy cream with the confectioners’ sugar and vanilla until thick. Spread the whipped cream in a ½-inch-thick layer on a foil-lined rimmed baking sheet. Freeze until firm, about 1 hour. Slide the foil onto a work surface. Using decorative cookie cutters, stamp out shapes and return them to the baking sheet. Keep frozen until serving.
2. Meanwhile, in a medium saucepan, combine the remaining ¾ cup of heavy cream with the milk, granulated sugar and salt. Bring just to a simmer. Remove from the heat and add the chocolate. Let stand for 2 minutes, then stir until smooth. Keep warm over low heat, stirring occasionally. To serve, ladle the hot chocolate into mugs and top with a frozen whipped cream shape.
MAKE AHEAD The frozen whipped cream can be frozen in an airtight container for up to 1 week.
3 More Whipped Cream Ideas for Hot Cocoa
MINI SHAPES Use small cookie cutters to stamp out adorable miniature whipped cream shapes.
COLORED SHAPES Add strawberry preserves to whipped cream and use a skewer to create a cool swirled pattern before freezing. Alternatively, mix a drop or two of red or blue food coloring into whipped cream before freezing. These shapes look especially good in white hot chocolate because they’ll slowly tint the drink as they melt.
SPICED Get creative with spices. Try mixing ground cardamom or cinnamon into whipped cream before freezing. Or instant espresso for a mocha-style hot chocolate.
MAKE WHITE CHOCOLATE CANDIES
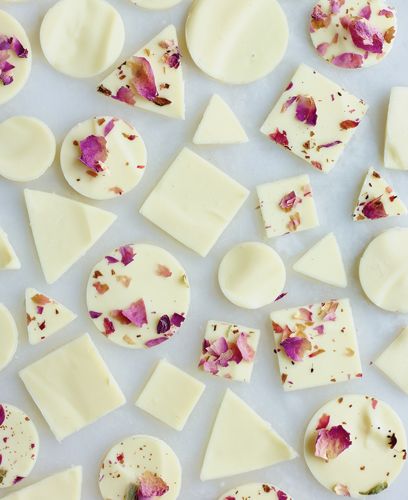

Spread melted white chocolate on an aluminum foil–lined baking sheet. After it firms up, stamp out bite-size candies with cookie cutters.
DIY White Chocolate Candies
Active
20 min;
Total
1 hr 5 min
Makes
about 44
Forget the double boiler: One of the easiest ways to melt chocolate is in the microwave. After stamping out your candy shapes, you can remelt the white chocolate scraps to make even more.
1 lb. white chocolate, finely chopped
Purple food coloring, matcha powder, cocoa powder, rose petals or lavender flowers, for decorating (see directions )
In a large microwave-safe bowl, heat the white chocolate at high power in 20-second intervals until nearly melted. Let stand for 2 minutes, then stir until smooth. Using a small offset spatula, spread the white chocolate in a scant ¼-inch-thick layer on a foil-lined baking sheet. Let stand until firm, about 45 minutes. Using 1-inch-wide cutters, stamp out candies and transfer them to a plate.
VARIATION See the three ideas on the next page.
Turn Plain Chocolate into Eye Candy
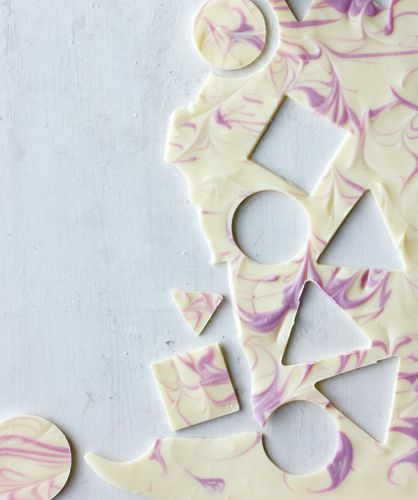
MARBLING To make swirled white chocolate candies, mix ¼ cup of the melted white chocolate with 2 drops of purple food coloring until no streaks remain. Using a small offset spatula, spread the remaining melted white chocolate in a scant ¼-inch-thick layer on a foil-lined baking sheet. Drop spoonfuls of the purple chocolate on top of the white chocolate and, using a skewer, make decorative swirls. Let stand until firm, about 45 minutes. Using 1-inch-wide cutters, stamp out candies and transfer them to a plate.
EDIBLE FLOWERS Using a small offset spatula, spread the white chocolate in a scant ¼-inch-thick layer on a foil-lined baking sheet. Sprinkle with dried rose petals or lavender flowers. Let stand until firm, about 45 minutes. Using 1-inch-wide cutters, stamp out candies and transfer them to a plate.
MATCHA OR COCOA POWDER Using a small offset spatula, spread the white chocolate in a scant ¼-inch-thick layer on a foil-lined baking sheet. Let stand until firm, about 45 minutes. Using 1-inch-wide cutters, stamp out candies and transfer them to a baking sheet. Dust with matcha or cocoa and serve.