MARIMO BALL AQUATIC GARDEN
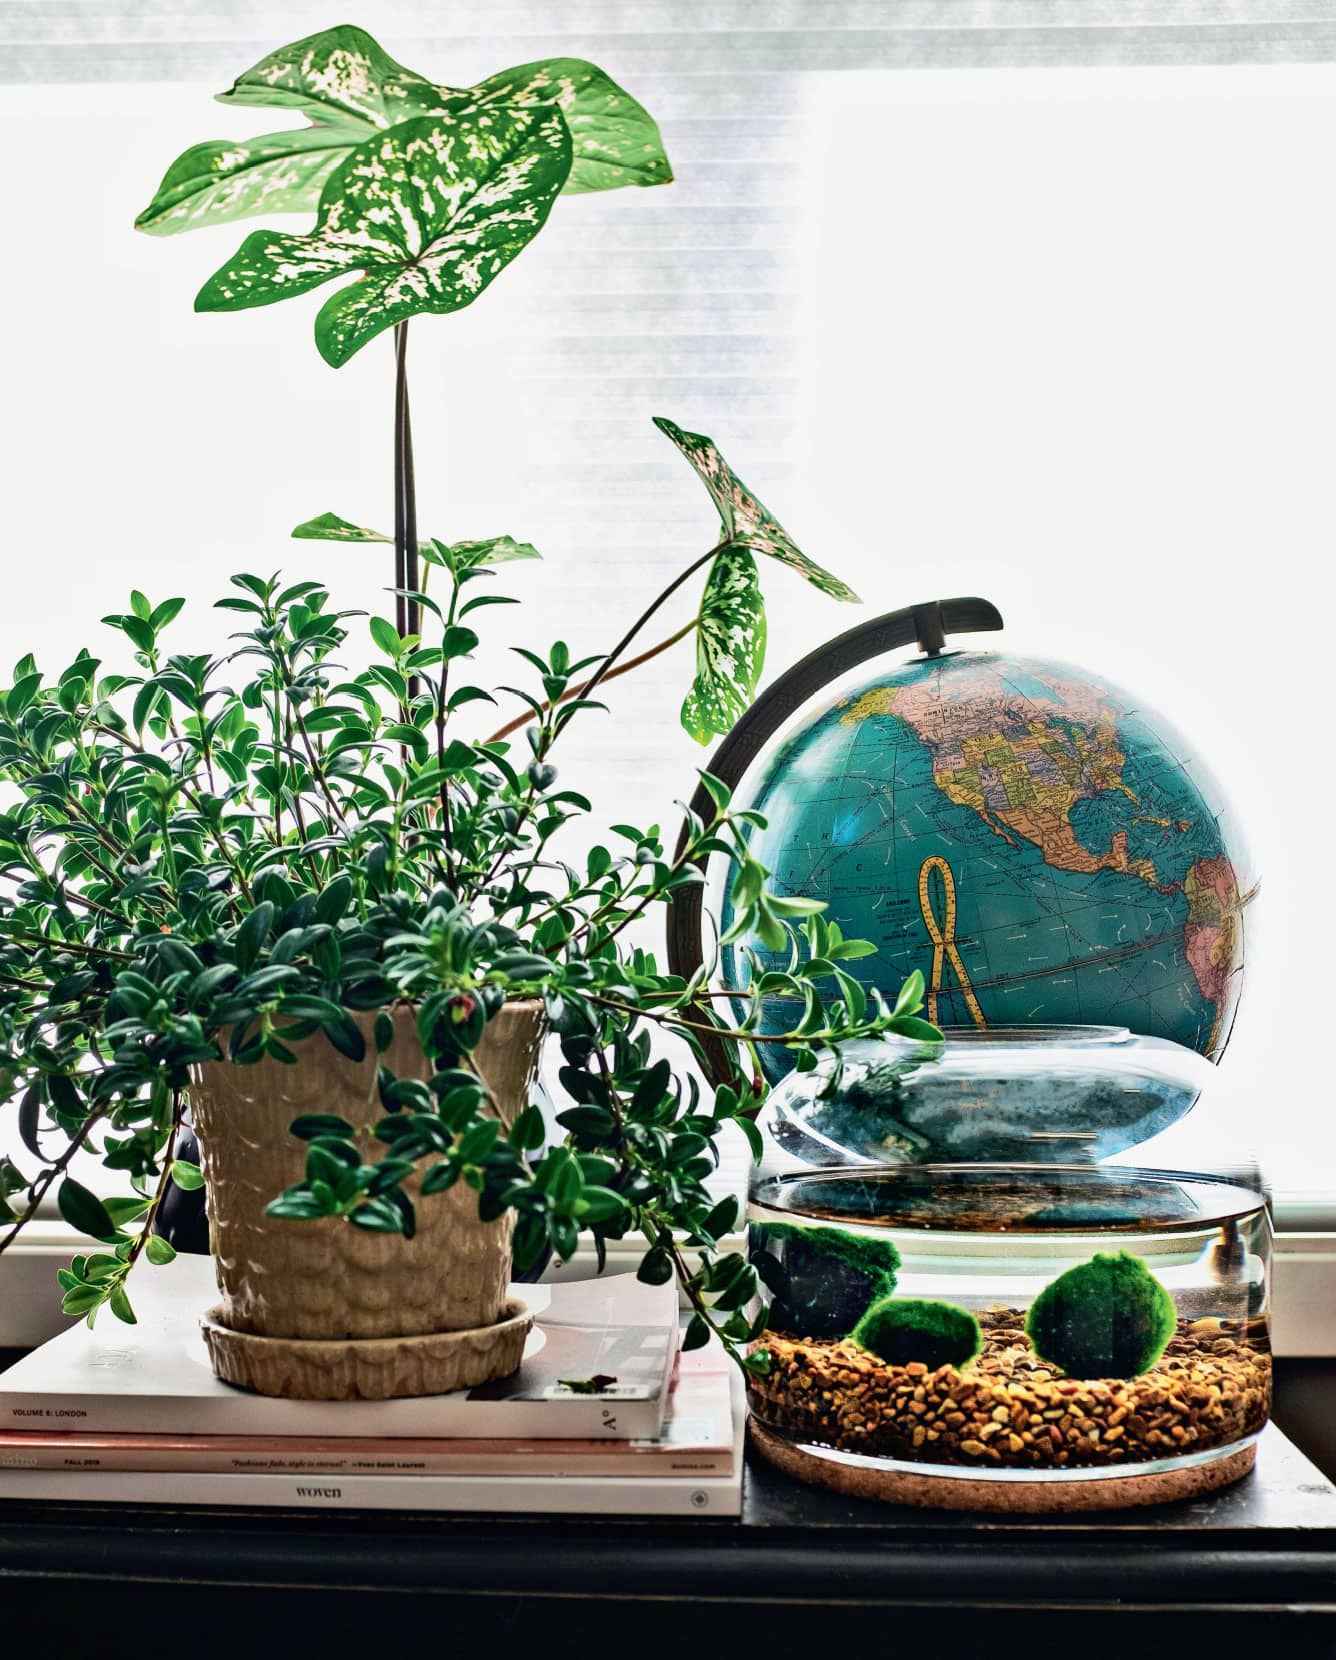
Quite often plants die because they are overwatered. The best thing about aquatic plants is that you can’t overwater them because they live in water! A marimo ball (Aegagropila linnaei)—also called a moss ball, lake ball, or lake goblin—is a perfect plant for your desk or bedside table, as long as it receives medium light.
What is a marimo moss ball, you might wonder? The first thing to know is that it isn’t moss at all, but a type of algae. Their native habitat is fresh- water lakes in Japan and Iceland, where they thrive rolling back and forth on the lake bottom with the waves. This gives them their spherical shape. In Japanese, marimo means “bouncy ball.”
As they live at the bottom of lakes, marimo balls can grow in low to medium light, which makes them perfect for home environments. If they’re exposed to too much bright light, they will suffer and turn brown. In addition, unwanted algae will grow if the container receives too much light, which may also block the amount of light getting to the marimo ball. Marimo balls need to be turned regularly to expose all sides to the light, otherwise brown, dead patches develop. Mimicking the movement of their natural environment helps keep their round shape.
STEP 1 Make sure your glass container is clean. If you wash it or use window cleaner, make sure it’s well rinsed to get all the cleaning product residue removed.
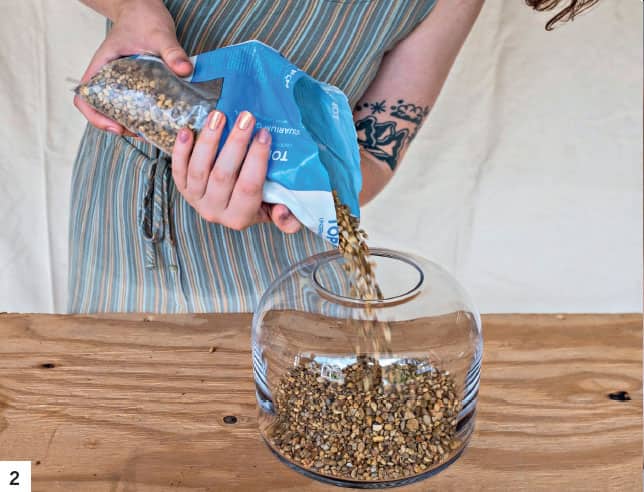
Step 2 Add gravel to the bottom of the glass display container.
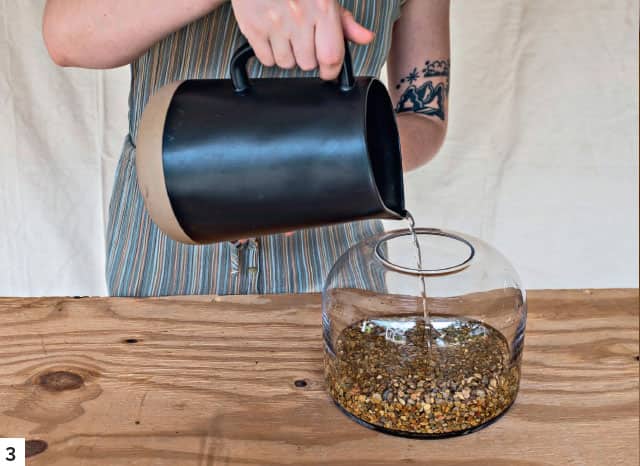
Step 3 Fill the container with water.
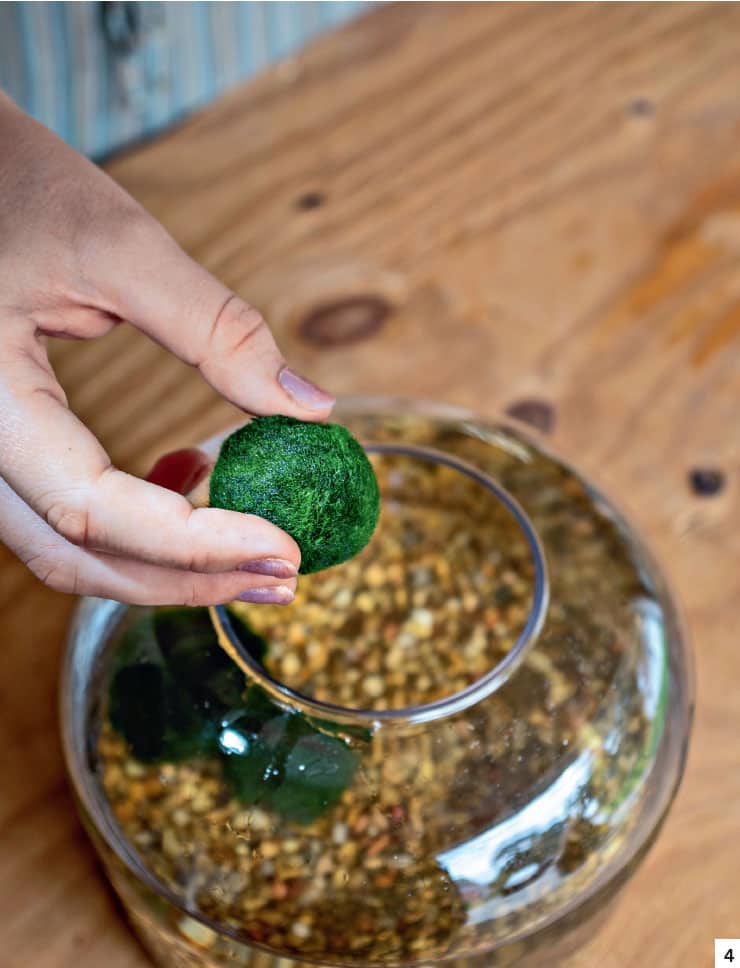
Step 4 Add your marimo balls to the container. They may float, so squeeze them gently to remove any air bubbles, and they should sink to the bottom.
Step 5 You can add a cover or leave it open. A glass plate makes a great cover and doesn’t block the light.
Enjoy your marimo balls for years to come!
RECYCLED T-SHIRT PLANT HANGER
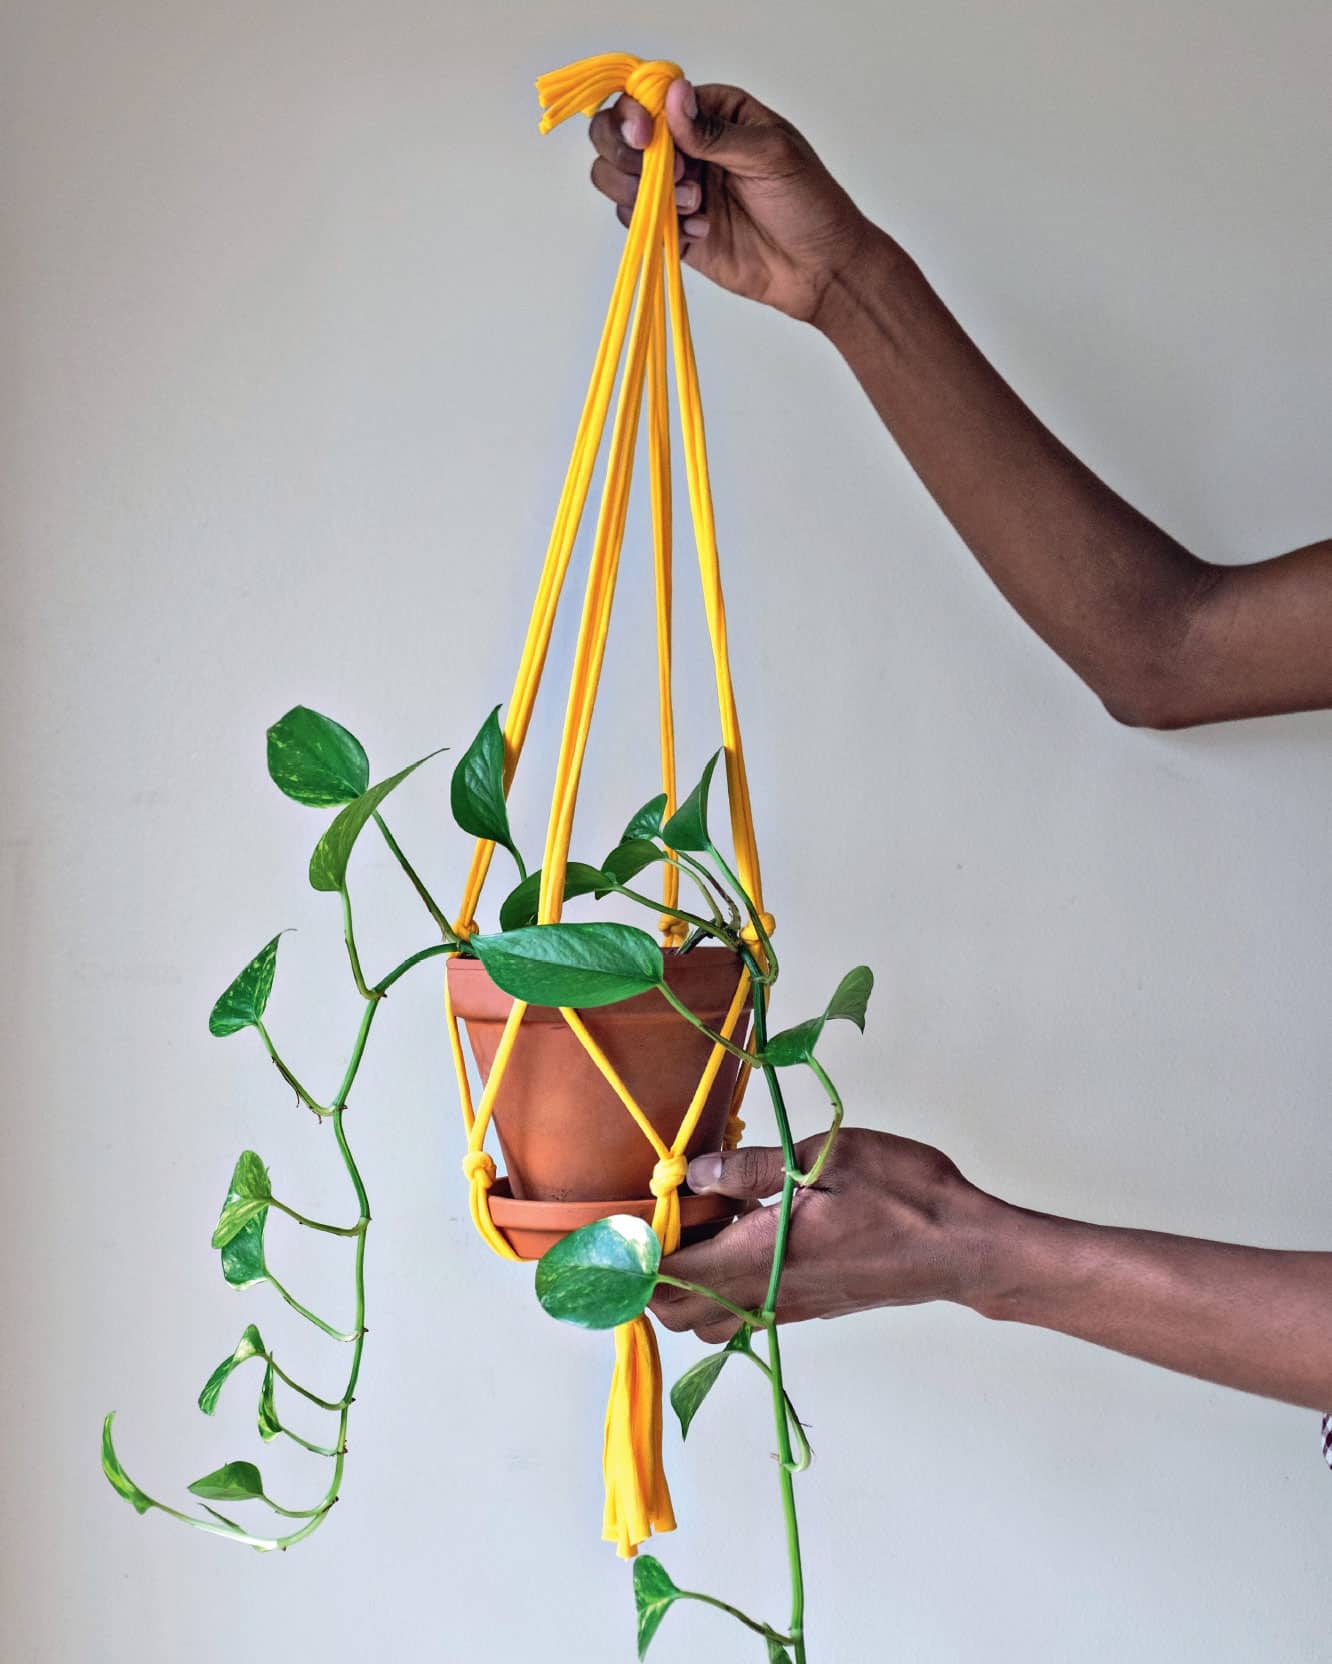
Think twice before you throw away that old t-shirt. It can be upcycled into a plant hanger in just a few simple steps. Maybe you’ve admired those macramé hangers that are all the rage and can make one from the pattern shown here.
If that seems too time-consuming, grab a t-shirt, some scissors, and a tape measure, and you can have a great plant hanger in a short amount of time. It only entails cutting up the shirt and tying 10 knots.
You could make a few of these in an afternoon and upcycle old clothes at the same time. Before you know it, your windows will be full of hanging plants!
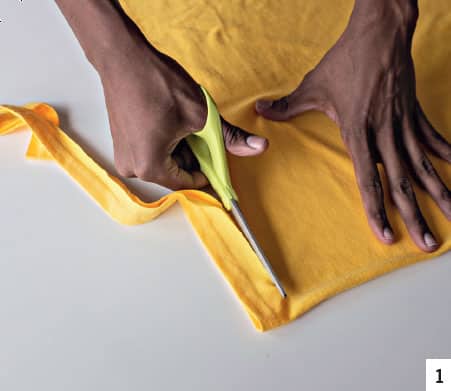
STEP 1 Lay the t-shirt on a flat surface and smooth it out to remove any large wrinkles. Cut the hem off the bottom of the shirt.
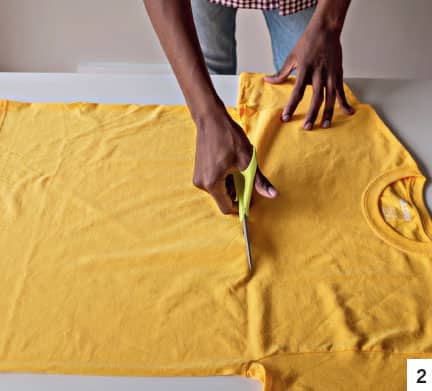
STEP 2 Cut the t-shirt across the front directly under the sleeves and discard or save to use for another project. You now have the body of the t-shirt left.
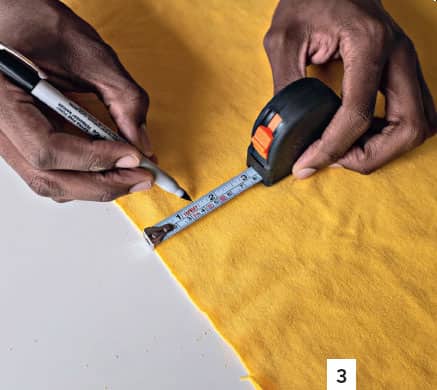
Step 3 Using a tape measure or ruler, measure up 11/2" (3.5 cm) from the bottom of the shirt. Mark the spot on both sides. You may want to use a yardstick to draw a straight line from one mark to the mark on the opposite side. It doesn’t matter if it isn’t perfect. Cut the body of the t-shirt into eight strips 11/2" (3.5 cm) wide starting on the side edge of the shirt.
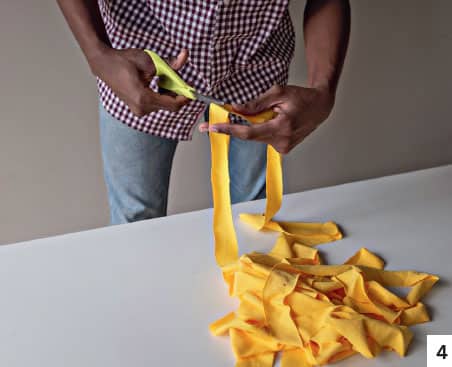
STEP 4 These pieces will be circles when first cut. To make them into strips, cut through the circle in one spot.
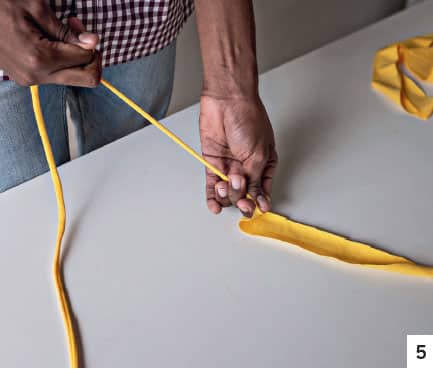
Step 5 Pull the strips to stretch them out. When stretched, the entire strip will curl up like a tube.
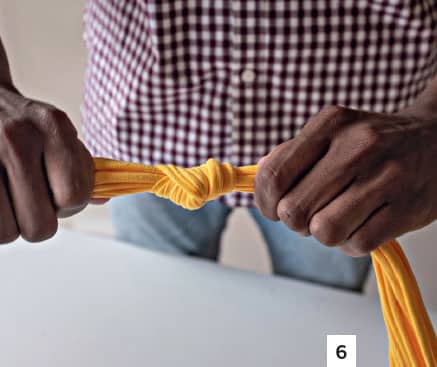
Step 6 Gather all the strips together, making sure they are even at one end. The hanger is worked from the bottom to the top. Holding all the strips together, tie a large knot approximately 5" (13 cm) from the bottom.
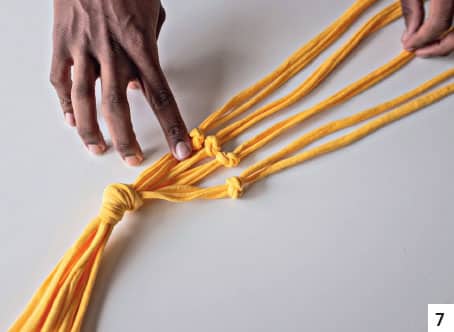
Step 7 Divide the eight strips into pairs, forming four pairs of two strips each. Using one pair of strips, tie a knot approximately 3" (7.5 cm) from the large bottom knot. Continue around, tying a knot in each set of strips. There will be four knots.
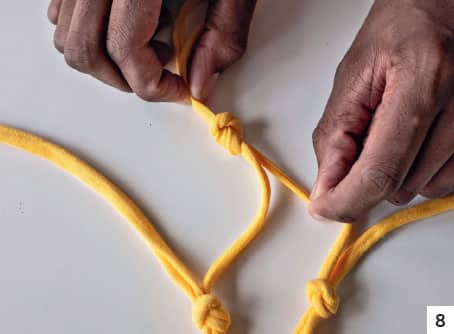
Step 8 Now drop down another 3" (7.5 cm), take one strip from one pair and one from the adjoining pair, and tie a knot.
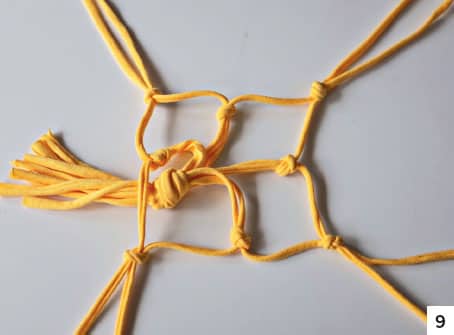
Step 9 Continue around, tying three more knots. This forms the basket that the plant will be placed in.
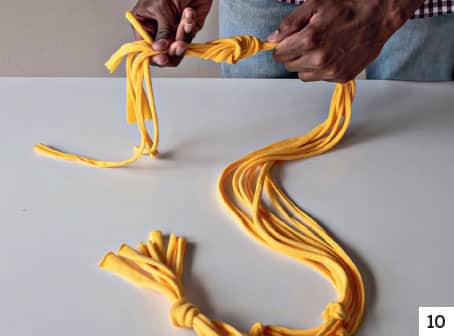
Step 10 Now gather all eight strips back together and tie a large knot at the top of the hanger. Cut the ends off above the knot. You can adjust the length of your hanger by tying the knot lower toward the basket and cutting the long ends off, or you can leave them hanging.
MACRAMÉ PLANT HANGER
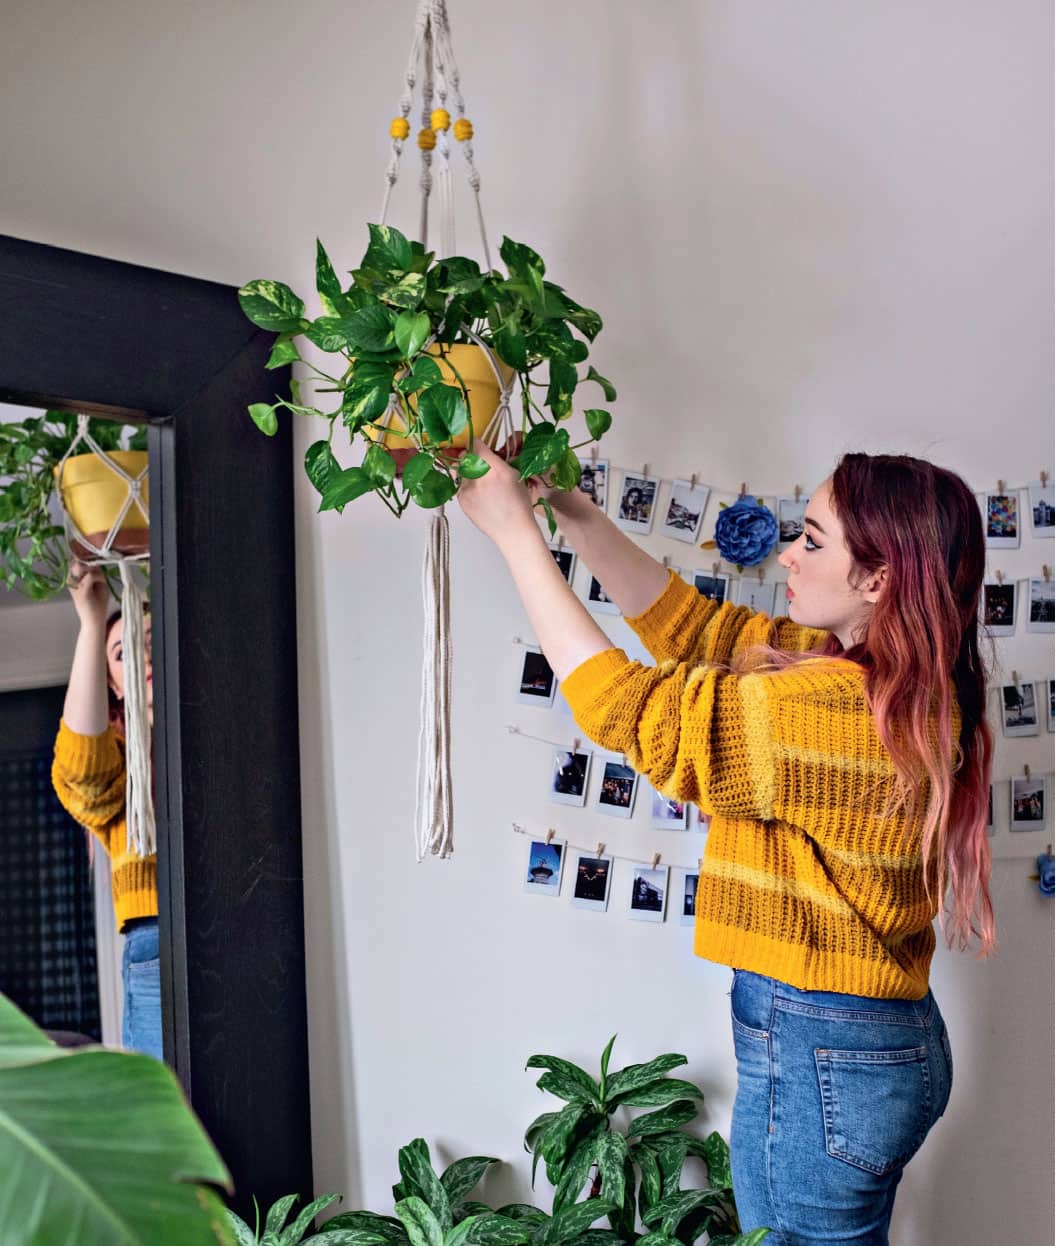
Are you running out of floor and windowsill space for all your plants? Look up! By making a plant hanger, you can utilize the ceiling area to house your vining plants. Macramé has made a comeback, and it’s even more popular now than it was in the 1970s. The technique simply involves tying different knots with string to form a pattern. If you have ever made a friendship bracelet, you can macramé, because they use many of the same knotting techniques. Making a hanger for your plant is fun and easy once you master a couple of those simple knots. The best part is, you can have more plants by hanging them from the ceiling, making the most of unused space. You only need a few supplies to make this hanger.
Note: Follow the directions exactly as they are written, one step at a time, and you macramé hanger will be simple to make. Pay attention to the repeats.
STEP 1 Cut eight 4-yard (3.7 m)–long cords. Cut two 1-yard (91.4 cm)–long cord for wraps.
Step 2 Thread the eight 4-yard (3.7 m) cords through the ring so that the ring is at the middle of the cords. There will be sixteen cord ends hanging down from the ring. Make sure they are relatively even at the bottom. This hanger is worked from the top to the bottom.

Step 3 Tie a 11/2" (3.5 cm) wrap (or gathering) knot (see knot illustrations shown here) around the sixteen cords using one of the 1-yard (91.4 cm) cords.
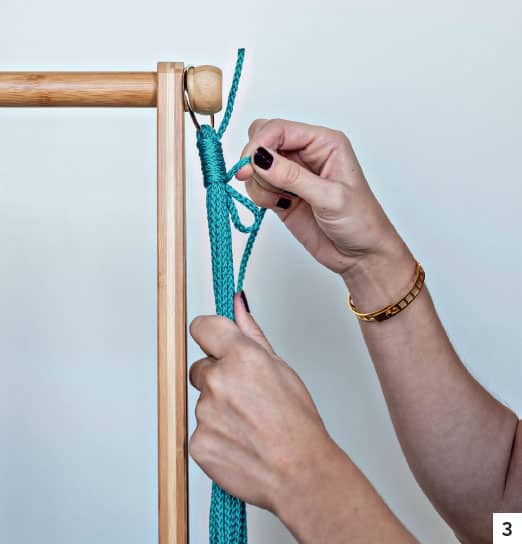
Step 4 Now you will begin to work on one arm or sinnet of the plant hanger. Each sinnet is worked separately until the basket to hold the plant pot is formed. Separate the sixteen cords into four groups of four strings each to form a sinnet.
Step 5 Using four cords, tie five square knots (see knot illustrations shown here).
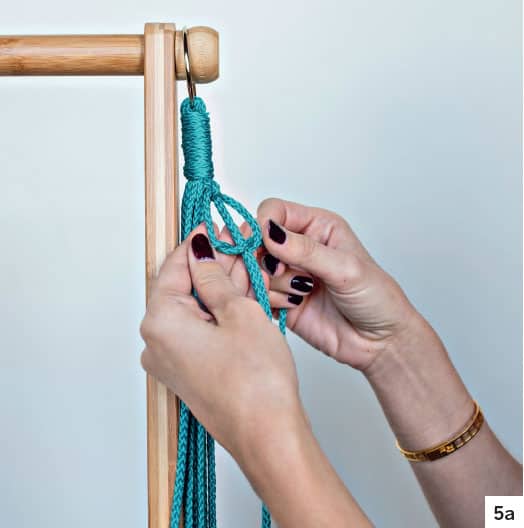
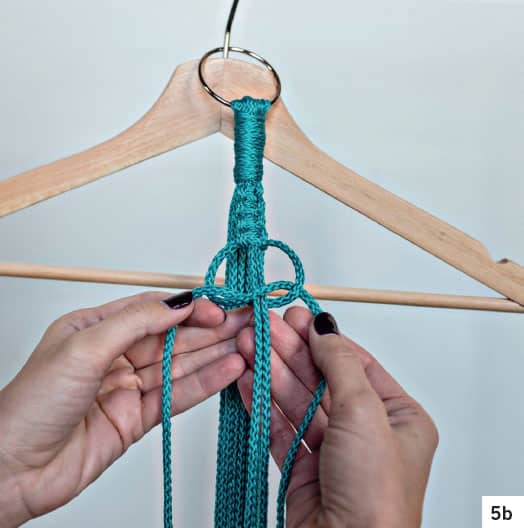
Step 6 Switch threads, bringing the two longer middle threads to the outside. (The longer cords will now be used to tie the knots.) Drop down 2" (5 cm). Tie ten half knots (see knot illustrations shown here). The result is a twisted stitch.
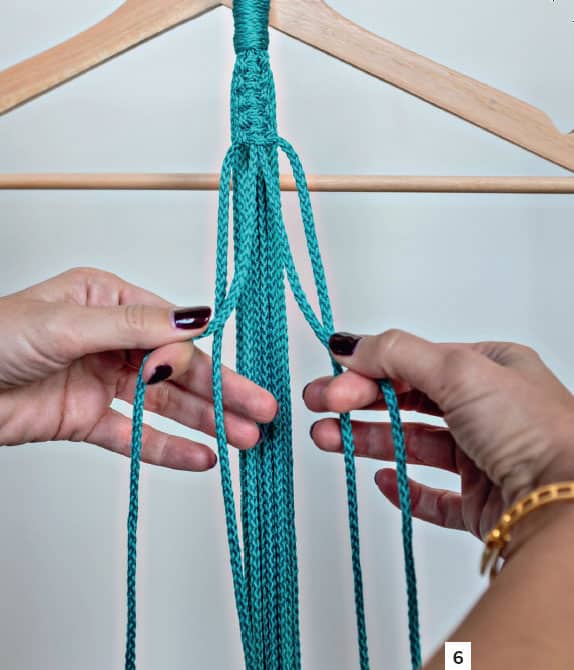
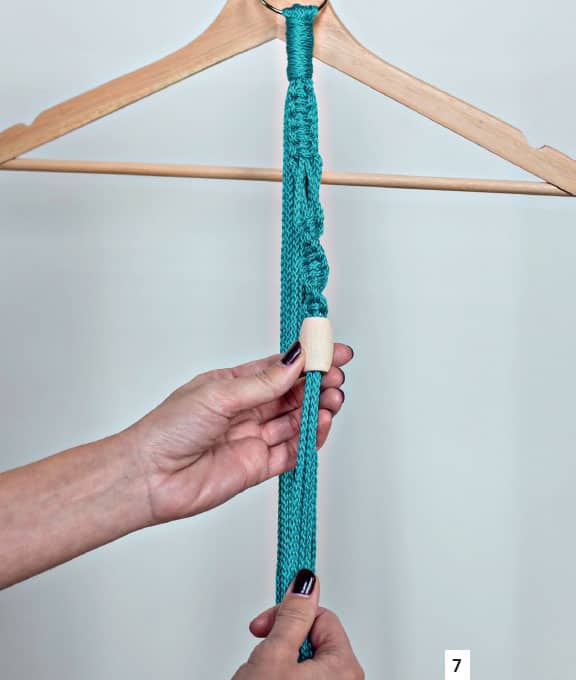
Step 7 Thread one bead over all four cords and slide it up right under the half knots you just tied. Tie ten half knots under the bead.
Step 8 Drop down 6" (15 cm) and tie two square knots. Repeat the process from Step 5 through Step 8 on each of the remaining three sinnets. The four arms or sinnets of the macramé hanger are now done, and we will start to work on the basket of the macramé holder that will cradle the plant container.
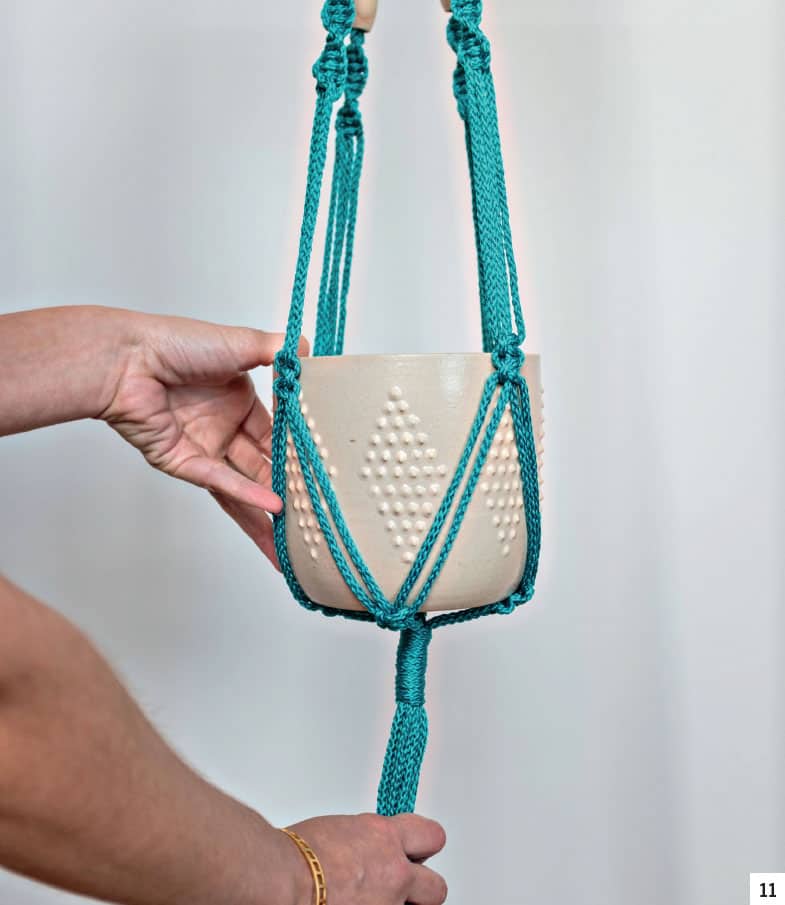
STEP 9 By using threads from neighboring sinnets each time, the result will be a webbed basket that the plant pot sits in. Skip down 4" (10 cm). Take two cords from one sinnet and two cords from the neighboring sinnet and use them to tie two square knots. Repeat with the remaining sinnets.
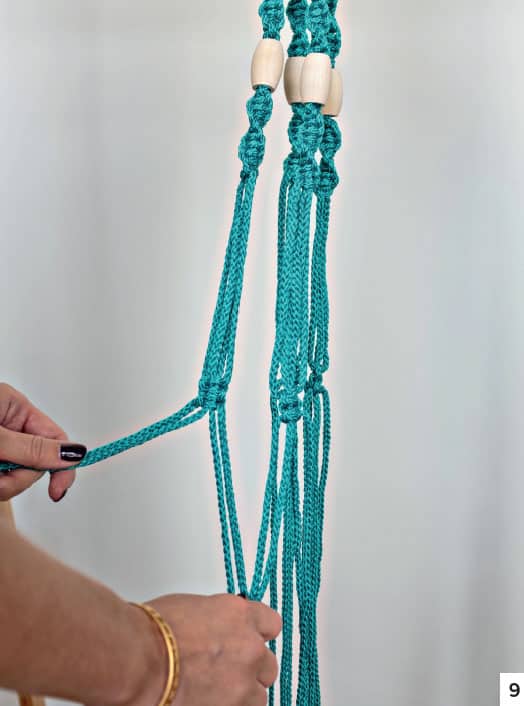
Step 10 Once all four sinnets are tied, repeat the step above, again skipping down 4" (10 cm) before tying the knots.
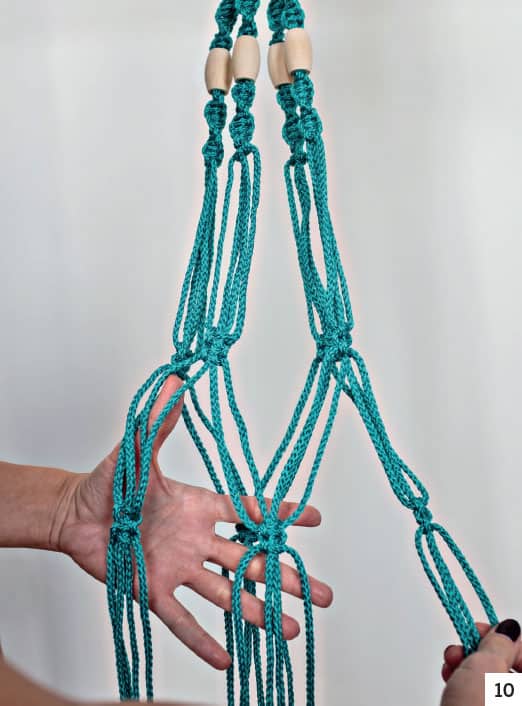
Step 11 Drop down 2" (5 cm) below the last square knots made and tie a wrap knot with the remaining 1-yard (91.4 cm) cord. Trim the ends of the cords evenly and let the ends fray naturally.
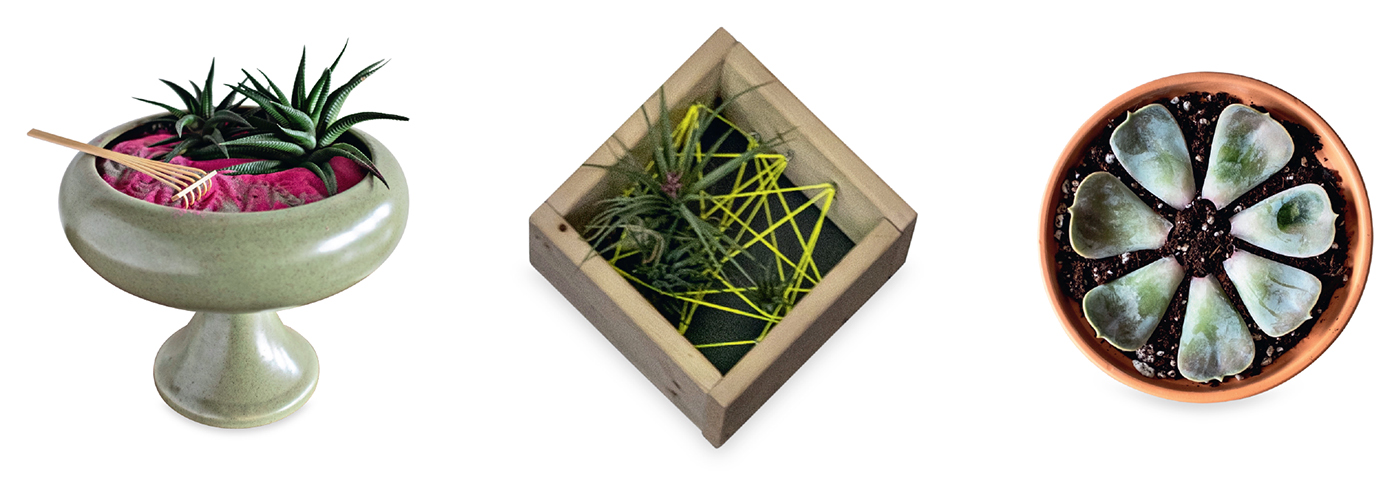
A HAWORTHIOPSIS ZEN GARDEN
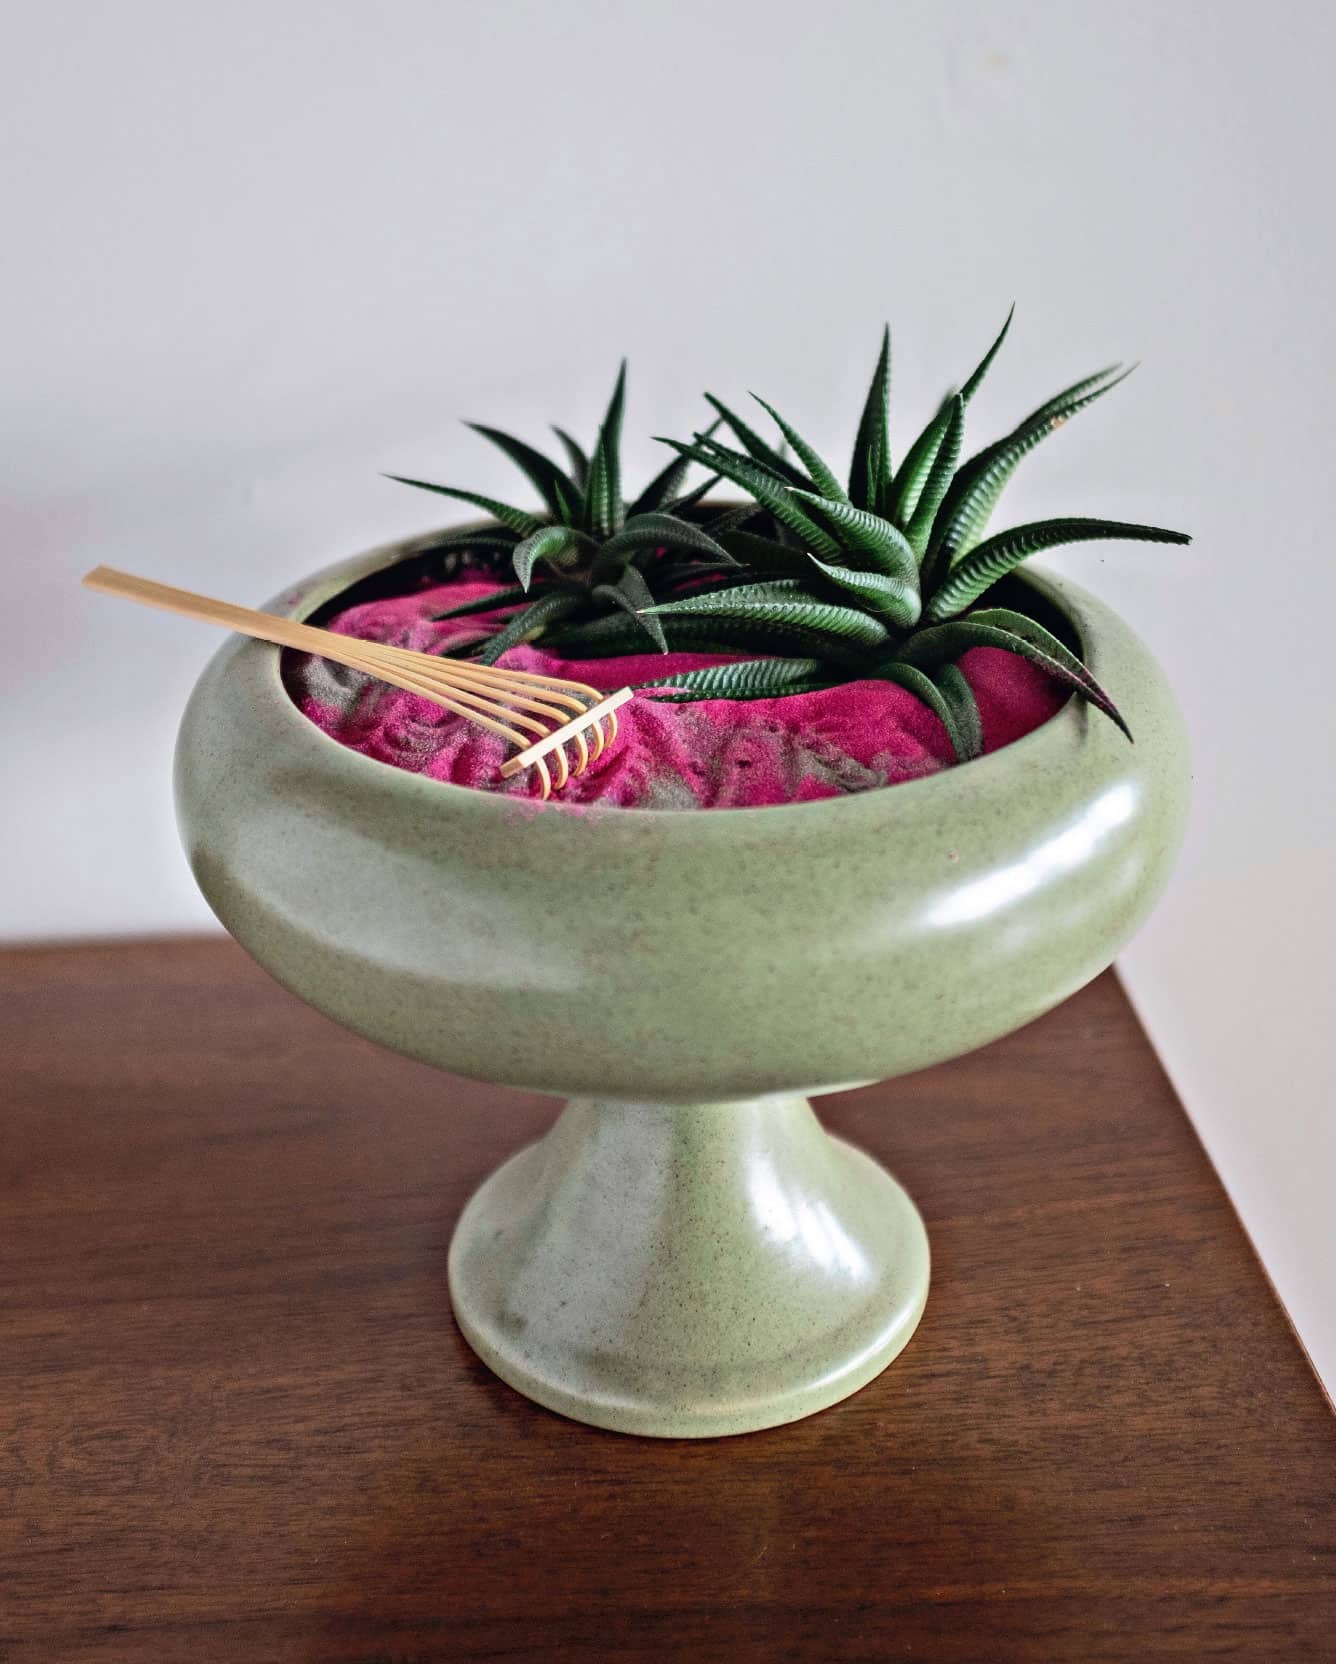
We all need to shut down, turn off social media, and contemplate life from time to time. As we know, that can be hard to do. This desk-sized Zen garden is a perfect way to do just that. What is a Zen garden, you ask? It is a small Japanese rock garden or “dry landscape” garden. It is usually an outside garden, with purposefully arranged rocks, water features, plants, and gravel or sand to rake.
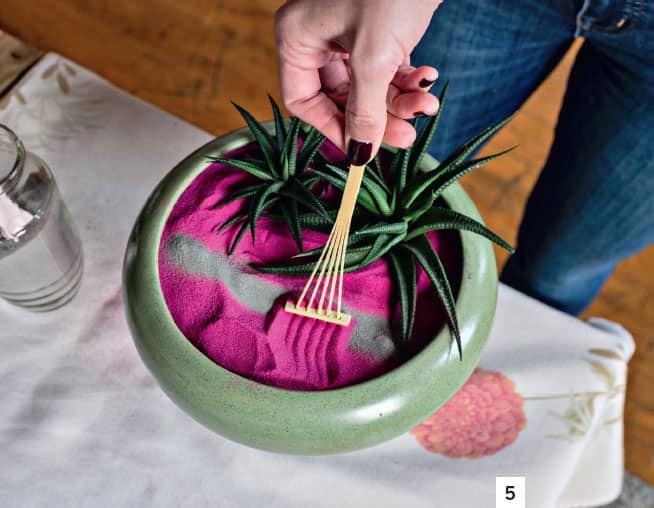
Many of these gardens are found at temples in Japan, where the priests often rake the gravel to help with concentration. The raking of the sand in a ripple pattern represents water. Rocks are usually a part of the garden, used to represent mountains, but because of the small scale of our garden, they haven’t been included. If you would like to add a small stone or two to make it more Zen-like, feel free to do so. This is your creation and there are no rules that must be followed.
Though this isn’t a true Zen garden, it does give us the same vibe. Place it on your desk, and when you are feeling stressed, pick up the rake, admire the plants, and let calmness enter your mind.
The plants we used are succulents that can withstand lower light levels than most. If your garden is in a medium to bright light, it should grow well.
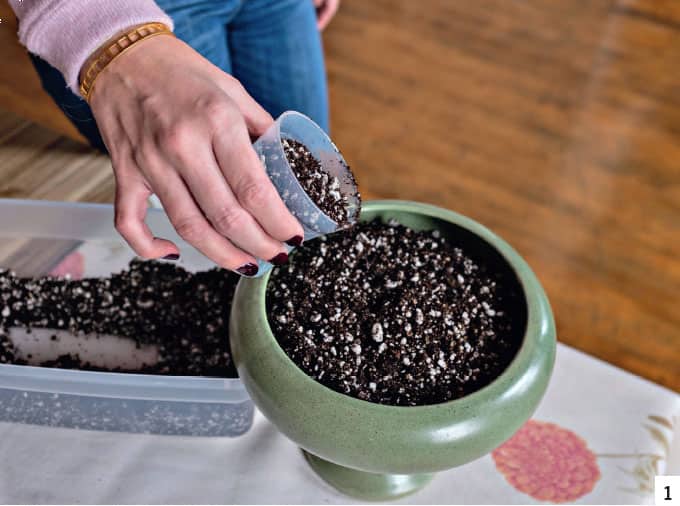
STEP 1 Add the cactus and succulent potting mix to your container. Leave approximately 1/2" to 1" (1 to 2.5 cm) of space at the top of the container for the sand. If the potting mix is too close to the top, the sand will wash over the side of the container when you’re watering the plants.
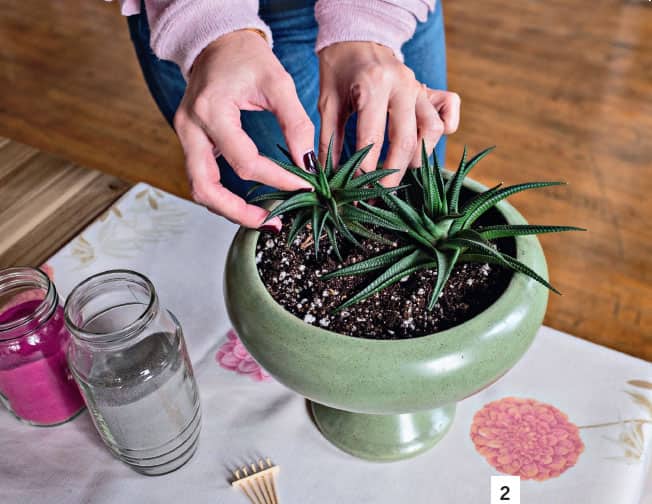
Step 2 Plant your haworthiopsis along one edge of the container. Carefully snuggle the plants in close to each other so you have more room for the sand area of the design. Lightly firm the soil around the plants and across the top of the container to make a level plane for the sand. Water the plants to settle them in.
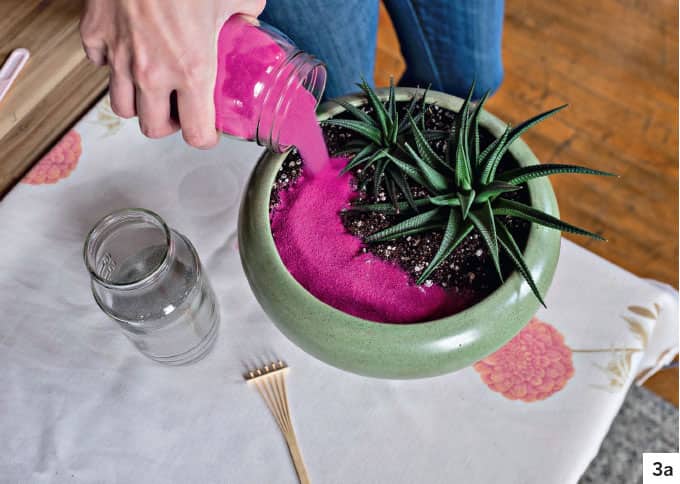
Step 3 Now it’s time to add the sand. I used two colors of sand, but plain- colored sand can also be used and is more in keeping with the Zen garden aesthetic. Use a funnel or small container to add the sand, being careful to keep the sand off the leaves of the plants, especially if colored sand is used.
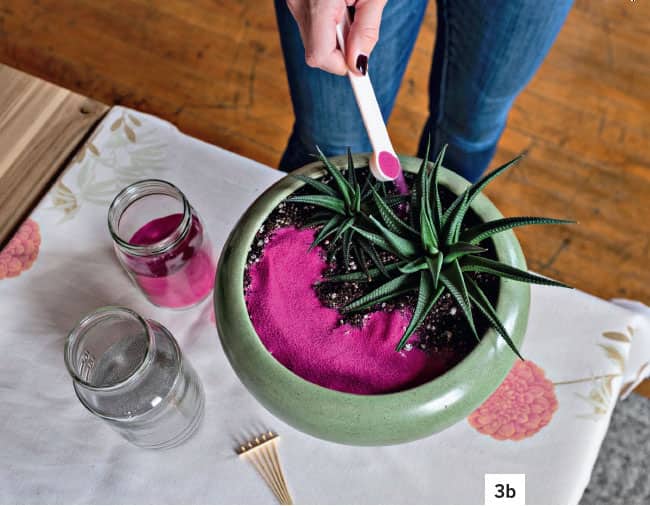
STEP 4 If you do get some sand on the leaves, use a small brush, such as a paint or makeup brush, to carefully sweep it off.
Step 5 Place your Zen garden on your desk or somewhere you’ll be able to use it often to settle your thoughts and bring calmness to your day.
TEST TUBE PROPAGATOR
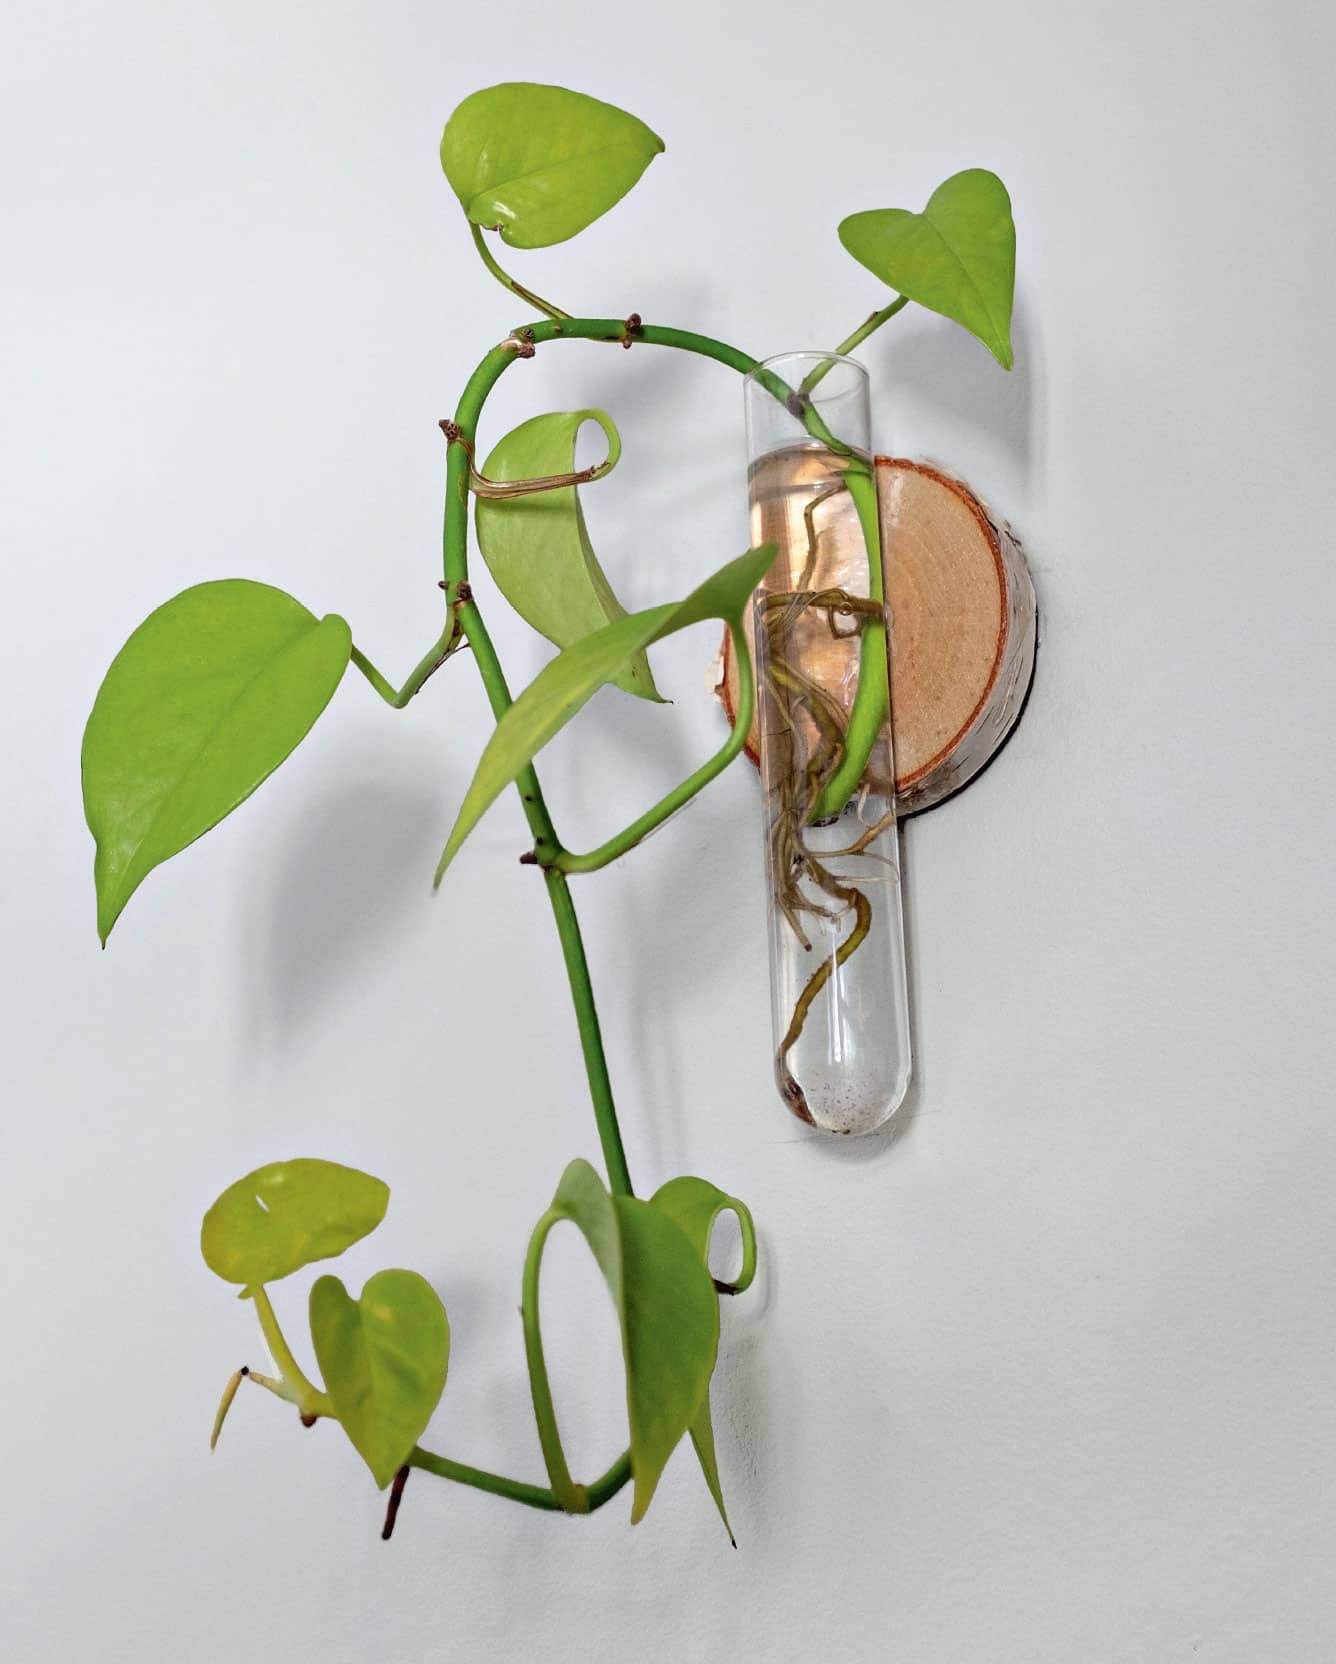
If your plants become long and straggly or look like they’re in need of a trim, you now have a great reason to start new plants! Trimming your plants helps them stay full and keeps them at a manageable size. When you trim a long stem off a vining plant—such as a pothos—a new stem will emerge near the cut area. The cuttings can be rooted directly in moist potting medium or in water.
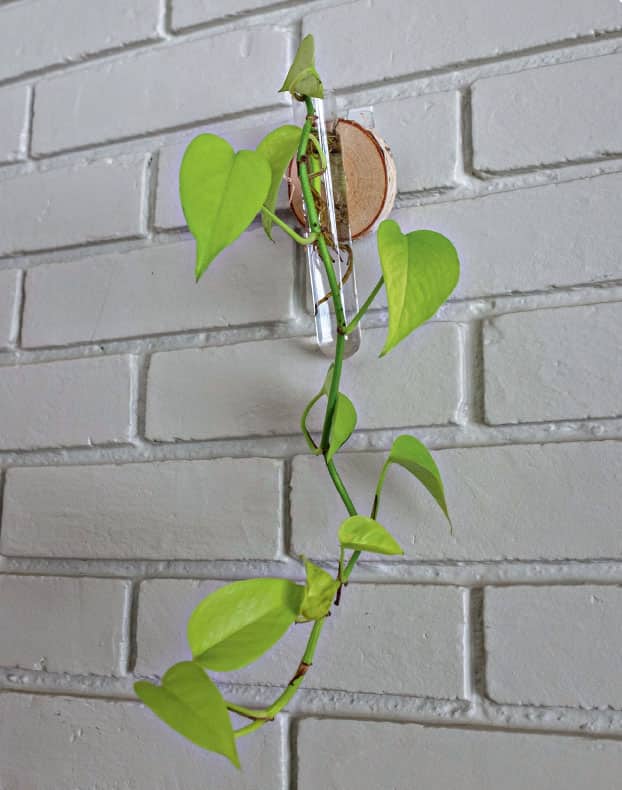
Rooting the stem pieces in water only requires a receptacle that holds water. You can use old spice bottles, small vases, or even drinking cups to root new plants, but why not use something that also doubles as artwork? These test tube propagators are a perfect fit. The tubes are attached to small pieces of wood and then hung on the wall. One is perfect for rooting a single cutting, but a whole wall of them can make a bold statement and hold multiple cuttings, creating a green wall. These propagators are simple and quick to make, and buying the supplies won’t break the bank.
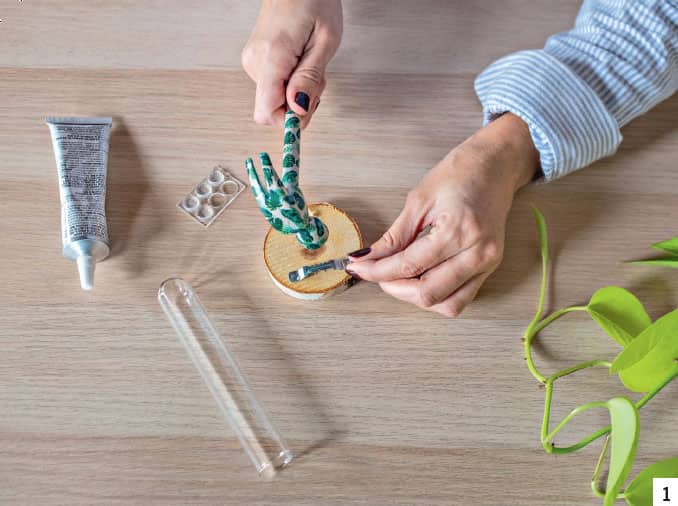
STEP 1 Gather your materials. Because you’ll be using glue, cover your work area with newspaper. Decide which side of the wood round you like best—this will be the front side, where you’ll attach the test tube. Turn it over and nail the sawtooth picture hanger at the top of the round. Add a bumper to the bottom of the round below the hanger so it will hang level on the wall.
STEP 2 Now turn the round over.
IMPORTANT: Make sure you have the sawtooth hanger level at the top before your glue your test tube on. If you don’t check, you may have a test tube that doesn’t hang straight. Imagine the sawtooth hanger on the back is the top of a T and the test tube is the leg of the T. Hold the test tube on the front of the wood round, and at the same time turn it to look at the back to make sure the test tube is perpendicular to the hanger. You can place the test tube top edge even with the wood round edge or raise it up an inch or so, or you can center the wood round in the center of the test tube. The placement of the tube on the wood round is up to you.
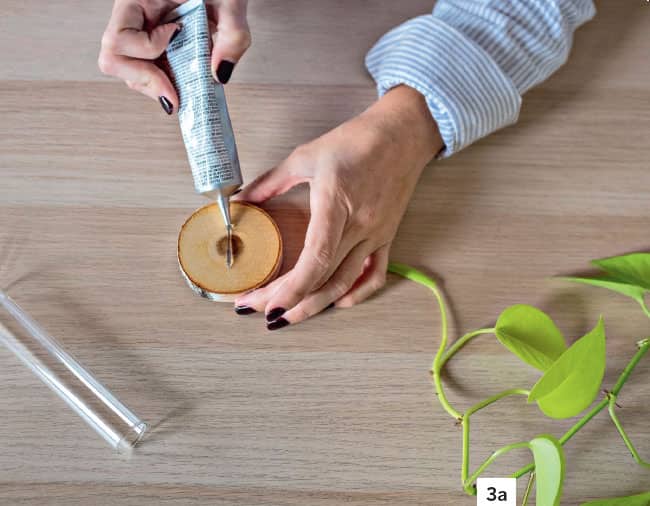
STEP 3 Carefully lay it down, remove the test tube, and run a generous line of glue down the center of the wood round. Place the test tube in the glue, pressing it firmly but carefully to make sure it has maximum contact with the glue. Don’t press too hard, or you may break the glass.
FYI: Do not use a hot glue gun. I tried it, and it worked for about an hour before the test tube fell off the wood and smashed into a million pieces on the floor.
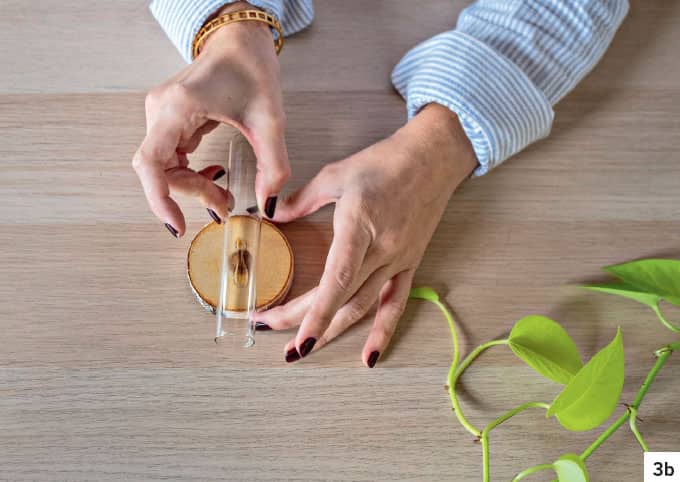
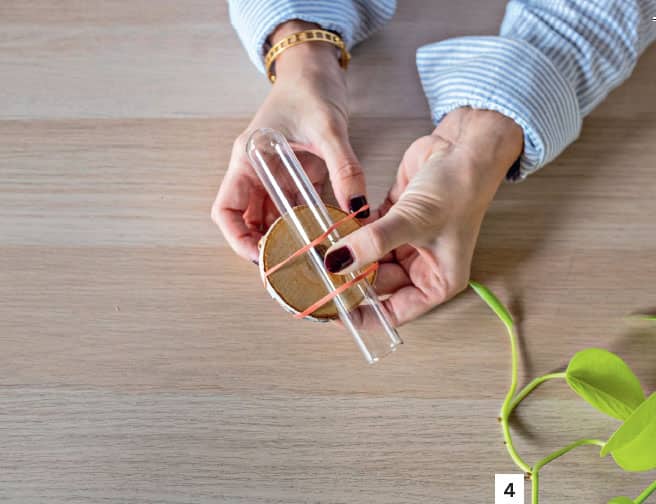
STEP 4 Carefully stretch the rubber bands around the test tube and wood piece to keep the test tube in place while the glue dries. Allow it to dry for a few hours (follow the directions on the glue container) before taking the rubber bands off.
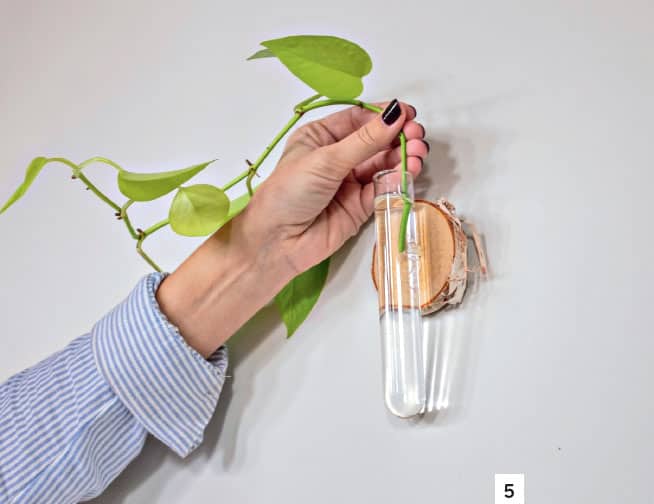
STEP 5 Add water and plant cuttings to the test tube, and you are ready to hang your propagator on the wall. Remember to keep adding water as needed, especially as the roots start to grow and use water.
RECYCLED TABLE KNIVES PLANT STAKES
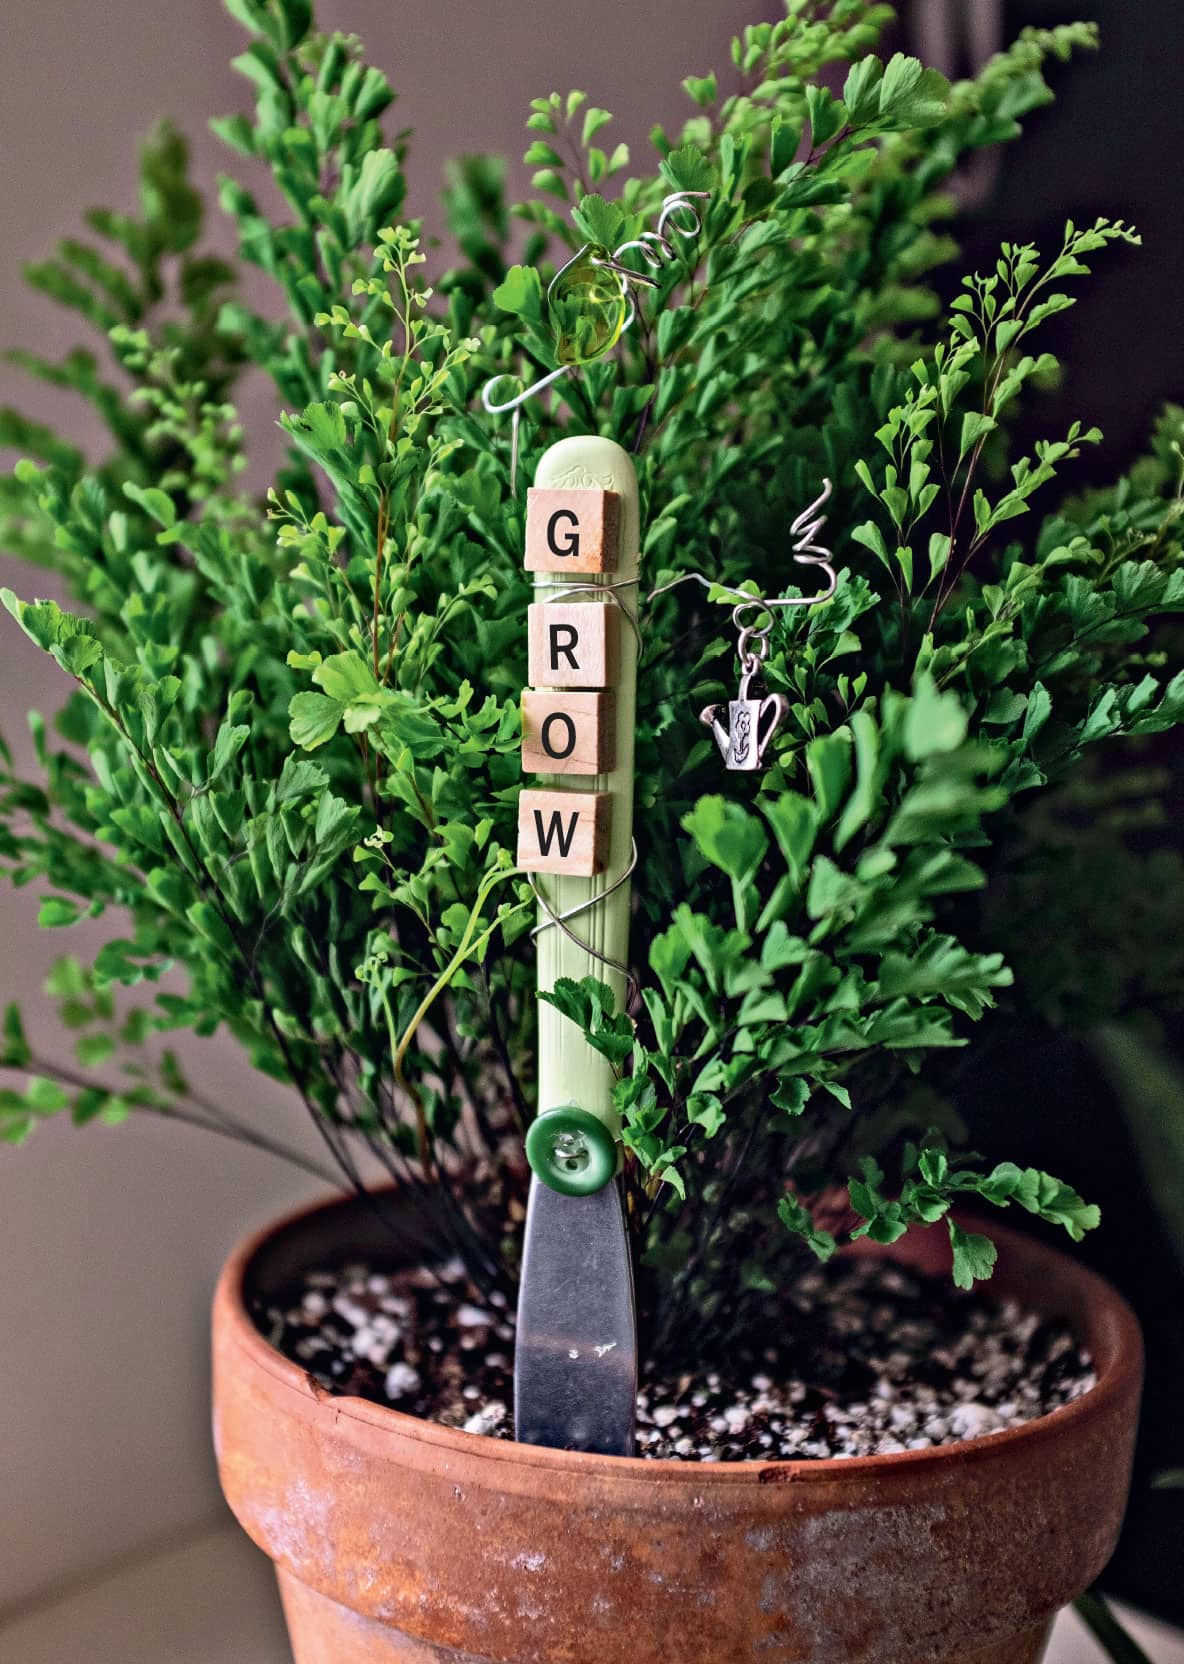
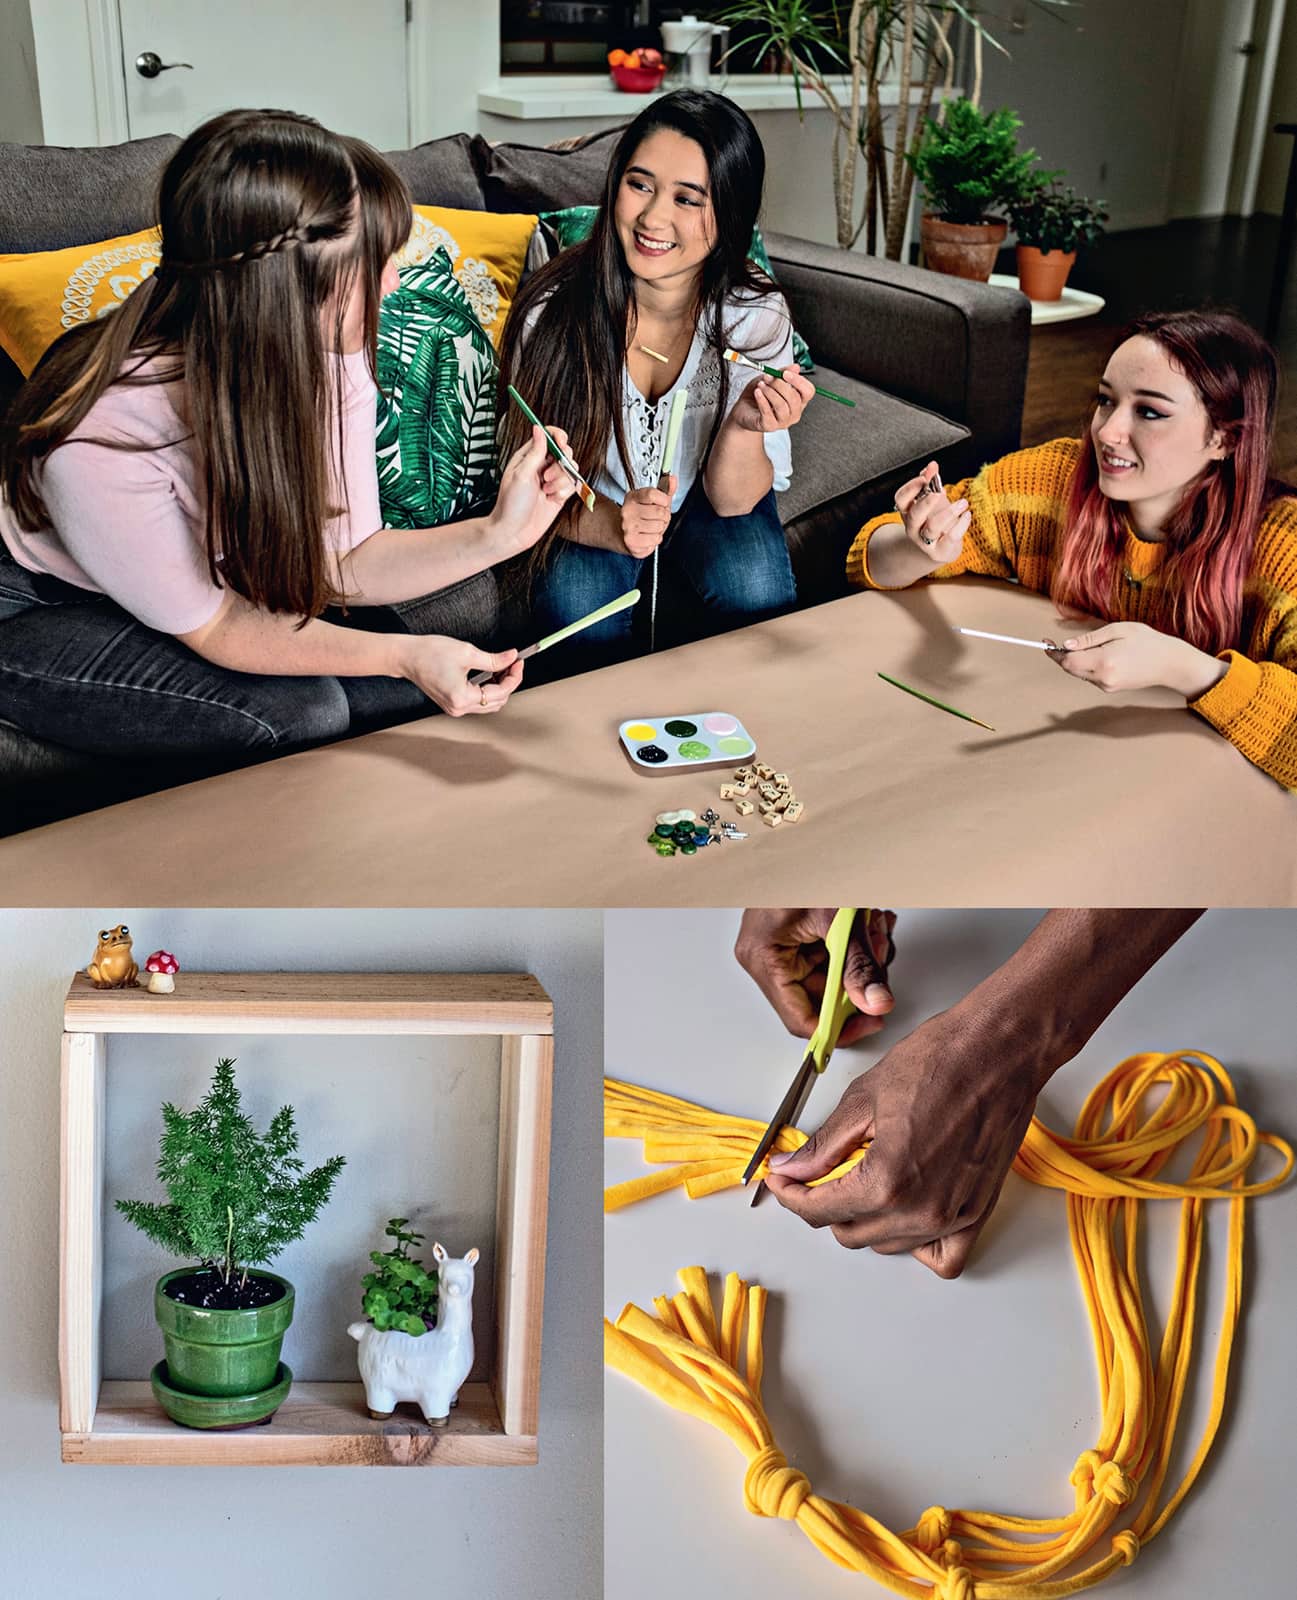
Do you name your plants? Perhaps you have Frank the fiddle-leaf or Phil the philodendron living in your bedroom? Or maybe you’re just looking for a way to remember the botanical names of your plant babies. Yes, you could keep the tag that comes with the plant, but sometimes plants don’t have tags or you tend to“misplace” them. Plus, let’s face it, those plastic tags aren’t all that attractive. This is a fun way to remember the name of your plant, and it includes using something that might otherwise be thrown away. In this project, you’ll upcycle table knives into decorative plant stakes. Thrift stores usually have bins of inexpensive silverware, so you can buy multiples. When choosing your knife, look for the largest handle you can find so there’s more room to decorate. Then the fun begins! This is a great project to create with a group. Share paint and decorations with friends and have a fun evening crafting for your plants.
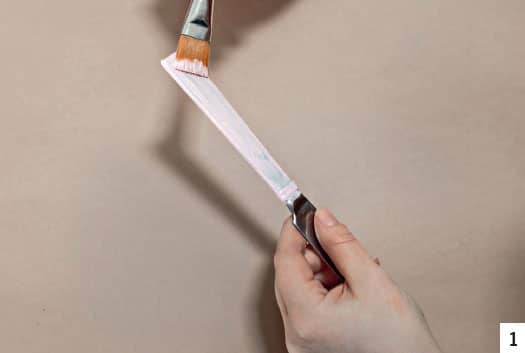
STEP 1 Paint your knife handle and allow it to dry, placing it in an upright position. If you’re applying outdoor sealer, do so at this time and let it dry. (Note: The outdoor sealer is not necessary, but it does help keep the paint from chipping off.)
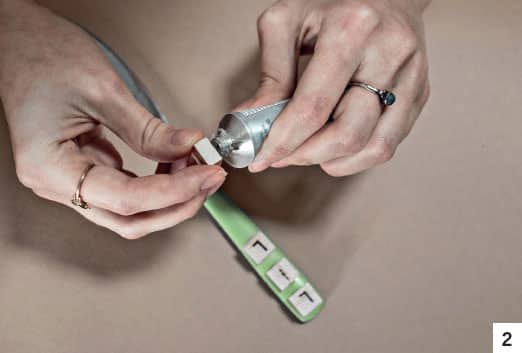
Step 2 Place your alphabet tiles on the handle first to ensure spacing and fit. Place a small amount of glue on each tile and attach it to the knife. Leave the knife lying flat until the glue is dry. This keeps the tiles from shifting or sliding off. (Note: Use caution when using the glue. Do not get it on your hands, clothes, or furniture.)
Step 3 Cut a piece of wire approximately 24" (61 cm) long. Select a button or bead and string the wire through it until it is in the middle of the wire. Put a drop of glue on the button or bead and attach it to the handle of the knife right where the blade ends and the handle begins. Bring both ends of the wire to the back of the handle and twist it to keep the button in place. Let the glue dry. Now you are ready to crisscross the wire up the knife handle. Cross the ends over the front of the knife, bring them to the back again, and twist to secure. Bring the wire back to the front and crisscross it again. If you have written a word or glued tiles on, make sure your crosses occur between the letters. Twist the wire again on the back, and bend the leftover ends of the wire out to either side of the knife.
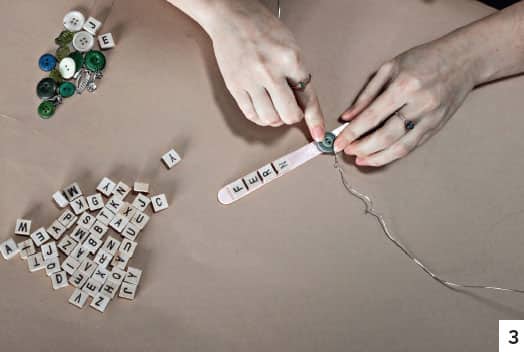
Step 4 Twist one side of the extra wire around the handle of a small paintbrush to make a loop, add the charm or bead, and squeeze the loop together to secure the charm.
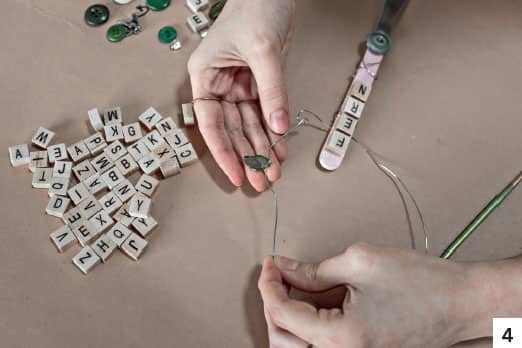
Step 5 Twist the excess wire around the paintbrush handle to make a spring-like decoration, and cut off the excess wire. (Twisting the wire around the paintbrush handle is for decorative purposes only; you could choose to attach the charm or bead and then cut off the excess wire.)
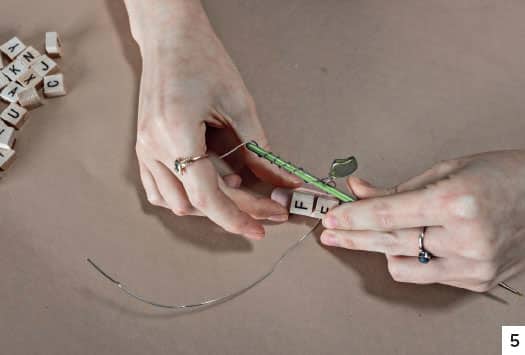
Step 6 Repeat the directions above on the wire from the opposite side, adding another bead or charm if you wish.
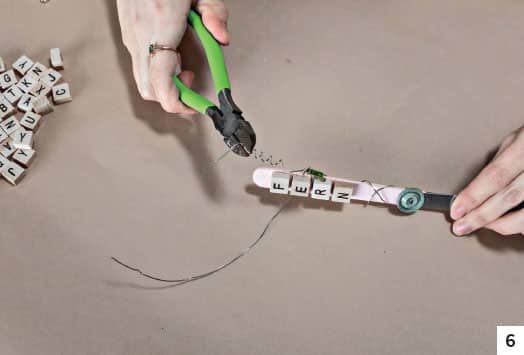
The fun of making these plant stakes is that you can use your imagination and creativity to make them your own, combining the paint, tiles, wire, and charms, or keeping them simple.
WOODEN PLANT TRELLIS
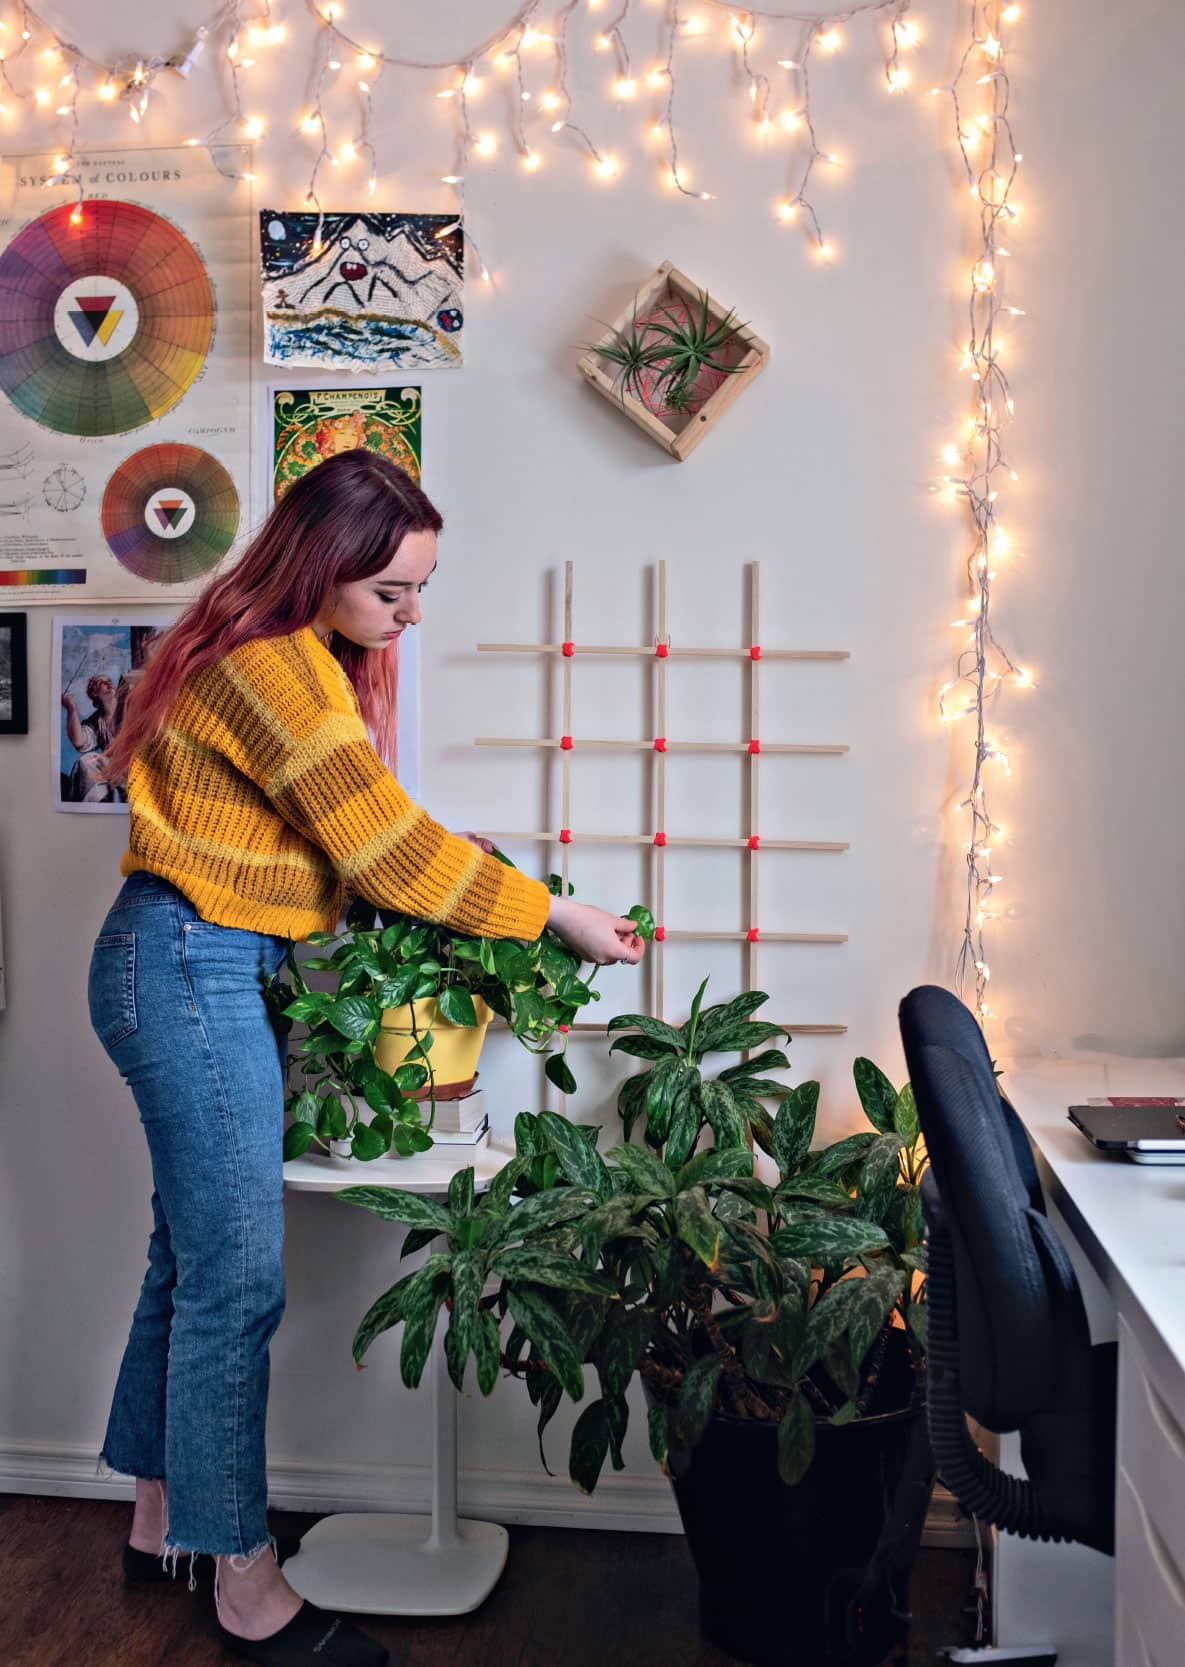
Do you have a plant with long tendrils you don’t know what to do with? Are you tired of stepping on it or watching your cat bat at it? You could make a macramé hanger (see here) and suspend it from the ceiling. Or, you could use it to make a living wall. This project uses wooden dowels to build a trellis your plant will love scrambling through. It can be hung on the wall or even the ceiling. By using removable adhesive hooks, it’s possible to hang it anywhere and then remove it easily (carefully taking the plant off it first, of course!). This indoor trellis could also be inserted into a large container rather than being hung on a wall. If that’s how you’d like to use your trellis, use wooden dowels made of cedar that can better withstand the constant moisture in the soil without rotting.
STEP 1 If the ends of your dowels are color-coded by size, use a piece of sandpaper to remove as much of the paint as possible.
Step 2 Cut the five horizontal cross bars 21∆" (54 cm) long. This length allows for a 5” (13 cm) overhang on each side and accounts for the 3/8" (9.5 mm) width of each vertical dowel.
Step 3 Lay three 36" (91.5 cm) dowels parallel to each other and 5" (13 cm) apart on your work surface. Make sure they are even at the top. Use small pieces of painter’s tape to firmly attach the three dowels to the surface you’re working on. This is a big help, especially when attaching the first horizontal dowel.

Step 4 Lay the first horizontal 21∆" (54 cm) dowel across the three vertical dowels 5" (13 cm) down from the top. The horizontal dowel will extend out 5" (13 cm) on each side of the vertical dowels. I used a small amount of glue at each spot where the dowels intersect for added stability. It is not crucial but helpful.
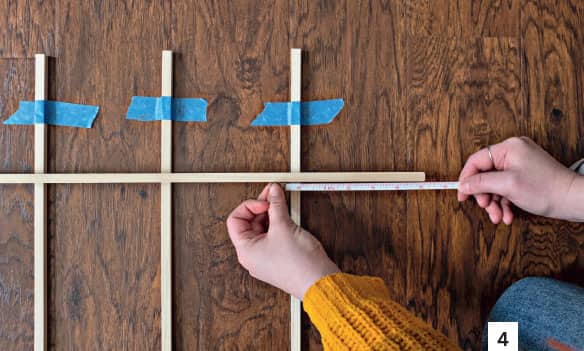
Step 5 Nail the dowels together in the three places where they cross each other. Make sure to center the nail as close as possible to the middle of the two intersecting dowels. Otherwise, the nail may come out the side or split the wood. Continue adding the remaining four dowels in 5" (13 cm) increments down the trellis’s length.

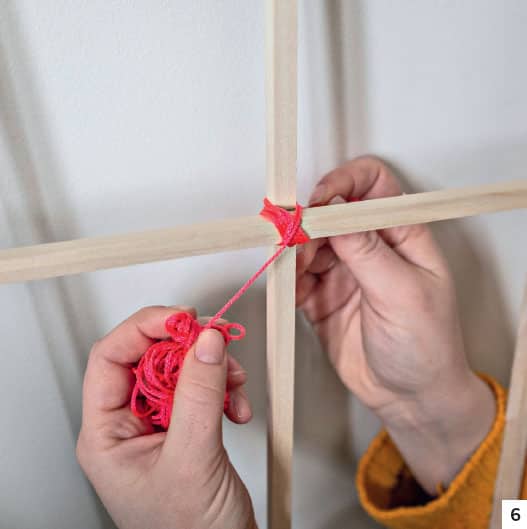
Step 6 Use colored twine to cover the nails and give the trellis the appearance of being tied together at the junctions. The twine isn’t necessary, but it adds some color to the trellis without taking too much attention from the plant. Use different colors of twine on every intersection to make it really unique.
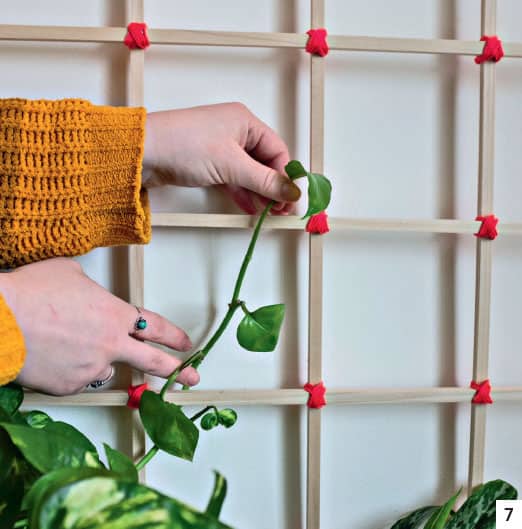
Step 7 Using the removable adhesive hooks, hang your trellis on the wall. Carefully weave the long plant tendrils through the openings, trying not to bend or break them. If you have a plant on a shelf, hang the trellis from the ceiling. No matter where you place your trellis or how you decorate it, I guarantee your plant will love climbing through it!
SWINGING PLANT HANGER
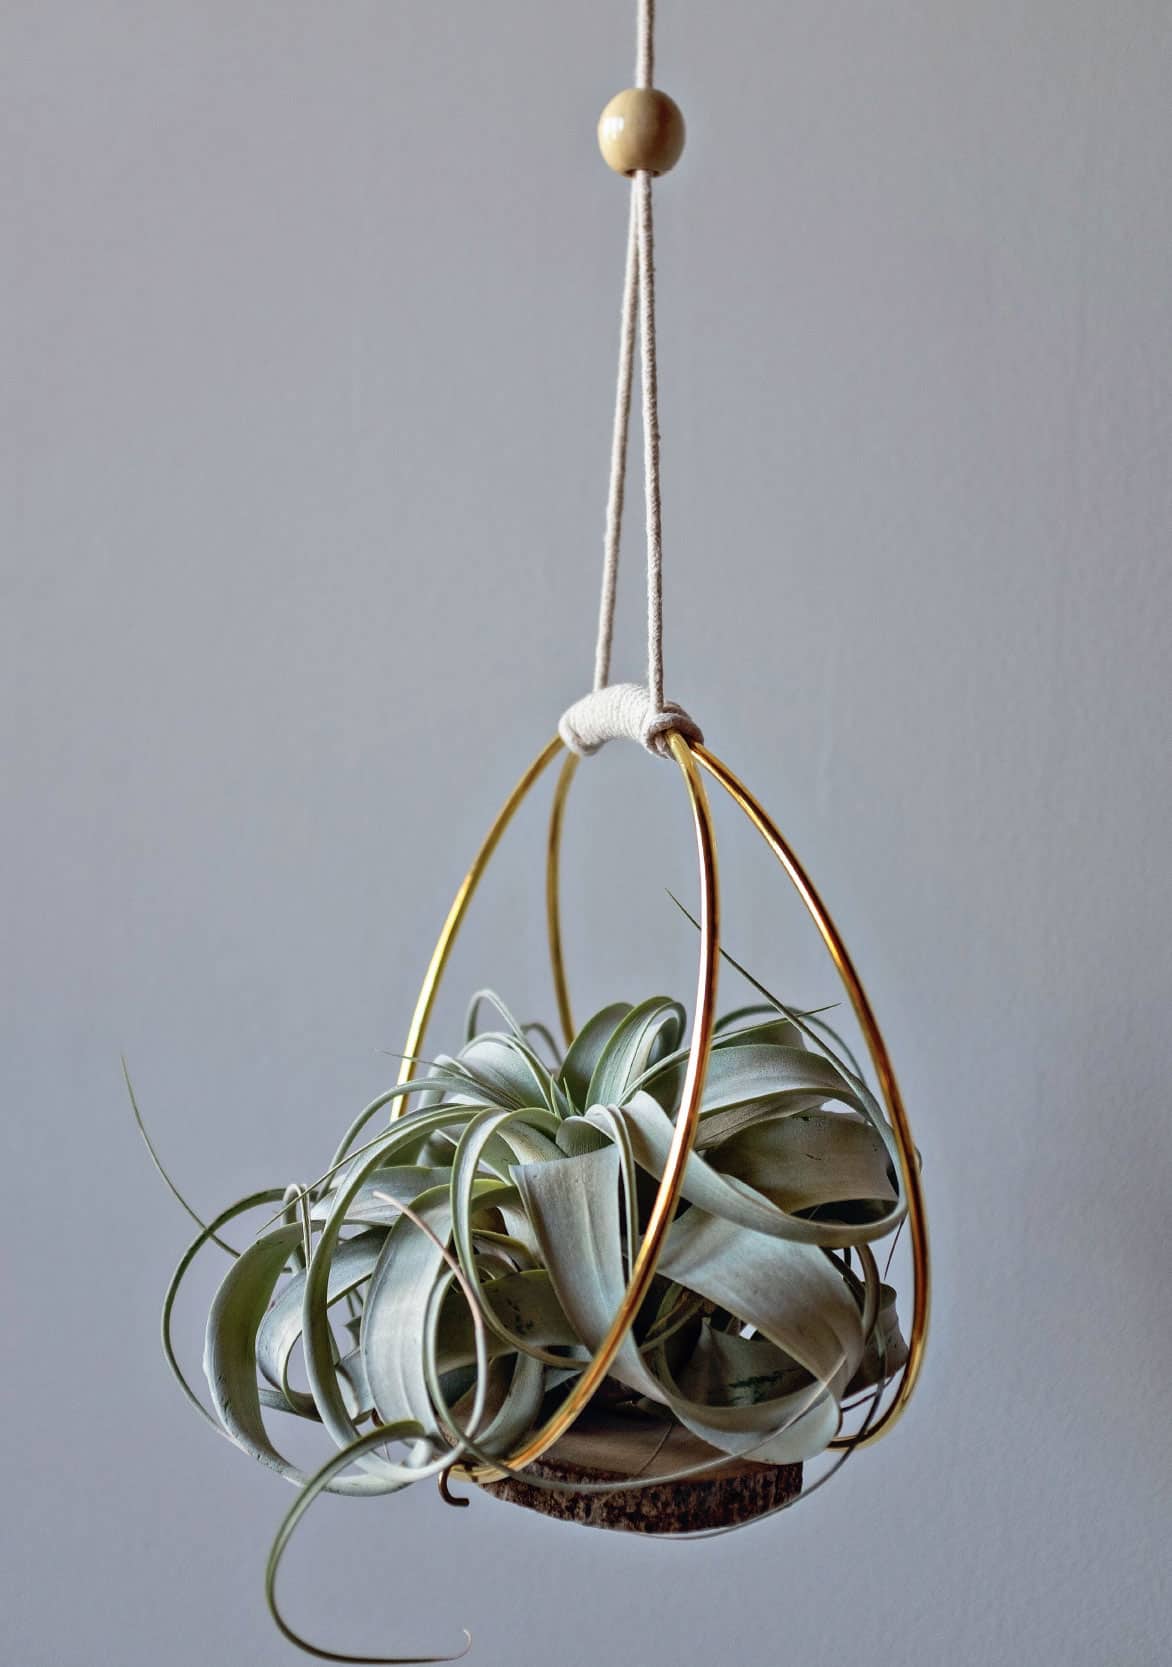
Have you been looking for a different kind of plant hanger to mix in with your macramé? This swinging hanger is a simple project to make and a unique way to show off your plants. The juxtaposition of the wood, metal, and string is unique. You can create this hanger in less than an hour, and your plant can be displayed in no time. This is the perfect perch for an air plant or for a plant your kitty has been batting at.
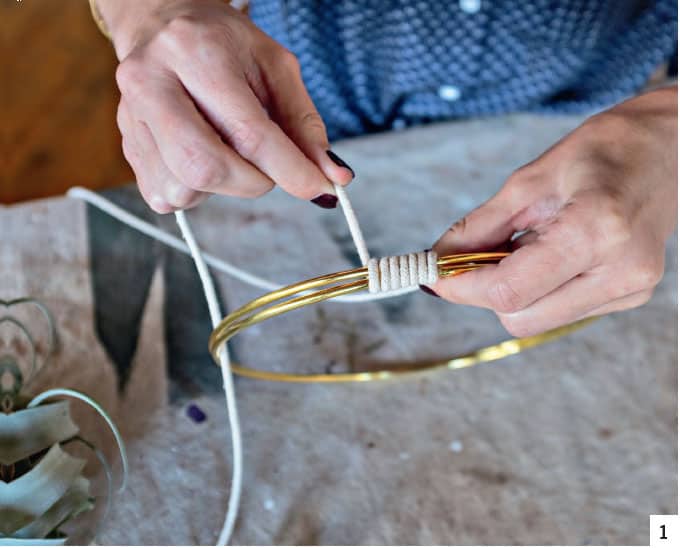
STEP 1 Place the two rings together on your work surface. Fold the 3-yard (2.7-m) cord in half and bring one end through both rings, stopping with the center of the cord at the top of the rings. The two ends of the cord will be used separately. Using one end of the cord, wrap the cord tightly around the two rings for 11/2" (4 cm) along the rings.
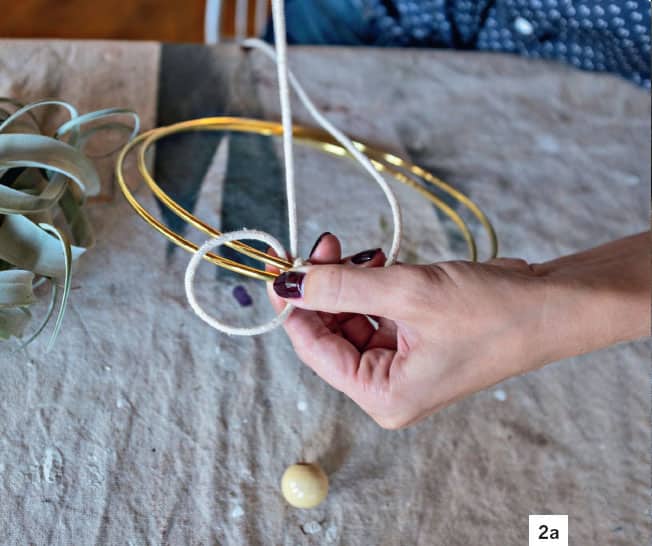
Step 2 Leaving the last wrap loose, bring the end of the cord around the rings, thread it through the loop, and pull tightly. This keeps the cord from loosening up on the rings.
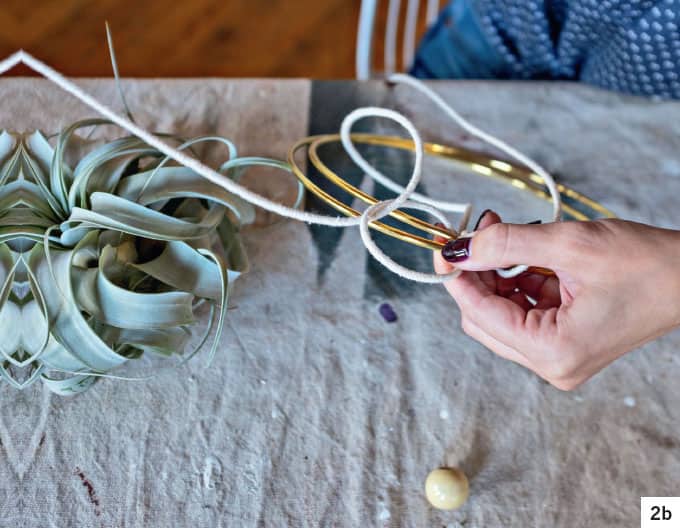
Step 3 Using the other end of the cord, wrap the cord around the rings 11/2" (4 cm) the opposite way, again keeping the last wrap loose, threading the end of the cord through as before and pulling tightly. You now have 3" (7.5 cm) of wrapped cord across the top of the rings with the loose ends of the cord on each end.
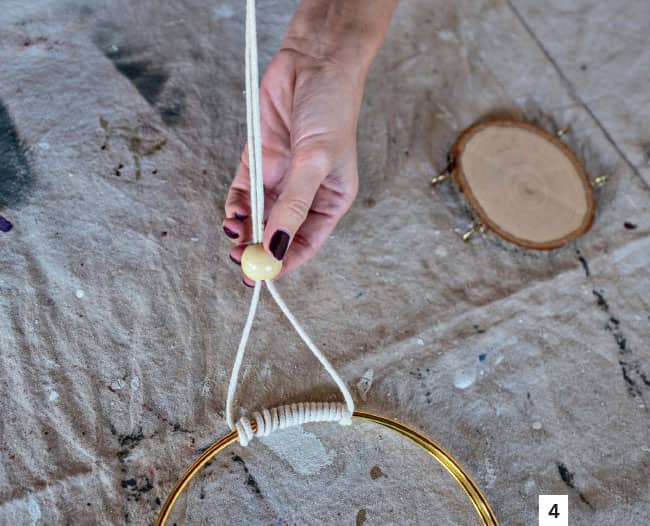
Step 4 Bring the two cords together and, using the large macramé bead, thread the bead over the two cord ends. Using the two cords, tie a knot at the level where you would like it to hang. Cut off the excess cord or leave it to hang, in case you need to change the height of the hanger later. (If you would like a much longer hanger to accommodate a loft with tall ceilings, just use a longer piece of cord from the beginning.)
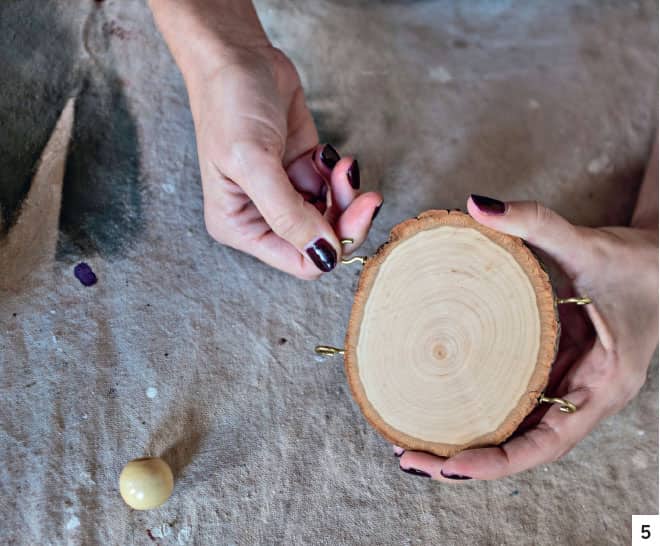
Step 5 Now we are ready to add the wood round to the bottom of the rings. It works best if you first hold the wood round between the two rings to see where it is best to place the four hooks, as every piece of wood will be a different shape. The cup hooks need to be able to hook over the rings, so choose the place to attach them carefully. You may want to mark the spots with a marker. Screw the hooks into the side of the wood round, making sure all the hook openings are pointed down.
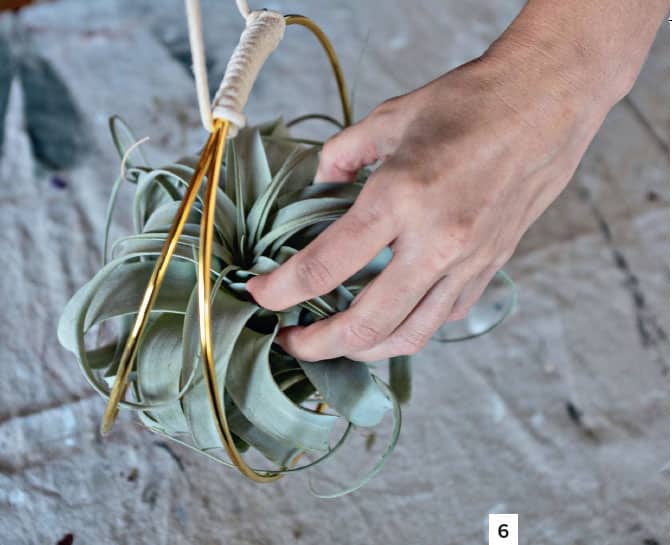
Step 6 Place the cup hooks over the rings, and you’re done!
KOKEDAMA
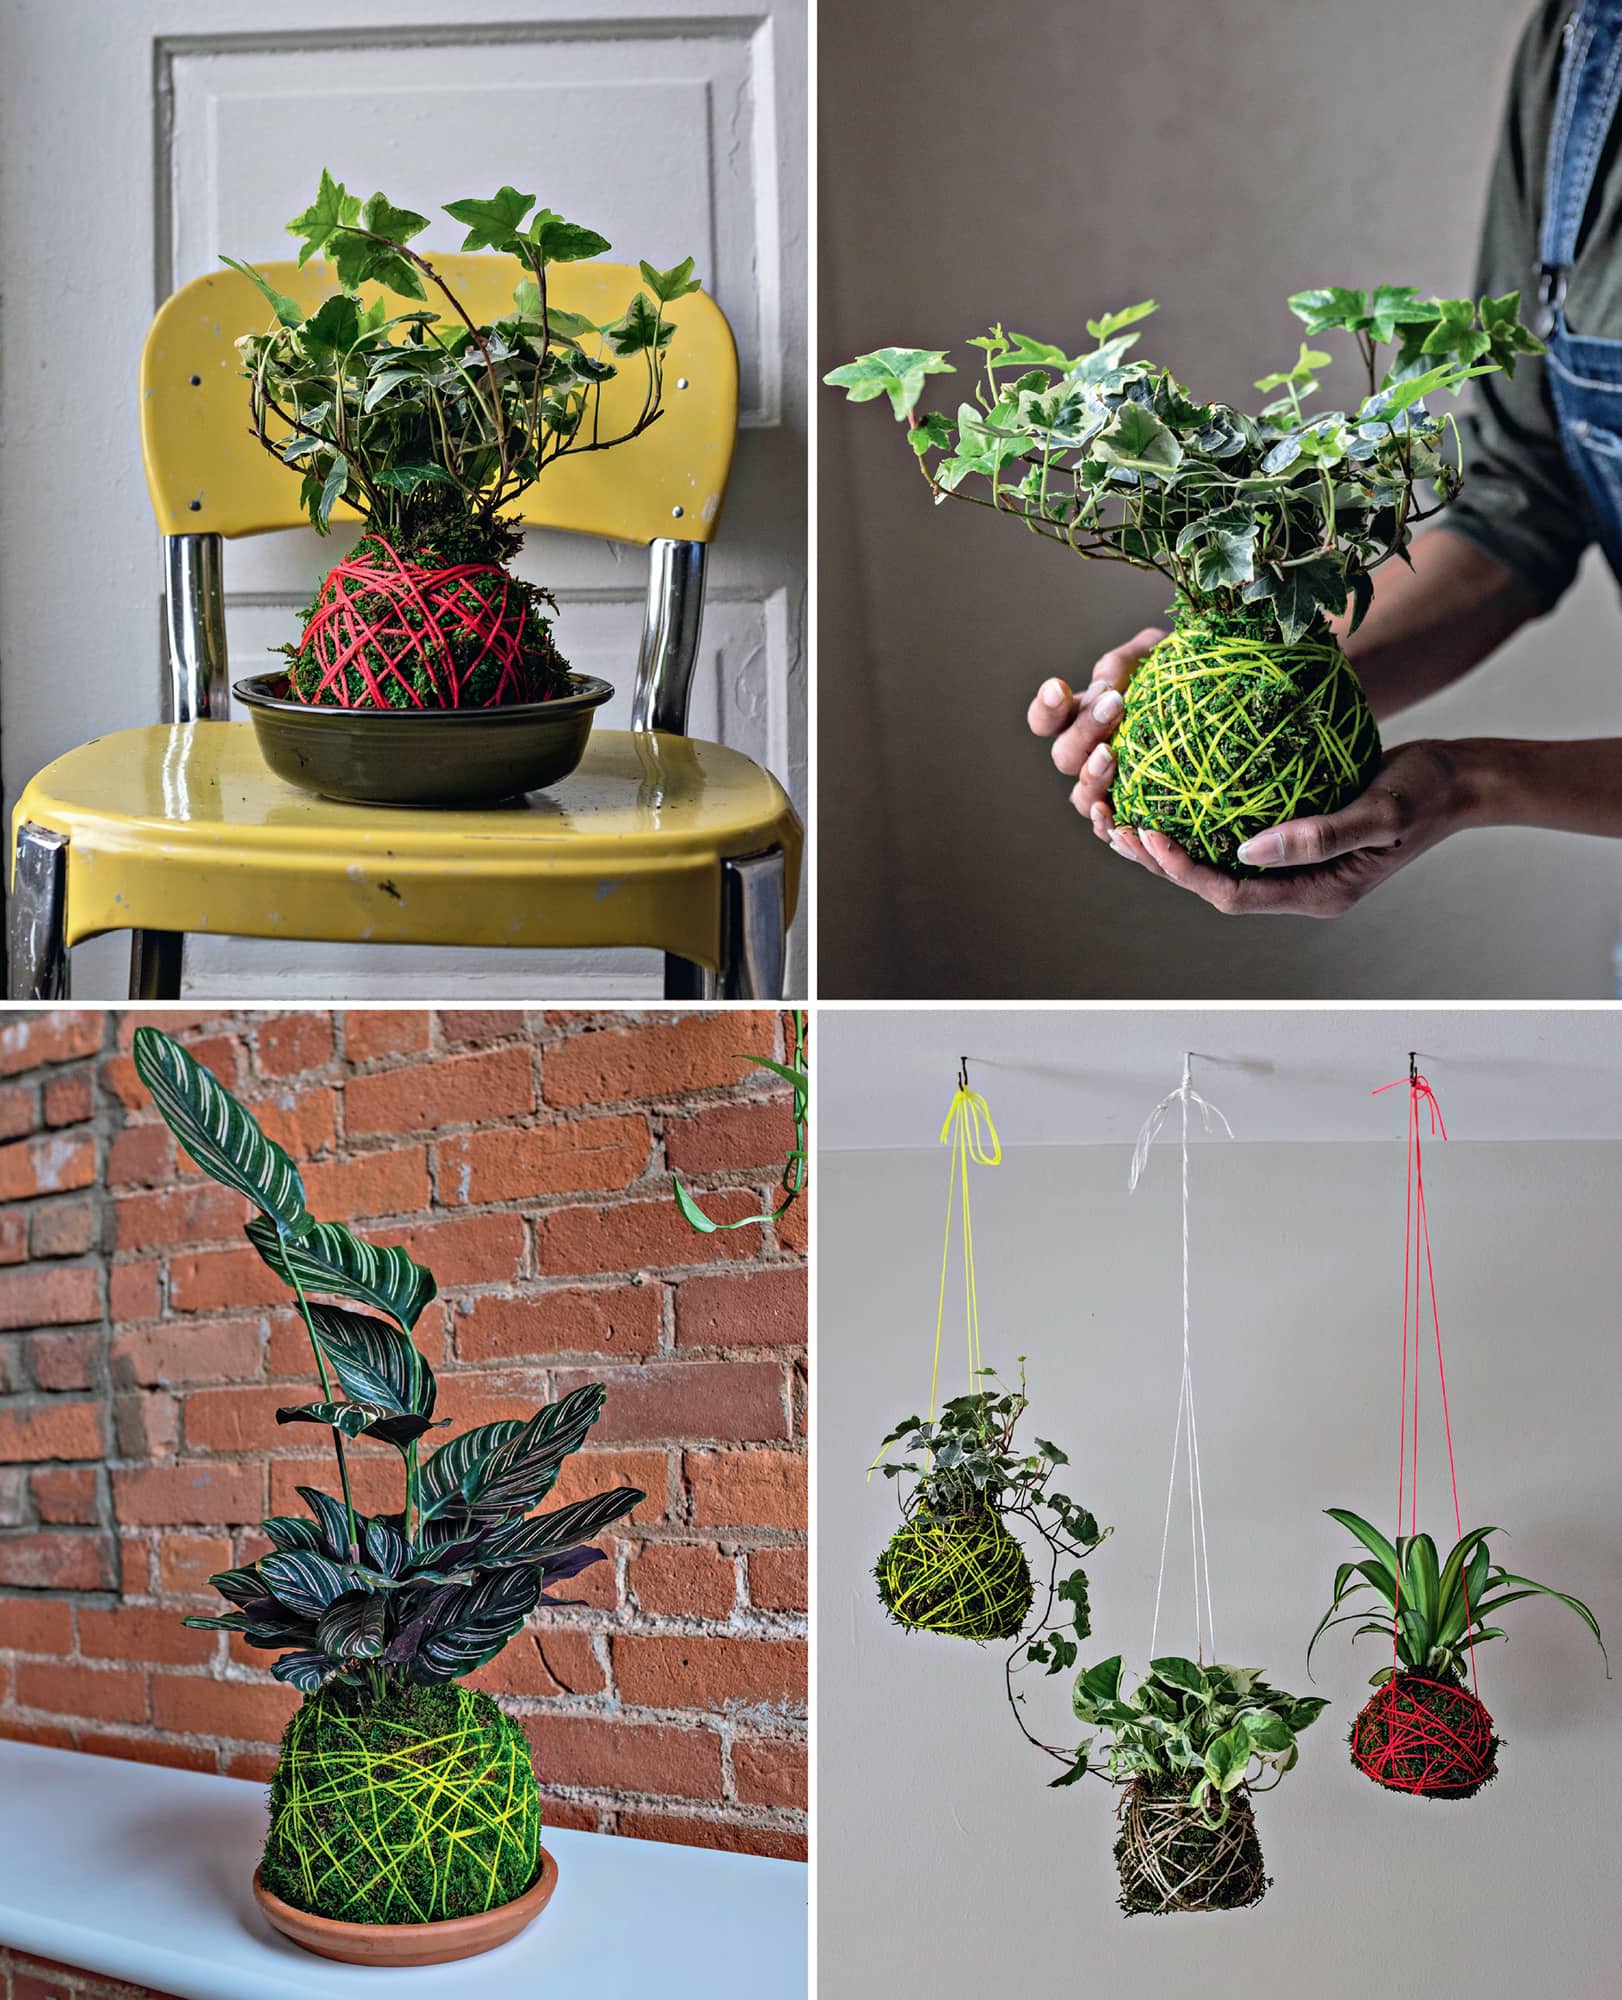
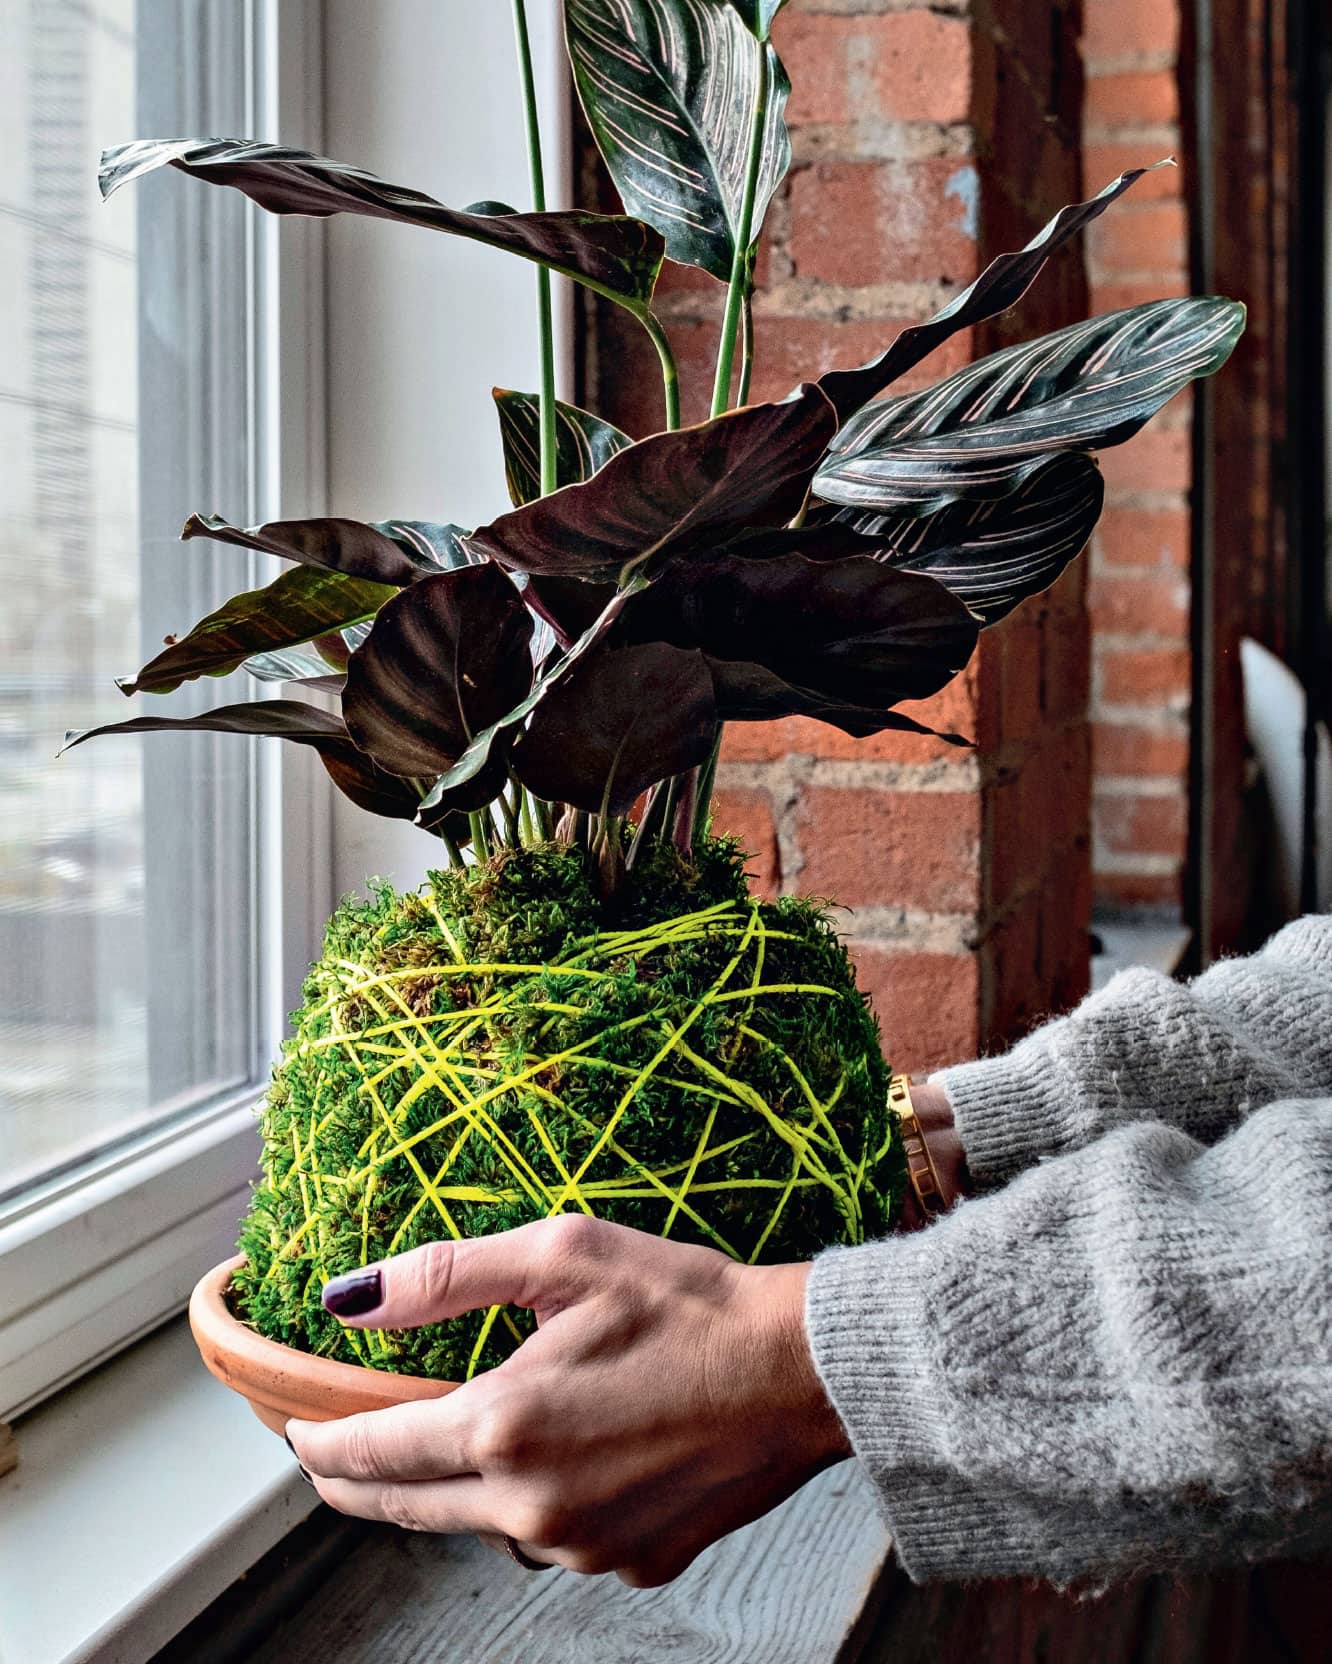
String gardens have become popular on social media, but if you haven’t seen one yet, a string garden is a grouping of kokedama balls suspended from string to make a garden. In Japanese, kokedama means “moss ball.” It is simply a plant that has its roots wrapped in moss instead of being grown in a traditional container.
Kokedama can be displayed by being hung or placed in a shallow dish. It’s an interesting and unique way to display houseplants. Any plant can be used for kokedama, but make sure the plant you want to use will grow well where you want to display it. Because the root system is only contained in moss, it will dry out more quickly than it would in a container. You’ll have to water your kokedama more often than your plants in containers, so using a plant in high light, where the plant would require more water, may not be the best choice. If you are someone who likes to water, go for it. Otherwise, choose a medium- to low-light plant to place in a lower light level so you won’t have to water as often. I hang a trio of these on my front porch every summer. They receive morning sun and are protected from the wind, so I only have to water them every few days. I take them down and soak them in a large pan of water until I know they have become completely moistened. They can drip on my porch, but when you water them inside, they’ll have to be left in the sink or shower until they’re done dripping. This is a project that is fun to do with friends. Gather all the supplies, have them bring a plant of their choosing, and make an evening of it!
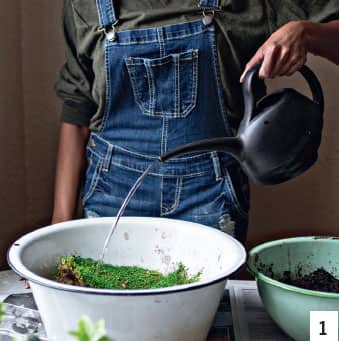
STEP 1 Lay down newspapers or plastic to protect your work surface from mud and water. Disposable gloves are a good idea to protect your hands. Soak your sheet moss in a bowl of water to make it easier to work with. Add water to the soil you are working with too, so that it holds together when you form the soil ball to wrap the roots with.
Step 2 Take your plant out of its pot and remove most of the potting medium from around the roots, being careful not to damage them or the plant.
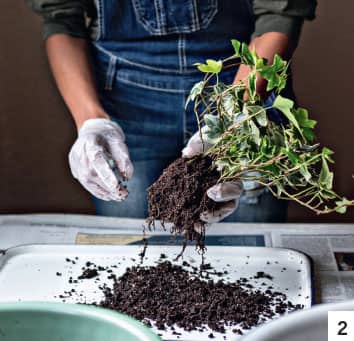
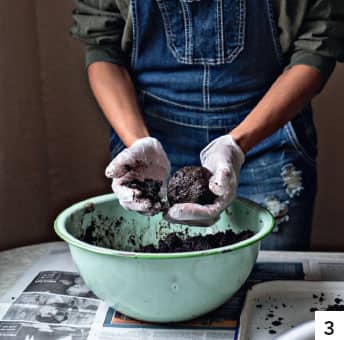
Step 3 Make a firm ball of heavy potting soil (I use bagged topsoil) that doesn’t fall apart. Many kokedama sources call for something called akadama soil. This is a clay soil that holds water and helps hold the ball shape. It’s often used in bonsai soils. Akadama isn’t readily available and is a bit costly. I have been making kokedama balls for years and have never had a problem with using topsoil.
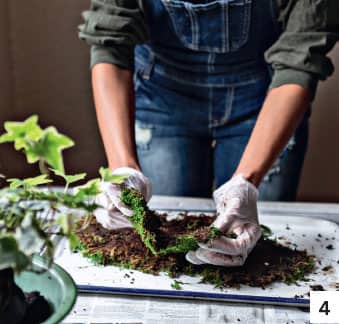
STEP 4 Squeeze the excess water out of the moss and lay out a circle of wet sheet moss large enough to cover the root ball. The green part of the moss will be facing down so that when the root ball is wrapped, the green side will be showing.
STEP 5 Split the soil ball in half and add one half to each side of the root ball of your chosen plant.
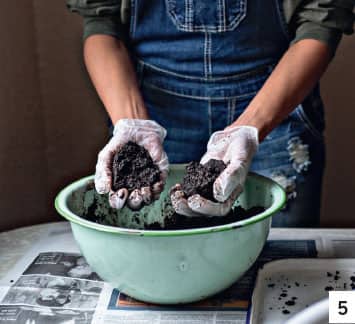
Step 6 Gently squeeze it back together, forming a sphere.
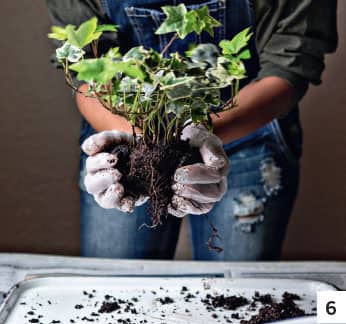
Step 7 Set your plant in the center of the moss and bring the sheet moss up around the root ball. Make sure the entire root ball is covered, but not the stems of the plant.
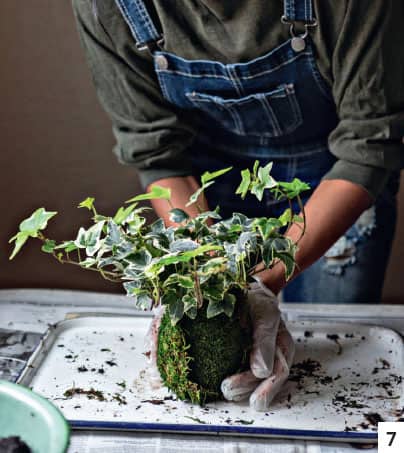
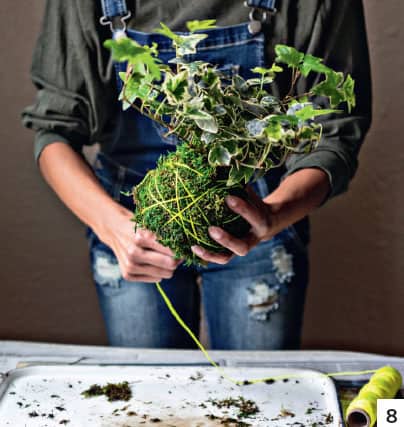
Step 8 Wrap your thread around the middle of the ball and tie a knot to secure it. Tuck the short end in as you start wrapping the long end. Wrap the ball, turning it as you go to make sure the ball is sufficiently covered. The twine should be wrapped snugly around the ball so that it doesn’t become too loose when the ball dries out, but not tight enough to damage the plant roots.
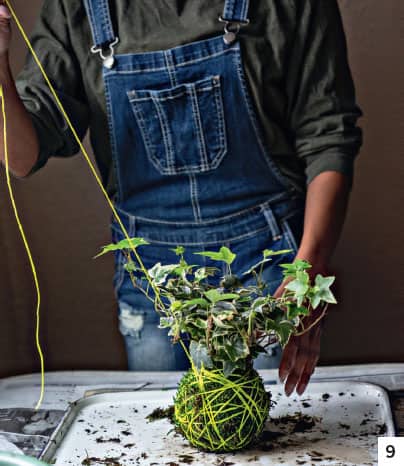
Step 9 If you’d like to hang your kokedama ball, cut three or four equal-length pieces of cord. Cut the cord long enough to be able to hang your kokedama at the height you would like it. Knot each string to the wrapping cords at different spots around the ball so that it hangs evenly. Knot the strings together toward the top, and you are ready to hang your kokedama.
GRAFTING CACTI
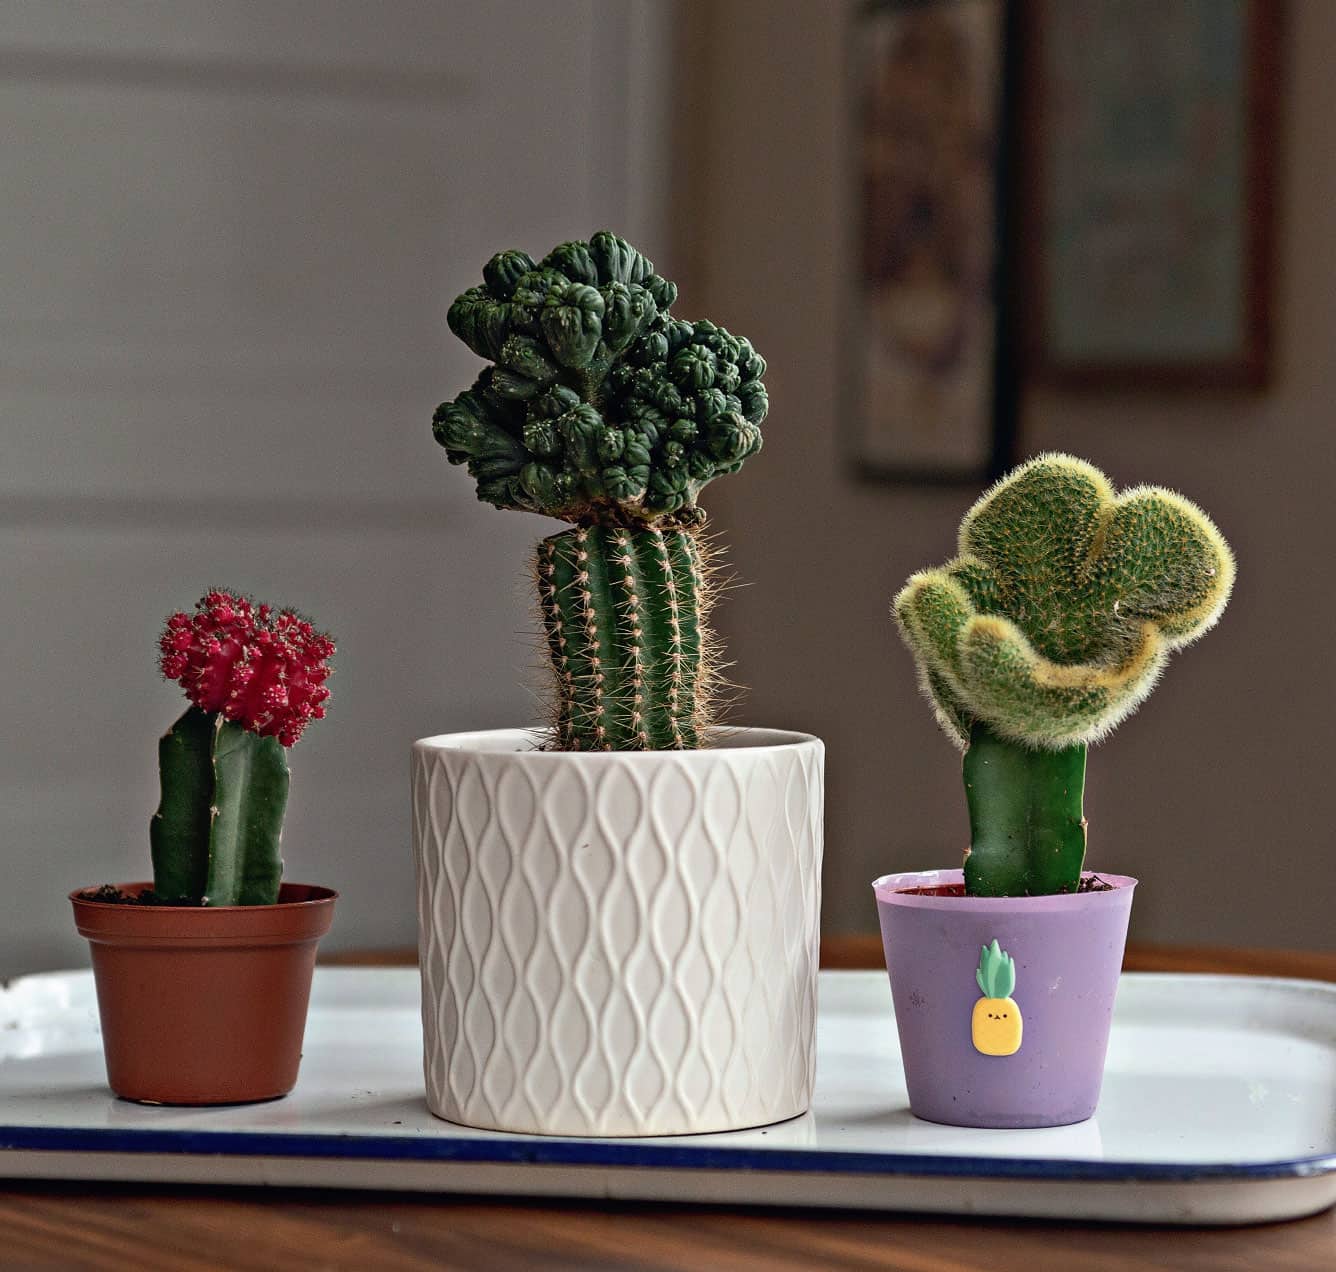
A grafted cactus consists of two different cacti fused or grafted together to grow as one. Did you know that if you use a fast-growing cactus and graft a slow-growing cactus on top of it, the slow grower will grow faster? Isn’t nature amazing? Also, by grafting two cacti together you can make a new unique plant—a form of botanical art. The process isn’t complicated but does require a high level of preciseness and cleanliness to make sure the cacti graft together well. An important point is that you must use two cacti, not a succulent and a cactus. It is easy to mistake many succulent plants (such as euphorbias, for example) for cacti because they have spines, but they won’t graft to a true cactus, so be aware of what you are purchasing for your grafted masterpiece.
STEP 1 Choose two cacti that you think would look good grafted together.
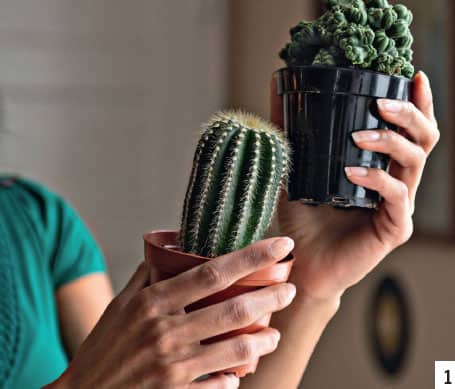
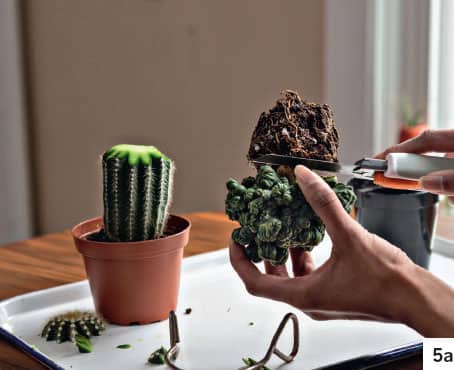
Step 2 Carefully slice the top off the columnar cactus. This is called the stock plant. The stock plant keeps its roots and supports the plant being grafted to it. There is no exact place that this needs to be done. You decide how tall or short you want your grafted cactus to be. The stock plant cactus will only grow in girth; it will not grow taller, because the growing tip has been removed.
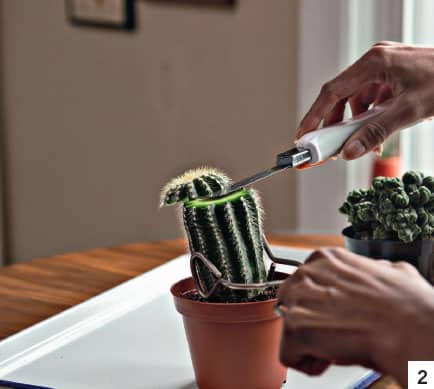
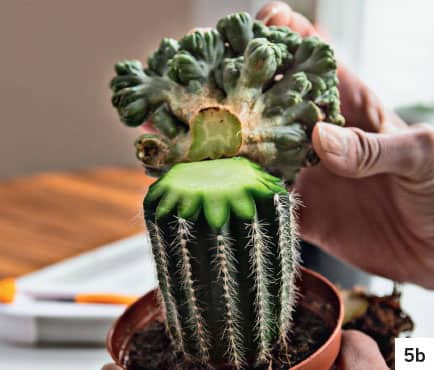
STEP 3 The skin of the cactus needs to be cut around the edge, beveling it slightly. This needs to be done because the soft center of the cactus may sink in, which would leave the outside (skin) taller than the center, preventing the two cacti from attaching to each other; they need a good connection to graft together. The beveled edge allows the center to sink a bit and yet still have good connection with the cactus above. (Note: In the photos, I exaggerated the amount of edge to cut off, for clarity purposes. Only a small amount needs to be taken off.)
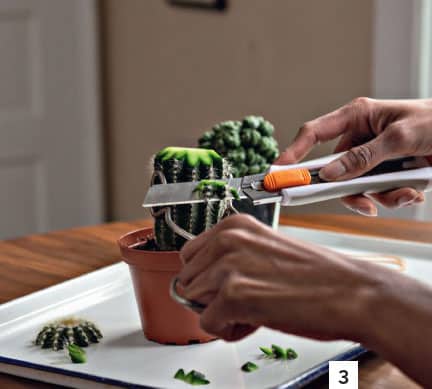
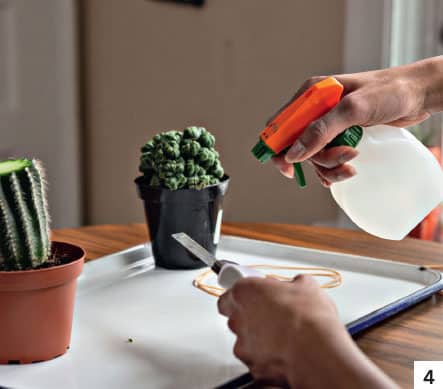
Step 4 Before making your next cut, spray or wipe your knife with alcohol.
Step 5 Slice the round, crested, or montrose cactus off the root ball and immediately place it on the cut top of the columnar cactus, making sure to match up the growing points (5a). These should appear as round outlined areas in the center of the cut area.The top plant being grafted onto the bottom stock plant is called the scion (5b).
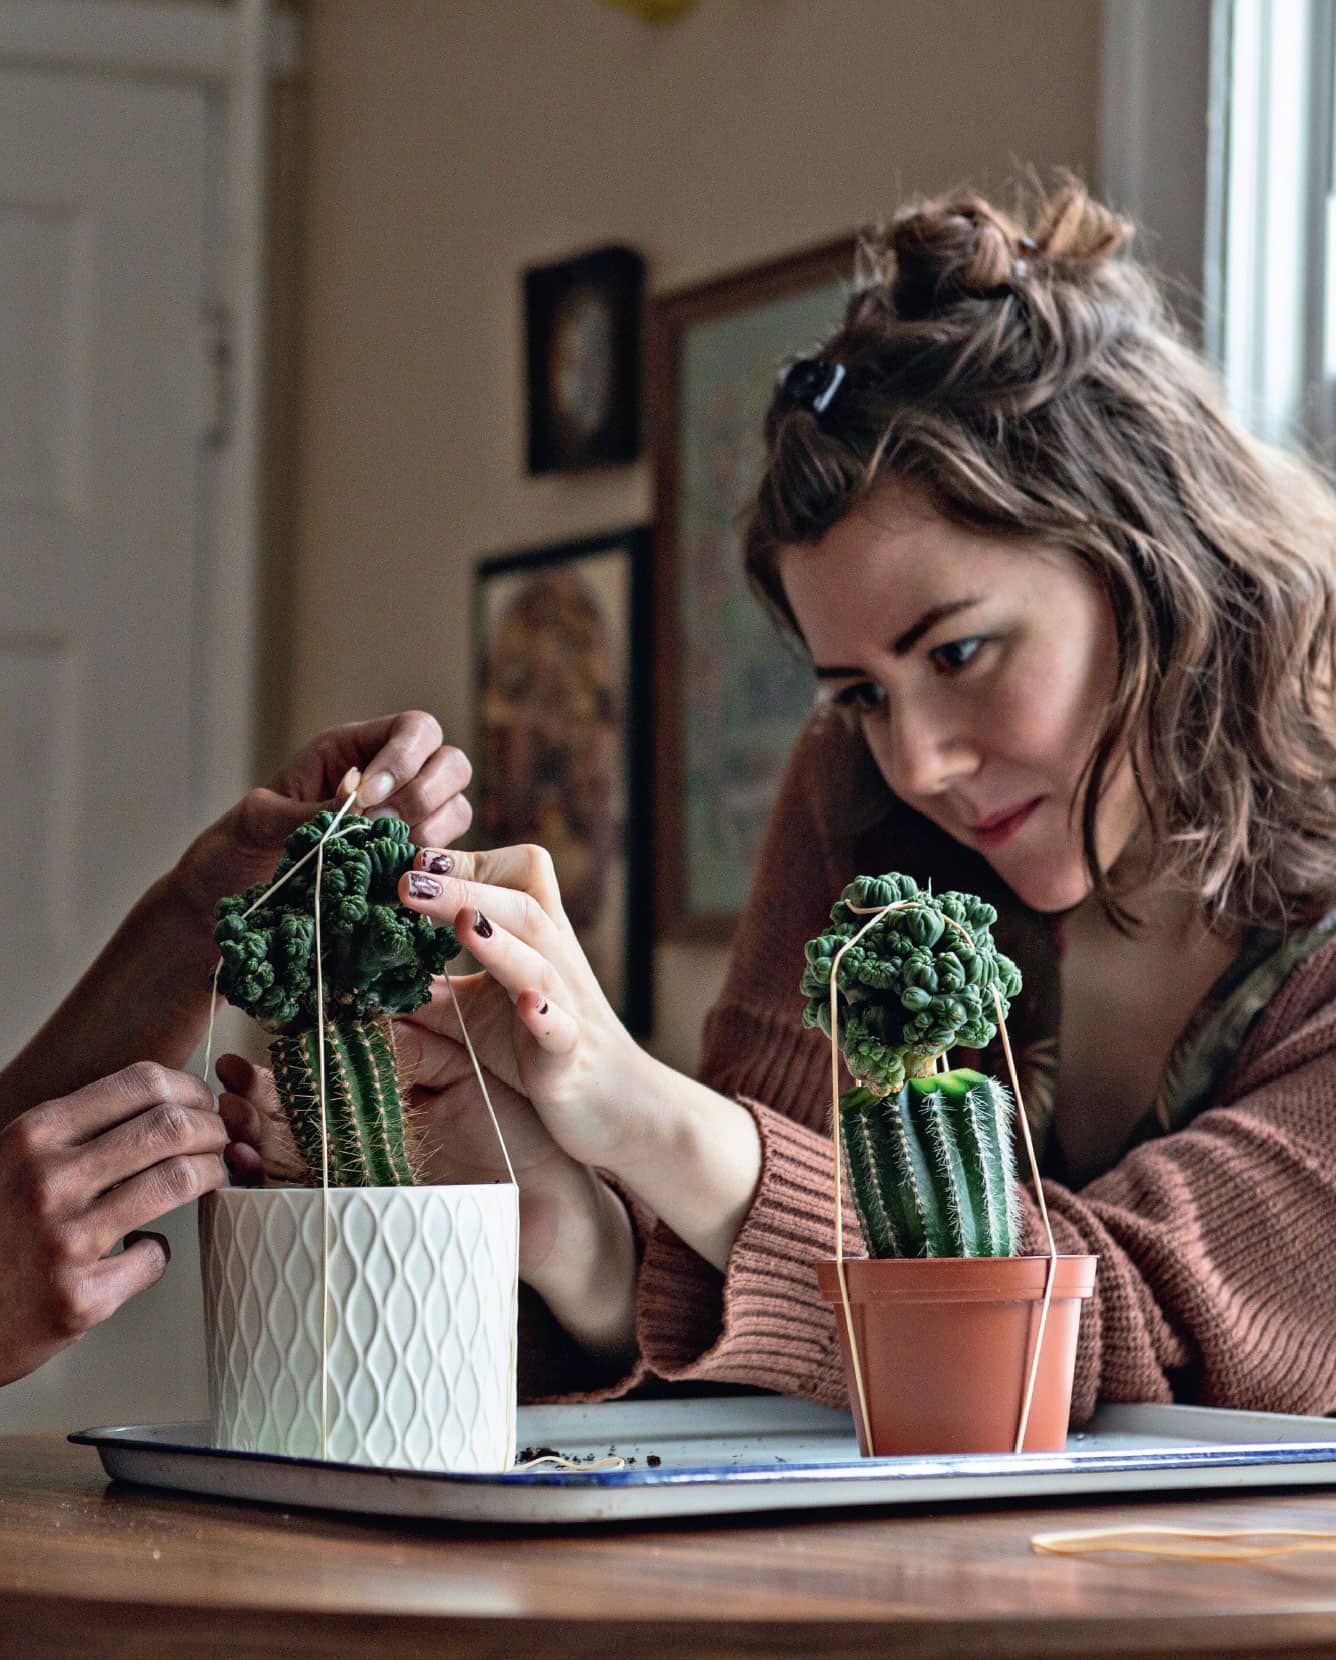
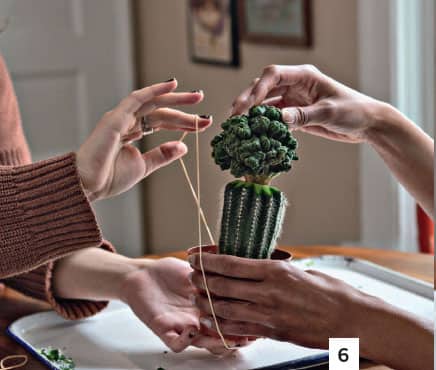
STEP 6 Carefully press the scion down to get a firm connection between the two cacti. Use rubber bands to hold the two cacti together. This is where a friend’s help comes in handy. Stretch the rubber bands around the pot and cacti while holding them together. If you are doing it alone, tape the rubber bands to the bottom and sides of the container. Then it is easy to grab the bands and bring them up around the top of the cacti without them coming off. This can be challenging, especially with spines.
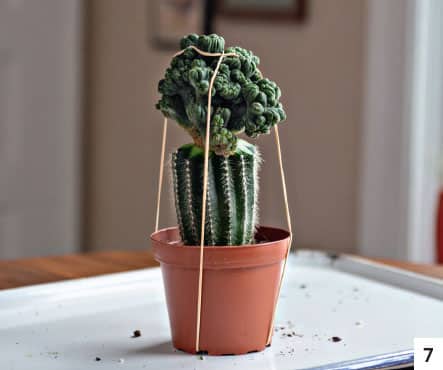
Step 7 If there is any shrinkage of the cacti as the cut ends callus over, the rubber band will contract with the plants, keeping them in tight contact with each other. Now it’s all about patience.
BONSAI PLANTING AND PRUNING
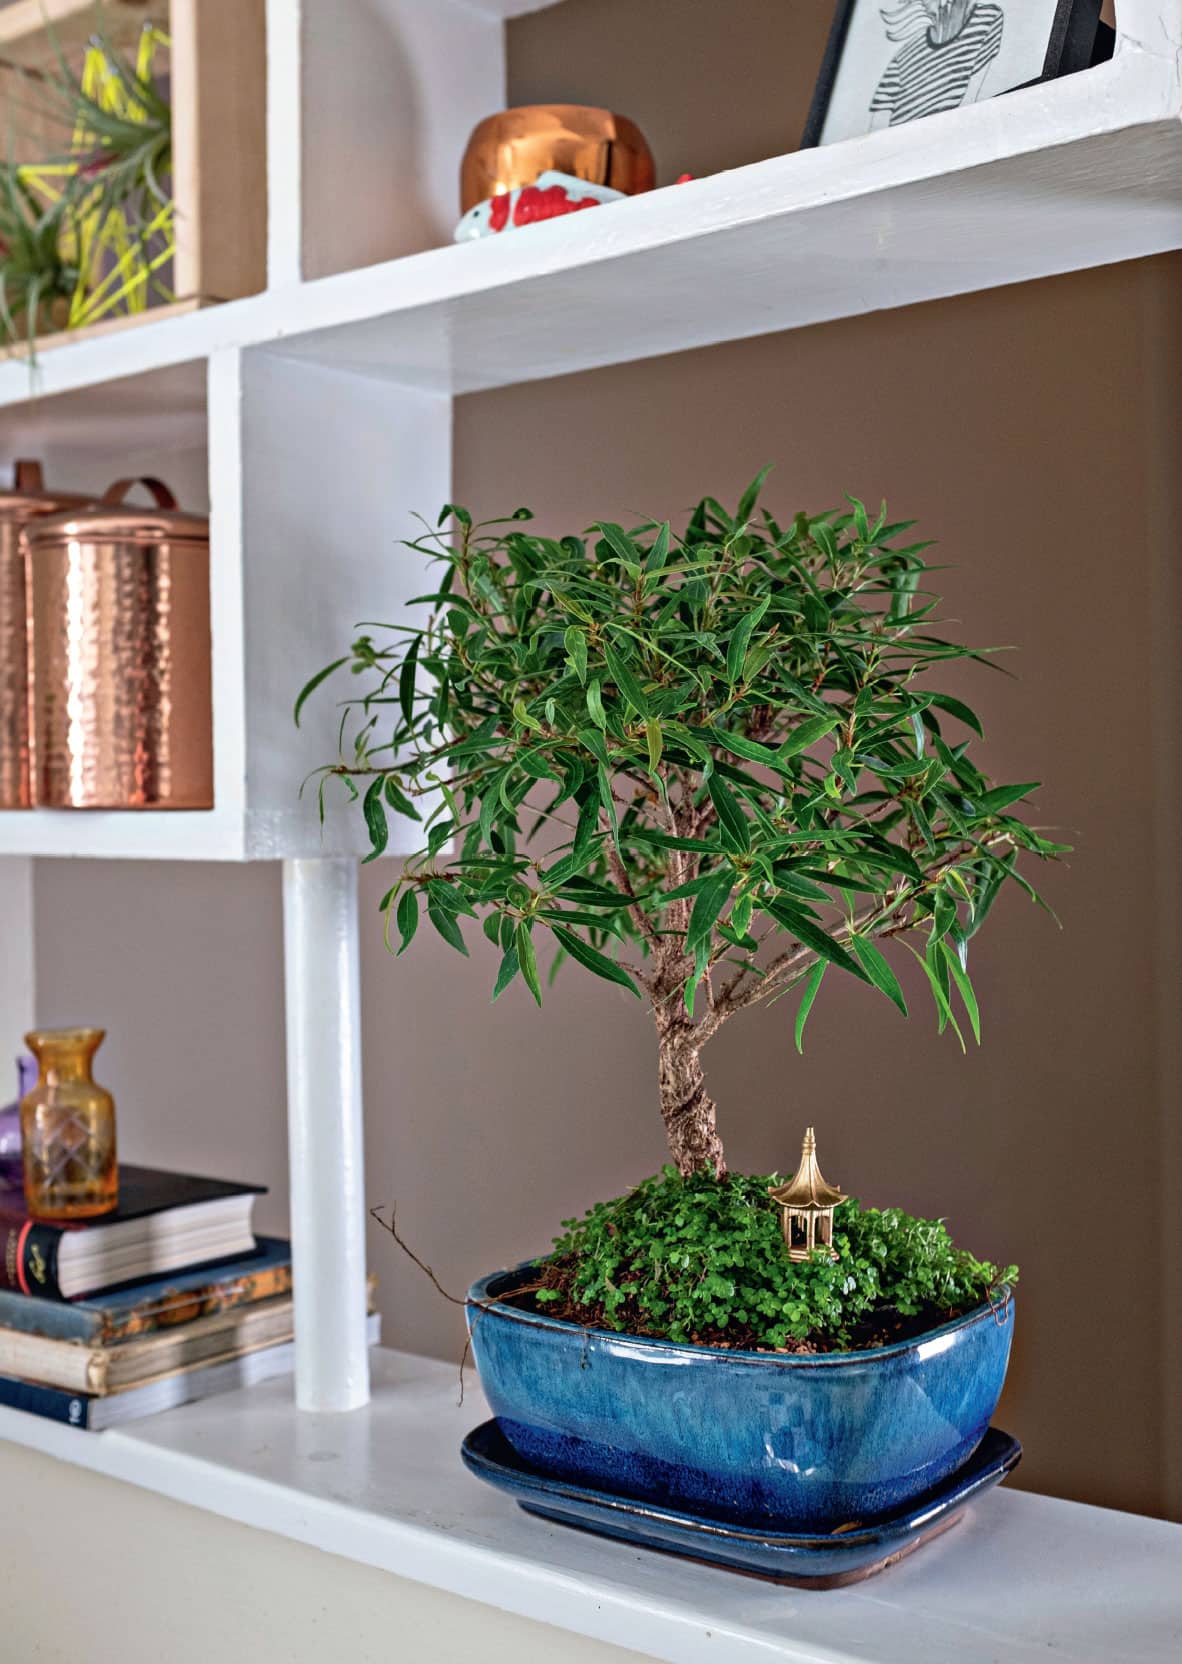
Bonsai is an age-old Japanese art form that involves growing plants in small containers and pruning and training them to look like they are old, full-grown trees. Often the plants used are hardy trees that require a winter rest—such as maples or beeches—and take many, many years to train. If, on the other hand, you choose a houseplant to train as a bonsai, you can achieve results much quicker. Let’s go through the process step by step, from buying the plant to its long-term care.
STEP 1 Study your plant and decide which side you would like to be the front. Find the side that is “greeting” you. Maybe it leans a bit, or the branches are reaching out toward the front. Every plant is different. You also need to decide which shape you’d like to eventually end up with, because your plant must be trained in this shape from the beginning.
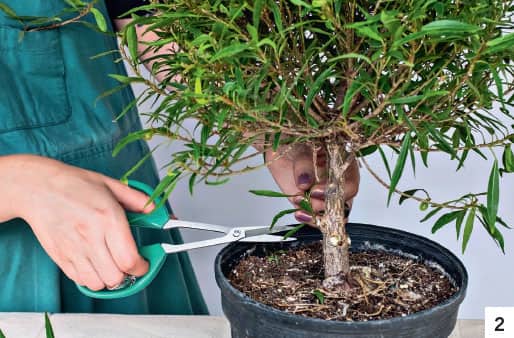
Step 2 After you have studied your plant and decided which form you want your tree to become, it’s time to trim your tree. A good rule of thumb is to take off any branches that point straight up or straight down. If the trunk of your plant is thin, a shorter tree makes the trunk look larger. The fun part of this process is that it’s all up to you. You decide what your tree will eventually look like by the way it is trimmed and wired.
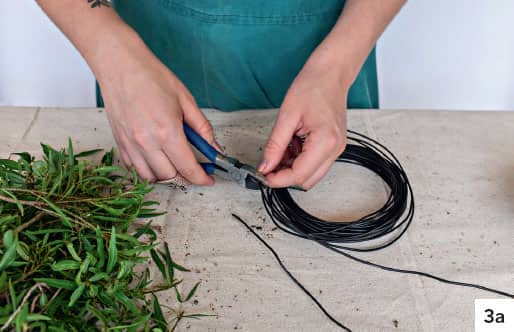
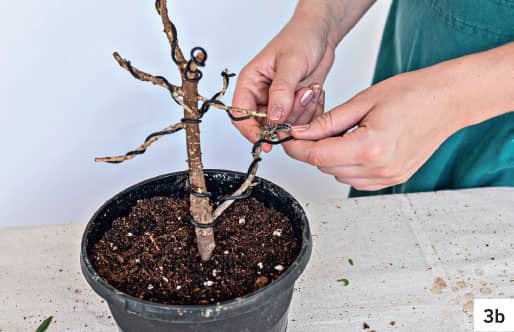
Step 3 That leads us to the next step: wiring the tree. This is when you’ll determine the final form of the tree. Starting with the bottom branches, cut your wire long enough to go from the tip of one branch, around the main trunk, and up the opposite branch. At this time, you can remove all the leaves to see the branches better. This will also help the leaves to regrow in a smaller size, more proportionate to the size of the tree. Usually there are branches across from one another, and you can use one piece of wire to train both branches simultaneously. By going around the trunk, there’s more stability. Wrap your branches carefully, making sure the wire isn’t too tight, but firm enough to hold the branch the way you’d like it to grow. Continue wiring the branches until you reach the top of the tree. If the branches are thin on top, you may have to use a smaller wire than you used on the bottom branches. Look down at the tree from the top. There should be no branches over top of lower branches. It should look like the spokes of a wheel. Check the wire often to make sure the plant isn’t being scarred by a too-tight wire. Remove the wire just before it starts cutting into the branch, usually after a few months. If your branch moves back, it needs to be rewired.
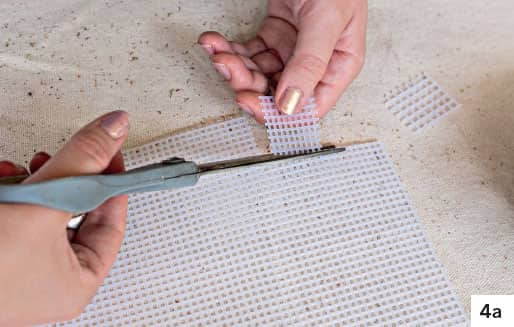
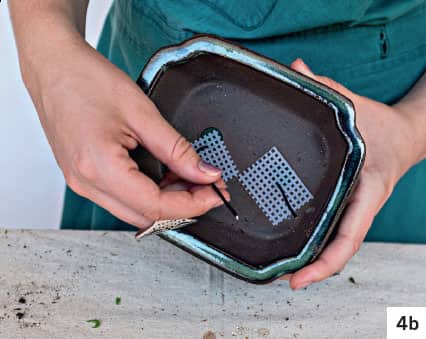
Step 4 Get your pot ready for the tree. Cut two small squares of the 7-hole mesh and cover the drainage holes in the bottom of the pot. This ensures that the bonsai soil doesn’t wash out of the holes. Cut a 10" to 12" (25 to 30 cm) piece of wire and thread it through the drainage holes so that the ends of the wire come up into the pot. This wire will be used to secure the plant into the pot.
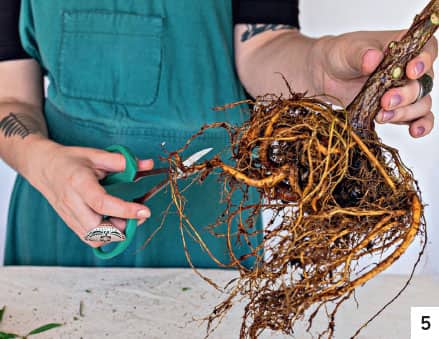
Step 5 Now it’s time to take the plant out of its nursery pot and get it ready to transition to its bonsai pot. This process may seem harsh, but it won’t hurt the plant. Remove the plant from its pot and remove all the soil from the roots. A chopstick works well to tease the roots from the soil. Rinse the roots in water to remove any remaining potting soil. Because it’s going into a much shallower pot than the one it came out of, the roots will need to be trimmed. Trim them just enough to fit into the pot. Position the plant the way you want it, then cross two ends of the wire over the root ball and twist the ends together to hold the plant in the pot.
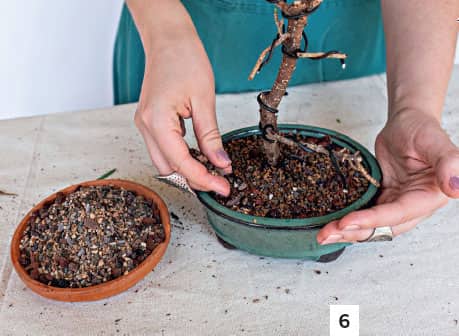
STEP 6 Once your bonsai is in place, add bonsai soil to the pot, filling in between all the roots. Use the chopstick to work the bonsai soil down into the roots. Water it well.
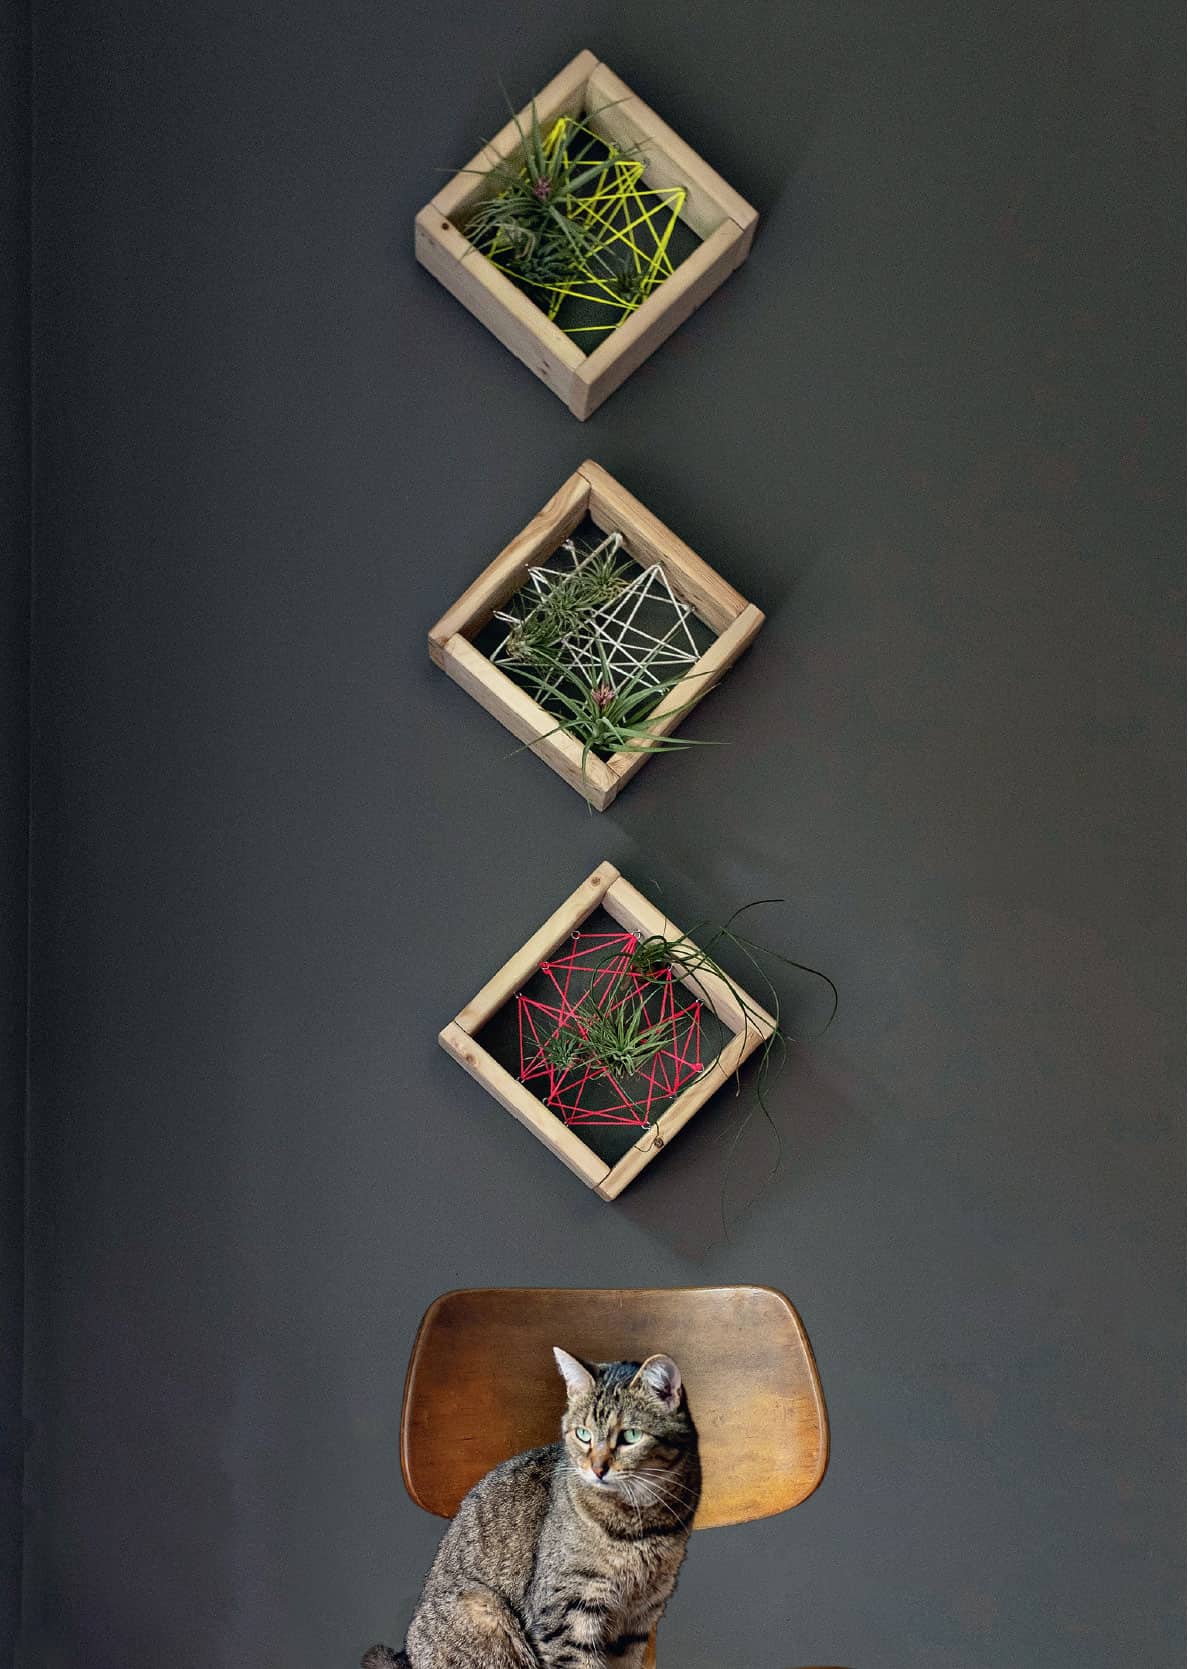
SHADOW BOX TRIO FOR AIR PLANTS
This trio of shadow box shelves is a perfect accent for any wall in your bedroom, living room, or bathroom. With a few simple steps and the right tools and supplies, you can make these shadow boxes in a short amount of time. The boxes have twine strung randomly throughout the frame, making places for air plants (tillandsias) to hang out. You can paint the boxes to match your décor or stain them. Use your imagination and have fun decorating your shadow boxes!
STEP 1 Using the square, draw straight cutting lines across the 1" x 4" x 8' (2.5 cm x 10 cm x 2.4 m) board in 7-inch (18-cm) increments. Using a square ensures your lines are straight when you draw the cutting lines. If the lines aren’t straight, your box will not be square. For three boxes, cut twelve boards of the same length.
Step 2 Start by nailing one board to the end of another board, with one board overlapping the other. Use at least two nails on each end. Turn clockwise so your two boards form a backwards L shape.
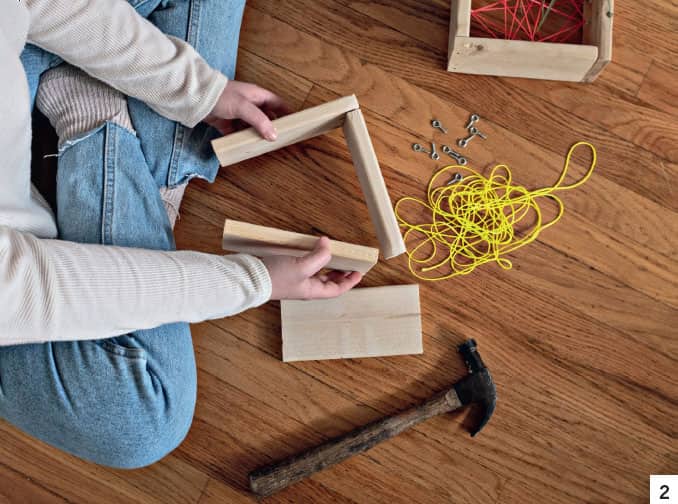
Step 3 Nail the next board on top of the backwards L to form a sideways U, again overlapping the two boards. Turn the sideways U clockwise so it looks like a U, and again nail a board on top of the right arm of the U. After nailing the final edge together, you now have a box. Repeat the directions above twice more to create two more boxes.
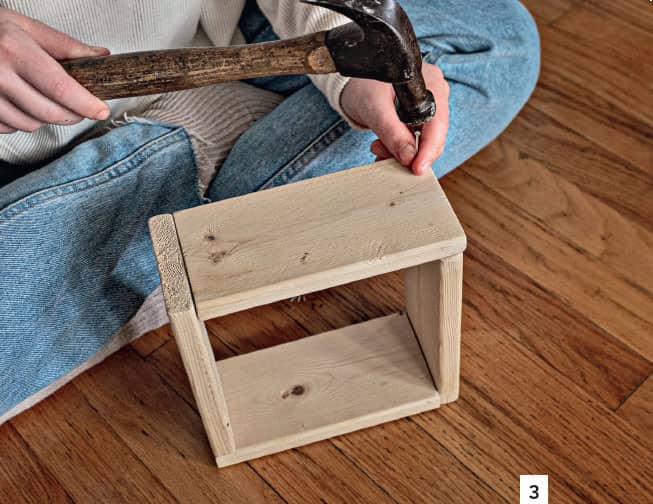
Step 4 Paint or stain your boxes the color of your choice, or leave them natural.
Step 5 Fasten two sawtooth picture hangers to the back edge of the top board of each box, placing one on each end. If you would like to hang your shelves in a diamond pattern, attach one hanger diagonally across a corner of the box.
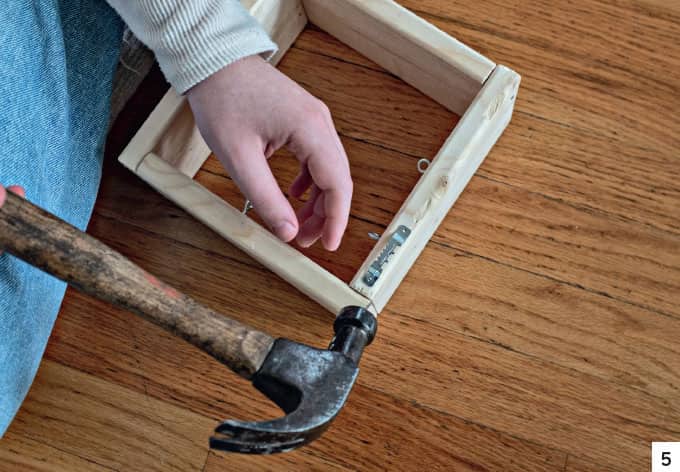
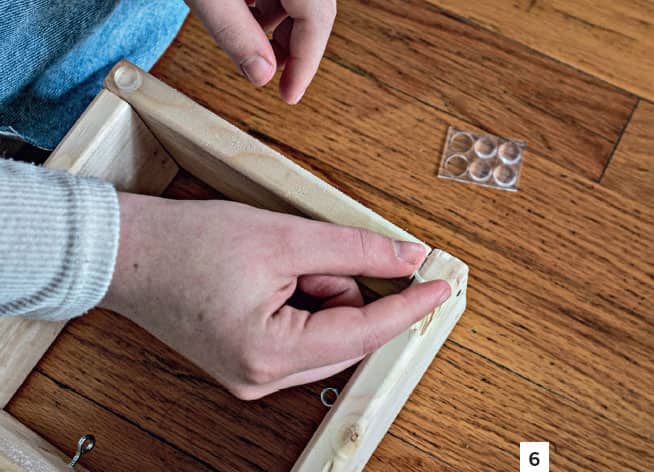
Step 6 Stick two rubber bumper pads on the bottom back edge of the box, one on each end to ensure the box is level against the wall. These bumpers protect the wall, but they also compensate for the depth of the picture hangers. There will be a slight space between the box and the wall because of the hangers and bumper pads. Use a level when hanging the boxes if you want them hung straight.
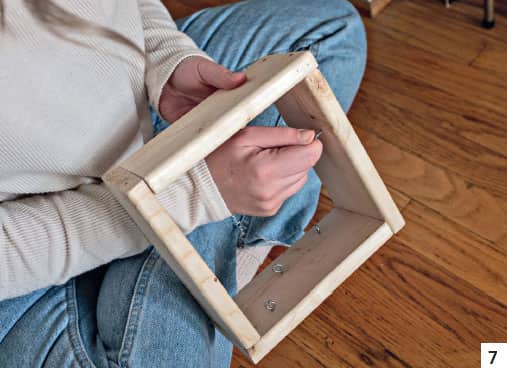
STEP 7 To make a web inside the box for your air plants, screw three eye screws randomly into each interior side of the box.
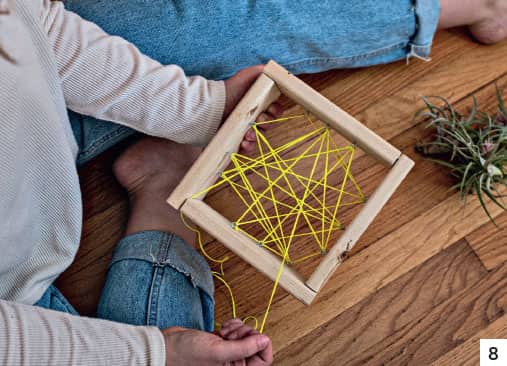
Step 8 Tie your twine to the first eye screw and then string it randomly between the other eleven eye screws to make a web-like design, knotting it to the last hook. Trim the ends of the twine.
Step 9 Place your air plants in the openings created by the twine.
PLANT SHELVES
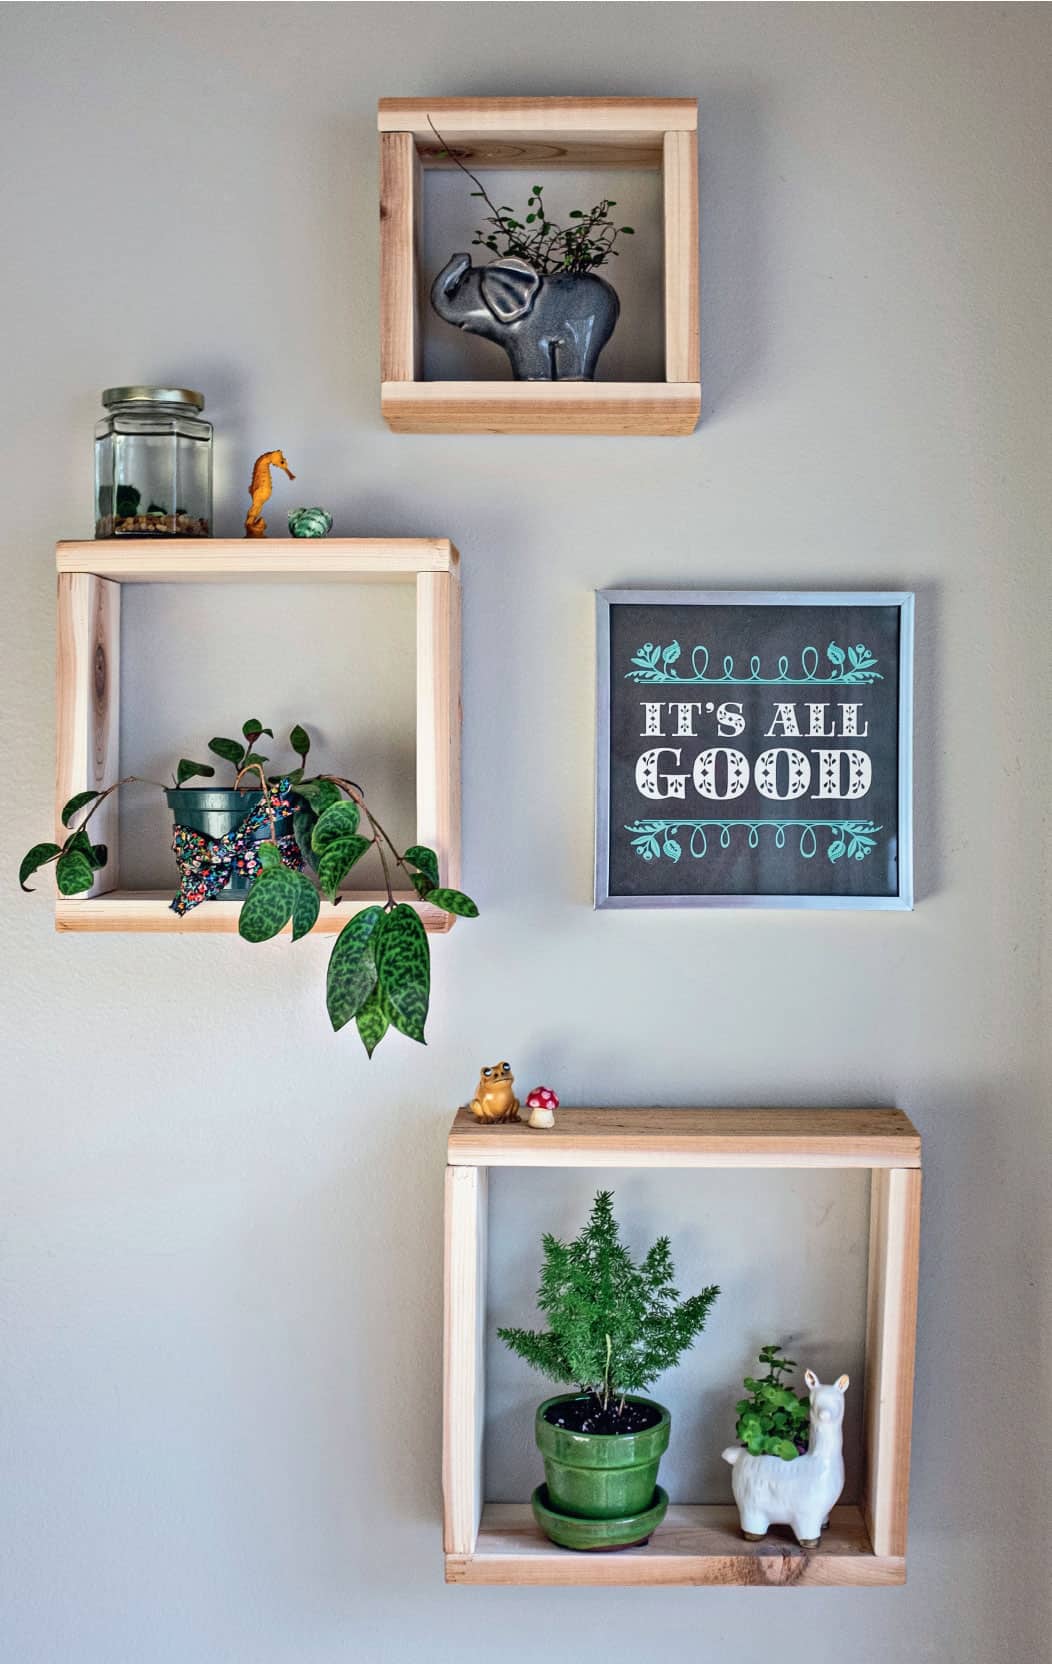
These shelves are fun to make and even more fun to decorate. You may have a collection of small items that would be perfect on these shelves, side by side with your plants. Let your personality show, using tiny gnomes, gems, an owl collection, or whatever. These box shelves are made in three sizes; they can be hung together in a pleasing arrangement or on different walls individually. You could also make them all the same size, if you’d like. When you’re finished building the shelves, paint or stain them, or leave them natural. It’s all up to you! When decorating them, choose plants that work with the amount of light you have to offer. If the light you have isn’t enough for your plants, purchase a small clip-on or hanging grow light to add light to your shelf.
STEP 1 Using the square, draw straight lines (cutting lines) across the 1" x 4" (2.5 cm x 10 cm) boards as follows:
For the large box shelf:
2 12" (30 cm)
2 10©" (26 cm)
For the medium box shelf:
2 10" (25 cm)
2 8©" (21 cm)
For the small box shelf:
2 8" (20 cm)
2 6©" (16 cm)
Using the square ensures that your lines are straight when you draw them. If the lines are not straight, the board will not be straight when it is cut. This would lead to an odd-shaped shelf, not a square. Using the sandpaper, sand the boards to remove any rough edges. Start with the coarse grit, switch to the medium, and then use the fine grit for a smooth, no-sliver finish.
Assembling the shelves:
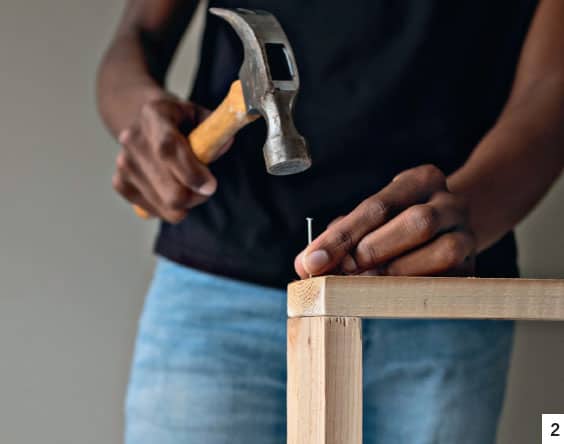
STEP 2 Using the two 12" (30 cm) and 10©" (26 cm) pieces and two nails per end, attach the two smaller pieces to the 12" (30 cm) piece to form a U shape. Make sure the 12" (30 cm) board is placed on top of the two 10©" (26 cm) boards. Then attach the remaining 12" (30 cm) piece to the bottom of the two 10©"(26 cm) pieces to form a square. Repeat the process using the two 10" (25 cm) and 8©" (21 cm) pieces, and the two 8" (20 cm) and 6©" (16 cm) pieces. You now have three square box shelves.
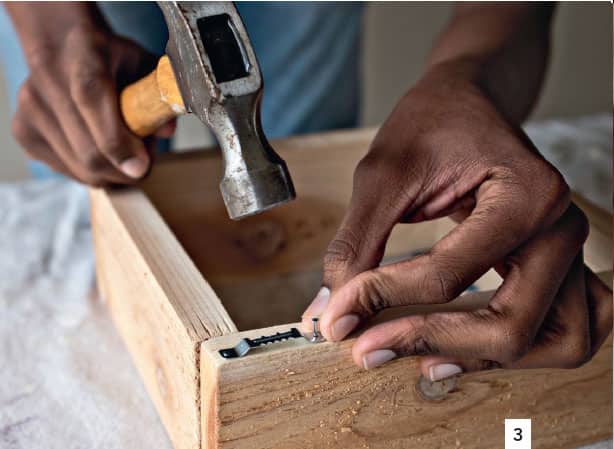
STEP 3 Fasten two 13/4" (4.5 cm) sawtooth picture hangers to the top edge of the top board on the back of the shelf, placing one on each end.
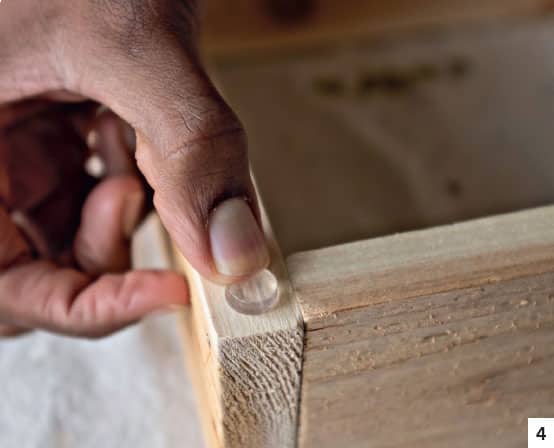
STEP 4 Stick two rubber bumper pads to the bottom edge of the bottom board on the back of the shelf. This ensures the shelf will sit level against the wall. The bumpers protect the wall and compensate for the depth of the picture hangers.
These shelves are perfect for adding some greenery to any room and displaying a few of your favorite things.
PROPAGATING PLANTS BY AIR LAYERING
If you have a plant so tall that it is hitting the ceiling, or one that has greenery only at the top, with bare, straggly stems beneath, then this is the project for you. Many people throw away overgrown or unsightly plants, not knowing they could easily save the plant with a simple propagating technique called air layering (or air propagation). Instead of taking a cutting and rooting it in water or soil, this technique takes place directly on the plant, typically on the main stem or a side shoot. It’s often used on plants with woody stems, such as citrus, fiddle-leaf fig, dracaena, and rubber plant, to name just a few. Many plants that we use as houseplants become large trees in their natural habitats and have bark-covered stems. This tropical bark isn’t as thick as an oak or a maple, but it’s woodier than soft-stemmed houseplants such as aglaonema or dieffenbachia. While soft-stemmed plants are easy to propagate in moist potting medium or water, woody cuttings are tough to start in water or soil. Air layering works perfectly for these tougher-skinned plants. However, you’ll need a bit of patience. It takes a few months for the roots to form.
STEP 1 Soak your sphagnum moss in a bowl of water—it’s best to work with moistened moss. A large handful of moss is all that’s needed, and you may want to wear disposable gloves.
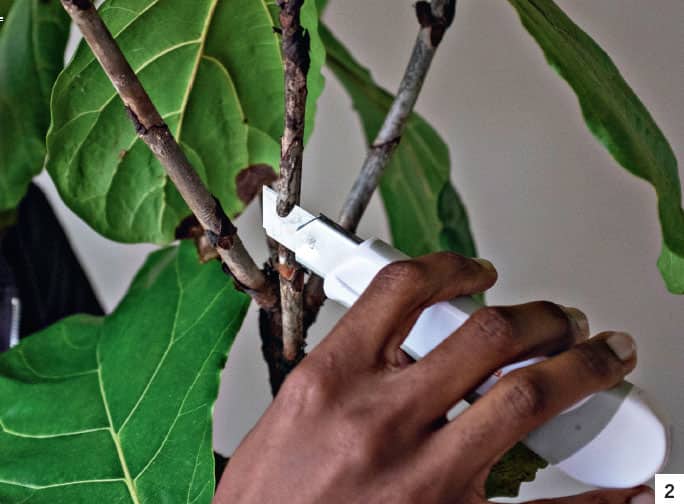
Step 2 Use a sharp knife to carefully slice with an upward motion, approximately one-third to halfway through the stem of the plant at the chosen spot. Do this carefully, making sure to not cut yourself or cut all the way through the stem.
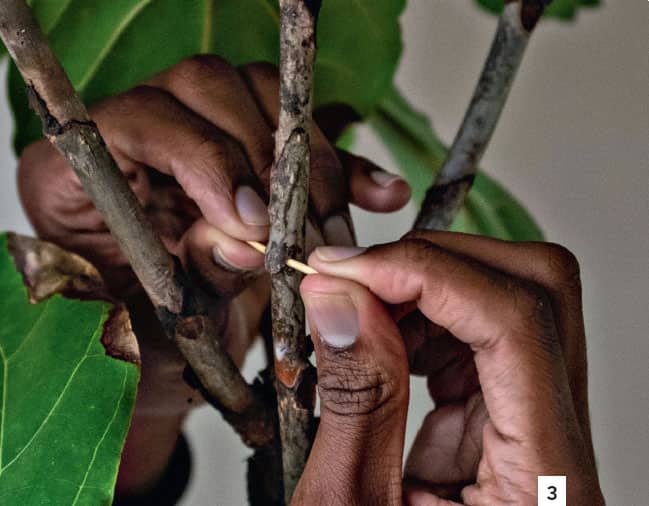
Step 3 Wedge the toothpick or matchstick into the cut to keep it open. Trim the ends of the toothpick even with the edges of the plant stem.
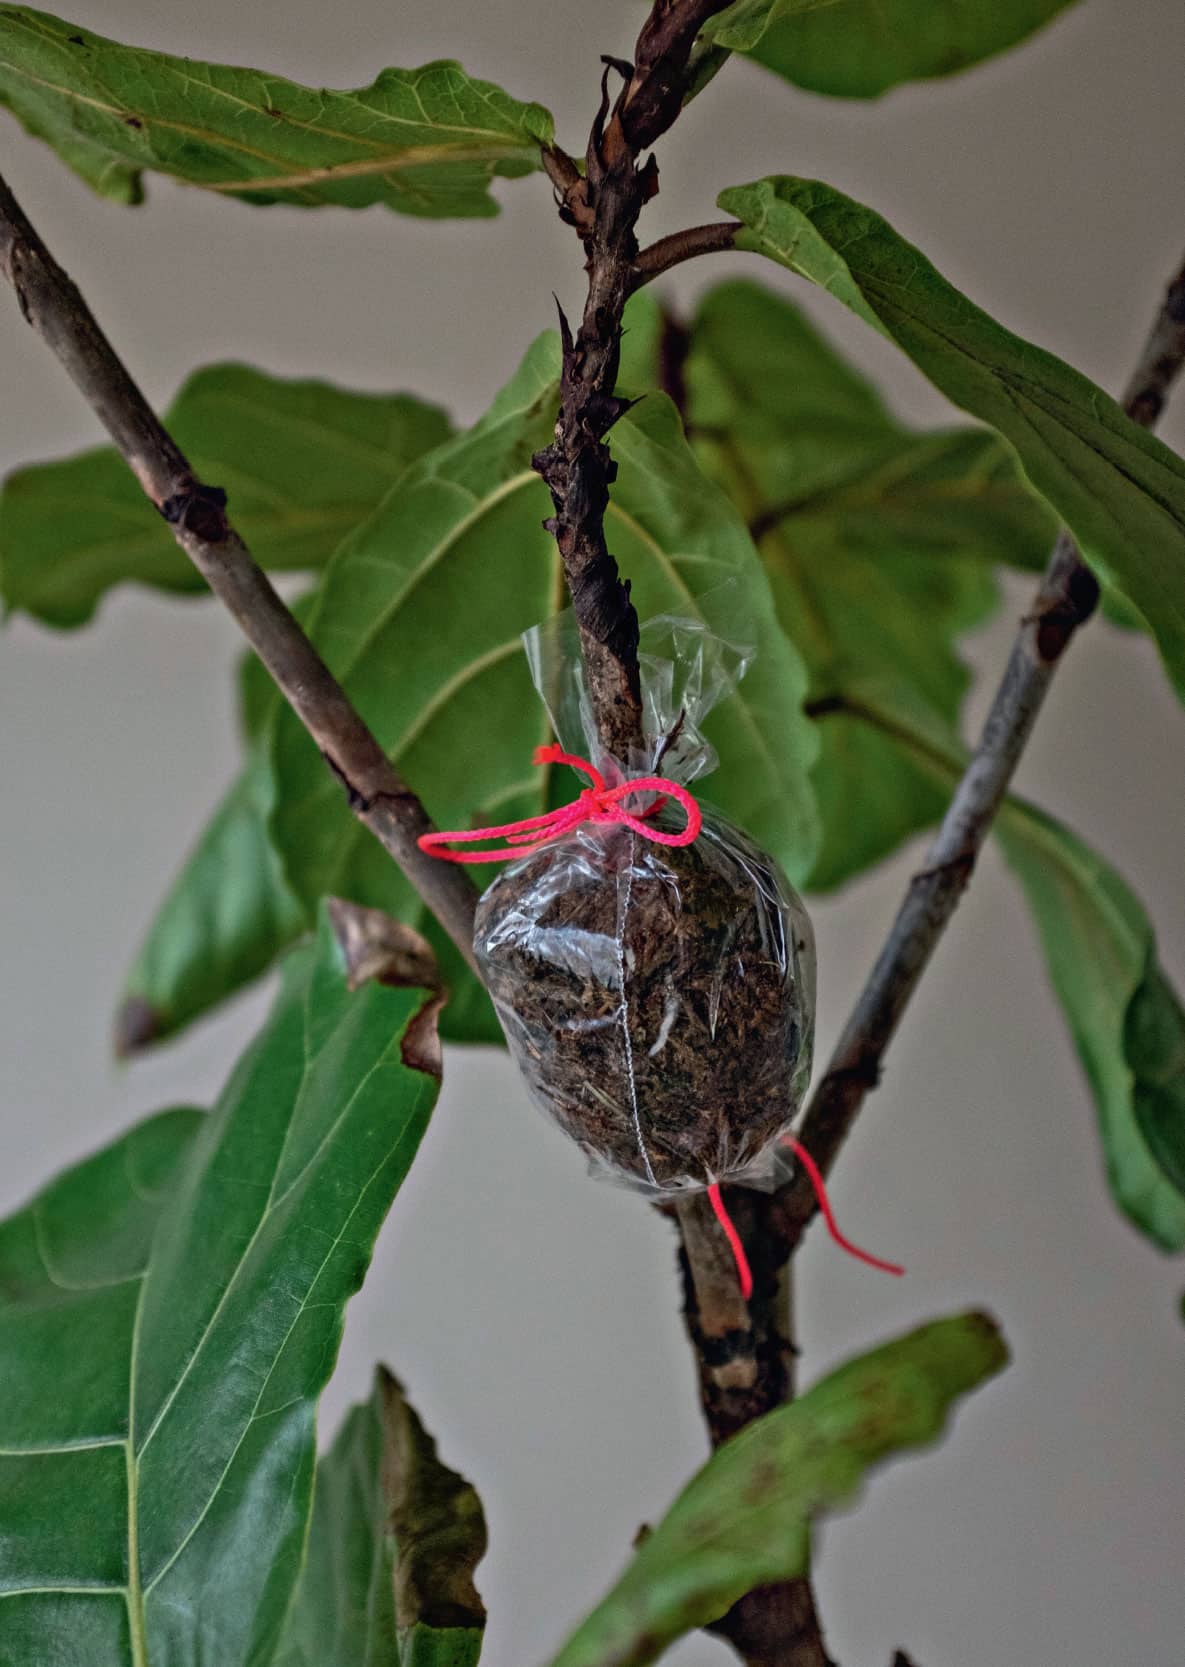
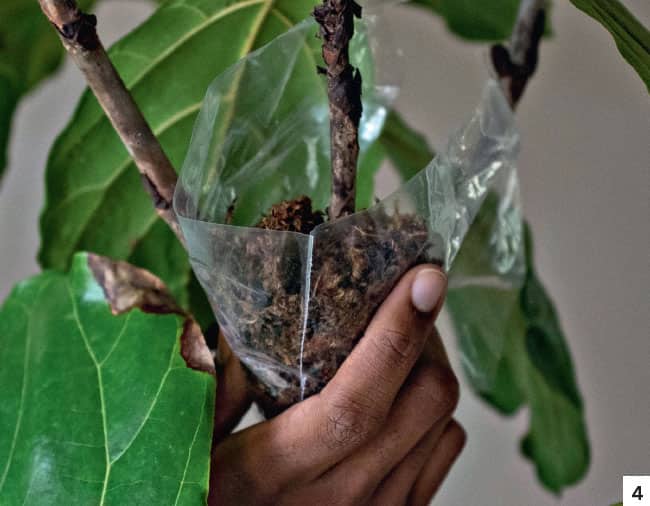
Step 4 Wrap the moistened moss around the cut area. The moss ball should be about the size of an orange or a bit larger when you’re done, depending on the thickness of the stem being air layered.
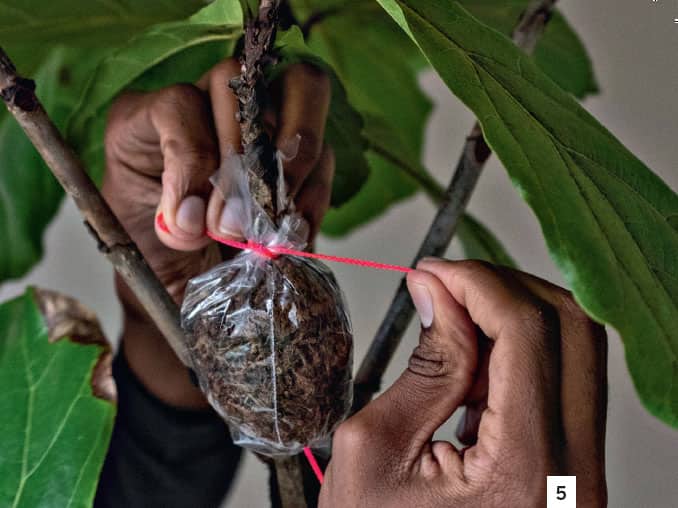
STEP 5 Use a piece of plastic wrap to enclose the moss completely. Tie the twine around the stem of the plant at the top and bottom of the plastic wrap to keep it closed and the moisture inside. Make sure the twine isn’t too tight, which may damage the stem.
Step 6 The key to this process is to make sure the moss stays moistened. Untie the top twine often to check the moss for moisture. If it feels dry, add a small amount of water and tie it back up. Keep checking the moss, and eventually you’ll see roots developing. When the roots have filled the moss inside the plastic wrap, it’s time to slice the newly rooted plant from the stem of the mother plant (see sidebar at left).
TAKING LEAF AND STEM CUTTINGS
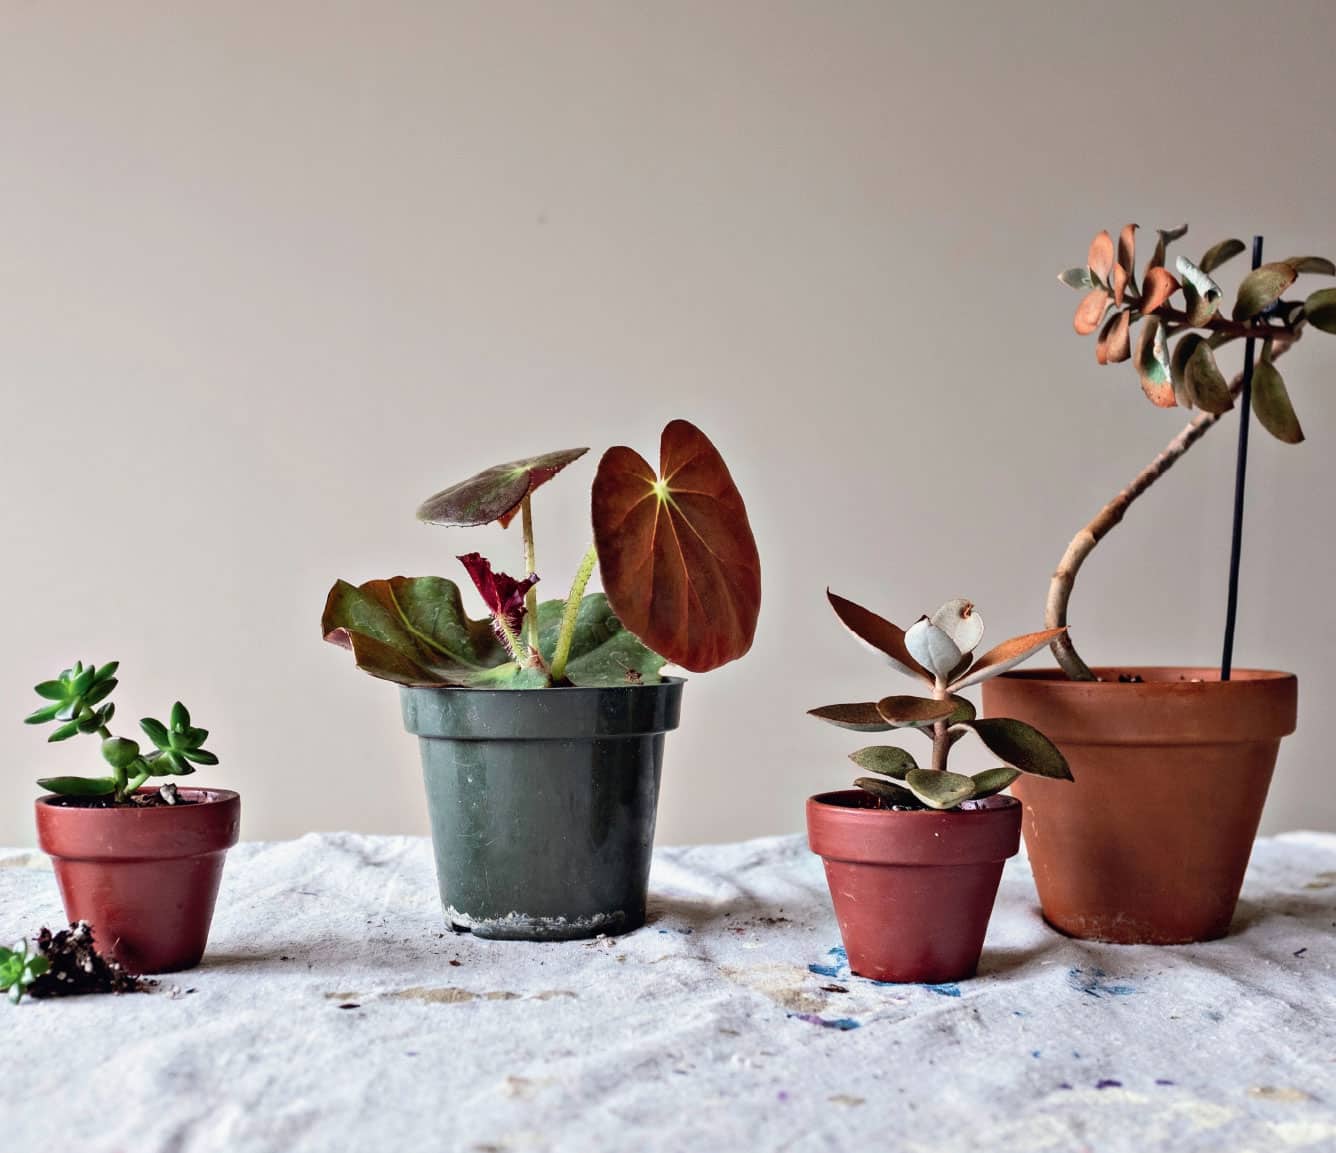
Swapping houseplants with friends is a lot of fun. Thankfully, you don’t have to give up your favorite plant in order to get a new one to try. Instead, learn how to propagate your plant babies and you’ll always have plenty to share with friends and family. Propagation makes duplicates of your plants, and stem and leaf cuttings are among the easiest forms of plant propagation. It can be done with all sorts of houseplants, and it’s a simple process. Some plants, such as succulents and African violets, are easy to propagate using just one leaf. Vining plants and those with long stems are easy to propagate from a stem cutting. Not only does the process make more plants, but it also improves the look of the original plant, keeping it from becoming overgrown. It’s easy, but it does take a little courage. You’re going to have to snap leaves off, cut stems, and behead plants. I used to be afraid of doing these things too. I was concerned I was hurting the plant or might kill it altogether. Don’t worry. I’ll walk you through the steps and you will have more plants to share in no time flat.
Instructions for propagating succulent leaves
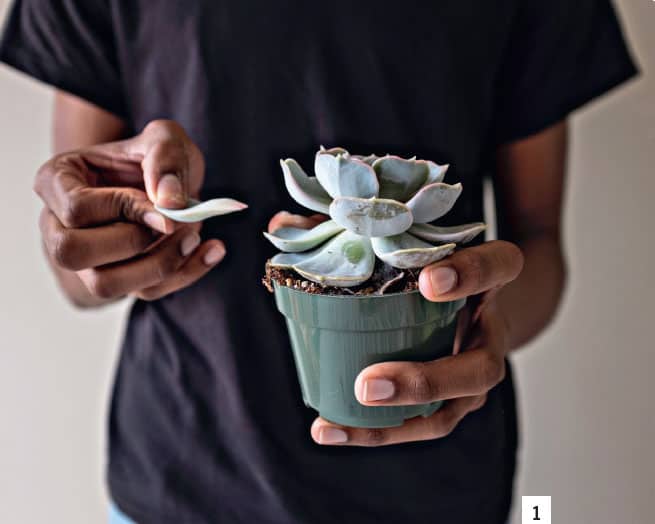
STEP 1 Begin with a succulent, such as an echeveria (shown) or aeonium. “Snap” a few leaves off the bottom of the plant. To do this, carefully ease your finger in between the rows of leaves and apply pressure to the leaf close to the stem of the plant, pushing in a downward motion. It should snap right off. Another way to do the same thing is to lightly hold the leaf between your finger and thumb and move it to the right or left until it breaks off. The plant needs to be well watered and the leaves turgid (firm) for this to work. If the leaves are not firm, they may not snap off easily and you may damage the plant.
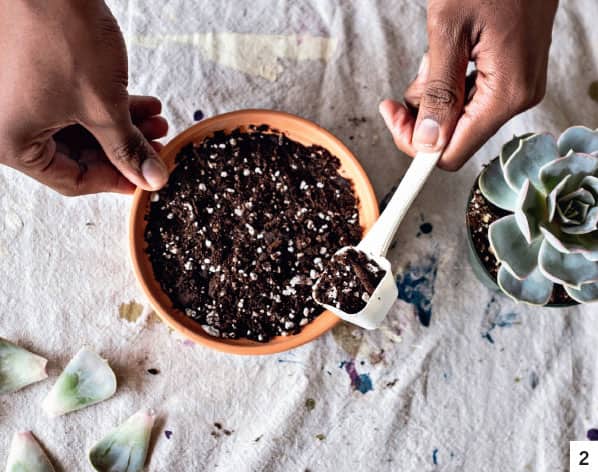
Step 2 Fill a pot with moistened potting soil. It can be large or small, depending on how many leaves you have to propagate.
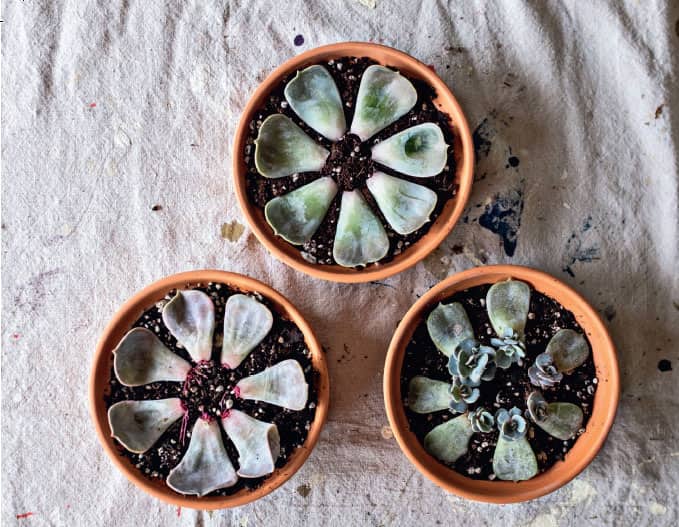
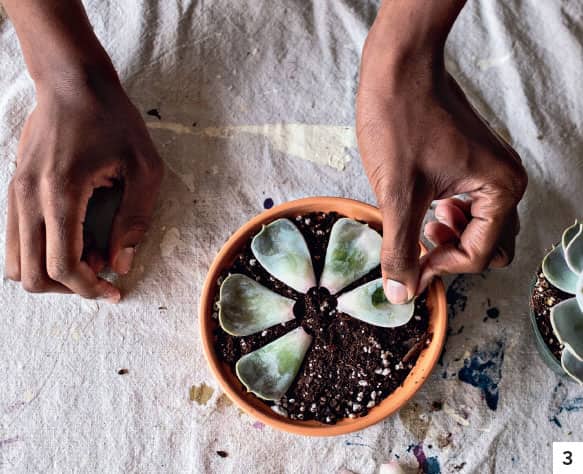
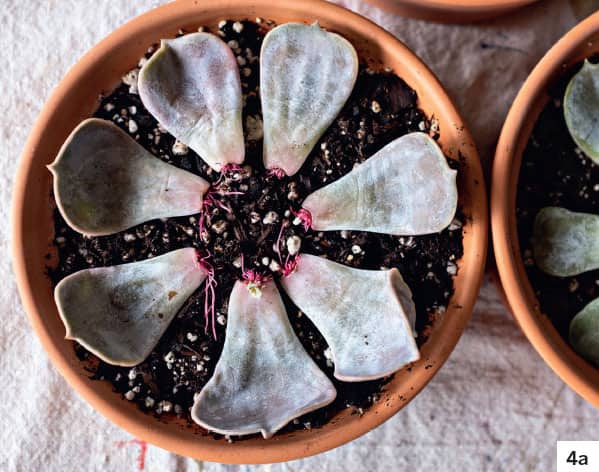
Step 3 Lay the leaves on top of the moist (but not wet) potting mix and forget about them for a bit. Do not stick the end of the leaf into the medium because the “snapped” end needs to heal or callus over before it can be planted. If they are freshly cut and inserted into moist medium, they will rot. By simply laying them on top of the soil, the ends will heal, and they will send out roots when they are ready.
Step 4 Roots will soon develop from the cut end of the leaves and grow down into the potting soil. A tiny new plant will appear at the base of each leaf in a few weeks.
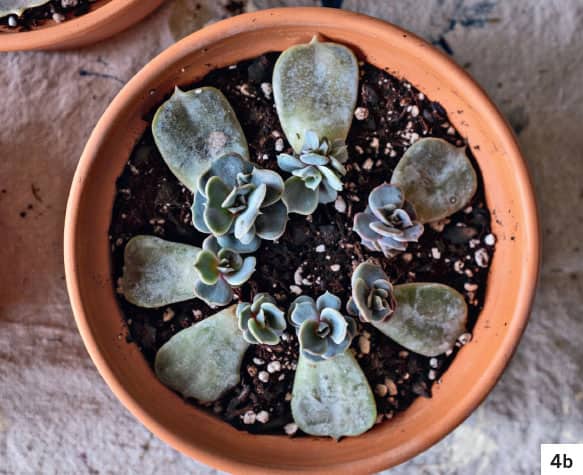
Step 5 When they’re a good size, you can pot each little baby plant into its own pot. Carefully remove the mother leaf if it hasn’t already rotted away. There is nothing cuter than a tiny succulent!
STEP 1 Cut off a 4" to 6" (10 to 15 cm)–long piece of vine or plant stem, making sure the piece has at least one set of leaves on it.
Step 2 Insert the cut end of the stem into a clean pot of moist potting soil. You can dip the cut stem in plant rooting hormone prior to sticking it into the soil. This isn’t necessary for most houseplants, but rooting hormone can improve your chances of success and speed the growth of new roots. Alternatively, insert the cut end of the stem cutting into a container of water.
Step 3 If you’re growing in soil, keep the cutting well-watered, but not sopping wet, and it should form roots in 4 to 6 weeks. Some of the original leaves may turn yellow and fall off. Don’t worry; new shoots will form once roots are established. If you’re rooting your cutting in water, when you see roots forming through the glass a few weeks later, you then can plant the rooted cutting into a container of potting mix.
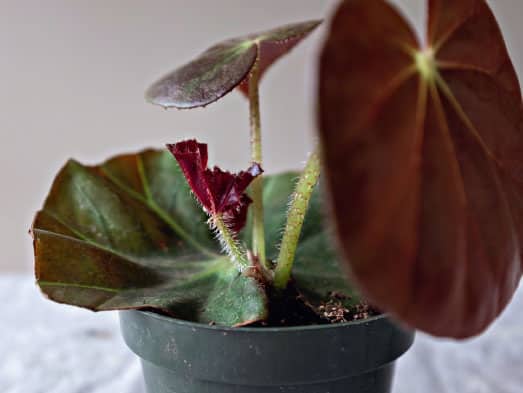
REX OR RHIZOMATOUS BEGONIA: Remove the leaf from the petiole. Cut the leaf into a wedge shape with the main middle vein intact and stick the point of the wedge into moist potting medium. A new plant will grow in a few weeks.
CANE-TYPE BEGONIA: A vegetative node is needed for stem cutting. Place the stem cutting in moist potting medium. Keep it moist while the roots and baby plants are being formed.
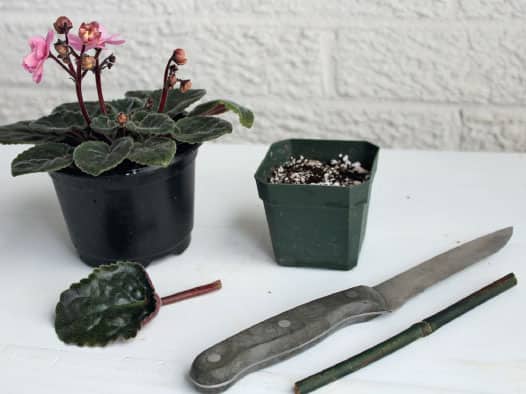
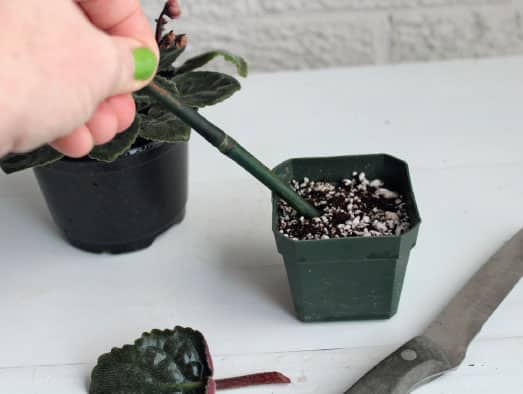
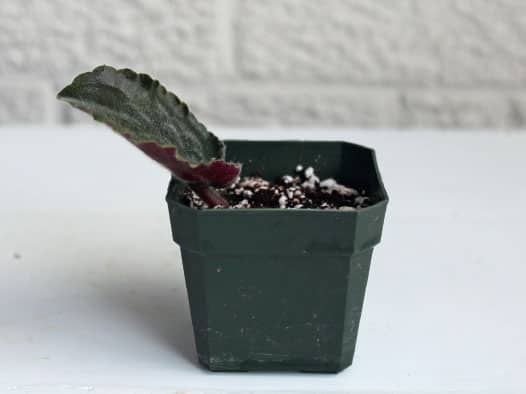
AFRICAN VIOLET: All you need is one leaf with approximately 1" (2.5 cm) of the petiole left. Cut the leaf petiole on a slant to allow for more root growing area and insert on an angle into a small container of moist potting medium. Use a stick (or pencil) to make a hole first so you don’t damage the petiole when inserting it.
I cover the leaf with a clear deli container to maintain a high, consistent humidity level. This isn’t necessary if the potting medium is kept moist. New plants (yes, more than one violet) should appear in a few weeks.
When your begonia and African violets are 1" or 2" (2.5 or 5 cm) high, transplant them into new containers.
