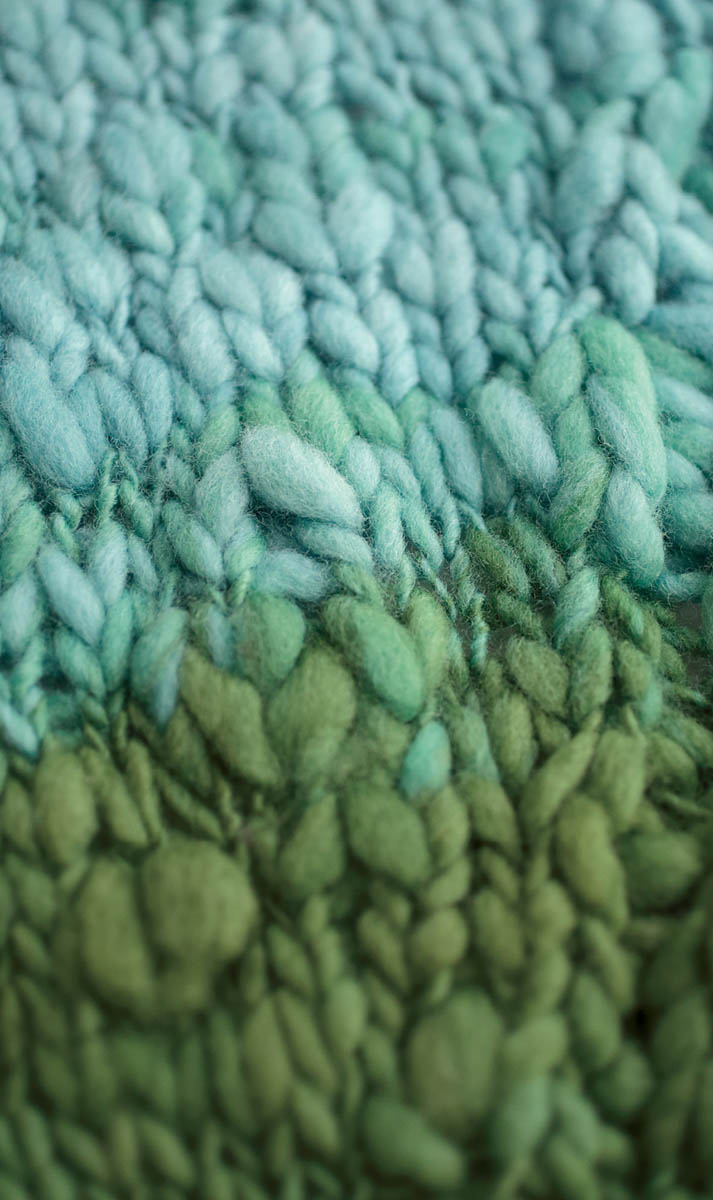
Bump in the Night
Designed by Amy King
I love a thick-and-thin yarn, but many people get stuck wondering what to make out of it. This shawl is a funky, warm, and interesting way to use that wonderful, squishy singles yarn.
Finished Measurements
- 60" long × 20" at its widest in the center
Fiber
- Spunky Eclectic, Polwarth (Progression colorway), 14 oz combed top, Snowdrop Inn
Yarn Description
- Singles
- 440 ypp
- 5.5 wpi
- Short draw
- Thick-and-thin spun
- Lightly fulled
Yarn Amount
- 340 yds (Note: You can use less or more than this, as you divide your yarn in half before you begin knitting in order to maximize the amount of yarn and fiber you have. See Knitting Notes on the next page.)
Gauge
- 8 stitches and 13 rows = 4" × 4" in stockinette stitch after blocking. Gauge is approximate due to thick-and-thin nature of the yarn.
Needles
- US 13 (9 mm) needles, straight or a 24" or longer circular needle, or size needed to obtain correct gauge
Other Supplies
- Stitch marker
- Cable needle
- Yarn needle
Abbreviations
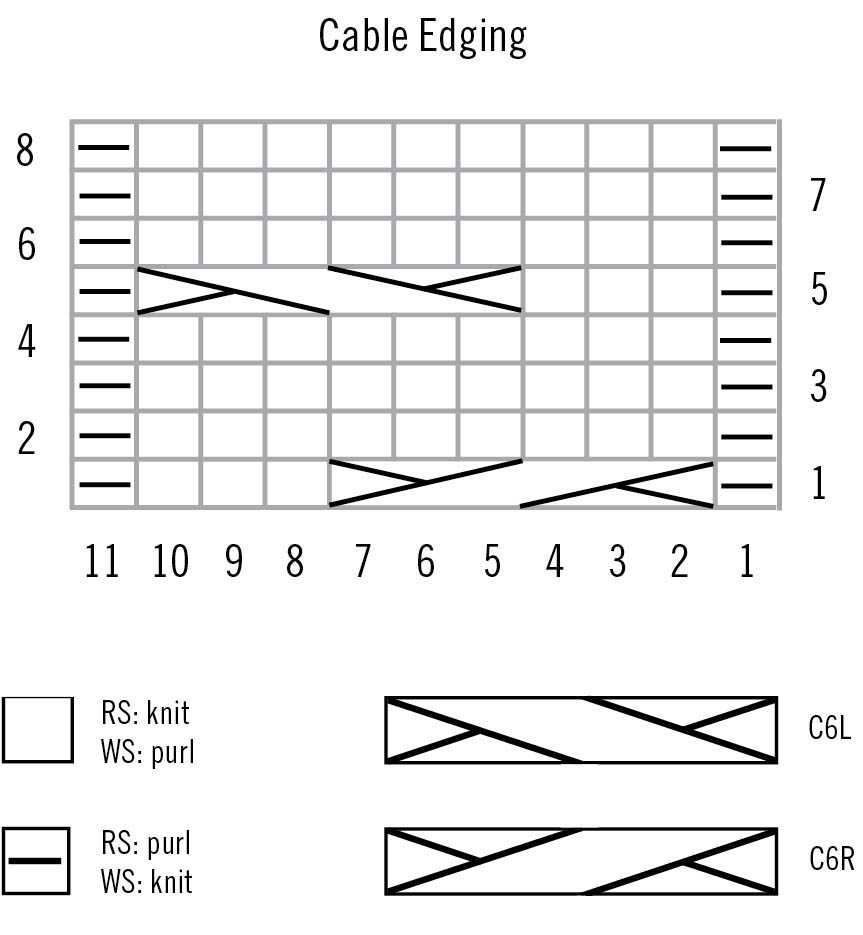
- C6L Slip next 3 stitches to cable needle and hold in front of work; k3, then k3 from cable needle
- C6R Slip next 3 stitches to cable needle and hold in back of work; k3, then k3 from cable needle
Spinning Notes
Spinning thick and thin is a lot about spinning incorrectly. You make the best lumps and bumps by pulling too far back into your fiber supply. Just a little too far back, and it will make your spinning perfectly uneven.
Knitting Notes
This shawl is worked side to side, first increasing to the center and then decreasing to the other end. You can work it two different ways. I’ve given directions for specific sizes and stitch amounts for the increases. If you’re worried about not having enough yarn, however, or if you know you have more than enough and would like a larger shawl, you can divide your yarn in half, and then use half to create the section of the shawl with the increases and the other half to decrease and finish the shawl, skipping the even section in the middle. Either way, you will have a lovely shawl in the end.
Pattern Stitches
Cable Edging
(worked flat over 11 stitches)
Row 1 (RS): P1, C6R, k3, p1.
Row 2 and all WS rows to Row 8: K1, p9, k1.
Row 3: P1, k9, p1.
Row 5: P1, k3, C6L, p1.
Row 7: K1, p1, k9.
Knitting the Shawl
First Section
- Setup: Cast on 18 stitches. Knit 2 rows.
- Row 1 (RS): K2, yo, k2tog, kfb, place marker, work Cable Edging pattern (see Pattern Stitches), k2. (1 stitch increased)
- Row 2 and all WS rows: K2, work Cable Edging pattern, purl to the last 2 stitches, k2.
- Row 3: K2, yo, k2tog, knit to marker, work Cable Edging Pattern, k2.
- Row 5: K2, yo, k2tog, knit to 1 stitch before marker, kfb, work Cable Edging Pattern, k2. (1 stitch increased)
- Row 7: K2, yo, k2tog, knit to marker, work Cable Edging pattern, k2. Note: Every time you complete the 8-row repeat of Cable Edging pattern, you will have increased by 2 stitches.
- Continue to work as established until you have increased to 38 stitches total, or if you’ve divided your yarn into two sections, work until the first half is almost done, ending with a wrong-side row.
Second Section
- Next RS row: K2, yo, k2tog, knit to marker, work the appropriate row of the cable chart, k2.
- All WS rows: K2, work appropriate row of Cable Edging pattern, purl to the last 2 stitches, k2.
- Work in this manner for 16" or until you’ve used the first half of the yarn, ending with a wrong-side row. If you’ve separated your yarn into two equal portions, attach the second ball and continue, working the same number of rows even as you did in the first half of this section.
Third Section
- Row 1 (RS): K2, yo, k2tog, knit to 2 stitches before the marker, ssk, work Cable Edging pattern, k2.
- Row 2 and all WS rows: K2, work Cable Edging pattern, purl to the last 2 stitches, k2.
- Row 3: K2, yo, k2tog, knit to marker, work Cable Edging pattern, k2.
- Row 5: K2, yo, k2tog, knit to 2 stitches before the marker, ssk, work Cable Edging pattern, k2.
- Row 7: K2, yo, k2tog, knit to marker, work Cable Edging pattern, k2.
- Note: Every time you complete the 8-row repeat of the Cable Edging pattern, you will have decreased by 2 stitches.
- Continue to work rows 1 and 2 until you have decreased to 18 stitches. Remove the marker.
- Knit 2 rows. Bind off all stitches loosely.
Finishing
- Wet-block and pin to size. Weave in ends.
Tetris Pullover
Designed by Julia Farwell-Clay
This slightly boxy drop-shoulder pullover uses a modular construction to highlight organically occurring color shifts from the random spinning of space-dyed roving.
Sizes
- 32" (36", 40", 44", 48", 52")
Finished Measurements
- 38" (42", 46", 50", 54", 58") at bust, intended to be worn with 4"–6" of positive ease
Fiber
- Into The Whirled, Romney top, 9 (10, 11, 12, 13, 14) oz Rhinebeck colorway
Yarn Description
- 2-ply
- 1,600 ypp
- 13–14 wpi
- Worsted draft with short forward draw
- Finished by snapping
Yarn Amount
- 860 (970, 1,080, 1,180, 1,290, 1,400) yds
Gauge
- 20 stitches and 30 rows = 4" × 4" in stockinette stitch on larger needles
Needles
- US 4 (3.5 mm) straight needles
- US 4 (3.5 mm) double-pointed needles or 16" circular needle for finishing neck
- US 5 (3.75 mm) straight needles or size needed to obtain correct gauge
Other Supplies
- Extra needle in larger size
- Stitch markers, removable and ring style
- Stitch holders or scrap yarn
- Yarn needle
Abbreviations
- cdd Slip next 2 stitches together knitwise, k1, pass 2 slipped stitches over stitch just knit
Spinning Notes
From Beth Smith, spinner:
For this yarn, I focused on what Julia wanted to happen with the colors, which was to have them as mixed up as possible. I spun a few yards from the full thickness of the top — short forward draw but with a light pinch — and sent her photos. We talked about color repeats and how long she wanted each color bit to be. We decided that I should strip the top in half so that the color lengths would be shorter and change more often. When plying there was some color matching, but the overlapping of different colors was desirable for this particular sweater.
I spun this yarn with a light pinch because Romney is a heavier wool and can make a dense yarn pretty easily. I didn’t want to compress the yarn too much: I wanted a lighter and airier yarn without the woolen surface.
From Julia Farwell-Clay, designer:
When I originally spun the sample yarn for this sweater it was a DK-weight yarn with the colors as marled as possible. I ended up being pressed for time to both spin and design this sweater, so I asked my friend Beth Smith to spin the yarn for me. What Beth sent was a lighter-weight yarn than I would have spun for myself. This ended up being a wise decision on her part, as the Romney made for a lofty yet slightly crisp yarn.
After swatching, I decided to loosen up both the gauge and the profile of my original sweater idea, knitting the sport/fingering yarn closer to a gauge one might think better suited for a heavier yarn. The resulting fabric allowed the yarn to drape a little, which was suited to a slightly boxy, easy-to-wear shape. A fiber with a different character, like Merino or a silk blended with Bluefaced Leicester, for example, would be equally suitable for this project, so long as it is spun to a yarn that makes a pleasant knitted fabric at the recommended knitted gauge.
Knitting Notes
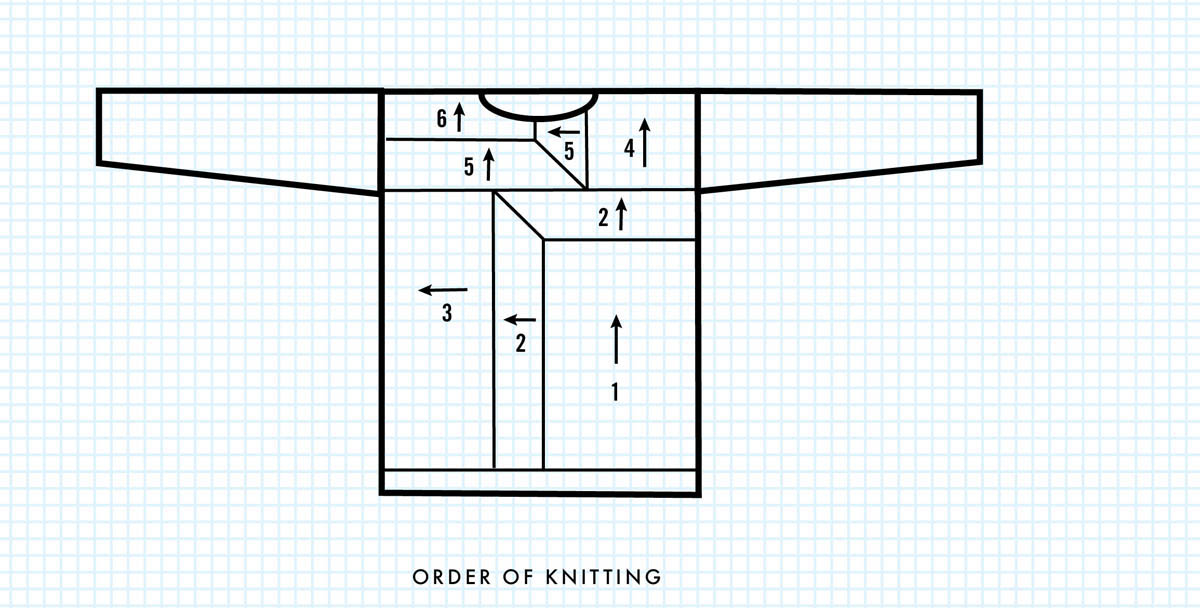
The sweater is worked flat and in front, back, and sleeve pieces. The front and back are worked modularly, then joined at the shoulder using a three-needle bind off. Hem and neck stitches are picked up after seaming and worked in the round. Sections are named according to their position on the sweater as it will be worn. In other words, a so-called Right section may appear on either the right or left of the working fabric, depending on if a right-side or wrong-side row is being worked, so sections will be referred to by their “as-if-being-worn” position.
Knitting the Sweater
Lower Front Left
- Using the extra (larger needle and a long-tail cast on), cast on 50 (55, 60, 65, 70, 75) stitches and work in stockinette stitch until piece measures 111⁄2" (121⁄2", 121⁄2", 131⁄2", 131⁄2", 141⁄2"), or 41⁄2" less than desired length to upper arm, ending with a wrong-side row.
- Next Row (establish mitered section, RS): Knit to last stitch, M1R, place marker, k1. Keeping right side facing, pick up and knit along left edge at the rate of 2 stitches for every 3 rows, about 57 (62, 62, 67, 67, 72) stitches after marked stitch, but precise number doesn’t matter. Turn.
- Next Row (WS): P1, knit to last stitch, p1.
- Next Row (RS): Knit to marker, M1R, slip marker, k1, knit to end of row. (2 stitches increased)
- Repeat these 2 rows 16 times more, or until mitered section is 3" wide, ending with a right-side row. Do not cut yarn. With right side facing, slip all stitches up to marker onto stitch holder or length of scrap yarn and remove marker.
Lower Front Right
- With wrong side facing, purl across live stitches.
- Next Row (RS): Knit all stitches.
- Continue in stockinette stitch until section measures 61⁄2" (71⁄2", 81⁄2", 91⁄2", 101⁄2", 111⁄2"), or until entire front measures 19" (21", 23", 25", 27", 29") across. Bind off all stitches.
- With right side facing, return held stitches to working needle, starting at right edge of work.
Upper Front Left
- With right side facing, join new yarn at end of the held stitches (at mitered corner) and pick up and knit 2 stitches for every 3 rows along upper edge of Lower Front Right, about 32 (37, 42, 47, 52, 57) stitches.
- Next Row (WS): Purl across all stitches (including the previously held ones) along the full width of the front.
- Next Row (RS): Knit 36 (41, 46, 51, 56, 61) stitches. Place remaining stitches on holder and set aside.
- Work these 36 (41, 46, 51, 56, 61) stitches in stockinette stitch as established until section measures 4" (41⁄2", 51⁄4", 6", 61⁄2", 7") or 141⁄2" (151⁄2", 151⁄2", 161⁄2", 161⁄2", 171⁄2") from initial cast on at lower hem.
Front Neck Left Shaping
- Next Row (RS): Knit.
- Next Row (WS): Bind off as required until 36 (40, 45, 49, 53, 57) stitches remain. Purl to end of row.
- Next Row (RS): Knit all stitches.
- Next Row (WS): Bind off 3 stitches. Purl to end of row.
- Bind off 1 stitch at neck edge every wrong-side row three times, or until 30 (34, 39, 43, 47, 51) stitches remain. Work until section measures 51⁄2" (6", 63⁄4", 71⁄2", 8", 81⁄2"), or 211⁄2" (23", 233⁄4", 251⁄2", 26", 271⁄2") total length from cast-on edge at lower hem. Place shoulder stitches on holder and set aside.
Upper Front Right
- Setup Mitered Section: Return held stitches of Lower Front Right to needle.
- With right side facing, join yarn at neck edge and pick up and knit 2 stitches for every 3 rows along Left
- Front vertical edge, place removable stitch marker in the last stitch [about 20 (23, 26, 30, 33, 35) stitches total]. Continuing around the corner, work across stitches of the Lower Front Right.
- Note: The following section is worked in garter stitch with purl selvedge.
- Next Row (WS): P1, k to last stitch, p1.
- Next Row (RS): Knit to last stitch before marked stitch, cdd, knit to end of row.
- Repeat last 2 rows 16 more times, or until mitered section is 3" wide, ending with a right-side row. Move the stitch marker up onto the needle, to the left of the cdd stitch (when looked at from the right side).
- From here you will work back and forth in stockinette on the stitches (the horizontally oriented stitches) to the left of marked stitch, decreasing away the stitches on the other side of the marked stitch.
- Next Row (WS): Purl to marker, p2tog. Turn work.
- Next Row (RS): Slip stitch from right needle to left needle, k2tog, knit to end of row.
- Next Row (WS): Purl to marker, turn; do not work a held stitch.
- Next Row (RS): Slip stitch from right needle to left needle, k2tog, knit to end of row.
- Next Row (WS): Purl to marker, p2tog. Turn work.
- Next Row (RS): K to marker, turn; do not work a held stitch.
- Continue in this way, working held stitches together with first or last stitch in row 2 out of every 3 rows until all held stitches are worked. End having completed a wrong-side row.
Front Neck Right Shaping
- Next Row (RS): Bind off as required until 36 (40, 45, 49, 53, 57) stitches remain. Knit to end of row.
- Next Row (WS): Purl all stitches.
- Next Row (RS): Bind off 3 stitches, knit remaining stitches.
- Bind off 1 stitch at every right-side neck edge three times, or until 30 (34, 39, 43, 47, 51) stitches remain. Work until section measures 51⁄2" (6", 63⁄4", 71⁄2", 8", 81⁄2") or 211⁄2" (23", 233⁄4", 251⁄2", 26", 271⁄2") total length from cast-on edge at lower hem. Place shoulder stitches on holder and set aside.
Lower Back Panel
This section is worked side to side.
- Setup: With larger needle, cast on 75 (75, 80, 80, 85, 85) stitches.
- Work in stockinette stitch until piece measures 8" (9", 10", 11", 12", 13"), ending with a wrong-side row.
- Next Row (RS): Knit.
- Next Row (WS): P1, k to last stitch, p1.
- Continue piece in garter stitch with wrong-side purl selvedge as established for 3", ending with a wrong-side row.
- Continue in stockinette stitch an additional 8" (9", 10", 11", 12", 13"), until Lower Back Panel measures 19" (21", 23", 25", 27", 29") across. Bind off all stitches.
Upper Back Panel
- Setup: With right side facing and starting at cast-on end, pick up along upper edge of Lower Back Panel as follows: 2 stitches for every 3 rows in stockinette sections and 1 stitch for every garter-stitch ridge. [about 95 (105, 115, 125, 135, 145) stitches]
- Work in garter stitch for 3", ending with a wrong-side row.
- Work in stockinette stitch with wrong-side purl selvedge as before until section measures 7" from pickup row, ending with a wrong-side row.
- Place shoulder markers 30 (34, 39, 43, 47, 51) stitches from each end.
- Work next row, bind off neck stitches between markers.
- Join front to back shoulders using three-needle bind off.
Sleeves
(make 2)
- Setup: Using smaller needle, cast on 46 (46, 50, 50, 54, 54) stitches.
- Work in garter stitch for 11⁄2".
- Switch to larger needle and work in stockinette stitch until sleeve measures 3" from cast-on edge, ending with a wrong-side row.
- Increase Row (RS): K1, M1, knit to last stitch, M1, k1. (2 stitches increased)
- Work this increase row every 12 (10, 8, 6, 6, 6) rows 7 (10, 12, 15, 16, 18) times altogether. [60 (66, 74, 80, 86, 90) stitches]
- Continue until sleeve measures 17" (17", 18", 18", 19" 19") from cast-on edge. Bind off all stitches.
Finishing
- Wet-block all pieces to schematic measurements.
Knitting the Neck
- Setup: Using smaller needle, join yarn at right shoulder seam with right side facing, pick up and knit 1 stitch in each shoulder seam and 1 stitch for every bound-off stitch across back neck for 38 (40, 40, 42, 44, 46) stitches, then 10 stitches down left front neck slope, 23 (25, 25, 27, 29, 31) stitches across front garter and bound-off edge, and 10 stitches up right front neck slope. [81 (85, 85, 89, 93, 97) stitches]
- Work garter stitch in the round for 3 rounds (purl 1 round, knit 1 round, purl 1 round).
- Bind off all stitches loosely.
- Place markers on front and back pieces, 6" (61⁄2", 71⁄4", 8", 81⁄2", 9") down from shoulder seam. Sew sleeves to body between markers. Sew side seams.
Hem Edge
- With right side facing and using smaller needle, pick up approximately 190 (210, 230, 250, 270, 290) stitches along hem edge of piece by picking up 2 stitches for every 3 rows of stockinette stitch and 1 stitch for every garter-stitch ridge.
- Work garter stitch in the round (purl 1 round, knit 1 round) until hem section measures 11⁄2".
- Bind off all stitches.
- Weave in all ends.
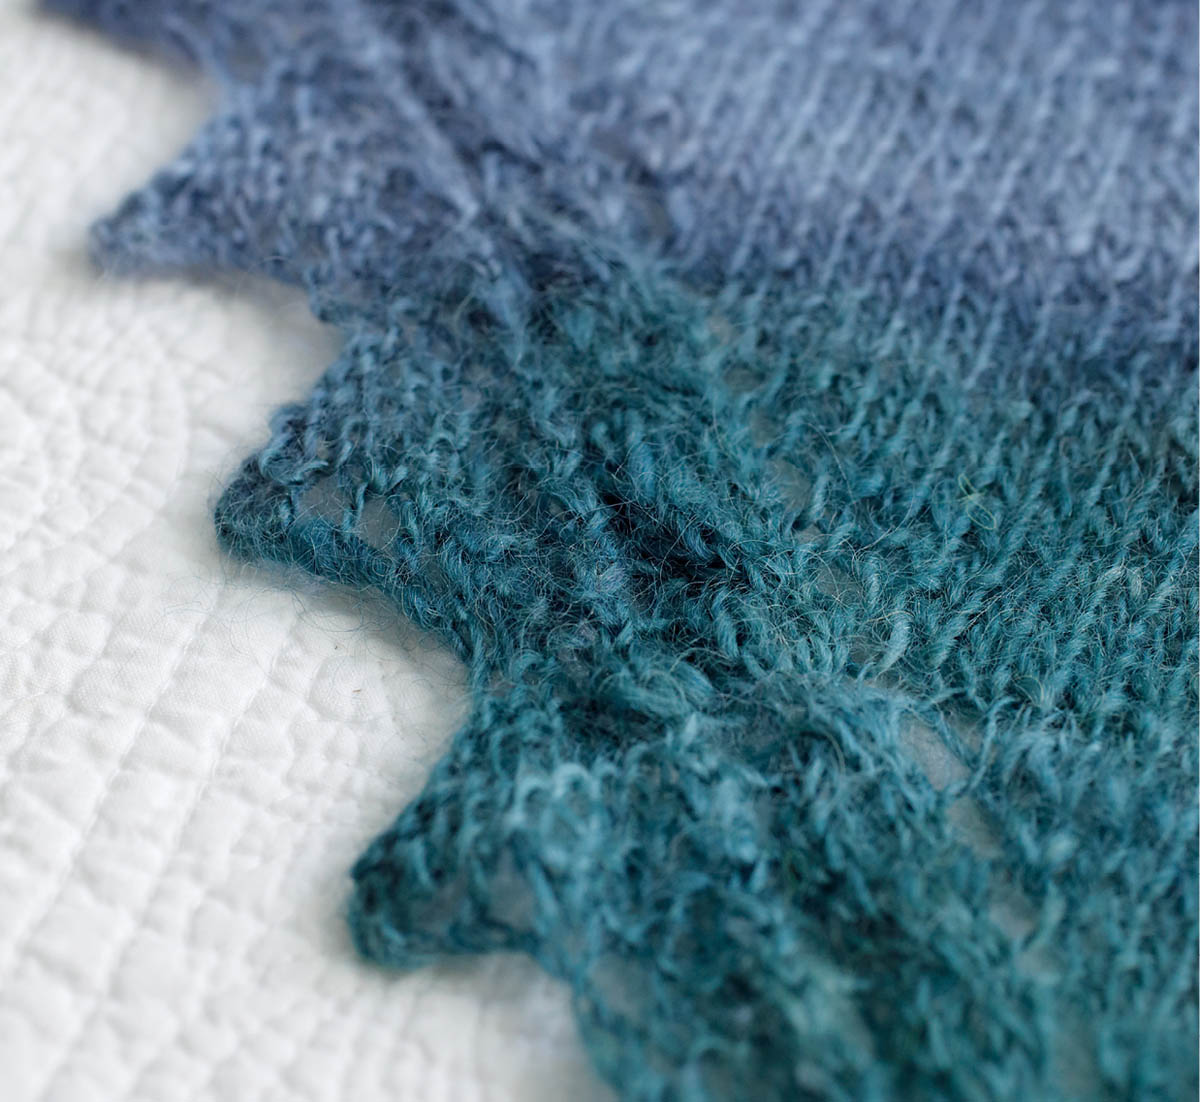
Wenny Shawl
Designed by Amy King
Singles yarns come in all sizes. This shawl shows off the skinnier side of singles. Much like its thicker cousin (see Bump in the Night), this shawl has a single cable accenting the edge, this time with a bit more openness and toothiness.
Finished Measurements
- 65" wide × 26" long at the center
Fiber
- Spunky Eclectic, Wensleydale, 7 oz combed top, Lime Beginnings in the Progression colorway
Yarn Description
- Singles yarn
- Fingering weight
- Worsted spun
- 1,200 ypp
- 24 wpi
- Drafted short draw
- Lightly fulled
Yarn Amount
- 560 yds, but more or less could be used (see Knitting Notes on next page)
Gauge
- 18 stitches and 28 rows = 4" × 4" in stockinette stitch
Needles
- US 6 (4 mm) needles, straight or 24" or longer circular needle, or size needed to obtain correct gauge
Other Supplies
- Stitch marker
- Cable needle
- Yarn needle
Abbreviations
- C4R Slip next 2 stitches to cable needle and hold in back of work, k2, then k2 from cable needle
Spinning Notes
This fiber is a little tricky: you need to spin to the staple length. This is a great thing to remember. When you work with Wensleydale, pull out a bit and look at it. It’s long! It really doesn’t need a super lot of twist to hold together. Spinning this low twist for singles should be a dream. Set that wheel to pull in faster to help remind you to let go quicker than you would for other fibers.
Knitting Notes
This shawl is worked side to side, first by increasing to the center and then by decreasing to the other end. It can be worked two ways. I’ve given directions for specific sizes and stitch amounts to increase to, but if you’re worried about the amount of yarn you have or you know you have more and want a larger shawl, you can divide your yarn in half. Use half to create the first (increase) part of the shawl, and then use the other half to create the second half of the shawl. Either way you will have a lovely shawl in the end.
Pattern Stitches
Shark Tooth
(worked flat over 3 stitches, increased to 8)
Row 1 (and all odd-numbered rows through row 11): Knit all stitches.
Row 2: Slip 1, yo, k2.
Row 4: Slip 1, yo, k3.
Row 6: Slip 1, yo, k4.
Row 8: Slip 1, yo, k5.
Row 10: Slip 1, yo, k6.
Row 12: Bind off 5 (1 stitch remains on right needle), k2.
Cable
(worked flat over 6 stitches)
Row 1 (RS): P1, k4, p1.
Row 2 (and all even-numbered rows through Row 6): K1, p4, k1.
Row 3: P1, C4R, p1.
Row 5: P1, k4, p1.
Knitting the Shawl
- Cast on 16 stitches.
- Knit 4 rows.
Increase Section
Note: While the body of the shawl is gaining only 1 stitch per right-side row, sometimes the edging will be gaining a stitch as well and sometimes losing 5.
- Row 1 (RS): K2, yo, k2tog, k1, yo, place marker, work Cable pattern (see facing page), yo, k2tog, work Shark Tooth. (1 body stitch increased)
- Row 2 and all WS rows: Work Shark Tooth, p2, work Cable pattern, purl to the last 2 stitches, k2.
- Row 3: K2, yo, k2tog, knit to the marker, yo, slip marker, work Cable pattern, yo, k2tog, work Shark Tooth.
- Continue as established until you have completed 16 full repeats of the Shark Tooth edging. You will have 3 stitches for the tooth, and the rest of the shawl will have 109 stitches. (112 stitches total)
Note: If you are working this shawl with two balls of yarn instead, ensure you end this section close to the end of the first ball, ending after row 12 of Shark Tooth edging.
Decrease Section
- Row 1: K2, yo, k2tog, knit until 3 stitches before the marker, sk2p, yo, slip marker, work Cable pattern, yo, k2tog, work Shark Tooth.
- Row 2 and all WS rows: Work Shark Tooth, p2, work Cable pattern, p to the last 2 stitches, k2.
- Continue as established until you have decreased to 16 stitches.
- Knit 4 rows.
Finishing
- Wet-block and pin to size. Be sure to pin out the points when blocking the shawl. Weave in ends.
La Cuerda
Designed by Laura Nelkin
Knit jewelry is an excellent way to use up smaller bits of handspun. La Cuerda, a long sinuous rope, plays with a new technique Laura developed for working beaded I-cord. Beads are placed on stitches to create rings of sparkle around the entire I-cord strand. The beads are added individually on regular stitches and in sets of three on elongated stitches, creating a pattern of color and texture throughout the strand. It’s incredibly addictive to experiment with the placement of color. Start to play, and see what you come up with — the possibilities are endless! La Cuerda is long enough to be worn wrapped two or three times around the neck and is easily adjusted to make it longer or shorter.
Finished Measurements
Fiber
- Blue Moon Fiber Arts 50% Merino/50% Yak top, o.5 oz color: Cranberry Bogged
Yarn Description
- 2-ply slightly more twisted than balanced
- 1250 ypp
- 12–14 wpi
- Worsted draft
- Hot soak and hang to finish
Yarn Amount
Gauge
- 21 stitches and 30 rows = 4" × 4" in stockinette stitch
Needles
- Two US 5 (3.75 mm) double-pointed needles or size needed to obtain correct gauge
Other Supplies
- Hook-and-eye or toggle clasp
- 252 size 8° Miyuki Delica beads (approximately 10 g), Garnet Gold Luster (color A)
- 276 size 8° Miyuki Delica beads (approximately 11 g), Gunmetal (color B)
- US size 14 (0.75 mm), US size 12 (1 mm) steel crochet hook, or Verna-X Beadle Needle for placing beads
- Yarn needle
Spinning Notes
From Carol Knox, spinner
This was fantastic fiber to play with and a beautiful colorway. I spun this short forward draw, drafting back and forth across the top in a worsted style with no twist in the drafting triangle. It made a beautiful, smooth, yet very soft yarn — one of the nicest I’ve spun.
Knitting Notes
Working I-cord. I-cord needs to be worked on double-pointed needles, as follows:
- Knit 1 row, and do not turn your work.
- Slide your work to the other end of your double-pointed needle. The working yarn will be at the wrong end of your work.
- Pull the working yarn around the back of your work and knit the next row.
- Continue in this way, never turning your work but sliding the stitches at the end of every row. Easy!
Wrapping yarn. Insert the right needle into the next stitch on the left needle, wrap the yarn twice around the right needle at its widest circumference, and then knit the stitch. When you encounter these wrapped stitches on the next round, drop the extra wrap, creating an elongated stitch.
Placing beads. With super floss, crochet hook, or Beadle Needle, place bead onto next stitch on left needle, then knit the stitch. This will lock the bead into place. See the appendix, Adding Beads to Your Knitting, for more advice on how to do this.
Knitting the Necklace
- Setup: Thread one end of clasp onto yarn. Using the long-tail cast on (see here), cast on 2 stitches, slide the clasp up, and then thread the tail of the yarn through the clasp as well. Cast on 2 more stitches. (4 stitches on needle)
- Work I-cord throughout.
- Rows 1–3: Knit.
- Row 4: K1, M1, k2, M1, k1. (6 stitches on needle)
- *Next 12 Rows: Knit.
- Next Row: Place 1 color A bead six times, one on each stitch.
- Next 2 Rows: Knit.
- Next Row: Knit across, wrapping yarn twice for each stitch.
- Next Row: Place 3 color B beads six times (3 beads on each stitch).
- Repeat the last 4 rows once more.
- Next 3 Rows. Knit.
- Next Row: Place 1 color A bead six times, one on each stitch.
- Next 12 Rows: Knit.
- Next Row: Place 1 color B bead six times (3 beads on each stitch).
- Next 2 Rows: Knit.
- Next Row: Knit across, wrapping yarn twice for each stitch.
- Next Row: Place 3 color A beads six times, as above.
- Repeat the last 4 rows once more.
- Next 3 Rows: Knit.
- Next Row: Place 1 color B bead six times, as above.
- Repeat from * four more times.
- Next 12 Rows: Knit.
- Next Row. Place 1 color A bead six times, as above.
- Next 2 Rows: Knit.
- Next Row: Knit across, wrapping yarn twice for each stitch.
- Next Row: Place 3 color B beads six times, as above.
- Repeat the last 4 rows once more.
- Next 3 Rows: Knit.
- Next Row: Place 1 color A bead six times, as above.
- Next 12 Rows: Knit.
- Next Row: K1, k2tog twice, k1. (4 stitches on needle)
- Next 2 Rows. Knit.
- Cut yarn, leaving an 8" tail.
- K2, thread the second half of the clasp onto yarn, slide it up so that it is touching last stitch worked on the right needle, k2.
- Bind off 1 stitch, slide the cut end of yarn through clasp again, bind off the remaining stitches.
Finishing
Weave in all ends, making sure to thread the ends through the clasps a few times to secure them. Block if desired.
Winter Library Shawl
Designed by Jillian Moreno
I do a lot of my work at my public library, and in the winter there is a bit of a breeze that flows through the spot I like best. This is my favorite shawl to wear at the library. The quarter-moon shape and the weight of the fiber and gauge help it stay on my shoulders without slipping, and the bit of flowered embroidery brings a little spring to my winter work.
Finished Measurements
- 81" long × 18" at its widest point
Fiber
- Sweet Georgia Yarns, Bluefaced Leicester top, 10 oz, Ultraviolet (MC)
- Sweet Georgia Yarns, 50% Merino/50% silk top, 1⁄2 oz each in the following colors: Glacier (CA), Raspberry (CB), Dutch (CC), Melon (CD), Basil (CE), and Wisteria (CF)
Yarn Description
- MC: 2-ply
- 600 ypp
- 8–9 wpi
- Woolen draft
- Soak and snap finishing
- CC: 2-ply
- 775 ypp
- 12 wpi
- Woolen draft
- Soak and snap finishing
Yarn Amount
- Ultraviolet (MC): 365 yds; 25 yards for each of the following:
- Glacier (CA)
- Raspberry (CB)
- Dutch (CC)
- Melon (CD)
- Basil (CE)
- Wisteria (CF)
- (Note: These fiber amounts do not include fiber for sampling or swatching.)
Gauge
- 12 stitches and 18 rows = 4" × 4" in stockinette stitch, after blocking
Needles
- One US 7 (4.5 mm) circular needle, 32" or longer, or size needed to obtain correct gauge
Other Supplies
- Stitch markers (optional; removable are recommended)
- Yarn needle
- Tapestry or crewel needle for embroidery
Spinning Notes
I spun the embroidery yarns woolen and plied each to balance, looser than you might think you want for stitching. I did it this way because I want my stitches to spread softly on the knitted surface.
Pattern Stitch
Moss Stitch
(worked flat on an even number of stitches)
Row 1: *K1, p1; repeat from * to end of row.
Row 2: *P1, k1; repeat from * to end of row.
Knitting the Shawl
- Setup: Using MC, cast on 244 stitches. Do not join; the shawl is worked back and forth in rows.
- Work Moss Stitch (see Pattern Stitch) for 4 rows.
Set up Short Rows
- Row 1 (RS): K127, turn.
- Row 2 (WS): P10, turn.
- You now have two obvious gaps where you turned. If you wish, place removable markers in the gaps to help you navigate. If you are using markers, remove them before you work the decrease, and then replace them on the right needle before you turn at the end of a row.
Shape Shawl Body
- Row 1: Knit to 1 stitch before gap, ssk, k2, turn work.
- Row 2: Purl to 1 stitch before gap, p2tog, p2, turn work.
- Repeat these 2 rows until all stitches have been worked, ending with a wrong-side row. (166 stitches)
- Work in Moss Stitch for 4 rows. Bind off.
Finishing
Wet-block the shawl to the finished measurements. Weave in ends. Embroider flower motif as shown in diagram or in your own design.
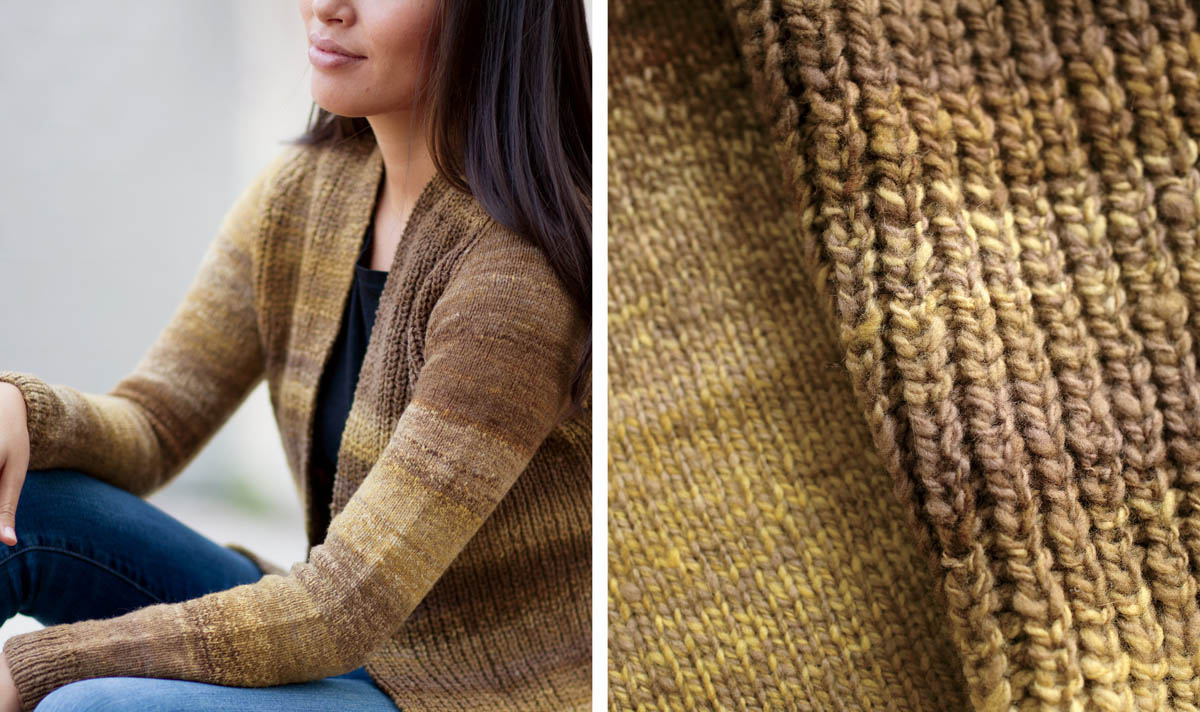
Rigby Cardigan
Designed by Bristol Ivy
One of my favorite reasons for knitting with handspun is its texture, which I wanted to accentuate in this sweater. My goal was a project that felt textured and cozy, and that took advantage of the wonderful zeal and vibrancy handspun yarn has. The first step toward this was choosing to make rolags from the handdyed sliver and spinning it into an open, fluffy, woolen-spun 2-ply with a little bit of extra ply twist. The yarn is bouncy, lofty, and full of life, with the irregularities and toothiness inherent in carded fiber. From there, I picked a simple stitch pattern that would further accentuate that texture — a variation on Fisherman’s Rib called English Rib. Typically, any stitch that compresses the row gauge could lead to a heavy, sagging fabric, but the open and airy woolen-spun yarn construction counteracted that. The cardigan that resulted is simple, clean, and wearable, with hints of architecture in the waist shaping in the back; ribs trail together and branch off to create a structured and flattering shape.
Sizes
- Woman XS (S, M, L, XL, 2XL, 3XL, 4XL)
Finished Measurements
- 331⁄2" (371⁄2", 411⁄2", 451⁄2", 483⁄4", 523⁄4", 563⁄4", 603⁄4") bust circumference, with fronts overlapping 3" (3", 3", 3", 33⁄4", 33⁄4", 33⁄4", 33⁄4")
Fiber
- PortFiber, 100% domestic Rambouillet, 141⁄2 (161⁄4, 18, 193⁄4, 211⁄4, 23, 243⁄4, 261⁄2) oz (15% buffer added), Fields of Gold colorway (combed sliver), carded into rolags
Yarn Description
- 2-ply
- Approximately 1,400 ypp
- 131/3 wpi
- Assisted long draw drafting
- Finished by soaking, spinning out excess water, and whacking
Yarn Amount
- Approximately 1,270 (1,420, 1,575, 1,730, 1,860, 2,015, 2,165, 2,320) yds
Gauge
- 20 stitches and 40 rows = 4" × 4" in English Rib, after blocking, on size A needles
- 26 stitches and 40 rows = 4" × 4" in stockinette stitch, after blocking, on size B needles
Needles
- Size A: US 6 (4 mm) circular needle for English Rib, 32" or longer, or size needed to obtain correct gauge
- Size B: set of four or five US 5 (3.75 mm) double-pointed needles, at least 4" long, or size needed to obtain correct gauge
- Size C: set of four or five US 4 (3.5 mm) double-pointed needles, at least 4" long
- Size D: US 7 (4.5 mm) circular needle, 32" or longer for 1x1 ribbing on body
Other Supplies
- Stitch markers
- Cable needle
- Stitch holders or scrap yarn
- Yarn needle
Abbreviations
- CD-L (cabled decrease left) Slip next 2 stitches to cable needle and hold in front, insert needle as if to purl through first stitch on left needle and first stitch on cable needle, purl these stitches together. Insert needle as if to knit through next stitch on cable needle and next stitch on left needle, knit these stitches together (2 stitches decreased; leans left)
- CD-R (cabled decrease right) Slip next 2 stitches to cable needle and hold in back, insert needle as if to knit through first stitch on left needle and first stitch on cable needle, knit these stitches together. Insert needle as if to purl through next stitch on cable needle and next stitch on left needle, purl these stitches together (2 stitches decreased; leans right)
Pattern Stitches
English Rib
(worked flat over a multiple of 2 stitches plus 1)
Row 1 (RS): Slip 1, *p1, k1; repeat from * to end.
Row 2 (WS): Slip 1, p1, *k1 below, p1; repeat from * to end.
Knitting the Sweater
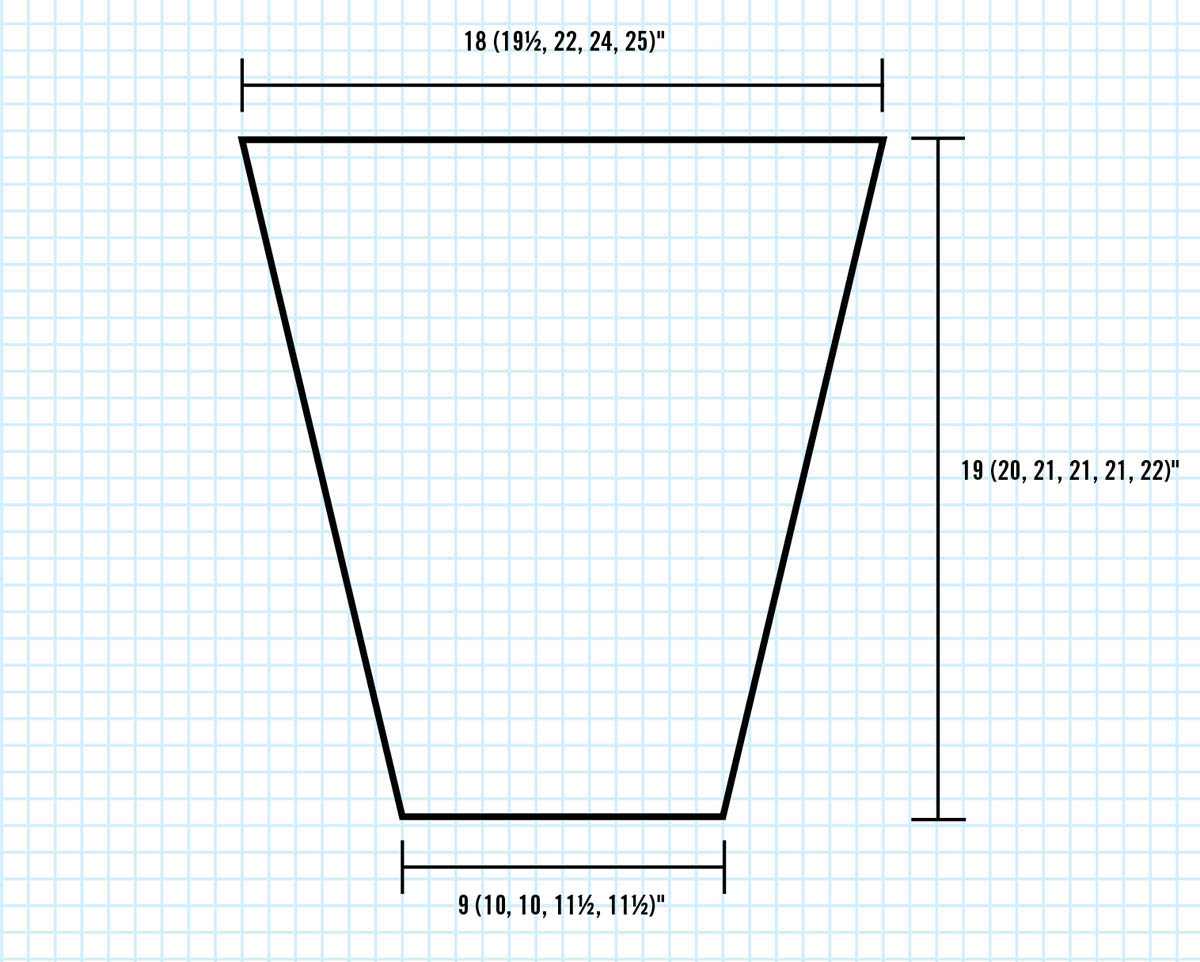
The Sleeves
(make 2)
- With size C needles and using long-tail cast on, cast on 48 (48, 52, 52, 54, 54, 58, 58) stitches. Distribute across needles as you prefer, and join to work in the round.
- Ribbing Round: *K1, p1; repeat from * to end.
- Work in 1x1 ribbing as established until work measures 2" from cast on.
- Change to size B needles.
- Work even in stockinette stitch for 13 (11, 9, 9, 7, 5, 5, 5) rounds.
- Next Round (increase round): K1, M1L, knit to 1 stitch before end, M1R, k1. (2 stitches increased; 50 [50, 54, 54, 56, 56, 60, 60] stitches)
- Repeat this increase round every 14 (12, 10, 10, 8, 6, 6, 6) rounds 5 (1, 13, 1, 13, 24, 24, 16) more time(s), then every 12 (10, 8, 8, 6, 4, 4, 4) rounds 5 (12, 1, 16, 7, 1, 2, 14) time(s). [70 (76, 82, 88, 96, 106, 112, 120) stitches]
- Work even in stockinette stitch until sleeve measures 19" (19", 191⁄2", 191⁄2", 20", 20", 201⁄2", 201⁄2"), ending final round 3 (4, 4, 5, 6, 7, 8, 9) stitches before end.
- Next Round: Bind off next 6 (8, 8, 10, 12, 14, 16, 18) stitches, work in stockinette stitch as established to end. You will now work flat. [64 (68, 74, 78, 84, 92, 96, 102) stitches]
- Next Row (WS): Purl.
- Sizes XS and S only: Work 2 rows even in stockinette stitch.
- All sizes:
- Next Row (decrease row, RS): K1, ssk, knit to 3 stitches before end, k2tog, k1. [2 stitches decreased; 62 (66, 72, 76, 82, 90, 94, 100) stitches remain]
- Repeat this decrease row every other row 29 (31, 34, 36, 38, 40, 43, 45) more times. (4 [4, 4, 4, 6, 10, 8, 10] stitches remain)
- Bind off all stitches and set aside.
Body
- With size D needle and using long-tail cast on, cast on 191 (211, 231, 251, 271, 291, 311, 331) stitches. Do not join.
- Next Row (WS): P1, *k1, p1; repeat from * to end.
- Next Row (RS): K1, *p1, k1; repeat from * to end.
- Work even in 1x1 rib as established until work measures 2" from cast-on edge, ending after a wrong-side row.
- Next Row (RS): Work 50 (55, 60, 68, 75, 80, 85, 90) stitches in rib as established, place marker for side, work 17 (19, 21, 23, 23, 25, 27, 29) stitches in rib as established, place marker, work 18 (20, 22, 24, 24, 26, 28, 30) stitches in rib as established, place marker, work 21 (23, 25, 21, 27, 29, 31, 33) stitches in rib as established, place marker, work 18 (20, 22, 24, 24, 26, 28, 30) stitches in rib as established, place marker, work 17 (19, 21, 23, 23, 25, 27, 29) stitches in rib as established, place marker, work 50 (55, 60, 68, 75, 80, 85, 90) stitches in rib as established to end. New markers placed will be referred to as shaping markers.
- Next Row (WS): Work row 2 of English Rib.
- Work even in English Rib for 22 more rows.
- Next Row (decrease row, RS): Work in English Rib as established to side marker, slip marker, (work in English Rib as established to 4 stitches before shaping marker, CD-R, slip marker) twice, work in English Rib as established to marker, slip marker, (CD-L, work in English Rib as established to marker, slip marker) twice, work in English Rib as established to end. (8 stitches decreased)
- Repeat this decrease row every 24th row once more, then every 22nd row twice, ending with a decrease row. [159 (179, 199, 219, 239, 259, 279, 299) stitches remain]
- Work even in English Rib for 1", ending after a wrong-side row.
- Next Row (increase row, RS): Work English Rib as established to side marker, slip marker, (work in English Rib as established to 2 stitches before shaping marker, k1-yo-k1 into next stitch, p1, slip marker) twice, work in English Rib as established to marker, slip marker, (p1, k1-yo-k1 into next stitch, work in English Rib as established to marker, slip marker) twice, work in English Rib as established to end. (8 stitches increased)
- Repeat this increase row every 12 (12, 14, 14, 14, 14, 14, 14) rows 2 (2, 1, 1, 1, 3, 3, 3) more time(s), then every 10 (10, 12, 12, 12, 0, 0, 0) rows 1 (1, 2, 2, 2, 0, 0, 0) time(s), ending with an increase row. [191 (211, 231, 251, 271, 291, 311, 331) stitches]
- Work even in English Rib for 10 (10, 12, 12, 12, 14, 14, 14) rows.
- Next Row (RS): Work in English Rib as established to 5 (6, 7, 9, 10, 11, 14, 15) stitches before side marker, bind off next 5 (6, 7, 9, 10, 11, 14, 15) stitches knitwise, remove marker, work in English Rib as established to next side marker, removing shaping markers as you go, remove side marker, bind off next 5 (6, 7, 9, 10, 11, 14, 15) stitches knitwise, work in English Rib as established to end. Do not break yarn. Place Back stitches and Right Front stitches on holders or waste yarn. [45 (49, 53, 59, 65, 69, 71, 75) stitches on needle]
Left Front
- Work even in English Rib as established for 5 rows.
- Next Row (decrease row, RS): Work 3 stitches in English Rib as established, CD-L, work in English Rib as established to end. (2 stitches decreased)
- Repeat this decrease row every 6th row 11 (10, 9, 5, 6, 5, 6, 5) more times, then every 4th row 3 (6, 9, 16, 16, 19, 19, 22) times. [28 (32, 36, 42, 44, 48, 50, 54) stitches decreased; 15 (15, 15, 15, 19, 19, 19, 19) stitches remain]
- Work even in English Rib as established until work measures 21⁄4" (21⁄2", 23⁄4", 2", 2", 21⁄4", 23⁄4", 3") from final decrease, slightly stretched. Place all stitches on holder or waste yarn. Break yarn.
Back
- Replace stitches on needle and rejoin yarn ready to work a wrong-side row. [91 (101, 111, 115, 121, 131, 141, 151) stitches on needle]
- Work even in English Rib as established for 5 rows.
- Next Row (decrease row, RS): Work 3 stitches in English Rib as established, CD-L, work in English Rib as established to 7 stitches before end, CD-R, work 3 stitches in English Rib to end. [4 stitches decreased; 87 (97, 107, 111, 117, 127, 137, 147) stitches remain]
- Repeat this decrease row every 6th row 11 (10, 9, 5, 6, 5, 6, 5) more times, then every 4th row 3 (6, 9, 16, 16, 19, 19, 22) times. [56 (64, 72, 84, 88, 96, 100, 108) stitches decreased; 31 (33, 35, 27, 29, 31, 37, 39) stitches remain]
- Work 1 wrong-side row even.
- Bind off all stitches using a sewn (see Sewn Bind Off) or stretchy bind off to match English Rib gauge.
Right Front
- Replace stitches on needle and rejoin yarn ready to work a wrong-side row. [45 (49, 53, 59, 65, 69, 71, 75) stitches on needle]
- Work even in English Rib as established for 5 rows.
- Next Row (decrease row, RS): Work in English Rib as established to 7 stitches before end, CD-R, work 3 stitches in English Rib as established to end. (2 stitches decreased)
- Repeat this decrease row every 6th row 11 (10, 9, 5, 6, 5, 6, 5) more times, then every 4th row 3 (6, 9, 16, 16, 19, 19, 22) times. [28 (32, 36, 42, 44, 48, 50, 54) stitches decreased; 15 (15, 15, 15, 19, 19, 19, 19) stitches remain]
- Work even in English Rib as established until work measures 21⁄4" (21⁄2", 23⁄4", 2", 2", 21⁄4", 23⁄4", 3") from final decrease, slightly stretched. Place all stitches on holder or waste yarn. Do not break yarn.
Finishing
- Seam sleeves into place and seam underarms. Note that due to differences in gauge, the ratio of rows in the raglan seams and stitches in the underarm seams will not be 1:1; however, the lengths should be equal if gauge was accurate.
- Replace front stitches on needles, and join using a three-needle bind off. Be careful not to twist either of the pieces. Stretching slightly so that the three-needle bind off is at the center back, seam into place.
- Weave in all ends, and block to measurements.
Hive Mind
Designed by Adrian Bizilia
The cellular patterning and deep, dark honey color of these mittens remind me of a beehive. These are a simple knit with peasant thumbs and a bold graphic stitch pattern that is easy to memorize. A contrasting color outline sharply defines the mitten edge. These mittens will look great in two semisolids or a semisolid and a striped yarn.
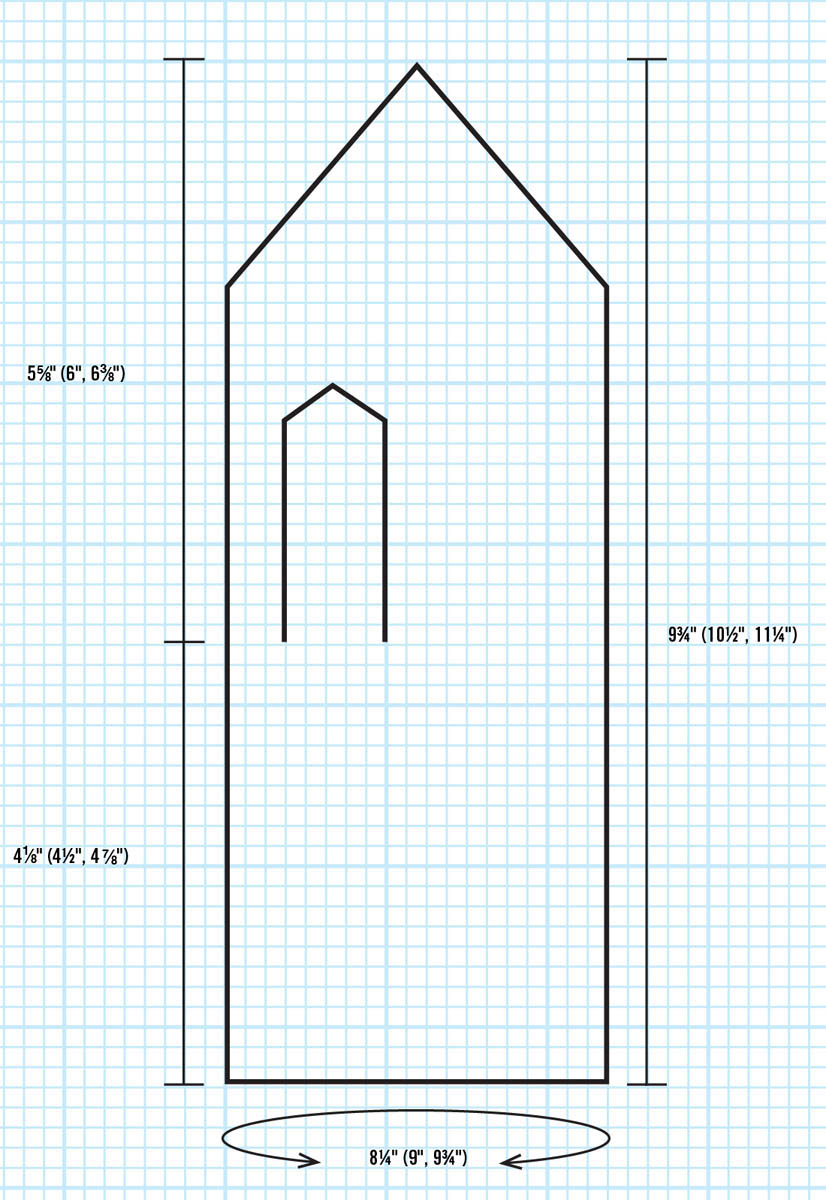
Sizes
Finished Measurements
- 81⁄4" (9", 93⁄4") circumference; 93⁄4" (101⁄2", 111⁄4") length
Fiber
- MC: Hello Yarn, handdyed Corriedale wool, 2 oz (2.25 oz, 2.5 oz), Treacle semisolid
- CC: Hello Yarn, handdyed Corriedale wool, 1.5 oz (1.75 oz, 2 oz), Frost handpaint
Yarn Description
- 2-ply
- 1,000 ypp
- 12 wpi
- Worsted spun
- Soaked and hung to dry
Yarn Amount
- MC: Treacle, 120 (140, 160) yds
- CC: Frost, 100 (110, 120) yds
Gauge
- 27 (25, 23) stitches and 32 (30, 28) rounds = 4" × 4" in colorwork pattern, after blocking
Needles
The pattern is sized by gauge; use the needle size needed to obtain correct gauge. I’ve suggested needle sizes for each garment size:
- Small: US 3 (3.25 mm)
- Medium: US 4 (3.5 mm)
- Large: US 5 (3.75 mm)
You may use any of the following for working a small circumference in the round:
- A set of four or five double-pointed needles, at least 5" long
- Two circular needles, 16" or longer
- One circular needle, 32" or longer (for Magic Loop)
Other Supplies
- Smooth scrap yarn for cast on and holding thumb stitches
- Bit of contrasting fiber for separating skeins
- Yarn needle
- Stitch marker
- Cable needle
Spinning Notes
For these mittens, I wanted a springy, balanced, 2-ply sport-weight yarn, so here’s what I aimed for:
- 24 wpi singles
- 12 wpi plied
- 6 tpi singles
- 3 tpi plied
Both fibers are combed tops that I spun using the worsted short-draw method. I wanted a hard-wearing yarn for these mittens, so I flattened the fibers as I spun the singles, taming them and creating a smooth yarn that would also show the patterning better.
For the MC (Treacle semisolid fiber). Break the wool into two equal lengths and spin each from the end onto its own bobbin, then ply from the bobbins.
For the CC (Frost handpainted fiber). You want the colors to line up, but not perfectly, so that there is a bit of overlap and therefore soft transitioning between colors. Split the length of fiber into four equal pieces lengthwise. Roll them into little balls with the same color on the outside of each ball. Split the contrasting color fiber into two equal lengths. On one bobbin, spin piece 1, starting at the outside end. Spin in a piece of scrap fiber (something that’s a different color from your project fiber), just so you’ll know when plying that you’ve come to the end of the first skein, followed by piece 2, starting at the outside end. On a second bobbin, spin piece 3, starting at the outside end. Spin in the piece of contrasting fiber, then piece 4, starting at the outside end. Ply your handpainted singles, allowing some overlap where the colors change. Depending on the dye job and evenness of spinning, you might want to do a little surgery and remove some of one singles to help the colors meet up the way you want. When you get to your contrasting-color sections, remove those and tie a knot. That’s the separation of your two — hopefully matching! — skeins, one for each mitten.
Finishing. Soak your yarn in warm water and shampoo or wool wash, rinse, and hang to dry.
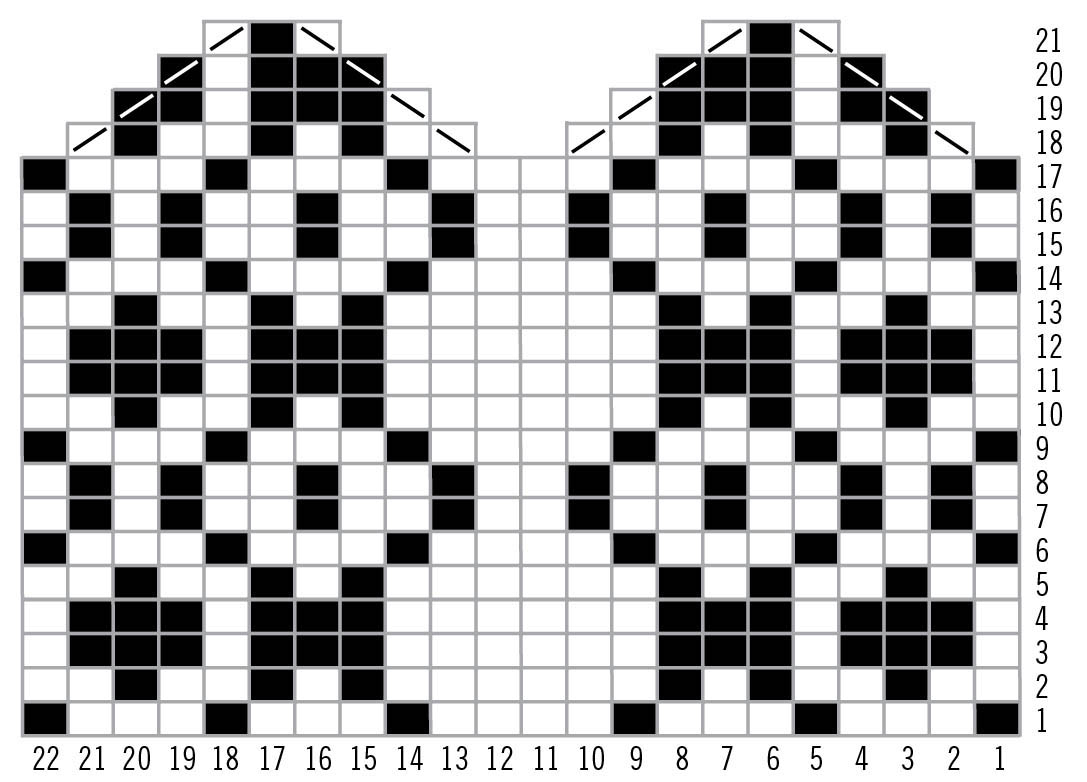
Knitting Notes
When working with the handpainted skeins, be sure to start at the same end of each ball for each mitten so that your colors will match. Tying a knot in the same end of both skeins will help you find the matching ends later. These mittens are knit in the round from the bottom up.
Charts are for stranded knitting with all knit stitches (stockinette) and are read from right to left on all rounds.
I did not catch the floating yarn at all in the body of the mitten, but I did twist the yarns together at each side of every thumb round to keep them from pulling across the inside of the thumb.
Tubular Cast On for 2x2 Ribbing
Method 1
Cast on 26 stitches in scrap yarn. Do not join. Switch to MC.
Round 1: (K1, yo) across. Distribute stitches across needles as you prefer, and join for working in the round. (52 stitches)
Method 2
Crochet a chain of 26 stitches with scrap yarn. Switch to MC.
Round 1: (K1 into bump at back of crochet chain, yo) across. Distribute stitches across needles as you prefer, and join for working in the round. (52 stitches)
For Both Cast-On Techniques
Round 2: *Wyib, slip the knit stitch purlwise; purl the yo; repeat from * around.
Round 3: *K1; wyif, slip the purl stitch purlwise; repeat from * around.
Round 4: *Wyib, slip the knit purlwise, p1; repeat from * around.
Round 5: *K1, slip 2nd stitch onto cable needle and hold to back, k1, p1 from cable needle, p1; repeat from * around. Remove scrap yarn.
Knitting the Mittens
(make 2)
- With MC, cast on 52 stitches with Tubular Cast On for 2x2 Ribbing.
- Ribbing Round: *K2, p2; repeat from * around.
- Work 8 rounds in ribbing as established.
The Hands
- Work Mitten Chart twice around, joining CC when required. Work as established until round 23 is complete. On the next round, you will place scrap yarn for the thumb position, as follows: Work in pattern as established on the back of the hand; begin the second repeat of the pattern on the palm side of the hand. When you get to the insertion point marked on the chart, knit the 11 marked stitches and place them on scrap yarn. Note: The insertion mark for the right mitten is red; the insertion mark for the left mitten is green.
- Return stitches to left needle, and complete round per chart.
- Continue as established until chart is complete. Cut both yarns, leaving 6" tails. Thread both tails onto yarn needle and pull through final stitches to close mitten top.
The Thumbs
- Without removing scrap yarn, place upper 11 and lower 11 thumb stitches onto your needles. Remove scrap yarn.
- Thumb setup: Starting at stitches at lower side (cuff side of mitten), rejoin yarns and following appropriate Thumb Chart (Right or Left, as required), work the first 11 stitches per chart, pick up and knit a stitch with MC, and work it together with the following chart stitch; work in pattern to end of chart, and pick up and knit another stitch with MC at the end of the round, and slip it to the first needle of the round.
- Next round: K2tog in color as indicated by chart, and complete round in pattern.
- Continue as established until chart is complete. Cut both yarns, leaving 6" tails. Thread both tails onto yarn needle and pull through final stitches to close thumb top.
Finishing
- Wash and block mittens. Weave in ends.
Dye Goddess Pullover
Designed by Jillian Moreno
When I saw the sweater Lisa Souza was wearing at the New York State Sheep and Wool Festival in Rhinebeck — a pullover knit from spiral-ply yarn — I fell instantly in love. It looked like the exact sweater I want to wear on blustery fall days — it’s the knitting equivalent of a big bowl of comforting soup. I asked Lisa to choose and dye the fiber for my version, and she presented me with deep, rich greens in matte Merino for the thick-and-thin ply and a bright acid green in lustrous Merino/silk for the core ply, which is so shiny it flashes like sparks over the sweater.
Sizes
Finished Measurements
- Chest: 35" (41", 44", 461⁄2", 491⁄2")
- This sweater is loose and easy Kaanapali; recommended ease for this sweater is at least 3".
Fiber
- Thick-and-thin: Lisa Souza Knitwear and Dyeworks, Merino, top, Kaanapali, 17 (19, 20, 21, 22) ounces
- Core: Lisa Souza Knitwear and Dyeworks, 50% Merino 50%/50% silk, top, Gween, 71⁄2 (8, 81⁄2, 91⁄2, 10) ounces
Yarn Description
Spiral-ply yarn is made up of two plies. One ply is used as a core yarn and one ply (the thick-and-thin yarn) is wrapped around the core by plying with uneven tension. The spiral-ply and core yarns were spun with a worsted draft; the thick-and-thin yarn was spun with a woolen draft.
- Spiral-ply yarn: 7.5 wpi; 500 ypp
- Core yarn: 28 wpi; 1,600 ypp
- Thick-and-thin yarn: 6.5 wpi; 900 ypp
Yarn Amount
- 750 (800, 850, 920, 960) yds spiral-ply yarn
(Note: This amount does not include fiber for sampling and swatching.)
Gauge
- 11 stitches and 16 rows = 4" × 4" in stockinette stitch using the larger needles, after blocking
Needles
- US 7 (4.5 mm) needles for working flat or size needed to obtain correct gauge
- US 6 (4.0 mm) needles for working flat
- One US 6 (4.0 mm) 16" circular needle
Other Supplies
- Yarn needle
- Stitch marker
Spinning Notes
Your core-ply yarn should be heavily twisted — more than what you’d use for a regular 2-ply yarn. I used a twist angle of 60 degrees.
Spinning thick-and-thin yarn takes practice. Sarah Anderson has great instructions in her book The Spinner’s Book of Yarn Designs.
Knitting Notes
This sweater is knit in pieces from the bottom up.
When swatching your spiral-ply yarn, use a needle size between what you would use for the thickest and for the thinnest parts of the yarn. This yarn is knit a bit looser than you might think necessary to give the thick parts room to puff!
Pattern Stitch
2x2 Rib
(multiple of 4 stitches)
All Rows: *K2, p2; repeat from * to the end.
Knitting the Back
- Setup: Using larger needles, cast on 48 (56, 60, 64, 68) stitches.
- Work 2x2 Rib (see Pattern Stitch) for 2".
- Work in stockinette stitch until piece measures 13" (14", 15", 15", 15"), ending with a wrong-side row.
Armhole Shaping
- At the beginning of the next 2 rows, bind off 4 (4, 5, 5, 6) stitches. [40 (48, 50, 54, 56) stitches remain]
- Work even in stockinette stitch until armhole measures 9" (10", 11", 12", 13"), ending with a wrong-side row. Your piece will measure 22" (24", 26", 27", 28") from the cast-on edge. Bind off all stitches.
Knitting the Front
- Work as for Knitting the Back to start of Armhole Shaping.
Armhole Shaping
- At the beginning of the next 2 rows, bind off 4 (4, 5, 5, 6) stitches. You now have 40 (48, 50, 54, 56) stitches on your needles. Work in stockinette stitch for 6" (7", 8", 9", 10"), ending with a wrong-side row.
Front Neck Shaping
- Next Row (divide for neck, RS): K16 (19, 20, 22, 23). Join a second ball of yarn and bind off 8 (10, 10, 10, 10) stitches, knit to end of row.
- Working both sides at the same time, k2tog at neck edge on each side every right-side row 4 (5, 4, 6, 6) times. (12 [14, 16, 16, 17] stitches remain on each side)
- Continue even in stockinette stitch until armhole measures 9" (10", 11", 12", 13"), ending with a wrong-side row. Your piece now measures 22" (24", 26", 27", 28").
- Bind off all stitches.
Knitting the Sleeves
(make 2)
- Setup: Using smaller needles, cast on 24 (28, 28, 32, 32) stitches.
- Work 2x2 Rib for 2", ending with a wrong-side row.
- Change to larger gauge needles and work in stockinette stitch for 1", ending with a wrong-side row.
Sleeve Shaping
- Next Row (increase row, RS): K2, M1, knit to last 2 stitches, M1, k2. (2 stitches increased)
- Work 3 rows even in stockinette stitch.
- Repeat the last 4 rows 7 (5, 12, 13, 18) more times.
- Work an increase row followed by 5 even rows 5 (7, 3, 3, 0) times. [50 (54, 60, 66, 70) stitches]
- Continue even in stockinette as required until sleeve measures 19" (20", 21", 21", 22"), ending with a wrong-side row.
- Bind off.
Finishing
- Block pieces to measurements. Assemble sweater by sewing shoulders together first, then set sleeves into shoulders. Sew sleeves from wrist to armhole, and body seams from bottom to armhole.
- Note: If you find you have trouble seaming with the spiral-ply yarn, change to a commercial yarn in a similar color and weight.
Knitting the Neck
- Setup: Starting at left shoulder seam, and using the smaller circular needle, pick up and knit 52 (52, 56, 56, 60) stitches around neck edge.
- Place marker, and join for working in the round.
- Work 2x2 Rib for 2".
- Bind off.