ARTISAN CHEESE & WINE FONDUE with ARTICHOKES & FRENCH BREAD
We prefer to use artisan cheese when possible, and can often find artisans or small, local dairies producing Fontina and Parmesan cheese. What is the difference between artisan cheese and that purchased under a national label? Artisan cheese refers to cheese produced in small batches by hand using the craftsmanship of skilled cheesemakers. It is often more complex in flavor. Of course, if artisan cheese is not available, feel free to substitute a similar cheese from the grocery store.
4 TABLESPOONS (½ STICK) UNSALTED BUTTER
¼ CUP FINELY MINCED YELLOW ONION
8 OUNCES BUTTON OR WILD MUSHROOMS, THINLY SLICED
4 CLOVES GARLIC, MINCED
1 (12-OUNCE) JAR MARINATED ARTICHOKE HEARTS, DRAINED AND CHOPPED
½ CUP DRY WHITE WINE
4 OUNCES FONTINA CHEESE, CUT INTO ½-INCH CUBES
8 OUNCES CREAM CHEESE, CUT INTO ½-INCH CUBES
KOSHER SALT AND FRESHLY GROUND BLACK PEPPER
¾ CUP SHREDDED PARMESAN CHEESE
1 LOAF FRENCH BREAD, CUT INTO PIECES FOR DIPPING

SERVES 4 TO 6
Melt the butter in a 12-inch nonstick skillet over medium-high heat. Add the onion and mushrooms and cook, stirring frequently, for 8 to 10 minutes, or until the mushrooms are tender and their liquid has evaporated. Stir in the garlic and cook for 30 seconds more.
Add the artichoke hearts and wine to the mixture. Bring to a simmer, reduce the heat as needed to maintain a simmer, and cook for 5 to 10 minutes. Add the Fontina, cream cheese, and salt and pepper to taste. Stir until the cheese has melted and the mixture is smooth. Add the Parmesan and cook, stirring, until melted.
Pour the mixture into a fondue pot and keep warm. Serve with French bread.
 This is excellent served with fresh vegetables such as broccoli and cauliflower.
For artichoke and spinach fondue: Omit the mushrooms and substitute 1½ cups fresh trimmed spinach leaves, coarsely chopped. Add the spinach to the onions, cook 2 to 3 minutes, then proceed as recipe directs.
Fondue pots are available in electric and nonelectric versions. Those that are not electric generally keep the fondue warm by holding it over a can of burning Sterno. Be sure to keep an extra can of Sterno in the pantry so you do not run out. If using an electric fondue pot, follow the manufacturer’s directions for the best temperature, but generally a cheese fondue needs a low temperature. If you do not have a fondue pot, you can keep this fondue warm in a small slow cooker.
Freshly grated Parmesan cheese adds more flavor than packaged shredded Parmesan cheese. To grate the Parmesan cheese, use a rasp-style grater, such as a Microplane. To “grate” this hard cheese in a food processor, allow the Parmesan to come to room temperature, cut it into 1-inch cubes, and place them in the work bowl of the food processor fitted with the metal chopping blade; pulse to very finely chop.
Yes, it takes time, and one of you needs to stir continuously for about 20 minutes, but Garlic Shrimp Risotto is a comforting dish to make on a cold night. Take turns stirring, pour a glass of wine, and look at this as the ideal time to talk to each other. The rewards, both in terms of your dinner and conversation time with your honey, are worth the effort.
3½ CUPS LOW-SODIUM CHICKEN BROTH
2 TABLESPOONS UNSALTED BUTTER
1 SHALLOT, MINCED
2 CLOVES GARLIC, MINCED
1 CUP UNCOOKED ARBORIO RICE
KOSHER SALT AND FRESHLY GROUND BLACK PEPPER
¼ CUP DRY WHITE WINE
6 TO 8 OUNCES FRESH SHELLED AND DEVEINED SHRIMP, OR FROZEN SHRIMP, SHELLED, THAWED, AND DRAINED
½ CUP FROZEN PEAS, THAWED
½ CUP SHREDDED PARMESAN CHEESE
1 TABLESPOON MINCED FRESH FLAT-LEAF PARSLEY
SERVES 4
Heat the chicken broth in a 2-quart saucepan over medium heat until steaming hot. Reduce the heat to very low, cover, and keep the broth warm.
Melt the butter in a 4-quart saucepan over medium heat. Stir in the shallot and cook, stirring frequently, for 2 minutes. Stir in the garlic and cook, stirring frequently, for 30 seconds. Stir in the rice and cook, stirring frequently, until the rice begins to turn golden, about 3 minutes. Stir in the salt and pepper to taste and the wine and cook, stirring continuously, until the rice has absorbed the wine.
Set a timer for 20 minutes. Stir about ½ cup of the hot broth into the risotto. Cook, stirring continuously, until the rice has absorbed all of the broth. Continue to add hot broth in ½-cup increments, stirring until the rice has absorbed the broth after each addition. (Cooking the rice and adding all of the broth should take about 20 minutes. Generally, add broth to the rice every 2 to 3 minutes.)
Just after stirring in the last of the broth, stir in the shrimp and peas. Cook, stirring continuously, for 2 to 3 minutes, or until the shrimp begin to turn pink. Stir in the Parmesan.
Remove from the heat, spoon into a serving bowl, and garnish with the parsley.
The exact amount of liquid the rice will absorb may vary a little. If, after you have stirred in the last of the hot broth, you wish to make the risotto a little more moist, heat an additional ½ cup broth until steaming hot and gradually stir it into the cooked risotto. This tip works well for risotto cooked on the stove or in a slow cooker.
What is arborio rice? This is a short-grained Italian rice, and since the short grains become moist and stick together as they cook, it is used to achieve the classic creamy texture desired for risotto.
What is a shallot? A shallot is a member of the onion family, but it is known for its mild flavor that has hints of both garlic and onion. In appearance, it may remind you of a large garlic clove for the head has multiple cloves (often two of them), with each clove covered with papery skin. As this recipe lists one shallot, use just one of the cloves of the shallot, peel away the papery skin and mince it finely.
To prepare the risotto in a slow cooker, spray a 4-quart slow cooker with nonstick spray. Melt the butter in a 4-quart saucepan and cook the shallot, garlic, and rice as directed above, then pour it into the slow cooker. Return the pan to the heat and add 2½ cups of the chicken broth. Heat until the broth comes to a boil. Pour the boiling broth into the rice in the slow cooker and stir well. Cover and cook on high for 2 hours, stirring after 1 hour.
Pour the remaining 1 cup broth into a small microwave-safe glass bowl or measuring cup. Microwave on high for 3 minutes or until it boils. Gradually stir the boiling broth into the rice in the slow cooker, stirring continuously. Stir in the shrimp and peas. Cover and cook on high for 10 to 15 minutes, or until the shrimp are tender and turn pink. Stir in the Parmesan cheese. Sprinkle with the parsley.
What an exceptional recipe to “sneak” vegetables into the menu and it is guaranteed that non-veggie lovers will devour this with abandon. This can be made ahead for easy entertaining.
2 TABLESPOONS OLIVE OIL
1 LARGE ONION, CHOPPED
1 LARGE FENNEL BULB, CHOPPED
3 MEDIUM CARROTS, CHOPPED
1 (12-OUNCE) JAR MARINATED ARTICHOKE HEARTS, DRAINED AND CHOPPED
3 CLOVES GARLIC, MINCED
3 CUPS MARINARA SAUCE OR 1 (23-OUNCE) JAR MARINARA SAUCE
12 TO 14 LASAGNA NOODLES (ABOUT 12 OUNCES)
1 LARGE EGG, LIGHTLY BEATEN
1 (15-OUNCE) CONTAINER LOW-FAT RICOTTA CHEESE
3 CUPS SHREDDED MOZZARELLA CHEESE
½ CUP SHREDDED PARMESAN CHEESE
1½ CUPS FRESH TRIMMED SPINACH LEAVES, COARSELY CHOPPED
SERVES 8
Heat the olive oil in a Dutch oven over medium high heat. Add the onion, fennel, carrots, artichoke hearts, and garlic and cook, stirring frequently, for 3 to 4 minutes, or until the vegetables are crisp-tender. Stir in the marinara. Reduce the heat and simmer, covered, for 15 to 20 minutes.
Cook the lasagna according to the package directions. Drain.
Preheat the oven to 350°F. Spray a 9 x 13-inch pan with nonstick spray. Combine the egg, ricotta, 2 cups mozzarella, ¼ cup Parmesan, and spinach.
Spoon 1 cup of the sauce into the pan and spread to coat evenly. Arrange 4 lasagna noodles lengthwise over the sauce. Spoon ½ of the ricotta mixture evenly over the noodles. Top with 1 cup of the sauce.
Arrange 4 lasagna noodles crosswise over the sauce, cutting to fit as necessary. Spoon the remaining ricotta mixture evenly over the noodles. Top with 1 cup of the sauce.
Arrange 4 lasagna noodles lengthwise over the sauce. Spoon the remaining sauce over the noodles. Cover with aluminum foil. Bake for 30 minutes. Uncover. Top with the remaining 1 cup mozzarella and remaining ¼ cup Parmesan. Bake uncovered for 15 minutes, or until hot and bubbly.
To freeze: Assemble and bake, omitting the cheese topping. Refrigerate until cool, then wrap, label, and freeze. Remove from the freezer before serving, so it partially thaws. Bake at 350°F about 30 to 40 minutes or until heated through. Add cheese and bake for 15 minutes.
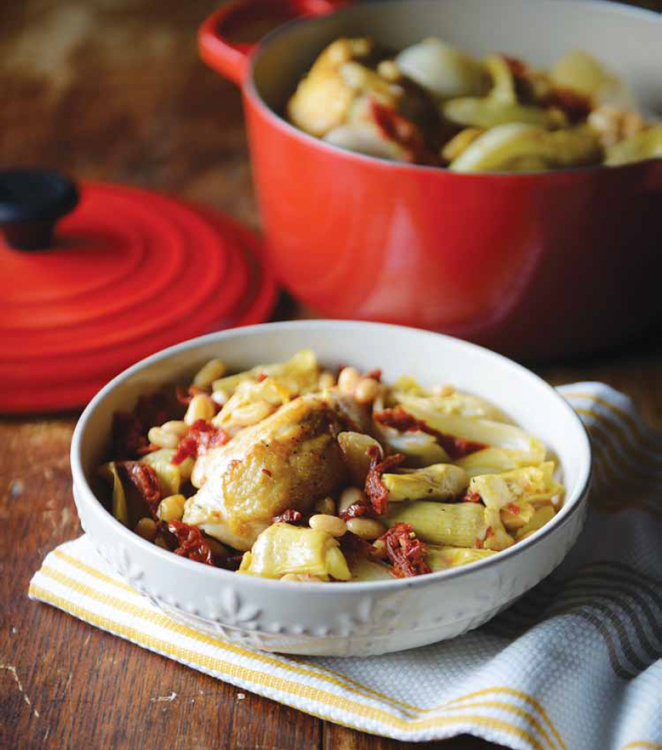
WINTER CHICKEN, ARTICHOKE & FENNEL CASSOULET
Winter Chicken, Artichoke, and Fennel Cassoulet really is a perfect dinner on a cold night. The fennel, sun-dried tomatoes, and artichokes create a modern flair, but the beans and chicken mean the dish offers classic, comforting flavors.
1 TABLESPOON VEGETABLE OIL
2 BONE-IN, SKIN-ON CHICKEN BREAST HALVES (SEE TIPS)
KOSHER SALT AND FRESHLY GROUND BLACK PEPPER
1 MEDIUM FENNEL BULB, TRIMMED AND QUARTERED
½ MEDIUM SWEET YELLOW ONION, QUARTERED
2 CLOVES GARLIC, MINCED
1 CUP REDUCED-SODIUM CHICKEN BROTH
⅓ CUP CHOPPED SUN-DRIED TOMATOES IN OIL, DRAINED
1 TEASPOON ITALIAN SEASONING
¼ TEASPOON RED PEPPER FLAKES
1 (14-OUNCE) CAN QUARTERED ARTICHOKE HEARTS, DRAINED
1 (16-OUNCE) CAN GREAT NORTHERN BEANS, RINSED AND DRAINED
2 TABLESPOONS MINCED FRESH FLAT-LEAF PARSLEY OR MINCED FENNEL FRONDS, FOR SERVING
SERVES 2 TO 4
Preheat the oven to 375°F.
Heat the oil in a 12-inch ovenproof skillet with a lid over medium-high heat. Add the chicken, skin-side down, and cook for 5 minutes, or until well browned. Turn and cook for 3 to 4 minutes more, or until well browned. Season with salt and pepper. Transfer the chicken to a plate.
Add the fennel and onion to the skillet and cook, stirring frequently, for 3 minutes, or until the onion is tender. Stir in the garlic and cook for 30 seconds. Stir in the chicken broth, sun-dried tomatoes, Italian seasoning, and red pepper flakes. Heat until the liquid boils, then reduce the heat to maintain a simmer and cook for 1 minute. Return the chicken breasts to the skillet, skin-side up. Pour the artichoke hearts and beans over the chicken.
Cover and bake for 30 minutes, or until the chicken is no longer pink inside and a meat thermometer inserted in the center registers 165°F. Remove from the oven and let rest, covered, for 5 minutes. Sprinkle with the parsley.
Chicken breasts sold today are often quite large—and bone-in halves can each weigh up to 1 pound. If the chicken pieces are large, you may find one piece is the perfect amount to share—especially since there are lots of vegetables in this hearty dish. This dish reheats wonderfully so leftovers may be welcome!
Pat the chicken dry with a paper towel before cooking to ensure better, more even browning.
Bone-in pieces of chicken add to the flavor in the dish. If you wish to use boneless skinless chicken breasts, you may do so. Cook as directed, but reduce the roasting time to about 20 minutes or until the chicken is no longer pink inside and a meat thermometer inserted in the center registers 165°F.
Have you ever cooked fennel? This flavorful plant has stems that look somewhat like celery, fronds that can serve as an herb, and a bulbous end that is cooked and served as a vegetable. For this dish, cut off the stems and leaves to mince for the garnish or to use in another dish, and use just the bulb end. Trim away any tough or dry outer leaves from the bulb, then cut the bulb into quarters.
If desired, or if an ovenproof skillet is not available, brown the chicken as directed in a skillet, then place it in a 2½- to 3-quart casserole. Cook the vegetables in the skillet as directed, add the broth and seasonings, and bring to a boil. Spoon the vegetables over the chicken and pour the broth over all. Cover and bake as directed.
MUSHROOMS & CARAMELIZED ONION EGG SKILLET
You can spend a lazy weekend morning at home together and enjoy this fantastic Mushroom and Caramelized Onion Egg Skillet for a late breakfast or brunch. It will remind you of a favorite dish at the neighborhood breakfast spot, but you won’t have to get dressed up to go out and enjoy it.
2 TABLESPOONS UNSALTED BUTTER
½ MEDIUM SWEET YELLOW ONION, HALVED AND THINLY SLICED
1 CUP SLICED BUTTON OR WILD MUSHROOMS
½ TEASPOON DRIED THYME LEAVES
KOSHER SALT AND FRESHLY GROUND BLACK PEPPER
4 LARGE EGGS
¼ CUP MILK
¼ CUP CHOPPED JARRED ROASTED RED PEPPERS, DRAINED
½ CUP SHREDDED SWISS CHEESE
½ CUP TRIMMED SPINACH OR KALE LEAVES, TORN INTO PIECES (OPTIONAL)
SERVES 2
Melt the butter in a 10-inch nonstick skillet over medium heat. Add the onion and cook, uncovered, stirring frequently, for 10 to 12 minutes, or until the onions begin to caramelize. Add the mushrooms and season with the thyme and salt and black pepper to taste. Cook, stirring frequently, for 5 minutes, or until the onions are a deep golden color, the mushrooms are tender, and the liquid has evaporated. Spoon into a bowl and set aside.
Whisk together the eggs and milk in a small bowl. Season with salt and black pepper. Return the skillet to the stovetop over low heat. Pour the egg mixture into the skillet and cook, stirring frequently but gently, until the eggs are almost set. Stir in the roasted red pepper. Stir in the cheese and onion-mushroom mixture and cook, stirring gently, until the eggs are set. If desired, stir in the spinach and cook just until wilted.
TIPS:
Do you wonder what kind of mushrooms to use? Wild mushrooms, such as shiitake or morel mushrooms, are more flavorful and provide a deeper, earthy accent. Button mushrooms are more readily available. Use a combination of mushrooms or the variety that you prefer.
OVEN-TOASTED HAM & EGG TARTINE SANDWICHES
A tartine is an open-faced French sandwich. Imagine that you two are strolling the romantic streets of Paris and can stop at one of the little cafés that dot the streets. Don’t forget to linger over the café au lait! What a great way to start your morning.
2 SLICES CRUSTY WHOLE-GRAIN BREAD OR COUNTRY WHITE BREAD, TOASTED
2 TABLESPOONS PLUS 1 TEASPOON UNSALTED BUTTER
2 THIN SLICES COOKED HAM
2 SLICES GRUYÈRE OR SWISS CHEESE
2 LARGE EGGS
KOSHER SALT AND FRESHLY GROUND BLACK PEPPER
SERVES 2
Preheat the oven to 400°F.
Lightly spread one side of each piece of toast with about ½ teaspoon of the butter. Place the toast, buttered-side up, in a single layer in an 11 x 7-inch baking dish or on a 10 x 15-inch baking sheet.
Top each slice of toast with a slice of ham and then a slice of cheese. Bake, uncovered, for 5 minutes, or until hot and the cheese has melted.
Meanwhile, melt the remaining 2 tablespoons butter in an 8-inch nonstick skillet over medium heat. Break one egg into a custard cup, then slip the egg into the butter. Repeat with the second egg. Season the eggs with salt and pepper. Cook until the egg whites set.
Carefully turn the eggs and cook on the second side until the egg yolk is done as desired. (As an alternative, to serve the eggs sunny-side up, using the tip of a small spoon, baste the egg yolks with melted butter. Cover and cook for 1 minute. Continue to baste the egg yolk, then cover and cook until the egg yolks are thickened and done as desired.)
Place the cooked eggs on top of the ham and cheese on the toast and serve immediately.
Use thin slices of deli ham or leftover ham. Sliced Black Forest or Virginia ham will have more flavor than deli-shaved ham, and slices of country ham will be packed with a distinctive flavor. Of course, use the ham that you prefer and that is available. To boost the flavor if using a milder-flavored ham, toast the bread as directed, then lightly spread each slice with Dijon mustard and top with ham and cheese.
Breaking the eggs into a custard cup, then gently slipping them into the hot skillet will make a more attractive egg.
Cook eggs until the egg yolk thickens—it need not be firm. The very young, the elderly, pregnant women, and those who are ill or who have weakened immune systems should avoid eating uncooked or undercooked eggs.
Does your small skillet have a lid? Check to see if a lid for one of your saucepans fits the skillet. Frequently, the pot and pan manufacturers sell “open stock” covers that will fit your skillet perfectly. Housewares and kitchen shops also sell lids in a variety of sizes, or in a pinch, you can use the bottom of a baking sheet. Flexible silicone lids for bowls are now readily available. Read the label on these lids carefully as some are safe to use when cooking and others are only safe for reheating in the microwave but are not safe to use on a pan on the stove. Be sure to check with the manufacturer if you are not sure—and do not take chances.
Lazy-dazey weekend mornings call for a make-ahead breakfast. Pull the covers back over your head and know that a memorable meal is minutes away.
3 (1½-INCH) SLICES BRIOCHE LOAF
3 LARGE EGGS
1 CUP HALF-AND-HALF
2 TEASPOONS PURE VANILLA EXTRACT
½ TEASPOON GROUND CINNAMON
8 TABLESPOONS (1 STICK) UNSALTED BUTTER
⅓ CUP PACKED BROWN SUGAR
¼ CUP MAPLE SYRUP
1 TABLESPOON BOURBON
PINCH OF TABLE SALT
½ CUP COARSELY CHOPPED PECANS, TOASTED
SERVES 4 TO 6
Spray a 7 x 11-inch baking dish with nonstick spray. Cut each bread slice in half. Arrange the bread slices in a single layer in the prepared dish.
Whisk together the eggs, half-and-half, vanilla, and cinnamon in a small bowl. Pour the egg mixture over the brioche slices. Cover with plastic wrap and refrigerate for at least 3 hours or overnight.
Preheat the oven to 350°F.
Remove the brioche from the refrigerator. Heat the butter, brown sugar, maple syrup, bourbon, and salt in a 1-quart saucepan over medium heat, stirring frequently, until the butter has melted and the mixture begins to bubble and foam. Pour the butter sauce over the bread slices. Bake, uncovered, for 35 to 40 minutes or until golden. Remove from the oven and baste with the sauce from the dish. Sprinkle the pecans evenly over brioche. Serve warm.
TIPS:
If desired, omit the bourbon.
Substitute 1½-inch-thick slices of French bread for the brioche. Cut enough slices to cover the bottom of the baking dish. Proceed as directed.
Toasting pecans intensifies their flavor. To toast the pecans, spread them in a single layer on a baking sheet. Toast in a preheated 350°F oven for 5 to 7 minutes, or until lightly toasted.
GOAT CHEESE AUX FINES HERBES OMELET
What sounds good for that leisurely breakfast? Or, maybe you spent the day together, out at flea markets, antiques shops, or art galleries, searching for a special little accent piece, so a simple dinner at home sounds too good to pass up. Either way, goat cheese and fresh herbs boost the flavor of an omelet to lofty heights.
1 TO 2 SPRIGS FRESH FLAT-LEAF PARSLEY, FINELY MINCED
1 TO 2 SPRIGS FRESH TARRAGON, FINELY MINCED
2 FRESH CHIVES, FINELY MINCED
4 LARGE EGGS
KOSHER SALT AND FRESHLY GROUND BLACK PEPPER
1 TABLESPOON UNSALTED BUTTER
¼ CUP GOAT CHEESE CRUMBLES
SERVES 2
Combine the minced herbs in a small bowl. Set aside.
Whisk together 2 of the eggs, 1 tablespoon water, and salt and pepper in a small bowl.
Melt half of the butter in an 8-inch nonstick skillet over medium-low heat. Pour the egg mixture into the skillet. Cook gently until the bottom is set. Using the edge of a spatula or pancake turner, gently lift the edge of the cooked eggs away from the skillet, then tilt the pan slightly to allow the uncooked eggs to flow around the edges and under the omelet. Repeat, gently lifting the edges and tilting the pan until most of the eggs are cooked and the top is softly set.
Sprinkle about half of the herbs and half of the goat cheese over half of the omelet. Gently fold the omelet over the herbs and cheese. Transfer to a plate and keep warm.
Repeat with remaining ingredients to make a second omelet.
Fines herbes is a classic French herb mixture and traditionally includes chives, tarragon, and parsley or chervil. Chervil is more difficult to find, so in this case, fresh parsley is used.
How do you mince fresh herbs? Herbs that are dry will mince more easily, so rinse and pat them dry with paper towels. Remove and discard tough stems. Place the herbs on a cutting board. Hold the tip of a large chef’s knife down with one hand and use a rocking motion to cut through the stack of herbs. Gather the leaves together again into a pile and repeat until the herbs are as finely minced as you wish. An alternate way is to drop the herbs into a small, deep bowl or cup and mince using the tips of kitchen shears.
You can follow these basic directions to make any flavor of omelet you can imagine. Top the cooked eggs with other minced herbs or other cheeses. If you top an omelet with vegetables or meats, cook the vegetables or meat until they are tender or cooked through before topping the omelet.
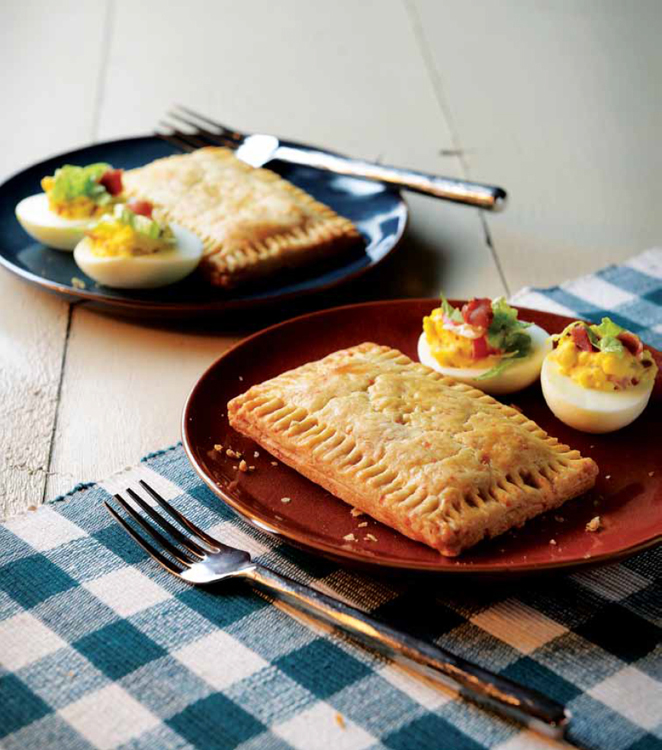
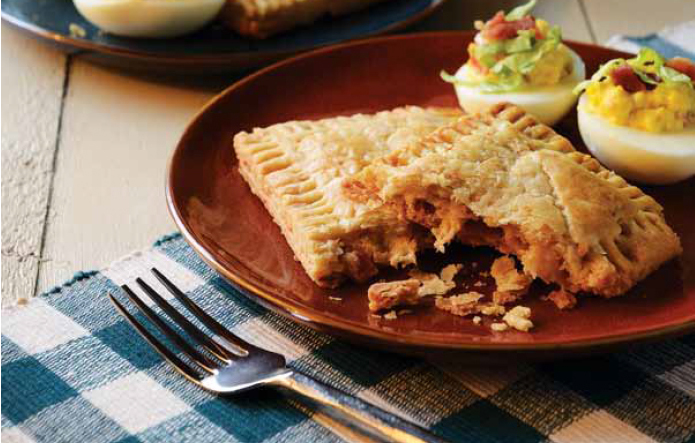
These are not your mother’s deviled eggs. The addition of bacon, lettuce, and tomato launch these eggs into today’s food arena. They are perfect for picnics, pretheater fare, and late-night noshing.
4 LARGE EGGS, HARD-BOILED AND PEELED
2 TABLESPOONS LIGHT MAYONNAISE
1 TEASPOON PREPARED MUSTARD
SEVERAL DASHES OF HOT SAUCE
2 SLICES BACON, COOKED UNTIL CRISP THEN CRUMBLED
2 CHERRY TOMATOES, SEEDED AND FINELY CHOPPED
KOSHER SALT AND FRESHLY GROUND BLACK PEPPER
2 TABLESPOONS FINELY SHREDDED LETTUCE
SERVES 2 TO 4
Slice the eggs in half lengthwise. Remove the yolks and place them in a medium bowl; set the whites aside. Mash the yolks and stir in the mayonnaise, mustard, and hot sauce. Gently fold in three quarters of the bacon and the cherry tomatoes. Add salt and pepper to taste.
Fill the egg white halves evenly with the yolk mixture and garnish with lettuce. Sprinkle evenly with the remaining crumbled bacon.
Serve immediately or store, covered, in the refrigerator until ready to serve.
TIPS:
For Jalapeño Deviled Eggs, prepare as directed above, omitting the lettuce and garnishing with 2 tablespoons finely chopped, drained, pickled jalapeños.
What is the best way to hard-boil an egg? The name of these eggs is really “hard-cooked” because for the best results you really do not boil the eggs. Place the eggs in a single layer in a saucepan and add cold water to cover the eggs by a depth of 1 inch. Heat until the water just begins to boil. Remove the pan from the heat, cover it, and allow the eggs to stand in the hot water for about 12 minutes. Drain and cool under cold running water, then peel.
To pack for a picnic, make the BLT Deviled Eggs as directed and refrigerate in a sealed container. Pack the container in a cooler along with a frozen ice or gel pack.
These savory chicken and cheese tarts are perfect to take on a picnic. The tasty chicken filling is neatly sealed inside the buttery pastry, making them easy to pack, serve, and eat. They are small, so be sure to pack plenty.
CRUST:
1¼ CUPS ALL-PURPOSE FLOUR
2 TABLESPOONS SHREDDED PARMESAN CHEESE
½ TEASPOON TABLE SALT
4 TABLESPOONS (½ STICK) COLD UNSALTED BUTTER, CUT INTO 4 PIECES
¼ CUP VEGETABLE SHORTENING
1 LARGE EGG, SEPARATED
2 TO 2½ TABLESPOONS COLD MILK
FILLING:
½ CUP FINELY CHOPPED COOKED CHICKEN
¼ CUP SHREDDED SWISS CHEESE
2 TABLESPOONS GARDEN VEGETABLE–FLAVORED WHIPPED CREAM CHEESE SPREAD
2 TABLESPOONS CHOPPED JARRED ROASTED RED PEPPERS, DRAINED
⅛ TEASPOON GARLIC POWDER
KOSHER SALT AND FRESHLY GROUND BLACK PEPPER
MAKES 6 TARTS
MAKE THE CRUST: Whisk together the flour, Parmesan, and salt in a bowl. Using a pastry cutter or two knives, cut in the butter and vegetable shortening until the mixture resembles coarse even crumbs. Stir together the egg yolk and 2 tablespoons of the milk. Add the egg-milk mixture to the flour mixture. Using a fork, lightly stir until the flour is moistened. If additional moisture is needed, add the remaining ½ tablespoon milk, 1 teaspoon at a time, until the flour is moistened. Gather the dough into a ball. Divide the dough in half; wrap each portion in plastic wrap and refrigerate for several hours or overnight.
MAKE THE FILLING: Stir together all the ingredients in a small bowl until combined.
ASSEMBLE THE TARTS: Preheat the oven to 350°F. Line a baking sheet with parchment paper.
Roll each piece of dough into a 6 x 12-inch rectangle on a floured board. Cut each into 6 (3 x 4-inch) rectangles, making a total of 12 rectangles. Place 6 of the rectangles on the prepared baking sheet, about 1 inch apart.
Evenly divide the filling among 6 of the pastry rectangles, spooning about 1½ to 2 tablespoons of filling into the center of each pastry. Spread lightly, leaving a ½-inch border.
Whisk together the egg white and 1 tablespoon cold water in a small bowl. Brush the border of each pastry rectangle lightly with the egg white mixture. Place a second rectangle of dough directly over the first. Use the tines of a fork to seal the edges of the pastry together. Prick the top pastry several times with a fork. Brush the top lightly with the egg white mixture. Bake for 23 to 26 minutes, or until golden. Transfer the tarts to a wire rack to cool.
TIPS:
To make the dough for the crust in a food processor, place the flour, Parmesan, and salt in the work bowl of a food processor and pulse to blend. Add the butter and vegetable shortening and pulse until both are evenly cut into the flour mixture. Add the egg yolk and 2 tablespoons milk to the work bowl. Process just until the mixture comes together and forms a ball. Proceed as directed.
Substitute 1 (4.5-ounce) can chunk chicken breast, drained and flaked, for the ½ cup chopped cooked chicken.
These tarts are just as good served chilled at a picnic. To pack for a picnic, make the Chicken and Swiss Pop Tarts the day before and cool completely. Pack the tarts between layers of paper towel and place in a zip-top bag. Place the sealed bag of tarts in the refrigerator overnight. Pack the bag in a cooler along with a frozen ice or gel pack.
Do you know how to separate an egg? The best way is to use an egg separator—readily available where kitchen utensils and gadgets are sold. If you don’t have one, pour the egg through your clean fingers, allowing the white to drip into a small bowl and cupping the yolk in your palm. Pouring the yolk back and forth between eggshell halves is no longer recommended as the shells can harbor bacteria.