
Once you toss the wrapping paper, you discover shiny new appliances, dishes, and glassware. Add the groceries and you may feel chaos. Where should you put everything?
It is time to create the perfect pantry and organize the kitchen. No, it need not be the double-doored, multishelved closet featured in the magazines, but your studio apartment has even more need for a well-organized pantry and kitchen than those larger, glamorous kitchens. How can you ever get organized?
Take a minute and plan your routine. Walk around and pretend you are simmering soup, tossing salad, or baking cookies. Think about the utensils, pans, or equipment you might use, and then plan how to take the fewest steps to reach them. Can you possibly stand in one spot and reach everything you need?
Group items you will typically use together in one spot. The mixer, bowls, and measuring cups become the baking center. Place cutting boards close to knives and mugs by the coffee maker or teapot.
Store those items you use daily in the most convenient spots, and those that you use infrequently in more out-of-the-way spots. If you cannot start your day without a smoothie, keep the blender handy, but if you think of using the blender just for icy drinks when your friends are gathering, you can store it farther back.
Stash the pot holders and tools you need to grab quickly by the stove. Cooking spoons, pancake turners, whisks, tongs, and other tools must be ready when you need them and it is vital to keep the pot holders near the stove.
Let safety rule. Keep knives in a block and not loose in a drawer. If counter space doesn’t allow for the knife block, there are many other safe options available, such as a wall-mounted magnetic knife strip or holder or a knife holder that fits into a drawer. If an appliance is too heavy to lift safely, do not place it up high, and take care when storing sharp appliance blades.
Prep. Cook. Serve and enjoy. Store. Repeat. Before starting any recipe, assemble all of the tools and equipment you will need to execute the recipe. Wash, trim, and chop produce. Measure all ingredients. Preheat the oven. Select pans and grease or line them with parchment paper if it is required. These steps will make the cooking go more smoothly. Then, serve dinner attractively and savor every bite—yes, use those pretty serving bowls and placemats. Then, after dining, clean it up and return each ingredient and utensil to its spot, ready for next time. You will find it makes the cooking process quicker, easier, and much less stressful. This is especially true now that there are two of you in the kitchen. You do not want to find out midway through the recipe that your sweetie used the last of the olive oil or vinegar and failed to mention it (or failed to purchase a new bottle), and you won’t have to go on a mad race trying to locate the tongs while the meat in the skillet burns.
Communicating about everyday tasks such as cooking makes everything run more smoothly. Mount a whiteboard, chalkboard, or bulletin board in the kitchen or behind a closet or pantry door. Write notes to each other about what’s for dinner and keep a running grocery list. Yes, handwritten notes are old-fashioned, and you might think that a tablet or computer is the way to go, and that is fine, as long as you both can access the list quickly. But leaving a mobile device out in the car or in your backpack, or setting it anywhere you can’t find it instantly, will not help you keep that list!
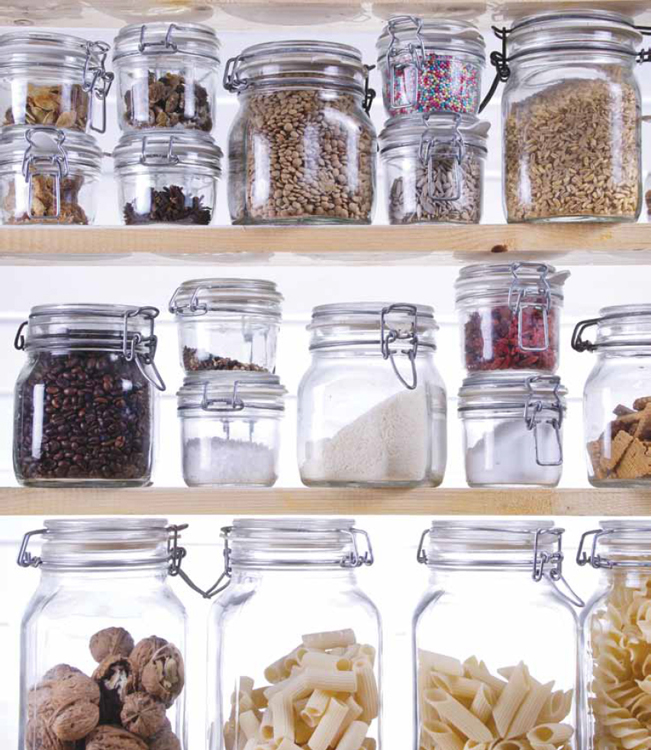
An organized pantry makes cooking less stressful and saves money. So just what is a pantry? It is the room, closet, cabinet, or shelf where the food, utensils, and dishes are kept. So every kitchen has a pantry, whether you have a strategy or not. Plan and organize your storage and you will have a treasure chest; ignore what you stuff in the kitchen cabinet and let partially used boxes or bags of food collect naturally, and you will have a costly mess of this and that.
Where do you begin? Think about the kinds of menus you will serve and use them as a guide.
Keep like items together in zones. Baking powder, baking soda, flour, and sugar become a baking zone. Canned foods can be grouped together in one zone—with all of the canned fruit, tomatoes, and beans in one area or everything you need for chili (chili powder, tomatoes, beans, etc.) in its own zone if that is a specialty of yours. Likewise, if Asian-inspired dishes are a specialty for one of you and Italian the specialty of another, you might want to assemble separate zones with all you need to create those tantalizing meals.
Make items easy to find. Use clear containers so you can spot the contents as well as estimate the volume at a glance. Use lazy Susans or cabinet bleachers so items are easy to spot.
Label everything. Yes, many foods today are date coded (see here), but keep a permanent marker nearby to label items with the date when you opened them.
Keep foods tightly sealed; food in open containers will not stay fresh. Just like bags or boxes of chips or crackers, partially used boxes of cereal or pancake mix stay fresher if tightly sealed in a storage container.
Where to put it? Bins that keep potatoes and onions dry and cool are ideal. Place the bins on the floor, or in a cool, dark spot, but store them in separate bins—if they are stored together, natural gases will intermingle and cause the potatoes to spoil more quickly. Bread is best stored at room temperature, as bread stored in a refrigerator will stale. Store spices in individual airtight containers, away from heat and light—not over the stove. Check them periodically to make sure the spices are still fresh (contrary to popular belief, they don’t have an unlimited shelf life, at least not flavorwise).
Rotate items in the pantry so you always operate on a first in, first out method. Place recently purchased items in the back and move older ones to the front for easy use.
The pantry is not just storage for leftovers—look at it as a cache of fantastic future dinners. Keep a variety of flavor additions handy, for they are the quick fix or vibrant flavor additions that transform everyday meals into spectacular dishes!
Think of the refrigerator and freezer as part of your pantry. Check product labels to see if there are recommendations regarding storage. Open bottles of salad dressings, marinades, and sauces usually must be refrigerated. If you’re unsure if they need to be refrigerated, visit the manufacturer’s website for recommendations.
BAKING NECESSITIES
 All-purpose flour
Baking powder
Baking soda
Brown sugar
Confectioners’ powdered sugar
Cornstarch
Sugar
Vanilla extract
CANNED, JARRED & DRIED
Artichokes
Beans
Broth (low-sodium beef, chicken, vegetable)
Chipotle peppers in adobo sauce
Dried cranberries
Dry bread crumbs
Panko bread crumbs
Roasted red peppers
Sun-dried tomatoes
Tomatoes (diced, crushed, sauce, paste)
DAIRY
Butter
Cheese (chunks, sliced, shredded)
Milk
Sour cream
Yogurt (regular, Greek)
FAVORITES
Chocolate-hazelnut spread
Honey
Jam and jelly
Peanut butter
FRESH PRODUCE
Garlic
Ginger
Lemons
Limes
Onions
Potatoes
Shallots
NUTS
Almonds
Pecans
Pine nuts
Walnuts
OILS & VEGETABLE SHORTENING
Canola or vegetable oil
Nonstick spray
Olive oil
Sesame oil
Vegetable shortening
RICE & PASTA
Brown rice
Long-grain rice
Penne or macaroni
Spaghetti
SAUCES & FLAVOR BOOSTS
Barbecue sauce
Dijon mustard
Ketchup
Marinara or pasta sauce
Mayonnaise
Mirin
Miso
Salsa
Salsa verde
Soy sauce
Sriracha or other hot sauce
Worcestershire sauce
SPICES & SEASONINGS
Basil (dried)
Cayenne pepper
Chili powder
Cinnamon (ground, sticks)
Cumin (ground)
Garlic (powdered, minced dried)
Italian seasoning
Mustard (powdered)
Oregano (dried)
Paprika
Pepper, black (ground, whole peppercorns)
Red pepper flakes
Salt
Thyme leaves (dried)
VINEGAR
Apple cider vinegar
Balsamic vinegar
Red wine vinegar
Rice vinegar
White wine vinegar
STORAGE & PAPER SUPPLIES
Aluminum foil (regular and nonstick/release foil)
Parchment paper
Plastic wrap
Storage containers with tight-fitting lids
Zip-top food storage bags (gallon-size)
Zip-top freezer bags
These are tips and tricks our years of cooking have taught us. Oh, we wish we had known all of these things when we started cooking! We thought we would save you from struggling the way we did in the beginning.
OLIVE OIL: There is a wide array of domestic and imported olive oils available, and you need not purchase the most expensive. Those labeled cold pressed are preferred, as the oil is extracted by pressure and not with chemicals. Extra-virgin olive oil is a fine oil that comes from the first pressing so it is fruity and more expensive. It is especially good for salad dressings or drizzling on Italian bread—times when the fruity flavor will be appreciated. Virgin olive oil is less expensive and is just slightly more acidic so it is a good choice, especially if used in cooking. “Light” olive oil is confusing, as it has the same amount of fat and number of calories—the “light” actually refers to the oil being highly filtered and lighter in color and body than extra-virgin or virgin olive oil. Olive oil breaks down at higher temperatures so if you sauté with it, do not use a high heat.
FLOUR: To measure any kind of flour (all-purpose or whole-grain), spoon the flour out of the flour canister and into the cup, then level it off with the flat edge of a table knife. This is known as the spoon-and-sweep method. Do not dip the measuring cup into the flour canister, nor shake the cup to level it off. Store whole-grain flour, tightly sealed, in the refrigerator for up to 6 months or in the freezer for up to 1 year.
BROWN SUGAR: Brown sugar is labeled dark or light and you can use them interchangeably. The dark brown version has a more intense molasses flavor and is popular in Southern cooking. We find you often use the one you grew up with or the type that is most familiar to you—so Roxanne chooses dark and Kathy chooses light. Brown sugar is always measured “packed” to ensure that any pockets of air have been pressed out of the sugar (since brown sugar is slightly moist, it doesn’t automatically settle like regular granulated sugar does). Spoon it into the measuring cup and pack it lightly; it should hold its shape when turned out into the bowl.
SALT: Today salt comes in a variety of colors, origins, and textures. Kosher salt can be used for all cooking because it dissolves quickly. Sea salt is crystalline in shape and is ideal to sprinkle on cooked foods as a finishing touch. Fleur de sel, a sea salt from France (the name of which translates to “flower of the sea”), is a delicately flavored specialty salt and due to its cost, it is a special-occasion salt that should be sprinkled over food just before eating. Table salt is finely ground and is available with and without the addition of iodine, a necessary nutrient. It is fun to experiment with the varieties available. We tend to use kosher salt for savory cooking and table salt for baking cakes and cookies.
BUTTER: We prefer unsalted (sometimes labeled “sweet”) butter for cooking, and it is the butter used for all of the recipes in this book. We do not recommend using margarine. When cooking, it is difficult to substitute “light” or butter spreads as they have a higher moisture content than regular butter. Using lighter or diet varieties will affect the texture and flavor of the baked good or dish. Purchase butter when it’s on sale, then store it in the freezer for up to 9 months.
CHEESE: Chunks of cheese that you slice or shred as you need them will provide the freshest, best flavor. However, the grocery aisles are packed with every variety of chunk, shred, or slice imaginable, and those that are sliced or shredded offer convenience. In this book, if we list shredded cheese, you may shred it yourself using a box grater or a food processor, or turn to the packaged variety. Please, avoid using (or at least don’t tell us if you do) a can of grated Parmesan cheese or a block of pasteurized cheese spread. Those cheeses labeled “reduced fat” may not melt as smoothly or taste as rich as the full-fat variety, and the quality and melted texture vary by brand. If you want to use the lower fat varieties, experiment with different brands to find the best.
Hidden behind those pantry doors are all kinds of flavor boosts for every dish.
Your memory of Grandma’s cooking may get your taste buds excited, and yet, while comforting and good, all too often old-fashioned cooking means dishes were mildly seasoned. Today our taste buds beg for more intensely flavored dishes, and bold is the name of the game. You are used to restaurant meals and international cuisines and that means your taste buds are attuned to spices, herbs, and flavor boosts never imagined a few years ago. Your pantry becomes a spicy cache of flavor.
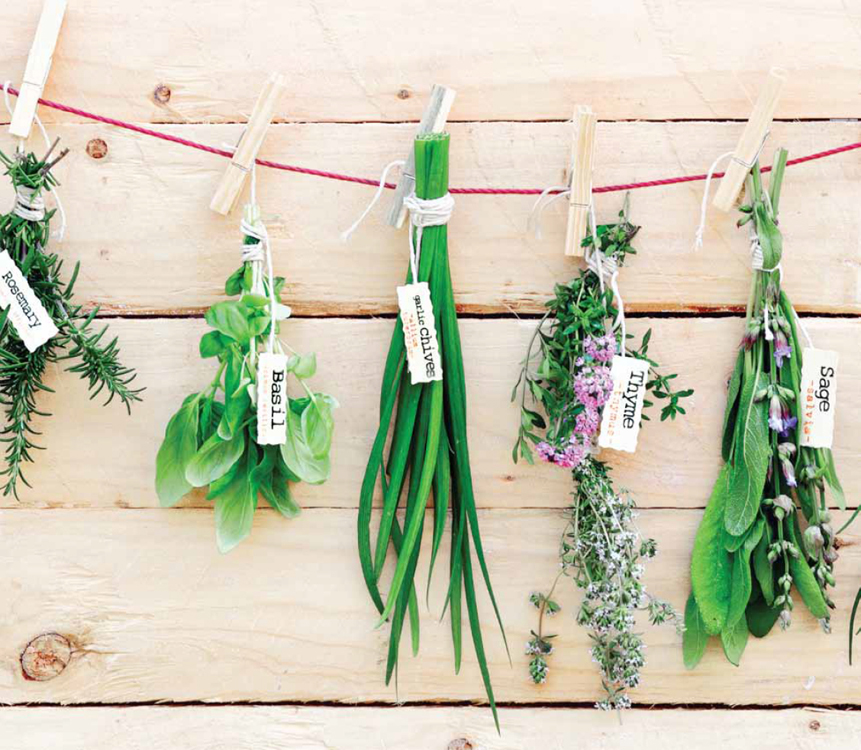
FRESH AND DRIED HERBS:
Herbs and spices will add the flavor you are seeking.
FRESH:
 For fresh herbs, always select those with bright colors that show no signs of wilting. Keep herbs refrigerated in a damp paper towel sealed in a zip-top bag, or place the stems of a bouquet of herbs in a glass of water and cover with a plastic bag. Snip off the leaves you need for a dish. If mincing fresh herbs for a recipe, place the leaves on the cutting board and cut, using a rocking motion, with a sharp chef’s knife, or place the herbs in a cup or small bowl, then use the tip of kitchen scissors to finely snip them.
Fresh herbs add a great flavor punch, but heat and long cooking may fade their flavor. Always taste and add additional fresh herbs during the last few minutes of cooking. This is especially true in a slow cooker (see here).
DRIED:
Bottles of dried herbs, spices, and seasoning blends are convenient and are readily available when fresh isn’t possible. You will also find tasty blends and combinations you never dreamed possible! To extract the most flavor from dried herbs, crumble them in your hands just before adding them to the dish.
Be sure to remove bay leaves just before serving so no one chokes on them.
Age, light, and heat are the enemies of dried herbs and spices in those little bottles. Store herbs and spices in a cool, dark place, away from heat. That means not in the cabinet or shelf over the stove or refrigerator. Most professionals recommend keeping open bottles of herbs or seasonings for just 6 months to a year. Yes, they are expensive and it is tempting to keep them longer, but you want to avoid hoarding open bottles of spices until the flavor diminishes and they stale. Buy small bottles that you can use up. You might visit a store that sells bulk spices and buy just what you need. Or, share half with your coworker or neighbor. If the bottle is not date-coded, use a marker to write the date when you opened it.
If you begin to use an old, open bottle of dried herbs and it has no aroma—or you cannot identify if it is cinnamon or chili powder based on the aroma—why are you using it? It will add no flavor, or if it does add flavor, it may impart an off or stale flavor to the dish you are cooking.
Add herbs, spices, salts, and seasonings conservatively at first, then add more as needed toward the end of cooking. This is just prudent as you can always add seasonings, but it is difficult to remove one that is “too much.” Generally substitute 1 teaspoon of dried leaf herbs for 1 tablespoon of minced fresh herbs.
Never underestimate salt and pepper. Salt not only adds flavor, it balances, blends, and brightens the other seasonings. Pepper may add the perfect little kick, especially if you freshly grind the pepper.
QUICK SEASONINGS FOR MEAT:
DRY RUBS: Dry rubs are seasoning blends that are rubbed onto the surface of the meat prior to cooking. Dry rubs that contain ground chiles (such as chili powder) and sugar should be used on quick-cooking meats as chiles and sugar brown quickly and can cause overbrowning if cooked too long.
These simple herb blends may add just the flavor you are seeking—or are a starting point to create your own signature blend:
TUSCAN: Blend together minced garlic or garlic powder with dried basil leaves, oregano leaves, and rosemary. Season with salt and pepper.
MEXICAN: Begin with chili powder and stir in ground cumin and dried oregano leaves. Do not forget the salt and pepper. Add a bit of cayenne if you enjoy heat.
ASIAN: Season the meat with peeled, minced fresh ginger, garlic, red pepper flakes, salt, and pepper.
If selecting a seasoning blend, read the label. You may discover the blend lists salt first (which means it is the ingredient in the largest volume) followed by a small amount of herbs as well as preservatives or chemicals. Other blends are a wonderful combination of herbs or seasonings you might not already own and are worth the money.
If you enjoy curries or highly spiced Mexican foods it is great to stock up on chiles, curry powder, or cumin. If not, don’t avoid them, but when you do try a new recipe, buy the smallest container you can find or check out the bulk items aisle and purchase just the amount you need to use.
MARINATING 101:
Marinate beef, chicken, or pork in a simple marinade to add flavor and tenderize the meat. Most marinades are made of oil; an acid such as lemon juice, wine, or vinegar; salt and pepper; and often additional flavor boosts, such as herbs, soy sauce, mustard, or Worcestershire sauce.
With a well-stocked pantry, marinades go together quickly so there is no need to turn to bottled marinades. Plus, when making your own, it is very easy to adjust the flavor to your preference, reduce the sodium level, and avoid additives.
TO MARINATE:
Place the meat in a zip-top bag (or in a glass dish) and add the marinade; seal the bag (or cover the dish). Marinate the meat in the refrigerator for the time indicated by the recipe. Chicken and fish will take on the flavor in just minutes, while less tender cuts of beef may marinate several hours or overnight.
Drain and discard the marinade.
Pat the meat dry with a paper towel and cook.
FLAVOR BOOSTS:
DRESS UP MAYONNAISE
For any sandwich, panini, grilled meat, or salad, transform mayonnaise into something special. Blend any one of the following into mayonnaise:
Minced scallions or chives
Minced fresh garlic
Lemon juice, grated lemon zest, and a few grinds of pepper
Minced fresh garlic and finely minced fresh basil
Chopped canned artichoke hearts, drained, and shredded Parmesan cheese
FLAVOR A PANCAKE OR WAFFLE MIX
Stir any one of these favorites into the batter before baking:
Mini chocolate chips
Chopped, toasted nuts
Crisp, crumbled bacon
Ground cinnamon, nutmeg, or ginger
Vanilla, maple, or lemon extract
Top that bowl of oatmeal with:
Chopped, toasted nuts
Fresh blueberries, sliced strawberries or bananas, or any favorite fresh fruit
Dried cranberries, blueberries, cherries, or raisins, or dried, chopped apricots, apples, or other dried fruits
Flavored low-fat yogurt
Ground cinnamon, nutmeg, or ginger
RAISE THE BAR ON RICE
Replace equal portions of the water with broth, tomato juice, diced tomatoes, or white wine.
Stir in dried Italian seasoning or dried basil, oregano, thyme, or other dried herb leaves.
Sauté chopped onion, garlic, shallot, red or green bell pepper, sliced mushrooms, celery, or minced carrots until tender, then add the rice and liquids according to the package directions.
Grocery success begins at home. The plans you make take a few minutes but save lots of time, money, and stress in the end. Remember, there are two of you, so talk everything over—including the budget, the meal expectations and what you will serve, who will cook, and even your food quirks, diet, and guilty pleasures. Don’t let “little” differences, such as who will cook, how healthy to make the meal, or how much to spend, escalate into your own version of Chopped or Kitchen Wars.
Set a budget. What is a realistic amount that your household income will allow for food? What kinds of meals and groceries do you prefer? Do you enjoy buying top-quality, gourmet items and accompanying the meals with wine? Or, would you prefer simpler, less expensive meals? Plan the budget together and experiment to see if it is realistic. Compromise on your goal and make a pact to stick to it. It is not to say you can’t ever splurge, but that is a once-in-a-while treat, not a weekly oops. If you enjoy eating out, be sure to remember that restaurant meals are costly and add that amount to your weekly food budget.
Planning for two servings often takes more careful preparation than cooking for a larger family. Cooking larger recipes may provide more leftovers than you wish to have. Also, many items are packaged for families so using it up prior to spoilage may be a problem. For example, if you two are not avid bread eaters, buy a loaf and freeze some for later use. While a gallon of milk may be a great buy, it is a waste of money if it spoils prior to use.
Plan your meals—not just for tonight, but for several meals. What is the main dish and key side dish? Posting it allows you both to know, so whoever comes home first can start the meal. More important, if you shop with those menus in mind, you can be sure to purchase what you need. It is also easier to use up partial ingredients. For example, if you used chicken broth in a sauce you can plan to use the broth in the soup a few days later.
Check your staples and pantry. Keep your pantry organized so you can quickly scan and see what you have or what you need. Mount a whiteboard, chalkboard, bulletin board or notepad inside a cabinet so you can get in the habit of making a grocery list and writing down items as you need them. Add staples to the list as you get toward the bottom of the box so you can replace it. (Do you want to keep that list electronically? Go for it, but be sure the device is always close by for if you must hunt for it you won’t keep the list up-to-date. A whiteboard on the inside on the cabinet door is always in the same place and always handy.)
Check the ads, coupons, and online specials before leaving for the store. You will discover if chicken breasts are on sale and therefore worthy of stocking up on, or if seasonal fruits or a specific meat cut is on sale and is one you would like to include in the menu plan for the week.
Clip coupons, organize your stash, and use them. If your store has a customer reward program, use it and maximize your savings. Frequently, you can use a manufacturer’s coupon or online coupon in combination with a reward program for maximum savings. Check out couponing websites for couponing classes, tips, and guides, and if someone teaches a class or offers a webinar, take it—you will learn many great ideas.
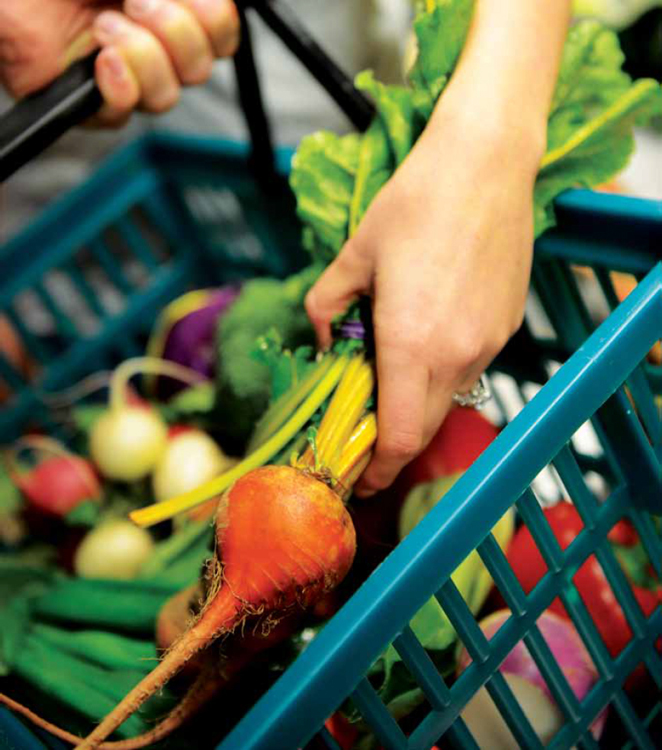
Buy in season or visit farmers’ markets. You will find you eat healthier, will enjoy the freshest produce available, and may discover new varieties of old favorites. Produce that is in season is plentiful and less expensive. Talk to the farmers and you will discover it is easy to choose items that are organic or grown without chemicals or pesticides.
Make a list and stick to it. Do not shop when you are hungry. You will be tempted to add snacks or spur-of-the-moment purchases.
While some larger packages cost less per serving, it is not guaranteed. Evaluate the cost per serving. If storage space is at a premium, they may not be a great buy for you no matter what the price might be. Many stores post the cost per ounce on a shelf tag, so compare and choose the best one for you. Also, if you are trying a new recipe or learning to cook a new cuisine, avoid the larger packages until you hone your skill and know you enjoy that recipe.
Stock up on sale items, especially if it is an item you purchase frequently or use regularly when cooking. If you open a new jar of marinara every 2 to 3 weeks, buying several extra ones when they are on sale is wise. However, if a bottle of oil or soy sauce lasts you a year, do not buy several bottles just because they are on sale.
Compare brands and be flexible. If you are brand specific, admit it, especially so your spouse knows you will not even try an alternate brand of coffee or peanut butter. For many items, however, you will find that brands are similar and store brands offer substantial savings over name brands.
Compromise and plan together. Since there are two of you in the kitchen, you might alternate cooking tasks. Maybe you each pick a couple of menus and write the needed items on the grocery list. If one of you has special allergies or dietary needs, planning becomes even more important.
Minimize surprises that affect your budget. For example, some couples are surprised to learn how much money goes toward groceries. If your grocery budget includes paper goods or cleaning supplies, that is fine, but be aware of it. If you use cash at the farmers’ market but a debit card at the grocery store, be sure to keep track of the total you spent on the groceries. Dinners out or last-minute guests are fun, but do not let the costs creep up unexpectedly if you are trying to stick to a budget or trim expenditures.
The healthiest and often cheapest foods are around the perimeter of the store. This is where foods that are less processed reside—the fresh produce, meats, dairy, etc. To avoid temptation, especially when trying to make healthy purchases and save money, avoid those center aisles stacked with candy, chips, and soda.
DATE CODES:
While convenient, dates codes are not legally required (except on formula and baby foods) and may actually cause a bit of confusion. There are no set standards and each manufacturer sets its own dates regarding quality. The wording is often tricky. Read the label carefully and if you have questions about the storage time of a particular food, visit the producer’s or food company’s website.
There is no need to throw out everything that is past the stamped date. Of course, if the food has developed an off odor or appearance, throw it out without question. (It is always better to be safe than sorry.) However, many items may still be wholesome and safe to eat—even if the quality has begun to fade.
SELL-BY DATE: Tells the store how long to display the product for sale. Purchase the item before that date for the best quality. (Be sure to check carefully at the store and if necessary, hunt for the freshest. Do not be embarrassed to dig to the back of the display to find the freshest.)
BEST IF USED BY: A recommendation for the best flavor or quality. It is not a safety date.
USE-BY DATE: The last date recommended for peak quality.
Do you want to add convenience? Generally, items that are in a more natural state cost less than items where one or more preparation steps have been done for you. For example, lettuce in heads or bunches cost less than salad mixes, and whole carrots cost less than trimmed baby carrots. Ground beef costs less than premade beef patties. Neither is wrong and either can fit into a budget—just make an informed decision.
Check out salad bars, olive bars, and delis. While the price per pound of prepared foods is more than buying the whole item, you may find there is so much less waste that it becomes a sound purchase for you. For example, if you want to use just three or four olives, buying that amount and not a whole can is wise. Likewise, a few broccoli florets from the salad bar may be wise if you are just using it in one stir-fry dish and do not have plans to use the whole bunch. It also may be a wise purchase if the convenience helps you to get a quick meal on the table on a busy evening so you can avoid eating out.
Stay out of the store on non-shopping days. Shopping every day adds to the cost and zaps your time. If you shop daily, it sounds easy, but realistically, you will spend about 30 minutes, and suddenly you have wasted a couple of hours that week on groceries.
Keep the kitchen savvy going and store your purchases correctly when you get home. Don’t just dump everything out of the bag; put things where they belong, placing newer items behind the open, older items in your pantry and following the guidelines below for other items.
PRODUCE: Generally, wash produce when you get home. (Notable exceptions are mushrooms, berries, potatoes, and onions—these items should be washed just prior to using them.) Wash lettuce and greens and pack them between paper towels in sealed zip-top bags. Be sure to wash fruits, including citrus, well. Scrub cantaloupes and melons with a vegetable brush under running water.
MEAT: Refrigerate meat quickly after shopping. Plan to use ground beef or chicken in 1 or 2 days, or freeze for use in the weeks to come. Beef or pork steaks or roasts may be kept in the refrigerator for 3 to 5 days, or frozen for later use. While it looks tight, the plastic wrapping around the meat package used by typical grocery stores is not freezer-ready, and if you freeze the meat without additional wrapping, the meat will dry out. Slip the package into a freezer bag, seal it tightly, label, and freeze. Separate larger packages of meat into usable sizes—packing one or two chicken pieces together, making ½-pound packages of ground beef, or separating other meats into sizes typical of what you might use. If you plan to freeze bacon, separate every two or three slices with parchment or waxed paper, then it seal all in a freezer bag. Once frozen, you can separate them and use just a slice or two as needed. Thaw meats, still tightly wrapped, in the refrigerator.
The first step toward becoming an appliance pro is to use that shiny new equipment from your registry, and to keep using it. Appliances can make kitchen tasks easier and quicker. Unpack them, become familiar with them, and use them.
Keep them handy. When planning where to store appliances, try to select a convenient spot. Place those you plan to use daily, such as the coffee maker, toaster, or that blender you want to use for your daily smoothie, right where you can reach them. If waffles might be a Saturday morning treat once a month, maybe the back of the cabinet is a good spot for the waffle maker.
Read the booklet or information packed with the appliance, or visit the manufacturer’s website. You will discover all kinds of priceless information. You will find tips on how to use the appliance safely and efficiently, how to clean it, and even how to use the appliance in fun and unexpected ways. Always use the appliance as it was intended; if you try to use it in a way other than as it was intended, you are courting danger.
Write the date you received the appliance on the outside of the use and care information and keep it. Slip the information leaflets into plastic sleeves and keep them all in a 3-ring notebook, or scan the information and make an electronic file for easy reference.
BLENDER:
Blenders vary from basic blenders, which are ideal for sauces and drinks, to professional-quality blenders that are quite powerful—some of these models can grind grains, heat soup, and make frozen desserts. Not all blenders will perform in the same way, so if you are in doubt, check on the manufacturer’s website to confirm the kind of blender you have.
BLENDER TIPS:
Use short, quick pulses for more even chopping and blending.
Blending is quick. Do not overdo it.
Stop the motor and scrape down the sides of the blender jar with a rubber spatula as needed to promote even blending.
Do not overfill the container. Most are marked with a “max fill” line. Work in batches, if necessary.
Place the lid on the blender, and then turn it on. It is always wise to hold the lid in place while blending—better safe than sorry. Turn off the blender and allow it to come to a stop, then remove the lid and scrape the container or pour the contents out. The blades are quite sharp; do not place your hand into the blender jar.
The lids on most blenders have a removable center. It is great to remove that center when drizzling in oil when making a salad dressing or pesto. It is necessary to remove the center of the lid to provide a vent if you blend a hot liquid, such as hot soup, so that any steam can safely escape. If you do not vent the lid, you need to let the liquid cool before blending.
GREAT USES:
Blending drinks—milkshakes, smoothies, cocktails, and fitness drinks
Blending sauces (especially hollandaise sauce), salad dressings (including mayonnaise), peanut or other nut butters, salsas, and dips
Making purees for sauces or soups
Mixing pancake batter or instant puddings
Chopping small amounts of nuts, herbs, or bread or cracker crumbs
Not good for:
Whipping cream or egg whites
Grinding raw meat
Mashing potatoes
Start on a low speed, especially if blending a hot liquid, then increase to a higher speed.
Most blenders will not chop ice unless there is liquid. Add juice, milk, or cocktail ingredients along with the ice and blend until it has a slushy consistency.
Liquids help the blender to chop hard foods, such as carrots, cabbage, or other vegetables. Add some liquid (water is great) before adding the hard foods to chop. Cut the food into even 1-inch pieces and add the pieces to the blender jar. Place the lid on the blender, then chop, using quick pulses. Pour into a fine strainer to strain out the vegetables. Discard the water or use it for soups.
IMMERSION BLENDER:
What is an immersion blender and when do you use it? Immersion blenders are also called “stick blenders” or “wand blenders” and they look like a sharp, swirling blender blade on the end of a stick or handle. They are quite handy, but can be dangerous. An immersion blender does many of the same things as a countertop blender. You move the immersion blender to the food, placing it into the pot of cooked vegetables, for example, or down into the tall milk shake glass, instead of spooning the food into the deep blender jar as when using a countertop blender. An immersion blender is especially convenient to use when blending small amounts of salad dressing or sauce, or one drink, milk shake, or smoothie in a glass. It is also a wonderful tool to use when pureeing a soup; you can immerse the immersion blender in the pot of soup or cooked vegetables directly instead of transferring it to a countertop blender. Always use caution as the spinning blade at the base of the immersion blender is very sharp. For safety and to avoid splatters, be sure to immerse the immersion blender head deeply in the food prior to turning the blender on and turn it off before lifting it out of the food. A deep bowl will minimize any possibility of splatters. Never use your fingers to dislodge a piece of food or clean off the blade. Unplug the immersion blender before disassembling or removing the blades.
FOOD PROCESSOR:
From a mini-chopper to a large, almost industrial size, food processors come in a variety of sizes to fit your needs.
GREAT USES:
Chopping produce or meat
Slicing or shredding
Mixing
Kneading
Preparing salsas, dips, spreads, and pestos
Not good for:
Mashing or whipping potatoes
Beating egg whites
Blending liquids (if overfilled, it will leak)
All tasks are quick. Use short pulses to blend or process. Do not overprocess—it can happen quickly. For the most even slicing, stand food evenly in the feed tube and use steady, even pressure.
Cut the food into even pieces that fit comfortably through the feed tube.
Do not overload the bowl. It is always better to chop in smaller batches.
Check the manufacturer’s website for tips regarding cheese, as there are so many types of cheese and various models have different levels of power available. Many cheeses shred best when chilled. To grate hard cheese such as Parmesan, allow the cheese to come to room temperature, cut it into cubes, and process using the metal blade. Do not attempt to slice Parmesan or soft cheeses such as mozzarella.
Making pastry in a food processor is quick and effortless. Be sure not to overprocess. Stop the motor just as the dough comes together to form a ball around the blade.
If one recipe has several steps, begin with the driest ingredients to chop, grate, or blend, remove the food, then go right on to blend or mix a moist step. This order makes the tasks, and the cleanup, go more quickly and easily.
Food processors are sold by the size of their work bowls, listed in cups of dry ingredients. However, this is a little confusing when it comes to liquids. Generally, if processing liquids, fill the processor bowl only about half full to avoid leaks. Also, if mixing heavy dough or kneading bread, you should follow the manufacturer’s recommendation for the number of cups of flour that can be used in one recipe.
Slow cookers are now available from small 1-quart units to large 6- or 7-quart units, or even as multiple vessels in one appliance or vessels that hook together to operate as one. Slow cookers can be round or oval. Many families find they use two or more different slow cookers—smaller ones for dips and larger ones for chili when tailgating.
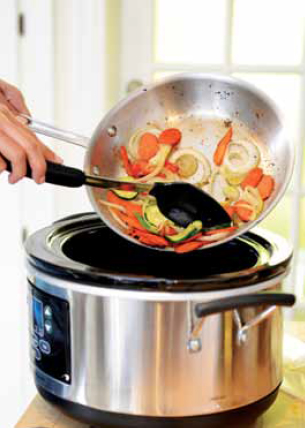
GREAT USES:
Soups, stews, chilies, and sauces
Roasting less-tender cuts of meat due to long, slow simmering
Not good for:
Boiling pasta
Cooking with milk, sour cream, or cheese (unless added toward the end of the cooking time)
Cook, with the cover on, for the time recommended or until the food is done and tender. Do not lift the cover to peek or stir.
You will have more liquid at the end of the cooking than what you began. If you adapt a recipe to the slow cooker, reduce the amount of liquid used in the recipe.
Use dry minced garlic to impart a true garlic flavor when slow cooking. The flavor of fresh herbs, fresh garlic, and even many dried herbs will fade while slow cooking. If you wish to use fresh herbs, add them at the end of cooking. We always recommend that you taste the dish just before serving and add additional seasonings as desired. If using dried herbs, select dried leaf seasonings instead of the ground varieties. Be sure the dried herbs are not old or stale; stale herbs offer very little flavor and, worse, can impart a bitter flavor, especially when slow cooking.
Generally, 1 hour on high equals about 2 hours on low. You can use this tip to adjust the cooking time to fit the time you have.
Many slow cookers now have removable stoneware vessels. You can fill the stoneware vessel with the recipe ingredients the night before, cover it, and place it in the refrigerator. In the morning, all you need to do is place the stoneware vessel in the heating base, cover it, and turn the slow cooker on, and you’re out the door.
Heavy-duty stand mixers are investments and generally last for many years.
STAND MIXER TIPS:
Insert or remove the mixing attachments (such as the dough hook, whisk, or paddle) with the mixer unplugged.
Many mixers have a variety of attachments available. You can find attachments to prepare pasta, grind meats or grains, shred or slice vegetables or fruits, juice citrus fruits, or make ice cream. Check with the manufacturer of your mixer to see what attachments are available, and then evaluate carefully to determine if the attachment is one you would use.
GREAT USES:
Creaming shortening or butter and sugar
Beating egg whites, cream, and meringues
Mixing dough for cookies and breads
Kneading bread dough, especially with the dough hook available on many models
Grinding meat (with a special attachment)
Extruding or pressing pasta dough (with a special attachment)
Not good for:
Very small volumes
Why use a stand mixer versus a handheld mixer? If you are whipping a small amount of cream or just an egg white, a handheld mixer might be ideal. Handheld mixers are also powerful enough to prepare cake mixes and beat light batters. However, many models are not powerful enough to beat larger volumes of food, mix heavy cookie dough, or knead bread. If in doubt, review the use and care information on the manufacturer’s website for a list of recommended foods and to find out which ones to avoid.
Depending on the brand of the mixer and shape of the bowl and beater, some large mixers cannot adequately mix just a cup or two or whip one egg white. Mix or whip these smaller volumes using a handheld mixer.
MULTI GRILL:
With so many uses and just one appliance to store, the multi grill makes an ideal choice for many. This one cooking appliance comes with a variety of interchangeable grids so you can use it as a grill, griddle, panini press, or perhaps a waffle maker.
MULTI GRILL TIPS:
Assemble the plates you wish to use for the cooking task before preheating.
Set the temperature dial to the prescribed temperature for the task you will be performing. Preheat until the indicator light comes on.
Cooking is quick. Check the cooking progress and cook until the food is fully cooked but not overcooked.
The surfaces are very hot. Use caution.
If your model came with a removable drip pan, be sure to have it correctly in place before cooking.
Some models are available that do not have removable or interchangeable plates, but work great for a single use, such as grilling meats in a contact grill, making toasty panini, or baking waffles. Some couples may select one of these appliances if they do not anticipate using all of the functions (or plates) of a multi grill. If the plates are not removeable, unplug the unit, allow it to cool, then wipe the plates clean with a damp cloth.
GREAT USES:
As a panini press for crisp, hot sandwiches
As a griddle for pancakes, eggs, sandwiches, French toast, bacon, or sausages
As an open grill or a closed contact grill for grilling meats, such as boneless chicken, steaks, burgers, or fish
Not good for:
Deep-frying
Bone-in chicken pieces
If you are a fan of waffles, be sure to add a waffle maker to your registry. You may also find your multi grill has waffle plates available as an accessory.
WAFFLE MAKER TIPS:
If your waffle maker has removable plates, or if you’re using waffle plates on a multi grill, assemble the plates and be sure they are correctly in place before preheating.
Preheat until the indicator light comes on.
The surfaces are very hot. Use caution.
Ladle the batter into the center of the grid. Check the manufacturer’s directions for an estimate regarding the volume needed to make a waffle and do not overfill the grid.
Bake until the indicator light comes on and the steaming stops. If you open the waffle iron too early, the waffle will stick.
GREAT USES:
Waffles for breakfast or brunch
Waffles for lunch or dinner with chicken or other meat
Sweet waffles or chocolate waffles for dessert
Hash brown potatoes
Not good for:
Grilling meats
Tabletop-size ice cream makers that churn just a quart are ideal for couples, and newer models eliminate the messy salt and ice required for older versions.
ICE CREAM MAKER TIPS:
New, tabletop ice cream freezers do not require salt.
Put the freezer container in the freezer for at least 24 hours If you make ice cream frequently, store the container in your freezer.
Look for the “max fill” line and do not overfill.
The appliance is often automatic and may turn off when the ice cream is done, usually in 20 to 30 minutes.
GREAT USES:
Ice cream
Frozen yogurt
Sherbets and sorbets
Gelato
Not good for:
Frozen drinks
What is the most important tool in a kitchen? Most cooks—home cooks and chefs alike—report emphatically that it is a sharp knife. It does not matter if you have two or three shiny new ones, or received that megablock with lots of polished, matching knives: A good knife is indispensible.
Old lore used to deter people from giving knives as gifts—and we hope your family and friends did not follow those tales. Once, if a friend gave a knife, it meant the friendship might be severed, so to be prudent a penny or other coin might be taped to the gift box so the recipient could quickly pay the giver for the gift. Surely, we have moved beyond this silliness, and you registered for—and received—the knives of your dreams.
If you did not register or receive those knives, shop carefully to select the best knives for your family. You will be using them daily for years to come and you will want to make a sound decision. Also, do not be swayed into thinking that you must buy a block with lots of knives. You can select a knife or two now, then add knives as time, and needs, change.
First, pick them up and see how they feel in your hands. Are they balanced? Does the fit feel right? Both of you need to test the feel and be sure it feels right, for both larger and smaller hands.
HIGH-CARBON STAINLESS STEEL: Especially popular for good knives, it combines the sharp edge of a carbon-steel blade with the rust and corrosion resistance of stainless steel. It is an ideal choice, but expensive.
CARBON STEEL: Long used for knives, it can be sharpened to a very sharp edge. The downside is that it stains and rusts easily.
STAINLESS STEEL: This once popular material is still occasionally found in less expensive knives. While pretty, stainless-steel knives are hard to sharpen.
CERAMIC: Now used for knives, ceramic makes a hard blade that does not corrode, and it can hold a sharp edge for a long time. However, is brittle, so if you drop a ceramic knife, the blade may crack.
Technology and manufacturing practices change, so if you find you are replacing a knife in years to come, do not just take the manufacturer’s claims at face value. Read some current, nonbiased reviews so you can make an up-to-date, sound decision.
PARTS OF A KNIFE:
The tang is the portion of the blade that runs through the handle. Top-quality knives will have a tang that runs all the way through the knife.
The handle of a knife may be made of wood or plastic—or even be a continuation of the metal used in the blade. The material is more a matter of personal preference, but how you plan to care for the knives should also affect your choice. Test the grip and see how the handle feels.
CARE & CLEANING:
Avoid the dishwasher. Even if the marketing material says you can place it in the dishwasher, most food professionals will recommend against it for so many reasons. First, it is a matter of safety. Grabbing a knife from the dishwasher is dangerous, and typically someone gets cut. Second, the hot water and detergent dulls the knife and the sharp points can even pierce plastic coated shelves or edges in the dishwasher. In addition, if the knife has a wooden handle, the dishwasher dries it out. Wash knives separately in hot, soapy water, rinse, and dry.
Remember, there are two of you in the kitchen and if your sweetie is nice enough to wash the dishes, don’t surprise him or her with sharp knives hidden in the soapy dishwater.
SHARPENING:
That metal rod in the knife block is called a steel and is used to sharpen your knives. It is essential, because if you use it correctly and regularly, it will help maintain the sharp edge on your blades. Hold the blade of the knife at a 20 degree angle to the steel and lightly glide the knife over the steel three or four times. Wash the knife and you are good to go. Do not get crazy and overdo it—you don’t have to use the steel after every cut—but make a regular habit of it and your knives will maintain sharp edges longer. Now, where do you store them?
Please do not throw knives loose in a drawer—one of you will be cut while fishing for a knife. If you do not have a block or if the block will not fit in a tiny kitchen, there are many other safe options available, such as a magnetic knife strip or a knife holder that fits into a drawer. There are also plastic sleeves that slip over the blades. Evaluate your space and let safety be your guide.
POPULAR KNIVES:
Sure, that big megablock is great. However, if you are selecting a few top-quality knives, these are the most popular ones.
FRENCH OR CHEF’S KNIFE: An all-purpose knife 6 to 10 inches long
PARING KNIFE: A smaller knife for fine, detailed work or peeling
BREAD KNIFE: A long knife with a serrated edge that makes it easier to slice bread and soft foods like tomatoes
SLICING OR CARVING KNIFE: A longer, thinner knife for slicing meats
ELECTRIC KNIVES:
Did you receive an electric knife? Odds are you might have one for it is among the most popular presents in the small appliance category. An electric knife is ideal for slicing most meats, from roasts to chicken, turkey, brisket, or ham, and it is handy for lots of other foods. An electric knife:
Cuts through the crust of bread—artisan, crusty loaves, or freshly baked loaves.
Slices angel food cake without mashing.
Slices melon, pineapple, and squash that have tough outer rinds.
Is not for slicing through bones.
TO USE AN ELECTRIC KNIFE:
Unplug the knife and be sure to lock any safety latches before inserting the blades. Once the blades are securely in place, plug it in, then press the on switch. There is no need to exert pressure—let the motor and vibrating knife blades do the work. Once you are finished slicing, unplug the knife and lock the safety latches before removing the blades.
KNIFE SAVVY:
Hold the knife securely between your thumb and index finger. Use your opposite hand to hold the food and guide the knife. Curl your fingertips on the guiding hand out of the way and the side of the knife blade can slide safely against your knuckles.
Sharper, well-cared-for knives that are used correctly are safer, and you do not want to join the throngs of cooks who lament that a dull knife slipped and nicked a finger.
Use the center of the blade for most cutting and chopping.
Use the tip when cutting details or fine, thin slices. Use the base or heel of the knife when cutting through heavy, hard foods.
KITCHEN SCISSORS OR SHEARS: You will use this indispensable tool daily. Far beyond snipping a bag open, scissors make quick work of mincing herbs, cutting raw or crisp cooked bacon, dicing dried apricots or other dried fruits, or even slicing a pizza instead of using a pizza cutter. Don’t use your office scissors for cooking tasks; they need to be separate tools.
PIZZA CUTTER: This great tool is sharp, so store it carefully but keep it handy for slicing pizza, cutting the crusts off slices of bread, cutting wedges from tortillas, and so many other uses.
POULTRY SHEARS: While you will find this tool beneficial if you attempt to cut up a whole chicken, you will also turn to it when trimming fat from chicken breasts or cutting chicken quarters into smaller pieces. These sturdy shears are also great for cutting through the shells of lobster and other tough jobs. Quality reigns: Lightweight and inexpensive poultry shears may not be up to the task. Be sure the shears come apart for easy and thorough washing.
CUTTING TERMINOLOGY:
DICE: cut into tiny, even cubes, ⅛ to ¼ inch
CHOP: cut into small or bite-size pieces
MINCE: cut into very fine pieces
CUBE: cut into even cubes, often of a specified size
No matter what knife you use, or what you are chopping, cutting, or slicing, keep the pieces even. The food will cook more evenly and look more attractive.
RASP-STYLE GRATER: Most often called Microplane graters (a common brand), rasp-style graters were once at home in the tool box, but are now a kitchen favorite. Use a rasp-style grater to zest citrus, grating off just the colored portion of the rind (the white pith beneath is bitter). You can also use the grater for quickly grating Parmesan cheese or other types of hard cheese or for grating fresh ginger or chocolate.
VEGETABLE PEELER: Use it for thinly peeling the skin off carrots, potatoes, and more. It makes great garnishes, too, so use it to make strips of chocolate, Parmesan cheese, or curls of citrus peel.
CUTTING BOARDS:
You probably will never pick up a knife without picking up a cutting board, too, so if a good knife is the most important tool in your kitchen, a cutting board ranks toward the top. Gone are the days of your mom’s or grandma’s kitchen when one old wooden cutting board leaned against the backsplash. Today there are choices in materials, colors, and sizes and each offers benefits.
A good cutting board should feel secure and not slip around the counter as you use it. While you might think that a super-slick surface would be ideal, the opposite is true. Ideally, it should have just a little texture so that the knife does not inadvertently slip across the surface while you are chopping, nor should the surface be so hard that the knife wears or dulls as you slice.
Many materials fit the bill and will make a great choice.
Wooden boards are classic and generally they are the easiest on the knife blade. Those made of bamboo are often more expensive but may last longer than other hardwoods. Wooden boards require a little more care than plastic boards, as they are not dishwasher safe, and to extend their life, you should oil the surface occasionally with mineral oil.
Plastic boards are colorful and dishwasher safe. They are often the least expensive.
Tempered glass, marble, or ceramic boards are available and many are beautiful. They are heavy, but are very durable and sanitary and often are heatproof so it is a great surface on which to set a hot pan. The sound of knives clipping against the hard surface may be irritating to some and the hard surface is harder on the knife blade.
CARE AND CLEANING:
Take care to avoid cross-contamination and, ideally, use two different boards. Use one for raw meat, poultry, and seafood and another board for bread and produce. It is great to color-code the boards to make it easy to identify them, or choose a different size, shape, or look for each separate task.
Cleanliness is very important for all boards. Wash them in hot, soapy water after each use, or if dishwasher safe, wash them in the dishwasher. To sanitize a cutting board, mix 1 tablespoon of unscented liquid chlorine bleach in 1 gallon of water, flood the surface of the board, covering it completely. Rinse well and dry.
No matter the material, replace boards that become scratched or deeply marred, as the grooves can harbor bacteria.
Round out your kitchen with basic utensils. Among the basics are the following:
CAN OPENER: Every kitchen needs a can opener. Whether you choose an electric or a manual one is a matter of personal choice and may be dependent upon how often you use canned food versus fresh.
CITRUS JUICER: The juice from a freshly squeezed lemon, lime, or orange will add a much better flavor to the dish or salad dressing you are preparing. With a handy citrus juicer, it takes just a minute to juice the fruit and you will not be tempted to use a bottled juice. There is no need to have a large electric juicer when an inexpensive smaller juicer or handheld reamer will quickly handle the job.
COLANDER: You will find you frequently reach for a colander to drain pasta or potatoes, or the fat from ground meat.
COOKING SPOON: The classic was made of wood, and that still is a great choice. Newer ones are made of such materials as stainless steel and heatproof plastic, which offer bright colors and fun designs. If you will be using nonstick cookware be sure to use a plastic or wooden spoon to avoid marring the nonstick finish.
CORKSCREW AND BOTTLE OPENER: Yes, they are bar tools, but you may find you reach for them often when cooking, since wine, beer, and spirits are common recipe ingredients.
PANCAKE TURNER: While chefs or food professionals may not agree with this name, it is popular in some regions of the country to call it a spatula. No matter what you call it, you might choose both a flexible metal and a nylon or heatproof plastic for use in different pans. While nonstick finishes are harder and more resistant to scratches today, some manufacturers still recommend that you avoid using metal utensils in nonstick pans. We always choose a very thin and flexible turner to use when baking cookies as we want to lift the edge of the hot cookies without breaking them. A large, firm or stiff turner is ideal for lifting heavier meats, sandwiches, pizza, or vegetables.
PASTRY BRUSH: Use a brush to spread melted butter over dough, olive oil over slices of French bread, or sauce over grilled meat. Silicone bristles stay flexible after repeated washings and are easier to keep clean.
ROLLING PIN: There are so many new designs to choose from, but a trusty rolling pin is needed to roll out dough for pastry crusts or cookies.
SLOTTED SPOON: A must in every kitchen, a slotted spoon makes it easy to spoon out vegetables, cooked bacon, or other foods from their cooking liquid or fat.
SPATULA: This is sometimes referred to as a rubber scraper. Be sure it is heatproof, and if not, do not use it in hot foods or while cooking.
STRAINER: A fine-mesh strainer, or even two or three different sizes of strainers are used often for small tasks like draining a can of artichokes or for larger jobs like straining the cooked meat and bones from a stock.
TONGS: Avoid piercing meat with a fork when you turn it; piercing can cause juices to drain away. Instead, choose tongs for that job.
WHISK: You may want a variety of sizes, selecting a larger one for whisking several eggs at once and a smaller one for whisking a small amount of salad dressing. A whisk is the tool of choice for combining dry ingredients prior to making cookies or a cake. You are doing so much more than just combining the ingredients—whisking is essential to aerating the flour. When cooking, you will find a whisk is perfect for making a lump-free sauce.
VEGETABLE BRUSH: While it once may have been viewed as unnecessary, current food safety guidelines emphasize washing produce, especially cantaloupe and others with tough outer skin, with a stiff brush.
SPECIALTY UTENSILS:
PASTRY CUTTER OR BLENDER: This handle with parallel sturdy blades or wires is used to cut cold butter or vegetable shortening into flour for pastry.
MEAT TENDERIZER: While we may not frequently tenderize meat anymore, we often pound meat to make it thinner. Purchase one with a smooth side so you can use it to pound chicken or pork cutlets into a thin cut that will cook quickly and evenly. If you don’t have one, a heavy pan, can, or rolling pin will suffice.
SCOOPS: Yes, a sturdy ice cream scoop is more than a luxury. Dipping out solid ice cream can be a chore without a heavy-duty scoop. You will also find that spring-loaded scoops, available in a variety of sizes, are convenient to use when scooping meatballs, cookie dough, or melon balls.
We always recommend using a meat thermometer. It is great to check if meat is cooked to a safe temperature, but even more, it is an ideal way to accurately gauge doneness and ensure that every piece of meat you cook is cooked to perfection! No more over- or undercooking a piece of meat.
Today’s meat cuts are different from those your mom may have purchased a few years ago. The meat may be leaner or the animal may have been allowed to feed on only grass or grains and overcooking may result in a dry cut of meat.
Some thermometers are oven safe, so you can leave the thermometer in the meat as it cooks. Others are instant-read thermometers and are not heatproof so you take the meat out of the oven and quickly check the temperature, then return the meat to the oven.
Insert the thermometer into the meaty center of the meat, away from fat and bone.
What are “rest times” and why should you bother?
Meat is quite hot when you take it out of the oven or off the grill and that residual heat continues to cook the meat, increasing the internal temperatures. All meat will taste more juicy and flavorful if you allow it to rest for 5 to 10 minutes before cutting and serving. If you want to serve a piece of meat that is still a bit pink, like a good steak, chop, or roast, you can take the meat out of the oven at the minimum temperature, cover, and allow it to rest for at least 5 minutes.
What temperature is the minimum for food safety?
With new research and food standards, the minimum safe temperatures are occasionally updated by the U.S. Department of Agriculture (USDA). To stay up-to-date, visit their website at www.usda.gov and follow the links to food safety. Remember, the color of the meat (inside or out) is not a good or reliable indicator of doneness. Follow these guidelines:
|
160°F |
|
|
145°F, then rest for 5 minutes for medium-rare doneness 155°F, then rest for 5 minutes for medium doneness |
|
|
165°F |
|
|
165°F |
|
|
160°F |
|
|
145°F, or until fish is opaque and flakes with a fork |
|
|
145°F, then rest for 5 minutes |
DRY: These are the nesting cups that generally come in 1, ½, ⅓, and ¼ cup measures. It is important to use these when measuring flour, sugar, or other dry ingredients so you can level off the top with a flat edge, such as a table knife.
LIQUID: This clear, marked cup with a spout is the tool to use when measuring any liquid. Do not measure dry ingredients in this cup—you may be tempted to shake the cup to try to level it off and that will compact the flour and cause incorrect measurements. In addition, due to its design you cannot level off the dry ingredients, so an incorrect measurement will result.
MEASURING SPOONS: These spoons will be used constantly! Note that a teaspoon measuring spoon does not equal a typical teaspoon you use to eat with, so keep the measuring spoons handy.
TIPS FOR MEASURING:
If measuring a sticky ingredient, like honey, molasses, syrup, peanut butter, or solid vegetable shortening, spray the cup or spoon first with nonstick spray. The sticky ingredient will come out of the measuring cup or spoon much more easily.
If baking becomes your passion, invest in a kitchen scale for the most accurate measurements.
While the bright and shiny pots hanging on the rack look sexy and chic, pots and pans are made to be used, and quality cookware makes it easier to get the best results.
Did you register for a set of pans … and unwrap the ones you wanted? If you are still searching for the best cookware, use these tips to select them.
Avoid cheap, thin, flimsy pans. Thin ones warp or dent, and food will scorch easily.
Buy pots and pans as if making a sound investment, as the set you select may last a lifetime. Study the materials and finishes and try to understand the pros and cons each material offers. Pick them up to see if they feel balanced and comfortable to lift. Check the feel of the handle in your hands. Are the handles oven safe? Will the handles stay relatively cool? Most important, do not buy a set based on looks, or a designer name, and do not select the highest-priced one thinking it is the best set. Evaluate your needs and the foods you intend to cook and make the best selection possible.
What type of range do you have now, or what is top on your list when you can purchase a range or remodel the kitchen? If you will be using an induction range, be sure the pans contain iron (sometimes called ferromagnetic materials). If you have a smooth, glass-top range, be sure the bottom of the pans is smooth and avoid retro cast-iron pans that have a rough surface or unglazed ring.
No one set of pans does everything best for everyone—and even if you select a set, you may want to supplement with specific pieces. Add a wok, grill pan, or cast-iron skillet if these cooking styles are part of your skills, or add a pasta pot or omelet pan if you often cook these foods.
ALUMINUM: Aluminum is a great conductor of heat, so it heats quickly and evenly. It is a popular choice since it is lighter in weight. However, it reacts with some foods, especially acidic foods such as tomatoes or vinegar, and it stains. To prevent the reaction, it is often covered with stainless steel or is treated so as not to react.
COPPER: The best conductor, it heats up (and cools off) quickly. It is expensive, hard to maintain, and softer, so it dents. It reacts with some foods, so sometimes copper pans are lined with stainless steel.
STAINLESS STEEL: While pretty, stainless steel is a poor conductor of heat, so it develops hot spots and cooks unevenly. A stainless-steel pan is often constructed with a heat-conducting core of aluminum or copper.
CAST IRON: Cast iron conducts heat slowly and retains the heat. It is durable so it can last a lifetime, but it may be difficult to handle as it is heavy. An unseasoned cast-iron pan reacts with acidic foods and can rust. It is porous so it should not be soaked in soapy water or run through the dishwasher. Because of the reactions and potential for rusting, cast-iron pans are often coated with porcelain enamel. A highly seasoned cast-iron pan, even one you might inherit from Grandma, develops a slick surface from the years of use. A new, uncoated cast-iron pan should be seasoned before use. To do so, line the bottom rack of the oven with aluminum foil, then preheat the oven to 350°F. Rub the pan, inside and out, with a coating of vegetable oil or melted vegetable shortening. Place the pan upside down on the top oven rack. Bake for 1 hour. Allow it to cool, and it is ready to use.
GLASS OR CERAMIC: While once glass or ceramic pans for stovetop cooking were available, they are no longer common, and instead this material is used for casserole dishes and ovenware.
PORCELAIN ENAMEL: A smooth, glassy finish, often used on cast-iron, it not only adds color, it makes the pan stain and scratch resistant. Since it is slick, foods often do not stick to the surface.
ANODIZED: This finish means the surface is oxidized, so the aluminum becomes nonporous and nonreactive. Food barely sticks, and the aluminum surface is easier to clean. Since tomatoes, wine, and other acidic foods do not react with the surface, many aluminum pans are now anodized.
NONSTICK: The durability of nonstick cookware has improved, but many manufacturers still recommend using nylon, plastic, or wood utensils and warn against using abrasive cleaners on the surface. Often, manufacturers of nonstick cookware do not recommend using high heat, and if that is the case, it is not the best pan to use for searing or browning meat. While nonstick pans are safe, there are still questions about the manufacturing process and some suggestions of health concerns, so some people wish to avoid this finish. However, if you enjoy cooking eggs or making cheese sauce, you might want a nonstick skillet and pan in your arsenal.
SIZES AND SHAPES:
Below is a list of common pots and pans, and how many you might want of each.
SKILLETS: Many kitchens begin with a small (6- to 8-inch), medium (10-inch), and large (12-inch) skillet. Many skillets are sold without covers, so if you want to cover and simmer foods, you may want to add a cover; sometimes it is sold separately. If you want to oven-bake in the skillet, choose oven-safe varieties, or note the material used for the handles and evaluate if it is oven safe.
SAUCEPANS OR POTS: Select a range of sizes, from small (1-quart) to large (4-to-6 quart). The volume is measured by filling to “flooding,” so the full volume of the pan may not be usable (for example, the usable capacity of a 2-quart pan is about 6 cups, or 1½ quarts).
DUTCH OVEN: This larger covered pan holds 6 to 12 quarts and is ideal for soups, stews, chilies, and other dishes that are braised or stewed. Traditionally this pot or kettle was made of cast iron, was oven safe, and was quite heavy. Many brands and sets of pots and pans now include a Dutch oven so they are available in a variety of materials and finishes.
STOCKPOT: This tall pot is ideal for soups, stocks, stews, chilies, and other large dishes. It is also the pan most suited to cooking pasta or boiling a large quantity of water. Some stockpots today come with a perforated pasta insert. Avoid stockpots that are made of a thin metal; the soup or chili will easily scorch on the bottom if not stirred very frequently.
GRILL PAN: A heavy pan, similar to a skillet, but formed with ridges across the bottom so the fat can drain away from the meat as it cooks. The shallow sides of a grill pan also make it easy to turn the meat.
GRIDDLE: Griddles are available in electric or stovetop models and are perfect for cooking foods that do not require a lot of fat or liquid. Specialties include pancakes, French toast, and grilled sandwiches.
Do either of you like to bake? Even if you say “not really,” you need a selection of bakeware—and if you love to bake, then selecting an array of quality bakeware goes without saying. Every kitchen needs pans and casseroles safe for oven baking. Even if you are not baking artisan breads, the oven will be used frequently to reheat, brown, broil, roast, braise, and bake a range of foods—from the most intricate gourmet dishes to convenient mixes.
Quality bakeware lets you become the master of the oven. Choose the right pans or dishes and you will find that foods bake better. The results will be more even, for you will be less likely to burn the bottoms of the cookies, overbrown the edges of the brownies, or serve underdone, still-cold-in-the-center main dishes.
MATERIALS:
ALUMINUM: Aluminum is always a favorite in the kitchen because it transfers heat evenly. Baking (or cookie) sheets and cake pans made of aluminum bake evenly. When new, the finish is often bright and shiny, but untreated aluminum can discolor as it reacts with certain foods, especially acidic foods such as tomatoes or vinegar.
STAINLESS STEEL: This material is known for shiny pans—a plus when baking lightly colored cakes and cookies—but it does not transfer the heat evenly.
CERAMIC, POTTERY, OR GLASS: These materials transfer heat slowly, which means they heat up slowly and cool off slowly. Square and rectangular baking dishes, pie plates, loaf pans, and many casseroles are made of ceramic, pottery, or glass. These dishes are often safe for use in the microwave, too. Sudden temperature changes will cause many glass, ceramic, and pottery pieces to break, so allow them to cool before washing and do not pour cold liquids into hot casserole dishes. Read the label, as some are safe for freezer-to-oven use while others specifically recommend against using them under the broiler or on a burner of the stove. Some are safe to place in a hot, preheated oven while some specialty items, especially those handmade by a local potter, should be placed in a cold oven to allow the dish, food, and oven to heat together to avoid any possibility of cracking.
Below is a list of common bakeware items and how many you might want to have in your kitchen.
| BAKING SHEET OR COOKIE SHEET |
|
| 13 x 18 inches | 2 |
| CAKE PANS |
|
| Round, 8 or 9 x 2-inch | 2 |
| Square, 8 or 9 x 2-inch | 2 |
| LOAF PANS |
|
| 8 x 4 x 2½-inch or | |
| 9 x 5 x 3-inch | 2 |
| RECTANGULAR BAKERS |
|
| 9 x 13 x 2-inch | 1 |
| 7 x 11 x 2-inch | 1 |
| PIE PLATES |
|
| 9-inch (regular and deep-dish) | 1 |
| Individual (about 4¼ inches in diameter) | 2 |
| TART PANS |
|
| About 4½-inches in diameter | 2 |
| PIZZA PAN |
|
| 12 inches in diameter | 1 |
| CASSEROLE DISHES |
|
| 1-, 2-, or 3-quart | 1 of each size |
| COOLING RACKS |
|
Available in a variety of sizes, these are indispensable, and if you bake you will need one or two cooling racks.
SILICONE: Flexible silicone (or what we often call “plastic”) bakeware is fun due to the variety of colors and shapes available. Foods do not stick to the slick surface. They can go directly from the freezer to the oven and most are safe in the microwave. Do not place them on a hot burner. These pans can be cut or damaged with knives or scissors.
FINISHES:
Gleaming bakeware is readily available untreated, and many cooks choose shiny cookie sheets or cake pans without added finishes but you may also choose from an array of finishes. What do those finishes offer and how can you make a wise selection?
NONSTICK: If you select nonstick bakeware, double check the use information as you may need to avoid metal tools that might scratch and scouring with stiff brushes or steel wool. Evaluate the color: Darker finishes, often typical of nonstick, will absorb heat so your cookies and cakes may brown more. Today, many cooks will line baking sheets and cake pans with parchment paper, which means foods do not stick and clean up is a snap, so a nonstick finish is less important.
ANODIZED: The surface is oxidized, making it nonporous, so foods stick less. Anodizing also prevents discoloration from acidic foods, but it may make the surface dark, and delicate cakes or light-colored sugar cookies will brown more quickly or too much.
PORCELAIN COATED OR PORCELAIN ENAMEL: This smooth, glassy finish is often used on cast iron. It not only adds color, but it makes the pan stain and scratch resistant and prevents rust. Since the coating is slick, foods often do not stick to the surface. Porcelain might be found on casserole dishes, pie pans, loaf pans, and rectangular baking dishes.
OTHER FEATURES TO CONSIDER:
GAUGE: A pan’s gauge is the thickness of the metal or glass. Thin metals may be less expensive to purchase, but may be trickier to use in the oven as they will develop hot spots or scorch. Thin metal is more likely to warp or dent. Choose pans, of any material, that seem heavy for their size.
SIZE: Commercial, recognized manufacturers generally adhere to fairly standard sizes for most bakeware, but read the label as there are still variations. Bakeware sizes are listed by the dimensions (which are taken at the top inside edge) or by the volume capacity (which, as with saucepans, equals the capacity filled to overflowing, so the usable capacity for a 3-quart baking dish will be about 2½ quarts). Specialty manufacturers may offer unique sizes and shapes, which are fun when selecting a mold or cake pan, but may be challenging when you need to know if your casserole or favorite cake recipe will fit.
SHINY OR DARK: A shiny surface reflects heat, which minimizes overbrowning and is good when baking cookies, biscuits, or a layer cake. A dark finish on the surface absorbs heat so cookies or biscuits baked on a dark baking sheet often brown quickly, so the bottoms of the cookies may become overly brown before they are baked through.
Glass or ceramic dishes retain heat, so you can reduce the oven temperature by 25°F.
The size, weight, and material of the bakeware may affect the baking time, especially for cakes, cookies, and brownies or other items that are baked for shorter baking times. Check the baked good at the minimum baking time listed in the recipe, then continue baking as needed.
If you are thinking about greasing or buttering a pan, be sure to check your recipe because some cookies spread out too much when placed on a greased sheet. Cakes, except angel food cakes, and breads are generally baked in a greased or buttered pan (and many recipes now recommend lining the pan with parchment paper as well).