Desserts are my downfall. I truly love desserts as much as savory dishes. My favorite is a batter cobbler, in part because the grandchildren love it so. A single cobbler can be eaten by six people or two, with the two people eating it again for a slightly sinful breakfast and maybe for lunch as well. But I long for meringues, as they make me think of my childhood when I loved making them. And how could I leave out a croquembouche, which brings to mind the glorious dessert served for my oldest “nearly” daughter, Audrey, and her husband, Pierre-Henri, at their wedding supper. Made of little puffs that look like small cabbages and taste divine with their fillings of flavored creams and topped with little wisps of caramel—well, of course I dream of them. There is the chocolate snowball, that old workhorse of a dessert, made so simply and stunning the diners with its deliciousness and beauty. How could I give it up?
The caramel cake is another I dream about, remembering MaMa Dupree’s efforts to please us with one, so many years ago, and craving it whenever I think of good cooking. I hope you think of me as you cook these recipes, and make them your favorites too.
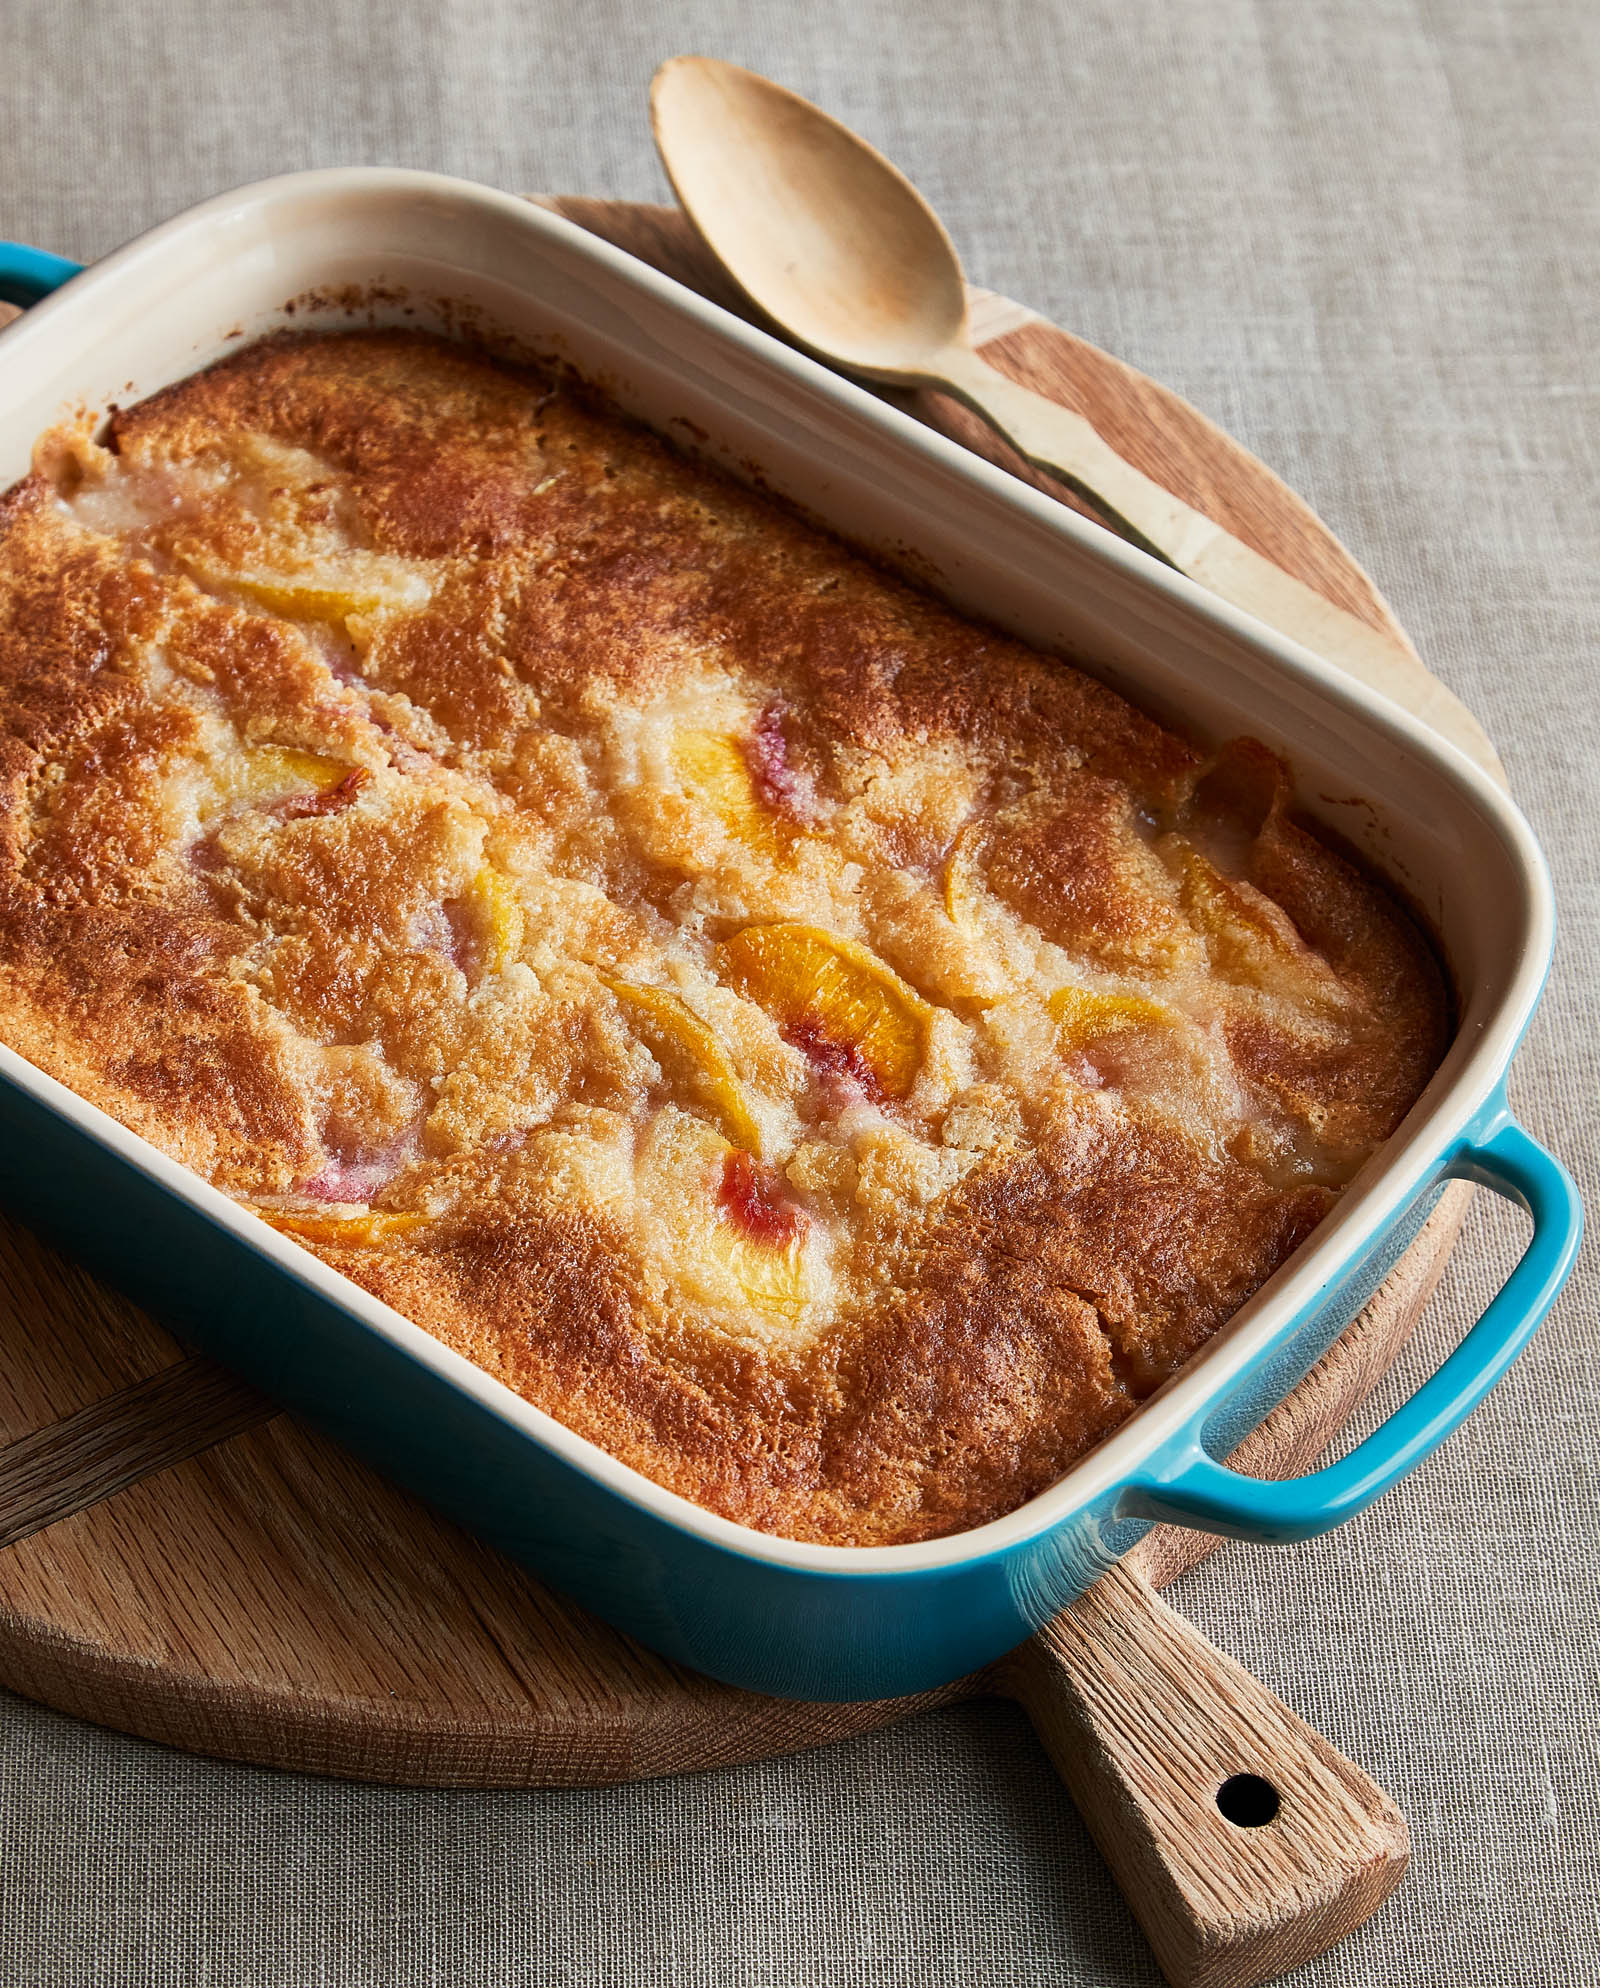
Lazy Girl Peach Batter Cobbler
This cakey cobbler is a Southern standby. In Social Circle, Georgia, where I lived for many years, this was a frequent favorite at church and potluck suppers. Our grandchildren expect me to bring it when we join them at the beach or when they come to our home, in which case I double the recipe—because it also happens to be delicious for breakfast.
Serves 4 to 6
1 cup granulated sugar, divided
2 cups sliced peaches
1/2 cup unsalted butter
1 cup commercial or Homemade Self-Rising Flour
1 cup whole milk
Sprinkle 1/4 cup of the sugar over the peaches and let sit while melting the butter. In an 8 x 11-inch baking dish or decorative oven-to-table dish, melt butter in the oven while the oven preheats to 375 degrees. (The butter crisps the edges, so I say “the bigger the dish, the better.” If you prefer a deeper cobbler, use a smaller baking dish.)
Whisk together the flour, milk, and remaining sugar. It can be just a bit lumpy. When the butter has melted, remove the hot pan and pour the batter into the hot butter in the pan. Don’t worry if the batter puffs up a bit on the sides. Sprinkle the peaches evenly over the top of the batter.
Bake until the batter has risen around the fruit, the top is light brown and “cobbled” looking, and the sides are darker brown, about 30 to 45 minutes. An inserted fork should come out clean. Serve hot. It can be made ahead and refrigerated or frozen. Reheat before serving.
Variations:
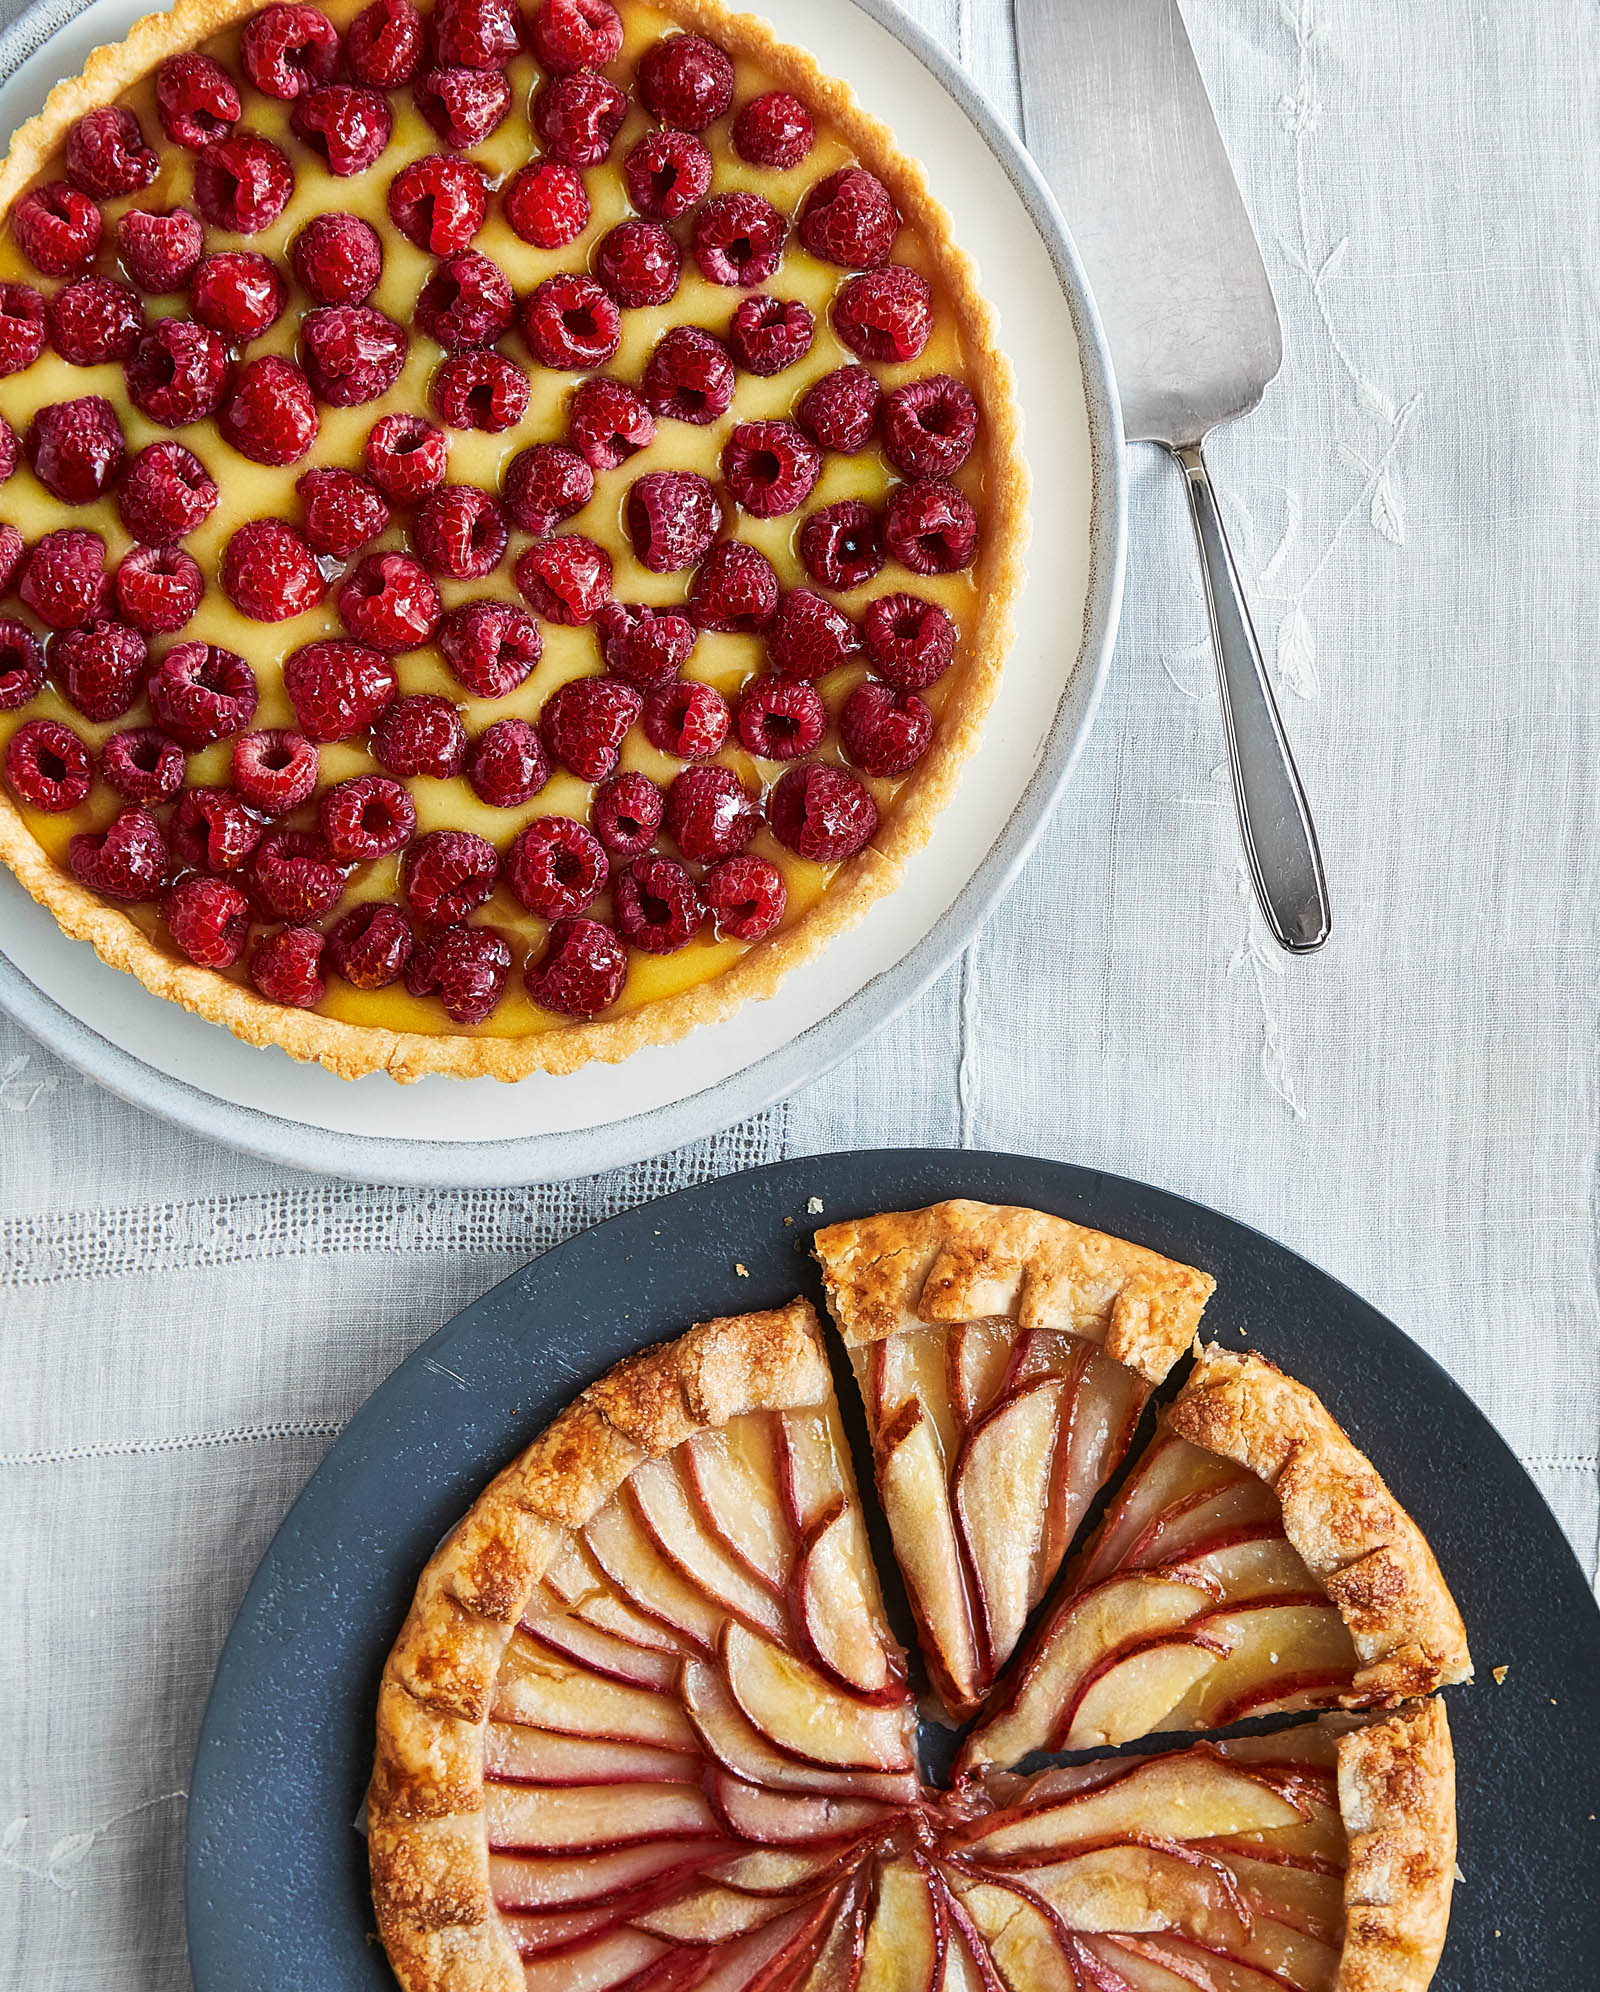
The sinuousness of the vertically sliced pears makes a stunning presentation, but sliced apples and peaches hold their own as well. Drain any excess liquid before arranging on the piecrust. If the pears are soft, slice them a little thicker.
Serves 4 to 6
1 recipe Very Versatile Cream Cheese Dough, or 1 (9-inch) store-bought piecrust
2–3 Bosc or other cooking pears, cored and sliced vertically 1/4-inch thick
1/2 cup granulated sugar, divided
Chopped candied ginger, optional
1 large egg mixed with 1 tablespoon water
2 tablespoons apricot jelly, warmed in microwave
Preheat oven to 375 degrees. Line a baking sheet with parchment paper. Roll the piecrust into a round 1/8-inch thick, or any desired shape. Set on top of the parchment-lined baking sheet and chill 30 minutes. Toss the fruit slices with 1/4 cup of the granulated sugar. Leaving a 1-inch border around the edge of the crust, arrange the pear slices neatly into a circular fan pattern, making about two to three concentric circles. Make an edge and fold the 1-inch border up over the pears, if necessary, on all sides to make a rim to contain the mixture, pleating every inch or so to maintain the shape. Sprinkle remaining sugar, and candied ginger if using, over the top of the pears. Refrigerate at least 15 minutes, or as necessary to chill the dough.
Move the baking sheet to the preheated oven and bake for 20 minutes. Remove from the oven, brush the edges with the egg wash, reduce oven temperature to 350 degrees, and bake until crust is golden brown, about an additional 10 minutes. If using peaches or apples it may require a bit more time to brown. Remove the tart carefully using two spatulas to a wire rack to cool. Brush the top with 2 tablespoons warm apricot jelly. Serve at room temperature.
Variations:
Lemon curd and berries are a classic combination, with the curd made in advance and the berries added a few hours before serving. As a general rule, I taste any fruit I use in a recipe but especially berries, which can range in sweetness, adding powdered sugar if needed. Lemon juices vary in tartness.
If the curd is too tart, dust with powdered sugar before serving. When in a hurry, this can be made with a store-bought crust. I prefer the national brand that comes two rolled doughs to a box.
Makes 1 9-inch tart
1 recipe Lemon Curd
1 recipe Very Versatile Cream Cheese Dough, or 1 (9-inch) store-bought piecrust, rolled to 1/8-to-1/4-inch thickness
2–3 cups fresh berries, such as raspberries, blueberries, or strawberries
Confectioners’ sugar, optional
Prepare the Lemon Curd and chill. Preheat oven to 350 degrees.
Arrange the piecrust in a 9-inch tart pan, preferably with a removable bottom, cutting off any excess. Lightly prick the surface of the piecrust with the tines of a fork. Crumple a piece of parchment, waxed paper, or aluminum foil. Reopen, smooth out, and place into the piecrust and fill with raw rice, beans, or pie weights. Bake until the piecrust is fully cooked, about 25 minutes, covering edges as necessary to prevent burning. Remove from oven, scoop out the pie weights, remove paper, and let cool on a rack. When cool, remove outer ring of tart pan, fill crust with lemon curd, smoothing the top with an offset spatula or knife. Arrange berries in a pattern on curd as desired. Chill before serving. Dust with confectioners’ sugar, if desired.
Variation: Make into bite-sized or individual tarts or as a prebaked, free-form tart.
Curd is an indelicate way to describe this smooth, creamy lemon sauce, which goes back in time to old and modern French, English, and Southern recipes, including Thomas Jefferson’s and Martha Washington’s collections. The curd itself is delicious as a filling for cakes, meringues, tarts, and pies. It can be made with a whole egg instead of yolks, but care must be taken to avoid overcooking the whites; so I stick with yolks and use the whites for another purpose. My friend and coauthor Cynthia has made it in a slow cooker with a whole egg.
Like mayonnaise, lemon curd will last a long time in the refrigerator, as it has a high degree of acid (a low pH). If mixed with something that dilutes the acidity, its life span is shortened. Since citrus acidity varies and the home cook has no real idea of its strength, some care should be taken. Usually it can be kept, tightly sealed and refrigerated, for up to a month.
Makes 2-1/2 cups
5 large egg yolks
1 cup granulated sugar
1/2 cup unsalted butter, softened
1/2 cup fresh lemon juice
3 tablespoons lemon rind, no white attached
Lightly whisk the egg yolks in a heavy saucepan, bowl, bain-marie, or double boiler. Whisk in the sugar and butter, then the lemon juice.
Stir the egg mixture with a rubber spatula over low heat until thick but still falling easily from a spoon, 5 to 10 minutes, making sure to scrape the sides and bottom occasionally. The temperature should register approximately 170 degrees and it should be saucy. If too thin, carefully cook a few minutes longer. (If the mixture simmers at the edges of the pan, quickly strain; it will be usable if smooth and no egg bits remain.)
Add the rind to the egg mixture. Taste for flavor and add more juice or rind if necessary and available. Remove from the heat and cool. Store in the refrigerator in a tightly covered jar.
NOTE: Peculiarly, egg yolks do not like sugar sitting on top of them without any agitation from a spoon or whisk. The sugar tends to “cook” the egg yolk.
Variations:
Very Versatile Cream Cheese Dough
This is a miracle dough, adapted from one of Rose Beranbaum’s recipes in her book The Pastry Bible. It is most easily made in a food processor or mixer but can be made by hand. It is flaky and tender and browns beautifully. The cream cheese emulsifies, tenderizes, and is pretty indestructible. The only moment of trickiness is rolling out the dough, as it wants to stick and pull apart. This doesn’t hurt the dough, as it can be pushed back together, but it is a bit alarming when it first happens. Rolling the dough between pieces of plastic wrap or in a large plastic bag eases the anxiety. The recipe can be easily doubled.
Makes 1 (9-inch) piecrust or 30 to 40 tassies
1-1/2 cups all-purpose flour, preferably soft-wheat, divided
1/2 cup unsalted butter, cut into 1/2-inch cubes and frozen
3 ounces cream cheese, cut into 4 pieces and chilled (not frozen)
1 large egg mixed with 1 tablespoon water, to glaze
Before measuring, whisk flour in its container with a wire whisk or fork to lighten. Take a large spoon and scoop up the flour from the container and slide it into a dry measuring cup. When full, level off any excess flour with the back of a knife. Add 1 cup of the flour to the bowl of a food processor. Set aside remaining 1/2 cup flour for rolling out the dough.
Add the butter cubes to the food processor and pulse until the size of oatmeal or grits. Add the cream cheese pieces and pulse quickly until it becomes a lumpy dough. Scrape out the dough between two pieces of plastic wrap or onto a large plastic bag. Press dough into a smooth, flat disc about 8 inches in diameter. Move dough to a clean plastic bag or wrap in plastic, and refrigerate at least 30 minutes or up to 5 days.
Roll out the pastry into a 1/8-inch-thick round between two pieces of plastic wrap or in a large plastic bag. If sticky, sprinkle the surface with a bit of the remaining flour. If using a tart pan with removable bottom, surround the bottom and sides of the pan tightly with foil to prevent filling from leaking out while baking. Remove the top sheet of plastic wrap or slit the bag and flip dough into a pie or tart pan. Fit dough into the recesses of the pan by lifting gently and lightly pressing dough along the bottom and sides of pan. Remove second sheet of plastic wrap. Decorate edges as desired. Prick the bottoms and sides lightly with a fork. Chill 30 minutes or more, or freeze if desired.
When ready to use, preheat oven to 350 degrees. Crumple a piece of parchment, waxed paper, or aluminum foil; reopen, smooth out, and place into the piecrust. Fill with raw rice, beans, or pie weights and prebake 15 minutes, covering edges as necessary to prevent burning. A roasting bag, as used for roasting chicken, is an ideal substitute for the paper. It can be filled with rice and beans or weights, put on the crust, removed, and reused at a later time.
Remove crust from oven, scoop out rice and beans, remove paper, and brush bottom with egg glaze. Reduce the heat to 300 degrees and return to oven until completely baked, about 6 to 8 minutes. Remove from oven, cool on a rack, and fill as desired.
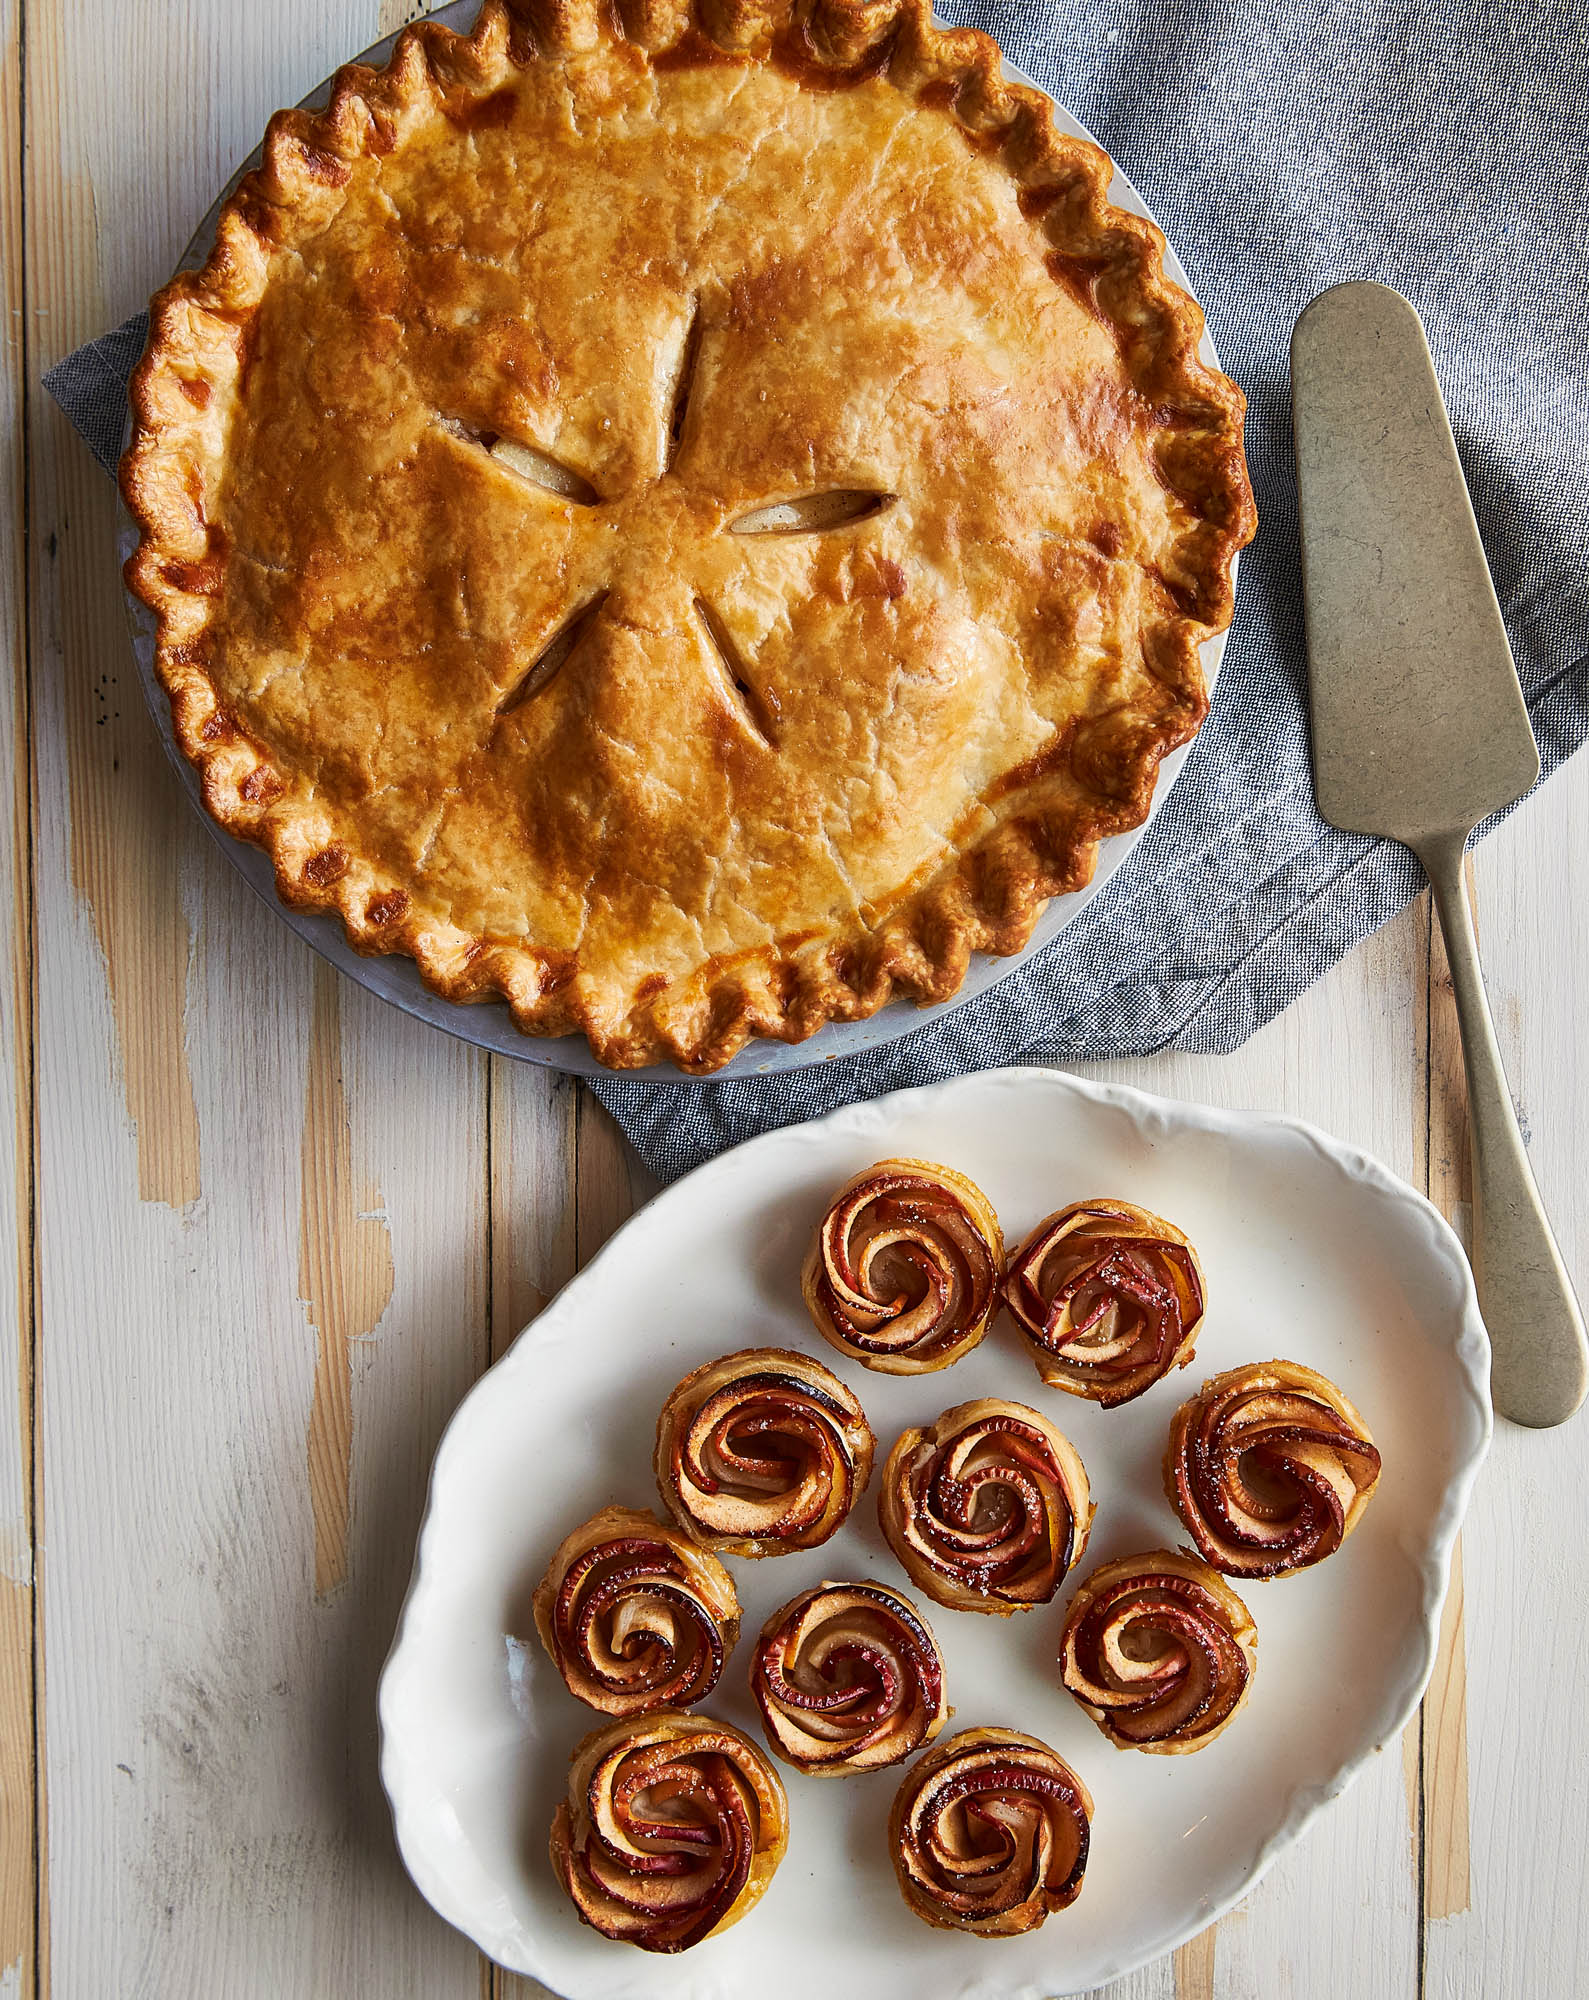
Rose’s Best All-American Apple Pie
Rose Beranbaum has been a long-time culinary hero of mine. I read her books and follow her blog. She is doggedly precise enough to ensure success to all. She has a chart in her book The Pastry Bible for the best apples to use for baking.
Makes 1 (9-inch) double-crust pie
2 batches Very Versatile Cream Cheese Dough, kept separate
Extra all-purpose flour for rolling
2-1/2 pounds baking apples, such as Golden Delicious or Galas, peeled, cored, and sliced 1/4-inch thick (about 4–6 apples, 8 cups sliced)
1 tablespoon lemon juice
1/4 cup packed light brown sugar
1/4 cup granulated sugar
3/4 teaspoon ground cinnamon
1/4 teaspoon freshly grated nutmeg
1/4 teaspoon salt
2 tablespoons unsalted butter
1 tablespoon + 1 teaspoon cornstarch
Remove one dough for the bottom crust from the refrigerator. If necessary, allow it to sit for about 10 minutes or until it is soft enough to roll.
On a floured pastry cloth or between two sheets of lightly floured plastic wrap, roll the bottom crust 1/8 inch thick or less and 12 inches in diameter. Transfer it to the pie pan. Trim the edge almost even with the edge of the pan. Cover with plastic wrap and refrigerate for a minimum of 30 minutes and a maximum of 3 hours.
In a large bowl, combine the apples, lemon juice, sugars, cinnamon, nutmeg, and salt and toss to mix. Allow the apples to macerate at room temperature for a minimum of 30 minutes and a maximum of 3 hours.
Transfer the apples and their juices to a colander suspended over a bowl to capture the liquid. The mixture will release at least 1/2 cup of liquid.
In a small saucepan (preferably nonstick), over medium-high heat, boil down this liquid, with the butter, to about 1/3 cup (a little more if you started with more than 1/2 cup of liquid), or until syrupy and lightly caramelized. Swirl the liquid but do not stir it. (Alternatively, spray a heatproof 4-cup measuring cup with nonstick vegetable spray, add the liquid and butter, and boil it in the microwave 6 to 7 minutes on high.) Meanwhile, transfer apples to a bowl and toss with the cornstarch until all traces of it have disappeared.
Pour the syrup over the apples, tossing gently. (Do not be concerned if the liquid hardens on contact with the apples; it will dissolve during baking.)
Roll out the second dough for the top crust, large enough to cut a 12-inch circle. Use an expandable flan ring or a cardboard template and a sharp knife as a cutting guide.
Transfer apple mixture to the pie shell. Moisten the border of the bottom crust by brushing it lightly with water then place the top crust over the fruit. Tuck the overhang under the bottom crust border and press down all around the top to seal it. Crimp the border using a fork or your fingers, and make about 5 evenly spaced 2-inch slashes in the top, starting about 1 inch from the center and radiating toward the edge. Cover the pie loosely with plastic wrap and refrigerate for 1 hour to chill and relax the pastry. This will maintain flakiness and help to keep the crust from shrinking while baking.
Preheat the oven to 425 at least 20 minutes before baking. Set an oven rack at the lowest level and place a baking stone or baking sheet on it before preheating. Place a large piece of greased foil on top to catch any juices.
Set the pie directly on the foil-topped baking stone and bake for 45 to 55 minutes, or until the juices bubble through the slashes and the apples feel tender but not mushy when a cake tester or small sharp knife is inserted through a slash. After 30 minutes, protect the edges from over-browning with a foil ring.
Cool the pie on a rack for at least 4 hours before cutting, as it will be gooey. Serve warm or at room temperature. Store at room temperature up to 3 days.
My once apprentice Nicole Mariner first showed me how to make these little roses. I fell in love with them and now make them whenever I can. To start, learn using a name-brand boxed piecrust and then move to your own if you prefer. And of course, made from any leftover dough, they can be the cook’s treat.
Makes about 10
2 Gala or other red-skinned apples
1/4 cup granulated sugar
Pinch salt
1/4 teaspoon cinnamon, optional
1/2 teaspoon lemon zest, optional
1 (9-inch) piecrust
Flour for rolling
1 teaspoon cinnamon sugar, optional
Preheat oven to 350 degrees. Grease a mini-muffin tin and set aside.
Wash the apples and remove cores, but do not peel them. The skin is what gives the roses their red color. Cut apples in half from stem to blossom end. Slice each half into very thin wedges, about 1/8-inch thick. In a microwaveable bowl, stir together sugar, salt, and optional cinnamon and lemon zest. Add apple slices and stir to coat. Microwave for 45 seconds to 1 minute, until apples are tender and pliable. Allow to cool.
Place the piecrust on a lightly floured surface and roll out until about 1/8 inch thick. Cut into ten 1-1/2 x 6-inch strips. Arrange about 6 to 8 apple slices lengthwise across the top of the strip of dough, rounded skin-side up, overlapping slightly. Fold up the bottom half of the dough and press to enclose the apples. Gently, tightly roll the dough to form a rose shape. Wet your fingers with the juices from the cooked apples to help seal the dough; place in the muffin tin. Then repeat with remaining dough and apples. Sprinkle with cinnamon sugar and bake in preheated oven for about 20 to 25 minutes, until pie dough is cooked and roses are golden brown. Allow to cool for a few minutes, then remove the roses to a cooling rack.
Variation: There are various jelly glazes that spruce up pies and tarts. The rule of thumb is that red fruit should have a red glaze. Heat red currant, mixed berry, or other red jam or jelly with a small amount of water in a small saucepan over low heat to thin; strain if necessary, then brush on while pie dough and jelly are both hot. For yellow fruits, we use a clear or light-colored jam such as apricot, orange marmalade, pineapple, etc.
Tassies are miniature Southern tarts, typically served at bridal showers, weddings, or any time a special little-sized delicacy is needed. They are the cook’s hidden weapon, as they freeze so nicely and can be made well in advance. The Very Versatile Cream Cheese Dough is easily pushed into the tiny tins. Pecans have a certain affection for bourbon, but vanilla is also a good addition.
Makes 30 to 40 tassies
1 recipe Very Versatile Cream Cheese Dough
1 large egg
1/2 cup packed light or dark brown sugar (use 3/4 cup for a sweeter filling)
1 tablespoon unsalted butter, melted
1 teaspoon bourbon extract, bourbon, or vanilla extract
1/8 teaspoon salt
2/3 cup chopped pecans, divided
Prepare the Very Versatile Cream Cheese Dough as directed. Divide dough into 30 equal pieces and roll to make little balls. Chill the balls for 30 minutes or up to several days.
Move the balls to 30 tiny, lightly greased, fluted mini tart pans or miniature muffin cups on a rimmed baking sheet. Press the dough balls with fingertips or a tart tamper (a wooden dowel that comes with different-sized rounded ends) against the bottoms and sides. Move baking sheets with the lined pans to the refrigerator or freezer to chill while preparing the filling. If any tassies crack after refrigeration, press a small amount of dough onto the crack to cover.
Preheat oven to 325 degrees. Beat together the egg, brown sugar, butter, extract, and salt in a mixing bowl until all the lumps are gone. Line the dough-lined pans with half the pecans and carefully spoon in the egg mixture, taking care to keep the filling below the sides of the dough, thus preventing it from slipping under the dough and caramelizing, making it difficult to remove the tassie. Dot with the remaining pecans. Bake until the filling is set, about 25 minutes. Cool 5 minutes on a rack, making sure to remove tassies from the pans while they are still warm lest they stick. If tassies are reluctant to come out, insert a small thin knife between the tassie and the pan and give the tassie a boost.
These will keep several days closely wrapped or 3 months in the freezer. They defrost quickly at room temperature or can be heated on a rimmed baking sheet while still frozen.
Variation: Chocolate Pecan Tassies
Add 1/3 cup miniature chocolate chips to the recipe, putting half into the tins with half of the pecans. Dot the filled tins with the remaining half of the chips and nuts.
Makes about 30
1 recipe Very Versatile Cream Cheese Dough
1 large egg mixed with 1 tablespoon water, to glaze
1 recipe Lemon Curd
Prepare the Very Versatile Cream Cheese Dough as directed. Divide the dough into 30 equal pieces and roll into balls. Chill the balls for 30 minutes. Meanwhile, prepare the Lemon Curd as directed. Chill at least 1 hour.
Move the balls to 30 tiny, lightly greased, fluted mini tart pans or miniature muffin cups placed on a rimmed baking sheet. Press the dough with fingertips or a tart tamper (a wooden dowel that comes with different-sized rounded ends) against the bottoms and sides. Place the baking sheets with the lined pans in the refrigerator to chill for 30 minutes. If any tarts crack after refrigeration, press a small amount of dough onto the crack to cover.
Preheat oven to 350 degrees. Crumple several small pieces of parchment, waxed paper, or aluminum foil; reopen, smooth out, and place into the tiny crusts; fill with raw rice, beans, or pie weights and prebake 15 minutes, covering edges as necessary to prevent burning. Remove from oven, scoop out rice and beans, remove paper, and brush bottom with egg glaze. Reduce the heat to 300 degrees and return to the oven for 6 to 8 minutes, or until completely baked. Remove from oven, cool on a rack, and fill with chilled Lemon Curd.
Variations: Top tarts with a blueberry, raspberry, or curled lemon rind or other garnish. Or fill any empty tarts with a good-quality, delicious fruit jam.
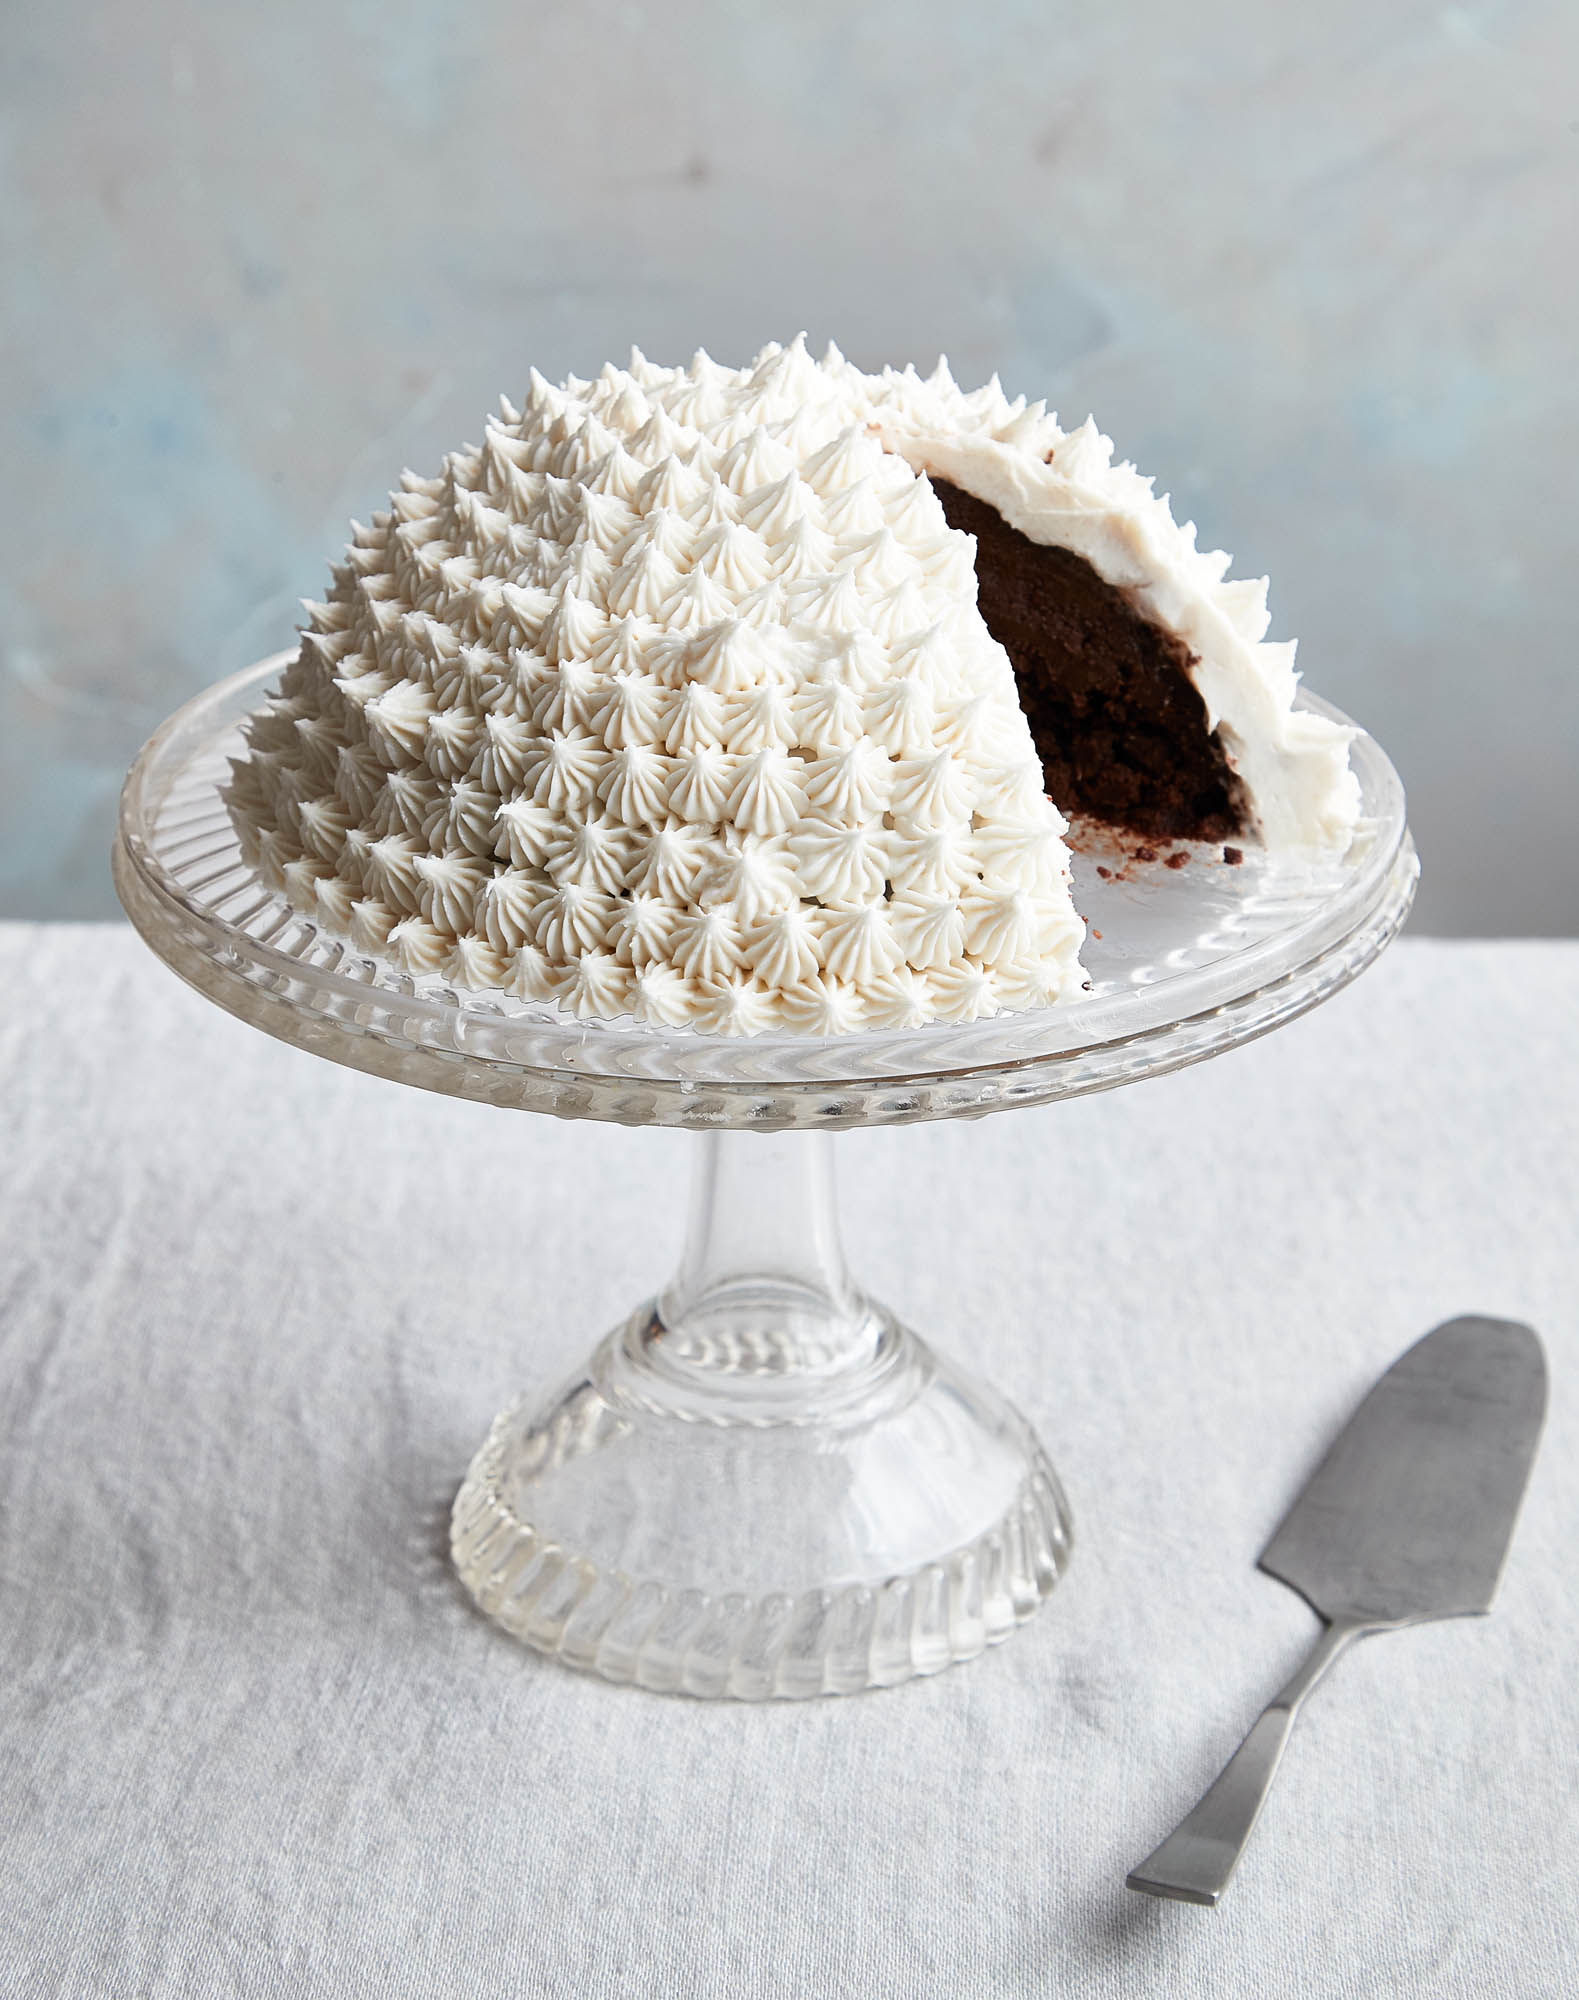
Our snow is as light as this layer of snowy white whipping cream covering a dense chocolate ball as big as a glass bowl. It is as easy to serve and cut as a cake and even easier to make using a food processor or mixer. Having arrived in the South from the North, this recipe is here to stay. The recipe doubles easily, making one gigantic ball or two dinner party–sized ones. It is a perfect Passover dessert as it contains no flour.
Serves 6 to 8
1 (12-ounce) package semisweet chocolate chips
1/2 cup water
1 cup plus 2 tablespoons granulated sugar, divided
1 cup unsalted butter, room temperature
4 large eggs
1 tablespoon vanilla extract, optional
1 cup heavy cream
1 teaspoon vanilla extract
Grated chocolate for garnish, optional
Preheat oven to 350 degrees. Line a 5-cup ovenproof bowl with a double thickness of foil.
Melt the chocolate with the water and 1 cup sugar over low heat or in the microwave; cool slightly. Transfer the chocolate mixture to a mixing bowl or food processor bowl fitted with the metal blade. Beat in the butter then add the eggs one by one, beating after each addition. Stir in the vanilla.
Pour the mixture into the foil-lined mold. Bake until a thick crust has formed on top, about 1 to 1-1/2 hours. It will still be soft, lightly jiggly, and slightly wet under the crust.
Remove from oven. It will collapse. Cool completely. Cover tightly and refrigerate until solid, 2 to 3 hours or overnight, or freeze. This can be done several days in advance.
When ready to serve, whip the cream with 2 tablespoons sugar and vanilla until stiff. Cut a small slit in one corner of a plastic bag, or use a plastic or pastry bag with a tip. Position the bag in a sturdy mug or glass, and fold the top third of the bag down around the outside of the container. Scoop the cream from the bowl into the bag until it is half full. Pull up the surrounding part of the bag and twist the cream-free top to keep the cream from gushing out. Hold the twisted part of the bag with the dominant hand, and position the fingers of the other hand at the bottom tip. When ready to pipe, push from the top.
Remove the snowball from the bowl and peel off the foil. Place on a serving dish, flat side down.
Pipe rosettes of whipped cream over the entire surface until no chocolate shows and it looks like a snowball. Chill until served. Press grated chocolate through a sieve over the piped cream, if desired. Slice in wedges to serve. Leftovers freeze well, tightly wrapped—good enough for family anyway.
Variations:
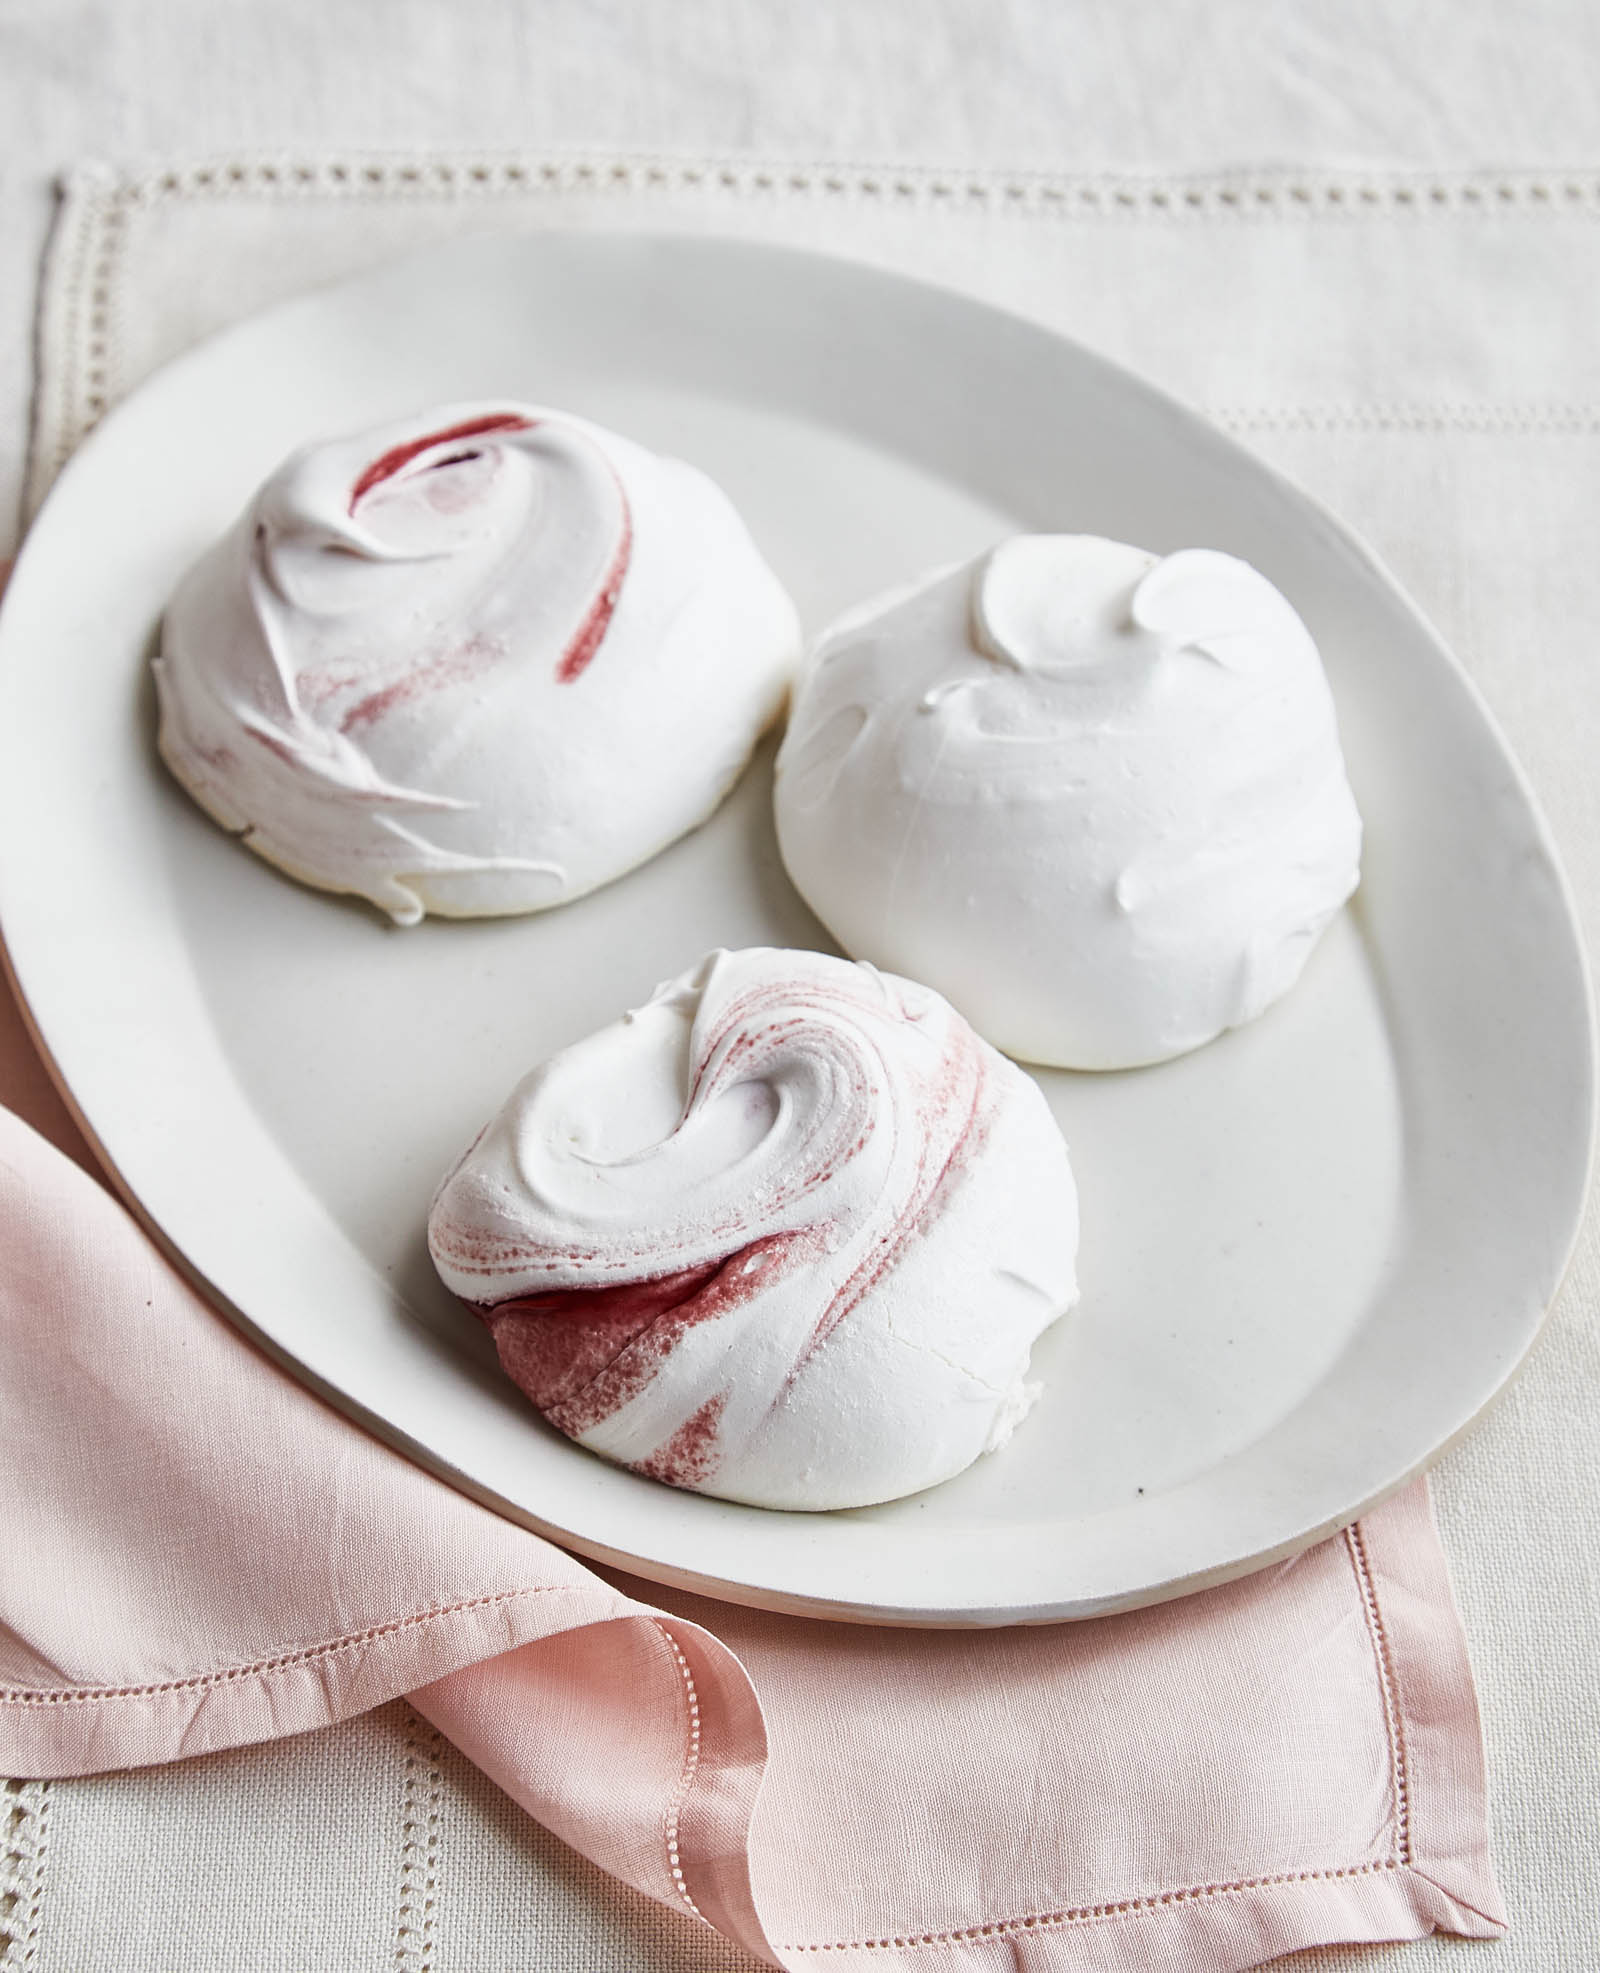
Meringues are fun to make and shape, both in traditional and whimsical ways. When the seasons change, I move from meringue baskets holding fruit, lemon curd, or cream, to pillows—sometimes raspberry pillows. I then move to Mont Blancs, tiny snowman-shaped meringues—and even teardrops dipped in chocolate. They are inexpensive to make, so experimenting is permissible. A little warning: muggy and humid or rainy days create some problems for meringue-making. Bake them at a lower heat, or turn heat down if they start to darken, and bake longer.
Makes 30 to 35
4 egg whites, room temperature (4 ounces)
1/4 teaspoon cream of tartar
1/2 teaspoon salt
1 cup granulated sugar
1/4–1/2 teaspoon vanilla extract
Preheat oven to 200 degrees. Oil and flour one or two rimmed baking sheets. Line with parchment or waxed paper, and oil and flour the paper. (This makes cleanup much easier.) The pans should be no longer than the length from the back of the oven to the front when the door is closed. If the pans are larger and only fit across the oven, halve the recipe, using just one pan rather than setting one pan directly under the other or letting the meringue mixture sit more than an hour while the first batch dries.
Beat the egg whites in a large bowl using a stand mixer fitted with a rotary whisk, or an electric hand mixer, or by hand with a balloon whisk, starting slowly and increasing speed until they are foamy. Add the cream of tartar and salt, then continue beating, gradually increasing the speed (it gets easier to beat as the pockets of air form) just until soft peaks form and the egg whites barely slide in the bowl when tipped. Avoid letting them get “rocky” looking and overbeaten.
Beat in half the sugar 1 tablespoon at a time, and continue beating until the meringue is very stiff and shiny. Sprinkle remaining sugar on top, add vanilla, and fold in with a metal spoon or rubber spatula, using a figure-eight motion to go down to the bottom of the pan and back up again, rotating the bowl after each “eight.” If the meringue deflates, beat further by hand with a balloon whisk to make firm peaks. An extra egg white will save overbeaten rocky egg whites. Beat in as needed.
Shaping and baking meringues: To make cloud shapes, dump a spoonful of meringue onto the paper and make a little depression with the back of the spoon that will be deep enough to hold cream and berries; repeat to fill the pan. Different-sized spoons will produce different-sized meringues, which requires an adjustment in time of baking. Bake 1 to 3 hours at 200 degrees to dry the meringues.
To make rounds to sandwich fillings like whipped cream or lemon curd, with or without fruit, draw circles on the paper. Spoon the meringue into the rounds evenly so they will stack when dried.
To pipe the meringue, cut a small slit in one corner of a plastic bag or use a plastic or pastry bag with a tip. Position the bag in a sturdy mug or glass, and fold the top third of the bag down around the outside of the container. Scoop the meringue from the bowl into the bag until it is half full. Pull up the surrounding part of the bag and twist the meringue-free top to keep the meringue from gushing out. Hold the twisted part of the bag with the dominant hand, and position the fingers of the other hand at the bottom tip, avoiding putting a hand (which is hot and will melt the sugar) on the side of the bag. Push from the top.
For traditional kiss-sized meringues, guide the bag with the fingers to the top of the pan, push gently from the top of the bag onto the pan and make a small round. Lift the bag, pulling up to make a point on the top of the meringue, and stop pushing.
To make larger, “two-bump” meringues, push from the top onto the pan, making a much larger bottom round. Pull up slightly, releasing, then push down again, making a second smaller bump, and pull up to make a point on the top.
To bake meringues, put the first tray vertically into a preheated 200-degree oven on the top shelf without touching the sides of the oven. Fill the second tray, as above, and move down a rack and to the other side of the oven, staggering the pans so the air can circulate around them. This will prevent the meringues on the top and bottom rows from overbrowning when the heat hits and the air can’t circulate.
Tips: Leftover and crumbled meringue mixed with whipped cream and a sauce or purée, such as lemon curd or raspberry purée, can be served as is or chilled and frozen in a plastic-lined loaf pan. Freeze, remove, and slice to serve.
Since the ratio of 2 portions of sugar to 1 portion of egg white is the same no matter how many eggs are whipped, the recipe works as well with larger or smaller amounts.
This meringue recipe produces a more stable, “brighter white” meringue as a result of cooking the egg white to 120 degrees before baking. I find that measuring the sugar onto a piece of waxed paper or parchment makes it easy to add with one hand while beating with the other. Ingredients are the same as for Traditional Simple Meringues.
Makes 30 to 35
4 egg whites, room temperature (4 ounces)
1/4 teaspoon cream of tartar
1/2 teaspoon salt
1 cup granulated sugar
1/4–1/2 teaspoon vanilla extract
Oil and flour the baking pans. Whisk the egg whites in a large bowl using a stand mixer fitted with a rotary whisk, or an hand mixer, or by hand with a balloon whisk, starting slowly, until they are foamy. Add the cream of tartar and the salt and continue, gradually increasing speed, until they form very soft peaks and barely slide in the bowl. Move the bowl over a pan of simmering water and steadily whisk in the sugar. Add the vanilla. Continue whisking until the mixture forms a glossy stiff peak and does not slide in the bowl, about 5 minutes by mixer, longer by hand. The mixture needs to register 120 degrees on a thermometer. If beaten too long, it looks rocky and starts to separate. If that happens, remove from the heat and continue whisking until the meringue is cool. Shape and bake as in the previous recipe.
Tip: For an even more stable meringue, preheat oven to 400 degrees. Spread superfine sugar out on a parchment-lined half sheet pan and bake sugar for 3 minutes stirring after a minute or two. Do not let caramelize unintentionally. Pile up a small amount of the sugar, insert a thermometer, and remove the pan when the temperature is 220 degrees.
Using the parchment as a funnel, steadily whisk the still hot sugar to the beaten egg whites when moving the bowl over simmering water as above.
Variation: Jam-Swirled Meringue Pillows
A fruit jam can be swirled into the meringue just before baking to give added color and flavor. Prepare the Swiss Meringue as directed. Heat 1/4 cup jam of your choice in the microwave for about 20 to 30 seconds to loosen. (Dark red raspberry works well for its bold color.) Pour through a fine mesh sieve into a small bowl. There are also commercial packaged sauces found in pastry aisles that can be used.
Just before shaping your meringues, dollop a couple of tablespoons of prepared jam over the top of the batter. Gently swirl jam through the meringue with one or two strokes of a spatula. Using a large serving spoon, scoop about 1/2 cup meringue and dollop gently onto the prepared baking sheet; use a second large spoon to help coax the meringue from the spoon, swirling the jam throughout the meringue with a small flourish as it drops. Bake as directed until dry, about 2 to 3 hours in a 200-degree oven.
Separating Eggs
Hit egg lightly but firmly on the counter or table. Using both hands, separate shell halves. Capture the yolk with one hand and let the rest slide into the bowl through the fingers of the other. Move egg yolk to one bowl, egg white to a larger one. Crack the next egg into a third bowl and move white and yolk once separated into the established bowls. The egg whites should be free of any yolk, which prevents them from beating. One egg white from a grade A large egg is a bit over one liquid ounce.
Meringues have been my comfort food since I was old enough to beat an egg white. In those days I beat them using a rotary hand whisk, a less-than-ideal solution but all I knew. I would work and work, turning the handle, watching the eggs gather and thicken in the too-small bowl. My spindly arms, unused to such activity, would give out after half an hour or so. I would add all the sugar at once and usually wind up with a thick, sugary mess. Disheartened, I would spread it out in dollops on a greased steel baking sheet and put them in a low oven, hoping for the best. Then I would go read my favorite books, Heidi, Heidi Grows Up, and Heidi’s Children, in the corner of the living room behind a big red easy chair, and wait.
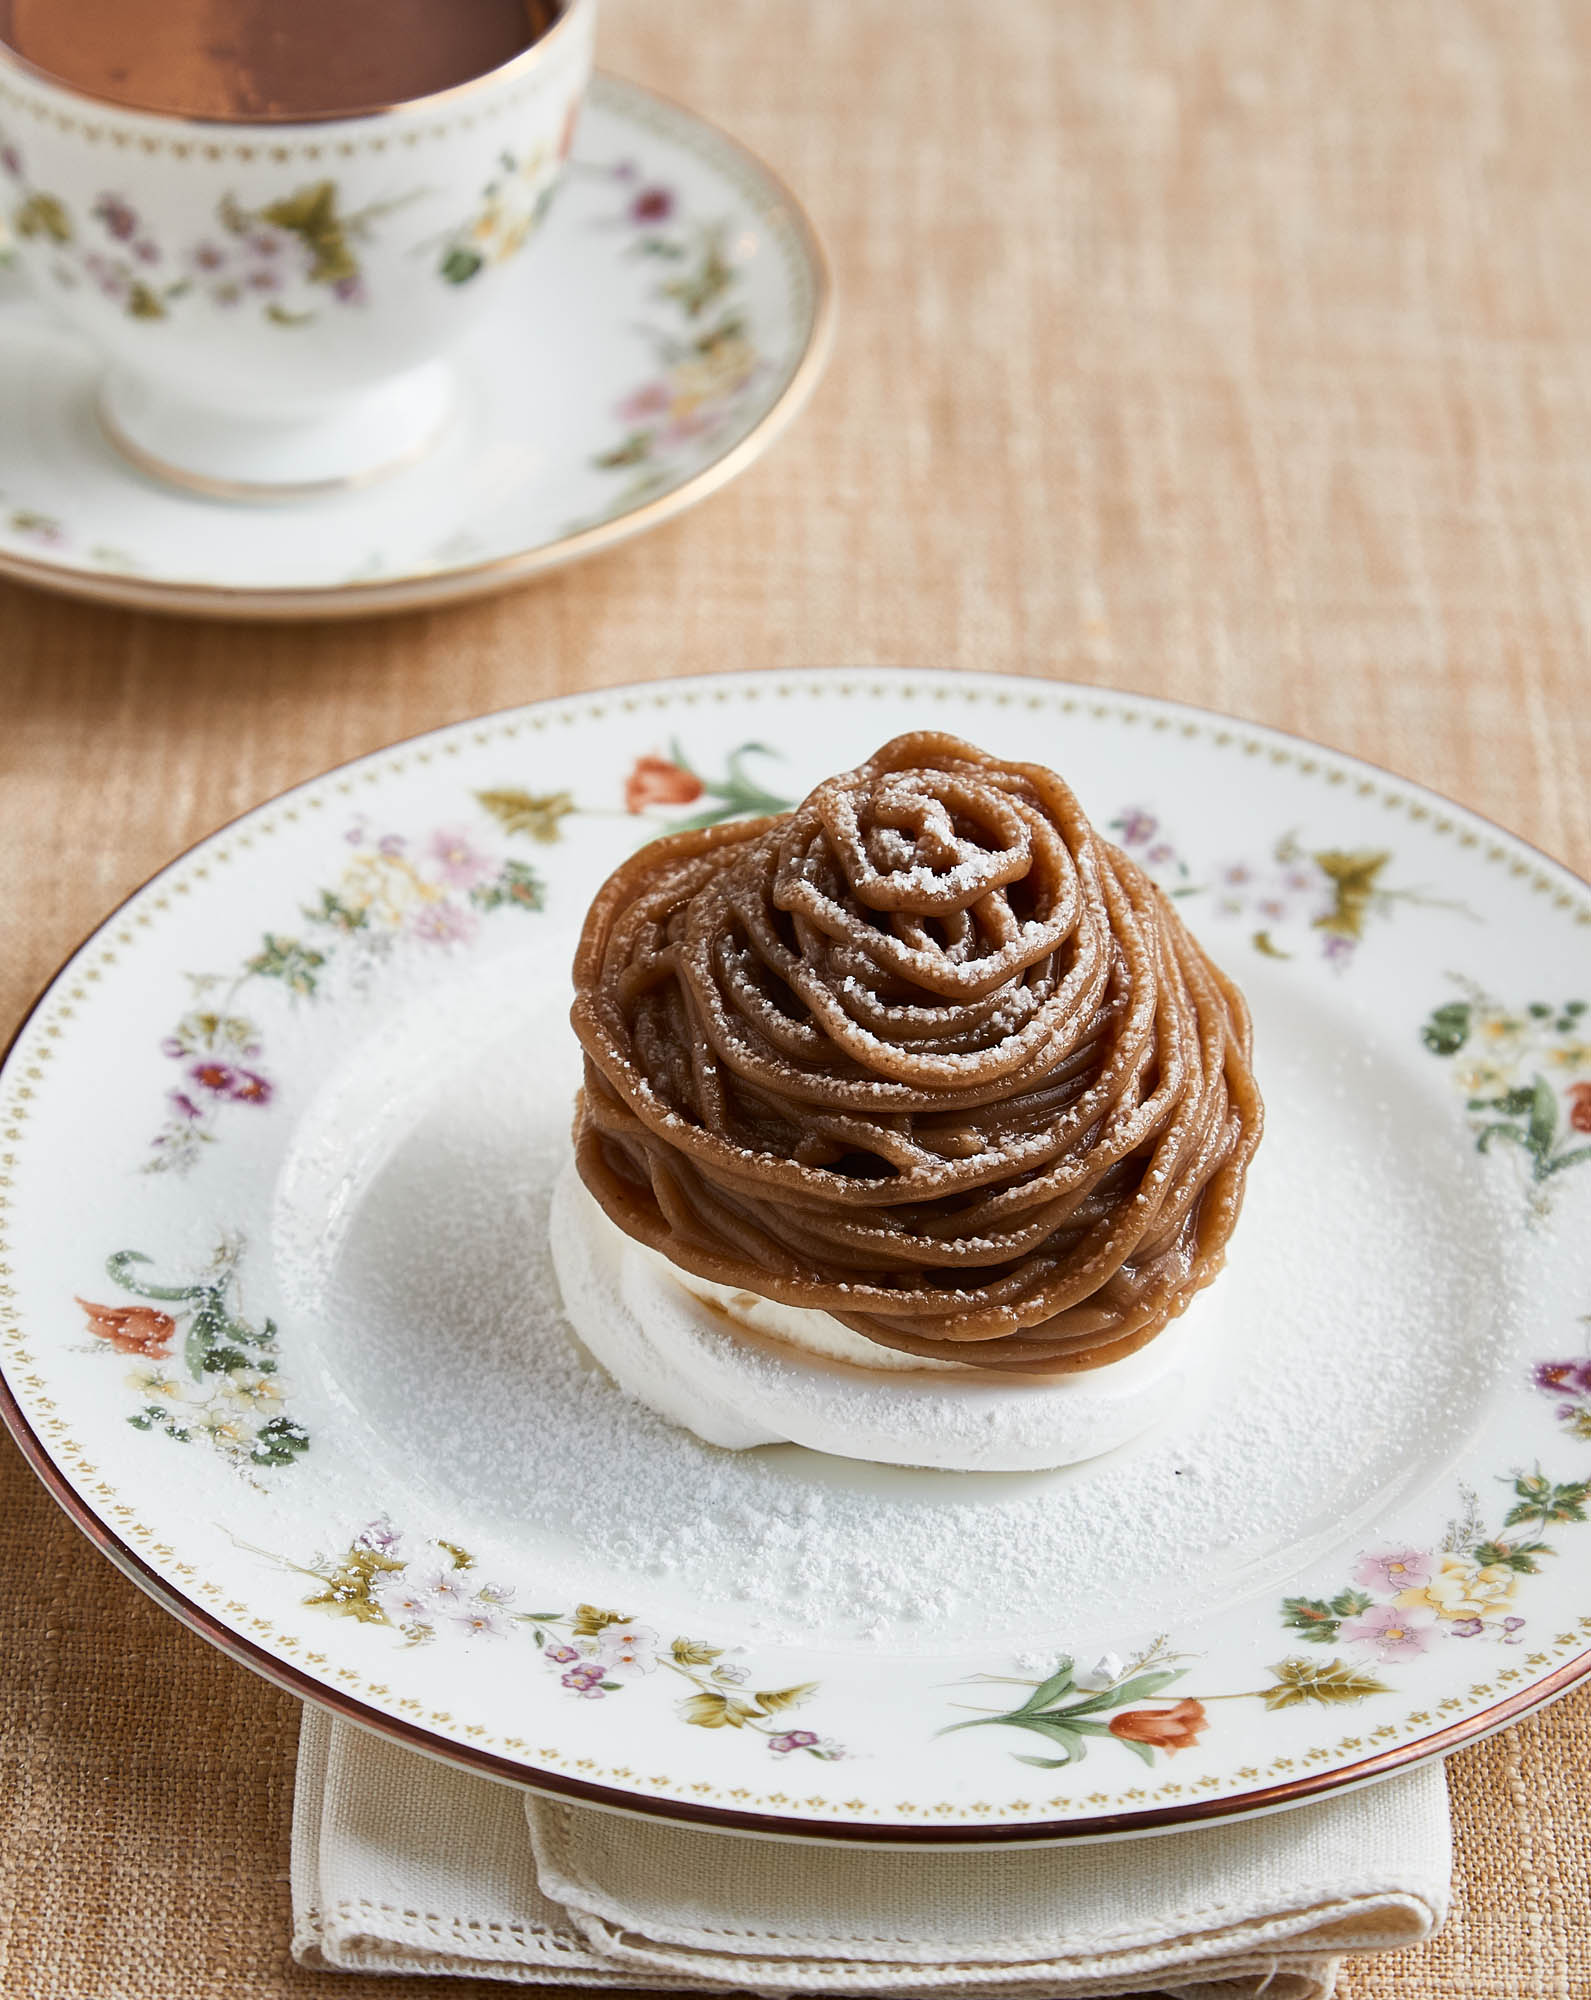
Decades later, I associate meringues with Paris and Angelina’s Restaurant on the rue de Rivoli, which serves Mont Blancs, my favorite dessert. I was first taken there by a very glamorous couple when it was called Rumplemayer’s, a sister restaurant to a patisserie of the same name on 59th Street in New York, down the street from the Plaza. The glamorous couple and I had been staying at the same home on the Riviera.
It was just after my first, brief, marriage, and I had taken what money I had to go to England and France. I stayed at the YWCA in London, ate a few meals with friends of friends, and walked around Mayfair and Kensington, not knowing I would return there to live in a few years’ time. Then I flew to Nice, the Riviera being my introduction to France. My first meal was lunch with the glamorous people—he was a TV star for CBS and she was equally awe-inspiring. We ate at a famous restaurant, La Colombe d’or, which I’d first heard of in a movie, looking down into a valley of trees and tiled roofs, surrounded by original art on the walls.
My beau, Chester, was what I call a “grandfather clause”—a previous relationship that had special rules. He too had married and divorced and moved to France since last we had seen each other. But we rendezvoused there, and after an idyllic week of sun and sand, where I met tiny olives mixed with tiny tomatoes as a beach snack, my first omelette, and buttery non-iceberg lettuce, I rode with the glamorous couple to Paris. There, we went to Rumplemayer’s, where I had their famous hot chocolate and pastries and was entranced by their painted walls and decor. The next time I was in Paris it had been purchased and was called Angelina’s. Their Mont Blanc became my favorite dessert and remains so still.
It took an online recipe attributed to Angelina’s for chestnut purée, coupled with my meringue recipe, for my assistant Jinny Ridall, to unlock the secrets. May it become your favorite dessert too. Oh, I never saw the famous couple again, Chester popped into my life with varying endearments, between then, one marriage, and partway to the last and final one before I had the sense to see what a cad he was. It just goes to show that a good recipe for a meringue can outlast a man’s affections.
This story was originally published in Nathalie Dupree’s Matters of Taste, © 1990 by Nathalie Dupree, published by Alfred A. Knopf, Inc. It may have been modified for this book.
Angelina’s is a most glorious restaurant on the Rue de Rivoli in Paris. At one time it was called Rumplemayer’s, and there was one in New York across from Central Park as well. Angelina was the name of the owner’s daughter, and the name was changed sometime in the 1970s.
Makes 8
1 recipe Swiss Meringues or Traditional Simple Meringues
Chestnut Purée
Makes about 3 cups, or substitute 2 to 3 cups
store-bought chestnut purée
1-1/4 pounds roasted shelled chestnuts
1 vanilla bean, split
1/3 cup granulated sugar
Mascarpone Cream
1 cup heavy cream
4 ounces mascarpone
2 tablespoons confectioners’ sugar, plus more for dusting
1 teaspoon vanilla
Prepare Swiss Meringues as directed. When you are ready to bake, preheat oven to 200 degrees. Prepare a baking sheet by lining with parchment paper. Draw eight 3-1/2-inch circles on the parchment paper as your guide for piping the meringues. Place in pastry bag fitted with 1/2-inch plain tip and pipe eight small rounds onto prepared sheet (see piping directions in the Traditional Simple Meringues recipe). Bake 2 hours, or until meringue is firm to the touch. If meringues brown during baking, reduce heat. Transfer meringues to rack and let cool.
Meanwhile, make the chestnut puree. Add chestnuts to a medium pot and cover with water. Scrape the seeds from the vanilla bean; add bean and seeds to the pot. Bring to the boil over high heat. Reduce heat to low, cover, and simmer until chestnuts are very tender, about 30 minutes. Rinse the vanilla bean pod and reserve for another purpose. Drain chestnuts, then add to the bowl of a food processor and purée until almost smooth.
In a small saucepan, bring 1/3 cup sugar and 3/4 cup water to the boil to make a thin sugar syrup. Set aside to cool. When cool, stream syrup into the chestnut purée while the motor is running. It should be thin enough to pipe through a pastry bag but still thick enough to hold its shape (you may not need all the syrup). If using canned puree, sweeten to taste with sugar syrup, making sure it is thin enough to be piped. Fit pastry bag with a 1/10-inch plain tip and fill with purée, or use a squeeze bottle.
Beat cream in a mixing bowl until medium peaks form, and then add mascarpone, sugar, and vanilla. Beat until stiff peaks form. Cut a small slit in one corner of a plastic bag, or use a plastic or pastry bag with a tip. Position the bag in a sturdy mug or glass, and fold the top third of the bag down around the outside of the container. Scoop the cream from the bowl into the bag until it is half full. Pull up the surrounding part of the bag and twist the cream-free top to keep the cream from gushing out. Hold the twisted part of the bag with the dominant hand, and position the fingers of the other hand at the bottom tip. Push from the top.
Arrange cooked meringues on parchment paper. Squeeze and spread a thin layer of chestnut puree on top, pipe mascarpone cream in a tall mound on top of each, then pipe chestnut puree in a bird’s-nest shape all around the edges and the top of the cream. Sprinkle with confectioners’ sugar and chill until serving time.
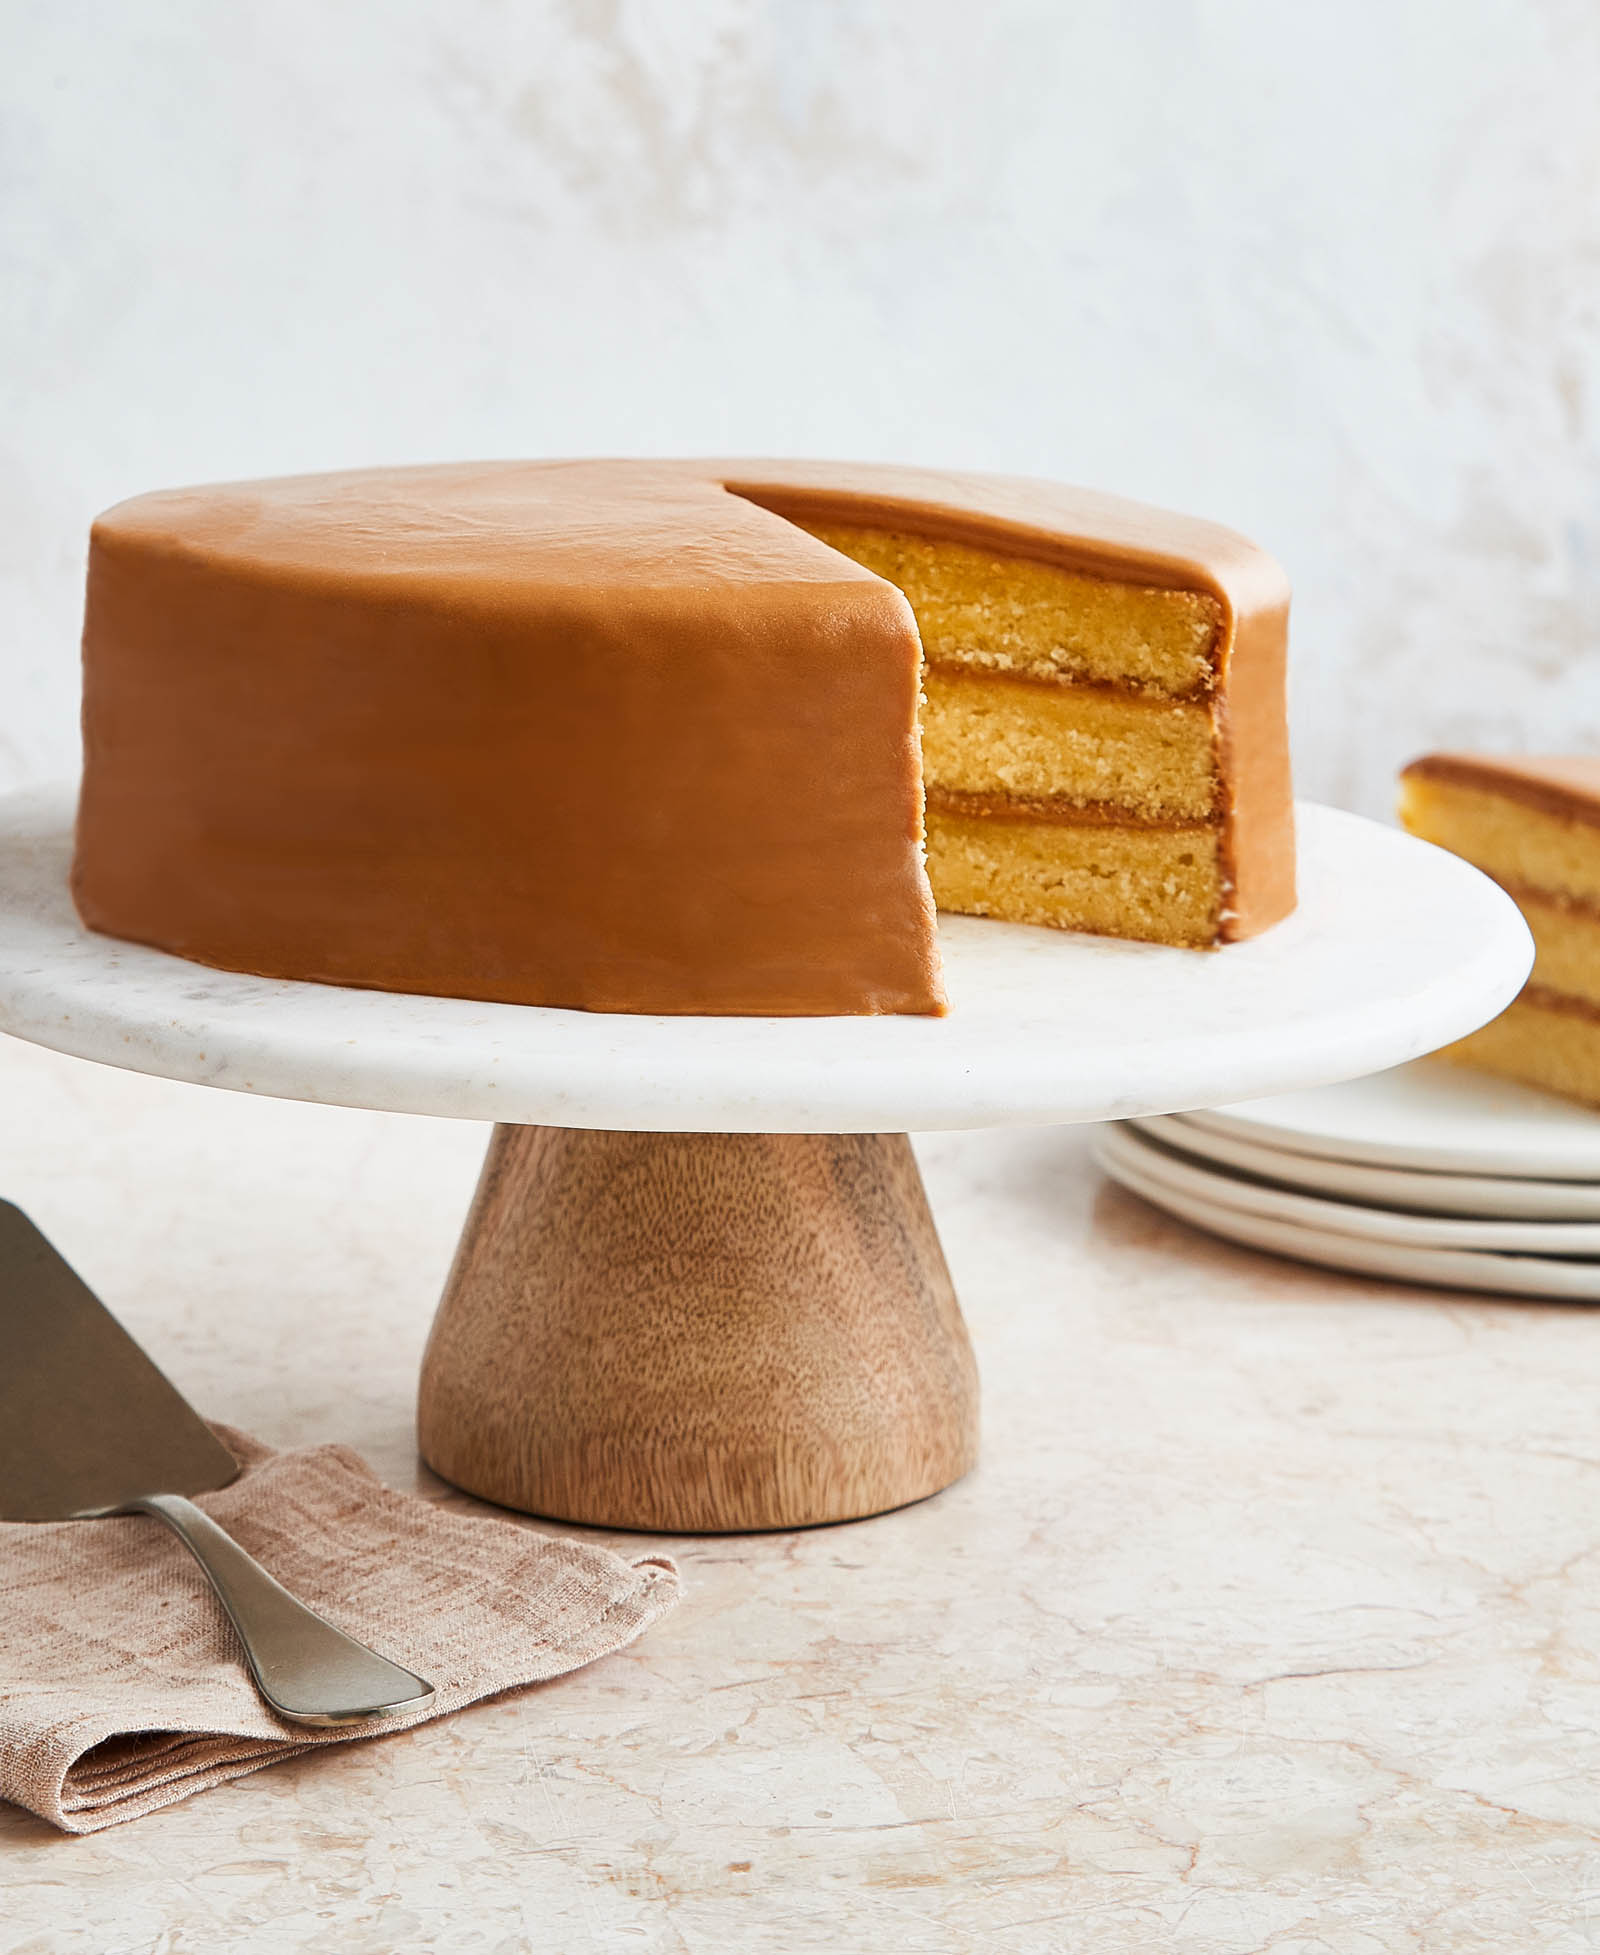
A popular national recipe in the 20th century, it is mostly prepared by Southern bakers and cooks and claimed as our own. The Caramel (burnt sugar) Icing was traditionally made in an iron skillet. Only a small amount of sugar is caramelized for the icing, but it flavors the whole mixture, giving the icing a grainy texture from the undissolved sugar. Some people prefer it that way. Heavy cream (my favorite) is preferred over half-and-half for its higher fat content, which prevents curdling. Use a candy thermometer to accurately judge the soft-ball stage. Keep warm by putting the bowl of icing in a pan of hot water until finished icing the cake, or it can be microwaved to reheat, checking in 10- to 20-second increments to make sure it does not overcook. For best results, the icing should be spreadable, like peanut butter. A thermometer, whether instant-read or candy, makes any sugar work easier. Sugar work is much more difficult on a rainy day because of the relationship between sugar and humidity.
Makes 1 (9-inch) round 3-layer cake or 1 (9 x 13 x 2-inch) 2-layer cake
1-1/2 cups unsalted butter, room temperature
2 cups granulated sugar
5 large eggs
3 cups all-purpose or cake flour
1/4 teaspoon salt
1/2 teaspoon baking powder
1-1/4 cups milk
1 teaspoon vanilla extract
1 recipe Caramel Icing
Position rack in the center of the oven and preheat to 325 degrees. Butter and flour three 9-inch cake pans or two 9 x 13-inch pans. Line the bottoms with parchment or waxed paper. Butter and flour the paper.
Cut the butter into 1-inch pieces, add to the bowl of a stand mixer fitted with a rotary whisk, and beat on low speed until soft. Increase the speed and whisk for 1 or 2 minutes, until it looks like lightly whipped cream. Add the sugar 1 tablespoon at a time, starting on low and increasing speed until well whipped, about 7 or 8 minutes. Beat in the eggs one at a time, beating after each addition.
Sift together the dry ingredients onto a large piece of waxed paper. Add a third of the flour mixture to the egg mixture and beat to incorporate, then half the milk and beat; repeat, ending with flour. Add the vanilla extract and beat until smooth. Pour the batter evenly into the cake pans. Tap the pans once against the counter to remove any air bubbles and smooth the top of the batter.
Bake 35 to 45 minutes, until a toothpick inserted in the middle comes out clean. The internal temperature of the cake should be 190 to 195 degrees on an instant-read thermometer.
Move the pans to a wire rack to cool completely. Carefully run a knife around the inside of the pans to loosen the cakes. Turn the pans upside down over pieces of parchment paper. Remove pans and peel off the paper. The cakes may be made ahead to this point. Well-wrapped, they can be frozen up to 2 months.
Spread with Caramel Icing (below), following icing directions on How to Ice a Cake.
Combining a small amount of caramel sauce with a sugar syrup produces this caramel icing.
Makes 3-1/2 to 4 cups
3-1/4 cups granulated sugar, divided
1 tablespoon light corn syrup
1/4 cup water
1/2 cup unsalted butter, softened
1/4 teaspoon baking soda
1 teaspoon vanilla extract
1-1/2 cups cream, half-and-half, or milk, divided
Heat 1/4 cup of the sugar with the corn syrup and water in a small saucepan over medium heat until dissolved. Proceed to cook until it turns a deep copper-amber color, watching carefully and swirling the pot over the heat as necessary to distribute the color evenly. A small portion may appear burnt—don’t worry unless the whole mixture seems burnt and has a burnt odor. If the whole mixture tastes burnt, discard and start over. This is the caramel.
Meanwhile, on low heat, dissolve the remaining 3 cups sugar with the butter, baking soda, vanilla, and 1 cup cream or milk in a large, heavy pan or Dutch oven. When dissolved, bring to a simmer just until little bubbles appear around the outside of the pan. Take care not to let it boil over.
Cover both hands with oven mitts or cloths to protect them from caramel splashes. Add a small portion of the cream or milk mixture to the caramel and bring to the boil to dissolve; pour it into the simmering milk mixture. If necessary to remove all the caramel from the pan, repeat this step. Bring the mixture to the boil and boil rapidly to the soft-ball stage (240 degrees on a candy thermometer), stirring constantly.
Carefully remove pan from the heat and place in a large roasting pan filled with enough cold water to stop the caramel cream from cooking. Transfer caramel cream quickly to the bowl of a stand mixer fitted with a rotary whisk, and beat until very thick and creamy. It should look and spread like peanut butter. If necessary, add a bit more of the cream to make it spreadable. If it is too cold to spread, place the bowl in a pan of hot water to warm up, and add a bit more cream if necessary. It also may be briefly warmed in the microwave as well, if transferred out of the metal bowl. Spread the icing on the cake. See How to Ice a Cake for instructions.
Variations: Orange Caramel Cake: Substitute 8 ounces sour cream for the milk and use orange extract instead of vanilla. Add 1/2 cup orange juice and 2 teaspoons grated orange rind, no white attached, to the icing ingredients when bringing them to a simmer.
Tip: To clean the caramel pan, add hot water, bring to the boil, and slosh around to dissolve the caramel. If necessary, continue to boil until caramel is dissolved. Caramel should be well diluted before pouring water into the sink so it doesn’t harden in the drains.
I think it is charming for home cakes to have a dome, declaring they are “homemade.” When necessary, even out domes or overbrowned layers with a sharp serrated knife. If they aren’t burned, keep the trimmings and make them into crumbs for decorating or into cutouts to keep children (and the cook) happy until it is time to eat the cake.
The tops of cakes will frequently crumb. Cake bakers usually remove this crumb with a pastry brush before icing. Move the prettiest layer to a rack set over waxed paper to catch icing drippings. Ice the cake layer by ladling or spooning a portion of the icing into the middle of the cake. Use a long spatula to spread, starting in the middle and working out to the sides. Wait to ice the sides until the cake is assembled. Keep the drippings in case more icing is needed for the bottom and middle layers. (It can’t be used for the sides, as it will have cake crumbs in it.)
Divide the remaining icing onto the number of layers left to ice, remembering to save some for the sides. Choose the least desirable layer as the bottom layer. Any broken layer should be in the middle. After the bottom layer is determined, move it to a cardboard cake round. If using a cake plate, make spokes with 5 x 3-inch strips of parchment or waxed paper on the serving plate, extending slightly, to catch the icing from dripping onto the plate. Ice as above, remembering that too much icing on the bottom two layers will cause the cake to slide.
Ice middle layer on a cake rack, then move on top of bottom layer. Top with the pretty layer, which is already iced. Spread icing over the sides if there is sufficient remaining. Slide out the strips of paper and tidy up the plate.
If icing is too stiff to spread smoothly, recheck the recipe to determine if ingredients were measured carefully, and adjust as needed. If it is simply too cold to spread, warm it quickly and carefully over low heat or in the microwave. If the icing is runny, chill slightly first, then try to add some of the thickest ingredient to make it firmer.
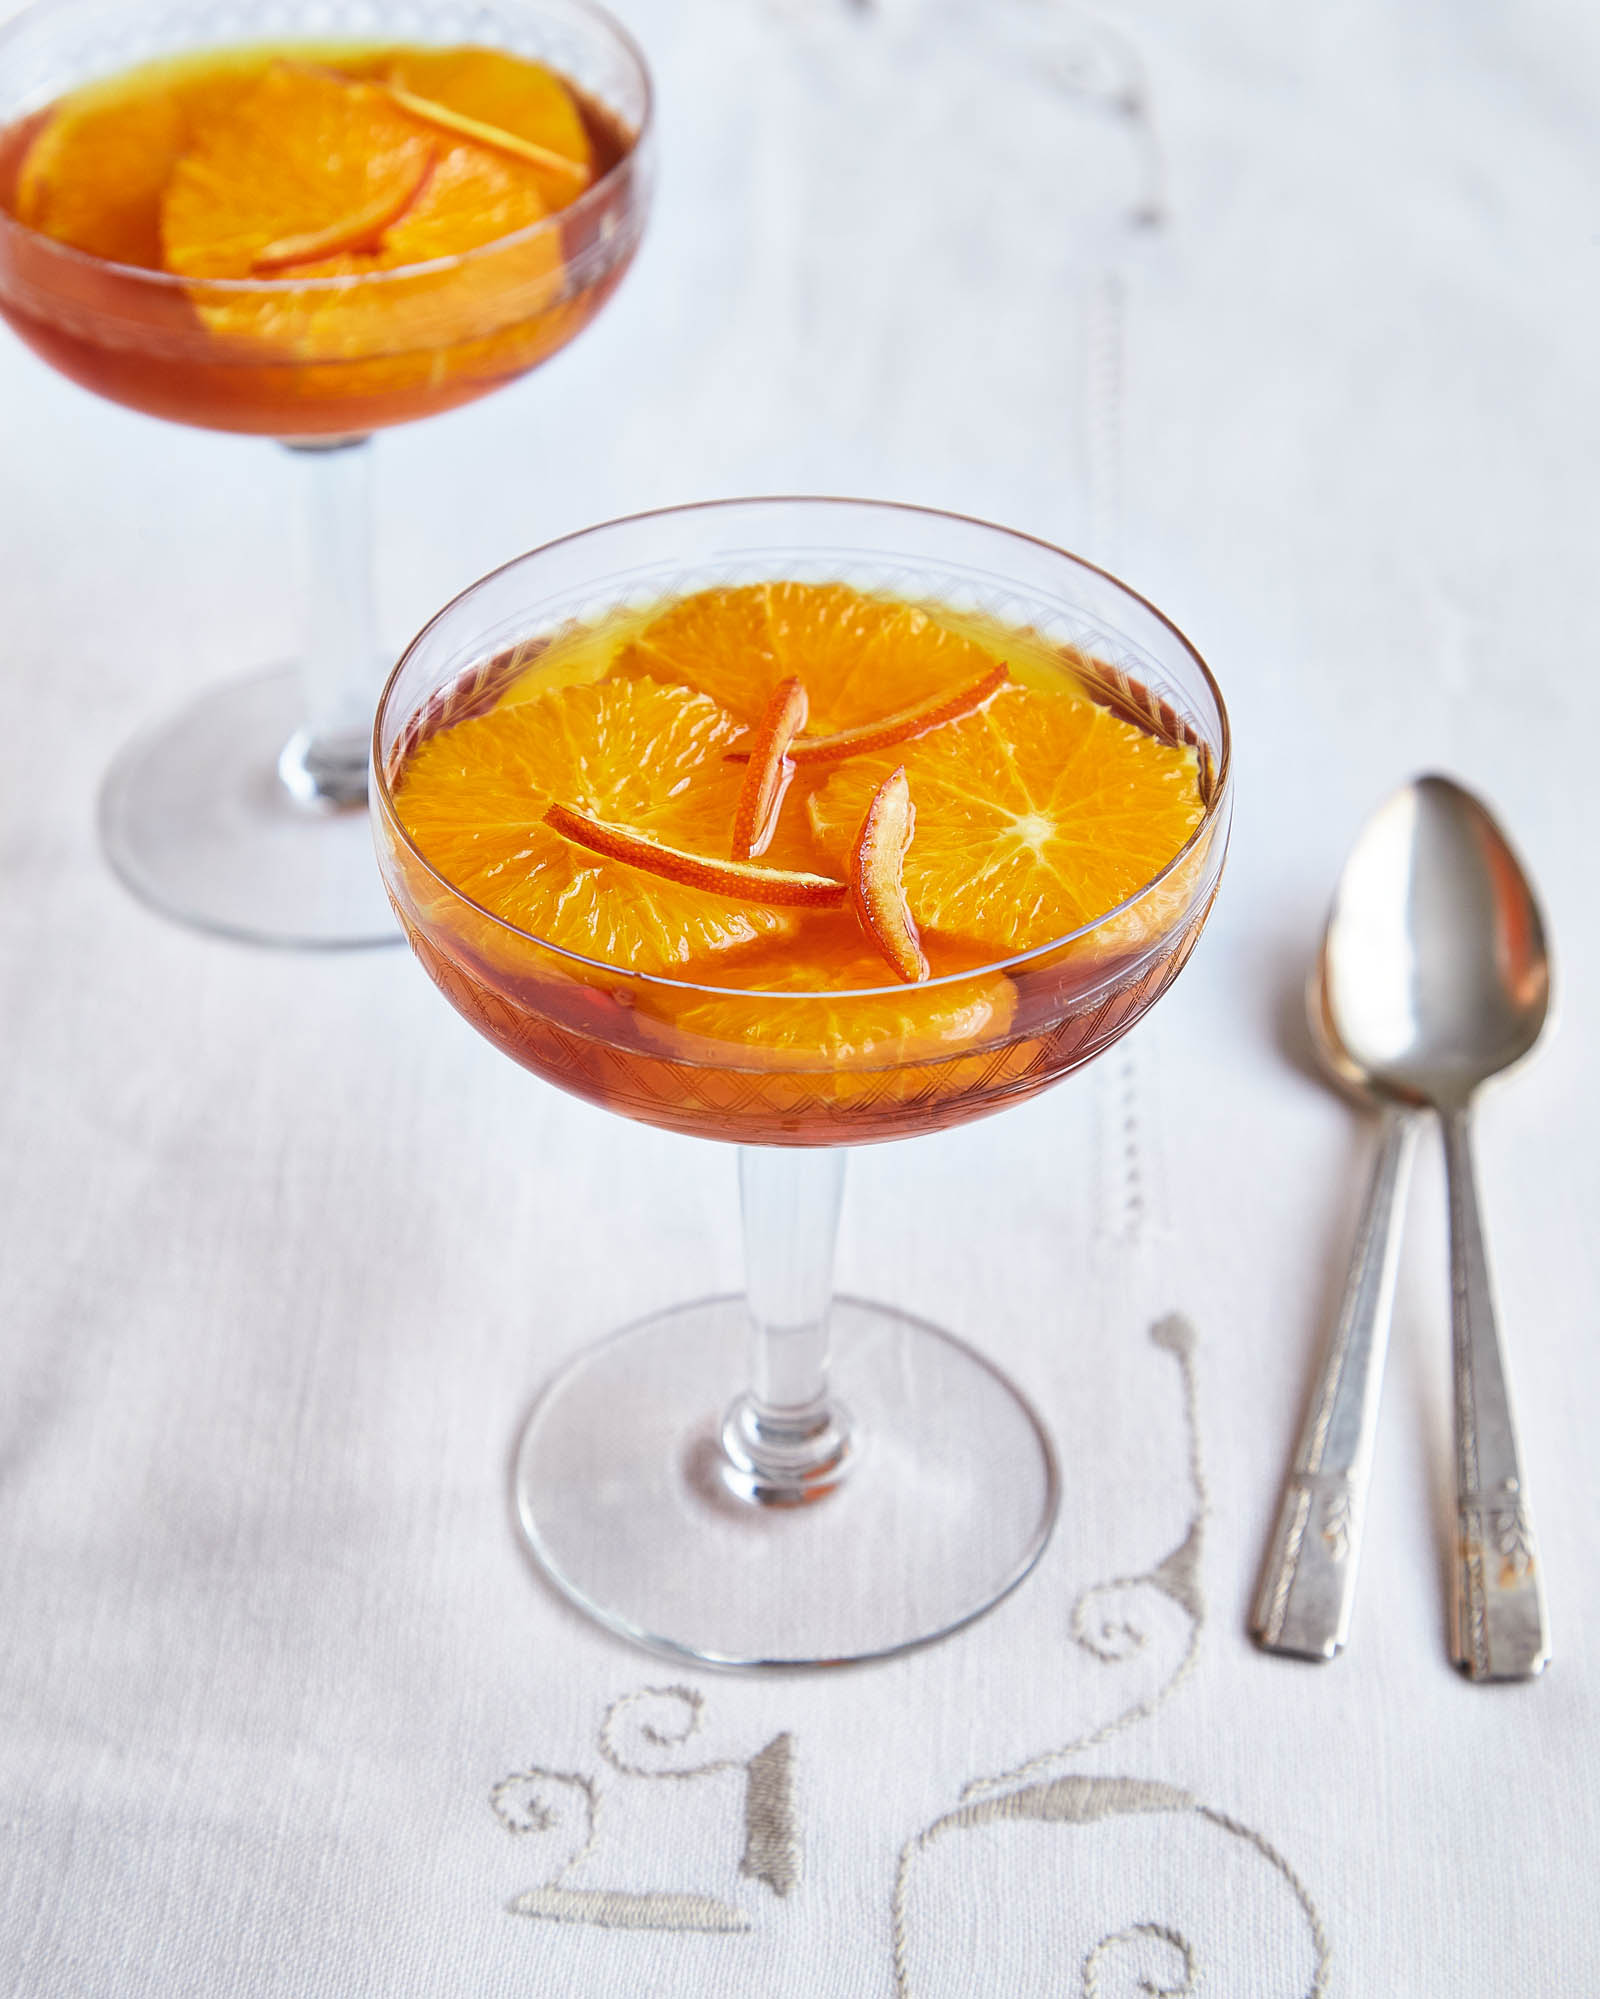
Originally a recipe from Chef Henri Pellaprat, co-founder of Le Cordon Bleu Paris, this made its way into the repertoire of Dione Lucas, Rosemary Hume, Julia Child, and others of his students, and then on to their students, of which I am one, and then to all of our students. It is always a winning dessert. Accompany with a small cookie if desired, or serve with a ginger snap and whipped cream.
Serves 6
1 recipe Caramel Sauce
6 oranges, plus rind
Prepare Caramel Sauce as directed (this may be done a day ahead).
Grate the rind of the oranges, leaving no white attached to the rind, or peel strips with a potato peeler and slice into thin julienne strips. Remove remaining rind and pith, and slice the oranges horizontally into rounds; remove the seeds.
Pour Caramel Sauce as needed over the oranges up to a day before serving. Sprinkle on the grated or julienned orange peel. Cover with plastic wrap. Serve individually or in a large bowl.
Variations: Add candied ginger and/or candied orange peel (Candied Citrus Rind) as well as, or in place of, the grated rind. Or add candied ginger to the caramel sauce.
Makes 1 to 2 cups
1 cup granulated sugar or a mixture of brown and granulated sugar, or all brown sugar, or honey
1/4 cup light corn syrup
2 cups water, divided
Heat the sugar in a saucepan with the corn syrup and 1 cup water over low heat, without boiling, stirring once or twice if necessary to completely dissolve the sugar. (There may be a little “sugar scum” on top, but the sugar on the bottom should be dissolved.) If there are sugar crystals on the side, brush down the sides of the pan, without touching the syrup, using a brush dipped in water. Place a pan of cold water next to the stove large enough to hold the saucepan if needed.
Once the sugar is completely dissolved, bring to the boil over high heat. This is the sugar syrup. Boil steadily until large bubbles form on the surface. Watch closely as the caramel turns from bursting bubbles to little bubbles then caramel. Cover hands or use an oven mitt, and tip the pan once it begins to color so the sugar colors uniformly. When it turns amber, remove from the heat. It will continue to bubble. If it becomes as dark as mahogany, carefully move it to a pan of water to cool it down immediately and stop the cooking. (Be careful of the bubbling water and sugar.) This is now a “caramel.” Left alone to cool, it will harden.
To continue making the sauce, wipe the bottom of the pot dry if necessary and return to the heat, adding the remaining cup of water. Return to the boil. If part of the caramel syrup has solidified, stir with a clean wooden spoon so the caramel will be evenly distributed. Bring back to the boil, and boil until reduced by one-fourth and slightly syrupy. Cool, pour into another container, and chill. This will last several weeks covered in the refrigerator.
For citrus aficionados, this is a temptation. Store judiciously. Use various citruses, or just one type, as below. Serve whole, or chop and use in cakes, fruit cakes, and any time you would use candied ginger.
Makes 2 cups (10 slices per orange)
3 large oranges with thick skin
4 cups water, plus more for boiling rind
1-1/2 cups granulated sugar, divided
2 tablespoons light corn syrup
Using a knife or vegetable peeler, peel rind from the orange, not getting any of the white. Add the peels to a 3-quart pot of cold water, making sure the water completely covers the rind. Bring the water to the boil, and boil for about 30 seconds. Drain in a colander and rinse the rind under cold water. Return rind to the clean pot and cover with cold water. Repeat the boiling and rinsing process.
After rinsing the rind the second time in cold water, add rind to a clean pot along with 4 cups water, 3/4 cup of the sugar, and the corn syrup. Cook over low heat until the sugar is dissolved. Bring to a gentle boil and cook for 1 to 1-1/2 hours. When done, the rind should be transparent, and there should be just enough syrup to coat all the pieces.
Spread remaining sugar on a cookie sheet and roll the rind in the sugar. Allow to dry on a wire rack for 1 hour or more. Turn pieces over with tongs and make sure they are dry before storing. Allow to sit if not completely dry. Store in the refrigerator.
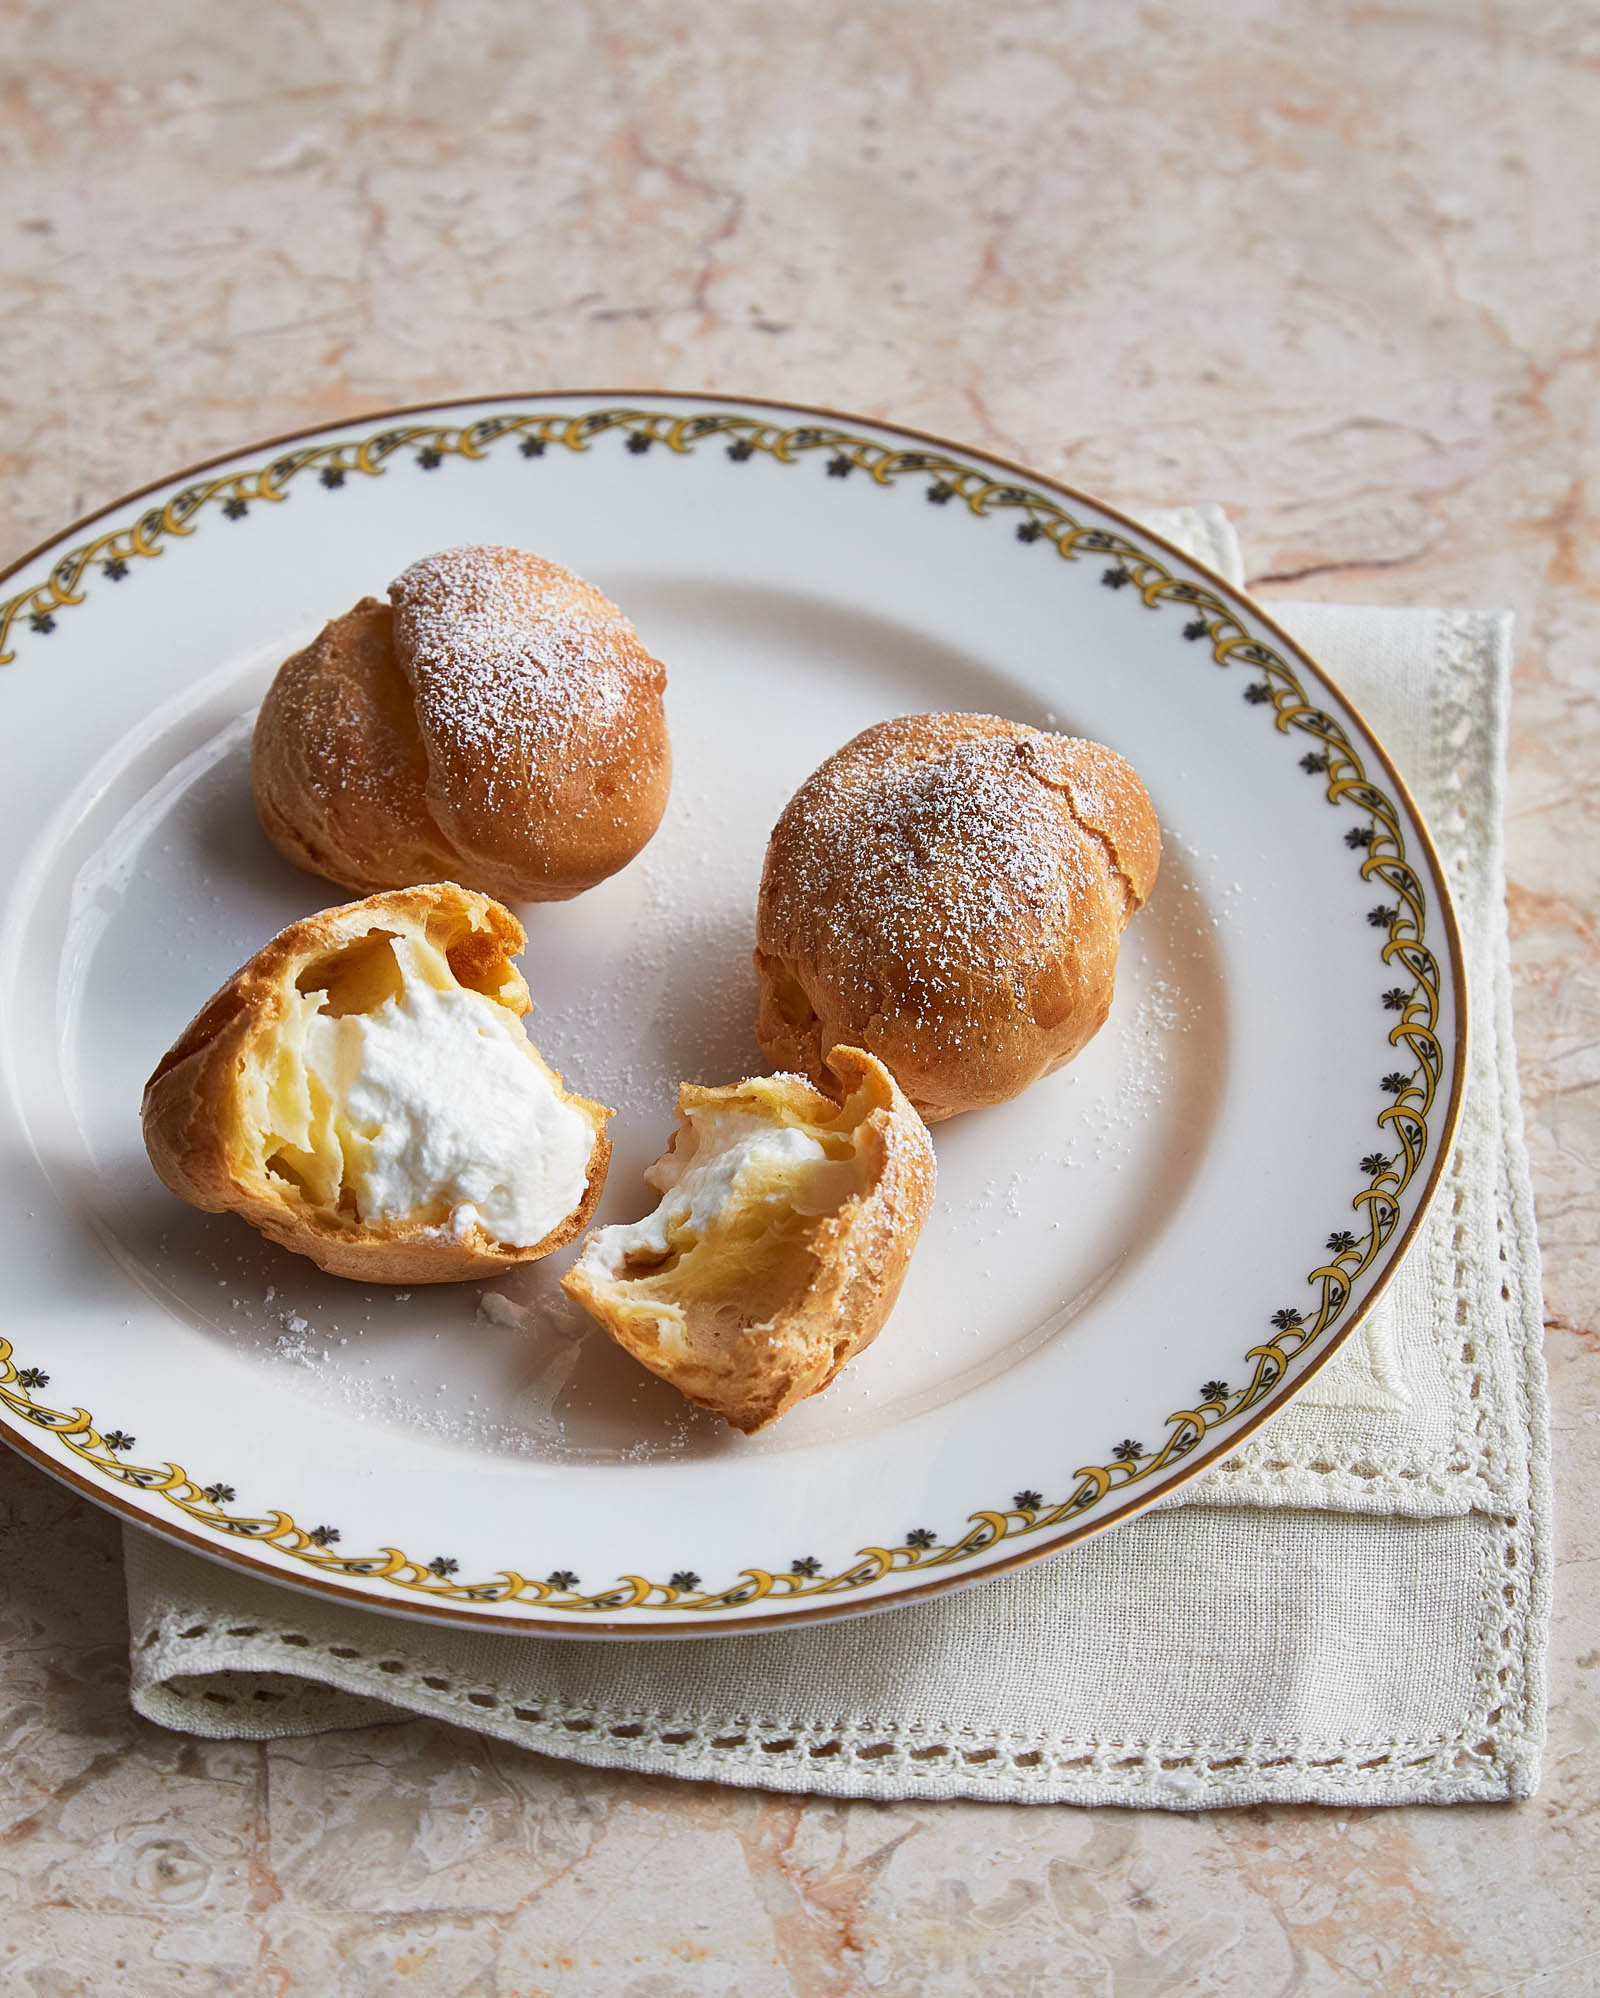
Nearly every European nation has a version of this dough, which in French is called pâte á choux. It can be baked, fried, boiled, or mixed with other foods to make another product altogether. A version was in Martha Washington’s cookbook as well as Thomas Jefferson’s. I invented this version thirty years ago after seeing a pastry made with a similar technique in an antiquarian cookbook and have used it ever since. It makes a roux first, then the liquid is added, it is stirred until thoroughly cooked, and then the eggs are beaten in to incorporate air. It’s a handy dough to master, as usually the ingredients are readily available and inexpensive. The recipe doubles easily, and the cooked puffs freeze well in a sturdy airtight container.
Makes 20 puffs, depending on size
1 recipe Pâte á Choux
1 recipe Diplomat Cream
1 recipe Chocolate Sauce, optional
Pâte á Choux
6 tablespoons unsalted butter
1 cup minus 2 tablespoons bread flour
1 teaspoon salt
1 tablespoon granulated sugar, optional
1 cup water
3 large eggs
2 egg whites
1 egg yolk mixed with 1 teaspoon water, for glaze
Melt the butter in a heavy 10- to 12-inch frying pan over medium heat. Whisk together flour, salt, and optional sugar. Stir into the melted butter over medium heat until the butter and flour come together. Continue stirring until the butter-flour mixture is smooth. Add the water and continue stirring until the mixture comes together. At first it will be paste-colored. When it pulls together into a thick glob and resembles well-buttered thickish mashed potatoes, with no streaks of white, indicating the flour has been sufficiently cooked, remove from the heat. In a frying pan this should take about 5 minutes.
Cool slightly. Fit a food processor with the metal blade. Add the paste. Mix the eggs and egg whites together in a small bowl. Add the eggs 1/4 cup at a time to the paste, pulsing after each addition. (Or beat with an electric hand mixer or a sturdy spoon.) Pulse or beat until the dough is glossy and drops slowly from a spoon. There may be some liquid remaining. Just discard any extra liquid. At this point, add cheese or any other flavorings as desired (see variations). The mixture may be made ahead to this point and refrigerated tightly covered for several days. Bring back to room temperature before baking.
Preheat oven to 350 degrees.
Line a rimmed baking sheet with parchment or waxed paper. Use a small amount of the dough to hold down the four corners of the paper. Snip a small corner off one end of a plastic or pastry bag and fit with a tip. (Using a pastry tube makes a more polished end product but is not crucial.) Position the bag in a sturdy mug or glass, and fold the top third of the bag down around the outside of the container. Scoop the dough from the bowl into the bag until half full. Pull up the surrounding part of the bag and twist the dough-free top to keep the dough from gushing out. Hold the twisted part of the bag with the dominant hand, and position the fingers of the other hand at the bottom tip. Push from the top.
Pressing from the tops and sides of the bag, pipe the pastry into nearly identical rounds or other shapes onto the parchment paper. The pastries may vary in size and shape from baking sheet to baking sheet, but those on each sheet should be consistent. Brush puffs with egg glaze and lightly press the tops with a fork to flatten. Bake one pan at a time until medium brown with no paste-colored streaks showing, about 30 minutes. Remove from oven, insert a needle, skewer, or small knife tip and pierce a hole in the side or bottom of each pastry. Return to oven. Reduce heat to 325 and bake 10 minutes more. Test by removing one puff and setting aside to cool.* Return the batch to the oven as needed, continuing to test. Adjust baking time for remaining pastry. Remove and cool briefly on a rimmed baking sheet before moving to a rack. The puffs may be kept covered a day or so at room temperature, or frozen for up to 3 months. Recrisp in a 350-degree oven for about 4 to 5 minutes before filling if they have become soggy. Fill as desired with Diplomat Cream before serving. Serve with optional Chocolate Sauce if desired.
To fill, insert a pastry tip into the previously cut hole and pipe in a smooth mixture, or split the puff in half horizontally, remove any undercooked centers, and fill with desired mixture. Replace the top and serve with chocolate sauce, if desired.
*Most novices tend to underbake the dough. Before the pan is returned to the oven, set one puff aside. As it cools, it will become softer. If it is not thoroughly cooked, it will become very soft and collapse to the touch. This indicates it was not cooked thoroughly. Return to pan in the oven. After 10 minutes, remove another puff and repeat the test.
Variations: Sweet and Savory Cream Puff Varieties
I can’t remember making a Diplomat Cream until Gabrielle Hamilton introduced one in the New York Times Magazine. I’ve taken it as my own, as it prevents weeping and keeps cream puffs and other pastries from getting as soggy as they do with whipped cream or pastry cream.
Makes about 2 cups, enough for about 12 golf-ball sized cream puffs. To fill croquembouche, three batches will be needed.
1 cup milk
1 vanilla bean, split, seeds scraped, both reserved
1/4 cup granulated sugar, divided
3 egg yolks
1-1/2 tablespoons cornstarch
Pinch of salt
1 tablespoon cold butter
1/4 cup plus 1 tablespoon heavy cream, divided
1/2 teaspoon granulated gelatin
1 tablespoon tap water
Combine milk, vanilla bean and seeds, and 2 tablespoons of the sugar in a small saucepot. Heat almost to the boil (small simmering bubbles will appear around the edge of the pan) over medium heat. Remove from heat.
In a heatproof mixing bowl, whisk together remaining 2 tablespoons sugar, egg yolks, cornstarch and salt until thick and creamy and pale yellow. Whisk the hot milk into the yolk mixture, then pour through a strainer, if necessary, to catch any cooked bits of egg, then back into the saucepot. Return pot to the stove and whisk constantly over medium-high heat until it bubbles and thickens, about 90 seconds. Remove from heat and pour contents back into the bowl, again through a strainer. Move the bowl over a panful of ice to cool slightly. Whisk in the cold butter while the mixture is still warm. When the pastry cream has cooled completely, add 1 or 2 tablespoons heavy cream to it to make it loose and soft when incorporating the gelatin. Set aside off the ice.
In a small microwave-safe bowl, sprinkle gelatin over the tap water evenly to soften. Break up any clumps, then microwave for 10 or 15 seconds to dissolve completely. If no microwave is available, add the water to a metal measuring cup or small pan, sprinkle in the gelatin and let sit a few minutes until it thickens evenly. Melt and dissolve over a very low heat until completely liquid. Taking care the bowl is not colder than the ingredients, as the gelatin will head for the coldest spot when dissolved, stir dissolved gelatin mixture into the cool pastry cream, making sure there are no clumps of undissolved gelatin. If there are, either remove completely and discard, or remove and redissolve in microwave or pan as before and re-add, stirring as before. Return to top of the pan of ice and stir with a spatula until the liquid is cool. Remove from the ice once cool.
Whip remaining 1/4 cup cold heavy cream to peaks the texture of the pastry cream and fold into the chilled pastry cream, blending thoroughly. Cover with plastic wrap and chill in a refrigerator until ready to use.
Variation: Flavor with orange liqueur, Madeira, sherry, or other liquid.
straining a custard
Not all egg dishes need straining, but “boiled” custards have two reasons for doing so: 1) removing the chalazae, the “stringy” part of the egg whites, and 2) the possibility of some overcooked eggs lurking on the bottom and sides of the pan. Straining cools down the custard as well as removing the less desirable bits and the bean pod. Unfortunately it may also remove the vanilla seeds, which lend a bit of character to the sauce.
This is a foolproof chocolate sauce. Of course, if a better chocolate is available or bitter chocolate is preferred, it can be substituted.
Makes 1/2 cup
1/2 cup heavy cream
3 heaping tablespoons semisweet chocolate chips
Heat the cream in a heavy pan on the stove, or in the microwave until hot but not boiling. When hot, add the chocolate and continue to cook over low heat until the chocolate is melted and smooth. Spoon hot sauce over cream puffs or set aside until needed. It will keep in the refrigerator covered for several weeks. Reheat over low heat or in the microwave if necessary.
My oldest nearly daughter Audrey married a Frenchman in France, where this was served at the dinner following her wedding. There are conical molds available, but free-form towers have a less formal, more welcoming look. Some croquembouche are made with a base or a pie or puff pastry round, which enables one to carefully move the croquembouche as necessary. Spun sugar adds a spectacular finish. The presentation plate should be one that can be immersed in hot water to dissolve any caramel adhering to it. I used to use one of silverplate, as it was sturdy and easy to dissolve the caramel.
Makes one 10-inch pyramid To feed about 15–20 people
60 quarter-sized Nathalie’s Cream Puffs filled with Diplomat Cream
3 cups granulated sugar
3 tablespoons light corn syrup
1 cup water
Spun Caramel Cage, optional
Set cream puffs on parchment paper strips on a serving plate (see “How to Ice a Cake").
Make the caramel “glue”: Add the sugar and corn syrup to the water and heat until dissolved over medium heat in a heavy saucepan without boiling. Bring to the boil and boil until it turns a rich amber color, about 20 to 30 minutes. Remove from heat and allow to cool just slightly. (See Caramel Sauce for more directions.)
Working quickly while the caramel is still warm and liquefied, using metal tongs, a long fork, or a gloved hand, dip the bottom side of one cream puff into the caramel, then dip the top. Place on the serving dish, bottom down. Continue dipping and moving to form a 10-inch circle of dipped cream puffs on the plate as a base. Another circle of caramelized puffs can be added inside this circle to create an extra-sturdy base for the pyramid. Continue to build by dipping another cream puff bottom. This layer will be smaller than the base layer, with each puff added in the center of two puffs below. Working quickly, add another puff adjacent and glued to the first, and also in between two base puffs. If the puffs are not adhering, it may be that the puffs need to be re-dipped, with the sides as well as the bottoms coated. Continue until the smaller round is on top of the base. If the caramel hardens, reheat over low to medium heat until liquid. Keep making rounds from the puffs and caramel, gluing each round into place on top of the one below, each round smaller than the previous one. When finished in a pyramid, brush the visible portions of the puffs with the extra caramel until shiny, securing any loose puffs with caramel, and remove parchment strips.
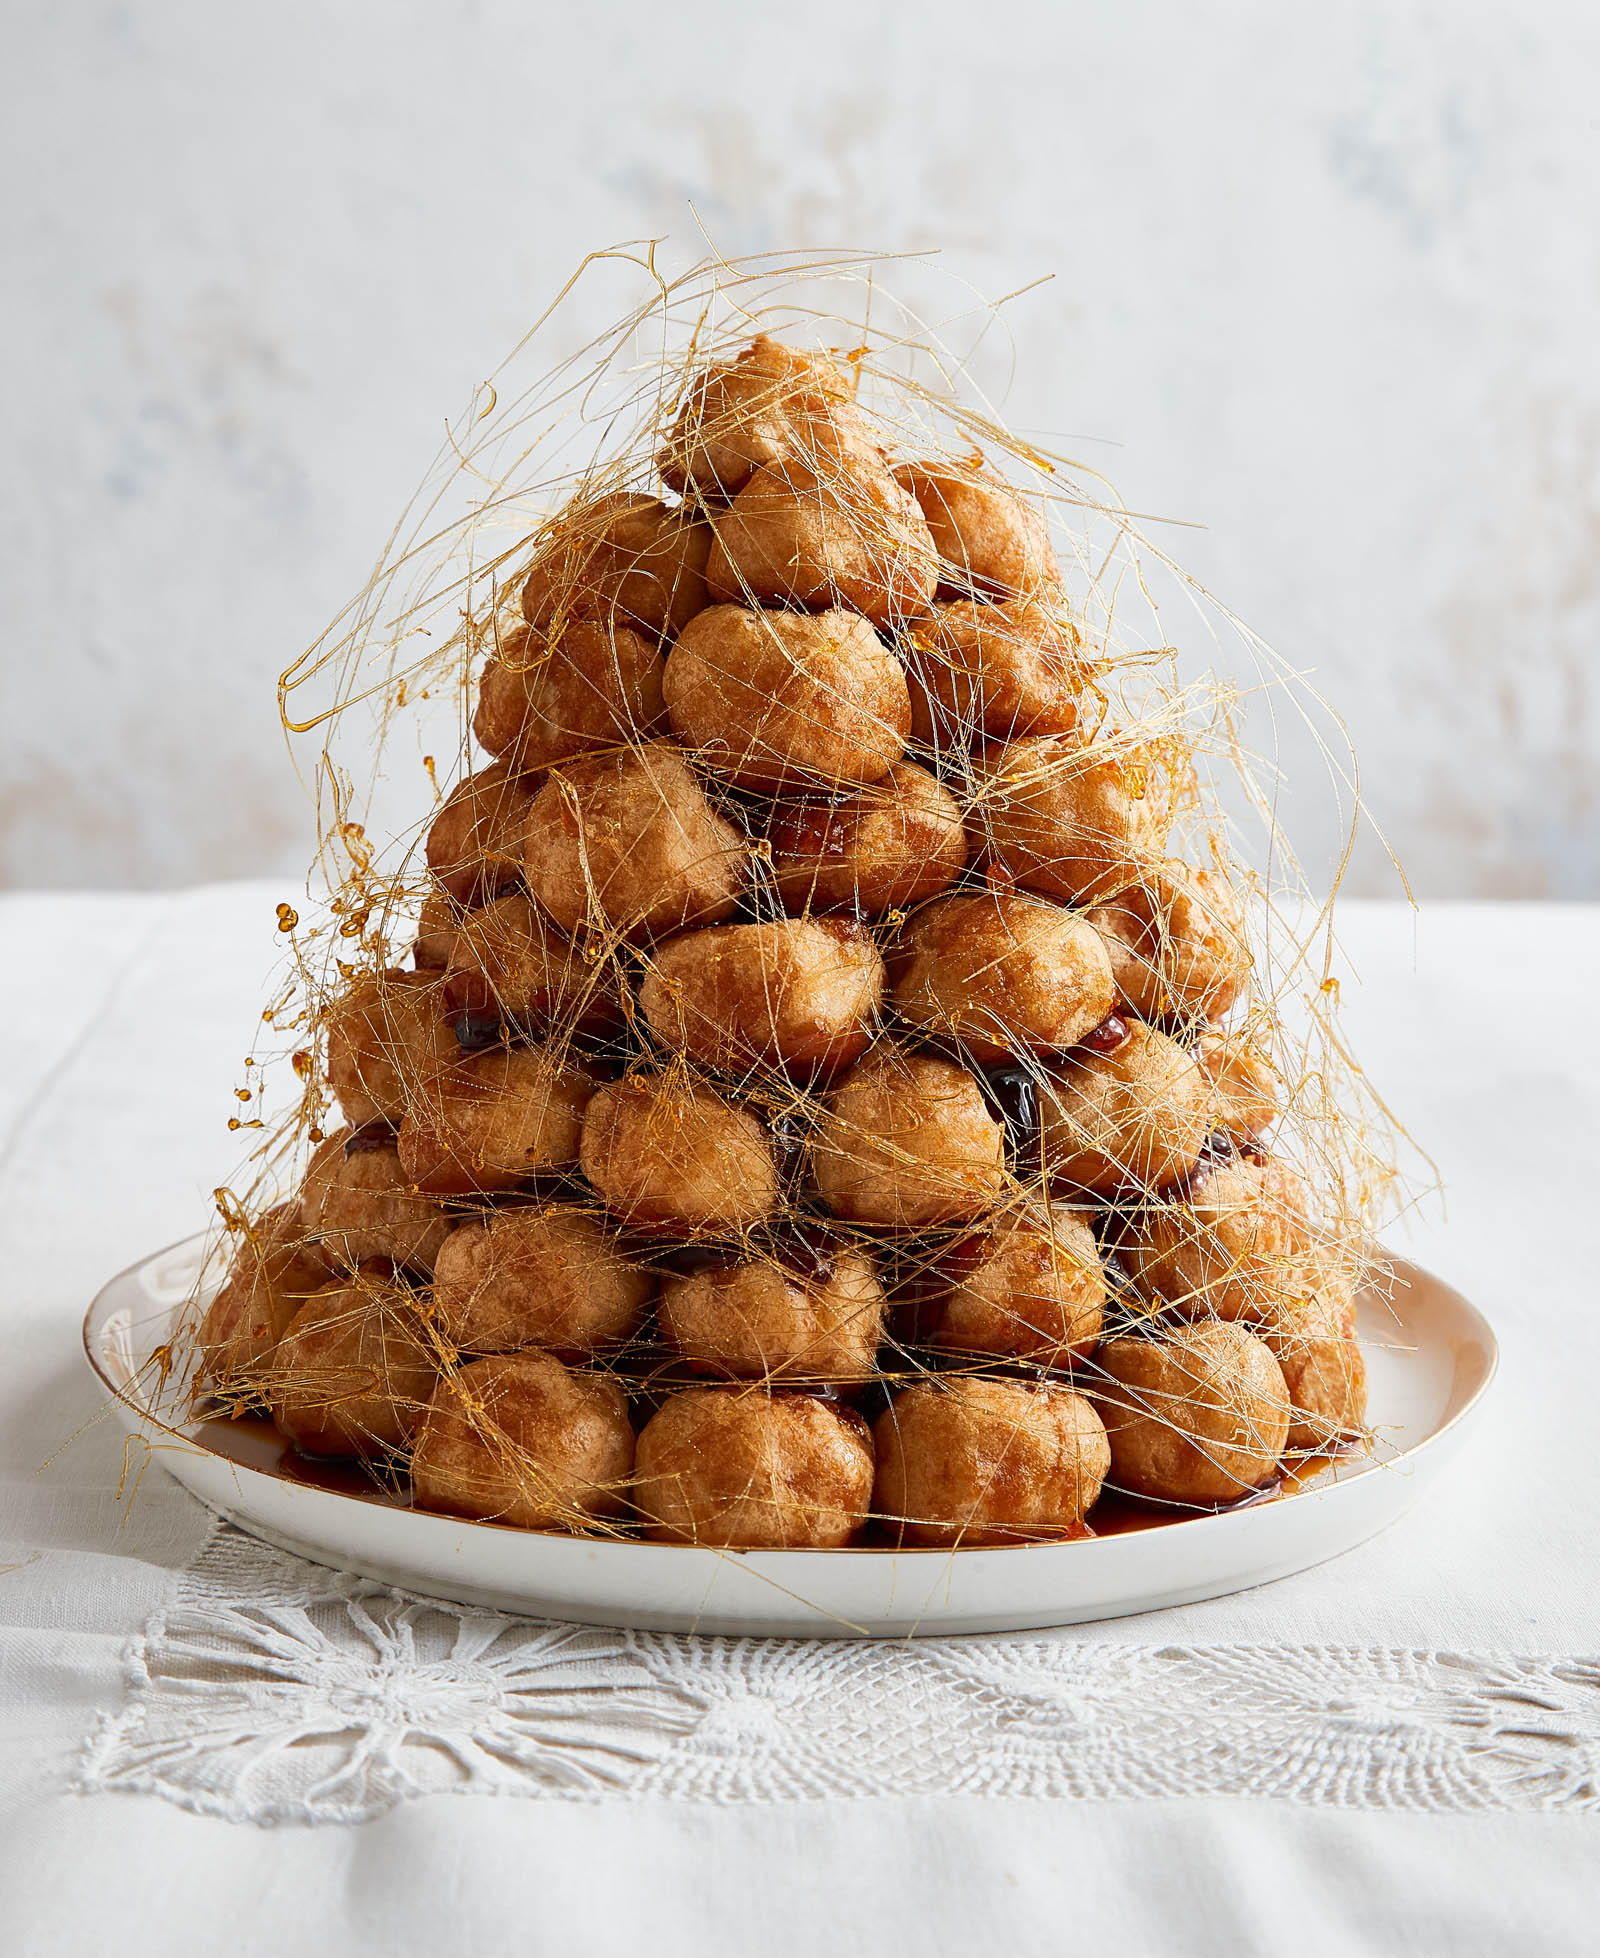
To finish the croquembouche, make a spun sugar cage. Move two wooden spoons to the edge of a countertop or table and tape the bowls of the spoons, facing down, onto the counter, with the wooden handles protruding out. Oil the handles to prevent the caramel from sticking to them. Spread newspaper underneath the work area to catch the caramel as it drips. (Or take a cue from photographer Hélène Dujardin. She does this on the counter above an open dishwasher door, which catches the drips. Then close and run through a cycle for easy cleanup!)
1 cup granulated sugar
1 tablespoon light corn syrup
1/3 cup water
Dissolve the sugar and corn syrup by heating with the 1/3 cup water. Once thoroughly dissolved, bring to the boil and continue to boil until the syrup has reached the hard-crack stage (between 295 and 310 degrees). Remove from heat and allow to cool slightly. Dip a fork or metal whisk into the warm caramel and make generous circles under and over the two spoon handles, creating a large nest of the golden strings. Don’t worry if any break as they harden. Just start another string and continue making the large circles. Use two hands to carefully move the bird’s nest to surround the croquembouche. Start at the top and work down, as the caramel circle may not be large enough to surround the croquembouche if the initial circles were not large enough. It will be pretty whatever is done!
Carefully store the croquembouche until ready to serve, preferably in a refrigerator or cold place. To serve, use two spoons to remove the puffs individually to small plates, 2 or 3 puffs per serving. Serve with some of the spun sugar.
With sincere thanks to all who helped, directly or indirectly, over the years in the creation of this book:
Jack Bass and Kitty, who had to put up with not interrupting me
Kate Almand
Angelina’s restaurant
Rose Beranbaum
Pat Conroy
Ma-Ma Dupree
Alma Friedman
Lauren Furey
Gabrielle Hamilton
Marcella Hazan
Rhoda Kreiser
Nicole Marriner
Deni Seibert
David Tanis
Anne Willan
Virginia Willis
Marion Wright
Ray Wright
Food photographer Hélène Dujardin, and food stylists Angie Moser and Anna Hampton; special thanks to recipe tester Jenni Ridall
Previous publications and editors:
Atlanta Magazine
Post and Courier Food section
Brown’s Guide to Georgia
Los Angeles Times Syndicate
Fred Brown
Dudley Clendenin
Russ Parsons
And especially Cynthia Graubart and Madge Baird