In icon view, every file, folder, and disk is represented by a small picture—an icon. This humble image, a visual representation of electronic bits and bytes, is the cornerstone of the entire Macintosh religion. (Maybe that’s why it’s called an icon.)
OS X draws those little icons using sophisticated graphics software. As a result, you can scale them to almost any size without losing quality or clarity. If you choose View→Status Bar so that the bottom-edge strip shown in Figure 2-4 appears, you get a size slider that you can drag to the right or left to make that window’s icons larger or smaller. (For added fun, make little cartoon sounds with your mouth.)

The Mac expands the notion of “an icon is a representation of its contents” to an impressive extreme. As you can see in Figure 2-5, each icon actually looks like a miniature of the first page of the real document.
Because you can make icons so enormous, you can actually watch movies, or read PDF and text documents, right on their icons.
To check out this feature, point to an icon without clicking. A Play button ( ) appears on any movie or sound file; as shown in Figure 2-5,
  and
and  page buttons appear on a multipage document (like PDF, Pages, or even presentation documents like PowerPoint and Keynote). You can actually page through one of these documents right there on its icon without having to open the program!

OS X offers a number of useful icon-view options, all of which are worth exploring. Start by opening any icon-view window, and then choose View→Show View Options (⌘-J). The pane shown in Figure 2-6 appears.
It’s easy—almost scarily easy—to set up your preferred look for all folder windows on your entire system. With one click on the Use as Defaults button (described below), you can change the window view of 20,000 folders at once—to icon view, list view, or whatever you like.
The Always open in icon view option lets you override that master setting, just for this window.
For example, you might generally prefer a neat list view with large text. But for your Pictures folder, it probably makes more sense to set up icon view, so you can see a thumbnail of each photo without having to open it.
That’s the idea here. Open Pictures, change it to icon view, and then turn on Always open in icon view. Now every folder on your Mac is in list view except Pictures.
Note
The wording of this item in the View Options dialog box changes according to the view you’re in at the moment. In a list-view window, for example, it says “Always open in list view.” In a Cover Flow–view window, it says “Always open in Cover Flow.” And so on. But the function is the same: to override the default (master) setting.
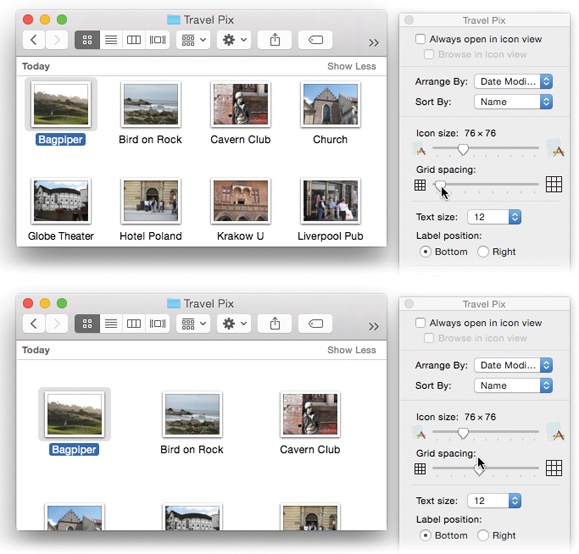
Figure 2-6. Drag the “Grid spacing” slider to specify how tightly packed you want your icons to be. At the minimum setting, they’re so crammed it’s almost ridiculous; you may not even be able to see their full names. But sometimes you don’t really need to. At a more spacious setting (bottom), you get a lot more white space.
This option makes sure that any folders inside the current window open up into icon view, too, even if you’d previously set them to open into some other view. So if you’re looking at your Pictures folder in icon view and you open the Grand Canyon Jaw-Droppers folder inside it, that folder also will be in icon view.
For a discussion of these pop-up menus, see Arrange By and Sort By.
It’s super easy to make all your icons bigger or smaller; just drag the Icon Size slider in the lower-right corner of the window. There’s an identical slider in the View Options window as well.
Listen up, you young whippersnappers! When I was your age, back when computers used Mac OS 9, you could control how closely spaced icons were in a window. Why, if I wanted to see a lot of them without making the window bigger, I could pack ’em in like sardines!
That feature disappeared—for seven years. But back in Mac OS X 10.5, it finally returned. Figure 2-6 shows all.
Your choices range only from 10 to 16 points, and you still can’t choose a different font for your icons’ names. But using this pop-up menu, you can adjust the type size. And for people with especially big or especially small screens—or for people with aging retinas—this feature is much better than nothing.
In fact, you can actually specify a different type size for every window on your machine. (Why would you want to adjust the point size independently in different windows? Well, because you might want smaller type to fit more into a crammed list view without scrolling, while you can afford larger type in less densely populated windows.)
Click either Bottom or Right to indicate where you want an icon’s name to appear, relative to its icon. As shown in Figure 2-7 at bottom, this option lets you create, in effect, a multiple-column list view in a single window.
While you’ve got the View Options palette open, try turning on Show item info. Suddenly you get a new line of information (in tiny blue type) for certain icons, saving you the effort of opening up the folder or file to find out what’s in it. For example:
Folders. The info line lets you know how many icons are inside each without having to open it up. Now you can spot empties at a glance.
Graphics files. Certain other kinds of files may show a helpful info line, too. For example, graphics files display their dimensions in pixels.
Sounds and QuickTime movies. The light-blue bonus line tells you how long the sound or movie takes to play. An MP3 file might say “03′ 08″ ” (3 minutes, 8 seconds).
.zip files. On compressed archives like .zip files, you get to see the archive’s total size on disk (like “48.9 MB”).
This option is what makes icons display their contents, as shown in Figures 2-4, 2-5, and 2-6. If you turn it off, then icons no longer look like miniature versions of their contents (tiny photos, tiny PDF files, and so on). Everything takes on generic icons.
You might prefer this arrangement when, for example, you want to be able to pick out all the PDF files in a window full of mixed document types. Thanks to the matching icons, it’s easy now.
Here’s a luxury that other operating systems can only dream about: You can fill the background of any icon-view window on your Mac with a certain color—or even a photo.
Color coordinating or “wallpapering” certain windows is more than just a gimmick. In fact, it can serve as a timesaving visual cue. Once you’ve gotten used to the fact that your main Documents folder has a sky-blue background, you can look at a screen filled with open windows and pick it out like a sharpshooter. Color-coded Finder windows are also especially easy to distinguish at a glance when you’ve minimized them to the Dock.
Once a window is open, choose View→View Options (⌘-J). The bottom of the resulting dialog box offers three choices, whose results are shown in Figure 2-7.
White. This is the standard option (not shown).
Color. When you click this button, you see a small rectangular button beside the word “Color.” Click it to open the Color Picker, which you can use to choose a new background color for the window. (Unless it’s April Fools’ Day, pick a light color. If you choose a dark one—like black—you won’t be able to make out the lettering of the icons’ names.)
Picture. If you choose this option, a “Drag image here” square appears. Now find a graphics file—one of Apple’s in the Desktop Pictures folder, or one of your own, whatever—and drag it into that “well.”
When you click Select, you see that OS X has superimposed the window’s icons on the photo. As you can see in Figure 2-7, low-contrast or light-background photos work best for legibility.
Incidentally, the Mac has no idea what sizes and shapes your window may assume in its lifetime. Therefore, OS X makes no attempt to scale down a selected photo to fit neatly into the window. If you have a high-res digital camera, therefore, you may see only the upper-left corner of your photo in the window. For better results, use a graphics program to scale the picture down to something smaller than your screen resolution.
This harmless-looking button can actually wreak havoc on your kingdom—or restore order to it—with a single click. It applies the changes you’ve just made in the View Options dialog box to all icon-view windows on your Mac (instead of only the frontmost window).

Figure 2-7. The View Options for an icon-view window let you create colored backgrounds (top) or even use photos as window wallpaper (bottom). Using a photo may have a soothing, comic, or annoying effect—like making the icon names completely unreadable. (Note, by the way, how the icons’ names have been set to appear beside the icons, rather than underneath, in the lower illustration. You now have all the handy, freely draggable convenience of an icon view, along with the more compact vertical spacing of a list view.)
If you set up the frontmost window with a colored background, big icons, small text, and a tight grid, and then you click Use as Defaults, you’ll see that look in every disk or folder window you open.
You’ve been warned.
Fortunately, there are two auxiliary controls that can give you a break from all the sameness.
First, you can set up individual windows to be weirdo exceptions to the rule; see Icon View Options.
Second, you can remove any departures from the default window view—after a round of disappointing experimentation on a particular window, for example—using a secret button. Choose View→Show View Options to open the View Options dialog box. Now hold down the Option key. The Use as Defaults button magically changes to say Restore to Defaults, which means “Abandon all the changes I’ve foolishly made to the look of this window.”
You can wield two different kinds of control over the layout of files in a Finder window: arranging and sorting.
Tip
You can perform all these obsessive reorganizations in any view: icon view, list view, column view, or Cover Flow view. That’s a big change from the olden days.
Arranging files means “Put my files into related clumps, separated by headings that identify them.” You can arrange files in any of the views—icon, list, column, Cover Flow—and there are some incredibly useful options here.
For example, you can arrange your documents into application groups (meaning which program opens each one); now you can see at a glance which files will open in, say, iTunes when you double-click them. Or you can organize your Pictures folder into Date Added groups, with headings like “Today,” “Last 7 Days,” and “Earlier.”
Figure 2-8 shows a few examples.
Tip
In icon view, the icons under each heading appear in a single row, scrolling off endlessly to the right. Use the usual sideways-scrolling gesture to flip through a row. (That is, swipe to the left on a trackpad with two fingers, or with one finger on a Magic Mouse.)
If you’re not into gestures, or if you don’t have a swipeable input device, click the tiny Show All button at the right end of a row. Now you’ve turned off that one-row-per-heading thing, and all the icons under that heading appear in the usual rows and columns; scroll down to see them all.
Apple wants to make extra, extra sure you’re aware of the Arrange commands. It gives you four different ways to find them:
Choose View→Arrange By. Choose one of the criteria from the submenu. Your options are Name (alphabetically); Kind (type of file, like Images, Movies, and Documents); Application (which program opens which documents); Date (Last Opened, Added [to the window], Modified, or Created); Size; or Label (Finder label colors, described on Broken Aliases). Marvel as the Finder puts your files into tidy categorized groups.
Choose from the
 icon. This icon appears in the toolbar of every Finder window. It contains the same options listed in the previous bullet.
Right-click (or two-finger-click) an empty spot in an icon-view window; choose from the Arrange By shortcut menu. Yep, it’s those same commands yet again.
In the View Options palette (seen in Figure 2-6), use the Arrange By pop-up menu. Yes, it’s a fourth place to find the same six options.

Figure 2-8. You can view your Finder-window files in neat little groups, separated by headings. Top left: The Applications window, in icon view, arranged by application category. Middle: The Documents folder, in list view, arranged by application (meaning “which program opens this document”). Bottom: The Desktop folder, in column view, arranged by date added.
Remember, arranging (clumping) is not sorting. You can, in fact, sort the icons differently within each arranged group; read on.
Sorting means just what it says: You can sort your files alphabetically (by Name), chronologically (by Date), in order of hugeness (by Size), and so on. See Figure 2-9.

Figure 2-9. Use either the View menu or the View Options window (right) to turn on permanent cleanliness mode. You’ve told the Mac to keep these icons on the invisible grid, sorted the way you requested. Just don’t get frustrated when you try to drag an icon and then discover that it won’t budge.
You can sort a window whether or not you’ve also arranged (grouped) it. You can even sort by different criteria. For example, you might have the programs in your Applications folder arranged by Application Category but sorted alphabetically within each category.
Once again, Apple gives you four ways to sort:
While pressing the Option key, choose View→Sort By. (Pressing Option turns the Arrange By submenu into the Sort By submenu.) Choose one of the criteria: Name, Size, and so on.
While pressing the Option key, click the
 icon. Once again, the Option key turns the Arrange By options into Sort By options.
Right-click (or two-finger click) an empty spot in an icon-view window. Press the Option key. And again, Option turns the Arrange By options into Sort By options.
In the View Options palette, use the Sort By pop-up menu. Hey, guess what? You didn’t have to press the Option key this time.
Tip
In icon view, you get an additional option: Snap to Grid. It means “Let me drag these icons into any sequence I want, using the trackpad or mouse.” When you release each drag, the icon jumps into the nearest position on the underlying spacing grid (unless you press the ⌘ key, which gives you full manual control of the icon’s position).
This option appears only if Arrange By is set to None. After all, if you’ve asked the Mac to arrange your icons into groups, then you’ve relinquished control of their grid spacing.
Whenever you’ve applied an Arrange or a Sort to an icon view, the icons remain rooted to an invisible underlying rows-and-columns grid. You can’t budge them.
Tip
You can, however, control how tight or loose that grid is, using the Grid spacing slider described on Browse in icon view.
But there are two situations when you’re allowed to drag icons freely into any order you want:
Icons never snap to the grid. If both Arrange By and Sort By are set to None, then you can go nuts, freely dragging icons into sloppy, off-the-grid positions.
If, later, you become overwhelmed by shame at your untidiness, you can choose View→Clean Up (if nothing is selected) or View→Clean Up Selection (if some icons are highlighted). Now all icons in the window, or those you’ve selected, jump to the closest positions on the invisible underlying grid.
These same commands appear in the shortcut menu when you right-click or two-finger click anywhere inside an icon-view window, which is handier if you have a huge monitor.
There’s even a Clean Up By submenu in the View menu and the shortcut menu. These commands don’t just put icons back onto the closest grid positions; they put the icons into their proper sorted positions among the other icons—by name, size, date, and so on.
Icons always snap to the grid. If Arrange By is set to None but Sort By is set to Snap to Grid, then you can drag icons into any order you like (that is, not in any particular sorted order)—but they’ll snap to the grid when you let go of the mouse button.
Tip
If you press the ⌘ key as you release the drag, you can reverse the snapping logic. That is, the icons will snap to the grid if Sort By is set to None, but you can drag them freely if it’s set to Snap to Grid. (Don’t press the key until after you’ve begun to drag.)
Although it doesn’t occur to most Mac fans, you can also apply any of the commands described in this section—Clean Up, Arrange, Sort—to icons lying loose on your desktop. Even though they don’t seem to be in any window at all, you can specify small or large icons, automatic alphabetical arrangement, and so on. Just click the desktop before using the View menu or the View Options dialog box.
Note
There’s only one View Options dialog box. Once it’s open, you can adjust the icon sizes or arrangement options of other windows just by clicking them. Each time you click inside a window, the View Options dialog box remains in front, changing to reflect the settings of the window you just clicked.
Incidentally, you can get rid of the View Options box the same way you summoned it: by pressing ⌘-J.