If you don’t really need the year’s worth of private Mac lessons, then here’s another low-effort option: Let the Windows Migration Assistant do the transferring for you.
Now, this app has a reputation for bugginess. But if it works on your system, it’s a nearly effortless automatic tool that copies all your important data from a Windows PC (running Windows XP SP3 or later) to your Mac. (And if it doesn’t work, Manual Network Transfers offers manual techniques that can do the same job.)
On the Mac, you’ll find the Migration Assistant program in your Applications→Utilities folder. Before you open it, make sure your Mac and your PC are connected to the same network (WiFi or wired), as described in Chapter 16.
Now open Migration Assistant. Choose the first option: “From another Mac, PC, Time Machine backup, or other disk.” Click Continue. (Enter your password if you’re asked for it.)
When all is said and done, here’s what it accomplishes:
Transfers your email into Mail from Outlook, Outlook Express, Windows Mail, or Windows Live accounts (POP or IMAP). Your messages even show up correctly marked as having been read, replied to, and flagged (except if they originated in Windows Live).
Transfers your address book into Contacts from Outlook and Outlook Express contacts, and from Windows contacts in the Contacts folder on your PC.
Transfers your calendar into Calendar from Outlook’s calendar.
Transfers your iTunes collection into iTunes for the Mac from iTunes on Windows. Everything comes over, including music, photos, videos (but not rentals), and apps and games for iPhone/iPad/iPod Touch.
Transfers everything in your Windows Home folder into the corresponding Mac Home-folder folders: Music, Pictures, Desktop, Documents, and Downloads.
Transfers your browser bookmarks and preferred home page into Safari from Explorer, Firefox, and Safari for Windows.
Transfers your account settings like language and even your desktop wallpaper.
All of this winds up in a new user account on your Mac. The migration program doesn’t make any attempt to merge your Windows world into your existing account on the Mac.
Now, the Migration Assistant app (in your Utilities folder) represents only the Mac end of this transaction. You also need the Windows end.
For that, download the free Windows Migration Assistant program. It’s waiting at www.apple.com/migrate-to-mac. Install it on your PC, which is a matter of clicking through three screens. In your Control Panel, turn off Windows Updates.
Now you’re ready to begin.
Make sure the PC and the Mac are on the same network.
It can be a WiFi network, but you’ll get a much faster transfer, with much less risk of interference, if you connect them to a wired network. For example, connect each with an Ethernet cable to your router.
On the PC, open the Windows Migration Assistant program that you downloaded. Click Continue.
The PC is now ready for action.
On the Mac, quit all programs. In your Applications→Utilities folder, open the Migration Assistant program.
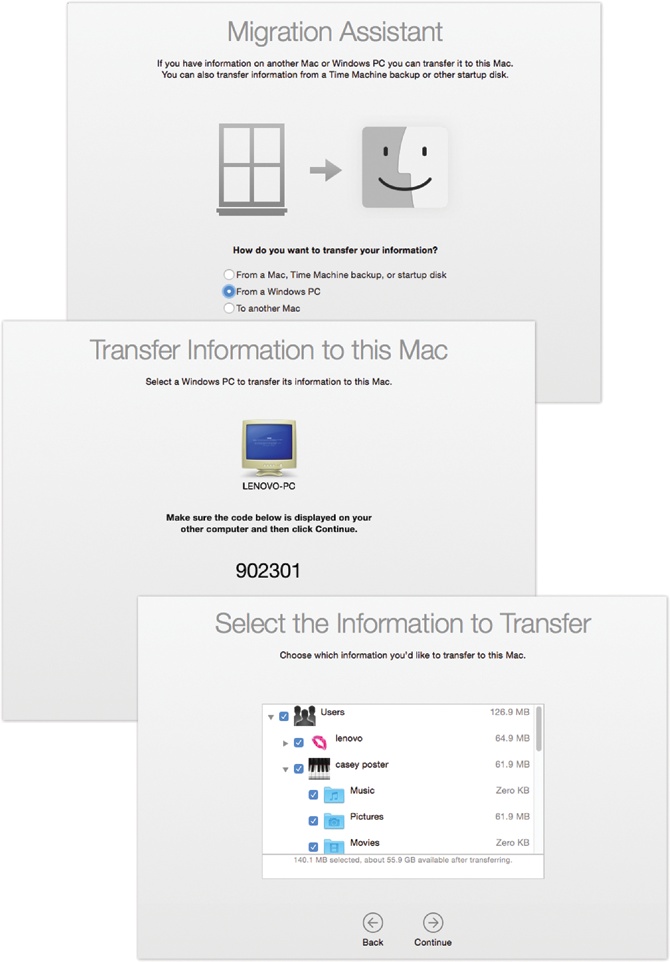
You’re offered two choices: “From another Mac, PC, Time Machine backup, or other disk” and “To another Mac” (see Figure 6-1).
On the Mac, click “From a Windows PC.” Click Continue. Provide your name and password, and click Continue again. Click “From another Mac or PC,” and click Continue.
At this point, your Mac should “see” the PC on the network. You’ll know, because you’ll see the PC’s name and icon in the dialog box shown in Figure 6-1, middle.
Figure 6-1. Here’s the Mac’s view of the Windows Migration Assistant procedure. Top: Tell it you’re transferring data from a PC. Middle: Here’s the passcode that, if you’re lucky, also shows up on the PC’s screen. (You don’t have to type it in anywhere, so it’s not really a passcode.) Bottom: Eventually, you’re asked what stuff you want to transfer. The copying process can take a very long time—hours. The “time remaining” indicator may not be especially accurate.
On the Mac, you see something like Figure 6-1, middle: a big passcode. On the PC, you’re supposed to see a matching passcode.
If you don’t see the passcode on the PC, then something—your firewall, your antivirus program, Migration Assistant flakiness—is getting in the way. You may have to opt for the manual procedures described on Manual Network Transfers.
If you see the passcode on the PC’s screen, then click Continue.
After a few minutes of whirring and thinking, the Mac displays a list of files that it can transfer from the PC (Figure 6-1, bottom).
On the Mac, turn on the checkboxes of the items you want copied. Click Continue to begin the transfer.
If all goes well, after a few hours, the Mac says, “Your information has been transferred successfully.”
On the Mac, click Quit.
If you choose
 Log Out, you’ll see that there’s a new account on your Mac, named after the account you transferred from the PC. If you try to sign into it, you’re asked to provide a password for this new Mac account. (If you didn’t want your Windows stuff to wind up in a new Mac account, then you can always copy it back into your main account using the Users→Shared folder as a tunnel between accounts.)
Tip
The Migration Assistant puts all your mail into Apple’s Mail program, the one described in Chapter 11. If you’d prefer to use Microsoft Outlook for the Mac as your email program, here are the steps for transferring the mail stash from Mail to Outlook: http://j.mp/xtsGwi.