Chapter 3
Managing Your Friends
The main thing about Facebook is its ability to connect you with friends. That is the whole reason that Facebook exists: to provide a place for the gathering of friends, a way for conversations to take place, and a platform for presenting visual aspects of one’s life—photos and videos. In this chapter you will learn how to find friends and to manage them. Chapter 4 deals with the conversation part of Facebook.
FIND AND VIEW FRIENDS
Finding and viewing friends can be one of your most important jobs in Facebook. You need to be friends with someone before you can drop in on them and find out what they are up to. Your friends, and sometimes their friends, are those with whom you will communicate when you share posts or send messages. You will see their postings as well. Consequently, defining what a “friend” is to be in your Facebook site is important to making sure your information is protected and your friends are who you want them to be. See “Understanding the Concept of Friends” QuickFacts.
Understanding the Concept of Friends
When you create a Facebook site, you accumulate friends. Friends are people you know with whom you want to communicate. You can communicate in a number of ways (see Chapter 4):
• You can share a comment with all your friends at once.
• You can share comments with selected friends.
• You can send a private message to one or more friends.
• You can chat online.
When you invite someone to be your friend, a request is sent to them by Facebook. When they confirm that they know you and want to be your friend, they are added to your list of Facebook friends.
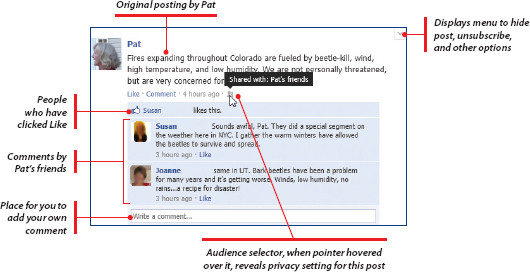
When a friend is added to your list of friends, depending on your privacy settings, he or she has access to your profile and to all the comments, photos, and videos that are posted to your site. Likewise, depending on your friend’s privacy settings, you have access to all of her or his comments, photos, videos, and friends. Your News Feed on your Home page is updated constantly with postings from your friends, such as that shown in Figure 3-1. Your private messages or online chats are not public.
When you first start using Facebook, you can start with a few friends that you know are already on Facebook. You can find names for friends from an existing email contact list, or by searching for friends, or simply typing in their email address and asking to be shown their page.
Figure 3-1: This posting shows how a friend posts a comment and is responded to by others.
 Find Friends Using Email Contacts
When you download contacts from your email provider, Facebook stores them all, even those you do not select to be friends. Facebook uses them to suggest names to you or others later. Facebook does not share these names with others, and it does not actually invite anyone on the imported list unless you say to do so, but it keeps them stored. Although Facebook likes to have these downloaded names handy to make things easier to find friends, you don’t have to accommodate this if it makes you uncomfortable. You can delete them, as you’ll see later.
To find friends using the Friend page:
1. From your Home page, click Find Friends in the left column under Favorites (notice that neither clicking Friends on the Timeline nor clicking Find Friends on the menu bar gives you the same result).
2. Under Add Personal Contacts As Friends, choose the email provider—for example, Windows Live Hotmail (see Figure 3-2)—that contains the contact list you want. After getting the names from one servicer, you can select additional ones if you use several email providers (such as Yahoo!), or you can include an email provider not listed (for example, Google’s Gmail) by clicking Other Email Service. Click Other Tools to use means other than email lists to find friends.
Figure 3-2: The Friend page enables you to import your contacts from web-based email providers.
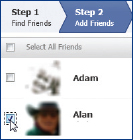
3. Enter your email address and, if needed, a password and click Find Friends. A list of potential names with thumbnail images will be listed. It is highly likely that you don’t want all names on your email list to be friends.
4. Click just the check boxes next to the thumbnails that you want.
5. When you have selected all that you want, click Add As Friends. You will see a message that all selected names have been sent an invitation from you to be a friend.
6. You may also see a list of people who are in your contact list, but are not on Facebook. Since all are selected by default, click Select All/None to deselect everyone.
7. If you know a listed person who might like to be on Facebook, click the thumbnail next to the name and click Send Invites. Invitations to join Facebook will be sent to the selected people. Otherwise, click Skip to void this way of inviting your friends.
Manage Your Imported Contacts
Facebook stores all your imported contacts, but you can delete selected contacts or all of them.
1. From your Home page, click Find Friends in the left column.
2. At the top of the Add Personal Contacts As Friends list, click Manage Imported Contacts. A list of your outstanding invitations and imported contacts will be displayed.
3. You have these options:
• To delete all imported contacts that have not been invited, under Contacts Imported (Not Yet Invited), click the Select down arrow, and click All. Then click Delete Selected.
• To delete selected imported contacts, click in the check box beside those you want deleted, and click Delete Selected.
| CAUTION! Facebook warns you about deleting all your imported names. They use the names to make your suggested friends more relevant, and this list is synced to your iPhone contact list. Your iPhone will no longer include these contacts (although if your friends include the email addresses in their profile, you’ll still see the contact information). If you go ahead and delete your imported names, you’ll need to open Facebook on your iPhone, click the Friends icon, and click Sync.
|
Invite People Facebook Suggests
Facebook automatically provides suggestions for people you might want to consider as a friend based on your current friends, work, schools, or other networks. You’ll see suggestions in several places. Also, you may want to suggest a friend to someone else. Often, the more established Facebook users suggest newbies to other Facebook users to help a novice get going. It is a friendly thing to do. (However, you may find that you do not want to confirm someone suggested to be your friend and don’t want to see them in the future. In that case, you can block them, as you’ll see later.) When the invitation is sent to be your friend, the invitee must confirm they also want to be your friend or the “friendship” will not happen.
1. From your Facebook Home page, click Find Friends in the left column.
2. On the Friends page, scroll down to the People You May Know list. Click See All on the upper-right area of the list of thumbnails to see all candidates.
3. If you find someone you want as a friend, click Add Friend. A request will be immediately sent. As soon as your new friend confirms your request, you are officially friends.
Respond to a Friend’s Request
You will receive requests from friends to be a friend. You must give your permission before a person can claim you as a friend. When you become friends, you can view each other’s Facebook pages.
Normally, you will see both a notice in your Friend Requests list and an email notifying you that you have a request to be a friend. Whether you get an email depends on your notification settings. By default, the request is sent via email, provided you haven’t reset this.
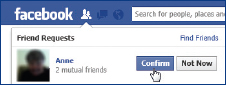
1. From any page click Friend Requests in the menu bar.
2. To immediately confirm that you want to be a friend, simply click Confirm. The notice will be sent to the sender and you will have a new friend.
3. If you’re not sure, click Not Now to hide the request. You will be asked if you know the person. Click No to stop requests from this person; click Yes to hide it only. You may also have an Ignore option. Click Ignore to have the person still visible, but inactive. To add this person later, click the name and then click Add Friend from his or her Timeline.
Suggest One Friend to Another
You can suggest someone as a friend to one of your friends. Invitations will be sent to both people and either one can confirm the other as a friend. To suggest someone as a friend to another person:
1. In your list of friends, click the photo of the friend to receive the suggestion.
2. Beneath the menu bar, to the right of the Friends and Message buttons, click the gear icon down arrow and then click Suggest Friends. A list of your friends will be displayed.
3. In the resulting list, click the friends you want to suggest. You can select more than one.
• You can type their name in the Find Friends text box.
• You can scroll through your list of friends.
• You can click Filter Friends and click a network that shows just friends connected with that criterion.
4. Click Send Suggestions. Both friends will receive an invitation to be a friend.
Respond to Suggestions from Other Friends
When you are new to Facebook, you likely will be sent suggestions from other friends. They may be helping you to get established on Facebook and suggest friends to help your experience be more robust.
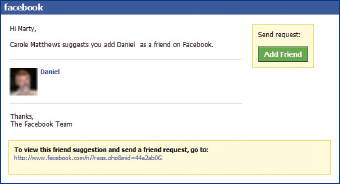
1. You may first receive an email alerting you to the request that you have received. Click the link in the email to go directly to the request.
2. If you want to be friends with the suggested person, click Add As Friend. If not, click Ignore. If you decide that you want to proceed, you will need to confirm the invitation that will be sent to the requested friend. If you are not sure at the moment or you decide not to be a friend with the suggested person, nothing will happen.
| Note If you delete or ignore a request to be a friend, the requestor will not find out. The request will simply be removed from your list of friendships waiting to be confirmed.
|
Marilyn Connects from Afar
My first Facebook friend request came by email three years ago when we were vacationing in Croatia, so I signed up. Since we were there, my account said my language was Hrvatski (Croatian), which amused us. Eventually, I changed it to English. Since then I have loved keeping tabs through Facebook with many friends living or visiting abroad.
At first I was unaware of privacy settings, but wasn’t concerned since I haven’t put much info on my Page. Now, I allow Friends Only to access my information (I think).
Photos are an interesting part of my Facebook interactions, especially of kids. I only have posted two photos, and I am uncomfortable uploading photos of my grandkids—just to be safe. I rarely search for friends; I only respond to requests from others. Among my friends are family members from other parts of the country, and I appreciate knowing what is going on with them. Many of my friends are politically active, and they share information that I particularly enjoy. Usually I check my Wall once a day; otherwise, it gets overloaded if I wait too long. Facebook isn’t something critical to my life, but is an interesting distraction.
Marilyn, 62, New Mexico
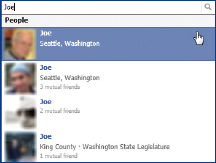
Use Search to Find a Friend’s Facebook Page
You can use the Search feature in Facebook to find friends.
1. On any page, click in the Search text box on the menu bar; type a name, location, school, or other criteria; and click the Search icon (the magnifying glass). As you type, a list of matching possibilities will be displayed.
• If you want to see more results, click See More Results For at the bottom of the list.
• To display the desired result, click the thumbnail image or name.
| Tip If you are finding it tough to find a person by name, try using an email address.
|
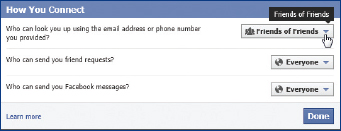
Set Search Privacy
If you want to restrict who may see you in a search, you can specify the category of people that are allowed to find you in a search.
1. On any page, click the down arrow to the right of Home on the menu bar. Click Privacy Settings.
2. To the right of How You Connect, click Edit Settings. A menu is displayed.
3. Select the category of friends that you want to be able to find you in a search: everyone, friends of your friends, or just your own friends.
4. Click Done when you’ve chosen. If you restrict the search to those who are already your friends or friends of friends, you will be invisible to others searching for you.
Search Friends by Location, School, Work, or Interest
You can search for friends filtered by location, one of your schools, a mutual friend, or an employer.
1. From any Facebook page, click Find Friends in the menu bar.
2. Click the check box containing the value you want, or enter another value, such as another city for the Hometown field or another high school for the High School field. A menu will display the possible candidates—click the one you want. A list of your friends and friends of friends matching those criteria is displayed.
3. Scroll through the list and click Add Friend for those people you want as friends.
| Tip To use the Search text box, first click in the text box and then type the name you want. As you type, a list matching your search criteria will be displayed. Click the name you want. Using the email address works best if the friend is not in your friend list.
|
Find Friends of Friends
One of your best sources of friends is the friends of friends.
1. On your Timeline page, click Friends beneath your name. A list of friends will be displayed.
2. Click the thumbnail of a friend who has friends you know and would like to invite to be your own friend. Depending on whether your friend has Timeline installed, you’ll see their Timeline (friends link below their name) or Wall (friends listed down the left column with the link on top).
3. Click whichever Friends (no.) link is available in order to display the entire list of friends. Hover your pointer over a person’s name to see more information about them.
4. Scroll through the list, click the photo of the person, and click Add As Friend for those persons you’d like to invite to be your friend. You’ll be shown a menu of categories to add the friend to. Click the one you want.
5. You’ll see the button change to “Friend Request Sent.”
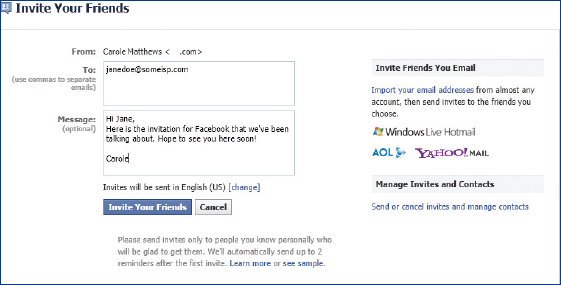
Invite Someone Not on Facebook by Email
You may have friends who are not on Facebook but you know would love it. In that case, you can directly invite a friend to join Facebook and then become your friend.
1. From your Home page, click Find Friends on the leftmost column.
2. Scroll down within Add Personal Contacts As Friends, and click Other Tools | Invite A Friend By Email. The Invite Your Friends dialog box will open as shown in Figure 3-3.
Figure 3-3: You can send an invitation to someone not yet on Facebook.
3. Click the To text box to select it, and type the email address of the friend you want to invite. Then click the Message text box and type your message.
4. Click Invite Your Friends. The invitation will be sent.
Manage Your Invites
To keep track of who you have invited and delete those who are not responding:
1. From your Home page, click Find Friends on the left column.
2. At the top of the Add Personal Contacts As Friends list, click Manage Imported Contacts. A list of your outstanding invitations will be displayed.
3. You have these options:
• To delete someone you have already invited who has not yet responded, click the check box and click Delete Selected.
• To send someone you have invited a reminder about your invitation, click the check box and click Send Reminder.
View All Your Friends to Find One
To see a list of all your friends or friends of friends and find a specific one:
1. Beneath your name on the Timeline page, click Friends.
2. You have these options:
• To quickly find a particular friend, click in the Search text box and type the name. As you type, your Friend list will be searched and the appropriate candidates listed. Click the one you want.
• To search by city, hometown, school, workplace, interest, or friend of friend, click the down arrow on the Search text box. Click the criteria you want. A search page will open with a text box for your criteria. Type the criteria you want, such as the city name. Another menu of possible candidates will be displayed, such as names of cities and states. Click the menu for the exact criteria. The matching friends or friends of friends will be displayed. Click the one you want.
MANAGE YOUR FRIENDS
Once you have accumulated your friends, you’ll want to know how to organize and manage them. You can put them in lists, track what they are up to, hide their posts or delete them, delete friends, and control what you see from them.
Controlling Your News Feed Content
You have several ways that you can control what pops up on your News Feed and Ticker sidebar from your friends. Here is summary of the potential actions you can take:
• Sort What Appears Click the Sort menu at the top of the News Feed and select between Most Recent and Top Stories. This prioritizes your News Feed between what is happening right now and what might be the most interesting to you based on your past preferences (see Chapter 2 for more information).
• Organize by List Lets you see posts from people only on a list. So you can see just the stories from your family, or your investing club, or so on. This allows you to follow the thread of a conversation, or see what one particular set of friends are now up to. (See “Organize Your Friends with Lists.”)
• Hide a Person’s Posts or Type Often you’ll have a friend whose posts are not to your taste. One example is that some friends will be addicted to games and share about them, and other friends don’t appreciate them at all. You can hide all posts from that friend, or the app or game he or she subscribes to. (See “Hide, Unhide, or Unsubscribe Posts.”) Hiding something can always be undone.
• Turn Off Posts for Your News Feed You can control whether a friend’s posts show up in your News Feed by toggling Show In News Feeds on and off from the person’s Friends button on their Profile page. (See “View a Regular Profile Page” or “View a Friend’s Timeline Page.”)
• Select Which Kind of Posts You’ll See You can control what types of posts you’ll see in your News Feed from a friend; for instance, live event happenings, games, photos, comments or likes, music and videos, and other activity. So if you want to stay connected with a friend but don’t want the games, you can choose that (see “Set What You See from a Friend”).
Understanding Types of Lists
There are several kinds of lists created either by you or by Facebook:
• Default lists Facebook creates these lists. These are Close Friends, those friends you want to closely track; Acquaintances, more distant friends you don’t want to see on your News Feed all that often or to track closely; and Restricted, friends who will only see your public posts (public posts are shown to anyone, even people who are not your Facebook friends).
• Smart lists Facebook creates these automatically from common traits you share with many friends, such as for the city you live in, or your hometown, where you have many friends, or a hobby. Family is an example of a smart list. These lists are automatically updated when you add a friend that matches the trait.
• Custom lists You can create these lists to track friends or to send posts selectively. Examples are a club to which you belong, family members, and so on.
• Friends list This is simply the list of all your friends—they are automatically added to it because they are confirmed friends. You can use it to find names to add to other lists.
Organize Your Friends with Lists
You can organize your friends into lists and track people separately by list. When you add a friend, you have the option of adding them to a group. This is particularly useful if you have a large number of friends from different parts of your life—for example, friends from high school, college, work, investment club, political party, and so on. Grouping your friends into lists has these advantages:
• You can prioritize posts that you see on your Wall, for instance, seeing those of close friends and family or not seeing those of more distant acquaintances.
• You can share messages with a list of friends rather than individually or all. This way, you keep your communications relevant to a group.
• You can vary your privacy by list so that friends in one list may have more restricted access than another list.
| Note Your lists of friends are not visible to others. Only you can see them or know about them. The only exception is the Family list. In that case, when you add a family member to your Family list, a notice is sent to him or her to invite them to add you to their Family profile.
|
Create a List of Your Friends
To create a custom list:
1. On your Home page, scroll down to the Friends group on the left column. You may need to click More to see it.
2. Click More again to see all the lists that currently exist on your Facebook site. They will be displayed in your center column.
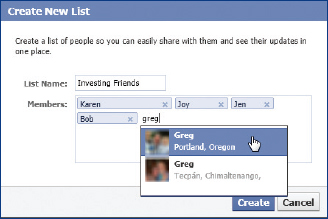
3. Click Create List on the top of the center column. The Create New List dialog box is displayed.
4. In the text box, type the list name.
5. In the Members text box, begin typing the names of the friends you’d like to add. As you type, a list of candidates will be displayed, as shown in Figure 3-4. Click the one you want, and repeat until you’ve added all the friends you want to the list.
Figure 3-4: You can group your friends into lists of common characteristics, such as those from your hometown, your church, or reading club.
6. Click Create. The new list is added to the Friends lists.
Add Friends to a List
You can add friends to a list as you invite them to be your friend, or afterward. Sometimes you’ll create a new list and want to add friends to it after the fact. To add or delete friends on a list, you must first display the list and then make your changes.
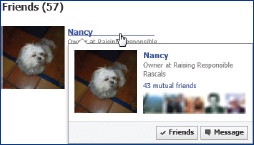
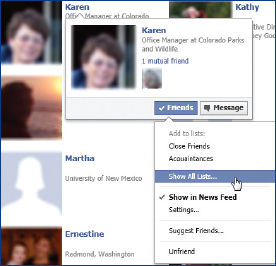
1. Find the thumbnail image of the person you want to add to a list. You can either click Find Friends | Manage Friends List from the Home page, or click Friends from the Timeline.
2. Hover your pointer over the name of the person until a profile box appears.
3. Hover your pointer over the Friends button. A list of lists is displayed, shown in Figure 3-5.
Figure 3-5: You can easily add a friend to a list, change their posting status, or “unfriend” them.
4. Click the list you want, or click Show All Lists for a longer list of lists.
–Or–
1. From your Home page, scroll down to the Friends list and click the name of the list. This displays the posts of people on the list in the middle column.
2. On the right column, beneath On This List, click in the text box and type the name of the person you want to add to the group. As you type, candidates will be displayed. Click the name you want.
Delete Friends from a List
To delete a friend from a list:
1. On the Home page scroll down to the Friends lists, and click the name of the list containing the friend you want to delete.
2. On the right column, to the right of On This List, click See All.
3. Find the friend on the list you want to delete, hover your pointer over the thumbnail image, and click Delete. The name is not deleted as one of your friends, only as someone belonging to the list being displayed. If you make an error, they can quickly be added back using the previous section.
4. Then click Finish to restore the list view.
Manage Your Friends List
Your Friends list is simply the list of all your friends. This is another way to find and add people to a list.
1. From your Home page, click Find Friends in the left column. The Friends page is displayed.
2. Click Manage Friend List in the upper-right corner of the center column.
3. Hover your pointer over the name of the person until a profile box appears.
4. Hover your pointer over the Friends button. A list of lists is displayed, shown earlier in Figure 3-5.
5. Click the list you want, or click Show All Lists for a longer list of lists.
Control Who Sees Your Friends List
1. From your Home page, click Find Friends in the left column. The Friends page is displayed.
2. Click Manage Friend List in the upper-right corner of the center column.
3. Click Edit in the upper-right corner of the center column.
4. Click who will be able to see your Friends list: everyone, only friends, only yourself, or a custom setting—for example, friends of friends, or only people on a list.
View Posts from Friends on a List
To view postings from friends on a specific list, display the Home page. On the left column, find and click the list name under Friends (you may have to click More to see the list you want). When you click the list name, the postings from people on that list are displayed in the center column.
Delete a List
Deleting a list does not delete the people on the list. It simply removes that way of viewing your friends’ postings or communicating with them.
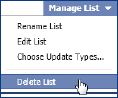
1. From the Home page, scroll down to the Friends lists, and click the name of the list you want (you may have to click More to see it).
2. Click Manage List on the upper right to display a menu.
3. Click Delete List.
Post to a List
When you post a comment, video, or photo, you can direct it to be shown only on selected friends’ Walls by selecting a list.
1. On your Home page or Timeline, click in the Status text box and type your comment.
2. Click the Friends button and click a list name. (Click See All Lists if the one you want is not displayed on the menu.)
Evelyn Tracks Family
I started on Facebook when I realized that everybody is on Facebook and I could see what my grandchildren are up to! Now my two sisters and I, as well as many of our children and grandchildren, use Facebook fairly frequently, sometimes several times a day, to, in effect, just say “Hi!”
I really enjoy the pictures that people post and to see pictures of kids that don’t live nearby. Of course, I love seeing my own grandchildren’s pictures as they perform or play sports. Mostly we comment on what is happening in the world, what we think of the weather or current news, or what one or the other of us or our friends has posted. None of it is terribly important—we still do have phones for that—but it is a great way to stay in touch and let each other know what we’re thinking about and doing. It is a great way to just acknowledge that we are thinking about each other.
Evelyn Y., 65, New Jersey
View a Friend’s Page
The Timeline page is what you see when you go to a friend’s page. Depending on the friend, you’ll see a variety of creative and interesting sites, each helping you to touch into the personality and interests of the person you are viewing. Some people spend a lot of time on their Facebook pages, and others are just barely present. It’s all good!
View a Friend’s Timeline Page
Figure 3-6 shows an example of an updated Timeline page. To find out what is happening on a friend’s Timeline:
Figure 3-6: A Timeline page shows a more visual presentation of your personal interactions with Friends.
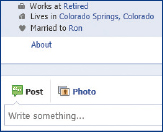
1. Click the friend’s thumbnail photo to see their Facebook page. You will see your friend’s Timeline with their basic profile beneath their photo and a divided center column of photos, friends, and activities beneath, with a Timeline on the right column. You have these options:
• Click About beneath the profile photo and info to see detailed profile information.
• Click and type in the Write Something text box on the left, and click Post to leave a message for the friend that is seen by all who visit her or his site.
• Click Photo to upload a photo or video on your friend’s Timeline, or use the webcam.
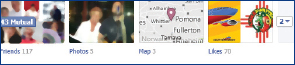
• Beneath the friend’s name, you can click Friends to see the list of friends, Photos to see all the photos they have added to their site, Map to see where they have been, and Likes to see what pages or ads they support (this friend likes 70 sites).
• Click the Friends button above the Likes link to display a menu where you can add the friend to a list, control whether you see their posts in your News Feed, suggest friends to them, or unfriend them.
• Click Message to the right of Friends to send a private message to the friend.
• Click the gear icon down arrow for a menu. You can add this friend to an Interest list, see all the communications you have in common with this one, “poke” your friend, suggest friends to them, report them for illegal activities, or block them from your site. (See Chapter 4 for more information on these features.)
2. To return to your own site, simply click your name for your Timeline, or Home in the menu bar.
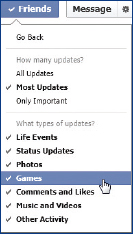
Set What You See from a Friend
You can distinguish between the many kinds of posts that a friend may send you. For instance, perhaps you have a close friend that you really want to track on Facebook, except for the games they play. You can choose to see everything except games.
1. Click the friends thumbnail photo to see their Facebook page. You will see your friends Timeline with their basic profile beneath their photo.
2. To the right of their name, click Friends | Settings.
3. Beneath What Type of Updates, click to clear any check marks beside the type of post you want to repress, such as Games. A check mark means you will see it on your News Feed; no check mark means you will not see it.
Hide, Unhide, or Unsubscribe Posts
Sometimes you’ll find a friend or an application that shares or posts too much. Perhaps the information is just something you don’t want on your Facebook page. Some people, for instance, do not play games and get a lot of postings about games, or during the political season, a lot of unsolicited opinions clog the Facebook space. You can hide or unsubscribe from one or a group of postings by a friend or application.
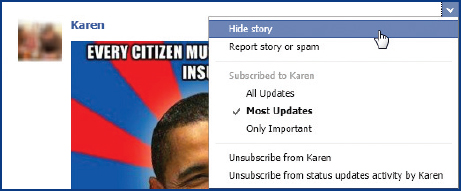
Hide or Unsubscribe Posts
On your Home page, in the News Feed stream, mouse over the posting that you want to hide or unsubscribe from. Click the down arrow that appears. You have these options (some may not be displayed if they do not apply to the post):
• Hide Story Hides the individual post from your News Feed.
• Report Story Or Spam Removes the post and reports it as illegal, offensive, or spam. (Reporting a post doesn’t mean that it will be removed from Facebook, since while the post may be offensive to you, it may be okay within the guidelines of Facebook.)
• Subscribed To name of person Allows you to control what level of posts you want to see: all posts, most of them, or only the “important” posts.
• Unsubscribe From name of person Hides this post and all future posts from this person or app.
• Unsubscribe From Status Updates Activity By name of person Prevents this post and all future posts from this person or app from being shown (only appears in the post if it is from an application, including games).
| Tip If you receive text messages that someone has updated their Facebook status and you would like these to stop, just reply with the word “unsubscribe” the next time you receive a post about that person. You’ll get a confirmation telling you that the unsubscribed status is successful.
|
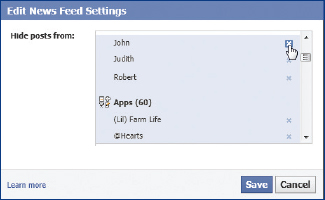
Unhide Posts from Friends
1. On the Home page, mouse over News Feed in the left column. A Pencil icon will appear (click the pencil and a menu option will appear).
2. Click Edit Settings. An Edit News Feed Settings dialog box will open listing all the friends and apps from whom you are hiding or unsubscribing.
3. Next to the friend’s name, app, or page you’d like to reinstate, click the X to remove it from the block list.
4. Click Save to complete the process.
Block or Unblock Someone from Your Site
If you have a friend that you must block from your site—perhaps they are posting insulting or politically incorrect statements—you can do so. Once a person is blocked, they will no longer be your friend or be able to post on your site. One exception: You can still interact with them in common games and applications. This is a confidential action—the blocked person will not know that he or she has been blocked.
Block a Person from Your Site
1. Click the down arrow to the right of Home on the menu bar, and then click Privacy Settings.
2. Scroll down and to the right of Blocked People And Apps, click Manage Settings.
3. In the Block Users area, either type the name of the person in the Name text box, or type the email address in the Email text box, and then click Block.
4. You’ll be shown a list of people with common names. Click Block by the name you want to block.
Unblock a Blocked Person
1. Click the down arrow to the right of Home on the menu bar, and then click Privacy Settings.
2. Scroll down, and to the right of Blocked People And Apps, click Manage Settings.
3. Beneath the Block Users area, the names of blocked persons will be listed. Click Unblock next to the name you want.
Delete a Friend Request Not Yet Confirmed
You may find that you want to retract an invitation to someone to be your friend that has not been responded to. You’ll want to wait long enough for the friend to respond to your invitation. But if time goes by and the person still does not respond, you may decide to withdraw it.
1. In the Search text box, type the name of the invited person. You’ll be shown a list of persons matching your criteria.
2. Click the thumbnail of the person you want. On the upper right will be a Friend Request Sent button.
3. Beneath their profile photo, click Cancel Request | Confirm.
4. To return to your own page, click the Facebook logo or Home.
Your invitation will no longer be displayed on their site.
| Note If you are wondering what has happened to an invitation to be friends that you remember sending to someone, you can tell your friend status by going to the person’s page and looking at the button on the upper right of the page. If it is Friends, you know you are already a confirmed friend; if it is Friend Request Sent, an invitation has been sent but not confirmed; and if it is Add Friend, you are not friends and have no invitation outstanding.
|
Control Which Friends See You
When you create a posting, you can determine who will see it. You can either hide a posting from specific people, including a list you’ve created, or you can make it visible to them.
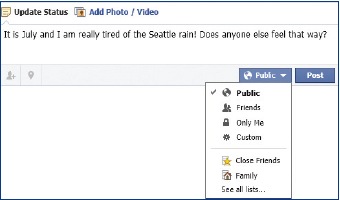
1. Click in the What’s On Your Mind text box on the top of the center column of your Home page, and type your comments. When you click the text box, the default audience setting (Public usually) will appear along with the Share command.
2. Click the Audience Selector down arrow, and a menu will open.
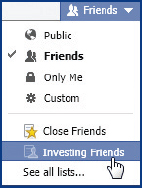
3. Click the degree of privacy you want:
• Public Anyone can see it
• Friends Only your confirmed friends can see it
• Friends Except Acquaintances Only friends who are not merely acquaintances
• Only Me For your eyes only
• Custom More choices are displayed
• Named List Only friends assigned to a list can see this post
Make a Post Visible or Hidden to Specific People
When you specify that a post is visible to specific people, it will be invisible to everyone else, as defined by your privacy settings. If you specify a post to be hidden, it will be visible to everyone else.
1. Click in the What’s On Your Mind text box on the top of the center column of your Home page, and type your comments. When you click the text box, the default audience setting (Public usually) will appear along with the Share command.
2. Click the Audience Selector down arrow, and a menu will open.
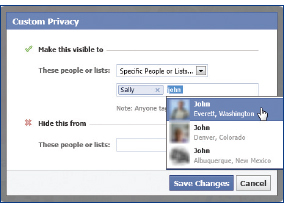
3. Click Custom. The Custom Privacy dialog box will open, as shown in Figure 3-7.
Figure 3-7: Using the Custom Privacy feature, you can make a post visible or hidden only to specific individuals.
4. To make the post visible only to specific friends, under Make This Visible To, click the These People Or Lists down arrow, and click Specific People Or Lists. Click in the blank text box and begin to type the name of a friend or list. As you type a list of names will be displayed. Click the ones you want included. Repeat this sequence.
5. To make the post hidden only to specific friends, under Hide This From, click the These People Or Lists down arrow, and click Specific People Or Lists. Click in the blank text box and begin to type the name of a friend or list. As you type a list of names will be displayed. Click the ones you want excluded. Repeat as needed.
6. Click Save Changes.
SET UP AN EVENT
You can create an event and invite your friends. The event can be a private affair or a public one. It can be a casual social party or a more formal business gathering. Once you have created the event and invited people, you can then track RSVPs.
Create an Event
To create an event:
1. On your Home page, click Events beneath your profile photo. The center column will display existing events you’ve created or been invited to.
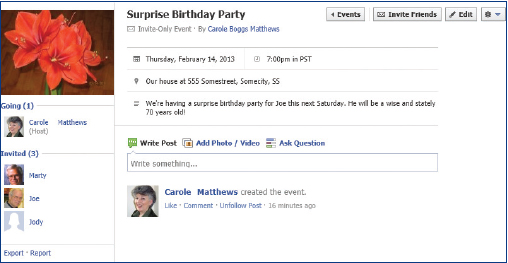
2. On the top of the center column, click Create Event. A Create Event page is displayed. You can see an example of a completed one in Figure 3-8.
Figure 3-8: Setting up an event is easy and allows you to manage inviting and tracking RSVPs.
3. Set the parameters of the event:
• In the Name text box, type a name for the event.
• Click the Details text box and type a description of the event in more detail.
• Click the Where text box to set the location or other identifying information.
• Click the When calendar and find the date you want.
• Click the Time down arrow and set the time.
• Click End Time to be able to set a date and time that the event will end.
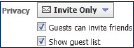
• Click Privacy Setting and select the recipients of the invitation. You can choose Public, where everyone sees the invitation; Friends, where the invitation goes out to your friends; or Invite Only, where you invite specific friends.
• Click Invite Friends to choose your guests. The Invite Friends dialog box will appear. Put a check mark next to each name you want to invite. Click Save. (See “Invite Your Friends” for additional information on this dialog box.)
• If you have chosen Invite Only, you will see two additional options. Clear the check marks to deselect whether the guests can invite additional friends and whether the guest list is displayed on the Events page.
4. Click Create to make it final.
5. On the invitation page, you can add a photo or video to make it more attractive. You can ask a question to poll those invited, and you can update the invitation with ongoing posts on the Events page itself.
Invite Your Friends
After you’ve created an event, you can invite additional friends.
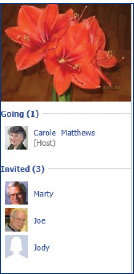
1. Click Events on the Home page to view the events. If you have more than one event, scroll to the event you want and click it. The Events page will open. On the left you’ll see those you’ve previously invited and those who have accepted so far.
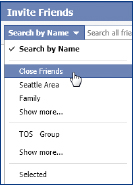
2. On the upper right of the page, click Invite Friends. The Invite Friends dialog box is displayed, as seen in Figure 3-9.
Figure 3-9: Inviting friends to an event is as easy as can be.
3. In the Search box, type the invitee names, and a list of matching friends is displayed. Then click the names of the friends you want to invite, and then click Save.
–Or–
Scroll down the list of names and place a check mark by those you wish to invite. Click Save to save the selections.
–Or–
Click the Search By Name down arrow and choose a list name or group name. You may have to click Show More to find the list or group you want. Place a check mark by the names of those you want to invite. Click Save.
4. Click the down arrow and choose Selected to review all the friends on your invitation list.
5. When you click Save, the invitations are sent.
Respond to an Event Invitation
To respond to an event invitation:
1. On your Home page, click Events on the left to view the list of events to which you are invited or have created. If you have more than one event listed, click the event you want to see.
2. In the upper right of the page, click Join, Maybe, Or Decline. The RSVP To This Event dialog box will be displayed. Your name will be placed in the appropriate slot: Going, Maybe, or Declined.
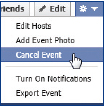
Cancel Your Event
To cancel an event that no longer seems like a good idea:
1. From your Home page, click Events in the left column to see your event. Click the event name that you want to cancel.
2. On the Events page, click the gear icon down arrow and click Cancel Event. You will be asked to confirm you really want to cancel this event. When you respond Yes, all information is lost.