Chapter 2
Customizing Your Facebook Site
One of the fun things about Facebook is having your own webpages. When you open an account on Facebook, you are given your own webpage, which you can customize to a limited degree according to your own desires. This chapter takes a look at the standard Facebook pages, and then leads you through setting some preferences. If you find that you are confused about what pages are used for what, you can’t find what you’re looking for, or you are hesitant about which information to reveal or keep hidden, this chapter will make your Facebook life easier.
EXPLORE YOUR FACEBOOK PAGES
Once you have entered some data, invited friends, and set yourself up in Facebook, the Welcome page shown in Chapter 1 will go away. The remaining set of pages allow you to “do the business” of Facebook, such as the Home page shown in Figure 2-1. You’ll see that there are five primary pages for you to understand:
Figure 2-1: When your screen is maximized, you’ll see a Ticker/Chat column in the Home and Timeline pages.
• Home Displays your News Feed and gives you access to Facebook’s many links. No one else can see this but you.
• Timeline Displays your personal profile information, your Wall (where personal comments are shared), your friends, and photos. Your friends will see this.
• Find Friends Offers several ways for you to invite new friends.
• Account Settings Includes a menu of options that allow you to, for instance, change your general account information and set account preferences.
• Security Settings Allows you to set security for your Facebook information.
These pages contain many common links and bits of information, but they are specialized for particular uses.
| Note Timeline has replaced the older Profile page (see “Work with an Alternate Profile Page”). This book assumes you are using Timeline. However, you may be one of the people who have not converted to Timeline. If this is the case, you’ll find Tips throughout the book directing you to the features using the Profile page. It is recommended, however, that you convert to Timeline. Once you’re used to it, you’ll find it more intuitive and visually interesting to use.
|
 Understand Your Home Page
When you want to know what’s going on in your friends’ worlds, go Home! Your Home page is known primarily as the place where your News Feed is displayed. A News Feed is the flow of information your friends are choosing to share. It is also a place where you can create and post your own comments (as is your Timeline page). You can reach other pages in Facebook from the Home page—it is your starting place. The page itself is divided into three or four columns with a menu bar at the top.
Understand Screen Sizing
The first thing to be aware of is that the contents of the window change depending on the size of your window. For instance, if your Home page is “maximized” (when your window fills the screen and the Maximize status is active in the upper right of your window), you’ll see four columns, as shown in Figure 2-1. The fourth column is a sidebar containing the ticker or activity of your friends and a list of friends currently online and available to chat. However, if your window is “not maximized” (where your window is smaller than the screen and the Restore status is active), you’ll see three columns, shown in Figure 2-2.
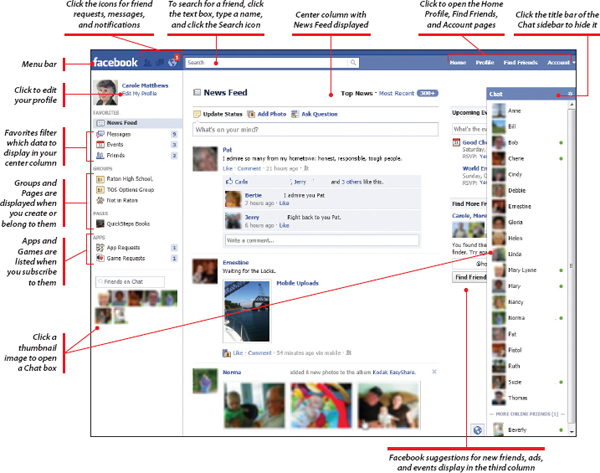
Figure 2-2: The Home page displays your News Feed and links to other Facebook pages.
To confuse things further, if the window is not maximized, the columns rearrange themselves. For instance, the Ticker is now crammed into the third column and the Chat list is in the left column. This book assumes the “not maximized” version for most of the discussion, without the sidebar.
Display the News Feed on Your Home Page
You can get to your Home page from anywhere in Facebook by clicking Home in the upper-right menu bar or by clicking the Facebook logo on the left of the menu bar. If your News Feed is not showing, click News Feed beneath your profile photo.
View the Home Page Menu Bar
Here are some of your options along the menu bar:
• Facebook The logo in the upper-left corner is displayed on all pages. Click it to return to the Home page.
• Friend Requests This is where you can see outstanding requests from others to be your friend. Just click the name and a request dialog box will appear. You can also click Find Friends on the left column of the Home page for the Find Friends page. Chapter 3 discusses managing your friends in more detail.
• Messages Lists private messages you have had with others. You can click a message to see it in its entirety. You can also click Send A New Message in the dialog box to send your own message to someone else. You’ll find more on sending messages in Chapter 4.
• Notifications Lists friends who have commented on or in some way interacted with one of your postings or status changes. You can see how to set notifications later in this chapter.
• Search Allows you to search Facebook for friends or groups. Just click in the text box, type a name or email address, and a list of matching friends is displayed as you type. The search results are displayed below the text box.
• Your Name Displays your Timeline/Profile page, which is the page others see when they click your name. You can share your own thoughts here as well as on the Home page.
• Find Friends This command leads you through finding and inviting others to be your friend. After you are established, this command displays likely candidates to be your friends that are friends of your friends, went to your school, or work in the same company. You are told the number of your friends who are friends with the suggested person.
• Home Displays the Home page. This is where you see what your friends have shared. You can communicate with them here, sharing your own thoughts or commenting on a friend’s posting, clicking “like,” or linking to others in a variety of ways.
• Down arrow icon Displays a menu of options relating to your Facebook account. For example, you can establish advertisements, establish settings for your account and privacy, access the Help Center, and log out.
Filter Views, Navigate, and Chat with the Left Column
You can change your Home page’s center column, navigate to other pages, and chat online by clicking an option in the left column. In addition, you can see a number of items contained within the option; for example, on my Messages option there are nine messages.
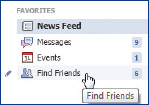
• Favorites The Favorites options immediately below the profile picture are Favorites filters that change the contents of the center column. For instance:
• News Feed Displays the stream of posts from friends.
• Messages Shows the contents of your private messages.
• Events Shows events you’ve created or been invited to.
• Find Friends Shows the Friend Finder page
• Beneath the Favorites are several other groupings and links to other pages. You may not find them in the order listed here, and you can change the order in which they appear.
• Apps and Games Apps, including the addictive games, are initially listed below the Favorites. Apps are covered in Chapter 8.
• Groups Figure 2-2 shows links to a number of groups. When you initially sign up, you’ll not have any groups, but you will be able to click Create Group. Groups are addressed in Chapter 7.
• Friends on Chat Shown on the bottom of the left column (in the non-maximized window), this displays friends who are currently online. If they have a green square in the lower-right corner of an image, they are available for you to chat with them. Hover your pointer over an individual image to see who it is.
| Tip To extend the list of groupings, such as the Groups or Apps link, hover your pointer over the title and then click More; the list of links will expand in the center column. Reduce the list again by clicking your browser’s back arrow. Some groupings will not have more to view.
|
Nancy Counsels Parents About Facebook
As a grandparent and family counselor, I have found Facebook quickly becoming an issue of serious concern for families in my community. It was clear to me that I needed to learn about Facebook if I was going to be able to help my clients. I didn’t want my private life to be visible to my clients, so I was hesitant, and frankly untrusting. I could easily see why parents struggle with their own lack of knowledge while teens fearlessly charge ahead.
In general, families I counsel are experiencing the results of having children running unfettered on Facebook with little parental supervision. These parents see me regarding their child’s lack of respect, school difficulties, homework, lack of motivation, and poor communication.
Of course, the kids take to Facebook like ducks to water. Parents, not so much! Parents often come to me for advice on how to “monitor” their kids (some call it “spying”) and identify the personalities of their child’s “friends” rather than figuring out how to manage the Facebook phenomena.
Nancy C., 68, New Mexico
Update Status, Add Content, and Ask Questions
In the top of the center column on the Home page is a menu bar where you can add your own content to the stream of News Feed. You can add a comment, add a photo or video, create a photo album, or ask a question. Here’s how:
• Update Status Click Update Status to add a comment to the News Feed. The text box will open. You can type your comment, set your privacy option, and click Post to publish it.
• Add Photos or Videos Click Add Photo/Video to get the options to upload a photo or video, create a webcam, or create a photo album. Chapter 6 discusses how to do these.
• Ask Question Click Ask Question and a text box is displayed where you can ask a question or poll your friends for a survey. Chapter 4 looks at this in detail.
Change News Feed View and Share and Add Items with the Center Column
The center column on the Home page is where the News Feed is displayed. This is the content of all the sharing that is being done by your friends that you are allowed to view (a person can restrict who views content, so you may not see everything a friend is posting). Here are your options:
• Change News Feed View To the right of the News Feed, click the Sort down arrow. It will display a menu showing Top News and Most Recent; if you click one, the other will become the link. Top News displays postings that Facebook thinks are the most interesting. It uses an algorithm involving the number of people viewing a post or responding in some way to determine this. Of course, Facebook’s assessment of “interest” may have nothing to do with your own judgment of your most interesting posts! When you click Most Recent, you’ll see the most recent postings of all your friends.

| Note The difference between the News Feed on your Home page and the Wall on your Timeline (or Profile if you don’t have Timeline) page may be hazy to start with. Your News Feed is just a continuous stream of postings, videos, or photos shared by your friends, or notifications when friends click Like or type comments on another person’s post. Your own shared comments are in the News Feed as well. The News Feed is the universe of sharings from your friends. The Wall, on the other hand, is personal. It is about you. It shows your postings or threads of conversations on which you have commented or “liked.” If you personally are tagged, responded to, or acknowledged among your friends, you’ll likely see it on the Wall.
|
View Events, Facebook Ads, and Other Miscellaneous Links
The right column contains several types of links. On the non-maximized page, you’ll see the ticker at the top of the right column. On the maximized window, you’ll only see ads and events, since the Ticker/Chat sidebar contains the Ticker. If you have events, you’ll see them listed as well as Facebook ads. Additional requests from friends and other appeals and informational links may be found here.
View Your Timeline Page with Its Profile and Wall
Your Timeline, shown in Figure 2-3, is where your personal Wall contains comments and activities, and personal profile information is shown, along with a list of your friends and your own activities. Your Timeline can be seen by those you specify in your privacy or audience selection settings. You can restrict access to this or not. This is also true with postings on your Wall—you can determine who may see them. You can find out how to change your profile information later in this chapter in “Manage Your Profile.”
One consideration about hiding or revealing information is your purpose for using Facebook and how well you know your “friends.” Facebook may be a casual social networking tool that you use for a broad community of friends or, conversely, a way to connect personally with family and close friends. If you decide to only allow people to be your friends that you personally know, you can feel freer about revealing personal information about yourself. If you befriend all who request to be your friend, you may be more cautious about what you reveal.
1. To view your Timeline with your Wall and personal information, click Your Name on the menu bar.
| Tip You can also display your Timeline from the Home page by clicking your profile picture.
|
2. To access major items on the Timeline click one of the following (see Figure 2-3):
Figure 2-3: Your Timeline is where you see your own Wall activity and change your personal profile.
• Friends Located beneath the Timeline cover photo or beneath your profile photo in the left column, it shows a page of all your friends.
• Photos This is located immediately below your cover photo and name and lets you view and add photos.
• Maps Displays locations you have pinned to the map.
• Likes Displays all the Facebook pages you have “liked.”
• Now Or you can click a specific year to see your Wall for that time period.
• Status This is located below your profile photo and allows you to add a comment of your own to your Wall. You can also just click in the What’s On Your Mind text box.
• Photo Located below your profile in the left column, this lets you add a photo or video, use the webcam, or create a photo album.
• Place Add a location to your Timeline.
• Life Event Add notice of an event in your life worth recording in the Timeline.
3. Immediately below your profile image is your profile. Click About to change or modify personal information. You can also click Update Info below the Timeline cover photo to do the same. See “Manage Your Profile” later in this chapter to find how to change and save your profile information. Chapter 3 considers this in more detail.
The Timeline is divided into two columns. As you scroll down the Timeline, you will see your activity for each year. If your Timeline page is maximized, you’ll also see the Ticker/Chat sidebar to the right.
Work with an Alternate Profile Page
Facebook revised how it displays profile and Wall information in 2011 when it implemented the Timeline design which replaced the Profile page. Facebook maintains that all users eventually will be converted to the Timeline, but they are slow to actually do it. “Timeline” in this book is used interchangeably with “Profile.” When Profile refers to the older version, it will be clear from the context.
Figure 2-4 shows the older version of the Profile page and where you find common features on it. There are still many people who have this page instead of the updated Timeline.
Figure 2-4: Some people still use the original Profile page rather than the newer Timeline.
Convert to Timeline
If you have an original Profile page and would like to convert to a Timeline, you can do so in a couple of ways:
If you have this message on your Profile page, click Get Timeline.
1. From any page click the down arrow to the right of Home and click Help | Visit The Help Center.
2. Type How do I get timeline in the Search text box. As you type a list of possible links will be shown. Click How Do I Get Timeline. A message is displayed.
3. In the message, click Introducing Timeline | Get Timeline.
Scan Your Account Menu
The Account menu contains access to several vital functions within Facebook. You get there by clicking the down arrow to the right of Home in the menu bar. Your options may vary.
• Use Facebook As This allows you to switch identities between your personal page and a Page you set up—for maintenance or promotion, for example. For instance, I can switch my personal Carole Matthews identity with my Page, QuickSteps Books. This allows me to enter comments and other activities as QuickSteps Books rather than as Carole Matthews.
• Promote Your Page Discussed further in Chapter 9, this allows you to set up a Page and advertise or use it to promote yourself or a business.
• Account Settings This lets you set your primary account options. These are your official names and contact information with Facebook, and not what is necessarily displayed. Refer to “Change General Account Settings” later in this chapter for more information.
• Privacy Settings This allows you to determine what personal information you will display or hide. Chapter 10 explores this in more detail.
• Log Out Discussed in Chapter 1, this is how you exit Facebook.
• Help Discussed in Chapter 1, this is Facebook’s help system.
MANAGE YOUR PROFILE
After you have created your Facebook account and entered your basic profile, you can return and fine-tune it, plus add new information. When considering what to place on your Facebook profile, there is always a line between displaying too much about yourself and not enough. You want your account to be interesting and to be personal enough that people know who you are, but at the same time, you don’t want to enable identity thieves and other unscrupulous people who would do you harm. Unfortunately, they are present and active on Facebook. But you don’t need to be too skittish either. Check Chapter 10 for more information.
Update Your Basic Profile Information
On your Timeline page, basic profile information is displayed beneath your profile photo on the left. It includes whatever you want, but often your location, birth day and month, high school and university, and work experience. To protect your information, you can control who sees each item of information you enter. Also read “Check Privacy Controls” after you’re done here.
1. To change or modify personal information, click Update Info beneath the Timeline cover photo. You’ll see a page similar to the one shown in Figure 2-5.
Figure 2-5: You’ll want to consider what information to display in your Timeline/Profile page.
2. For each item you will see an icon that controls privacy, also known as the audience selector. Click it and select the level of privacy, or the audience, you want:
• Public Everyone can see the information.
• Friends Only your friends can see the information.
• Only Me You are the only one who can see the information.
• Custom Allows you to set a custom setting for this information. You can select specific groups of people or individuals to whom you can either show or hide the information.
• Named groups Lists you have created and assigned to specific friends that can be treated with a single privacy setting (for instance, all my “Close Friends” can see all my postings).
3. To the right of the item click Edit.
4. Fill in the information as you want others to see it, and click Save Changes.
5. Consider the following:
• Work And Education Identifies where you work and went to high school and college. This is one way you will find friends (and they can find you). One of the first uses of Facebook for me was to connect with high school friends in the weeks leading up to a class reunion. I found friends I had not talked to in years. (I’m not going to say how many years!) To enter this information, just click in a text box and type your employer, college or university, or high school.
• Living This is important for people to figure out in searches whether you are the one they want to find. It asks for your “home” and your current city. However, it is also an important bit of information that can be misused. Protect your location by putting a city near where you live, but perhaps not the exact city. I do not live in Seattle, but I do live in the state of Washington, for example. That and my profile picture should assure that people looking for me can find me.
• Relationship And Family Lists your relationships, such as spouse or partner, and any children or other family members. It also asks for anniversary and birthdates of family members. I would flatly not give these out, protecting the privacy of my family.
• Pages Identifies any Pages (capital P) that you have created. Pages are created to promote people or products. They are used primarily for business purposes. I have one for the QuickSteps Books series, for example.
• About You Allows you to write an essay or a short paragraph about yourself. Examples of what you might post are a brief bio, a list of your most endearing traits or interests, a statement of your activities, or a poem you particularly like. What do you want others to know about you? This gives others insight into what makes you tick—what you are most eager for others to know about yourself. You can click the Audience Selector to control who sees it.
• Basic Info This includes the following information:
• Gender This may be obvious from your name, but if not, this might be important for people to find you when searching among all those who have similar names.
• Birthday This is a key bit of information needed for people to steal your identity. Consequently, I do not like my birthday revealed to anyone who doesn’t have a need to know. However, you can choose to share only the month and day or nothing at all.
• Interested In This lets you identify what your sexual orientation is. If you are looking for a partner, this might be helpful.
• Relationships You can supply this information if it is not already identified.
• Languages This lets you list languages you can use other than the one being displayed.
• Religion And Political Views This allows you to share your religious and political philosophies. This reveals a more intimate description of you by describing personal interests or passions.
• Contact Info This allows you to set up your mobile phone numbers, instant messaging addresses, home or business address, and a website address. For each address you can click the Audience Selector to select to whom you want to show the information. Again, you want your friends to be able to connect with you, but you don’t want to threaten your security. So be selective, both for which addresses you reveal and to whom you reveal them. I only show my email address and website Uniform Resource Locator (URL). If someone wants to know my address or phone numbers, they can ask me.
• Favorite Quotations This allows you to write a quotation or poem to which you really relate.
6. When your basic profile information is complete, click Done Editing at the top of the left column.
7. You can click your name on the menu bar or your profile photo to see how your profile now looks.
| Tip If you have not updated to the Timeline, you can update your profile information from your Profile page by clicking Edit Profile in the right column of your Wall.
|
| Note When you enter information such as your workplace or school, Facebook tries to find friends for you that have the same identifying information. This can be a quick way to find friends that you may not otherwise think about.
|
Check Privacy Controls
To quickly review your privacy controls so that you are aware that your information won’t be shown to the public right off the bat, follow these steps (privacy is discussed further in Chapter 10).
1. To the right of Home on the menu bar, click the down arrow, and then click Privacy Settings. You’ll see the Privacy Settings page.
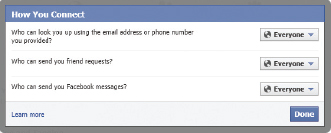
2. Scroll down to see the settings, such as How You Connect, and click Edit Settings. You’ll see the current settings, which, by default, are initially set to a combination of Everyone, Friends Of Friends (people who see you from a friend’s site), and Friends (only your own friends), as seen in Figure 2-6 for How You Connect.
Figure 2-6: Facebook provides a recommended way of controlling who will see your page, but you can customize it according to your own comfort zone, as you see here in the How You Connect dialog box.
3. I recommend initially allowing access to just Friends until you have had a chance to work with Facebook and understand who will be viewing your information. Reset the combination by clicking Friends.
4. Click Done to make it official.
Add a Profile Picture
If you did not enter a profile photo as described in Chapter 1 in the Welcome page, you can do it using the Timeline page, the primary place where you can access the ability to insert a profile photo from files on your disk or to take a webcam photo. (See Chapter 5 to learn how to work with photos in general.)
1. On the menu bar, click your name to see your Timeline page.
2. On the Timeline page, mouse over your profile photo, and click Edit Profile Picture. A menu of choices for editing your profile picture is displayed.
3. You have these choices, described in the following pages:
• Choose From Photos This allows you to choose from other photos you have already uploaded. Click View Albums to see all your photos.
• Take Photo This enables you to use a webcam to take a photo.
• Upload Photo This leads you through uploading a photo from your computer.
• Edit Thumbnail This is used to reposition the image in the frame—perhaps your head is too high or too much to one side, for instance.
• Remove This allows you to delete this photo.
| Tip From the Timeline page, click Photos beneath the cover photo, and then click Profile Pictures to share a comment about your profile photo.
|
Choose from Current Uploaded Photos
To choose from your current uploaded photos:
1. On the Timeline page, place your pointer over your profile photo, and click Edit Profile Picture.
2. On the menu, click Choose From Photos. You see your current profile pictures. Click the one you want.
3. If you don’t see the picture you want, click View Albums. You’ll see the list of albums. Click an album to find the photo you want, and then click the photo you want to make your profile photo. You may have a couple of options depending on your photo:
• Beneath the photo, click Make Profile Picture. (You may have to click Options first.)
• Drag the transparent box where you’d like the photo to be. You can change the size of the box by dragging the corners. To crop the photo for your profile photo, click Done Cropping beneath the photo when you’re ready.
Take a Picture with Your Webcam
Chapter 1 describes this process as you would do it from the Welcome page. Here is how you take a photo of yourself using the webcam with the Edit Profile Picture menu.
1. Click Take Photo. The Take A Profile Photo window will open and display the Adobe Flash Player Settings dialog box.
2. Click Allow to let Facebook access your camera, and use the icons on the bottom to adjust how Facebook is using your camera:
• The leftmost icon allows hardware acceleration (which you probably want).
• The second icon contains the privacy permission allowing Facebook to access your webcam photo.
• The third icon allows you to set the amount of storage that can be used for the picture.
• The fourth icon, which really doesn’t apply here, allows you to set the sound source and the volume level.
• The rightmost icon allows you to select the camera that you want to use.
To save the camera settings in the dialog box, click Remember.
3. Look into the camera, and when you like the image, click the Camera icon, and then wait for the countdown (3-2-1) while your photo is taken (smiling is optional, but lighting is critical!).
4. To save the picture, click Save Picture. To do it again, click the X in the upper-right corner to delete the picture and start over.
Add a Photo from Your Disk
To upload a photo from your computer using the Edit Profile Picture dialog box:
1. Click Upload Photo to use an existing digital photo.
2. Using Windows Explorer, browse for your photo file. When you find it, double-click the photo or click the photo and click Open. The photo will appear on your page.
Reposition Your Profile Photo
If you want to change the way your image is positioned in the profile picture (for instance, perhaps the top of your head is shaved off or your face is too near the left side of the frame), follow these steps:
1. On your Timeline page, move your pointer over your profile picture, and click Edit Profile Picture | Edit Thumbnail.
2. In the Edit Thumbnail dialog box, place your cursor over the image and drag it where you want it to be.
3. Click Scale To Fit to automatically resize the photo so that it fits the space better.
4. When it is positioned the way you want, click Save.

Ron Catches Up with Family and Old Friends
I first started using Facebook a couple of years ago when the media started reporting its phenomenal growth. The first thing that I discovered was that my grown children were on Facebook. More importantly, they were willing to friend me. Since no one in my family calls home regularly, Facebook now has allowed me to read and see photos of the events in their lives. Soon I discovered cousins that I hadn’t seen for years were regular Facebook commenters. I got to see pictures of them, their grown children, and their families. One cousin posted some old photos of her mom and dad, my aunt and uncle, and my grandmother. They were fascinating to see.
I turned my attention to old friends. In the 1970s and 1980s, I was a member of a small intentional community. Most of us moved to different parts of the country and lost touch with each other. Using Facebook’s search function, I found many old friends. We don’t write on each other’s Walls often, but it’s great to leave a comment now and then. Some of their children, who I remember as teenagers, friended me. Now seeing them grey haired and balding, I realize that maybe I’m a little older myself.
Ron H., 62, Oregon
MANAGE YOUR ACCOUNT
Your account contains information to manage your Facebook pages. When you click the down arrow next to Home on the menu bar and then Account Settings, you will see the page of account options seen in Figure 2-7. The items along the left of the page display the detailed options for each category:
Figure 2-7: The Account Settings page is where you set your Facebook account preferences.
| Note When seeking information about some of the account options, check Chapter 3 for more about editing friends, Chapter 9 for using Facebook as a Page, Chapter 10 for privacy settings, and Chapter 1 to log out and the Help Center.
|
• General The default tab, this contains your personal information and is explained in this chapter.
• Security Contains preferences about browsing and other security issues. Chapter 10 discusses this setting.
• Notifications This is where you identify which actions will result in notifying you by email or by a text message on your cell phone. See “Set Notifications” in this chapter.
• Subscribers Places a “Subscribe” button on your Timeline, which allows others to receive your public posts, even if they are not friends. See Chapters 3 and 4.
• Apps Allows you to edit certain preferences about the apps you use. Chapter 8 discusses this further.
• Mobile This is where you identify and connect Facebook to your mobile (cell phone) device. See Chapter 5 for more information.
• Payments Establishes and tracks your financial and credit card information in case you want to play games or purchase something, such as an ad, on Facebook.
• Facebook Ads This is where you can set two permissions for how Facebook handles third-party ads and your personal information, and to whom your actions in social ads will be displayed. See Chapter 9 for more information.
Change General Account Settings
Your account settings are the information you have revealed to Facebook. These are used to facilitate your relationship with Facebook.
1. Click the down arrow to the right of Home on your menu bar, and then click Account Settings.
2. Click the General tab if it is not selected by default. You have these options (with each one, click Edit to open the change options):
• Name Allows you to change your first, middle, or last name. If you are married or divorced, you might want to do this so people who know you under another name can find you. You can also change how your name is displayed or use an alternate name if you have one. You must enter your Facebook password. Then click Save Changes. Incidentally, you must wait 24 hours so Facebook can run a security check on your name change.
| Tip When changing your name, you can also enter an alternative name. You might want to do this to let others recognize you by a name you may no longer use, such as a maiden name or nickname. When you enter an alternative name, you can also choose whether it is to be shown on your profile along with search lists and friend requests. The default is to only use that name in searches.
|
• Username Allows you to create and change a username. Your account must have been verified before you can set up a username. You can only change a username once, so you want to be very careful about what you select. Your username is used to create a unique Facebook URL, such as www.facebook.com/username. People who navigate to your Facebook pages will be able to see your username.
• Email Records a change in your email. This is the address by which you are contacted by Facebook, and it must be a valid email address. Email sent to this address is also duplicated in the Messages area. You can also add another email address. When your friends download their own information (see “Archive Your Facebook Data”), you can choose whether your email address may be included in the downloaded information.
• Password Changes your password. You must remember your old one before you can enter a new one. (If you forget, you can ask Facebook to allow you to reset it at the time you log in.) You should change your passwords periodically, perhaps annually at the very least. Also, a combination of letters, numbers, and punctuation in the six characters required will ensure that you have a strong password.
• Networks Allows you to join an organization or other network.
• Language Allows you to identify which language you want as your primary one and to select a translation App if you need Facebook translated. See “Set Your Language” in this chapter.
| Tip The translator can be found by clicking the World icon to the left of the Chat bar on the bottom of the third column (or the Ticker/Chat sidebar in a maximized window).
|
Set Your Language
You can establish which language is your primary one while you’re using Facebook. You can also request a translator if needed.
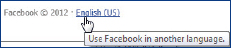
To set your language to one other than what is on the page:
Scroll down to the very bottom of any Facebook page (you may want to select a short one), and click the current language link next to the Facebook copyright date. A menu will appear. Click the language you want.
1. Click the down arrow to the right of Home, and then click Account Settings | General. The Language page is displayed.
2. Click Edit to the right of the Language item.
3. Click the Choose Primary down arrow, and click the language you want.
4. Click Save Changes.
Archive Your Facebook Data
Facebook allows you to copy or archive the data you have on Facebook. Your data will grow to be an immense storehouse of valuable photos and videos, including those placed on your Wall by friends; your profile information, including your contact info and groups; collections of your thoughts that you have shared on your Timeline Wall, private messages, and chats; names and comments of friends (and their email addresses if they give permission); notes you have written or events you have responded to—all the memories you have built up.
This is valuable information, and you are urged to protect it by taking care with how it is stored and revealed. You will not be able to download other people’s photos or videos from their pages or any of their private postings or personal information.
1. Click the down arrow to the right of Home on your menu bar, and then click Account Settings.
2. Click the General option on the left if it is not selected by default.
3. Beneath the Language option, click Download A Copy Of Your Facebook Data. The Download Your Information page is displayed.
4. Click Start My Archive.
5. You will be sent an email. Reenter your password, and enter any security codes requested.
| Note You can download an “expanded” version of your data, which includes information such as IP addresses you have used, pending friend requests, dates you changed your status, event history, and more profile information, including all your phone numbers and account settings you have changed.
|
Set Notifications
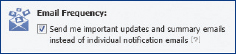
When there is activity on Facebook, you can elect to receive notifications by email or text messaging. Luckily, there is one place you can go to set all your notifications. A key to setting all notifications or a summarized group of them is the Email Frequency check box. By default, it is designed to send you a defined set of notifications, not all—which would be considerable. When this is checked, you periodically are sent one email or text message grouping with any notifications you have into one message. This is very nice to have. However, if you want to receive notifications for all your Facebook activity, clear the check mark and all notifications will be marked to be sent to you. Replacing the check mark in the Email Frequency check box restores the original settings. To selectively edit a category, you can open just its specific edit box, as explained here.
1. On a Facebook page, click the down arrow to the right of Home on the menu bar, and then click Account Settings.
2. Click the Notifications option on the left. The Notifications Settings page will open, as shown in Figure 2-8. You’ll see your email address where notifications will be sent and the Email Frequency option.
Figure 2-8: You can set your defaults for how you are notified about activities in Facebook.
3. A check mark placed by default in the Email Frequency check box reminds you that a summary notice will be sent to you instead of individual notifications. If you don’t want this, clear the check mark. I recommend you do not clear the check mark.
4. Then, to set the conditions for notifications you want, or to review those that are set by default, scroll down through the categories of notifications. The envelope icon to the right of a category with a number indicates the number of options set in that category.
5. Click either Edit or the Envelope icon to open a category’s edit box so that you can review or change the individual settings. Doing this displays the settings and resets all the notifications to be “turned on” or selected.
6. To remove notifications you do not want, clear the individual check boxes. Click the individual check boxes to turn them on or off separately.
7. Here are your options:
• Facebook Sets notification status for activities that typically occur on your Facebook site, such as being added as a friend or friend requests.
• Photos Establishes when notifications are sent if you have activity involving photos, such as to upload a photo via email, receive a comment on a photo or photo album, someone else comments or responds to your comment, or someone tags your photo or you in another photo.
• Groups Defines when you are notified for activities within groups to which you belong, such as a name change, if you are made an administrator, if you are added to a group, and more.
• Pages Defines when you are notified for certain Page activities, such as when you are made a Page Admin, someone suggests a Page to you, a reply is made to a discussion you’re in, a weekly Admin report is emailed to you, or a Page’s email settings are changed.
• Events Defines the conditions under which you are informed when activities happen in an event that you either are attending or creating, such as the event is cancelled or the date is changed.
• Questions Specifies the activities under which you are notified on a question you have asked or answered.
• Notes Defines whether you are notified when you are tagged in a note or comments are made.
• Links Defines whether you are notified when someone comments on a link you have initiated or commented on or shares a link you posted.
• Video Specifies the activities under which you are notified on a video you have posted or commented on.
• Help Center Specifies when you are notified when a question you posted is replied to or when your question is identified as the “Best Answer” to a question.
• Wall Comments Specifies when you are notified when someone comments on your Wall or makes a comment after you.
• Other Updates From Facebook Specifies whether you want to be notified when friends or products have updates or when you have a special research invitation from Facebook.
• Credits Specifies whether you want to be notified when you’ve purchased credits or an order is completed.
• Translations Determines whether you want to be notified when there is progress in a translation or approval for the translation.
• Other Applications Determines whether you want notifications from Apps you are using.
8. For each type of notification, click either the Email or SMS check box (the latter is only visible if your mobile phone is added to Facebook) to clear or place a check mark in the box, depending on your preferences. A check mark in the box indicates that a notification will be sent; no check mark indicates that no notification will be sent.
9. When you’ve finished setting the check marks as you wish, click Save Changes.