Chapter 9
Creating Pages and Facebook Ads
A Facebook Page (with a capital “P”) is oriented toward promoting a person, product, cause, or other entity. It is more official and businesslike than your personal page (with a lowercase “p”). Pages are where you present yourself, your products, and your cause to the world, and they are public—that is, they are available to anyone on Facebook. Pages must be created by people who are official representatives of the entity.
Facebook people who “like” the Page, or become its fans, receive any posts created on the Page on their News Feed. If they like the post, they share it with others, just like how a normal Facebook page functions. In addition, you can promote your Page in various ways to get more people to “like” your Page. This is how a business or entity can broadly communicate with its customers, clients, or fans simultaneously.
CREATE A PUBLIC PAGE
Creating a public Page is somewhat of a process. You create the basics, add the photos and other interesting elements, and invite viewers, also called fans. Although the flag for making the Page visible is turned on by default, you can turn it off, making the Page invisible to the world until you’re ready to publish it, or make it visible again. While it is invisible, the Page is only visible to its Admins. (See “Publish Your Page.”)
 Set up the Public Page
Setting up a public Page involves first naming the Page, categorizing it, and then adding photos and friends and fans to participate in your Page.
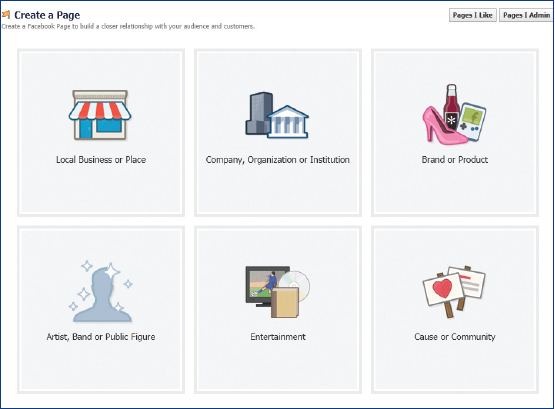
1. If this is the first Page you’ll create, scroll to the bottom of the Home page, and on the link bar click Create A Page. You’ll see the page displayed in Figure 9-1.
Figure 9-1: Facebook has templates from which you can choose for your Page.
| Tip If your Home page is too long to find the bottom easily, click any other page—for example, the Account Settings page—to find the bottom link bar more easily.
|
–Or–
If this is not your first Page, click any Page name in the left column of the Home page. Click Create Page on the top right.
You have these options describing the type of Page you want to create:
• Local Business Or Place
• Company, Organization, Or Institution
• Brand Or Product
• Artist, Band, Or Public Figure
• Entertainment
• Cause Or Community
2. Click the type of Page that fits your needs. You’ll see a group of text boxes, with some differences between the types of Pages. At a minimum:
• Click the Category down arrow, and select the category that matches your entity.
• Type the Name of the business, product, organization, artist, entertainment, or cause.
• Click I Agree With Facebook Pages Terms.
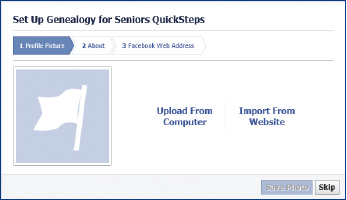
3. Click Get Started. You’ll see a three-step process, beginning with inserting an image or photo, as shown in Figure 9-2. Note that you do not have to complete the setup process right now. You can skip these steps and come back to them later.
Figure 9-2: Once you have named your Page, you can begin a three-step process to fill in the details.
Work Through the Entry Form
1. In Step 1 you have the option of uploading an image from your computer or importing it from a website. You can select one of these choices:
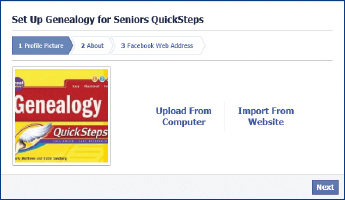
• Click Upload From Computer in Step 1, Profile Picture. A browser window will open so you can find the path to your photo or graphic. Double-click the image to upload it. You’ll see the image replace the profile photo placeholder, an example of which is shown in Figure 9-3. Click Next to go to Step 2.
Figure 9-3: The uploaded image replaces the Facebook placeholder.
• Click Import From Website in Step 1. In the Website text box, type the Uniform Resource Locator (URL) of the website where you expect to find the image. Click Import. Click the left and right arrows until you find the image you want. Click Select Image. You’ll see the image replace the profile photo placeholder. Click Next to go to Step 2.
• Click Skip to do this later.
2. Now you will be asked to enter some basic information about your Page. Click in the appropriate text boxes and add a description and then your website page, Twitter, or other website address. Click Add Another Site to enter multiple URLs. When you are satisfied, click Save Info to save your information. You can also click Skip to enter a description later.
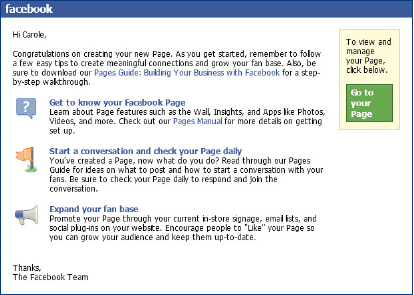
3. At this point your new Page will be displayed. You will also receive an email message telling you some basic info on how to proceed with your Page. See Figure 9-4.
Figure 9-4: You’ll get an email with helpful hints of how to proceed building your Page.
An example of your new page is shown in Figure 9-5.
Figure 9-5: Once you have entered basic information, your Page is ready to be tailored to your needs.
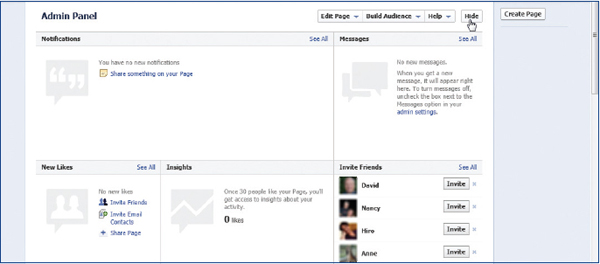
| Note Click Hide in the Admin Panel menu bar to switch between seeing what others see, and seeing your Admin Panel. “Hide” hides the Admin Panel; “Show” shows the Admin Panel.
|
Understand Facebook Terms for Pages
Before you can create a Page, you must agree to certain terms:
• You must be authorized to represent the product or entity in order to create the Page.
• You cannot solely use a generic name or description, such as “Coffee” or “Hot,” unless it is part of the name—for example, “Tucson’s Hot Coffee.” You cannot use abusive language in your name.
• Names cannot use improper grammar or excessive punctuation, cannot be all capital letters, and cannot use symbols other than alphanumeric characters.
• If you collect information about your users, you must obtain their consent, specify that you are the one collecting the information—not Facebook—and provide a policy statement telling how you are using the information and who else has access to it.
• You cannot identify on the Page which people visit your site.
• Applications and any promotional activities must comply with Facebook’s Platform Policies and Promotions Guidelines.
• You cannot have third-party ads on your Page, and your own advertising on your page must comply with Facebook Advertising Guidelines.
Facebook terms are revised periodically, so you must review them yourself to know what is currently required.
Add a Page Image
If you have skipped adding an image during the setup phase, you can still add a logo, a photo, or graphic showing what it is that you are promoting with your Page. Also, once you have added an image, you can change it. The image displays as a square and must be no smaller than 180 × 180 pixels.
1. On your Facebook Home page, find the Pages list in the left column. (You may have to click More to see it.) Then click the Page name to be edited.
2. On your Page, click +Add Profile Picture located on the image placeholder or click Edit Profile Picture to change it. A menu is displayed:
• To take a picture with a webcam, click Take Photo (refer to Chapter 1 for further instructions).
• To download a photo or graphic from your computer, click Upload Photo. Find the path to your photo or graphic and double-click the image to upload it. You’ll see the image replace the profile photo placeholder.
• If you have uploaded other images and the profile picture is among them, click Choose From Photos. Then click the image you want.
When you complete installing your profile picture, you’ll want to select a cover photo.
Add a Cover Photo
The cover photo is placed as a banner across the top of your Page. Your Profile Photo is set up against it, as seen in Figure 9-6. The best cover photo is one that is not used for sales or promotions, but which represents what your Page is about. In fact, there are some rules about what your cover photo cannot contain:
Figure 9-6: A cover photo can personalize your Page, making it unique and tailored to your content.
• Any notation of price, or a cost figure, or promotional figures, such as 25% Discount.
• No instructions about where or how to get the product, such as another webpage or contact or email information, or what to do next to get it.
• No calls to Like or Share the Page.
• No false or untrue information, which can trick others into thinking the product is something other than what it is.
• No violating intellectual properties belonging to others.
• The image should not be smaller than 399 pixels wide.
All cover images are public, so anyone coming to your page will see it. Images are displayed as 851 (wide) × 315 (tall) pixels.
1. To the right of the profile picture, click Add A Cover.
2. Click Okay | Upload Photo to acknowledge what you’re doing and display your computer file manager, such as Windows Explorer.
3. Find the path to your photo and double-click it. The image will be displayed on the top of your Page.
4. If you want to, you can drag the photo at this point to reposition in the banner.
5. Click Save Changes.
| Tip To reposition the cover photo after you’ve saved it, hover your pointer over the photo and click Change Cover | Reposition. Then drag the photo as you want it. Click Save Changes to finalize it.
|
Freya Builds Face into a Page
The technical setup for my Facebook Page for a nonprofit organization was straightforward and easy to do. Exploring the “face” of our organization has taken more time in learning how to best portray it through Facebook options. A few online classes enabled me to learn how to tailor possible special options. (I attended CharityHowTo.com.)
At first, a central thing to learn was the type of presentation and questions that would successfully engage our “customers.” I needed to expand from an advertising approach that merely announced a new program or activity, to more specific types of questions that invite visitors to engage with our mission and ideas. It’s about thinking with a community engagement mindset. This required me to think through what I can do realistically in terms of my time and attention to the Page, and what information is needed and natural to my organization. Facebook is one window for the world to view us, and it is important to be true to our mission and approach.
It’s been a slow journey, but the Page and I are coming into alignment with the social-media community.
Freya S., 58, Washington
Build an Audience
Your objective with a Page is to get others to look at it and, perhaps, take an action. If you elected not to invite your friends to look at your Page during the setup, you can still invite them now. You can invite friends in three ways: inviting your email contacts, inviting your Facebook friends, or sharing your page. You can upload a maximum of 5,000 contacts. People who are not Facebook members can still see your Page profile information—the photos and basic information—but they cannot post to your Page or see other posts.
Invite Your Email Contacts
This approach imports contacts from web-based services, such as Yahoo! or Hotmail. (At the time this was written, in order to import from Gmail, you must log into Gmail and create an export file and then upload it into Facebook. The form for enabling you to do this is found under Other Email Service.)
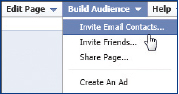
1. In your Admin Panel at the top of your Page, click Build Audience | Invite Email Contacts.
2. Next to the email servicer you use, click Invite Contacts:
• Use Other Email Service if you don’t use the services listed, such as for Gmail.
• Use Other Tools to upload a comma-separated value (CSV) or tab-delimited contact file from specific email programs, such as Microsoft Outlook Express. When you choose this option and click the email service you use, you will be given directions on how to create the contact file. Then you browse for it and upload it into Facebook.
3. Type in your email address and click Find Contacts. You may need to enter a password to sign in to your email account. (Note that Facebook does not store your password as one of its security measures.) You may need to negotiate a second sign-in or password entry dialog box for the mail system itself and click Sign In to complete the sign-in process. After you have signed in, your contacts will be downloaded and you’ll see a list of contacts, such as that seen in Figure 9-7.
Figure 9-7: Increase the number of fans on your Page by importing contacts from your computer contact list or web email account.
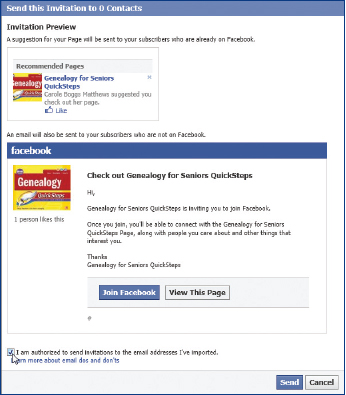
4. Click the names of the contacts you want to invite to view your Page. Click Preview Invitation to see the invitation and continue the process. Figure 9-8 shows an example.
Figure 9-8: An invitation to join Facebook so that non-Facebook friends can view your Page will be sent to contacts from your email service.
5. You must click the check box beneath the invitation to ensure that you have the correct authorization to send invitations to your email addresses.
6. When you are ready, click Send. The invitations to join Facebook will be sent to your selected contacts.
| Tip If you are using Windows Live Mail, it is currently not on the list of email services, but it is similar to Windows Mail. After opening Windows Live Mail, click Contacts in the lower-left corner. Then, in the ribbon at the top, toward the right, click Export and then click Comma Separated Values (.CSV). In the dialog box that opens, click Browse and save the file. Then upload it using the steps for Windows Mail.
|
Invite Friends
Perhaps your first option to get viewers is to notify your Facebook friends. You have a ready reservoir of people available to become your fans.
1. In your Admin Panel at the top of your Page, click Build Audience | Invite Friends. A list of your friends will be displayed.
2. If you wish to filter your list of friends, click Recent Interactions and click the group or list you wish to display.
3. Place a check mark next to the friends you wish to invite to view your Page.
4. Click Submit.
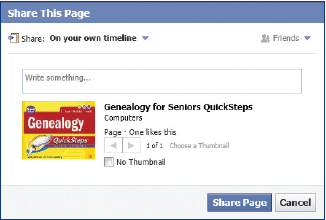
Share the Page
1. In your Admin Panel at the top of your Page, click Build Audience | Share Page. A Share This Page dialog box will be displayed.
2. Click the Share down arrow and choose where to share the page: on your own or a friend’s Timeline, in a group, on your page, or in a private message. When you click your sharing destination, you’ll be asked for specifics, such as which friend’s Timeline.
3. Click in the text box and type a short message introducing your page.
4. Click the No Thumbnail check box if you do not want the image to show in the post.
5. Click Share Page.
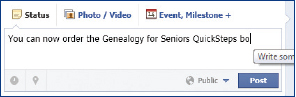
Post Status Updates
Posting status updates is how you communicate with your fans or customers. It is the same procedure as when you post a message in your personal Facebook account. If your Page is published, the posts will appear in your Page Wall and on your fans’ or supporters’ News Feeds. If the Page is unpublished, the Page itself is invisible to all except the Admins, so no one else will see it (see “Publish Your Page”).
To post a status update:
1. On your Page, click in the Write Something text box and type a post.
2. Click Post.
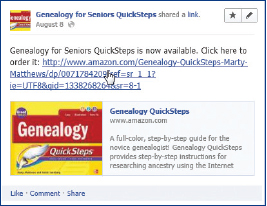
| Note You can attach a link on your Page. Find the link you want and copy it. Then on your Page, click in the Write Something text box and paste or type in the URL address of the link. A thumbnail and short description will be automatically displayed on the Wall.
|
Publish Your Page
Your Page can be made invisible, or hidden to the world at large, until you “publish” it, even to those fans you have invited to see your page. For instance, you might want to hide it until your Page is exactly the way you want it or while you update it or make changes. If your Page is unpublished, you’ll see a banner across the top of your page.
Make Your Page Visible
To publish your Page, or make it visible:
Click Publish This Page on the banner on the top of the Page screen.
–Or–
On the Page’s Admin Panel, click Edit Page | Manage Permissions. In the Manage Permissions panel, click the Page Visibility check box to clear the check mark. Click Save Changes.
Unpublish or Hide a Page
You can hide a Page to all fans and supporters by making it invisible. Then, after you have updated the Page, or come back from vacation, for example, you can make it visible again.
1. On the Page’s Admin Panel, click Edit Page | Manage Permissions.
2. Click the Page Visibility check box to place a check mark there.
3. Click Save Changes on the bottom of the panel.
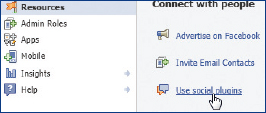
Promote the Page with Plugins
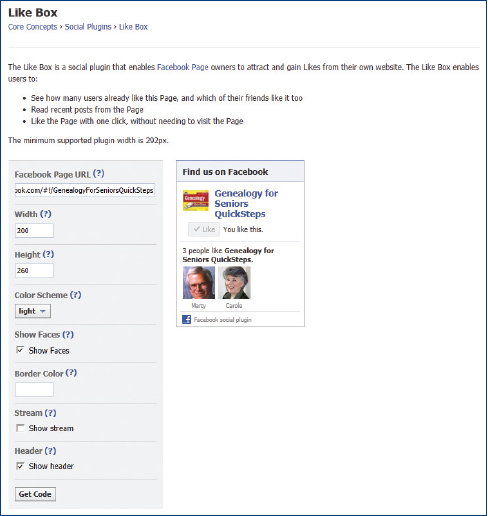
You can incorporate several social plugins, or Facebook programs that enhance or add to a Page’s basic capabilities. The Like box is one of these. You embed code in your website outside of Facebook that allows visitors to “Like” your Facebook Page even if they don’t ever see it. You can see an example on the right of Figure 9-9. A Like box is embedded in your website allowing people to click “Like” for your Page. The box tracks the number of people and optionally shows a thumbnail of all who support your Page. (These directions are similar to those you would use for other plugins, such as to link your Page to Twitter.)
1. On the Admin Panel of your Page, click Edit Page | Update Info. From the left menu, click Resources.
2. Under Connect With People, click Use Social Plugins.
3. Scroll down the list of social plugins and click Like Box (ignore the Like Button). A page similar to that shown in Figure 9-9 is displayed. On the left you see the settings for your Like Box, and on the right is an example of what it will look like.
Figure 9-9: Social plugins, such as the Like box, allow you to promote your Facebook Page on your website rather than within Facebook.
4. Complete the Like Box form (you can click the question mark to the right of each entry to see Facebook’s explanation):
• For the Facebook Page URL, go to your Page, select its URL in the browser’s address bar at the top of the browser window, and copy it (click the address to highlight it and press CTRL+C). Come back to the Like Box page, and paste the address into the text box (click in the text box and press CTRL+V). This is used to identify the location when the link in the Like Box to your Facebook Page is clicked.
• Click in the Width text box, and type the width in pixels of the box. Do the same with the Height.
• Click in the Color Scheme text box, and choose between Light and Dark.
• If you do not want thumbnail images to show of the people who click “Like,” click Show Faces to remove the check mark. Otherwise, do not change the setting.
• If you do not want to show streaming News Feeds from your Page, click Stream to remove the check mark. Otherwise, do not change the setting.
• If you do not want the header “Find Us On Facebook” to show, leave the check mark in the check box. The default is No Header. This header will only be shown when either Show Faces or Stream, or both, are also selected. Otherwise, do not change the setting.
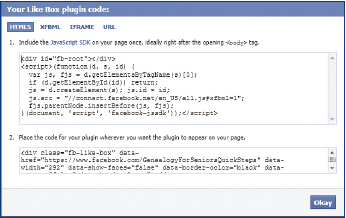
5. Click Get Code to get the code needed to embed a Like Box in your website. The Your Like Box Plugin Code dialog box is displayed with two versions. The first, iFrame, uses relatively standard code for websites, while the second, XFBML, uses some Facebook enhancements.
6. Copy the version of the code that you want, and paste it into your website’s code, placing the second code grouping where you want to see the Like box. This process will require knowledge of Hypertext Markup Language (HTML) code and where and how to insert this into your own webpage. If you want to change any of the features outside of the dialog box, you will also need knowledge of JavaScript and HTML. An example of what you can expect is shown in the left column in Figure 9-10.
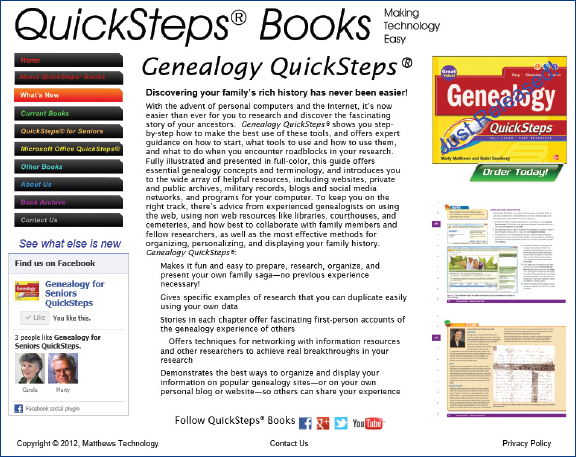
Figure 9-10: An example of how you might use a completed Like box
| Tip We’ve found that simply plugging in the Facebook Like Box code all in one spot where you want the Like Box placed is the easiest way to go. You can do this using the iFrame alternative.
|
| Note Social plugins are available to expand and enhance your Page. They require embedding program code into another website outside of Facebook. They require knowledge of web programming and website maintenance to implement.
|
Set Up a Mobile Phone
You can set up your Facebook Page to accept status updates and photo or video uploads from mobile phones. This allows you to keep tabs on your Page, regardless of whether you have a computer handy or not.
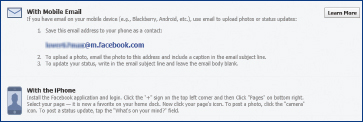
Update Your Page with Mobile Email
This feature gives you an email address where you can send photos, videos, and status updates from your mobile phone. The Facebook email address is saved as a contact in your mobile phone. Remember that anyone can use the email address to update your Page, so protect it and keep it secure.
When you upload photos to the Facebook Page using this email address, your email subject will be used as the photo or video caption. If you have no photos or videos, the subject is used to update your status.
1. On your Page’s Admin Panel click Edit Page | Update Info | Mobile. The With Mobile Email panel will open.
3. See Chapter 5 on how to send updates to your Page via email. You’ll see that the instructions for the iPhone are different from other devices, such as the Android, etc.
EDIT YOUR PAGE
Once your Page is created, you’ll want to make changes. You can change most characteristics of the Page using the Edit Page button. When you click that, you have many options.
Add or Remove Admins
You may find that you want to add or remove Admins for the Page. When you add an Admin, you are giving that person permission to make changes to the Page, including adding other Admins. The only restriction is that someone you add as an Admin cannot remove you. You must first remove yourself to allow someone else to be “first in line.”
Add an Admin
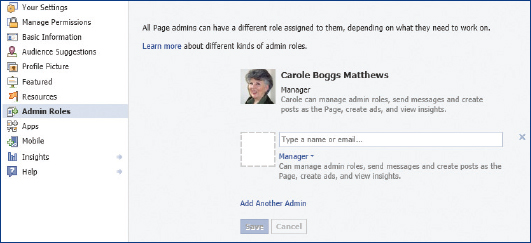
You can add an unlimited number of Admins to the Page. Their duties can be specialized so that not all Admins have equal access or ability to change the Page.
1. On your Page’s Admin Panel, click Edit Page | Admin Roles. You’ll see a panel similar to that in Figure 9-11.
Figure 9-11: You can add and delete other Admins of the Page, making it easier to maintain and support your fans.
2. Click in the Type A Name text box, and start typing the name of a confirmed friend of your primary Facebook account who you want to add as Admin. As you type, a list of candidates will appear. Click the name you want, and a thumbnail will be displayed.
3. Click Manager. A menu will appear that defines what level of access the Admin will have:
• Insights Analyst Can view Insights.
• Advertiser Can view Insights and create ads.
• Moderator Can do what the Advertiser can do, plus send messages as the Page and manage comments.
• Content Creator Can do what the Moderator can do, plus create posts and edit the Page and add Apps.
• Manager Can do everything on the Page, plus add and delete Admins.
4. If you have another Admin to add, click Add Another Admin and do the same as in Step 2.
5. Click Save. You see a Change Page Admins dialog box.
6. Type your Facebook password, and click Confirm.
Remove an Admin
1. On your Page’s Admin Panel, click Edit Page | Admin Roles.
2. Click Remove (the x) to the right of the name you want to remove, and click Save.
3. Type your Facebook password, and click Confirm.
Control Who Sees Your Page
You can tailor your Page to the people most likely to be interested in your product or entity.
1. On your Page’s Admin Panel, click Edit Page | Manage Permissions. The page displayed in Figure 9-12 is displayed. You have these options:
Figure 9-12: You can define in broad terms who your viewers may be.
• Page Visibility Makes your Page invisible, even to its supporters. This is a way you can turn its availability on and off. The page is visible when no check mark is present.
• Country Restrictions Lists only the countries that are allowed to view or not view your Page. If you do not enter any countries, viewers from all countries can see your Page, which is the default. If you enter a country name, click one of the options beneath to specify whether the country is able to view or not view the Page.
• Age Restrictions Limits the age of viewers. This may be needed for videos, photos, or language that is more appropriate for adults. Over age 13 is the default.
• Posting Ability Defines whether users can post content, add videos, or add photos to your Page. If you do not want to allow others to do this, clear the check marks. The default is to allow all viewers to post or add photos and videos.
• Post Visibility Allows others to choose to see the most recent posts by others. It is connected with the option Default Visibility Of Posts By Others, which sets the default of whether posts by others can be seen on the Page’s Timeline or not.
• Tagging Ability Determines whether viewers can tag photos on this Page.
• Messages Allows others to leave a private message for you by displaying the message button or not.
• Moderation Blocklist Allows you to define certain words or phrases, separated by commas, that cannot be posted to your site. If someone uses these, their post will be marked as spam and only you can see it.
• Profanity Blocklist Allows you to define certain words as being profane. In this case, the post will not be allowed.
2. Click Save Changes to make your permissions permanent.
| Tip To see who “Likes” your page, in the Admin Panel, click See All in the New Likes box. If you don’t see the New Likes box, click Show in the Admin Panel menu bar.
|
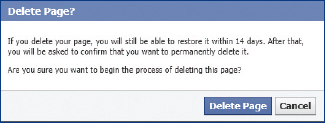
Delete Your Page
1. On your Page’s Admin Panel, click Edit Page | Manage Permissions.
2. Click the Delete Page link.
3. Confirm you want to delete it by clicking Delete Page.
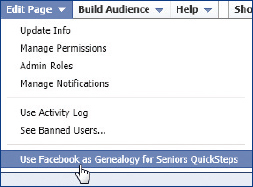
Use Facebook as Your Page
Switching to Facebook as your Page allows you to choose between being identified by your Page name and being identified by your regular Facebook name. For instance, I currently use Carole Matthews as my Facebook identity. When I post to my Page, QuickSteps Books, I am still Carole Matthews. I can switch this if I choose to always be QuickSteps Books. It is important to realize that if you switch, you can immediately switch back.
Switching identities makes your Page the way everyone sees you on Facebook, and the way you see yourself. For instance, you will notice that when you click Home, you see your Page, not your original Facebook pages with all your friends. Your Home page will display a different set of News Feeds, for instance, from other pages you “like.” Your Profile shows your Page Wall as others see it. Your original pages are not gone; they are hidden while your Page is being used as your Facebook site. When you reverse the switch, you’ll see your original Home and Profile pages again.
To determine which works for you, you need to answer the question: Is my Page the reason I have a Facebook account? Or is my Page something ancillary to my Facebook identity? If you want to use your Page as your primary Facebook identity:
From your Page’s Admin Panel, click Edit Page | Use Facebook As page. The identity of the Page will be switched from your name to your Page. This means that your posts from this site will be labeled with your Page name, not your personal name.
• You will now be notified when others click on or post to your Page, not to your personal Timeline.
• You can now find other Pages to like and comment on using your Page name.
• You’ll now have a News Feed just for your Page that is connected to other Pages that you or other Admins have “Liked.”
• You can reverse this setting and restore your original Facebook name at any time.
Reverse the Switch
If you want to return to using Facebook as your name:
From your Page’s Admin Panel, click Edit Page | Use Facebook As yourname. The identity of the Page will be switched from your Pages to your own name. This means that your posts from this site will be labeled with your own personal name, not that of your Page.
Like Another Page
Featuring other Pages on your own allows you to reach out to a broader community, letting viewers know something more about you. It can be a marketing tool as well, getting your own Page recognized by other Pages. To like or comment on other Pages, you must be switched to Use Facebook As Your Page.
Here is what you need to do to “Like” another Page.
1. Switch your Facebook identity to your Page. To do this, refer to “Use Facebook as Your Page.”
2. Search for or otherwise open the Page you want to like.
3. Beneath the cover photo, to the right of the name, click Like.
Rue Spreads the Word About Legal Hassles
I work as a spiritual life coach, and I use Facebook mostly to let people know about newsletter articles that I have written or new programs that I am offering. I also love reading about what my adult daughters are doing on their pages and sharing the odd YouTube video that has touched my heart.
Facebook was useful for me recently in helping to spread the word in the coaching community about a difficult legal issue that I had been beset with for a long time. I had been accused of practicing therapy without a license by the licensing regulatory board of the state I live in. I needed to hire legal defense. After nearly a year, the attorneys were able to clear my name.
I wanted to share with other coaches what I had learned about how to avoid professional legal risks. I was interviewed by several people, who then used Facebook to distribute the interviews and the information that I provided within the coaching community. Many people reposted the interview and information link on their own Facebook pages.
I am so glad that Facebook was there so other people could learn how to avoid what happened to me!
Rue H., 67, Colorado
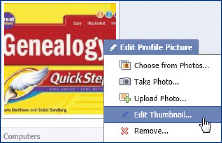
Adjust the Page Profile Picture
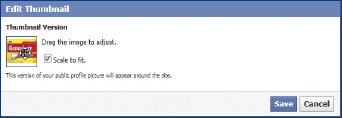
Your profile photo is used wherever your Page is referenced. It is important—both for personal and professional reasons—to have it be the image you are seeking. If the photo is not exactly what you want, you can delete or replace it or reposition the image to show parts of it more clearly.
1. Hover your pointer over the profile photo. Click Edit Profile Picture. A menu will be displayed.
2. You have these options:
• To replace this photo with another one, click Choose From Photos to select from uploaded photos, Take Photo to use the webcam to take a photo, or Upload Photo to upload a new photo, depending on how you want to select your replacement picture.
• To drag your image and reposition it, click Edit Thumbnail. Your cursor turns into a crosshair image. Using it, drag the image where you want it placed. Click Scale To Fit to scale the image to fit the space. Click Save to retain the new position.
3. To delete the photo, click Remove.
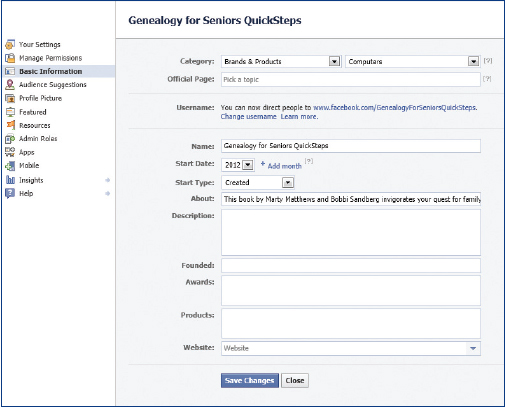
Change the Page’s Basic Information
Basic information includes everything essential about you. You see it on the Info page—your Page profile—and it gives your fans a way to know about your mission and background. Here is where people will understand who you are and why you are inviting them to look at your Page, so you want the information to be interesting and authentic. To change basic information:
1. From your Page’s Admin Panel, click Edit Page | Update Info. The Basic Information panel is displayed, as shown in Figure 9-13.
Figure 9-13: Your basic information is displayed on the Page’s Update Info page.
2. The page for editing your basic information is displayed:
• Click in each text box or click the down arrows, and type or select the contents.
• Proceed through the form until all the information you want to reveal is entered.
3. Scroll to the bottom, and click Save Changes to retain your changes.
4. Click View Page in the upper-right corner to return to your Page.
Manage Your Posts
You can manage your posts by placing them in favored positions, deleting them, or pinning them to the top of the post list.
Star a Post
To make a post larger and more prominent on your page:
1. Hover your pointer over the post.
2. Click the Star. The post will be expanded to fill both columns, such as seen in Figure 9-14.
Figure 9-14: A post can be “starred,” which expands it, giving it more display space.
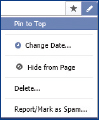
Pin a Post
Pinning a post at the top of a Page displays it more prominently and flags it for readers. The pinned post remains in place for seven days, and then is returned to its posted date-and-time slot. To be pinned at the top, the post needs to originate from the Page (not by a reader). To place a post near the top of a Timeline:
1. Hover your pointer over the post.
2. Click Edit (the pencil icon) | Pin To Top. The post will be moved to the top of the post list, and a bookmark displayed on the upper right.
Hide a Post
When you hide a post, it is removed from being seen by others. However, any photos will still be visible in the Photos view. Some posts cannot be hidden.
To hide a post from showing:
1. Hover your pointer over the post.
2. Click Edit (the pencil icon) | Hide From Page. The post will be hidden from view on the Timeline. You’ll see a message on your Page where the item was posted. You can click Undo at this time to repost it.
| Tip To unhide a post after you’ve hidden it, on the Admin Panel, click Edit Page | Use Activity Log, scroll to the hidden item, and click the Hidden from Page icon on the right.
|
Delete a Post
When you delete a post, it is deleted from your Timeline. There is no way to get it back. Some posts cannot be deleted.
To delete a post:
1. Hover your pointer over the post.
2. Click Edit (the pencil icon) | Delete.
3. Confirm that you want the post deleted. Click Delete Post again.
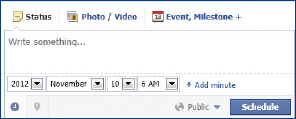
Schedule Your Post Time
You can create your posts and publish them later by scheduling when they are to be published. To publish your post for a specific date and time:
1. In the Write Something text box, type your post as usual.
2. Before posting it, click the Schedule icon  .
.
3. Click the Add Year down arrow and select a year; the month will appear. Select the Add Month and the day will appear. Continue until you have the exact time and date you want the post published.
4. Click Schedule.
Block Keywords or Profanity
You can block certain keywords from being posted on your Page. When people type in the blocked words, the content is marked as spam.
1. On the Admin Panel, click Edit Page | Manage Permissions. The Manage Permissions pane is displayed.
2. You have these options:
• In the Moderation Blocklist text box type the keywords you wish to block. Separate them with commas.
• Click the Profanity Blocklist down arrow, and select the degree of profanity you wish to block: None (the default) for no blocking, Medium to select commonly used profanity, and Strong to block the strongest, most offensive words.
3. Click Save Changes.
Keep Track of Your Traffic
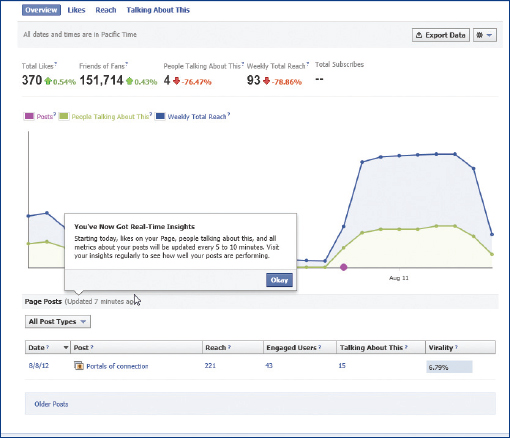
Facebook tracks some interesting statistics about the traffic crossing your Page. It tracks the size of your audience (who “Likes” you or comments on a post), whether they pass it on to other Pages, and displays reactions to posts by percentages, numbers, and graphically. An example is displayed in Figure 9-15.
Figure 9-15: A sampling of the statistics you can see about your Page
1. On your Page beneath the cover photo, click the gear icon | View Insights. You’ll see an Overview view. You have these options:
• Click Overview to see an overview of how widely your posts have been circulated. This is the default view.
• Click Likes to see who has “Liked” your page by gender and age, by country, and how many are new “Likes.”
• Click Reach to see the demographics of the span of your reach by gender, age, and country. You can see the frequency and dates of your reach and the visits to your Page by date. You can see the number of unique visitors.
• Click Talking About This to see the demographics of those who have talked about your page by sharing or commenting on posts by age, gender, and country. You can see how they have talked about your posts: by the number of Likes, stories from your posts, mentions and photo tags, or posts by others.
• Click Export Data to download the statistics to an Excel (.xls) or comma-separated text format (.csv) file so that you can work with the numbers.
• Click the gear icon to get additional information on how to understand the Insights pages.
Register a Username
As the Admin of a Page, you can request a username, similar to the username for your personal Facebook page. A username is simply a shortened name for your Page that makes it easier to use as a URL to the Page. For example, in the URL http://www.facebook.com/username you can use a name that is the same as your business or product, making it instantly recognizable and easy to remember and reference.
The only rules are that before you can obtain a username, you must have at least 25 followers or fans. The name itself must be yours to obtain—that is, you must have the right to use the name. It must be alphanumeric with no special characters (except it can contain a period). The name cannot be generic, such as “flower” or “music.” (That would allow unfair advantages to someone who could claim the URL http://facebook.com/flowers, for example.) The username must be specific to your Page.
Facebook claims that each Page can have one username specifically for it. Each Page must fit the eligibility criteria.
To get a username for your Page:
1. On your Page, click Edit Page | Update Info on the Admin Panel menu bar.
2. Click Create A Username For This Page.
3. Click in the Enter Desired Username text box, and type the name you want.
4. Click Check Availability. If necessary, repeat until you find a name you like.
5. Click Confirm to finalize the process.
| CAUTION! You can only have one username for a Page, and it cannot be changed once you’ve confirmed it (even to correct a misspelling), so make sure the name is exactly what you want before you confirm it.
|
Nancy Watches Facebook Help Her Son
My adult son recently made a decision to go professional with his singing talent. He’s had a personal Facebook page, but not being a computer enthusiast or a “small talk” communicator, he clearly needed a way to market himself more effectively. Facebook has been amazing!
Although a friend created a fan page for him, he doesn’t have professional photos or videos yet, but with the help of his Mac, Garage Band, and a little creativity, he has learned to post videos of his performances. He has also set up an event calendar on the fan page. His connection with the music community is growing quickly. People seem to appear out of the woodwork, helping to professionalize his fan page, as well as set up a blog and a website. He successfully has booked show after show in just a few short weeks.
Finding a Facebook fan page without being a member of Facebook has been instrumental, I’m sure, in getting some private party bookings. This could not have happened as quickly without Facebook, no matter how excellent his music may be. While he is still learning, the pace has been incredible, and his fans, friends, and his mom are all hopeful.
Nancy C., 67, New Mexico
MARKET YOUR PAGE
Pages, as you’ll recall, are public. They are designed to tell the world about some person or entity. You want others to see your Page. There are some ways you can make your Page more visible to others. One is simply to post updates. See “Post Status Updates” earlier in the chapter. You can also post a Like box on your site (see “Promote the Page with Plugins”), create an ad, or get a Badge.
Promote Your Page with an Ad
Promoting ads on Facebook is not free. But you set the price you’re willing to pay for an ad. Your price is entered into an auction type of process, where ads compete for valuable Facebook space in the right column. The higher your bid, the more likely your ad will be displayed. The less you are willing to pay, the less likely an ad will show results. However, the total price you pay will most likely be less than your budgeted amount, since Facebook charges you for what the ad actually costs, not what you’re willing to pay for any individual display of an ad. Prices change as the auction sifts through the display possibilities and competing bids for the space.
An ad for your page is easy to create. The two primary items to think about are the 135 characters of text and the image that you use in the ad. To make the ad work for you, you should identify who you want the ad to attract and form your words accordingly. The image, the most dominant part of your ad, should be attractive and appropriate to the organization.
1. In the Admin Panel, click Build Audience | Create An Ad. The Advertise On Facebook page is displayed, as shown in Figure 9-16. On the right is an ad preview. As you change your ad, it is reflected in the preview.
Figure 9-16: The first step in creating an ad is to design it with Facebook’s help.
2. You have these options:
• Choose a Facebook Destination This is where the viewer will end up when they click your ad. It should be your Facebook Page or the URL for an external website.
• What Are You Promoting Choose what you are promoting; for example, in Figure 9-16 the choice is between promoting a Page or a post on the Page.
• People Will See Choose between Facebook Ads, which is a typical ad for your business, cause, or person (and is probably what you want), and sponsored stories about your friends liking your Page or posting. When you click this a new panel pops up.
• Headline The title of the ad defaults to the title of the Page. You cannot change it if you are advertising a Page.
• Text The body’s standard text is contained in the text box. If you want to change it, click in the text box and replace the default text with your own text. It can be no more than 135 characters in length.
• Image Find an image for the ad for the Page, click Browse, and find the photo or graphic you want. It must be no greater than 100 (wide) × 72 (tall) pixels. If it is of a different size, it will be resized. Animated and Flash images are not supported.
• Landing View Click the down arrow and choose where a reader will land when they click your ad.
3. When the preview contains the content you want, scroll down. You’ll see the audience selection portion of the advertising form.
4. In the Choose Your Audience section, you can narrow the focus of your ad. By doing this you make the ad more effective—more specific to a targeted audience. All the targeting options are optional—perhaps advisable, but not required. You have these options:
| Note As you narrow the audience for an ad, you’ll see the numbers for your estimated audience decrease on the right.
|
• Location Identifies where people live. If you have a pizza parlor in Denver, for example, you’ll use a different location than if you sell cell phones internationally.
• Demographics Determines the specific age and gender of people who will see your ads. An ad for this book, for instance, would allow any gender over the age of, say 55, to be specifically targeted. I would not require an exact age match, so would leave the check box unchecked.
• Precise Interests and Broad Categories In the Precise Interests section, identify, using keywords, what interests your viewers will have. Think of all the keywords you can that might narrow the reach of the ad to be more directly targeted to those you want to see it. In the Broad Categories section, scroll down and select the broad categories that match the interests of your targeted population.
• Connections Allows you to specify the connection to the Page of those who will see it. Do you want people who already know of it and like it to be targeted for repeat business or new events? Or do you want people who don’t know about you to see your ad? The Friends Of Connections setting restricts the audience to only those friends of friends who also know about your Page. You’ll probably want to ignore this.
• Advanced Demographics If you click Show Advanced Targeting Options you can determine demographics pertaining to relationships, languages, education, and workplaces, as shown in Figure 9-17.
Figure 9-17: You can use Advanced Demographics to narrow your audience even more.
5. Continue to look at your audience numbers in the right column.
6. Scroll down for the objective part of the ad. This allows you to choose between billed for people who see the ad or story, or who actually click on the ad or sponsored story. If you choose Click On My Ad Or Sponsored Story, you’ll see a suggested bid to the right.
7. As you scroll down further, you’ll see the campaign, pricing, and schedule part of the ad. You have these choices:
• Account Currency Sets the currency you want to use.
• Account Country Sets your country.
• Account Time Zone Sets your time zone.
• New Campaign Name Names the current ad campaign. This helps you identify which ad produces which results. It makes tracking your ad or sponsored stories easier.
• Campaign Budget Sets a budget for the ads. You can set the budget to be for the lifetime of the campaign or per day.
• Campaign Schedule Have the ad run continuously by retaining the check mark in the check box. If you clear the check mark, or if you choose a lifetime budget (in the Budget menu), the schedule will show the beginning and ending date and time for the campaign to run.
• Pricing The default is “simple pricing,” wherein Facebook manages your budget and tries to maximize the display of ads during the campaign. You will not be charged more than your budget. You’ll not want to set your bid at the minimum or your ad will not be shown very often. The higher your bid, the more your ad is displayed. Remember that you’re competing with others for space in someone’s left column.
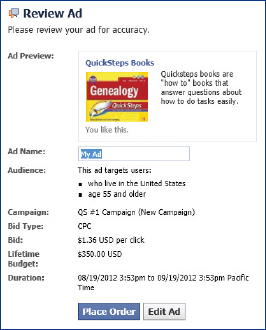
8. When you’re ready, click Review Ad. You’ll be shown a preview of the ad and the specifications you’ve set. An example is shown in Figure 9-18.
Figure 9-18: You can preview your ad prior to placing the order.
9. When you are ready, click Place Order.