Chapter 1
Stepping into Facebook
As seniors, we’ve seen a lot of changes. One of the most important is how the Internet has changed how we do many things—and one of the Internet tools most visible today is Facebook. From the largest and most disappointing stock offering in history, an Oscar-nominated movie, an enabler of revolution in the streets, and governments scrambling to shut Facebook down to stifle the flow of information, to less dramatic actions of grandmothers showing their friends photos of a new grandchild, Facebook is a versatile and dynamic Internet tool changing our vision of what our world may be. Seniors are right there, in increasing numbers, making use of Facebook to communicate, play games, and track what is going on with friends and family as well as interesting groups.
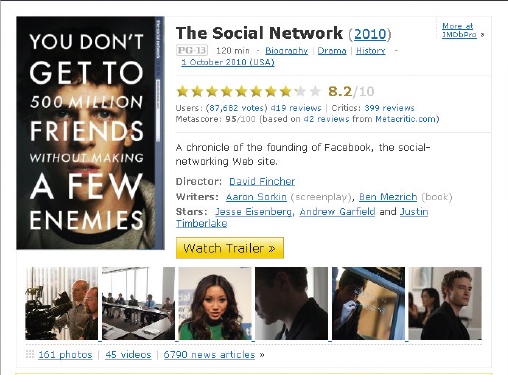
Facebook, now a publically owned website, was launched in 2004 (the movie The Social Network, shown in Figure 1-1, depicts its early days). Today it is perhaps the most visible social networking presence, although others are entering the competition for social networking. More than 900 million active users (http://en.wikipedia.org/wiki/Facebook) spend time on Facebook, some for hours a day. Facebook allows you to connect with other Facebook users—you choose which ones. You first set up your own webpage, which can be private for your designated family and friends or public where anyone can find you and initiate a connection. You can include a photo and personal information, or not, and then you can send invitations to others to be “your friend,” or respond to others’ invitations. You can correspond with all your “friends” at one time or individually, depending on your choice. You have to be over age 13 to use Facebook; most likely, that is not a problem if you’re reading this book!
Figure 1-1: The movie Social Network presents one interpretation of how Facebook was founded.
In this chapter we’ll find out what Facebook is all about, prepare for and sign up for an account, set some basic defaults and preferences, and build your initial profile. You also see how to get help, deactivate your account, and log in and out.
PREPARE FOR FACEBOOK
One of the ways you can prepare for Facebook is simply to wrap your mind around how Facebook is impacting our world. We’ll start the chapter with ways to think about what Facebook is. Also, I am assuming in this book that you already have a computer and the correct equipment, and that you know the basics about wandering through Windows. However, you may not be signed up for an Internet connection or email account, both of which are required to use Facebook. You’ll need to get both before you start; this chapter assumes you have both.
 Connect to the Universal Facebook
Working with Facebook over the years, I have come to see it as something more than a sophisticated social networking tool. Indeed, as we witness the role Facebook has played in communicating about revolutions, earthquakes and tsunamis, royal weddings, and other global events, we can see and feel it becoming ever more visible in our lives. It is even changing our language—“facebooking” and “unfriend” are two new words now in our vocabulary. To me, Facebook displays a new form of global human consciousness. What do I mean by that?
After all, at one level Facebook is just a computer program using various forms of communications to connect people worldwide, including telephone wires, satellites, computers, and radio waves. It is a human tool—certainly not, one would assume, a thinking entity. But Facebook is also more present to the world than a single human mind—it is a connection of millions of minds entering information and communicating through one network. Its presence in the world is not a trivial thing. The implications are immense. One image I have of Facebook is that of a global breathing mechanism: on the inhale, information comes in and is digested and recognized; on the exhale, information in the form of millions of messages is sent racing around the globe. Another image might be that of a global nervous system: stimuli come in the form of billions of bits of information; responses go out in millions of messages along electronic neurons on the Internet. Each human becomes a node in this network—one receptor in a nervous system.
Experience Immediacy of Information
One impact of Facebook, of course, is the immediacy of information. Within a couple of seconds into the 2011 earthquake in Japan, Facebook was broadcasting news of it. During the subsequent tsunami, Facebook was sending photographs and videos, and family members were contacting each other. One friend of mine driving in Japan noticed how Facebook was tracking callers in Japan and displaying messages pertaining to the earthquake and tsunami. On her Facebook page she could view alerts from American officials targeted at Americans in Japan. This was a significant benefit to language and informational challenges in chaotic times. We can see what is happening in all parts of the world, from tribal Africa to the swamps of Louisiana, at the time it is happening.
This ability to connect and the immediacy of information seem stunning in their ramifications. An example is the 2011 Egyptian revolution—Facebook was credited to a large degree with outing a regime through enabling people-to-people communications. In days, a 30-year dictator was dethroned. What enables people to have the courage to change their lives in such a drastic way? One factor would surely be the confidence that they are not alone, that others (whom they don’t even know) will support and join their actions—visible though online dialog. Today we can see the effects of Facebook in the struggle for political resolution in determining what kind of a country Egypt will become.
Envision the Viral Nature of Facebook
There is a viral nature to Facebook’s passing on of information—no time to consider and analyze. It’s just out there. How does this happen? Information passes from one person to a hundred friends, who each pass it on to another hundred friends in an explosion that can reach millions of people in a very short time. You share a comment on Facebook, and all your friends see it. Your friends comment on your post or click “like,” and their friends see it, on and on. For people with thousands of Facebook friends, each one with friends or fans of their own, messages fly like bats out of a cave, darkening the sky. Global news, such as political intrigues, are everywhere, instantly.
Appreciate the Mirror of Your Life
Looking at what passes across your Home page or News Feed can be like a mirror—showing your life’s voyage, old high school friends, previous wives and husbands, your family, and your changing friends over the years. I’ve found, and you’ll find in the quotes throughout the book, that long-lost friends have resurfaced. Parts of our lives are again made current. Our lives become more of a whole, rather than segmented into current and past parts. It’s quite amazing to see one’s journey through a lifetime of friends and acquaintances.
Be Aware of Limitations
Facebook is a dynamic tool for finding information and learning about the world in real time, but it has its limitations, or at least some aspects that could be limitations if we’re not aware of them.
Be Cautious About the Quality of Information
A hidden consideration is the quality of information you’ll find on Facebook. Quality is mixed and reflects who we are as a species. Some of the information is authentic and reveals truth about events and the feelings of the sender. But some is intentionally deceitful, trying to hide truth and propagate lies. Some Facebook messages are inspirational, drawing us to a higher calling of ourselves; others, not so much. It’s worth keeping in mind that Facebook is not a place to go for the “real skinny.” It requires discernment and thought. Although we as a species now know what is happening on our planet immediately, we don’t necessarily know what is happening, if you get my drift. And this uneven quality is who we are as humans. What you confront on Facebook depends on who your friends are.
Think About the Consequences of Selection
This fact, that what you are exposed to depends on your friends, has pros and cons to it. Your friends become a natural filter—you know about what your friends know about. You see opinions of your friends. You may not see opposing viewpoints if your friends share common viewpoints. Consequently, you will not see the whole picture—you only see one side of it. We can become more isolated and centered in our way of thinking unless we are forced to confront and deal with opposing viewpoints.
| Note Facebook, as most online sites, changes its “face” frequently. It does this to improve its user interface, making it easier to use, correcting problems, adding new features, and so on. So this book, or any book, will never exactly reproduce your online experience. But it will be very similar so that you can follow along, allowing for the differences you’ll no doubt encounter.
|
Find a Public Facebook Page
Getting your Internet connection up and running and creating an email account are only beginning steps to getting started with Facebook. First, you will likely find that Facebook is most fun when you have an account, friends, and are connecting with others. But you can view pages on Facebook without an account as well. This will give you an idea of what Facebook is about. Then you can sign up, find friends, and set your initial defaults.
Facebook has private and public pages. The public Pages (capital P) are often used by celebrities, events, products, or groups for advertising purposes. You can create one yourself (see Chapter 9). Also, these Pages are available to non-Facebook viewers. They are very similar to your own Home page. To simply and quickly view a Page on Facebook, follow these steps.
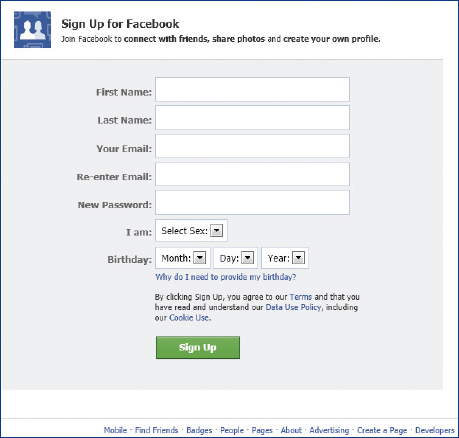
1. Open your Internet browser, and type Facebook.com in the address bar. The Home page of Facebook will be displayed—you can see the form in Figure 1-2.
Figure 1-2: The Home page of Facebook is where you find a form or sign up for an account.
2. Scroll to the bottom of the page, and click Pages on the bottom link bar. You’ll see a page of thumbnail images organized alphabetically.
3. Click the letter of the alphabet you want, and then click the thumbnail to see the Facebook public Pages for an individual or group, as shown in Figure 1-3.
Figure 1-3: Similar to your own page, a Facebook Page contains navigational tabs and postings from the site.
Pat Fights Being a Dinosaur with Facebook
I never thought about Facebook until my daughters flagged me as a technological dinosaur. They rummaged through my email contacts shouting, “Don’t you want to be friends with your buddies?” I thought I was friends with them, but I quickly learned Facebook carries friendships to a dynamic new level.
Imagine yourself at a party chatting with varied acquaintances, friends, and family. Some you know well; others you have not seen in years, or know only tangentially. With some, you will have thought-provoking, personal exchanges. Some discussions will be in groups, about books or a football game. Others you will want to track day-to-day events. Facebook enables you to keep up with all, gaining an expanded sense of family and friendship.
I use Facebook for social networking and follow that old advice “Don’t talk about sex, religion, or politics” when I write posts available to everyone. For private or select group conversations, I use Facebook messages. I encourage you to learn to use Facebook, set your privacy comfort level, and start reconnecting. Post pictures—they speak thousands of words. Oh, and don’t spy on your kids. It’s counterproductive.
Pat T., 68, Colorado
GET A FACEBOOK ACCOUNT
In this chapter you will get a Facebook account, perhaps saving a lot of the entering of data until later, if you choose. Chapter 2 explains how to input your personal profile in detail after your account is set up, so if you want to wait until later to enter personal data, do so. I actually recommend this in order to simplify the sign-up process and to have time to consider the implications of entering that data. Facebook creates a special “Welcome” environment that enables you to enter data easily when you are first establishing your site. This chapter covers the Welcome environment. However, you may find that entering your information at that time is inconvenient or you’re not yet comfortable doing it right then. So, Chapter 2 covers how you enter the same data once your Welcome environment is unavailable.
| Note You may not want to use your normal email account for your Facebook account, having greater privacy if you use a separate account from your regular email. You can quickly set up a new account using web mail. Web mail is the sending and receiving of email over the Internet using a browser, such as Internet Explorer, instead of an email program, such as Windows Live Mail. There are many web mail programs, such as Windows Live Hotmail (hotmail.com), Yahoo! Mail (mail.yahoo.com), and Google’s Gmail (gmail.com). As long as you have access to the Internet, you can sign up for one or more of these services, usually getting the basic features (simple sending and receiving of email) for free.
|
Sign Up for an Account
Setting up your beginning account is easy. You simply fill in an initial form with basic information, and then fill in the holes later with your personal data in your own Facebook page. If you find that you are not ready to fill in the details, you can skip some steps and do it later—“Skip” will be an option. To get started you’ll need an email address.
1. Open your browser, such as Internet Explorer, type facebook.com in its address bar, and press ENTER. The Facebook Sign In page is displayed, shown earlier in Figure 1-2.
2. Fill in the form with your name, email address, and a password. Enter your gender and birth date (needed to verify that you are old enough to register). Click Sign Up.
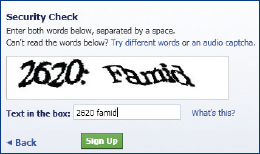
3. You may (or may not) have to type in the security check words designed to keep bots, or robot/drone computers, from pretending to be a person to access Facebook illegally. If the words are hard to distinguish, you may have to reenter them more than once. It’s a pain, but worthwhile. (The illustration contains one error in the typed code—can you find it? The answer is below.) Click Sign Up. The three-step page for completing your webpage will be displayed.
4. The first step in finalizing your webpage is to find your friends. If you want Facebook to look in your email files and find your friends, enter your email address and email password, and click Find Friends. Otherwise, scroll to the bottom and click Skip This Step—there will be other opportunities to find your friends. You’ll have to verify that you want to skip this step.
5. Step two allows you to enter your profile information. If you choose to do so now, type your high school, college, or university; the years you graduated from each; and then your employer. You may prefer to not enter dates that would reveal your age—in that case, you might want to wait and enter this later. Click Save & Continue. If you want to skip this step, click Skip—you’ll have another opportunity later.
• If you choose to enter the data now as you type school and employment data, you’ll see a list of possibilities (schools with the same names, for instance) presented to you; click the correct one if it is listed.
• Also, if you enter profile information at this point, you may see pictures of people you may or may not know and be asked if you want to add any as friends. Click any images of people who you know and want as friends in Facebook, or just click Skip or Save & Continue again.
6. The third step allows you to insert a picture of yourself onto your webpage. You can insert a photo or graphic using one of two techniques. Click Upload A Photo to find and retrieve a picture from your hard disk. Click Browse to locate the picture, and double-click it when found. Alternatively, click Take A Photo to take the photo with your webcam (the instructions for doing this are in this chapter in the section “Get Your Photo”). If you upload or take a photo, click Save & Continue; otherwise, click Skip to do this later. At this point you’ll see the Welcome To Facebook page of your new Facebook webpage.
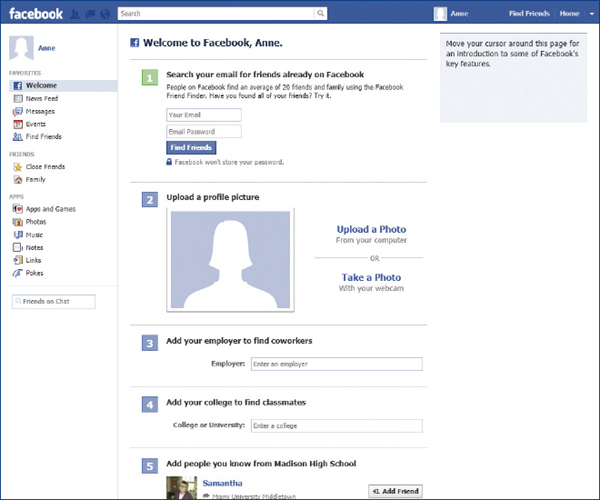
7. However, there is one more step. You’ll need to go to your email inbox, where you should see two email messages from Facebook. Double-click the Just One More Step email and click the link. You will automatically be confirmed and your Facebook page displayed, as shown in Figure 1-4.
Figure 1-4: When your email has been confirmed, your Facebook account is ready for you to enter the rest of your profile information.
| Note The Welcome to Facebook email allows you to click either the Get Started link or one of the three links in the body to begin your setup. You can come back to this email at any time. (In Facebook, to return to this beginning page, you can also just click Home in the upper right of the screen, and then Welcome in the left column.)
|
If you have chosen to skip entering your friends or profile, you can see how to do it in “Enter Personal Information in the Welcome Page” in this chapter, or refer to Chapter 2 to see how to do it at some future time.
| Tip Incidentally, the missing colon is the error in the illustration.
|
Open Facebook the Easy Way
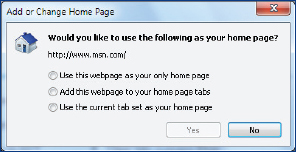
To place a Facebook tab on your Internet Explorer browser so that you can quickly find your webpage whenever you open the browser:
1. With your Facebook account opened in your Internet Explorer browser, find and click the down arrow on the Home icon  (in IE 8), or right-click the Home icon (in IE 9) and, in either case, click Add Or Change Home Page.
2. Click one of the following options, and then click Yes. (Click No if you don’t want Facebook to open automatically when you open the browser.)
• Use This Webpage As Your Only Home Page When you open your browser, this tab will be the only one that opens.
• Add This Webpage To Your Home Page Tabs This adds a tab for Facebook to the other tabs currently available when you open the browser. This is the set of tabs displayed when you open your browser.
• Use The Current Tab Set As Your Home Page This makes the current set of tabs available by default whenever you open the browser.
3. If you selected one of the options and clicked Yes, the next time you open your browser, a tab with the Facebook webpage will appear. If Facebook is not displayed, click the tab name (click Login and click Facebook) to open it.
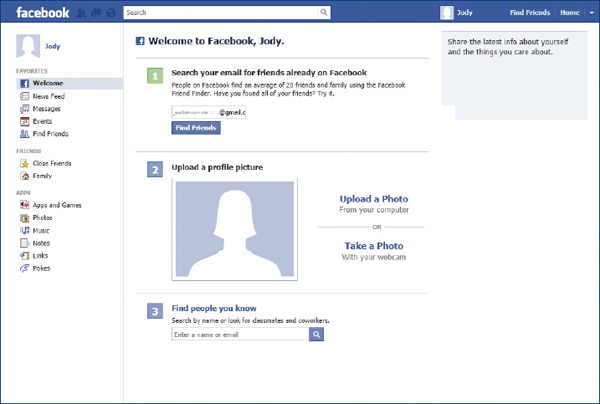
Enter Personal Information in the Welcome Page
When you signed up for your Facebook account, you had the opportunity to fill in personal information. After activating an account, Facebook welcomes you with a page, shown earlier in Figure 1-4, that leads you through finding friends, filling in your profile, and specifying which information may be displayed to the public. (If you don’t see it immediately, click Welcome on the left side.) On each step described next, just click the appropriate button, such as Find Friends or Upload A Photo. It is very straightforward, as you’ll see in the following sections.
However, unlike a lot of things in life, you will always be able to enter or modify your profile information. Chapter 2 describes how to change your profile information, even after you’ve gone “live.”
| Tip If you should lose your place after completing a section of adding personal information, click Home in the upper-right menu bar and click the Welcome link on the left column. You should be returned to the Welcome To Facebook page. Eventually, the Welcome link will disappear or become unreliable—there are other ways to access and change all the information, such as to click yourname | About.
|
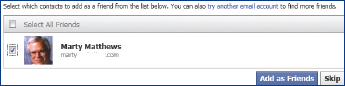
Find Friends in Your Email List
If you type an email address that has a contact list associated with it, Facebook will import the email addresses and find those contacts who also have Facebook pages. You will be able to choose which contacts you want to import into Facebook. To do this, you’ll need your email address and password. After you have chosen them to be your friend, an invitation is sent to each. They then confirm you as a friend before they appear on your list of friends.
1. In the Welcome page, type your email address and password into the text boxes, and click Find Friends. A window showing a list of people containing Facebook pages will be displayed.
2. Click the check boxes beside the names you want as friends, and click Add As Friends. You can also click Select All Friends to import all individuals in the list.
3. Repeat these steps with other email addresses if you choose.
To return to the initial page, you may need to click your browser’s back arrow button a couple of times or click Home on the menu bar and Welcome on the left sidebar. In this case, you’ll see that Find Friends is no longer displayed on the page, but you can still add friends easily.
Find Friends by Name
You may want to add friends not on your email list. You can ask Facebook to search for friends using either name or email address.
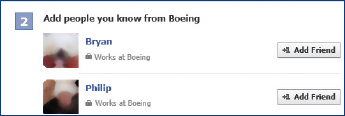
1. Under Find People You Know (see Figure 1-5), type the person’s name or email address, and click the Search icon. If you have typed the name, a list of candidates will be displayed. You’ll need to search through the list and find the one you want. If you typed the email address, the exact person is displayed.
Figure 1-5: The Welcome page allows you to enter information and find friends using the same initial entry format.
2. Click the image, and on the person’s page, click Add Friend. A request will be sent to them to be your friend. When they get your message and accept you, you’ll see a message on your Facebook page confirming the friend status.
Deborah Expands Her Networks
I’m a visual artist. The image orientation and relational aspects of Facebook present a dynamic landscape of family and friends from around the world and different phases of my life. Facebook keeps me aware and connected in new and expanded ways.
An example of this is an experience I had meeting Joan, who was attending a workshop of mine in New York. We agreed to connect through Facebook—just a casual intention.
Subsequently, in Japan while presenting another workshop, the big earthquake forced me to leave prematurely. I found myself in Hong Kong for three days because those flights were unavailable. As I sat wondering what to do, I posted on Facebook, “Guess what! I’m in Hong Kong for three days!” Soon after, Joan responded, “You’re in Hong Kong? Come stay with me!” Over the three days I held a surprise workshop; met a rich and rewarding group of colleagues in Hong Kong; and formed a strong, personal friendship with Joan.
Joan also needed a mentor for a project she was embarking upon. I knew just the person, Joe. Joe, retiring from an academic career, found that this invitation to mentor Joan in her project gave him a sense of new possibilities. Rich outcomes from one casual connection on Facebook!
Deborah C., 61, Washington
Get Your Photo
Placing a photo on your Facebook page makes it more interesting and lets others, especially people who have not seen you in person for a while, know that you are the person they are trying to reach. You must have either a digital photo or a webcam to take your photo.
1. On your Welcome page under Upload A Profile Picture, click Upload Photo to use an existing digital photo.
2. Click the Browse button on the right of the text box to open Windows Explorer and browse for your photo file. When you find it, double-click the photo or click the photo and click Open. The photo will appear on your page.
–Or–
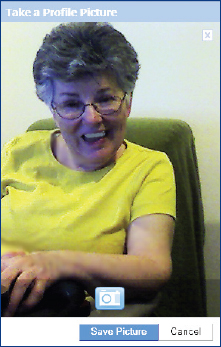
1. To use a webcam photo, click Take A Photo. The Take A Profile Photo window will open and display the Adobe Flash Player Settings dialog box.
2. Click Allow to let Facebook access your camera, and use the icons on the bottom to adjust how Facebook is using your camera.
• The leftmost icon allows hardware acceleration (which you probably want).
• The second icon contains privacy permission allowing Facebook to access your webcam photo.
• The third icon allows you to set the amount of storage that can be used for the picture.
• The fourth icon, which really doesn’t apply here, allows you to set the sound source and the volume level.
• The rightmost icon allows you to select the camera that you want to use.
To save the camera settings in the dialog box, click Remember.
1. Look into the camera, and when you like the image, click the Camera icon, and then wait for the countdown (3-2-1) while your photo is taken (smiling is optional, but lighting is critical!).
2. To save the picture, click Save Picture. To do it again, click the X in the upper-right corner to delete the picture and start over.
| Note If you find you want to change your profile photo in some way, either by adding a new one or changing the position of the image (for instance, perhaps the top of your head is shaved off or your face is too near the left side of the frame), see Chapter 2 for how to do it.
|
| Tip When taking a profile picture with a webcam, after clicking Remember in the Adobe Flash Player Settings dialog box, that dialog box is not shown again. If you want to return to the settings dialog box, right-click the Camera icon and click Settings.
|
Add Profile Info and Fill in Your Friend List
While you still have access to the Welcome page, you can fill in more of your friends. Getting connected with others is how you will truly experience the benefits of Facebook. The following instructions, depending on how much information you have already entered, may display slightly different numbering and titles of the Welcome page items than what you have on your page. However, the differences will be obvious. When you add someone as a friend, an invitation is first sent to them. They must agree to be your friend. To find more friends:
1. Under Add Your Employer To Find Coworkers, type the name of your employer in the Employer text box. A list of names with thumbnail images will be displayed, with others who work for that employer. You may want to click See All Suggestions to see more names. Click Add Friend for any that you know and want as your friend. An invitation will be sent to each person informing them that you want to be a friend.
2. Under Add Your College To Find Classmates, type the name in the College Or University text box. A list of potential classmates will be displayed. Again, you may want to click See All Suggestions to see more names. Click Add Friend for anyone whom you want as a friend.
3. Under Add Your High School To Find Classmates, type the name in the High School text box. Again, a list of people will be displayed. Click See All Suggestions to see additional names. Then click Add Friend for those classmates you’d like as a friend.
4. Under Add More People You Know, you’ll see a list of people who are friends with anyone you have already selected as being a friend. This is a good way to find people you might not think about otherwise. Again click Add Friend to send a request to be your friend.
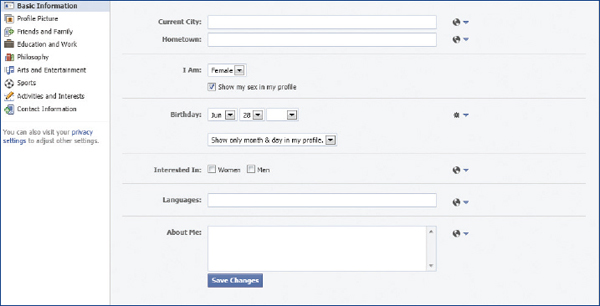
Fill in Basic Information
Before you go too much further, it is good to enter other important information. Security is an important element in entering this information, and Chapter 10 discusses security in detail. I’ll cover some of the basics here, but Chapter 10 is the place to go for more answers. Before you start, think about how much information you feel comfortable revealing. For example, it’s really not a good idea to reveal all information about yourself because of the problems around identity theft. Your exact location and birth date are examples of information I would never reveal.
To get to this information, which is discussed in more detail in Chapter 2, follow these steps:
1. Click your name in the upper-right menu bar.
2. Scroll down until you see Basic Information. Click Edit. The form shown in Figure 1-6 is displayed.
Figure 1-6: Basic Information contains the bare minimum of profile data.
3. Here is where you need to ask yourself some basic security questions. Here are our recommendations:
• When showing location, we recommend that you don’t enter your exact location. It’s better to specify a city close to you in the same state.
• It’s better not to display your whole birthday. You can choose to display the whole thing, only the month and day, or not at all.
• Be careful what you reveal about yourself, such as the names of children or grandchildren. You want a balance between revealing enough of yourself to be interesting and authentic, and not revealing too much so that someone can take advantage. You can choose where the balance feels right to you.
4. Click Save Changes when you are finished.
Final Thoughts on Entering Personal Information
You can also edit settings for your mobile phone and find more friends. Chapters 2 and 5 give you information on how to configure these settings. This section has given you a quick overview of how to set your initial profile. Remember that you can change these settings and more at any time.
FIND USEFUL TIPS
Here are a few useful tips that you may find are needed sometime during your Facebook life. For instance, Facebook has a Help Center that can be enlightening. It gives you tips on how to do more common tasks, such as adding friends or troubleshooting problems. Although you cannot directly contact Facebook to discuss specific problems, you can search through a myriad of questions that have already been answered and enter a new question of your own, which the gods of Facebook may opt to answer—or not.
Access the Help Center
The Help Center is a system of questions and answers plus user discussions. Frankly, it is not a great help system. It is hard to find the answers to specific questions—and you need to have the right question or it is no help at all. The discussions often reflect a high level of frustration of people trying to figure out unique problems. However, for the most common needs, it will probably work for you. To access and use Facebook Help:
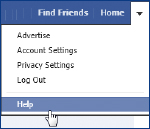
1. Click the down arrow to the right of Home on the menu bar, and click Help. You’ll see another menu.
2. You’ll see a small dialog box asking what help you want. You can either click a specific Help topic, such as Manage Your News Feed, or click in the Search For Help text box and type your own topic. To get a greater understanding of the Help feature, click Visit The Help Center link at the bottom. The window shown in Figure 1-7 is displayed.
Figure 1-7: The Help Center, always available, contains links to information you may find useful.
3. On the left is a navigation bar containing links to the overall concerns. For instance, Facebook Basics will give you information on the overall use of Facebook. If you want to view help for games, click Apps, Games And Credits.
4. Beneath the list of overall topics is a link to the Community Forum. Click it and you will see the Community Help topics for specific areas of Facebook. Which topics are displayed depends on the selected link on the left—Community Forum at the bottom is the default. Click a link to find out what questions have been asked by the community. At the bottom of the community help topics, you’ll see links to My Questions, My Answers, and Questions I’m Following. These allow you to track your questions and answers, and those of other community members.
5. To return to your Facebook page, click Back To Facebook in the upper right of the menu bar. (You may have to click Facebook Help Center on the upper left first.)
Deactivate Your Account
When you deactivate your account, it is unavailable to others. You can reactivate it at a future time. If you find that you want to make your Facebook account inactive, here is how you do it.
1. Click the down arrow to the right of Home, and click Account Settings.
2. Click Security on the left column. Then beneath the list of Security Settings, click Deactivate Your Account. The Are You Sure You Want To Deactivate Your Account? page is displayed.
3. Click a Reason For Leaving option—this is required. You can optionally click Other and then click in the text box and type a message. Click the Email Opt Out check box if you do not want to receive further emails from Facebook.
4. Click Confirm. Or you can click Cancel to change your mind. You’ll need to enter your password to confirm it is really you and then a security code.
Reactivate Your Account
Once you have deactivated your account, you can easily restore it: Simply log in to your account with your email address and password.
Terminate an Account
You can also, with a bit of difficulty, terminate a Facebook account if you are sure you will never want it again. When you do this, all information on your Facebook account is no longer available. You cannot be found in a search. You cannot reactivate the account or retrieve any content. (Some comments that you have posted to others will still be visible on their sites, however.)
1. From the down arrow to the right of Home on the menu bar, click Help and then click Visit The Help Center.
2. In the Search text box at the top of the Help Center page, type terminate an account. You’ll see a list of Frequently Asked Questions (FAQ) results.
3. Click How Do I Permanently Delete My Account?
4. In about the third paragraph down you’ll see a link to permanently delete your account.
Log In and Out
It’s a good thing to officially log out of your Facebook account, especially if you are not the only one using your computer, or if there are others who can peek at your computer monitor. If your Facebook page is open, anyone can see what is on it. This may not be a problem, but if it is, log out.
• To log in, just type facebook.com in the browser address bar, enter your email address and password, and click Log In.
• To log out, click the down arrow to the right of Home on the menu bar, and click Log Out.
Reviewing a Facebook Glossary
Facebook has its own vocabulary. Here are some common words you’ll encounter:
• Chat You can “chat” with someone else who is online at the same time. You indicate that you want to chat, and a dialog box opens, allowing the two of you to hold a person-to-person, written conversation.
• Friend A friend is someone you usually know, but may not, whom you have judged to be able to view your personal information, your Timeline Wall, and your postings. Usually this is someone imported from your email contact list, but you can also find their Facebook page (usually because you have friends in common) and ask to be their friend.
• Like When you see a comment, photo, or posting of someone else’s that you like or agree with, you can click a Like link that allows you to indicate your pleasure without writing anything. It shows to others that you have read their comments or viewed a photo or video and acknowledge it.
• Newsfeed When your friends (or others, not necessarily your friends, where you have commented on a Facebook page) post something to be shared, it is shown on your Home page. You see a stream of comments from everyone you have as friends on Facebook. You can see comments and happenings from old and new friends, from organizations you follow, and from individuals playing games you play. It is the primary focus of Facebook.
• Poke someone This is an irritating way to say “Here I am” to your friends. If you have to do this at all, do it sparingly. When you poke someone, a “poke” icon appears on their page with the ability to remove it or “poke back.”
• Postings This is a comment you type and share with others. It can be in response to another’s posting or a new one of your own. This is how you communicate with all your friends at once and others on Facebook.
• Profile Your personal information is your profile. Your education, home, family, job, contact information, and so on are how you communicate with others about yourself. It is displayed on your Timeline protected by your audience selectors—a way of setting privacy by selecting who will see your personal information. Some of your personal information, such as your name and profile picture is by default set to Public and cannot be hidden without hiding the site.
• Tagging You can tag a photo, post, pages, events, groups, or applications. When you do, you place a link in your News Feed that lets others link through your post to the tagged source. This enables you to draw attention to elements in Facebook that you like and want others to see.
• Timeline Facebook’s “album” approach to displaying the content of your Wall, including previously posted comments, photos, and replies from others. The information about you is posted according to the date it was entered into Facebook. You can add information about your life into the Timeline so others can see what has happened to you in the various years. A Timeline replaces the Profile page in earlier releases of Facebook.
• Wall The Wall is the area on your Timeline or older Profile page where you share information about yourself, and others post on your page. It is the content you see when you display your own Timeline or Profile pages or click a friend’s Facebook page. It is what others see when they click your name. It contains personal photos, videos, posts and postings from others, and your list of friends You get to it by clicking your own name in the upper-right menu bar.