In every photo you will ever take, there are three controls that determine the amount of light used in the exposure: the aperture, the shutter speed, and the ISO setting. There have literally been hundreds of books and videos produced on this topic. Understanding exposure is actually one of the most elementary aspects of photography—and, in fact, I teach my workshop students to think of the exposure as follows:
1. How much light? (The aperture.)
2. For how long? (The shutter speed.)
3. On a sensor that is preset to what sensitivity? (The ISO.)
As we dig further into this topic, I’ll introduce several controls for each of these three elements and how best to apply that particular element depending upon the image content or purpose.
Not too many people think about the reciprocal nature of photography. Whenever you are working with ambient or natural light, that is to say anytime you are not using a flash, setting your camera to 1/500 second at f/5.6 records the exact same amount of light as setting it to 1/60 second at f/16. You open the aperture 3 stops and close the shutter 3 stops, so the reduced time of exposure (shutter speed) balances the increased amount of light for an equivalent exposure with either pair of settings. There is, of course, a difference in terms of the depth of field and either the freezing or blurring of any action—but from purely an exposure level standpoint, they are exactly the same (image 1–1).

Image 1–1. Each of these combinations of shutter speed and aperture records the same total amount of light in the image.
In film photography, photographers often discussed a phenomenon called “reciprocity failure” (also know as “reciprocity effect”). This referred to film’s inability to yield truly equivalent exposures at shutter speeds faster than 1/10,000 second or slower than 10 seconds. In both of those extreme cases, film reacted differently and not evenly. In order to produce an equivalent exposure, you had to know the reciprocity factor of the specific film you were using. Film manufacturers produced charts with reciprocity effect values that allowed for fast exposure compensation calculations.
Happily, reciprocity failure is not really an issue with today’s digital camera sensors. With almost no exceptions, exposures at any shutter speed—either very fast or very slow—hold their expected linear relationships. When working on location, you can now use a very long shutter speed and be assured that the law will hold, and the doubling or halving of exposure times will provide the expected results.
Correct Exposure vs. Appropriate Exposure
One of the more finely nuanced aspects of photography I learned early on in my career is that there is the correct exposure for a particular picture, but there may also be the appropriate exposure—and this could very well differ from the correct exposure.
While the correct exposure documents each and every important tone in a way that accurately represents what the scene or subject looks like, the appropriate exposure might be darker or lighter. Proactively making this alteration in brightness can produce an image with more impact, drama, and possibly even a better sense of mood. As a photographer, you have the ability and responsibility to lead the viewer to the type of feeling you want to convey with your work—and often this is achieved by refining the exposure.

Image 1–2. “Correctly” exposing the couple would have made the sky bright and washed out. Underexposing to capture the couple in silhouette was a better choice for this scene.
Exposures are usually made by light striking or falling on your primary subject. Of course, there are exceptions; read on for more about that. When it comes to using sunlight or any type of ambient light, front-lit subjects (and even many side-lit subjects) can and should be easy to expose. However, there are exceptions to just about every aspect of photography and getting exposures that are appropriate to the image are no different. For example, there are some subjects, objects, and times of day (backlighting situations, silhouettes, and more), when the right exposure is not the best exposure you could use.
Consider a scenario where you are photographing an engagement portrait on a beach at sunset (image 1–2). If you are shooting for a great sunset, the couple will likely be in silhouette with little or no detail. You’ll get a deep, rich, and colorful sky—no problem. But, if you are shooting for good exposure on the couple, to see detail in their faces or clothing, the sunset will be very light, washed-out, and not have the rich color and impact you might expect. This is a case where the dynamic range of the camera simply cannot hold the exposure detail in both the backlit foreground and the more brightly lit background. To simultaneously capture detail in both of those areas, you’d somehow need to bring the two relative brightness levels closer together. As we go through this book, we’ll discuss the numerous methods for lowering the value of the sky, bringing up the value of the couple, or using a combination of both approaches. It can be done.
“This is a case where the dynamic range of the camera simply cannot hold the exposure detail in both the backlit foreground and the more brightly lit background.”

Image 1–3. This graphic represents an H & D curve, used in photography and sensitometry to represent the dynamic range—from highlights to shadows—of the tones captured in an exposure. Here we see the wider range for film on the right and the more narrow range for digital on the left.
It has been many years since the transition from film to digital took place, and that learning curve was challenging for many photographers. The issue was the reduction in the dynamic range (the range of contrast). The exposure range from black without detail to white without detail was broader and more forgiving with film. As image 1–3 indicates, the distance (in terms of f-stops) from black to white is reduced in digital. And while this seems like a big problem, it has become second nature for digital shooters. It just requires active highlight and shadow control in order to maintain detail in both areas.
Basic Daylight Exposure (The Sunny 16 Rule)
There are so many variables in photographic lighting—color temperature, posing, and camera techniques. But, as I noted in the introduction, one of the great things we have on our side when working in the sun is that the brightness never changes. As long as the sky is clear and the sun is at least 20 degrees or more above either horizon, the exposure will be consistent and predictable. And when I say consistent, I mean within 1/10 stop. Think of this as a constant—as an exposure fundamental you can always rely on, anywhere in the world. As long as the sky is clear and sunny, you have the standard brightness known as the basic daylight exposure. Some people think of this as the Sunny 16 Rule, which takes its name from part of the formula on which you base your camera settings.
This formula is very simple. Shooting under daylight conditions (clear sky, sun at least 20 degrees above the horizon), a front-lit subject will be correctly exposed at a camera setting of:
1/ISO at f/16
Translated, this simply means if you change the camera’s current ISO number into the closest shutter speed number, your exposures will be correct and true when exposed at f/16 on a front-lit subject. For example, if your camera was set to ISO 400, your basic daylight exposure settings would be f/16 and 1/400 second.
Using this as your starting point, you can derive a number of equivalent exposure settings using the concept of reciprocity introduced earlier in this chapter. Let’s consider another example. If the camera’s ISO was set to 125, the basic daylight exposure would be 1/125 second at f/16. The following chart (image 1–4) shows the reciprocal or equal exposure settings:

Image 1–4. Reciprocity allows us to create equivalent exposures by balancing wider apertures with faster shutter speeds or narrower apertures with slower shutter speeds.

Image 1–5. Variations from the basic daylight exposure (BDE) as taught by Brooks Institute of Photography in Santa Barbara, CA.
In addition to the set formula for a basic daylight exposure, you will soon learn there are variations that are very helpful as “plus” exposures from the standard—for days when the sky is not clear or when you want to work in areas with only indirect sunlight. For example, if it is a lightly overcast day or there’s very light rain, increasing your exposure settings by 1 stop (either opening the aperture 1 stop or slowing down the shutter speed by 1 stop) will typically produce a good exposure. Shooting in heavy shade under a tree or when there’s heavy rain would require an adjustment of +3 stops from the basic daylight exposure. There are numerous other variations listed on the facing page (image 1–5) that might help to establish a basic foundation for ambient light exposures when a light meter is not available or is difficult to use.
Memorizing this system has been one of the most effective “tools” I’ve been able to keep with me at all times. It has helped me throughout my career. When I am traveling and shooting street photography, the basic daylight exposure value is always in my mind. I can watch the light and set the exposure accordingly so I will not miss a picture. As I walk outside on any location shoot, I habitually, automatically, set my camera to ISO 125 then dial the shutter speed to 1/125 second and set the aperture to f/16. This is a great starting point; any front-lit, sunlit subject in my environment will be perfectly exposed at these settings. While I will certainly adjust the exposure to compensate for shade—when I walk inside a street market, for example—it’s not a bad way to begin the shoot.

Image 1–6. In bright sunlight, shooting at 1 stop under the basic daylight exposure (BDE –1 stop) was the correct choice for holding detail in the clouds and showing the warm lights on the ship’s rail.
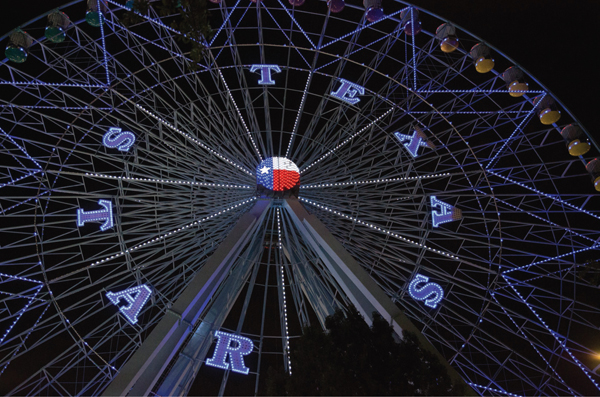
Image 1–7. This night shot illustrates that shooting 8 stops over the basic daylight exposure (BDE +8 stops) yielded a proper exposure for an amusement park scene.
Light meters have been used almost since the dawn of photography. Their only job is to give the photographer the correct combination of shutter speed and aperture for the scene in order give a good representation of what the scene looks like. There are numerous ways to use these measuring devices. However, there are only two distinct types of light meters—and while they both measure light, the ways they work are completely different.
Reflected light meters (also known as luminance meters) are designed to read and measure light that reflects off of a surface or emits from a surface. The meters are calibrated to give a shutter speed and aperture combination that will yield a correct exposure for a subject of middle or average tonality.
Generally speaking, this kind of meter does fine. By using the suggested aperture, shutter speed, and ISO setting on the meter, you can expect to obtain a true exposure for typical subjects. The only time the reflected light meter fails is when the scene (or primary subject within the scene) is very bright or very dark. In these instances, you must make exposure compensation—reducing the amount of light entering the camera to keep dark subjects dark, or increasing the amount of light entering the camera to record bright subjects accurately in bright tones.

Image 1–8. The meter was completely fooled by this scene in Greece, which was made up almost entirely of white. Shooting in program mode, the exposure compensation was set to +1 stop to make up for the difference between the 18 percent gray meter reading and the actual white tones in the scene. This brought those bright tone back to where they more closely resembled the reality of the scene.

Image 1–9. In order to make the sunset deep and rich—darker than the meter in the camera indicated—I used an exposure compensation setting of –3 stops. I shot this image in the aperture priority mode.
Reflected light meters will also give a correct exposure for an exposure aid, such as an 18 percent gray card or color checker chart. These kinds of exposure aids are made to reflect the same amount of light that strikes them, meaning they are in the middle of the range from white to black. You simply place them in the scene (under the same light as your subject), take a reading or test shot, then remove the card before creating your final images. Even if your scene or subject is very light or very dark, camera settings based on a reading from one of these exposure aids will produce accurate results.
If you do not have a gray card, there are certain common items with similar reflectivity that can also help you determine accurate exposure settings. For example, anything that is true red very closely replicates the middle tone between white and black. So does the average green color of grass. This is especially helpful if you are shooting in a park or yard. Some photo instructors suggest taking a reflected light meter reading off of the palm of the hand, then opening the aperture 1 stop. This will also yield a good exposure, as long as the hand is in the same lighting condition as your main subject.

Image 1–10. In this late-day image, the exposure was determined by aiming the in-camera spot meter at the red area on the boat to the left. This color value almost exactly replicates the reflectivity of 18 percent gray.

Image 1–11. The white boat was the primary subject for this image, shot in Trinidad and Tobago. However, a spot reading of that bright subject would have rendered an incorrect reading. Instead, I took a center-weighted reading of the green trees, which have a brightness level that is very close to middle gray. This placed the bright tones of the white boat properly in the final exposure.
Keep in mind that the reflected light meter built into most cameras also provides the option of taking spot readings, evaluative readings, center-weighted readings, and more. This can help you target your exposure metering based on what the camera “sees” in the viewfinder.
Incident light meters (also known as illuminance meters) are designed to read and measure the amount of light that strikes or falls on your subject. When the sphere or dome of the meter is placed in the same lighting area, on the same plane as the subject, and aimed toward the primary light source, it will provide a correct exposure reading. (Because the light is measured before it strikes any surface, the tonality of the scene or subject does not affect the reading as it does with reflected light meters.)

Image 1–12. I always use the incident meter with the dome or sphere aimed directly toward the primary source of illumination.


Images 1–13 and 1–14. Handheld light meters by Sekonic offer unique approaches for metering ambient light in combination with flash or strobe
During my workshops and in my magazine articles, I often call the incident light meter my “reality meter.” I have always felt that the day I started using my incident meter properly was the day my work started improving almost immediately. Some might argue that the incident meter is best used when aiming the spherical dome directly at the camera. In some cases, that is true. My testing has proved that aiming the dome toward the camera works well as long as the main light is no more than 45 degrees from the camera. If that main light is farther away than 45 degrees, it works best to aim the dome at the light.
Since the dawn of the digital camera, I have heard other photographers and educators dispel the need for meters—mostly due to the LCD preview on the back of today’s DSLR cameras. However, using the preview to determine exposure—changing the aperture and shutter speed again and again until you like what you see—is a lot like target practice. You just keep shooting until you eventually bring the exposure to the right place. When calibrated properly, the light meter will give you the correct exposure each and every time you apply its settings.
Metering Ambient Light Plus Flash
Taking readings with ambient light when combined with flash or strobe used to be a little more complex than it is in today’s modern photographic world. For this purpose, I am a solid user of Sekonic meters, and the reasons are fairly simple: they do exactly what they are supposed to do, they do it well. They are also well made and durable—and they offer the ability to measure both ambient and flash together in a most unique way. I’ll cover this system in detail later in the book (chapter 6).
One of the sure ways to determine exposure and contrast information in your digital image files—without guesswork—is by using the histogram. While our eyes can sometimes be fooled and the camera’s LCD screen can be out of calibration, causing it not to render a true visual of the picture, the histogram gives you objective data.
There are numerous ways to “read” the histogram, but I learned to think of it as a rectangular pipe. Any information that is contained within the pipe will print with detail. Any information outside of the pipe will not. If the data in the histogram climbs up the left or right walls of the graph, that is indicative of clipping—blacks that are pure black without detail (left edge) and whites that are pure white without detail (right edge).
As the graphics illustrate (images 1–16, 1–17, and 1–18), when the data is pushed heavily to the right side, it indicates overexposure. When the data is push heavily to the left side, it indicates underexposure. When all of the file information stays within the left and right sides, detail can be maintained. While this is extremely helpful in making sure there are no blown out highlights, it must be also realized that a histogram will not tell you the true exposure of your subject; rather, it provides an overall feel for the complete range of contrast.
When the exposure is pushed heavily to the left or right, you might envision an imaginary line following the data out past the edge of the rectangular box. This information is what will be lost should you make no exposure adjustment. We’re always taught to think outside of the box in creative thinking—but where technical exposure information is concerned, being outside of the box is not a good idea. I try to live my photographic life by this saying: “Gap left, gap right.”

Image 1–15. The histogram provides an objective way of evaluating the exposure of an image.

Image 1–16. Histogram data that fits within the bounds of the graph, tapering off at each extreme, indicates that all of the captured tones will be printable with detail.

Image 1–17. Histogram data that is pushed heavily to the left edge indicates shadow clipping (blacks that will print with no detail) and is indicative of underexposure.

Image 1–18. Histogram data that is pushed heavily to the right edge indicates highlight clipping (whites that will print with no detail) and is indicative of overexposure.