6. Adding to the Ambient Light
The term “additive lighting” refers to any situation where there is already light present and you make the decision—for whatever reason—to add more light. Working with flash or strobe in any ambient light situation is a perfect example of this technique, but it requires a great deal of understanding in order to achieve exactly what you want each time, with predictable results.

Image 6–1. This location portrait features Gabriel Alonso, a PPA Master Photographer and guitar player. It really speaks to me as to why we need to create a portrait that is not just of someone but is about someone. The tools of his trade are cameras and guitars—and here they are all lit against the wonderful background of this setting sun.
There are a lot of different reasons people choose to use additive lighting. For me, it is best determined by whether or not I need to change the brightness of my background separately from my subject. I know that sounds strange but bear with me as I explain.
We discussed the concept of reciprocity (i.e., the fact that a camera setting of 1/60 second at f/16 yields the same exposure as 1/500 second at f/5.6) back in chapter 1. However, it is important to know that this rule only applies in ambient or continuous light situations. When you introduce flash to the scenario, everything changes and a full range of understanding and control matters more than you might imagine.
In the first few years of becoming a photographer, I stayed away from using flash outdoors—not because I didn’t feel that I needed it, but because there were not many people talking about it and I had no one to learn from in my area. One day, I was photographing a high school football player’s individual posed shot for a sports pack and had a “happy accident.” I accidentally increased the shutter speed on my old Hasselblad while using a Vivitar speedlight on top of the prism viewfinder, set to Blue/f8. The result was an almost magically deep, rich, and cloudy sky with dark sunset colors and a perfectly exposed and lit player. I had no idea how it happened or how it worked. All I knew was that this was the single best football player picture I had ever taken—and I needed to learn how to reproduce it. (Note: “Blue/f8” was one of the really helpful “color” settings on the Vivitar flash system that I used all through the 1980s—I literally shot more than six-hundred weddings with this exposure setup! The 283 and 285 both used color settings when working in automatic mode with the flash. At ISO 160, in the days of color negative film, the “blue” setting would yield a great exposure at up to about 15 feet at f/8. As a result of the sensor or Thyristor being located on the front of the flash, the accuracy was really terrific, so I spent a lot of years sort of stuck on f/8 and auto!)

Image 6–2. In this example the background is 1 stop darker than it appeared in reality.
Image 6–3. Here we see the background as it actually appeared.
Image 6–4. The background in this one is actually 1 stop brighter than it truly appeared.

Image 6–5. Using just the available light can be nice in some cases. Here, however, there are dark areas on the face from the downward-casting light and there appears to be a very subtle green cast from all of the nearby foliage.

Image 6–6. Adding off-camera flash can help bring a portrait to life by smoothing out imperfections, opening up the shadows, and removing the appearance of green color shadows.

Image 6–7. In this flash/ambient combination image, I exposed for the background brightness, then set the flash to match it exactly. In other words, if the ambient exposure needed to be 1/125 second at f/11 and ISO 100, then I needed the flash to read f/11.

Image 6–8. This image shows the ambient light exposure by itself—and how we carefully chose the subject’s area so there would be no ambient light hitting him. This is quite helpful when combining flash and ambient light in a portrait.
Clearly, we all start out not knowing a lot of photographic technique and we tend to go through a lot of self-discovery. My education was very limited to the other photographers in my town and surrounding areas. Only one other photographer in my town was doing any flash work to speak of, so I tried to learn what I could from him. What I observed was that he was pretty good but couldn’t express very well what was happening—nor did he know how to create repeatable and consistent results. Slowly, though, I learned that there is a very clear separation between the effect of the shutter speed setting and the effect of the aperture setting once flash is introduced.

Image 6–10. This beautiful portrait, taken on Santorini, was backlit with the setting sun and filled with off-camera flash to control the brightness on the hair and shoulders.
The concept here is simple—don’t let yourself become confused by all of the noise in the photographic circles today that seem to have “foolproof” answers for everything. When using flash in an ambient light situation, here’s what you need to know:
The shutter speed controls all of the ambient light, and the aperture controls the brightness of the primary subject being lit by the flash.
Once this single sentence soaks in and becomes part of your photo DNA, you’ll have great success in moving forward with these techniques and making additive lighting work for you in your situation—at any time of day and in any location.
A good friend of mine works for a major theme park in Orlando, Florida—a park you might have heard of. He recently told me they were hiring for their portrait and wedding division and most of their applicants called themselves “natural light photographers.” To his way of thinking (and that of their management), this simply meant that these photographers did not use flash outdoors—or possibly did not understand how to use it. Using flash with the ambient light is a solid requirement to shoot in the Florida parks all day, every day—due to the screaming bright sunlight.
Image 6–9. With the sun directly behind the subject, I added flash at the appropriate aperture setting to give great skin tones on the subject.

Images 6–11, 6–12, and 6–13. Balancing the added light to record the background darker than it appeared (top left), as it really was (top right), and brighter than it really appeared (bottom).
Let’s break this down in simple terms. As noted above, the only time I introduce flash in an ambient situation is when I want to change the brightness of my background relative to the subject. To follow up on this statement, there are only three different background brightness levels that matter to me:
1. Making the background brighter that it really appears
2. Making the background as bright as it really appears
3. Making the background darker than it really appears
In images 6–11, 6–12, and 6–13 you can see that the subjects stay the same but the background changes. The first one illustrates the background brightness recorded at 1 stop below what it normally looks like. In the second one, we have the background as it really was. Finally, the third image shows what the background would look 1 stop brighter than it appeared in reality.
Once you have made the decision to use flash on your subjects in an ambient light situation, altering the shutter speed (up or down) will affect the exposure of any areas lit by ambient light. Provided you do not exceed the camera’s maximum flash sync speed (more on that below), a change in the shutter speed will not change the primary subject’s brightness; that exposure is controlled by the aperture working in concert with the output of the flash.
For me personally, the three situations mentioned above are what help me to make the shutter speed decision. For example, if the exposure with flash outdoors calls for 1/60 second at f/8 and the background appears to look normal, you can change the shutter to 1/125 second to darken the background by 1 stop or shoot 1/30 second at f/8 to lighten the background by 1 stop. It is critically important that you understand that the area of the subject that receives the flash will remain the same when you change the shutter speed. It is only changed by an adjustment in the aperture setting.

Image 6–14. Flash used outdoors with a softbox produced a soft, directional look on the face. Achieving a good balance between the highlight and the shadow is as simple as increasing or decreasing the camera’s shutter speed.

Image 6–15. I adjusted the flash zoom setting to 200mm (telephoto) while shooting with a 16–35mm lens. This produced a spotlight effect that can be really useful in some situations.
While we are on the topic of flash and ambient light, I also want to suggest that you read your camera’s manual to determine the highest shutter speed at which your flash can synchronize with the camera. This setting, known as the maximum flash sync speed, is the fastest shutter speed at which the whole sensor can be evenly exposed to the rapid flash burst. If you exceed this speed, you’ll see a dark band at the edge of your image; this is where the moving shutter curtain blocked the flash from reaching the sensor.
As we dig into this area of work there are a few things you really have to think about. Depending on what type of work you are doing, you might want to use your flash in high-speed sync mode or take advantage of its short flash duration. Many models offer both options, but which to use really depends on the kind of work you are engaged in. For example, if you are photographing adventure-sport athletes or dancers during a performance, you might want the fast burst of flash to help you really freeze the action. Alternately, you might want your flash to overpower the sun and need a short shutter speed to help cut that bright ambient light (maybe for a rich, deep sky). In this case, a unit that offers high-speed flash sync would be the better choice.
Just as when working in the studio, you will need to have a way to trigger or fire your lights when working on location. Several brands of studio-style lights (ones that are also designed for working on location) include proprietary wireless receiver/transmitter systems that allow you to trigger the light from the camera. If your lights (or lights you might consider buying) don’t have this kind of system, it’s not a problem. All strobe lights come with a cable that can be plugged directly into the camera. In most cases, this works with no problem. The only limitation is that the distance from the light to the camera is limited by the length of the cord—and there’s also some danger of tripping over the cord (especially in a dark room) and pulling over the attached camera and/or light.

Image 6–16. A strong, directional light source can sometimes add a bit of drama to an otherwise flat image on an overcast day. Here, I used the eTTL capabilities of the Canon 600EX-RT to determine the flash exposure based on the selected aperture.
Speedlights will, in most cases, require the use of a wireless receiver/transmitter system. This could be a third-party system, or one that’s built-in by the manufacturer—such as the receiver in the powerful Canon 600 EX-RT flash and the incredibly important Canon ST-E3-RT wireless transmitter. Together, these products allow photographers a lot of freedom in terms of lighting control—even when working indoors, in direct sunlight, or at great distances. In the ETTL modes, which allow the metering systems of the camera and flash to talk to each other, the resulting exposures are quite accurate.


Images 6–17 and 6–18. The Canon ST-E3-RT transmitter (left) has radio capabilities and is highly accurate with off-camera flash in the eTTL mode. Pocket Wizard Plus III radio remotes (right) are an industry mainstay and work well outdoors with the proper cables to fit specific flash units.
We touched on metering back in chapter 1, but let’s go over the different modes available when setting up your light meter. My meter of choice is the Sekonic L-758DR; this is their top-of-the-line meter, but their other meters include the same features we’ll be discussing in this section on working with flash. The settings available are:
• ambient
• non-cord flash
• cord flash
• transmitter flash

Image 6–19. The Flex TT5 remotes have also been used for many years and allow for high-speed flash sync.

Image 6–20. A Flex TT5 transmitter on the hot shoe of a Canon 5D Mark III camera.
When you set the meter to non-cord flash (meaning there is not a sync cord plugged into the meter, but it will read flash without a cord), you’ll discover one of the great features available on today’s flash meters—and one that not a lot of people know about. When used properly, just one meter reading can give you all of the information you need to create a light background, a dark background, or a truly realistic background. This is because the Sekonic brand has a unique method for determining the percentage of flash vs. the percentage of ambient light.
To do this, set the meter to the non-cord setting and take a reading with the dome of the meter aimed toward your flash. When it fires, the meter will do two things. First, it will give you an aperture setting to use on your camera (based on the ISO and shutter speed you have dialed into the meter). It will also give you a percentage reading, which appears at the top right side of the LCD window after the flash reading is taken.
The way I evaluate this is really very simple. A reading of 80 to 100 percent would equate to the flash being the primary source of illumination in the image—meaning that the background and all the ambient light will record as really, really dark. If the meter reads approximately 50 percent, it tells me that the flash is approximately equal to the ambient light level, so the background and all the ambient-lit areas will record pretty much like they look to the eye. However, if the reading says 20 to 30 percent, that indicates that the flash level is producing only enough light for fill. There will be some (but not much) influence from the flash, and the background will look lighter than it truly is. This is great for helping to smooth out facial features and open up dark eyes. For me, these simple numbers are the rule of thumb:
• 80 percent—the flash is a clear main light
• 50 percent—the flash is equal to the ambient light
• 30 percent—the flash is a fill light
This little bit of information has been critical to my success as a location photographer. In fact, after you take your first reading, simply roll the “thumb wheel” on the meter and you can see all of the variations of the percent numbers without having to take a new reading.


Image 6–21, 6–22, and 6–23. These three images of the Sekonic L758DR meter illustrate the percentage readouts in the LCD window. As you can see, once an exposure reading is made, you can easily roll the thumb wheel on the meter up and down in order to change the setting from 30 percent to 50 percent—and all the way to 80 or 90 percent. As discussed in the text, these values are critical to your successful use of off-camera flash.

Image 6–24. Off-camera flash helped to give some “snap” to this chef on location. A second light added a bit of color in the background.

Image 6–25. A medium softbox was used for this image of an old cowboy’s great face. Strong highlights created depth and the shutter speed was high enough to darken the ambient light on the background area.

Image 6–26. This location portrait of an executive called for two off-camera flash units. The primary source was inside a medium softbox, while the secondary light was placed behind him as an accent light to add depth.

Image 6–27. The dark background was controlled simply by increasing the shutter speed when using flash on location in this chef’s restaurant.

Image 6–28. Three lights were used to capture this beauty: one main and twin accent lights to separate her from the background area.
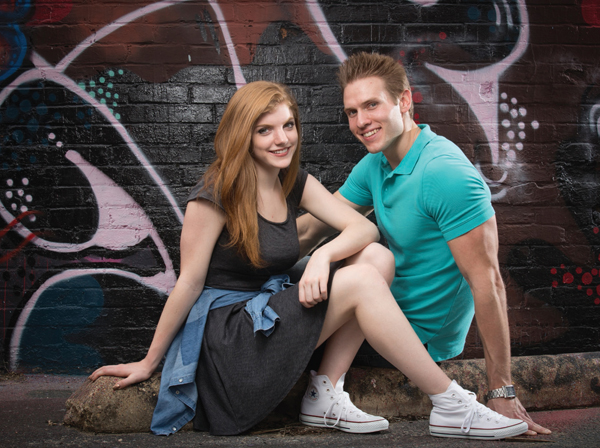
Image 6–29. This fun portrait of a cute couple was shot using flash and ambient together.

Image 6–30. Flash was used subtly to augment the ambient light. (Photo by Rob Hull.)