In my teaching about lighting, I like to reference what I call “the big three.” So far we’ve talked about two of them: light quantity (chapter 1) and light quality (chapter 2). Our third element to consider is the active pursuit and keen awareness of light direction. I don’t think the direction of light is thought about enough in terms of its role in the overall look and feel of just about all images. More than that, there are subtle differences in the brightness of light based on its direction.
In A Treatise on Painting, Leonardo da Vinci’s discussion of light and shadow includes a suggestion that the correct position of a light when painting a portrait is “when the light creates a shadow on the ground from the subject that is as long as the subject is tall.” That was his long, round-about way of saying that the optimum direction for the light in a portrait is at about a 45 degree angle to the subject. Most portrait photographers have learned this, as well. The reason it works is because lighting from an angle reveals the contours of the face and produces a three-dimensional look that gives the viewer a true sense of the subject’s appearance. When the light falls on the subject from an angle, all the subtle nooks and crannies, peaks and valleys are revealed through the interplay of shadows and highlights. (Note: DaVinci’s book is one that I highly recommend reading. He also discusses, in general terms, the importance of soft shadows on faces. However, this is not automatically assumed to be a standard way to work—after all, many of the old Dutch Master artists used hard-edged shadows in their work and soft light was not as important. I think the correct decision comes down to personal taste and the desired effect for the subject or mood.)
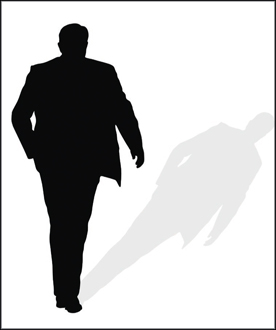
Image 7–1. Light direction can be a funny thing. It not only defines where the light is coming from, it also defines where the shadow is going.

Image 7–2. Texture appears as a direct result of the size of a light source and its angle to the subject. In this example, a small light source was placed at a strong angle to the subject.

Image 7–3. As the light source becomes larger, the texture is minimized—giving an almost softer look to the fabrics. Also, notice how much larger and softer the highlights are on the zipper pulls.
Texture is also of key importance in any discussion about light direction. Always remember that texture, as we perceive it in a photograph, is the direct result of light direction. Depending on the chosen light source, there may be small highlights and shadows revealing texture in the skin, across the surface of the sand, or even the leather of a handbag in a commercial image. Texture is one of the great controls that we have—and one that many new photographers overlook. The direction of the light and the size of the source relative to the subject are everything in this arena.
Let’s take a look at another strange reality concerning light direction—one that everyone has probably experienced but may not have understood at the time. As image 7–6 indicates, when an object or subject is front lit, the light reflects directly back to the camera position and the exposure is made. All is well. As that light source moves from the camera position toward a 45 degree angle, the exposure remains consistent. When you base your aperture, shutter speed, and ISO combination on the meter reading, the exposures will be good and accurate.

Image 7–4. A three-dimensional look can be seen in this portrait with clear directional lighting and with a light ratio of approximately 4:1—meaning the highlight side is 2 stops brighter than the shadow side.

Image 7–5. The light from a flash and small softbox is nearly straight-on to the subject. This lighting tends to smooth out any imperfections in the skin, making it ideally suited to glamour photography.
Before we proceed, we need to talk a moment to discuss how the light meter is best placed in a portrait situation. There are those who feel the need to aim the dome (or sphere) of an incident meter towards the camera to get an accurate reading. In some instances, I agree with this. For example, if the main light is within 45 degrees to the camera, you can successfully aim the meter at the camera and get an accurate reading that will result in a great exposure. It’s when the light moves beyond that 45 degree position (from the camera) that this may no longer apply.

Image 7–6. As the light source travels beyond 90 degrees to the camera (while staying at the same distance from the subject), the exposure will tend to become brighter. As the angle of the light increases, it becomes more efficient and therefore brighter.
Let’s take all of that information and see how to apply it in a scenario where the light source is coming from beyond a 90 degree angle to the camera—where it is coming back toward the camera as opposed to being pointed away from the camera. In my own work, I have found that whenever I have a strong or significant primary light source coming from more than 90 degrees away, I have higher impact, more drama, and generally better mood in my work. But it does make metering exposure a little more tricky. Here is what I have found to be true. Whenever the primary light source, for any given subject, is more than 90 degrees away from the camera, I have to compensate for the increased light output that results from the angle of the source. As the angle increases, the light source becomes more efficient from the camera’s perspective; it is seen as brighter.

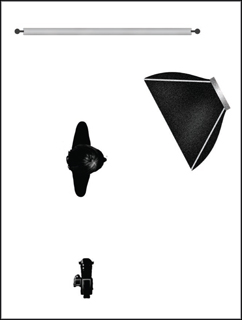
Image 7–7. For accent lighting, I almost always go for a strip light. It works beautifully when placed slightly behind the subject and aimed forward.

Images 7–8 and 7-9. This lovely profile portrait shows the efficiency of a light at a sharp angle to the face. With the meter aimed at the light source from the face, the reading was f/8. The final image was made at f/11 to account for the increased brightness due to the angle.

Image 7–10. The angle of incidence equals the angle of reflection.
The Angle of Incidence Equals the Angle of Reflectance
An important, often-quoted rule in photography tells us that the angle of incidence is equal to the angle of reflectance (or reflection). What this means is that light will reflect off literally any surface at the exact same angle that it struck the surface.
Where I see this effect most often in my work is in the case of any accent or kicker light coming from behind the subject. Depending on the exact placement, I will likely want the exposure reading for that to be well below whatever I am shooting at based on the main light. For example, if I am shooting a portrait at f/8 and have an accent light coming forward from behind and to the side of my subject, I would want that light to read approximately f/5.6 (or less) in order for it to not appear too bright. There are a few exceptions, such as in cases where you plan to strip your subject from one background and place them into another setting during postproduction. In that case, it might be a good idea to have the stronger accent in order to facilitate a cleaner extraction. But as a general rule, I always begin with my accent lights at least –1 stop from my main light. And—to clear up any confusion—I measure this with the meter at the subject’s position with the dome aimed directly at the accent light, careful not to let the main light influence the reading by hitting the dome.

Image 7–11. The accent light used in this example was set 1½ stops below the overall image exposure, based on the primary light. For example, if the exposure was f/16 for the main light, the accent light on her hair (opposite the main light) would have been set to meter at f/5.6½.
When working an accent light, you will see a stronger light value when it is placed on the opposite side of the face from the main light. Certainly, using the accent on the shadow side of the face will do this but it is not always the best way to work. You can actually work the accent lights on both sides in the same image, using them on the same side as the main light or on the opposite side.
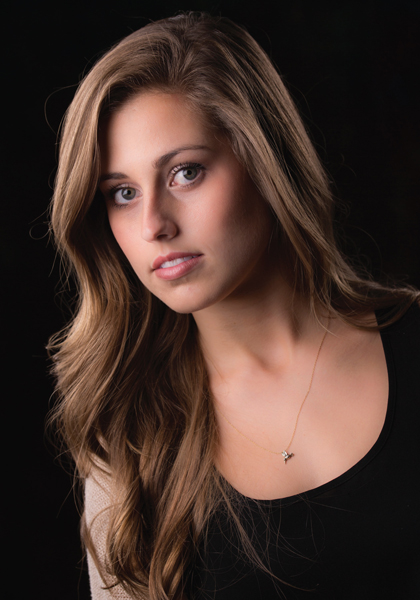
Image 7–12. Here, the accent light is on the same side of the subject as the main light. Once again, the exposure was set at a level of approximately 1 to1½ stops below the final exposure.
It would be necessary to understand this same effect in creating a profile portrait, where the main light is behind the subject (away from the camera) and turned to cast the shadows forward. In this case, using the meter’s reading will make the subject’s skin appear too bright. Once again, start your testing with the main light at least 1 stop below the camera’s exposure setting. If you wish to work at f/16, make sure that light reads f/11. It will look great and you will capture full range of detail in the subjects’ skin and facial features. The shadows and what you might do with them is a topic for another time.

Image 7–13. Beautiful profile lighting will come from behind the subject at an angle, aimed back toward the subject. As discussed, this type of light will be too bright if exposed exactly as the meter suggests when aimed from the subject back to the light.

Image 7–14. Another profile image shows a more subtle light ratio, probably 2:1—meaning there is only 1 stop difference between exposure levels of the highlight and shadow sides. For this image, the light was provided by a large, north-facing window.