CHAPTER 5
GRILL IT SLOW AND LOW: TWO-ZONE GRILLING
The recipes in this chapter are based on barbecue principles, with the addition of radiant heat. Most barbecue smokers today utilize truly indirect heat. But historically, barbecuing was more nuanced, combining techniques as we do here using basic charcoal (preferred) or gas grills and low, slow, radiant heat. There are lots of ways to cook big cuts of tough meat, and they don’t require dedicated or specialized equipment. You will enjoy the payoff in dishes like Slow-Grilled Beef Brisket, Salt-and-Pepper Picnic Shoulder on Your Kettle Grill and Jerk Ribs with Guava Glaze.
Note: Although you don’t need specialized equipment, you do need grill space large enough to accommodate the food in these recipes. Every recipe in this chapter is intended to be cooked on a grill no smaller than 18 inches/45.7cm in diameter.
GRILL-ROASTED WHOLE CHICKEN WITH HONEY AND ROSEMARY
MAKES 2 To 4 SERVINGS
A PERFECTLY COOKED CHICKEN IS THE STAR OF ANY MEAL, AND THIS IS ONE OF OUR FAVORITES. IT IS IMPORTANT TO TIE THE DRUMS TOGETHER, WHICH WILL HELP WITH EVEN COOKING AND BROWNING. AS WITH MANY OF THE BONE-IN RECIPES IN THIS BOOK, THE TWO-ZONE METHOD HELPS ACHIEVE THE GRILL FLAVOR AND COOK THE BIRD THROUGH WITHOUT BURNING THE SKIN.
4-lb/1.8kg broiler chicken
5 sprigs rosemary, divided
1 lemon, quartered
4 cloves garlic, smashed
2 tbsp/30ml canola oil
1 tbsp/18g kosher salt
1 tbsp/12g turbinado sugar
½ tbsp/3g coarsely ground black pepper
½ tbsp/3g chili powder
¼ cup/60ml warm honey
Equipment: Wire rack set in a baking sheet, butcher’s twine (optional)
Stuff the chicken cavity with 4 sprigs of the rosemary, lemon quarters and garlic. Tie the legs with butcher’s twine to hold the stuffing inside. Brush the exterior of the chicken with canola oil. Rub the salt, sugar, pepper and chili powder evenly over the entire chicken. Let sit at room temperature while building the fire.
Prepare the grill for low two-zone grilling. Pile unlit charcoal on one side of the grill. Fill a chimney with charcoal. Stuff two sheets of newspaper in the bottom of the chimney and light it. When the coals are fully engaged—you should see flames peeking over the top—pour them over the unlit charcoal. Cover the grill and close the vents 75 percent. If using a gas grill, light the gas and adjust the temperature on one side of the grill to medium.
When the temperature reaches 325°F/163°C, clean the grill grate. Place the chicken breast-side up on the cool side of the grill with the legs pointed toward the fire. Cover the grill. Cook the chicken for 1 hour, or until the internal temperature deep in the thigh registers 160°F/71°C.
Transfer the chicken to the rack, breast-side down, and let rest for 15 minutes. While the chicken is resting, in a small saucepan over low heat, warm the honey. Remove from the heat and keep warm.
Place the chicken on a cutting board, breast-side up. Discard the stuffing. Carve the chicken into drum, thigh, wing and breast portions. Place on a platter. Snip the remaining rosemary sprig into 5 pieces and sprinkle over the carved chicken. Drizzle with the warm honey and serve.

CHARCOAL-GRILLED RIBS: NORTH MEATS SOUTH
MAKES 2 ENTRÉE OR 4 APPETIZER SERVINGS
THERE’S NOTHING LIKE GRILLED RIBS, BUT FOR MAXIMUM ENJOYMENT, YOU WANT TO MAKE SURE THEY’RE COOKED RIGHT. PERFECTLY GRILLED RIBS SHOULD HAVE A TOOTHSOME, FIRM TEXTURE AND NOT BE FALLING OFF THE BONE. TO TEST FOR DONENESS, HOLD TWO RIB BONES AND PULL IN OPPOSITE DIRECTIONS. IF THE MEAT TEARS EASILY, THE RIBS ARE DONE. IF NOT, PUT THEM BACK ON THE GRILL AND COOK THEM FOR ANOTHER 30 MINUTES. WASH THESE DOWN WITH PEACH MINT JULEPS.
1 rack meaty baby back ribs (also called loin backs), 2½ to 3 lbs/1 to 1.4kg, peeled
1 cup/240ml Vermont Pork Mop (recipe follows)
½ cup/40g Memphis-Style Dry Rub (recipe follows)
Using a paper towel, remove the membrane from the back of the ribs. Rinse the ribs with cold water and place on a sheet pan. Brush the ribs generously on both sides with the Vermont Pork Mop. Refrigerate for up to 1 hour.
Prepare the grill for hot two-zone grilling. Pile the unlit charcoal on one side of the grill. Fill a chimney with charcoal. Stuff two sheets of newspaper in the bottom of the chimney and light it. When the coals are fully engaged—you should see flames peeking over the top—pour them over the unlit charcoal. Cover the grill and open the vents all the way. If using a gas grill, adjust the temperature on one side of the grill to high.
When the temperature reaches 350°F/177°C, clean the grill grate. Remove the ribs from the refrigerator and re-baste with any mop that has accumulated on the sheet pan. Sprinkle the ribs all over with 2 tbsp/10g of the Memphis-Style Dry Rub and place them as close to the fire as possible without being right over the charcoal. Cover the grill and cook for 1 hour, adjusting the vents and adding charcoal as needed to maintain a consistent 350°/177°C temperature. After 1 hour, test the ribs for doneness.
Remove the ribs from the grill and sprinkle generously with the remaining 6 tablespoons/30g dry rub. Slice and serve.
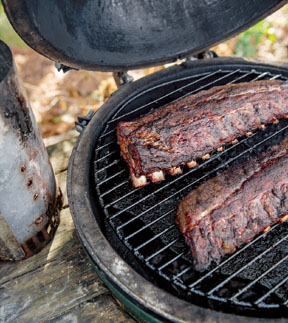
Ribs are close to but not over fire.

VERMONT PORK MOP
MAKES 1½ CUPS/350 ML
½ cup/120ml cider vinegar
½ cup/120ml maple syrup
¼ cup/60ml water
¼ cup/60ml ketchup
2 tbsp/30ml barbecue dry rub (your choice, but we recommend Memphis-Style; recipe follows)
1 tsp chipotle powder or cayenne pepper
In a medium bowl, mix all the ingredients well. Keep at room temperature while cooking or cover and refrigerate for up to 2 weeks.
MEMPHIS-STYLE DRY RUB
MAKES ¾ CUP/60 G
¼ cup/20g paprika
2 tbsp/10g garlic powder
1 tbsp/5g onion powder
2 tbsp/30g kosher salt
1 tbsp/2g dried thyme
1 tbsp/5g MSG
½ tbsp/3g ground coriander
½ tbsp/3g ground cumin
½ tsp curry powder
In a medium bowl, combine all the ingredients well. Store in an airtight container for up to 2 weeks.
SLOW-GRILLED BEEF BRISKET
MAKES 10 SERVINGS
WE OFFER A LOT OF ADVICE IN THIS BOOK ABOUT THE FINER DETAILS OF DIFFERENT GRILLING METHODS. BUT FROM DIRECT GRILLING TO GRILL-ROASTING TO LOW TWO-ZONE COOKING, ONE OF THE MOST IMPORTANT TASKS FOR GRILLING MEAT, IN PARTICULAR, TO PERFECTION DOESN’T ACTUALLY TAKE PLACE ON THE GRILL. WE CANNOT STRESS ENOUGH THE IMPORTANCE OF RESTING MEAT BEFORE SERVING IT. IF YOU CUT INTO OR SERVE IT RIGHT AWAY, THE JUICE WILL NOT HAVE TIME TO REDISTRIBUTE AND WILL DRAIN FROM THE MEAT, LEAVING YOU WITH A DRY MEAL. WE SUGGEST RESTING SMALLER PIECES OF MEAT FOR 5 TO 10 MINUTES AND LARGER PIECES FOR 15 TO 30 MINUTES.
5- to 7-lb/2.3- to 3.2kg beef brisket flat, with fat
¼ cup/60ml yellow mustard
3 tbsp/54g kosher salt
1 tbsp/5g freshly cracked white pepper
1 head roasted garlic, processed into a paste
½ cup/120ml red wine
½ cup/120ml low-sodium beef broth
½ tbsp/3g fresh oregano
½ tbsp/3g fresh thyme
8 cherry tomatoes
½ fennel bulb, cored and thinly sliced
½ sweet onion, thinly sliced
1 carrot, sliced
Equipment: Drip pan, roasting or aluminum pan, heavy-duty aluminum foil, probe thermometer
Brush the brisket with the mustard, then sprinkle evenly with the salt and pepper. Place on a baking sheet and refrigerate.
Prepare the grill for low two-zone grilling. Pile unlit charcoal on one side of the grill. Fill a chimney with charcoal. Stuff two sheets of newspaper in the bottom of the chimney and light it. When the coals are fully engaged—you should see flames peeking over the top—pour them over the unlit charcoal. Cover the grill and close the vents 75 percent. If you are using a gas grill, light the gas and adjust the temperature on one side of the grill to medium.
When the temperature reaches 300°F/149°C, clean the grill grate. Place the brisket on the cool side of the grill, fat-side up. Position a drip pan below the brisket. Cover the grill and cook for 3 hours, or until a thermometer inserted into the meat reaches 170°F/77°C. Rotate the brisket after 1 hour to develop an evenly caramelized crust. Add more charcoal and adjust the vents as necessary to maintain the fire temperature.
While the brisket is cooking, prepare the braising liquid. In a blender on high speed, mix together the garlic, wine, broth, oregano and thyme. Pour into a bowl and set aside until ready to use.
In the bottom of a roasting or aluminum pan that is large enough to hold the brisket and also fits on the grill, layer the tomatoes, fennel, onion and carrot.
After 3 hours, place the brisket, fat-side down, on top of the vegetables. Pour the braising liquid over the brisket and cover the pan tightly with heavy-duty aluminum foil. Return the covered brisket to the grill and cook for about 2 hours more, until a thermometer registers 195°F/91°C.
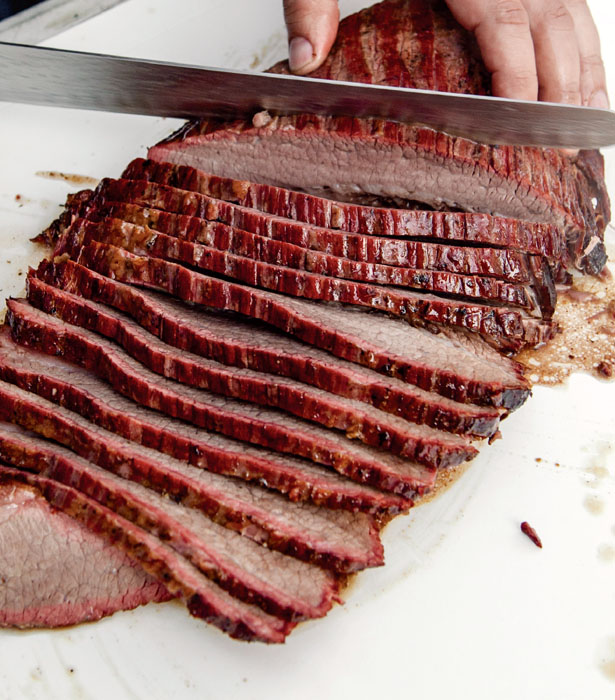
Remove the pan from the grill and rest the brisket. Place the brisket fat-side up in a 9"x 13"/23 x 33cm baking dish. Process the braising liquid and vegetables briefly in a blender or press them through a fine sieve. Pour the liquid over the brisket, tent with foil and let sit at room temperature for 1 hour. Slice the brisket against the grain in ¼-inch/6mm-thick slices. Fan the slices on a platter and drizzle with some of the braising liquid.
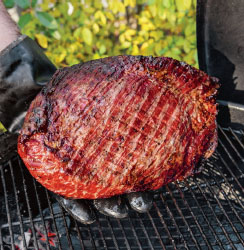
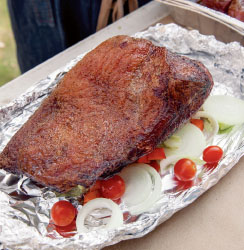
Fat-side down, on top of vegetables.
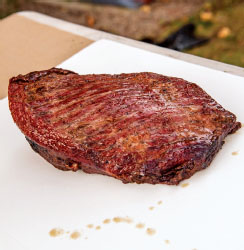
Resting brisket.

Slice brisket against the grain.

Cut in ¼-inch/6mm-thick slices.
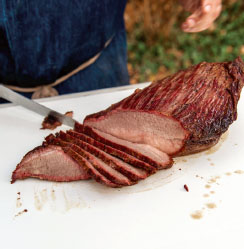
Fan slices to serve.
SALT-AND-PEPPER PICNIC SHOULDER ON YOUR KETTLE GRILL
MAKES 8 To 10 SERVINGS
THIS IS NOT BARBECUE PORK FOR THE PURISTS. IF YOU WANT THAT, AND WE OFTEN DO, CHECK OUT OUR RECIPES IN WICKED GOOD BARBECUE. THAT STIFF IS SERIOUS BARBECUE. BUT THAT DOESN’T MEAN YOU SHOULDN’T MAKE THIS RECIPE. THIS WILL BLOW YOUR MIND WITH ITS SIMPLE METHOD AND COMPLEX FLAVORS AND TEXTURE. THE GOAL HERE IS TO GET THE OUTSIDE CRUNCHY LIKE CHICHARRONES AND THE INSIDE NICE AND JUICY. IT WILL TAKE SOME PATIENCE—AND PROBABLY A BEER OR TWO. YOU WILL BE GRILLING THIS FOR A WHILE. AND TRY NOT TO PEEK. LIFTING THE LID TO LOOK IN WILL ONLY MAKE THE TEMPERATURE FLUCTUATE, WHICH WILL EXTEND THE COOKING TIME.
6- to 9-lb/2.7- to 4kg pork picnic shoulder
½ cup/120ml vegetable oil
½ cup/144g kosher salt
¼ cup/20g coarsely ground black pepper
Basic Vinegar Sauce (recipe follows)
Equipment: Probe thermometer, 2 aluminum pans approximately 10"/25cm wide
Rinse the shoulder under cold water and dry well with a paper towel. Score the skin around the shank portion by cutting a criss-cross pattern with a sharp knife. With your hands, rub the vegetable oil into the meat. Mix the salt and pepper in a plastic cup and sprinkle evenly all over the exterior of the shoulder. Place the shoulder onto a baking sheet and refrigerate while preparing the grill. Don’t forget to wash your hands.
Prepare the grill for low two-zone grilling. Pile unlit charcoal on one side of the grill. Fill a chimney with charcoal. Stuff two sheets of newspaper in the bottom of the chimney and light it. When the coals are fully engaged—you should see flames peeking over the top—pour them over the unlit charcoal. Cover the grill and close the vents 75 percent. Remove the top grill grate and place the aluminum pan on the side without charcoal to catch the drippings. If using a gas grill, light the gas and adjust the temperature on one side of the grill to medium. You don’t need a drip pan with a gas grill.
Remove the pork shoulder from the refrigerator (and grab a cold beer).
When the grill temperature reaches 300°F/149°C, clean the grill grate. Place the shoulder on the grate above the drip pan, fat-side up. Close the lid and, for charcoal, position the exhaust vent above the shoulder. Close the bottom vents and the top vent about halfway. Every 45 minutes or so, add a large handful of charcoal to the second aluminum pan and sprinkle it over the fire. A lot of kettle grills have a hinged grate that makes it easy to add charcoal to the fire. If yours doesn’t, you will have to pick up the whole grate with the shoulder on it, nudge it to the side and add charcoal on the fire. Not all charcoal is created equal. Some is very dense and will burn longer, while others are lighter and burn quickly, so you’ll have to adjust the charcoal-feeding schedule based on how quickly the fire burns.
If you like a soft bark, after 5 hours, wrap the shoulder in aluminum foil. This will also decrease the cooking time. If you prefer a crustier bark and you have plenty of beer left, skip the foil. Cook until the internal temperature of the meat registers 195°F/91°C, approximately 6 to 8 hours total.
Transfer the shoulder to a cutting board and tent with foil. Rest the shoulder at room temperature for 1 hour. Serve with cold beer and Basic Vinegar Sauce.
BASIC VINEGAR SAUCE
MAKES 3 CUPS/700ML
3 cups/700ml cider vinegar
½ cup/120g light brown sugar
2 tbsp/30ml hot sauce, such as Crystal or Tabasco
2 tsp/10g kosher salt
2 tsp/10g black pepper
1 tsp red pepper flakes
In a medium saucepan over medium heat, bring all the ingredients to a simmer, whisking until fully incorporated. Remove from the heat and cool completely. Transfer to a container and refrigerate, covered, for up to 1 month.
Okay, so you carefully selected that beautiful piece of protein and are gearing up to cook one of our sometimes-challenging-yet-always-worth-it recipes. Don’t settle for mediocrity now by picking up a bag of average charcoal at the hardware store. Instead, your admirable pursuit of excellence should most definitely extend to charcoal selection. While we almost always prefer hardwood charcoal, we concede that there are rare times when briquettes are acceptable. And you may find those times even more frequent than rare. Here are some pros and cons of both:
BRIQUETTES
 They are inexpensive and widely available.
 Many brands contain non-wood fillers. Seek out brands labeled “natural” that use only vegetable starch as a binder.
 They generate significant ash. Grills that are not designed to allow for ash buildup, such as ceramic grills, don’t work well with briquettes.
 Every bag contains briquettes with the same uniform size and density. You can fit more charcoal briquettes in the grill than hardwood, because the pieces fit together more tightly, which results in longer burn times. This makes it a good choice for longer cooking two-zone recipes.
 Extruded coconut charcoal is an environmentally friendly, hot-burning charcoal often used in yakitori grills. The only downside is it’s difficult to find in the U.S.
LUMP (HARDWOOD)
 Look for brands that highlight manufacture from specific woods, like maple or apple.
 For the most part, avoid brands made with kiln-dried wood floor scrap, which is lightweight and flavorless. In a pinch it is okay for quick, hot fires because it lights easily.
 Each bag of lump charcoal contains different sizes, shapes and density. We embrace variability, relying more on sensory cues to find that right cooking temperature. With experience, you will, too.
 See Resources for our favorite types of lump charcoal. If you can swing the space, buy a pallet of the good stuff in the spring before grilling season rolls into full gear. You’ll be happy to have it on hand.
JERK RIBS WITH GUAVA GLAZE AND GRILLED BANANAS
MAKES ABOUT 4 SERVINGS
WE LOVE THE INTENSE HEAT AND FLAVOR OF THE HABANERO. IF YOU’RE NOT A FAN OF THE HEAT, TRY ADDING A SMALL AMOUNT OF THE PEPPER UNTIL YOU HAVE OBTAINED YOUR COMFORT LEVEL. OR JUST TRUST US AND GO FOR IT.
OUR GOAL FOR THIS RECIPE IS TO GET THE RUB TO “CRUST UP” WHILE COOKING, WHICH GIVES THE RIBS A FABULOUS, DYNAMIC FLAVOR. TRADITIONALLY, PIMENTO WOOD IS USED TO COOK JERK-STYLE FOOD IN JAMAICA. ANY KIND OF HARDWOOD (WE PREFER CHUNKS) WILL WORK WELL TO ROAST THESE RIBS. KEEPING THEM IN THE SAME SPOT ON THE GRILL HELPS, TOO.
4 habanero peppers, stems removed, minced
¼ cup/60g brown sugar
4 tsp/7g ground cinnamon
2 tsp/4g cumin seeds, toasted and ground
2 tsp/4g dried thyme
2 tsp/4g dried oregano
2 tsp/4g ground allspice
1 tsp ground nutmeg
2 tbsp/36g plus 2 tsp/12g kosher salt
4 tsp/7g ground black pepper
¼ cup/60ml white vinegar
¼ cup/60ml canola oil
2 racks baby back ribs, about 2 lb/900g each, peeled
Grilled Bananas (recipe follows)
Guava Glaze, for serving (recipe follows)
Make the rub: In a small bowl, mix together the habanero, brown sugar, cinnamon, cumin, thyme, oregano, allspice, nutmeg, salt, pepper, vinegar and oil. Set aside.
Place the racks of ribs on a large baking sheet and coat completely with the rub. Refrigerate for 24 hours. Every 6 to 8 hours, reapply the rub that has dripped off, then flip the racks over.
Prepare the grill for hot two-zone grilling. Pile the unlit charcoal, preferably pimento wood (see Resources), on one side of the grill. Fill a chimney with charcoal. Stuff two sheets of newspaper in the bottom of the chimney and light it. When the coals are fully engaged—you should see flames peeking over the top—pour them over the unlit charcoal. Cover the grill and open the vents all the way. If using a gas grill, light the gas and adjust the temperature on one side to high.
When the temperature reaches 350°F/177°C, clean the grill grate. Place the two racks meat-side up as far as possible from the hot side of the grill. Cover the grill and roast the ribs for 30 minutes. Flip and rotate each rack, so the one that was closest to the fire is now the farthest, and both are meat-side down. At this point you might have to throw a little more charcoal on the fire to maintain the heat. Grill the ribs for 30 more minutes, then flip and rotate again, adding a small amount of coal. Continue to cook, covered, for 30 minutes more. The meat should be browning at this point.
After 1½ hours the ribs should be close to done. A thermometer inserted into the meat should register 170°F/77°C and the meat should be tender. (Note to our barbecue friends: This is not barbecue-tender style. It’s a grill-roast.)
Remove the ribs and let cool on a wire rack. Carefully spread the coals and let them cool to a low fire (you should be able to hold your hands over the fire for no more than 8 to 10 seconds) for grilling the bananas.
When ready to serve, on a large cutting board, cut the ribs between the bones. Arrange the ribs and bananas on a large platter in an alternating pattern. Drizzle the Guava Glaze over all. Don’t forget the napkins.
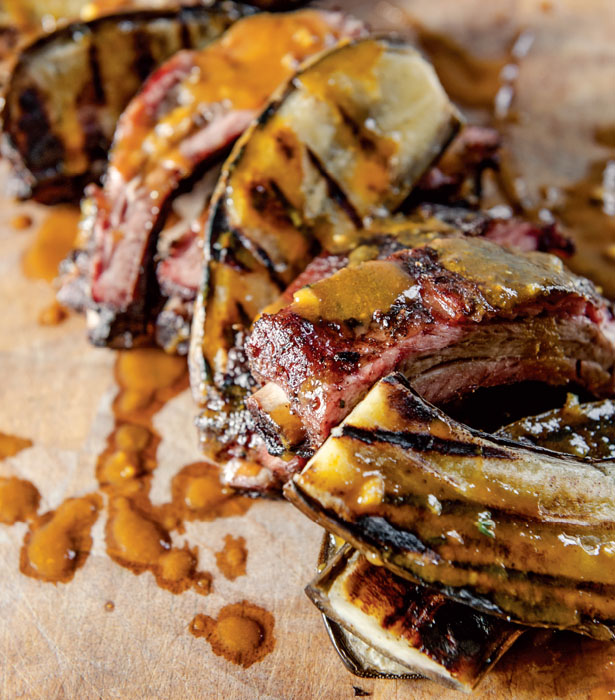
GRILLED BANANAS
IT’S SUPER IMPORTANT TO MAKE SURE YOU CLEAN THE GRILL BETWEEN COOKING THE RIBS AND THE BANANAS. THIS TROPICAL FRUIT HAS A TENDENCY TO STICK, WHAT WITH THE HIGH SUGAR CONTENT AND ALL.
3 ripe bananas, cut in half lengthwise, skin on
Vegetable oil, for grilling
Lightly rub the cut side of the bananas with oil.
When you can hold your hands over the grill for 8 to 10 seconds, grill the bananas, cut-side down, for 2 to 3 minutes, until they are slightly brown. Flip over and grill-roast for 1 minute more. Transfer to a platter.
GUAVA GLAZE
MAKES ABOUT 2½ CUPS/590 ML
1 cup/240g diced guava paste
½ cup/120ml white vinegar
½ cup/120ml water
½ cup/120ml pineapple juice or orange juice
1 tbsp/5g minced fresh ginger
1 tsp curry powder
½ tsp dried thyme
1 tsp kosher salt
In a small heavy saucepan, cook all the ingredients over low heat, stirring, until they are fully blended, 10 to 15 minutes. The paste will take a little while to soften and blend in but once it does you will have a rich, dynamic sauce for your killer ribs.
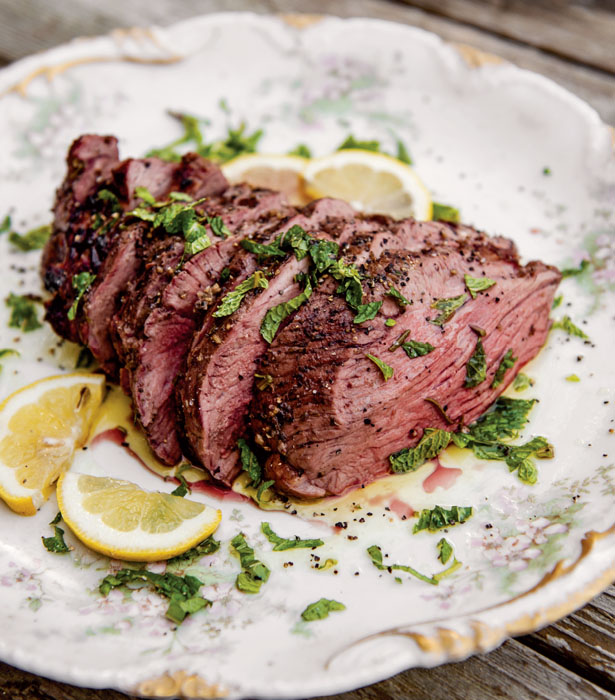
LEMON AND FRESH HERB GRILL-ROASTED LEG OF LAMB
MAKES 4 TO 6 SERVINGS
FOR THIS RECIPE WE USE WHAT WE CALL A DOUBLE-BANK METHOD, WHICH IS PERFECT FOR LARGE ROASTS BECAUSE IT ALLOWS YOU TO CARAMELIZE THE MEAT ON ALL SIDES EVEN THOUGH YOU ARE ROASTING IT OVER INDIRECT HEAT. WE RECOMMEND USING TWO REMOTE THERMOMETERS, SETTING ONE PROBE NEAR THE MEAT (SEE THE POTATO METHOD) AND ONE IN IT. THIS ALLOWS YOU TO MONITOR THE TEMPERATURES OF THE COOKING SURFACE AND THE FOOD. WE ALSO LOVE TO ADD HARDWOOD CHUNKS DURING THE COOKING PROCESS. WITH THE LONG COOKING TIME, YOU’LL GET WONDERFUL SMOKE FLAVOR.
Leaves from 1 sprig rosemary
6 sage leaves
1 cup/80g curly parsley
3 cloves garlic, roughly chopped
Zest of 1 lemon
1½ tsp/7.5g Dijon mustard
3 tbsp/15g freshly ground fennel seeds
 cup/160ml vegetable oil
Boneless leg of lamb (about 4 lb/1.8kg)
Kosher salt and freshly cracked black pepper, to taste
1 tbsp/5g minced fresh mint leaves
¼ lemon
Olive oil, for serving
Equipment: Aluminum drip pan, 2 remote thermometers, butcher’s twine
In the bowl of a food processor fitted with a steel blade, combine the rosemary, sage, parsley, garlic, lemon zest, mustard, fennel and vegetable oil and pulse to create a paste. Add a bit more oil if the mixture clumps up or is too thick.
Place the lamb on a baking sheet and trim any large pieces of gristle or sinew, leaving most of the fat in place. Smear both sides with the herb mixture. Cover and refrigerate overnight.
Remove the lamb from the refrigerator and prepare the grill for double-bank two-zone grilling. Fill a charcoal chimney with lump charcoal but do not light. Pile half the unlit charcoal to the right and the other half to the left. Set an aluminum drip pan between the charcoal piles and fill halfway with water. Refill the charcoal chimney, stuff newspaper in the bottom of the chimney and light it. When the coals are fully engaged—you should see flames peeking over the top—pour them over the unlit charcoal. Cover the grill and open the vents all the way. If using a gas grill, light the gas and turn on the front and rear, or outside burners, to high.
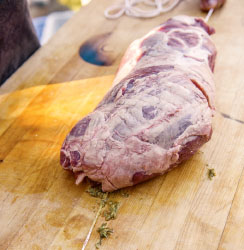
While the grill is heating, re-truss the lamb. Sprinkle both sides with salt and pepper. Roll the lamb back into a roast-like shape, fat side out, and truss with butcher’s twine.
When the temperature reaches 350°F to 400°F/177°C to 204°C, clean the grill grate. Place the lamb on the grill directly above the drip pan and cover the grill. For gas grills, place the lamb over the unlit burner. Grill-roast for 45 minutes, or until the internal temperature registers 120°F/49°C for rare (our preference) or 130°F/54°C for medium. If necessary, add a couple of small pieces of charcoal to each pile while the lamb is roasting to keep a consistent temperature.
Remove the lamb from the grill and place on a cutting board to rest for 20 minutes. Using kitchen shears, snip away the butcher’s twine. With a carving knife, thinly slice the lamb. Sprinkle with the mint, squeeze on the lemon juice and drizzle with a thin line of olive oil.
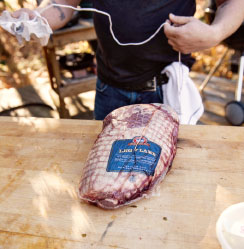
Boneless leg of lamb.
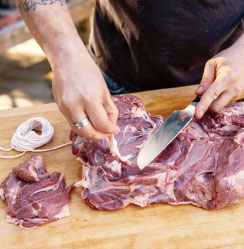
Trim any large pieces of gristle or sinew.
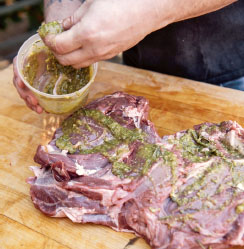
Herb wet rub.
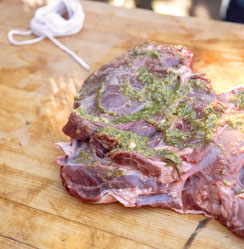
Rub with herb mixture.

Smear both sides.
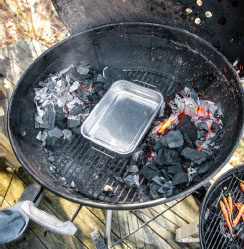
Double-bank two-zone grilling set up.

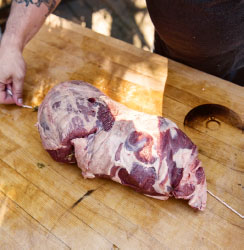
Flip cut side down.
Place on long strand of butcher’s twine.

Wrap twine around each end.

Create a loop around the leg.

Pull twine through the loop.
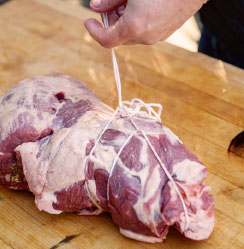
Tighten.

Repeat.
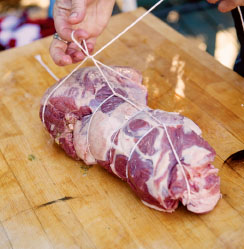
Pull tight on each loop.

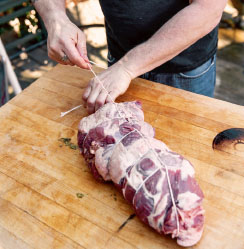
Tie off excess twine.

Cut excess.
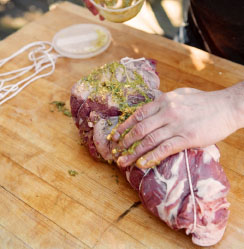
Ready for the grill.
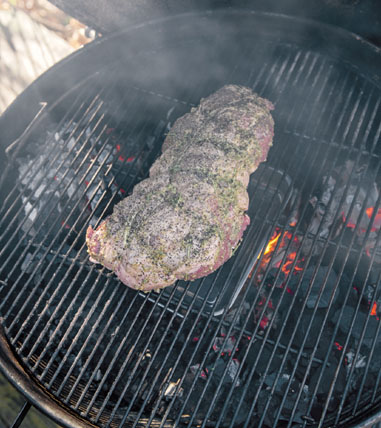
Lamb cooks directly over drip pan.

PERFECT HOLIDAY TURKEY ON YOUR GRILL WITH TURKEY BACK GRAVY, CORNBREAD DRESSING, BASIC BRINE AND GRILLED APPLES
MAKES 10 TO 12 SERVINGS
IN HER 1989 BOOK THE WAY TO COOK, JULIA CHILD TOOK A NEW APPROACH TO ROASTING TURKEY, TAKING THE BIRD APART BEFORE—RATHER THAN AFTER—COOKING. HER REASONING, ALWAYS SOUND, WAS THAT COOKING WHOLE TURKEYS ALWAYS TAKES FOREVER AND THE DIFFERENT PARTS COOK AT DIFFERENT RATES. JULIA SUGGESTED DECONSTRUCTING THE TURKEY, ROASTING THE PARTS SEPARATELY, THEN REUNITING THEM IN THE ROASTING PAN TO FINISH UP ALL TOGETHER. IT WORKS.
WE DON’T KNOW WHETHER JULIA EVER TRIED GRILLING HER THANKSGIVING TURKEY, BUT—NO SURPRISE—WE DO IT ALL THE TIME. AND WE’VE ENCOUNTERED THE SAME ISSUES OUTSIDE THAT WE USED TO RUN INTO INSIDE. SO WE TRIED TAKING THE TURKEY APART AND GUESS WHAT! PERFECT, JUICY TURKEY! WE DON’T REASSEMBLE THE TURKEY ON THE GRILL. WE SAVE THAT FOR WHEN WE BRING IT BACK INDOORS.
1 gallon/3.8L Basic Brine (recipe follows)
12- to 14-lb/5.4- to 6.4kg turkey
Kosher salt and freshly ground black pepper, to taste
½ cup/120ml low-sodium chicken broth
½ cup/120ml barbecue sauce
¼ cup/60ml apple cider vinegar
Grilled Turkey Back Gravy (recipe follows)
Cornbread Dressing (recipe follows)
2 tbsp/30ml vegetable oil
1 tbsp/5g freshly ground black pepper
1½ tsp/3g chili powder
½ cup/120ml maple syrup
Grilled Apples (recipe follows)
Fresh sage, for garnish
Equipment: 2-gallon/7.6L brining bag, baking pan lined with a cooling rack, two 18"/46cm squares heavy-duty foil

HOLIDAY GRILLING SCHEDULE AT A GLANCE
DAY 1
 Make brine
 Grill legs
 Grill back and neck
 Make stock for gravy
DAY 2
 Make gravy
 Grill breast
 Rewarm legs
 Make dressing
 Grill apples
Day 1: Make the brine and deconstruct the turkey (see photos). Remove and discard any trussing and pop-up thermometer. Refrigerate the neck, back and wings for Grilled Turkey Back Gravy.
Place the leg quarters on a baking sheet and season both sides with salt and pepper.
Place the turkey breast, meat-side down, into the brining bag and pour in the cold brine. Refrigerate for 12 to 24 hours.
Grill the legs. Prepare the grill for two-zone grilling. Pile unlit charcoal on one side of the grill. Fill a chimney with charcoal. Stuff two sheets of newspaper in the bottom of the chimney and light it. When the coals are fully engaged—you should see flames peeking over the top—pour them over the unlit charcoal. Cover the grill and close the vents 75 percent. If using a gas grill, light the gas and turn just one side on to medium.
When the temperature reaches 300°F/149°C, clean the grill grate and place the leg quarters skin-side down on the cool side of the grill for about 1 hour, or until the internal temperature of the leg reaches 160°F/70°C.
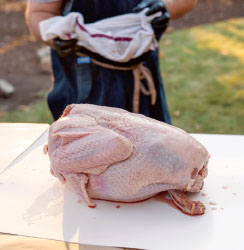
Place turkey breast-side down on a cutting board.
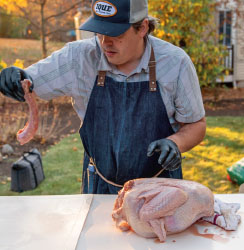
Remove neck, giblets bag.
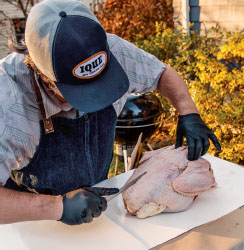
Create a line on each side of the backbone.

Cut along one side of backbone.
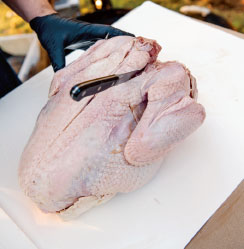
Cut along other side.
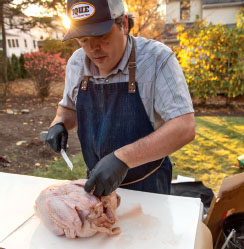
Begin to pull back out of cavity.
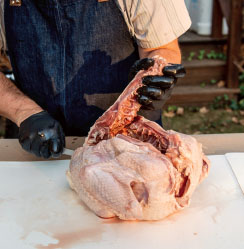
Pull up on back.
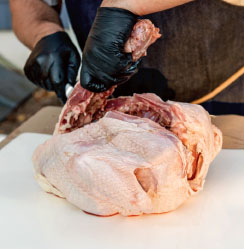
Continue cutting.
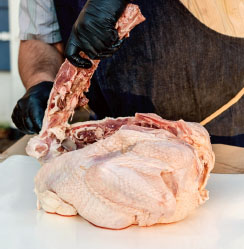
Remove back.

Cut between knuckle of wing and tip.

Remove wing tip.

Cut between breast and leg.
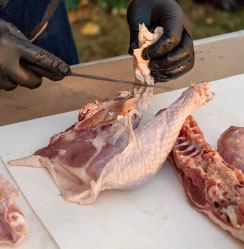
Remove leg and trim fat.
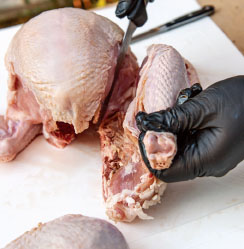
Repeat and remove other leg.
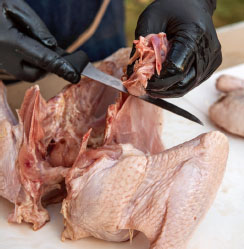
Trim rib bones.

Breast lays flat and is ready to go.

Trimmed breast and legs.

Fully deconstructed turkey.
If making the gravy, position the back and neck closer to the fire for 30 to 45 minutes, until slightly charred.
In a small saucepan over medium heat, combine the chicken broth, barbecue sauce and apple cider vinegar until warm. Transfer each leg to an 18 inch/46cm piece of heavy-duty aluminum foil and baste both sides generously with the broth mixture. Tightly wrap the legs in foil and return to the cool side of the grill for another 30 minutes, or until a thermometer inserted into the thick part of a leg registers 180°F/82°C. Remove from the grill, unwrap the foil and let cool to room temperature. Reseal the foil, place the legs on a baking sheet and refrigerate overnight.
Meanwhile, use the browned turkey back and neck to make the turkey stock for the Grilled Turkey Back Gravy. Cool, and refrigerate the stock, covered.
If making the cornbread dressing, place the cornbread and white bread cubes on a baking sheet and leave out, uncovered, overnight.
Day 2: Cook the breast and rewarm the legs. Remove the breast from the brine and place on a baking sheet lined with a cooling rack. Pat dry with paper towels and return to the refrigerator for at least 1 hour and up to 6 hours.
While the breast is drying in the refrigerator, finish the stock and make the gravy.
Prepare the grill for two-zone cooking. When the temperature reaches 300°F/149°C, brush the breast with the oil and sprinkle with the black pepper and chili powder. Place the breast on the cool side of the grill with the thicker wing end pointed toward the fire. Grill for 1 hour.
Remove the legs from the refrigerator and add them, still sealed in foil, to the cool side of the grill. Check the internal temperature of the turkey breast. Continue cooking until a thermometer inserted into the deepest part of the breast (near the wing joint) reads 155°F/68°C, approximately 1 more hour. Tent the turkey with foil if the skin becomes too dark.
Remove the breast and the legs from the grill, and place the breast on a clean baking sheet. In a small saucepan, warm the maple syrup over medium heat and spoon it over the breast. Tent loosely with foil and let rest for 45 minutes while you bake the stuffing and grill the apples.
To serve, fill the center of a large platter with the Cornbread Dressing. Set the breast on the dressing. Place a leg quarter, with drum pointed inward, on each side of the breast. Decorate the platter with the Grilled Apples and sage leaves. Pass the Grilled Turkey Back Gravy on the side.
BASIC BRINE
MAKES 1 GALLON/3.8L
1 gallon/3.8L water, divided
¾ cup/60g kosher salt
¾ cup/150g sugar
¼ cup/60ml maple syrup
10 sage leaves
1 head garlic, cut in half horizontally
10 whole black peppercorns
In a large pot over high heat, bring 2 quarts/1.9L of the water to a boil. Remove from the heat and add the salt, sugar, maple syrup, sage leaves, garlic and peppercorns, stirring until the salt dissolves. Pour into a large bowl, stir in the remaining 2 quarts/1.9L of cold water and refrigerate for at least 6 hours or overnight.
GRILLED TURKEY BACK GRAVY
MAKES 5 CUPS/1000G
THIS IS A TWO-DAY RECIPE.
3-lb/1.4kg turkey or chicken wings
1 turkey back
1 turkey neck
Reserved trimmings from deconstructed turkey
1 onion, sliced
2 stalks celery, chopped
1 carrot, chopped
1 gallon/3.8L cold water
½ cup/40g parsley, sprigs and stems
Kosher salt and freshly ground black pepper, to taste
¼ cup/60g butter
½ cup/60g flour
1 tbsp/15ml apple cider vinegar
1 tbsp/5 sage, cut into chiffonade
Place the wings, turkey back and neck, turkey trimmings, onion, celery and carrot in a deep, 8-quart/7.6L stockpot. Cover with the cold water. Bring to a boil over medium-high heat, then reduce the heat to a simmer. Skim any foam off the top, add the parsley and simmer slowly, without stirring, for 4 to 6 hours. Strain the broth through a fine-mesh sieve or cheesecloth. Cool in a low-sided wide pan or bowl at room temperature, whisking occasionally to release the steam, for 1 hour. Refrigerate overnight.
Remove the broth from the refrigerator and scrape the fat from the surface, reserving 2 tablespoons/30ml. Bring the broth to a boil, skimming off any bits that rise to the top. Lower the heat and simmer the broth until it is reduced to about 5 cups/1.2L, about 15 minutes. Season well with salt and pepper.
In a medium saucepan over medium-low heat, melt the butter and reserved turkey fat. Add the flour and whisk constantly for 5 minutes, until lightly colored. Carefully add 1 cup/240ml of the hot broth, whisking until smooth. Slowly add the remaining 4 cups/960ml broth, whisking constantly. Return to a simmer and cook, stirring occasionally, until thickened, about 10 minutes. Add the vinegar and sage and keep warm, ideally in a double boiler, until ready to serve.
CORNBREAD DRESSING
MAKES 10 To 12 SERVINGS
2 tbsp /30g butter, softened, for pan
1 onion, sliced
1 cup/120g sliced celery (2 large stalks)
1 cup/70g sliced button mushrooms (about 4 oz/113g)
2 tbsp/30ml olive oil
2 tbsp/10g chopped sage
1 tsp kosher salt
¾ tsp freshly ground black pepper
One 9" x 13"/23 x 33cm loaf day-old, unsweetened cornbread, cut into 1"/2.5cm cubes (about 8 cups/960g)
3 large slices day-old crusty white bread, cut into 1"/2.5cm cubes (about 2 cups/100g)
1½ cups/355ml chicken stock or broth
Equipment: Grill-safe baking pan
Coat the inside of a 9" x 13"/23 x 33cm baking pan with the softened butter; set aside.
Preheat the oven to 350°F/170°C/gas mark 4 or, while the turkey is resting, raise the grill temperature to 350°F/170°C by opening the vents and adding half a chimney of lit charcoal.
In a large sauté pan over medium heat, sauté the onion, celery and mushrooms in the olive oil until soft, about 15 minutes. Remove from the heat and stir in the sage, salt and pepper.
In a large bowl, combine the cornbread, white bread, sautéed vegetables and broth until just incorporated. Spoon into the prepared baking dish. When the grill temperature reaches 350°F/170°C, place the dressing on the cool side of the grill, cover the grill and bake for 30 minutes, or bake in the oven for 30 minutes. Mound the dressing on serving platter.
GRILLED APPLES
MAKES 12 SERVINGS
6 crisp apples, such as Gala, Fuji or Honeycrisp, cored and cut into quarters
2 tbsp/30ml vegetable oil, for brushing
1 tbsp/5g chili powder
2 tbsp/30ml agave nectar, at room temperature
1 tbsp/5g mint leaves, cut into chiffonade
When the cornbread stuffing is done, brush the apples with the oil and sprinkle with chili powder, then grill on all sides for 15 to 20 minutes. Arrange around the turkey, drizzle with the agave nectar and top with the mint
PUMPKIN BREAD IN A CAN WITH CHOCOLATE SEA SALT BUTTER
MAKES 3 SMALL LOAVES, ABOUT SIX ½"/13-CM-THICK SLICES EACH
USING THE GRILL AS AN OVEN, AS IN THIS RECIPE, IS DIFFICULT BECAUSE ONE OF THE TRICKIEST ASPECTS OF COOKING OVER CHARCOAL IS LEARNING HOW TO MONITOR THE TEMPERATURE OF THE FIRE. BUT THE HINT OF SMOKE THE CHARCOAL IMPARTS GIVES WHATEVER YOU ARE BAKING A UNIQUE FLAVOR YOU AND YOUR GUESTS WON’T SOON FORGET. TO SOME EXTENT, THIS TYPE OF GRILLING COMES WITH EXPERIENCE. AFTER DOING IT AGAIN AND AGAIN (AND AGAIN), YOU GET A FEEL FOR THE FIRE. BUT SOMETIMES IT IS IMPORTANT TO KNOW THE EXACT TEMPERATURE OF THE GRILL. MANY EXPERIENCED GRILLERS RELY ON THE TEMPERATURE GAUGE ON THE GRILL COVER. THE MORE SERIOUS AMONG US USE A REMOTE THERMOMETER WHERE THE RECEIVER, WITH TEMPERATURE INFORMATION, IS IN ONE LOCATION AND A PROBE IS DANGLED INTO THE GRILL THROUGH A COVER VENT TO MEASURE THE TEMPERATURE OF THE GRILL ENVIRONMENT. THERE ARE A VARIETY OF THESE GAUGES, WHICH WE ADDRESS IN THE TOOLS SECTION.
5 tbsp/65g sugar, divided, plus more for dusting
1 cup/120g flour
¾ tsp baking powder
½ tsp kosher salt
½ tsp ground ginger
½ tsp cinnamon
¼ tsp baking soda
 tsp nutmeg
4 tbsp/60g butter, softened
¾ cup/185g pumpkin purée
1 egg
3 tbsp/45g sour cream
½ tsp vanilla extract
Chocolate Sea Salt Butter, for serving (recipe follows)
Equipment: 3 small (10¾-oz/318ml) soup cans, washed well and dried; 6"/ 15cm wooden skewer
Prepare the grill for hot two-zone grilling. Pile unlit charcoal on one side of the grill. Fill a chimney with charcoal. Stuff two sheets of newspaper in the bottom of the chimney and light it. When the coals are fully engaged—you should see flames peeking over the top—pour them over the unlit charcoal. Cover the grill and open all the vents. If using a gas grill, adjust the temperature on one side of the grill to high.
Spray the insides of the soup cans with cooking oil spray. Pour about 1 tablespoon/15g sugar into one can and slowly rotate to coat the whole inside. Tip any remaining sugar into the second can and repeat, then do the same with the third can, so all cans are fully coated.
In a medium-size mixing bowl, sift together the flour, baking powder, salt, ginger, cinnamon, baking soda and nutmeg. Set aside.
In the large bowl of an electric mixer, cream together the butter and remaining 4 tablespoons/50g sugar until fluffy, about 3 minutes, scraping down the sides of the bowl. Add the pumpkin purée and continue beating until fully incorporated. Add the egg, beating to blend. Add the sour cream and vanilla, and beat on medium speed until well blended.
Add the dry ingredients in 3 batches, scraping down the sides each time, and mix on low until well blended. Divide the batter evenly among the soup cans, filling each about half full.
When the grill temperature reaches 350°F/170°C, clean the grill grate. Set the cans upright on the cool side of the grill and cover the grill. Bake, shifting the position of the cans for even heating every 10 minutes, until the breads are golden brown and a wooden skewer inserted into the center comes out clean, about 30 minutes.
Wearing heatproof gloves, transfer the cans to a wire rack and let cool for 10 minutes. Pop the breads out onto the rack. Slice them and serve immediately with Chocolate Sea Salt Butter. You can also place the slices on a baking sheet lined with parchment paper, spread the Chocolate Sea Salt Butter on each slice and set the sheet in a covered grill for about a minute, until the butter is melted.
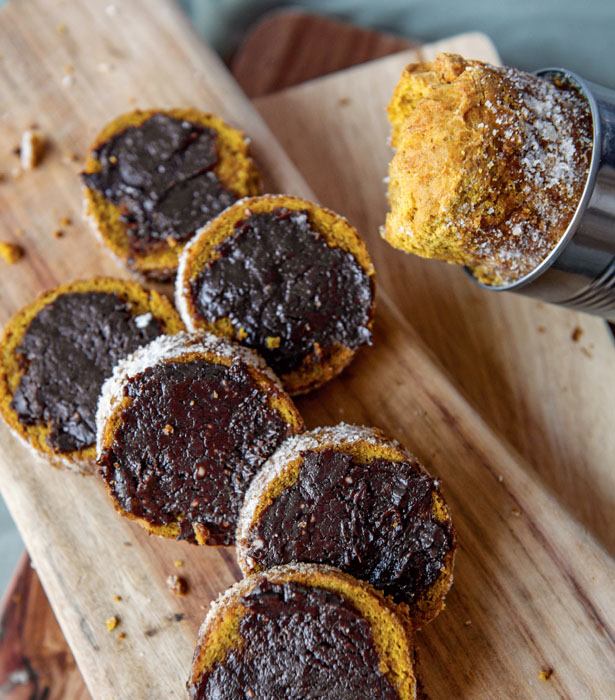
CHOCOLATE SEA SALT BUTTER
MAKES ½ CUP/120G
½ cup/120g butter, softened
3 tbsp/23g confectioner’s sugar
2 tbsp/16g unsweetened cocoa powder
1 tbsp/15ml your favorite bourbon or rye
1 tsp large flake sea salt, such as Maldon
In the bowl of a stand mixer fitted with the paddle attachment, mix the butter, sugar, cocoa powder and bourbon on medium speed until fully incorporated, scraping down the sides. Add the salt and mix for 15 seconds on low speed. Transfer to a serving bowl and refrigerate, covered, until needed. Let stand at room temperature until soft before using.
You can also roll the butter into a log in parchment paper, cover it well with plastic wrap and refrigerate.
GRILL IT SLOW AND LOW APPETIZERS AND DRINKS
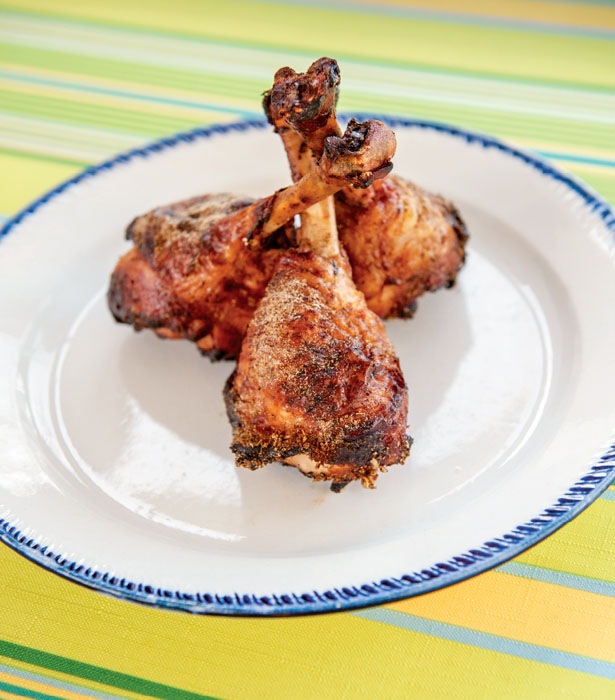
SICHUAN CHICKEN LOLLIPOPS WITH CUMIN-FLAVORED DRY SPICE
MAKES 8 LOLLIPOPS, 4 APPETIZER SERVINGS
THESE ARE MEATY AND BIG FLAVORED, PERFECT FOR A BACKYARD BARBECUE, WHERE YOU’LL HAVE CHICKEN IN ONE HAND AND A BEER IN THE OTHER. HERE WE DRAW INSPIRATION FROM CHINA’S SICHUAN PROVINCE, WHERE FLAVORS IN MANY WAYS ARE SIMILAR TO WHAT WE LIKE ABOUT AMERICAN BARBECUE. THEY HAVE A WONDERFUL BALANCE OF BOLD, SPICY, TANGY AND SWEET, AND PAIR BEAUTIFULLY WITH COLD BEER.
ONE WAY WE LIKE TO ACHIEVE A PUNCH OF FLAVOR IS TO INTRODUCE A SPICE RUB AT THE END OF THE COOKING PROCESS, AS OPPOSED TO THE MORE TYPICAL APPLICATION AT THE BEGINNING. A FINISHING RUB CREATES A BRIGHT, INTENSE, SPICY FINISH. IT’S WORTH THE EFFORT TO FIND SICHUAN PEPPERCORNS; YOUR GUESTS’ TONGUES WILL BE TINGLING HAPPILY FOR DAYS.
8 chicken legs
½ cup/120ml honey
2 tbsp/30ml soy sauce, preferably low-sodium
2 tbsp/30ml hoisin sauce
Juice of 1 tangerine
1 tsp ground ginger
2 tbsp/36g kosher salt
2 tbsp/10g Sichuan peppercorns (or white peppercorns)
2 tbsp/10g cumin seeds, toasted
½ tbsp/3g Chinese five-spice powder
Prepare the chicken legs. Using kitchen shears, cut off the knob at the end of the bone. Using a chef’s knife, scrape the meat down the bone from the knuckle end, pushing it toward the meaty end to create a “lollipop.” Remove the tendons using a pair of tweezers or pliers. Wrap the now bare bone with foil.
In a small bowl, mix the honey, soy sauce, hoisin, tangerine juice and ginger. Place the chicken in a large plastic zipper bag and pour in the mixture. Remove all air from the bag, seal it and refrigerate for 1 to 2 hours.
In another small bowl, combine the salt, peppercorns, cumin and five-spice powder. Using a spice grinder, process into a fine powder, working in batches if necessary. Store in a plastic cup or a measuring cup with a spout.
Prepare the grill for low two-zone grilling. Pile unlit charcoal on one side of the grill. Fill a chimney with charcoal. Stuff two pieces of newspaper in the bottom of the chimney and light it. When the coals are fully engaged—you should see flames peeking over the top—pour them over the unlit charcoal. Cover the grill and close the vents 75 percent. If using a gas grill, light the gas and adjust the temperature on one side of the grill to medium.
When the temperature reaches 325°F/163°C, clean the grill grate. Remove the chicken from the refrigerator. Take the lollipops out of the bag and place them directly on the grill grate very close to, but not directly over, the fire, with the bones pointing up. Discard any remaining honey-soy mixture.
Cover the grill and cook the chicken, rotating every 15 minutes, for 1 hour, or until a meat thermometer inserted into the thickest part of a lollipop reads 165°F/74°C. If the chicken starts to burn, move it to the cooler side of the grill. Remove the lollipops from the grill and place on a platter. Dust completely with the dry rub. Remove the foil and serve.
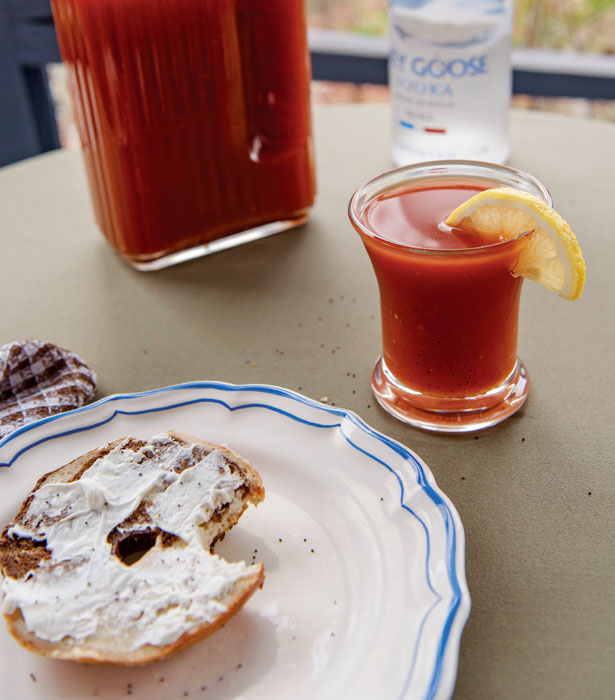
GALLON Of BLOODY MARY
MAKES 1 GALLON/3.8L, ABOUT 12 SERVINGS
TOO OFTEN WE ARE SERVED BLOOD MARYS THAT ARE WATERY AND LACK FLAVOR. WE AVOID THAT PROBLEM BY MIXING OURS THE DAY BEFORE, WITHOUT ICE. AS THE DRINK SITS OVERNIGHT, THE FLAVORS WILL BLOOM. RIGHT BEFORE SERVING, WE POUR OVER ICE. IT’S A GREAT WAY TO START A DAY OF GRILLING.
1 bottle (750ml) top-shelf vodka
½ cup/120g prepared horseradish
¼ cup/60ml Worcestershire sauce
Juice of 1 lemon
2 tbsp/30ml chipotle hot sauce
1½ tbsp/8g ground black pepper
2 (46-oz/1.4L) cans tomato juice
½ cup/40g your favorite barbecue dry rub
¼ lemon wedge
1 recipe Sweet, Spicy, Smoky Grilled Shrimp Cocktail or 12 lemon wedges, for garnish
Equipment: Clean, empty 1-gallon/3.8L jug with lid
Combine the vodka, horseradish, Worcestershire, lemon juice, hot sauce and pepper in an empty plastic 1-gallon/3.8L jug with a lid. Cover and shake well. Add the tomato juice almost to fill (there should be about 1 inch/2.5cm of space at the top of the jug). Shake well and refrigerate for at least 1 hour and preferably overnight. It will keep for up to 5 days in the refrigerator.
To serve, rim a pint glass. Spread the barbecue dry rub in a small, flat dish or saucer. Moisten the rim of the glass with the lemon wedge, and invert the glass into the rub, twisting a bit for good coverage.
Fill the glass halfway with ice. Give the Bloody Mary jug a good shake and pour over the ice. Garnish with a grilled shrimp or a wedge of lemon.
PEACH MINT JULEPS
MAKES 4 SERVINGS
THIS DRINK SCREAMS SUMMERTIME TO US. A FEW OF THESE, AND WE’RE NOT GRILLING ANYTHING; SO MAYBE THIS SHOULD BE THE DESSERT.
YOU SHOULD BE ABLE TO FIND PEACH PURÉE IN THE FROZEN SECTION OF YOUR MARKET OR ONLINE. CANNED PURÉED PEACHES ARE A GOOD ALTERNATIVE. IF YOU GO FOR THIS OPTION, YOU CAN USE THE SYRUP IN THE CAN INSTEAD OF MAKING YOUR OWN SIMPLE SYRUP.
½ cup/100g sugar
½ cup/120ml water
20 mint leaves, divided, plus 4 sprigs for garnish
1 cup/240g peach purée (see Resources)
10 oz/284ml bourbon (we like Bulleit)
In a small saucepan over medium heat, bring the sugar and water to a boil, stirring occasionally, until the sugar is dissolved. Remove from the heat and add 10 of the mint leaves. Cool to room temperature. With a slotted spoon, remove the mint leaves and add the remaining 10 leaves. Let stand for at least 10 minutes.
Strain the minted simple syrup into a 1-quart/940ml pitcher. Stir in the peach purée and bourbon, and pour over 4 ice-filled glasses. Garnish with the mint sprigs and drink up.