CHAPTER 3: Color Mixing
With a foundational understanding of pigments in place, you can move on to the art of paint mixing. Although basic guidelines are helpful to consider as you mix, there is plenty room for personal preference and style. You’ll also find that mixing acrylic and oil is a very different process than mixing watercolor. This chapter covers the following topics:
• Color Mixes for Oil & Acrylic

BASIC PAINTING MATERIALS
To fully grasp the way pigments behave and interact, it’s important to know the basics of your media. On the following pages, you’ll find information on the tools and materials needed to experiment effectively with color through paint.
TYPES OF PAINT
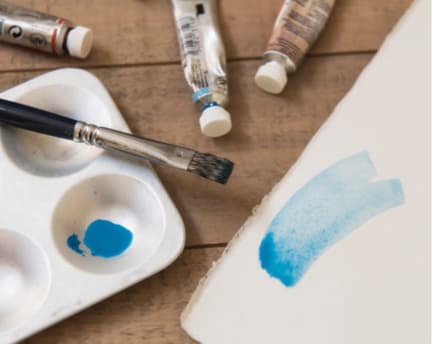
• Watercolor: Watercolor is a water-based paint made of pigment, gum arabic, glycerin, and a humectant to keep the paint moist. Thin the paint with water to create fluid washes of color. The more water added to a mix, the lighter the paint will appear. Clean up watercolor with soap and water. For information on watercolor palettes and mixing, see here.
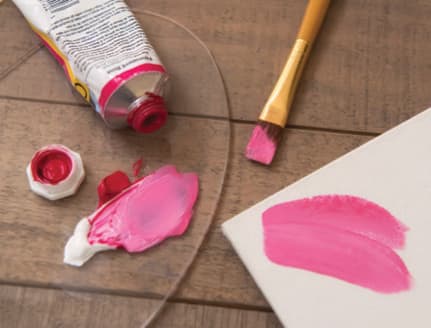
• Acrylic: Acrylic is also a water-based paint made of pigment and acrylic polymer dispersion. Thin it with water if desired, or paint in thick strokes. Acrylic can be used with a number of mediums and additives that change the consistency and sheen of the paint. Clean up acrylic with soap and water. For information on acrylic palettes and mixing, see here.
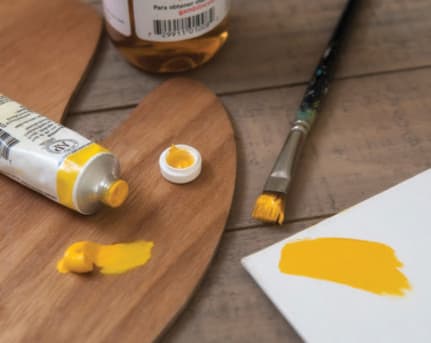
• Oil: This medium consists of pigments suspended in oil, such as linseed oil. This slow-drying paint is thick and luminous. Because oil paints are not water-based, they require a solvent for thinning the paint and cleaning up. Note that solvent emits toxic fumes, is highly flammable, and must be disposed of safely and legally. For information on oil paint palettes and mixing, see here.
BRUSHES
Choosing the right brush for the right task makes a big difference in your painting experience. Brushes come in three basic types: soft natural-hair, soft synthetic-hair, and bristle.
• Soft natural-hair brushes: These brushes are made of the hair of an animal such as a weasel, badger, or squirrel. High-quality naturals hold a good amount of moisture and are ideal for watercolor.
• Soft natural-hair brushes: These brushes are made of man-made fibers such as nylon and polyester. They are durable and ideal for acrylics, but they can be used with watercolor as well when natural-hair brushes are cost prohibitive.
• Bristle brushes: These brushes have coarse and sturdy bristles for working with thick oil and acrylic paint. They produce visible painterly brushstrokes. Made of hog hair, the bristle ends are flagged (or split) so they can hold more hair.
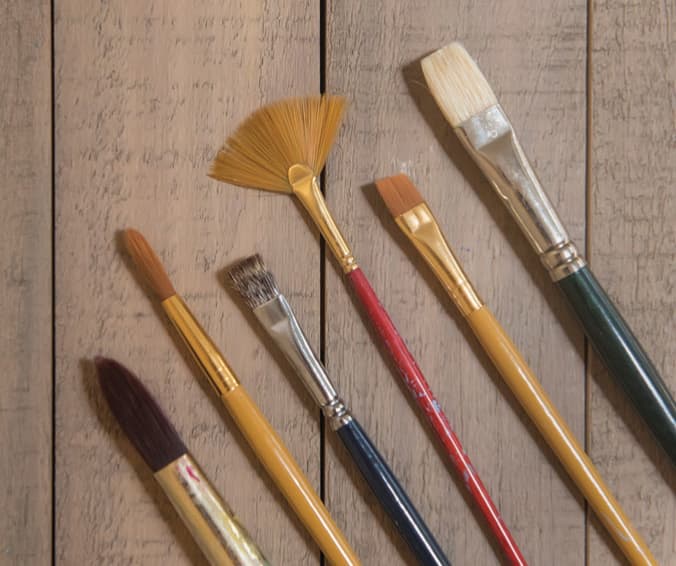
Shown are a variety of brush shapes, from round and flat to fan. Each shape produces a different style of stroke. Note that brush handles vary in length; short handles are best for watercolor and detail work, whereas long handles are best for painting with an easel while working in acrylic and oil.
SUPPORTS
A support is the surface on which you paint. Watercolor artists generally use sturdy papers coated with sizing, which prevents the paper from absorbing too much moisture and buckling or tearing. The paper comes in hot-press (smooth), cold-press (irregular), and rough textures. Acrylic artists can use a variety of supports, from canvas and wood to wood composite board and sturdy paper. Oil paint is generally used on canvas or wood. Before applying acrylic or oil to your support, make sure it has been primed so the paint has a bright, toothy surface to which it can bond. Many artists today prime their supports with white acrylic “gesso.”
OTHER SUPPLIES
• Jars of water for mixing and cleanup
• Paper towels and rags
• Old clothes or an apron
• Solvent for cleanup (if using oil paints)
• Artist tape and clips for securing your support to a painting surface
• Spray bottle for keeping watercolor and acrylic paints moist during a painting session
MIXING OIL & ACRYLIC
MIXING PALETTES FOR OILS & ACRYLIC
Mixing palettes are surfaces for preparing and mixing paints. They come in a wide variety of materials, shapes, and sizes. Below are the most readily available palettes for oil and acrylic painters.
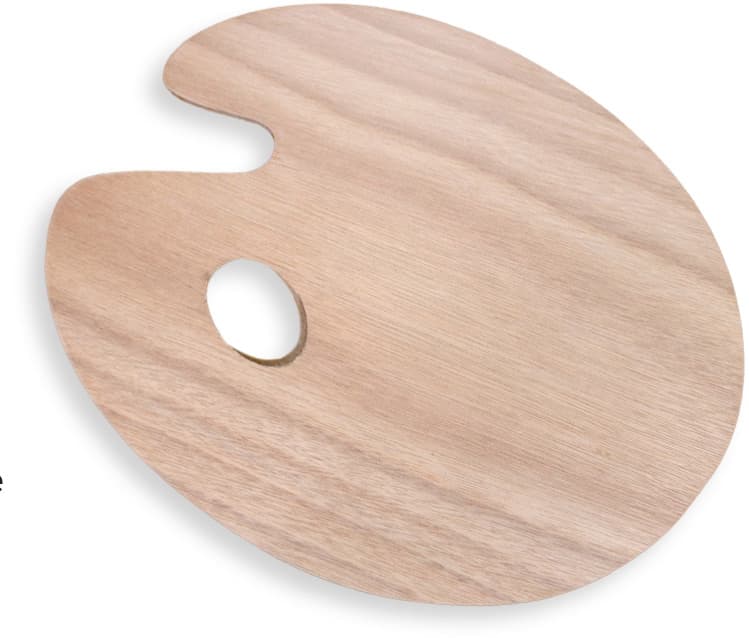
Wooden Palettes Traditional wooden palettes offer a flat, lightweight mixing surface for oil paints. The wood color provides a warm middle value to help you better judge your paint values as you mix—particularly if you paint on toned surfaces. These palettes often have a thumbhole to make it easy to hold while painting. Before using a wooden palette, seal its surface with a few layers of linseed oil or shellac. To clean, scrape off the paint and wipe down with a cloth and solvent. Note that wooden palettes are not a good choice for acrylic paint, which dries quickly and adheres to the wood.
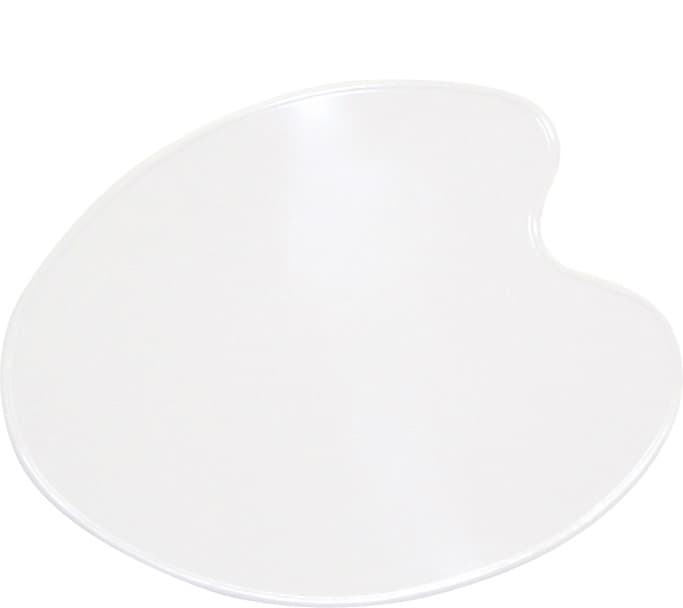
Plastic Palettes White plastic palettes are smooth, lightweight, and inexpensive mixing surfaces. They are available in an assortment of sizes and shapes, including handheld and tabletop varieties. Some are simple and flat, whereas others feature shallow wells for mixing washes. If using acrylic, clean the palette with soap and warm water. If using oil, clean it with a cloth and solvent.
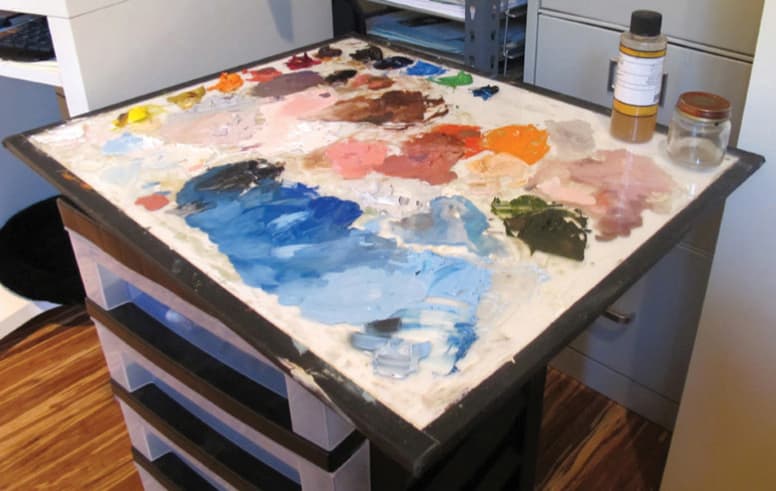
Clear Palettes Sheets of plexiglass or tempered glass make excellent tabletop mixing surfaces for oil or acrylic. They are sturdy, smooth, and easy to wipe clean. To control the color or value of the surface, paint the underside or slip a sheet of toned paper beneath. You can tape the edges for safer handling.
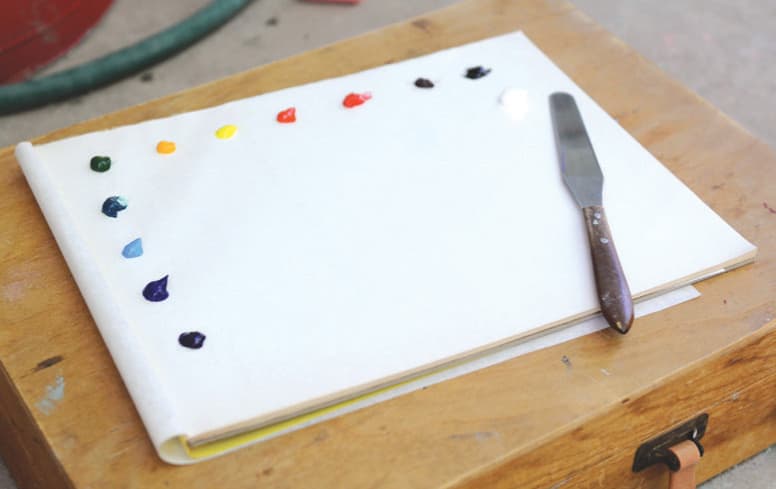
Palette Paper Palette paper comes in pads of disposable sheets. The paper is poly-coated for a smooth, moisture-resistant surface. Work directly on the pad and tear off the sheet when finished, or begin by placing a clean sheet on a flat surface (such as an old baking sheet).
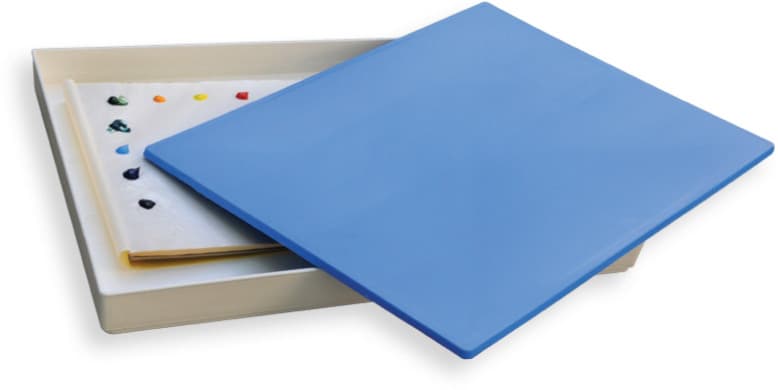
Sealed Trays Many artists use shallow, airtight containers for storing their palettes. You can use the plastic bottom directly, but most use them in conjunction with paper or handheld palettes. If using oil, this tray will protect the paint from dust. If using acrylic, this tray will help the paint stay moist if sealed and stored with a wet sponge. There are a few “stay wet” palettes for acrylic on the market that come with a sponge component.
PALETTE KNIVES
Although you can mix small amounts of acrylic and oil on your palette with a brush, it’s more efficient to use a palette knife for mixing large quantities. This handheld tool has a thin, flexible metal blade that you can use to scoop, smash, and move paint on your palette. A painting knife is similar to a palette knife, but it has a neck that sets the blade away from the handle. This prevents your hand from accidentally smearing your painting as you work. Painting knives offer interesting ways to apply (or remove) paint from your painting surface—from thick impasto strokes to thin smears and scraped designs.
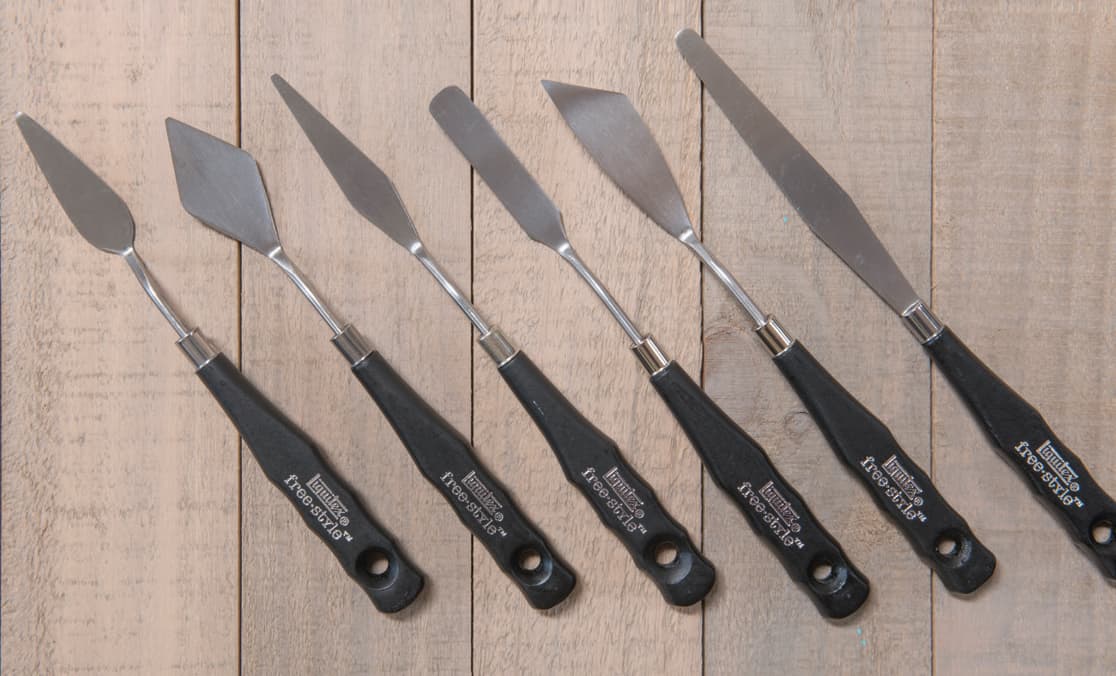
Painting Knife Shapes Painting knife blades are available in a wide range of sizes and shapes, such as diamond, trowel, pointed, and angled. Choose the best shape for the effects you desire. Palette and painting knives are also available in plastic for an affordable and disposable option.
Mixing Acrylics with a Palette Knife
Step 1
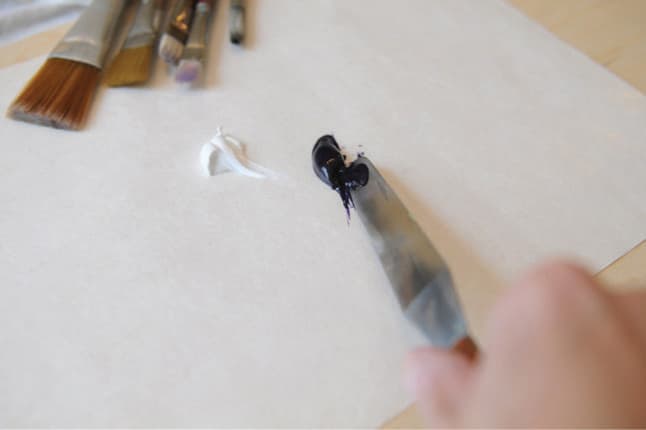
Begin by using the knife to pick up the paint colors you’d like to mix. Place them next to each other in an open area on your palette.
Step 2
Think of the mixing process as scoop, smash, and pat. Holding the blade at an angle to the mixing surface, scoop the paint piles onto the knife.
Step 3
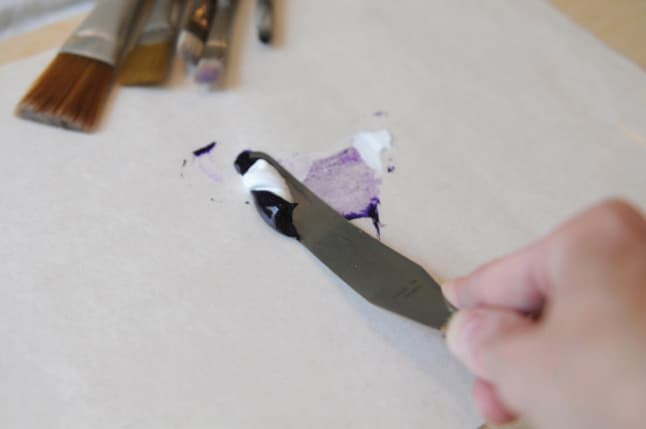
Turn over the palette knife and smash the paint onto the palette. Then gently pat and smear the pile of paint, spreading the paint colors into each other. Scoop and repeat this step until the paint is mixed to your liking.
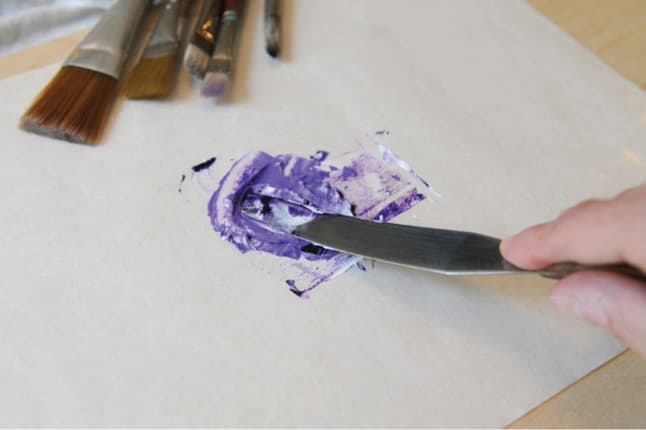
Step 4
Spreading the mix flat on your surface will help you judge the value of the paint without any shadows or strong highlights.
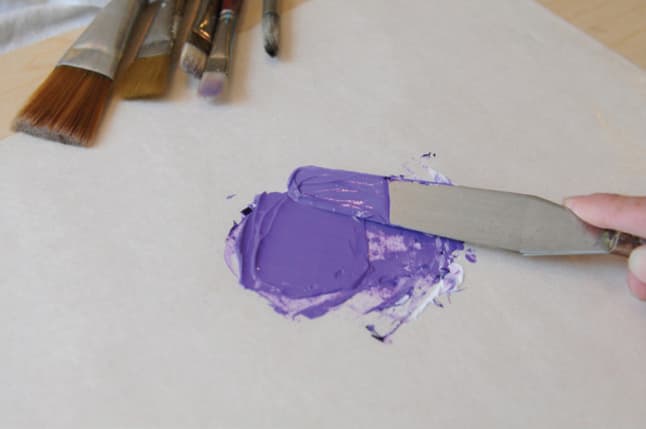
Step 5
Leaving as much paint on the palette as possible, finish by wiping off the blade using a paper towel or cloth. Some artists prefer lint-free rags for this step.
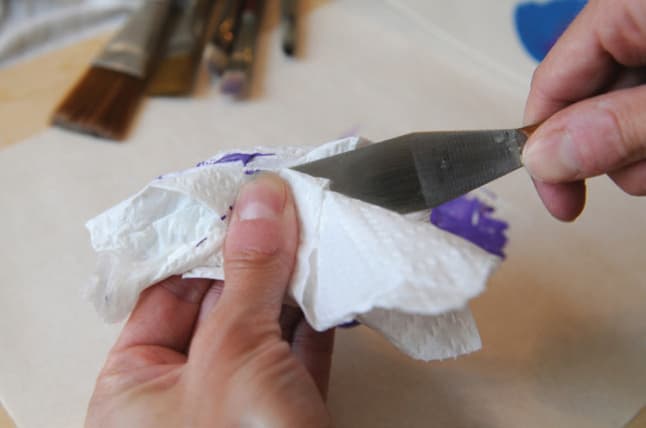
GLAZING ACRYLICS
Another way to mix acrylic paint is to do so directly on your painting surface in thin layers called “glazes.” You can create glazes by thinning acrylic with water or a medium specifically designed for glazing. Before applying a glaze over an existing color, make sure the existing paint is completely dry. Glazes not only create new and luminous tones on the canvas, they can also serve to unify a scene with washes of subtle color.
Creating a Glazing Chart
Using the colors in your palette, it’s a good idea to create a glazing chart similar to the example below. This will show you how each color looks when glazed under or over the other colors. In this glazing chart, the horizontal strokes of color were applied first, and the vertical columns of color were glazed on top.

MIXING WATERCOLOR
MIXING PALETTES FOR WATERCOLOR
Watercolor palettes are often made of white plastic, aluminum, tin, or ceramic (such as porcelain). These surfaces wipe clean easily and provide a bright mixing surface, allowing artists to judge the intensity of their watercolor washes. Watercolor palettes feature varying sizes of wells or pots that allow the washes to pool. Below are the most common formats available, although old shallow dishes found around the house can work as well.

Simple Welled Palette These palettes feature circular or rectangular mixing wells. Rectangular wells are generally slanted for better pooling. These types of palettes are great to use for one painting session at a time; clean them completely after each use.

Travel Palettes These portable, compact palettes conveniently fold and snap shut for painting on the go. The smaller wells can hold pan paints or wet paint straight from the tube, and the larger wells are great for mixing. You can let the tube paint dry in the small wells, reactivating the paint with water when needed.
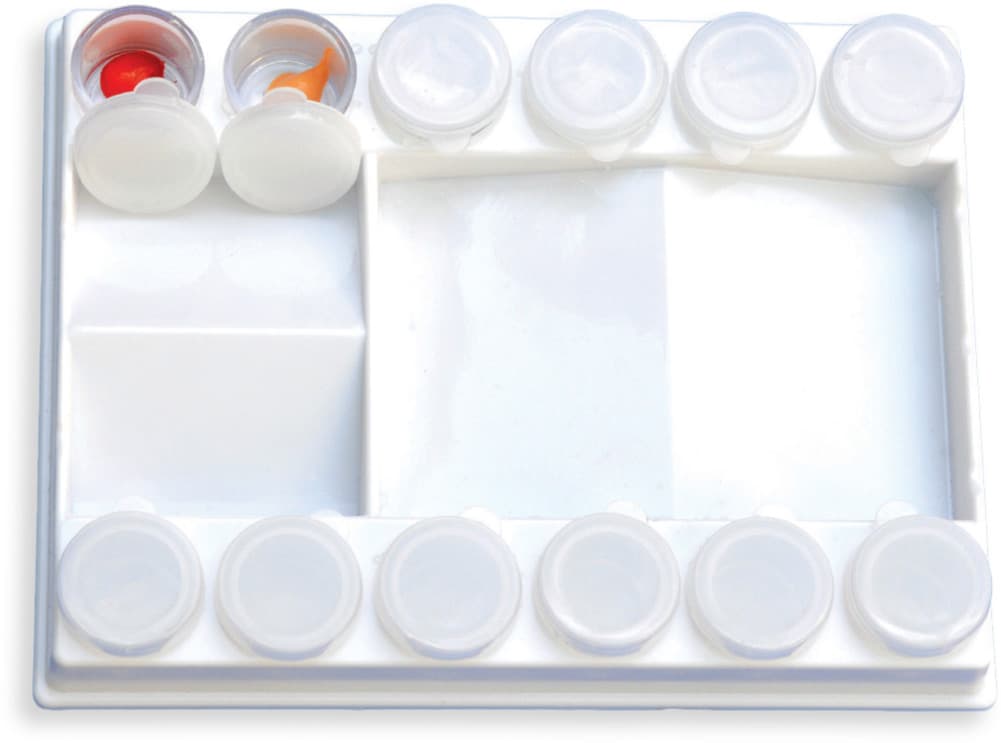
Potted Palettes These palettes come with a number of lidded pots that line mixing wells. The pots keep water-based paints—such as watercolor, gouache, and acrylic—moist and ready to mix. They also prevent spilling during travel.
APPROACHES TO WATERCOLOR MIXING
Painting with fluid, transparent washes of watercolor is a unique and enjoyable experience because of the way the colors can be mixed. Other types of paint (especially oil) are usually mixed on a separate palette and then applied to the canvas. They are also mixed additionally; in other words, white pigment is added to lighten the colors. In contrast, watercolor relies on the white of the paper and the translucency of the pigment to communicate light and brightness. A well-painted watercolor seems to glow with an inner illumination that no other medium can replicate. One way to make your painting vibrant and full of energy is to mix most of your colors on paper. It is unpredictable to a certain degree, but if your values and composition are under control, these unexpected color areas will be exciting and successful.
WET ON DRY
This method involves applying different washes of color on dry watercolor paper and allowing the colors to intermingle, creating interesting edges and blends.
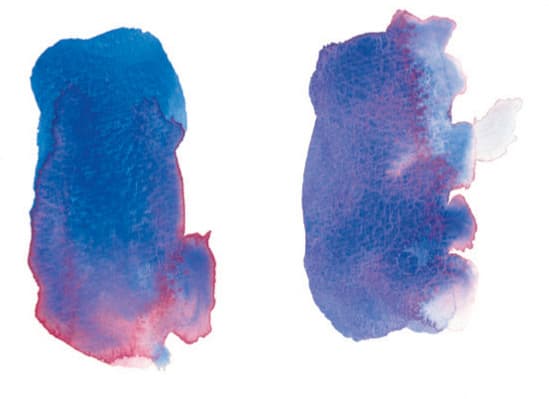
Mixing in the Palette vs. Mixing Wet on Dry To experience the difference between mixing in the palette and mixing on paper, create two purple shadow samples. Mix ultramarine blue and alizarin crimson in your palette until you get a rich purple; then paint a swatch on dry watercolor paper. Next, paint a swatch of ultramarine blue on dry watercolor paper. While still wet, add alizarin crimson to the lower part of the blue wash, and watch the colors connect and blend. Observe the added energy of the colors mixing and moving on the paper versus the flat wash.
VARIEGATED WASH
A variegated wash differs from the wet-on-dry technique in that wet washes of color are applied to wet paper instead of dry paper. The results are similar, but using wet paper creates a smoother blend of color.
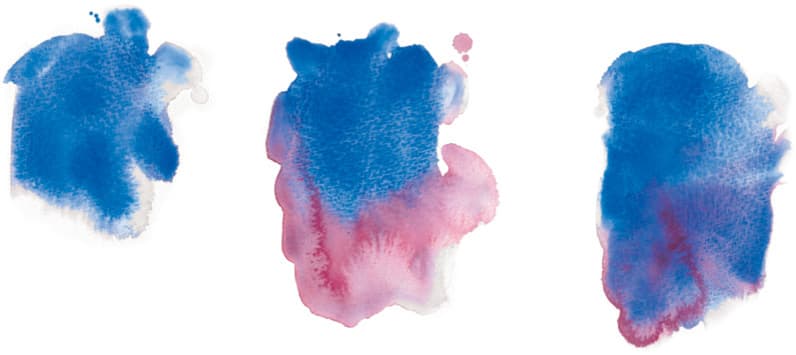
Applying a Variegated Wash After applying clear water to your paper, stroke on a wash of ultramarine blue. Immediately add some alizarin crimson, and then tilt to blend the colors. Compare this to your wet-on-dry swatch to see the subtle differences caused by the initial wash of water on the paper.
WET INTO WET
This technique is like the variegated wash, but the paper must be thoroughly soaked with water before you apply any color. The saturated paper allows the color to spread quickly, easily, and softly across the paper. The delicate, feathery blends created by this technique are perfect for painting skies.
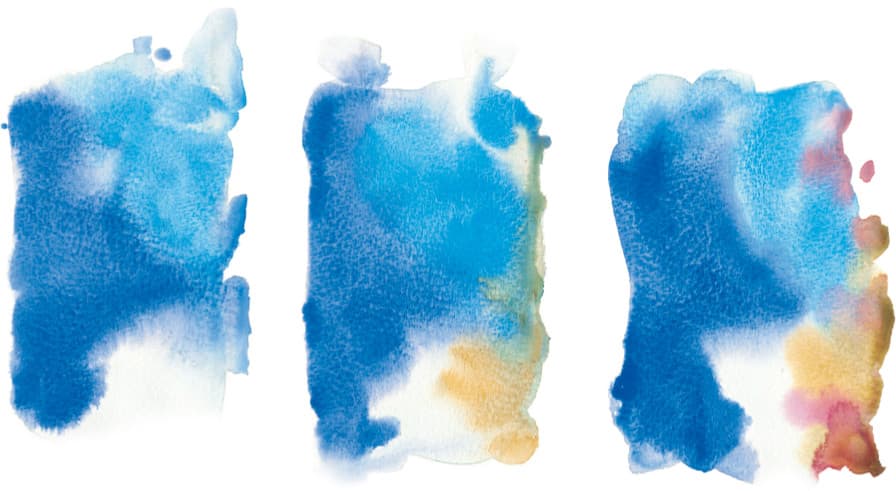
Creating a Wet-into-Wet Wash Loosely wet the area you want to paint. After the water soaks in, follow up with another layer of water and wait again for a matte sheen to appear. Then apply ultramarine blue to your paper, both to the wet and dry areas of the paper. Now add a different blue, such as cerulean, and leave some paper areas white. Now add some raw sienna and a touch of alizarin crimson. The wet areas of the paper will yield smooth, blended, light washes, while the dry areas will allow for a darker, hard-edged expression of paint.
CHARGING IN COLOR
This technique involves adding pure, intense color to a more diluted wash that has just been applied. The moisture in the wash will grab the new color and pull it in, creating irregular edges and shapes of blended color.
GLAZING WATERCOLORS
Glazing is a traditional watercolor technique that involves two or more washes of color applied in layers to create a luminous, atmospheric effect. Glazing unifies the painting by providing an overall wash of consistent color.
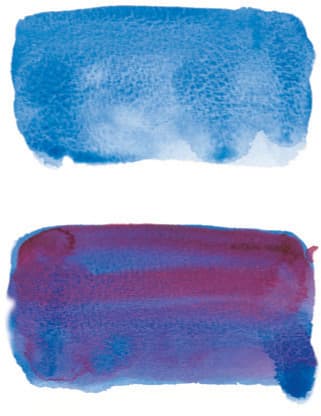
Creating a Glaze To create a glazed wash, paint a layer of ultramarine blue on your paper (which can be either wet or dry). After the wash dries completely, apply a wash of alizarin crimson over it. The subtly mottled purple that results is made up of individual glazes of transparent color.
Creating a Glazing Chart
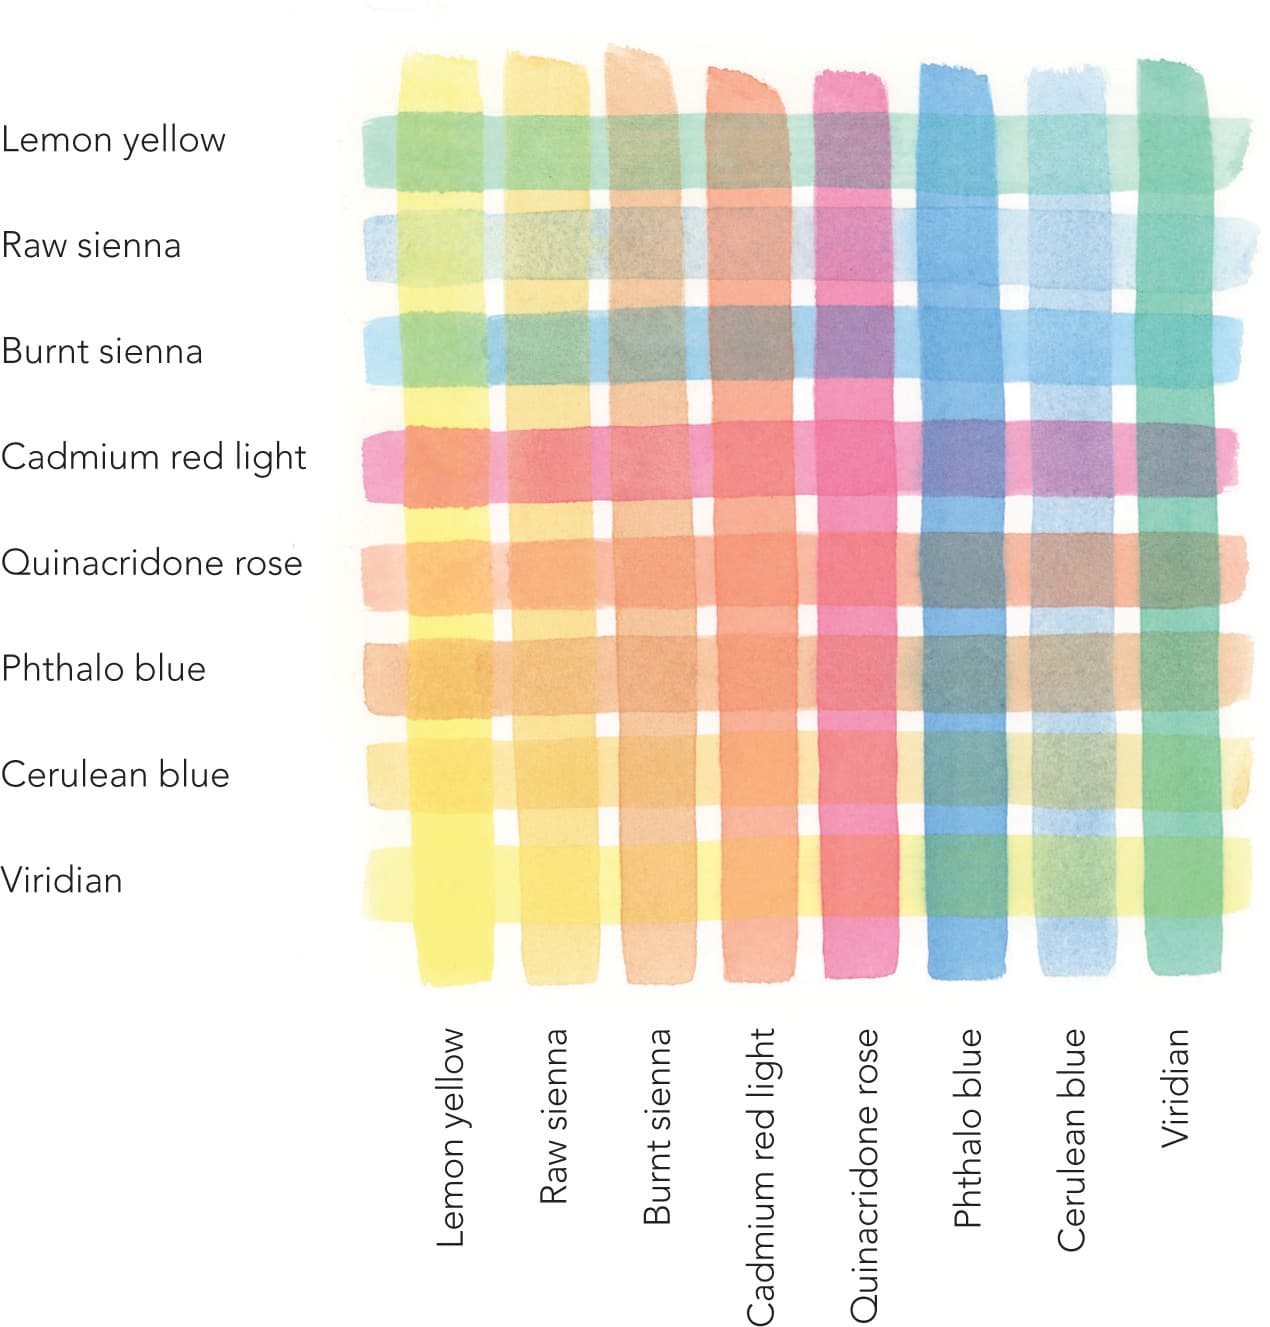
Using the colors in your palette, it’s a good idea to create a glazing chart similar to the example below. This will show you how each color looks when glazed under or over the other colors. You’ll notice that transparent colors such as phthalocyanines, rather than granulating opaques such as cerulean blue, create smoother, more luminous glazes. In this glazing chart, the vertical columns of color were applied first, and the horizontal strokes of color were glazed on top.
COLOR MIXES FOR WATERCOLOR
As we discussed shown here to here, watercolor can be mixed either on the palette or on the paper to yield different effects. For clarity of color, this section features mixes created on the palette and applied to paper. As you experiment with color mixing, remember that it’s best to limit your mixes to two or three pigments—any more than this can easily produce muddy results.
BASIC WATERCOLOR PALETTE
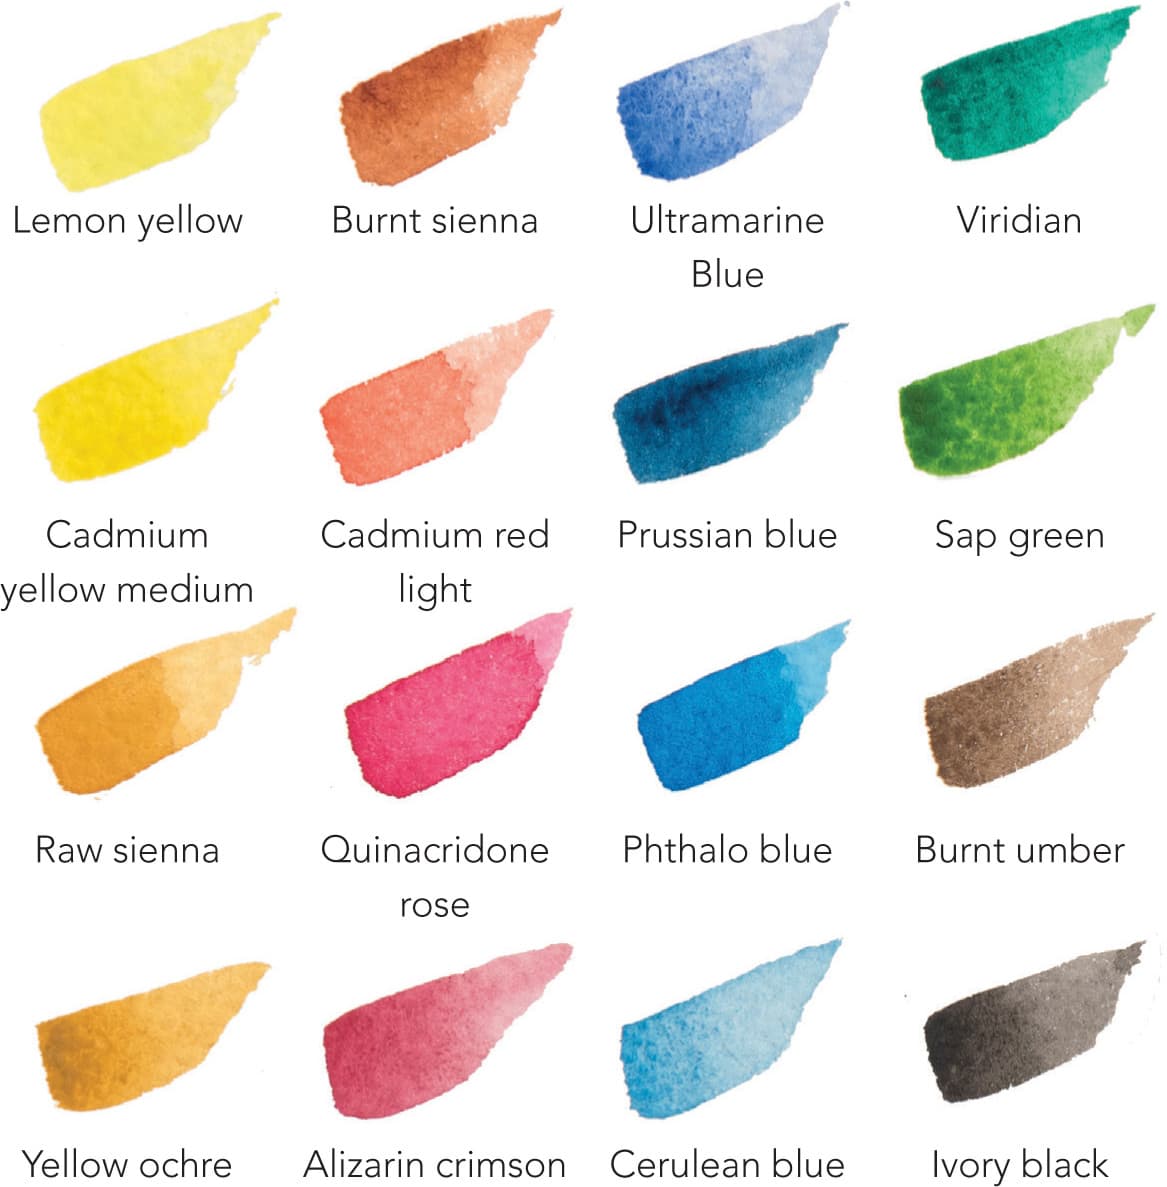
A basic watercolor palette generally includes a warm and cool version of each primary color, plus a few neutrals and sometimes a black. Artists often mix secondary colors rather than clutter their palette with additional paints. However, because green is such a predominant color in landscape painting, it may be helpful to include a green paint or two as well. The palette below features viridian, which can be replaced by the more intense phthalo green if desired. The mixes in this section use the colors listed in this palette.
MIXING PURPLES
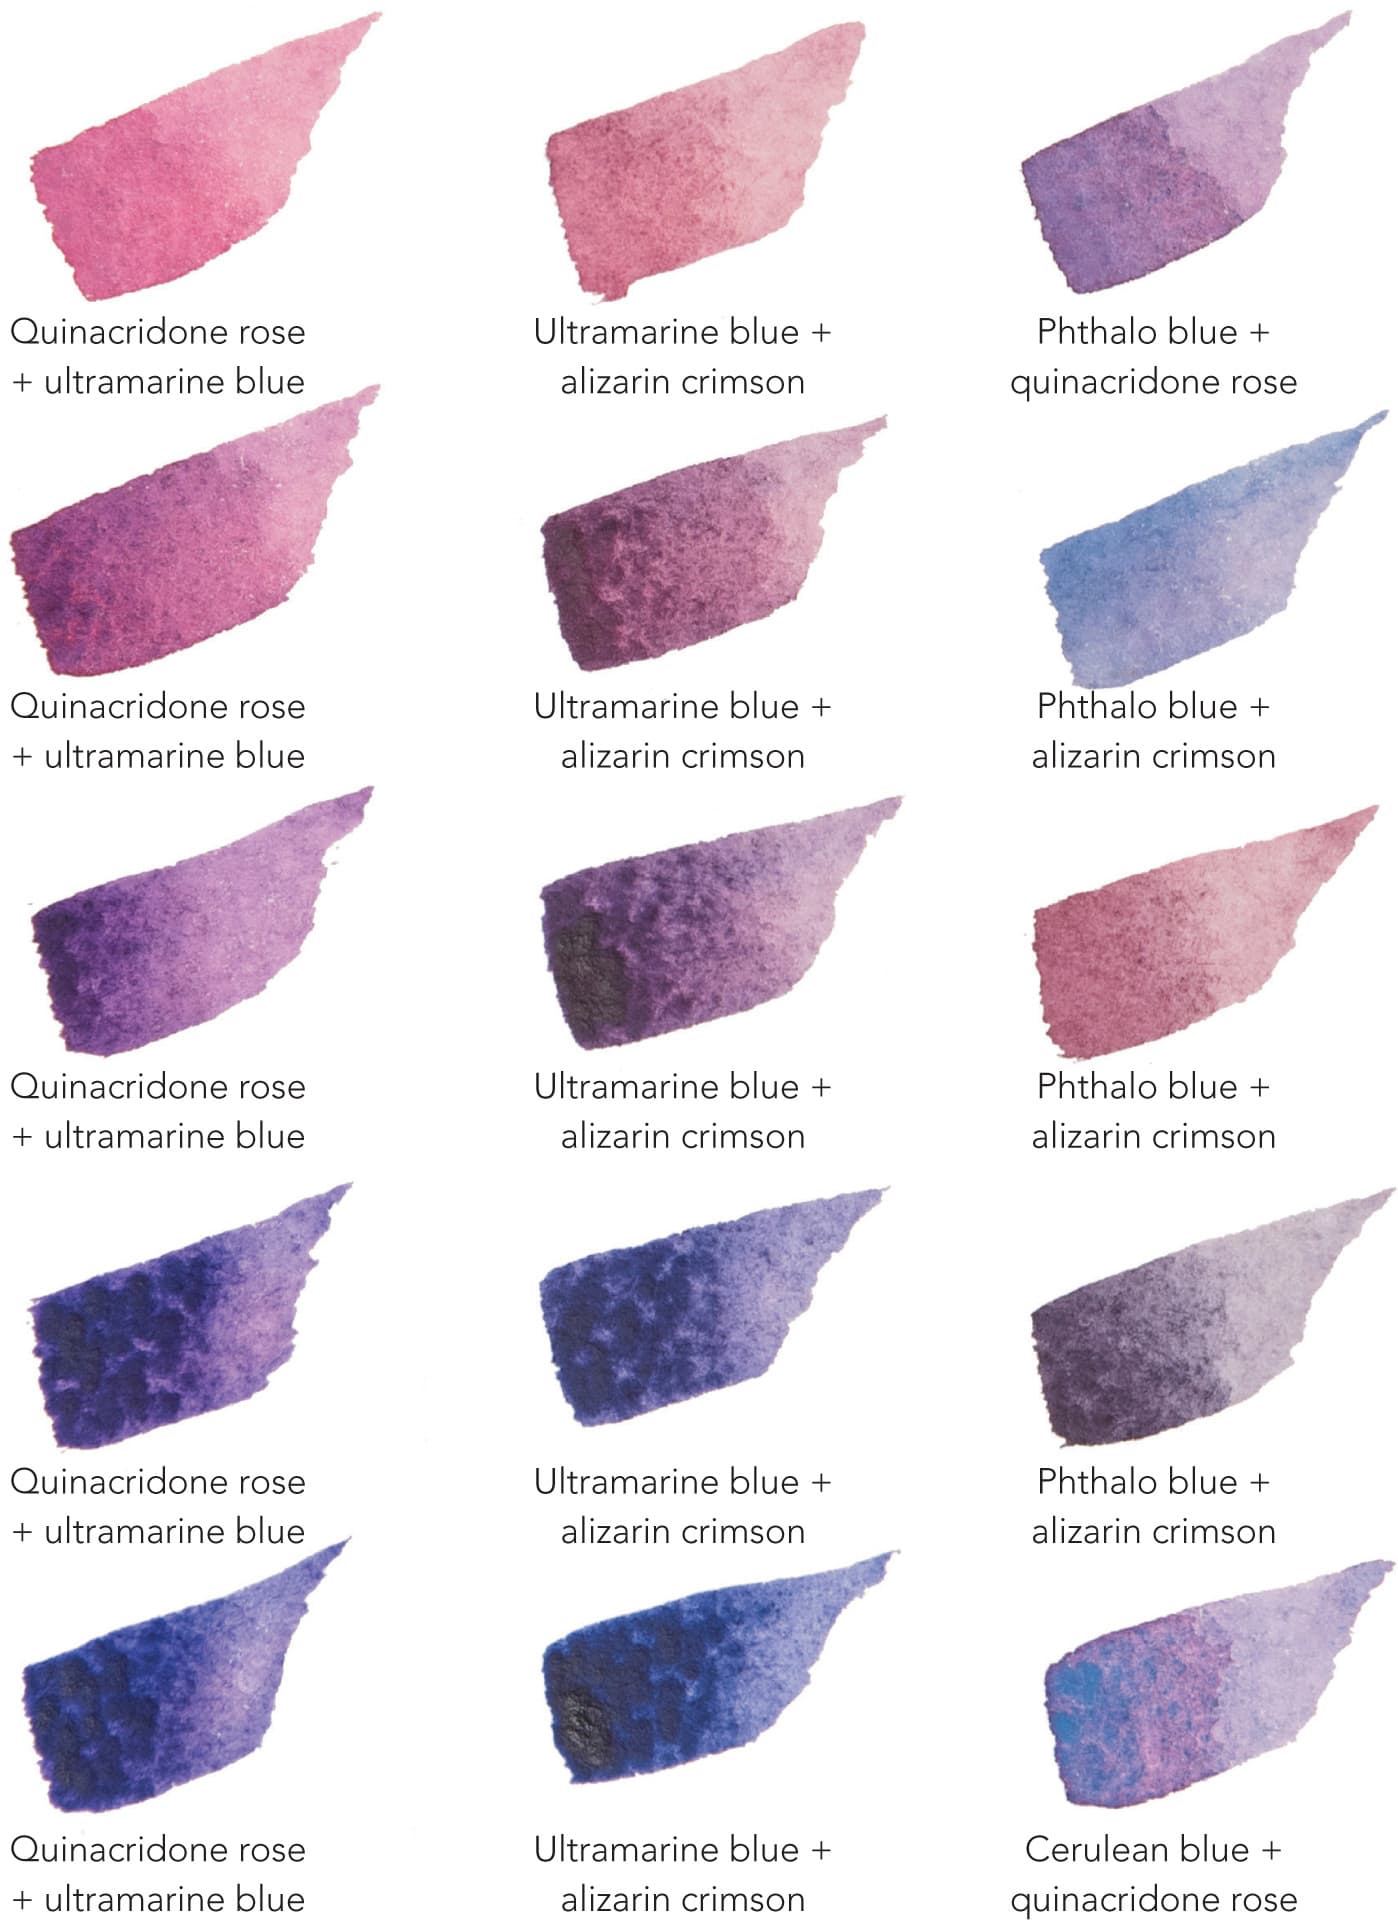
Purples appear in everything from florals and sunsets to distant mountains. It is easy to mix vibrant purples using a red-leaning blue and a blue-leaning red, but a variety of neutral purples are also very useful for creating depth in a painting through subtle shadows and distant layers of a landscape.
MIXING GREENS
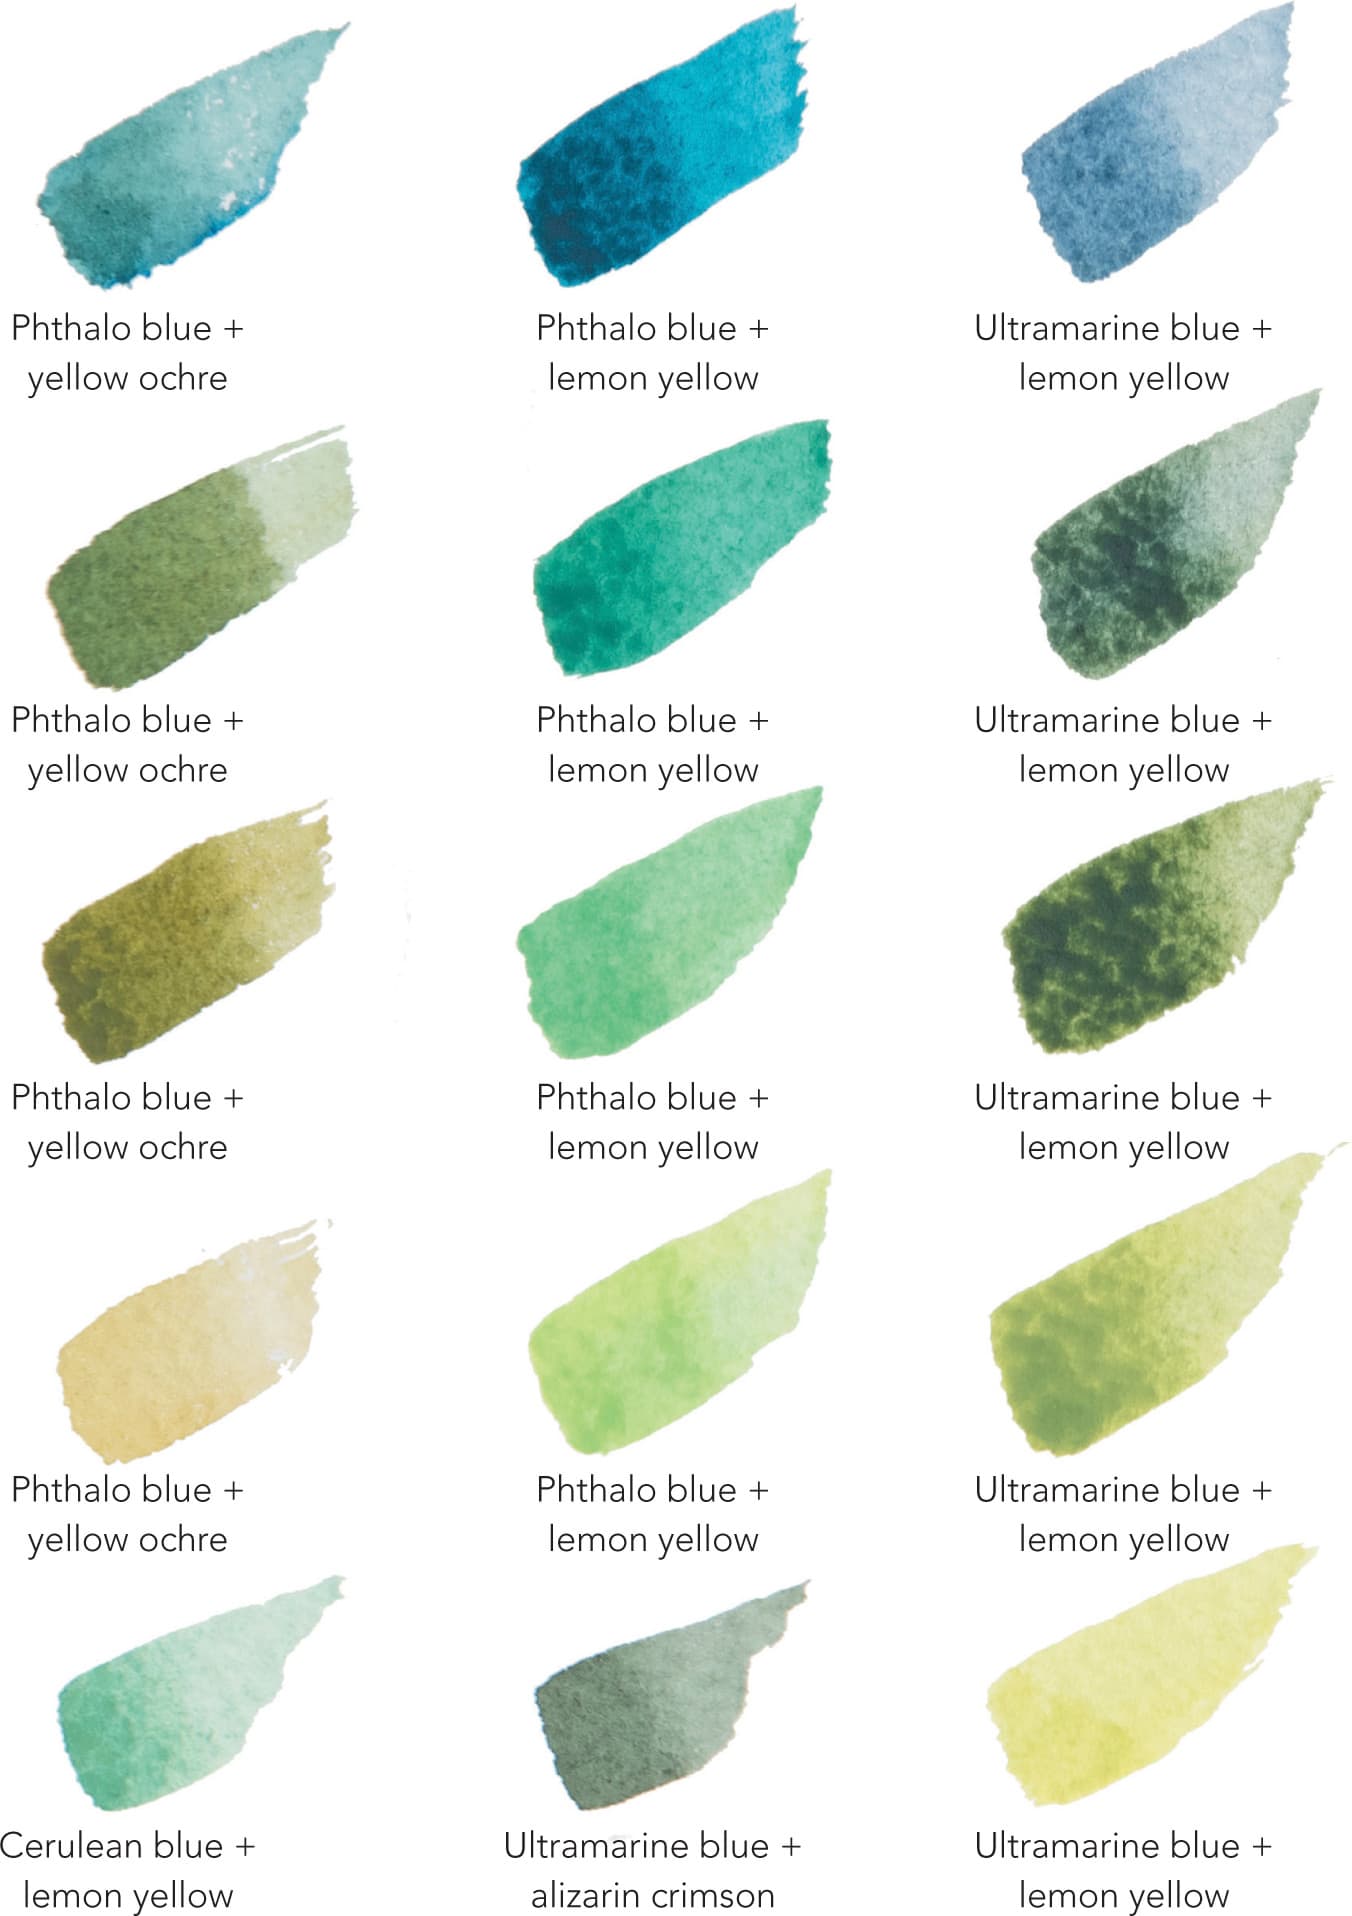
It’s likely that you’ll mix more greens than any other color, especially if you paint landscapes. These tones are ubiquitous in nature and range from bright, sunlit yellow-greens to soothing, muted tints and shades. You’ll find that the most vibrant greens result from combining a yellow-leaning blue with a blue-leaning yellow. The mixes on these pages also provide a wide selection of neutral greens, as well as rich tones and glowing highlights so you can capture the dynamic variations that exist within foliage.

In this watercolor painting, artist Joseph Stoddard builds depth in his foliage by avoiding large, flat washes of green. Instead, he applies a variety of green strokes—from bright gold tones to deep blue-greens.
MIXING ORANGES
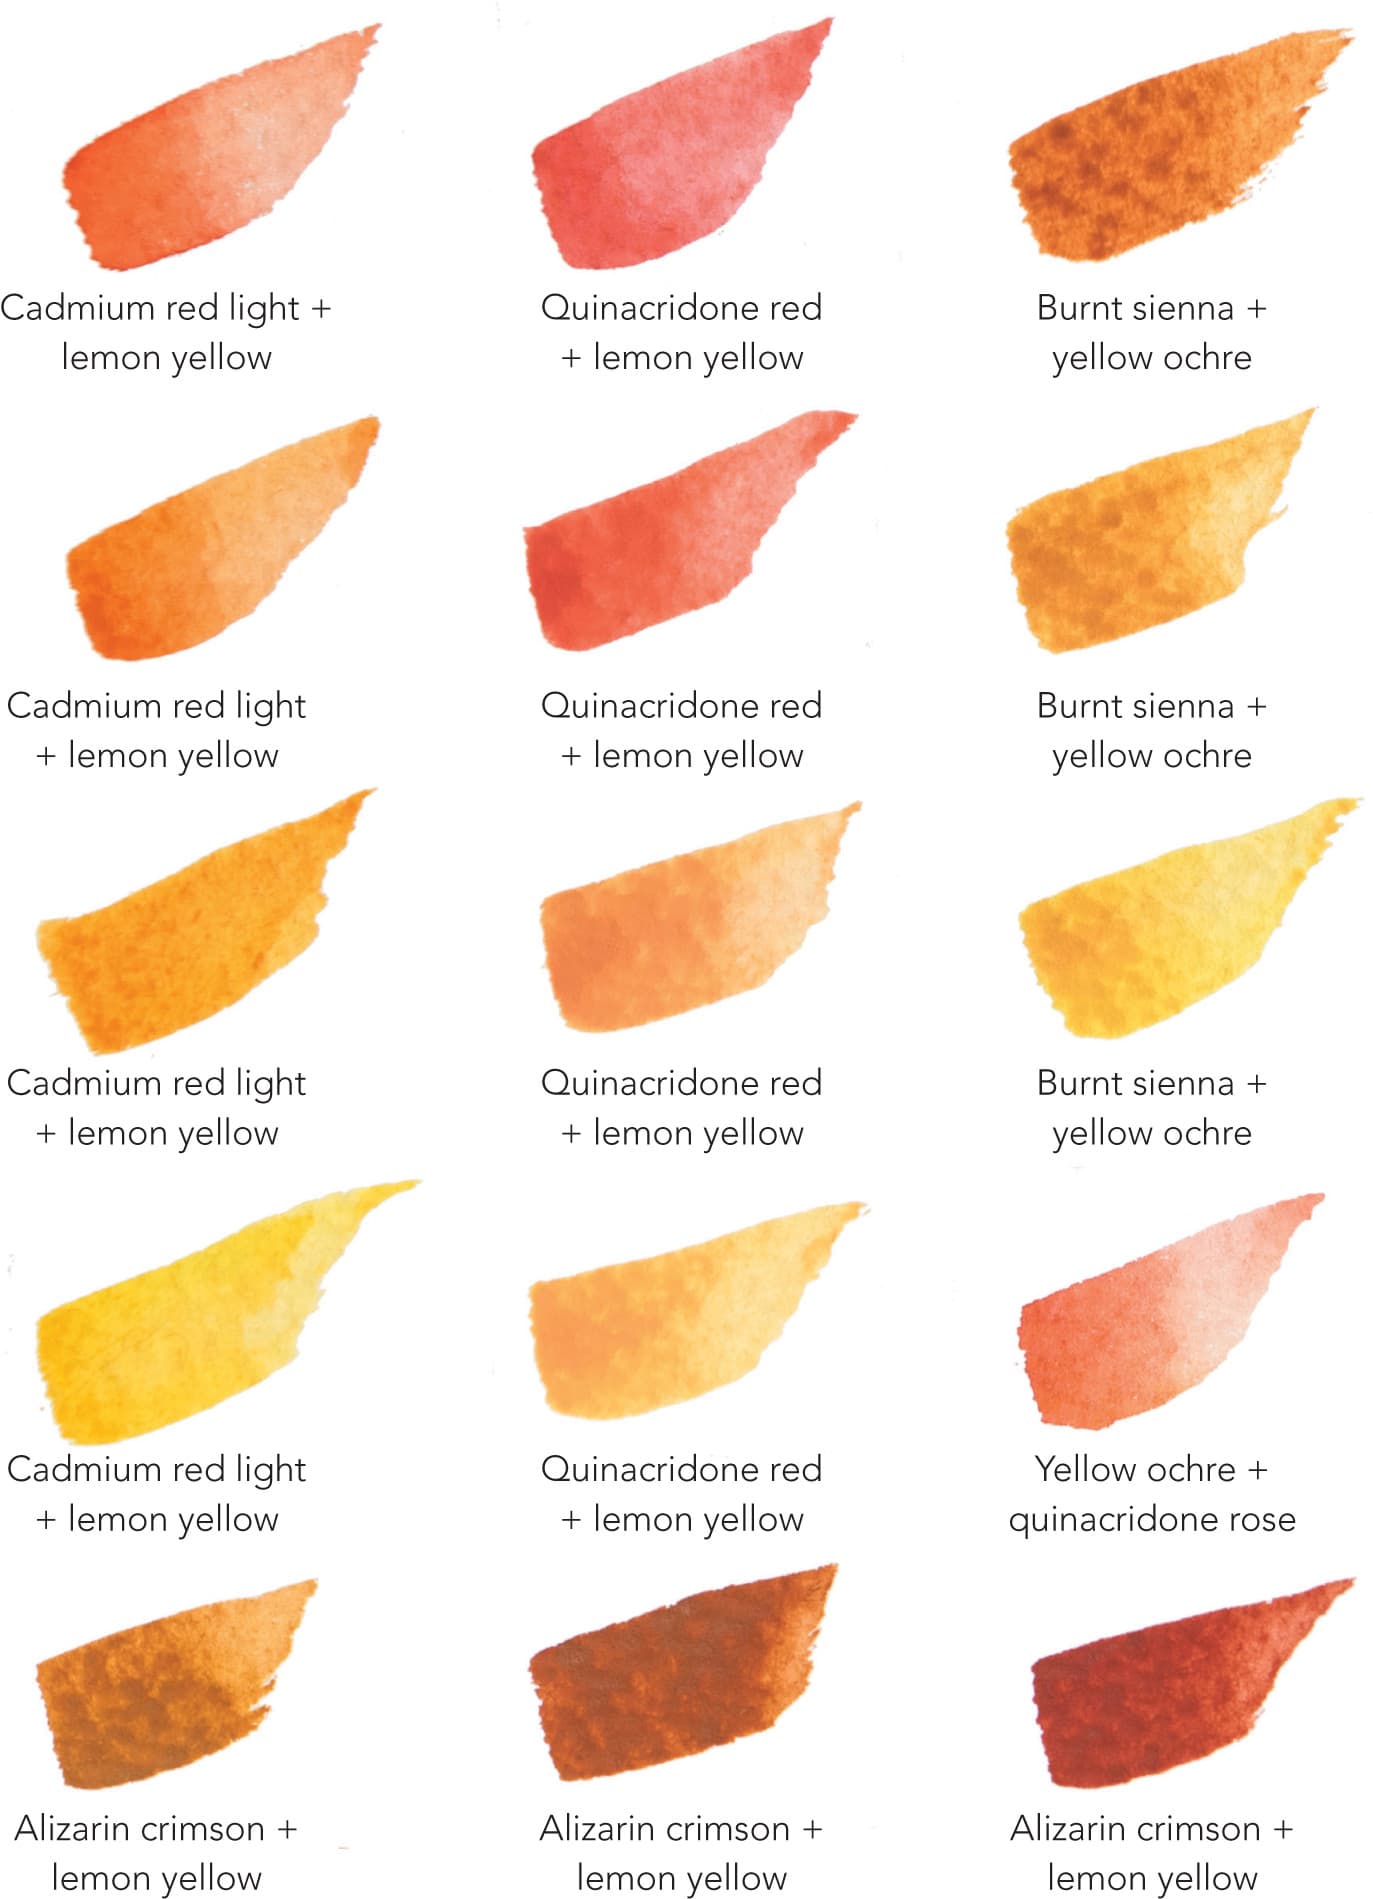
From dramatic skies to sunlit accents, orange can easily play a dominant or a supporting role in a painting. Vibrant oranges result from red-leaning yellows mixed with yellow-leaning reds, but soft, neutral oranges are useful for warming up a painting without overwhelming the eye.
MIXING NEUTRALS
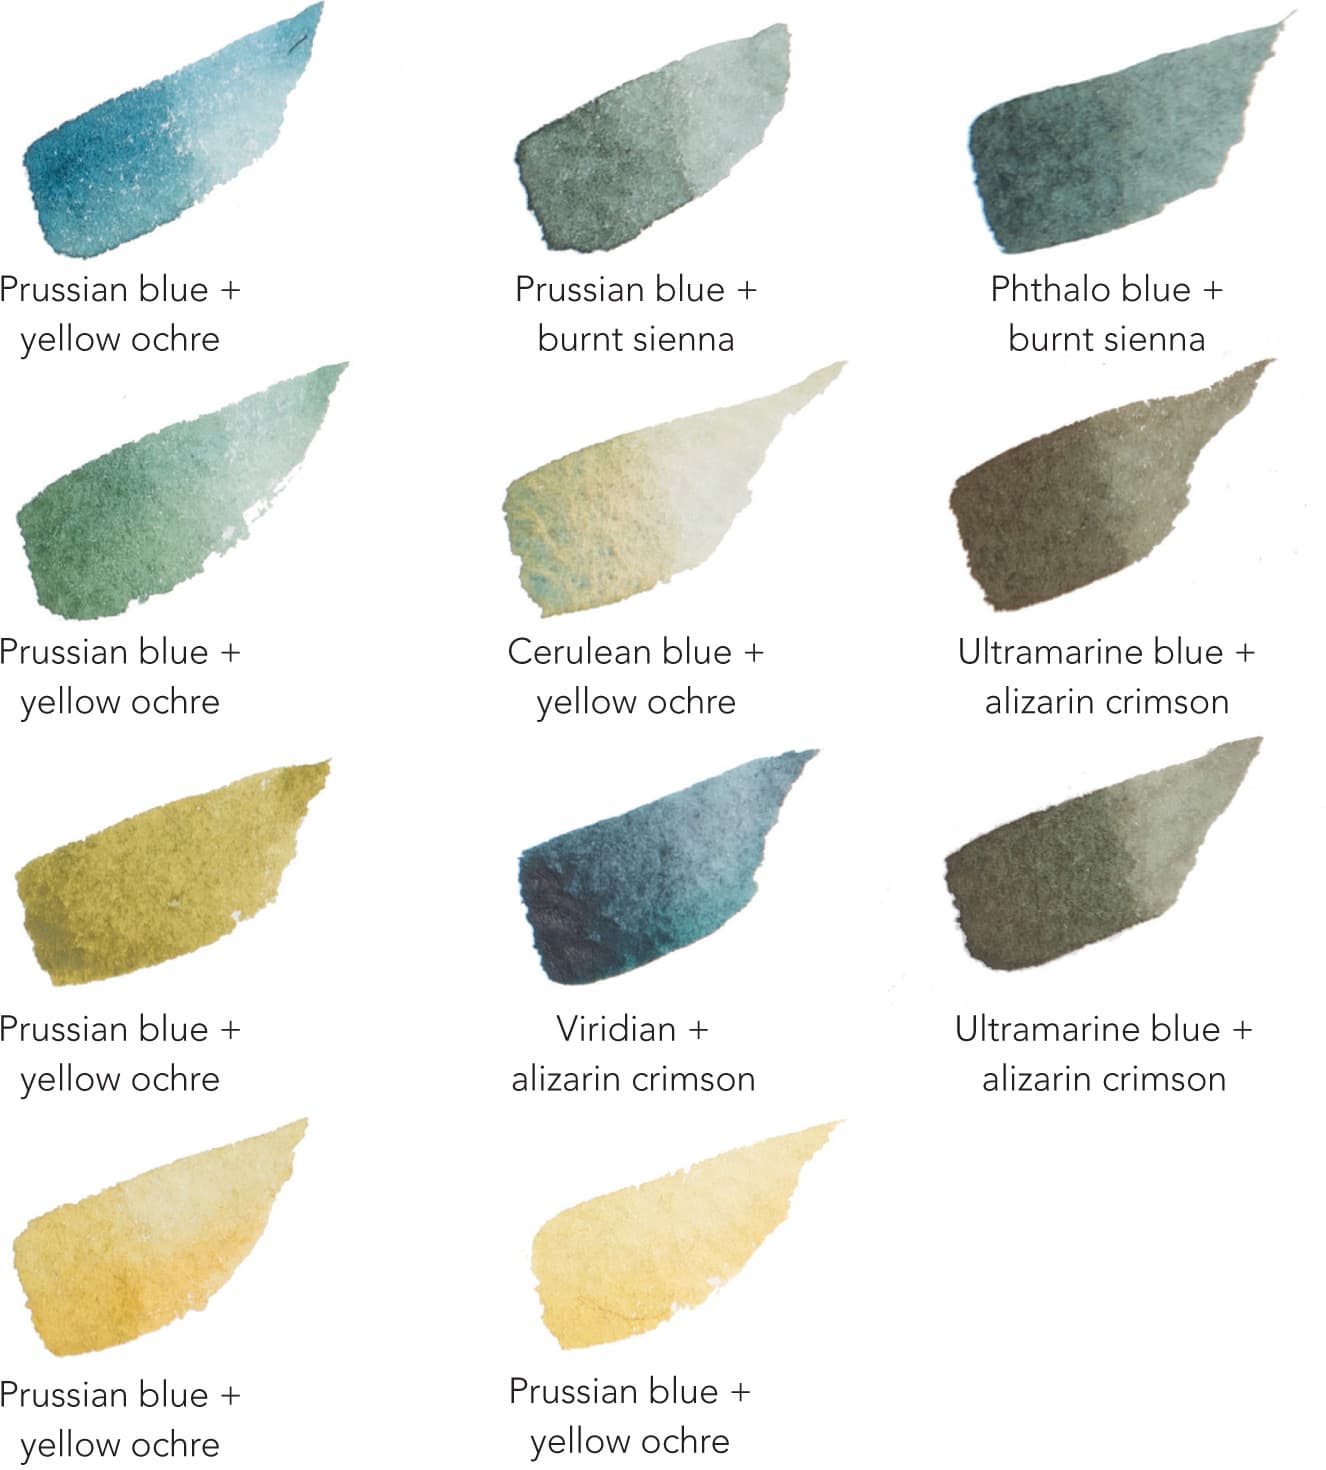
Neutrals may not hold a spot on the basic color wheel, but they are essential for painting realistically. Look around, and you’ll see that the world is dominated by neutral tones—from cool blue-grays to violet-leaning browns. It is these more subtle colors that allow purer colors to “sing” in a painting.

COLOR MIXES FOR OIL & ACRYLIC
SAMPLES OF VIOLET MIXES
Below is a selection of mixes that are helpful when working with violets. Each mix is accompanied by a “recipe,” allowing you to re-create any swatch desired.

SAMPLES OF BLUE MIXES
Below is a selection of mixes that are helpful when working with blues. Each mix is accompanied by a “recipe,” allowing you to re-create any swatch desired.

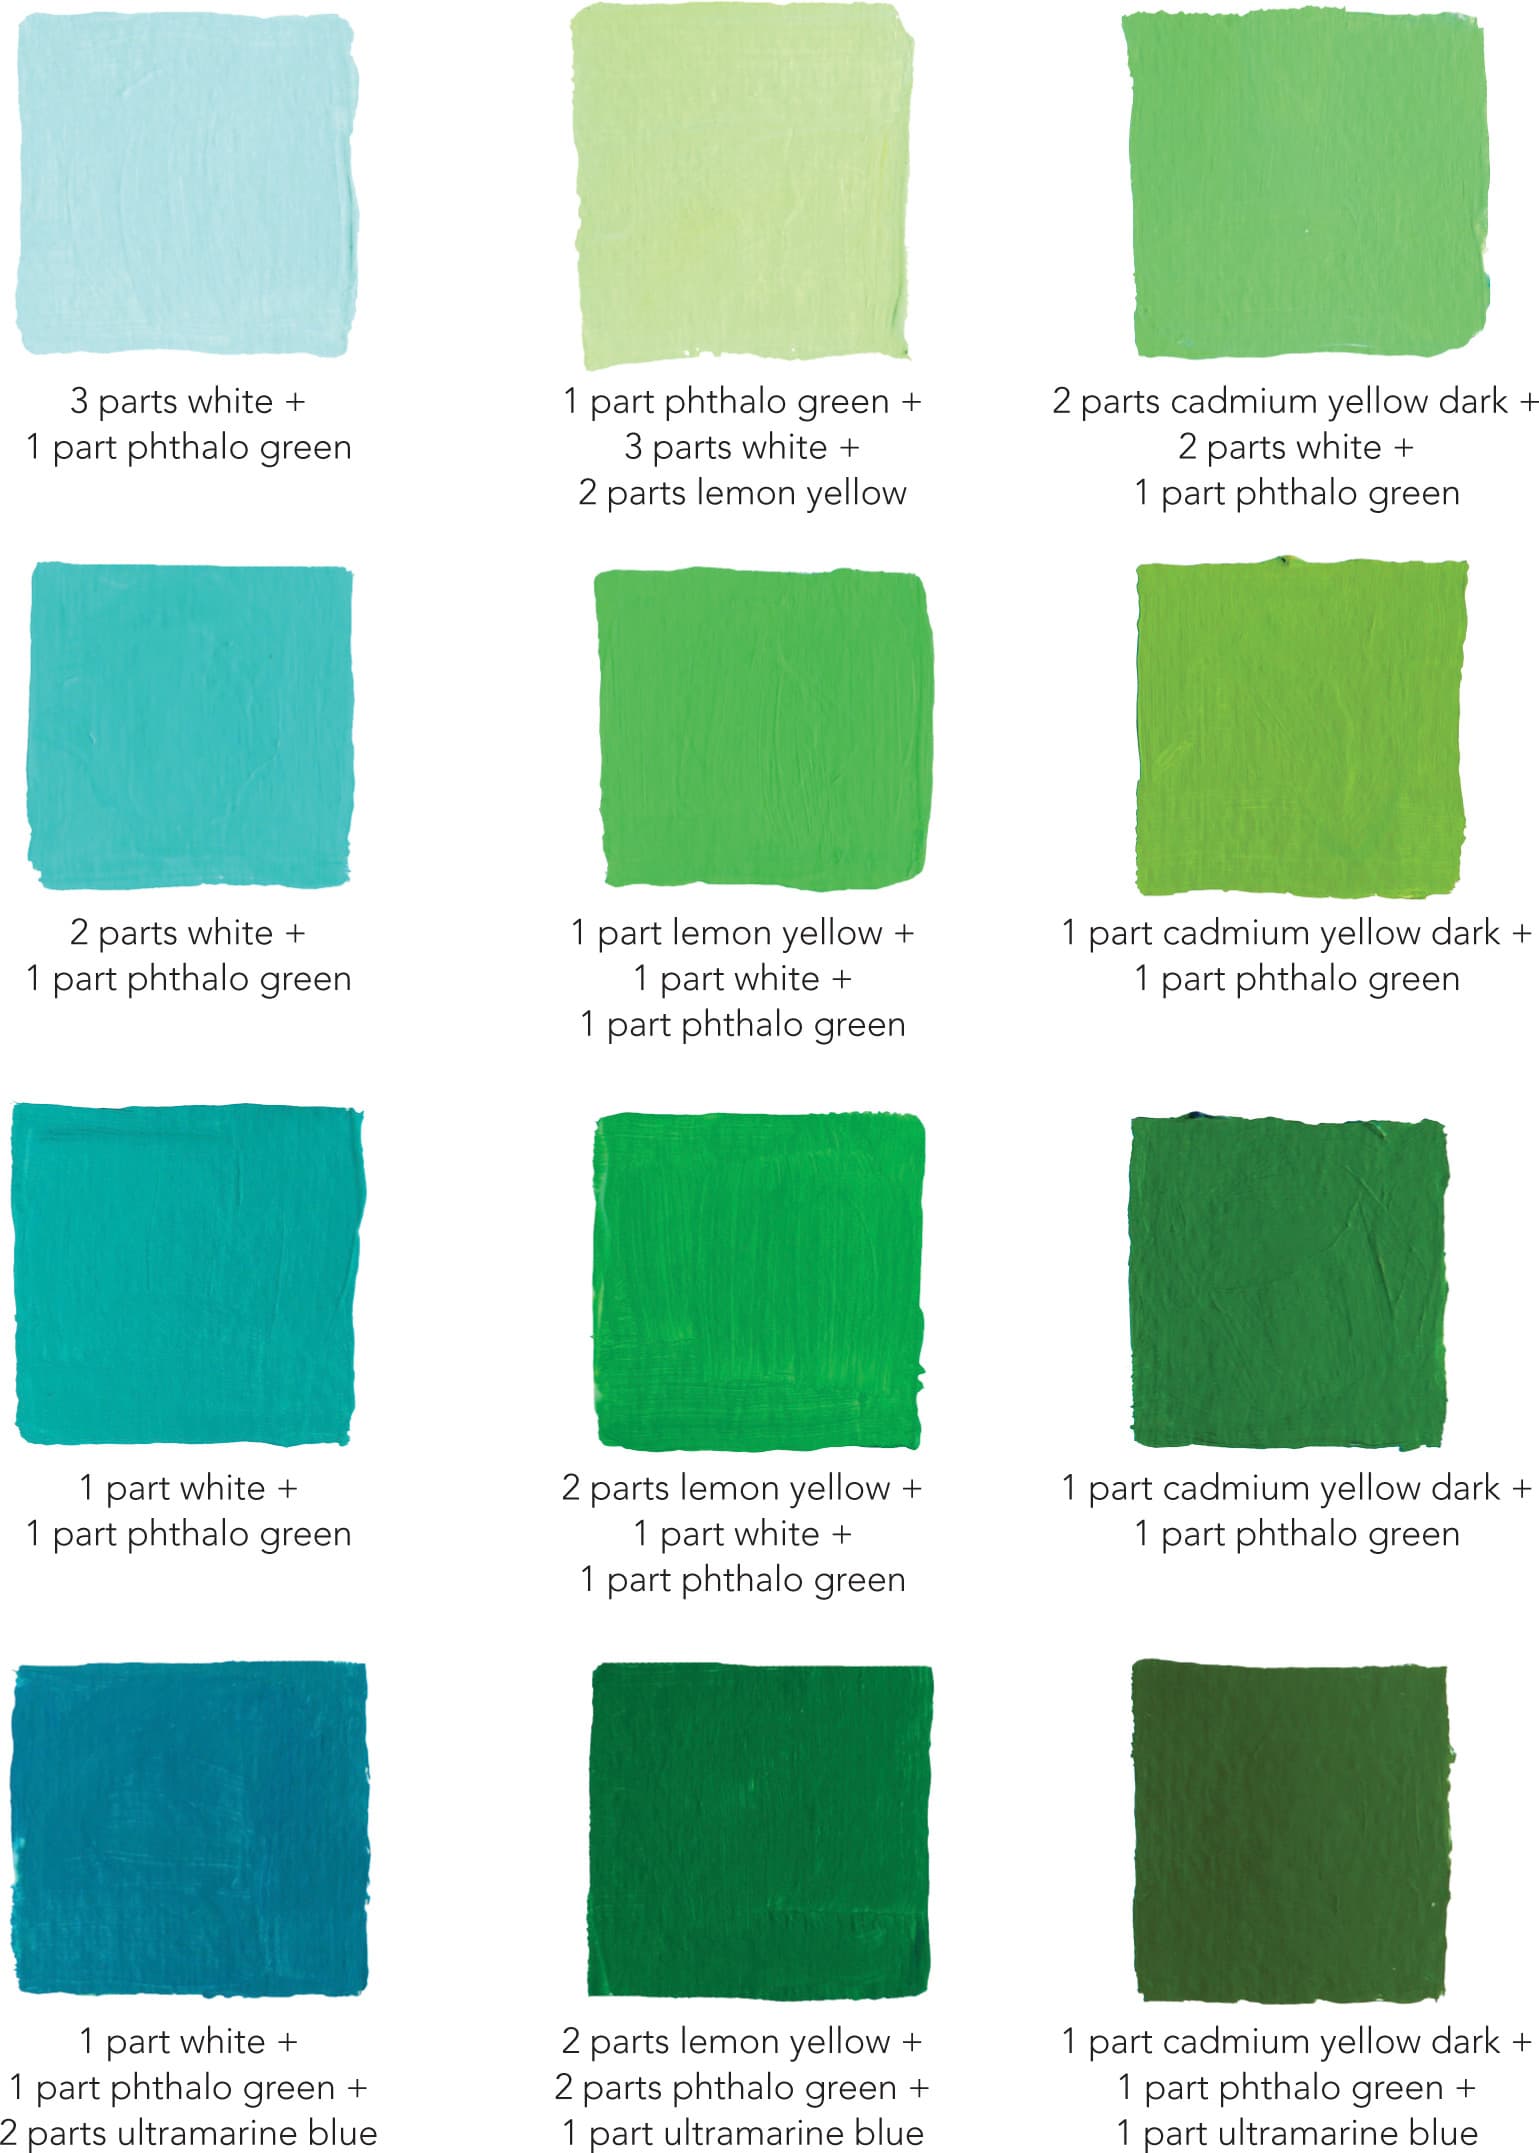
SAMPLES OF GREEN MIXES
Below is a selection of mixes that are helpful when working with greens. Each mix is accompanied by a “recipe,” allowing you to re-create any swatch desired.
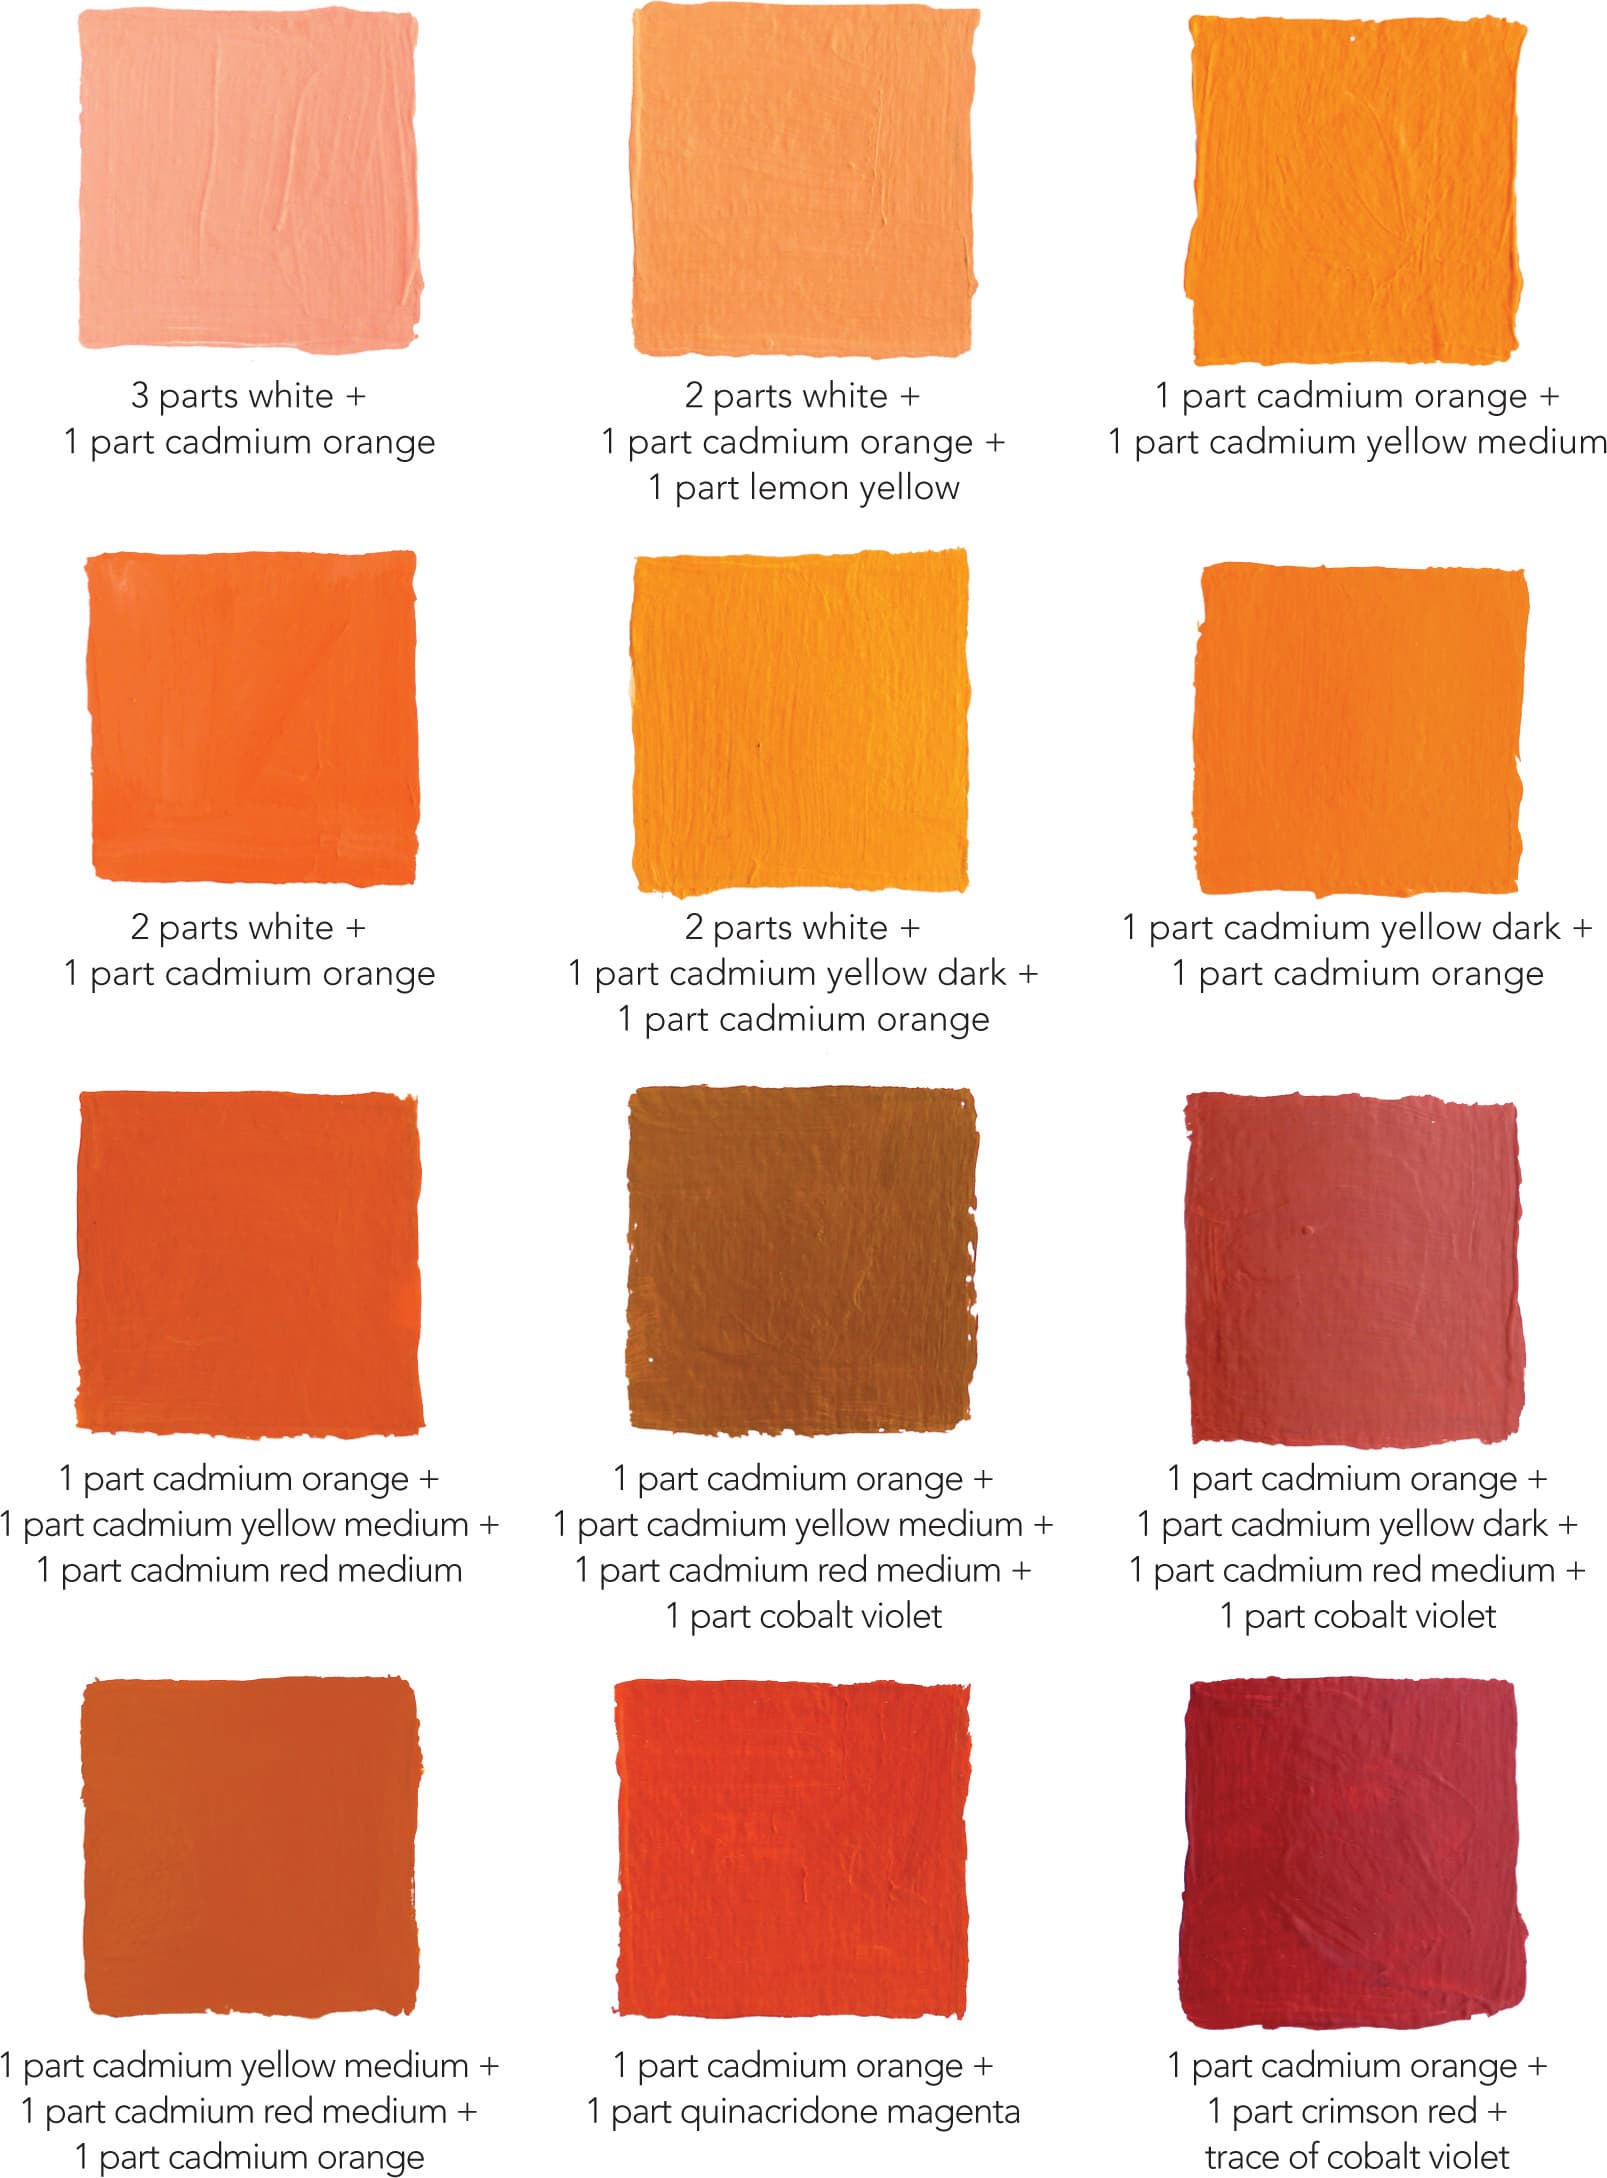
SAMPLES OF ORANGE MIXES
Below is a selection of mixes that are helpful when working with oranges. Each mix is accompanied by a “recipe,” allowing you to re-create any swatch desired.
SAMPLES OF BROWN MIXES
Below is a selection of mixes that are helpful when working with browns. Each mix is accompanied by a “recipe,” allowing you to re-create any swatch desired.

SAMPLES OF GRAY MIXES
Below is a selection of mixes that are helpful when working with grays. Each mix is accompanied by a “recipe,” allowing you to re-create any swatch desired.
