These days, managing all the open windows in all the open programs can be like herding cats. Off you go, burrowing through the microscopic pop-up menus of your Dock, trying to find the window you want. And heaven help you if you need to duck back to the desktop—to find a newly downloaded file, for example, or to eject a disk. You have to fight your way through 50,000 other windows on the way to the bottom of the “deck.”
Mission Control tackles this problem in a fresh way. The concept is delicious: With one mouse click, keystroke, or finger gesture, you shrink all windows in all programs to a size that fits on the screen (Figure 6-11), like index cards on a bulletin board. Now you feel like an air-traffic controller, with all your screens arrayed before you. You click the window you want, and you’re there. It’s efficient, animated, and a lot of fun.
Tip
If you use Mission Control a lot, the zooming animation might get a little tiresome. Fortunately, in Sierra, you can turn that off. Open System Preferences→Accessibility→Display, and turn on Reduce Motion. From now on, Mission Control simply pops to the screen instead of zooming.
The window miniatures are scattered all over your screen. The placement isn’t entirely random; macOS tries to place the thumbnails on the screen relative to their full-size windows’ positions, relative to the top, bottom, and sides of your monitor.
You can impose a little more order on all of this, though. Open System Preferences→Mission Control, and turn on “Group windows by application.” The windows still don’t overlap, but at least the windows of each program are laid out near one another in Mission Control.
Mission Control is a program, just like any other. So you can open it with a click on its Dock icon, from Launchpad, from the Applications folder, and so on.
But it’s really meant to be opened quickly, fluidly, naturally, whenever the mood seizes you—with a gesture. On the trackpad, that’s a swipe upward with three fingers. (On the Magic Mouse, it’s a double-tap with two fingers—taps, not clicks.)
Note
You can change this gesture so that it requires four fingers, if you like, in System Preferences → Trackpad (or Mouse) → More Gestures→Mission Control. Use the pop-up menu.
Or you can press the dedicated  key (formerly the Exposé key), if you have one, on the top row of your keyboard.
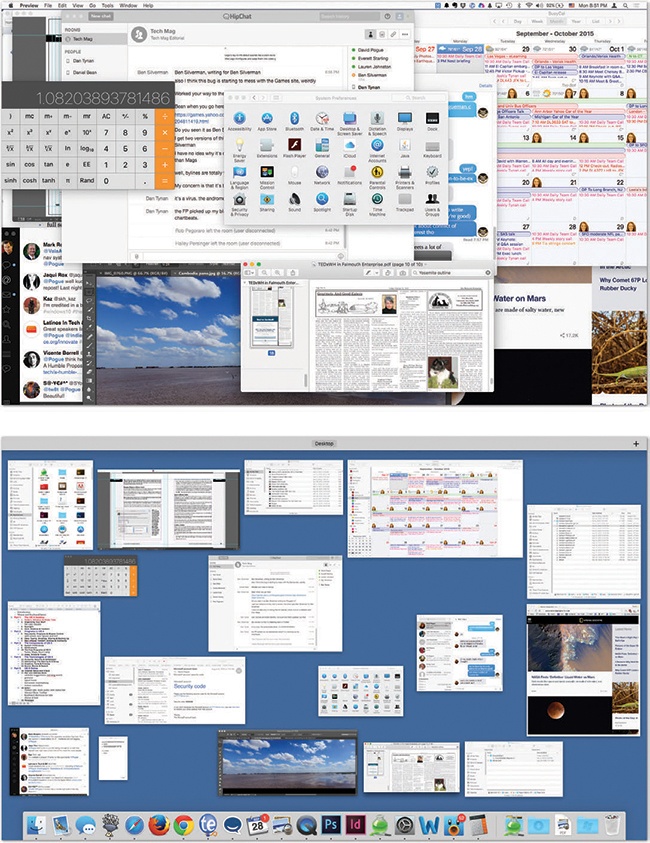
Bottom: With a three- or four-finger upward swipe on the trackpad, you can open Mission Control and spot every window, shrunken but not overlapped. These aren’t static snapshots of the windows at the moment you Mission Controlled them. They’re live, still-updating windows, as you’ll discover if one of them contains a QuickTime movie or a web page that’s still loading.
Figure 6-11. Top: Quick! Where’s the Finder in all this mess?

And even that’s just the beginning of the ways you can open Mission Control; read on.
Note
To exit Mission Control without clicking any of your windows or virtual screens, swipe down with three fingers. Or tap the Esc key. Or click a spot in the empty background.
You can reassign the Mission Control functions to a huge range of other keys, with or without modifiers like Shift, Control, and Option. To view your options, choose  →System Preferences and then click the Mission Control icon.
Here you’ll find four pop-up menus (Figure 6-12). The first, Mission Control, lets you specify how you want to open Mission Control. The other three—Application Windows, Show Desktop, and Show Dashboard—correspond to the three functions of the older Exposé and Dashboard features, described later in this chapter.
Within each pop-up menu, for example, you’ll discover that all your F-keys—F1, F2, F3, and so on—are available as triggers. If, while the pop-up menu is open, you press one or more of your modifier keys (Shift, Option, Control, or  ), then all these F-key choices change to reflect the key you’re pressing; now the pop-up menu says Shift-F1, Shift-F2, Shift-F3, and so on. That’s how you can make Shift-F1 trigger Mission Control, for example.
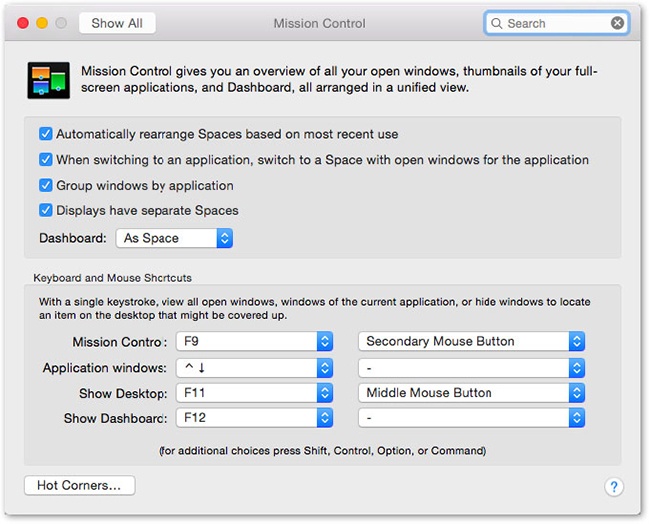
Figure 6-12. You can trigger Mission Control in any of five ways: by clicking its icon, with a finger gesture, by twitching your cursor into a certain corner of the screen (Hot Corners), by pressing a key (bottom half of this box), or by clicking the extra buttons on a multi-button mouse, including the Apple Mouse. Of course, there’s nothing to stop you from setting up all of these ways, so you can press or swipe in some situations and twitch or click in others.
These pop-up menus also contain choices like Left Shift, which refers to the Shift key on the left side of your keyboard. That is, instead of pressing F9 to open Mission Control, you could simply tap the Shift key.
Note
This is only an example. Repeat: This is only an example. Actually using the Shift key to open Mission Control is a terrible, terrible idea, as you’ll quickly discover the next time you try to type a capital letter. This feature is intended exclusively for hunt-and-peck typists who never use the Shift key on one side.
If you have a laptop, you’ll also find out that you can tap the fn key alone for Mission Control—and this time, it’s a great choice, because fn otherwise has very little direction in life.
If your mouse has more than one button, you’ll see a second column of pop-up menus in System Preferences (Figure 6-12). Each pop-up menu offers choices like Right Mouse Button and Middle Mouse Button. Use these pop-up menus to assign Mission Control (or Exposé or Dashboard) to the various clickers on your mouse: Right-click to hide all windows, middle-click to reveal the desktop, and so on.
Note, by the way, that on a laptop, the wording isn’t “right mouse button”—it’s “secondary mouse button.” Which means “right-click.” Which means that on a laptop, you can set it up so that a “right-click” trackpad gesture triggers one of these functions. See Notes on Right-Clicking for all the different ways you can trigger a right-click.
If you click Hot Corners, you see something like Figure 10-13. The four corners here represent the corners of your screen. Using these menus, you can assign a window-management feature to each corner; for example, if you choose Mission Control from the first pop-up menu, then when your pointer hits the upper-left corner of the screen, you’ll open Mission Control. (Launchpad and Notification Center are options here, too.)
Depending on the size of your screen, this option can feel awkward at first. But if you’ve run out of keystrokes that aren’t assigned to other functions, be glad that Apple offers you this alternative.
Note
In previous versions of the operating system, whipping the pointer into a corner was one good way to turn on your screensaver. Apple hasn’t forgotten about that, which is why you’ll also find commands called Start Screen Saver and Disable Screen Saver in the pop-up menus. Apple wants to make sure you don’t get confused and assign two different functions to the same corner.
Once you open Mission Control, you can click any window’s thumbnail to open it.
Tip
Try holding down the Shift key as you do it. You’ll enjoy watching all your windows shift around with macOS’s patented slow-motion animation, which can be quite a sight.
Or, if you decide to abandon ship and return to whatever you were doing, swipe downward with three fingers on the trackpad (two on the Magic Mouse), or press the Esc key.
The trouble with miniaturized windows is that, well, they’re miniaturized. The more windows you have open, the smaller they are, and the harder it is to see what’s in them.
If you need a little help identifying a window miniature, you have three options:
Point to a window thumbnail without clicking. MacOS displays a label for that window.
If that’s not enough information, press the space bar. That, of course, is the Quick Look keystroke, and it works here, too. It magnifies the window you’re pointing to, making it full size—big enough for you to read its contents and identify it.
Press
-~. That keystroke takes you into Exposé, described later in this chapter.