Something strange has been quietly taking place at Apple: Typing has been getting a lot of attention.
It began when Apple created system-wide spelling and grammar checkers. For the first time in computer history, the operating system took over typos and grammos. You didn’t have to maintain a separate spelling checker for each program you used. Now there’s just one, and it works in most programs: TextEdit, Stickies, Messages, Mail, Calendar, Safari, Pages, Photos, iMovie, and so on. Add a word to the dictionary in one program, and it’s available to all the others.
Today, there’s much more. There’s text substitution, where you type addr and the system types out “Irwina P. McGillicuddy, 1293 Eastport Lane, Harborvilletown, MA 02552.” (The same system autocorrects common typos like teh instead of the.) There’s also a case-flipping feature that can change selected text to ALL CAPS, all lowercase, or First Letter Capped. Both of these features are available in most Apple programs and in any other programs that tap into macOS’s built-in text-processing circuitry (although not, alas, Microsoft programs).
Your Mac can give you live, interactive spelling and grammar checking, just as in Microsoft Word and other word processors. That is, misspelled words or badly written sentences or fragments get flagged with a dashed red underline (for grammar problems, a green underline) the moment you type them. Here’s the crash course:
Check the spelling of one word: Highlight the word. Choose Edit→Spelling and Grammar→Show Spelling and Grammar. The spell-check dialog box opens, with the proposed corrections visible.
Check spelling as you type. Choose Edit→Spelling and Grammar→Check Spelling While Typing. (If Check Grammar With Spelling is turned on in the same submenu, you’ll get a grammar check, too.)
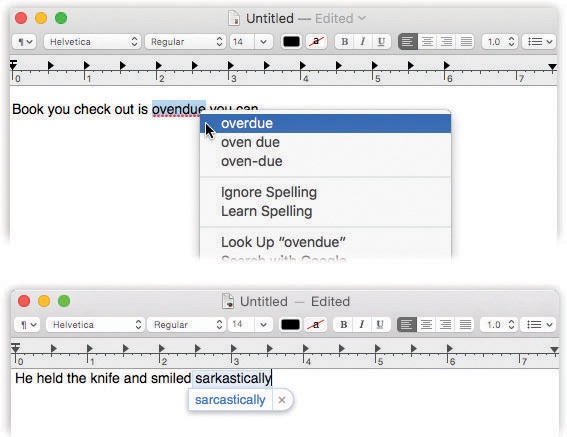
Now, as you type, you’ll see those red and green underlines on words the Mac thinks represent spelling or grammar mistakes. To fix one, right-click (or two-finger click) the underlined word, and proceed as shown in Figure 7-8.
Tip
In TextEdit, the factory setting for error-underlining is On. To turn it off for all new documents, choose TextEdit→Preferences, click New Document, and then turn off “Check spelling as you type.”
Check spelling after the document is finished. Choose Edit→Spelling and Grammar→Show Spelling and Grammar (or press
 -:). The Spelling dialog box appears. The first error it spots appears in the top box, with the proposed corrections in the bottom one.
If you like one of Apple’s proposals, then click it and click Change. If the word was correct already (for example, the guy’s last name really is Teh), then click Find Next (“Leave the word as I typed it”), Ignore (“It’s OK everywhere in this document”), or Learn (“Never flag this word again”).
Handily enough, you can also click Define to look up a highlighted word (one of the spelling suggestions, for example) in the Mac’s built-in Dictionary app. Also handily enough, the spelling checker is smart enough to maintain different spelling checkers (dictionaries) for different languages—and to recognize, within a single document, which language you’re using!
Fix spelling as you type. Note the difference. Checking your spelling just means “finding the misspelled words.” Fixing means autocorrecting the errors as they occur, as you type. You might not even notice that it’s happening!
This most tantalizing option is found in Edit→Spelling and Grammar→Correct Spelling Automatically. And sure enough, when this option is turned on, common typos like teh and frmo and dont get fixed as you type; you don’t have to do anything to make it happen.
Note
If you’re typing slowly enough, you might see the suggestion bubble illustrated in Figure 7-8. That, of course, is a feature Apple brought to the Mac from the iPhone/iPad. It’s saying, “Here’s the word I think you meant—and if you just keep on typing, I’ll go ahead and make the change I’m proposing. If you disagree, click on the
 in the word bubble to make me shut up and leave what you typed, just as you typed it.”
It’s not perfect. It doesn’t correct all errors (or even most of them). It occasionally even corrects a word you didn’t mean to have corrected. (When it makes a mistake, hit
-Z, the Undo command, to restore what you typed.) And sometimes it doesn’t make the change until you’re halfway through the sentence.Still, though. Kind of cool.
This useful feature autoreplaces one thing you type with something else. Why? Because it can do any of these things.
For example, the Mac can insert attractive “curly quotes” automatically as you type “straight ones,” or em dashes—like this—when you type two hyphens (-- like that).
You can see the built-in sample substitution (“omw” for “On my way!”)—and create your own—in the System Preferences→Keyboard→Text tab, as shown in Figure 7-9.
Apple doesn’t want to drive you nuts, though, so it makes sure you’re sure you really want these swappings to take place. So you have to turn on each of these features manually, in each program. (These commands are available anywhere you do a lot of typing, like TextEdit, Mail, and Stickies. Look for the Edit→Substitutions submenu.)
Auto-quotes. To make the quotes curlify themselves, choose Edit→Substitutions→Smart Quotes, so that a checkmark appears.
Auto-dashes. To turn double hyphens into these (—) long dashes, choose Edit→Substitutions→Smart Dashes, so that a checkmark appears.
Smart links. There’s also an option to create smart links, where any web address you type turns into a blue, underlined, clickable link to a web page. Turn on Edit→Substitutions→Smart Links.
You can program addr to type your entire return address. Create two-letter abbreviations for big legal or technical words you have to type a lot. Set up goaway to type out a polite rejection letter for use in email. And so on.
This feature has been in Microsoft Office forever (called AutoCorrect), and it’s always been available as a shareware add-on (TypeIt4Me and TextExpander, for example). But now it’s built right into most Apple programs, plus any others that use Apple’s text-input plumbing.
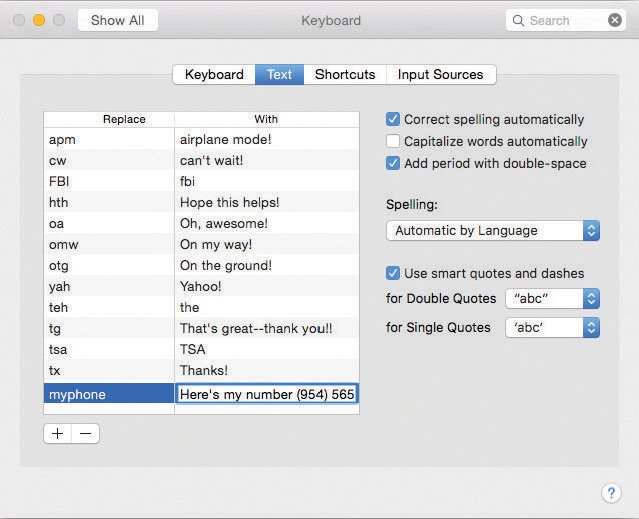
Figure 7-9. This is where you can manage macOS’s typographic substitutions. (They’re in the Keyboard pane of System Preferences—not Language & Region anymore.)
You build your list of abbreviations in the System Preferences→Keyboard→Text tab, shown in Figure 7-9. See the list at left? Click the + to create a new row in the scrolling table of substitutions.
Click in the left column and type the abbreviation you want (for example, addr). Click in the right column and type, or paste, the text you want macOS to type instead.
Tip
Don’t be shy—you’re not limited to short snippets. The replacement text can be pages long, which is handy if you’re a lawyer and you build your contracts out of boilerplate chunks of canned text.
You can even create multiple paragraphs—but not by hitting Return when you want a new line; no, hitting Return means “I’m finished entering this text” and closes up the box. Instead, press Option-Return when you want a paragraph break.
That’s it! Now, whenever you type one of the abbreviations you’ve set up, the Mac instantly replaces it with your substituted text.
And not just the Mac, either; your abbreviations autosync to iPhones, iPads, iPod Touches, and other Macs. If, that is, you’ve turned on System Preferences→iCloud→iCloud Drive.
(Remember, you can turn off the text-replacement feature in individual programs, if you like—TextEdit, Mail, Stickies, and so on. To do that, choose Edit→Substitutions→Text Replacement, so that the checkmark disappears.)
Gem in the Rough: The Least-Known Typing Feature
This may come as a shock if you think you know your Mac pretty well, but here goes: MacOS actually offers system-wide autocomplete of big words, just like the iPhone.
We’re not talking about the spelling checker, and we’re not talking about text substitution. (And we’re also not talking about the Touch Bar on brand-new MacBooks, which performs a similar trick with its QuickType feature.)
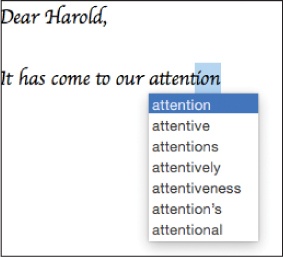
We’re talking, you start typing a word and the Mac finishes it for you. It’s ideal when you’re in a hurry, when you’re not sure how to finish a word (is it “independance” or “independence”?), or when you’re trying to solve a crossword puzzle. It works in all the standard Mac programs (TextEdit, Mail, Safari, Pages, and so on).
Once you’ve begun typing a word, press either F5 or Option-Esc to produce the list of possible word completions shown here. If the Mac correctly anticipates the rest of the word, great; press Tab, Return, or the space bar to accept the suggestion, and then keep right on typing. If it guesses wrong, you can either select a different word in the list (using the mouse or the arrow keys), or tap Esc to ignore the suggestions and continue typing.
On the iPhone, the software comes to your rescue every time you reach the end of a sentence. All you have to do is tap the space bar twice. The phone automatically gives you a period and a space and capitalizes the first letter of the next sentence.
Believe it or not, those features have now made their way into macOS. In System Preferences→Keyboard→Text, you can now turn on these options:
Capitalize words automatically. You can give your Shift keys a break. From now on, the Mac can capitalize proper nouns (Ohio, Texas, Pepsi, Bible, Empire State, American Express) and the first words of sentences for you. Just type away, and marvel as those lowercase letters become capitals an instant after you’ve typed them.
Add period with double-space. Truth is, there’s not much point to this feature on the Mac. On an iPhone, it’s a godsend because it saves you from having to swap onscreen keyboard layouts every time you want a period. On the Mac, the period key is always there! Still, for the sake of consistency, here it is: The “type two spaces to get a period” option.
Screamingly important note: Sadly, these features don’t work in all programs. They have an effect in Apple’s apps (Mail, TextEdit, Pages, Notes, and so on), but not in Microsoft or Adobe apps.
The final feature in macOS’s text-massaging tool chest is case swapping—that is, changing text you’ve already typed (or pasted) from ALL CAPS to lowercase or Just First Letters Capitalized.
This one’s simple: Select the text you want to change, and then choose from the Edit→Transformations submenu. Your options are Make Upper Case (all caps), Make Lower Case (no caps), and Capitalize (first letters, like a movie title).
Keep that in mind the next time some raving lunatic SENDS YOU AN EMAIL THAT WAS TYPED ENTIRELY WITH THE CAPS LOCK KEY DOWN.
Tip
Here’s a sneaky one: You can double-tap a word with three fingers on your trackpad to get a pop-up dictionary and thesaurus definition. (That’s a light double-tap, not a full double-click.) This trick doesn’t work in all programs, and it requires you to turn it on in System Preferences→Trackpad→Point & Click. And it’s a tad bit finicky.
But once you have it working, check it out: It also works in text documents you’re examining in Quick Look!