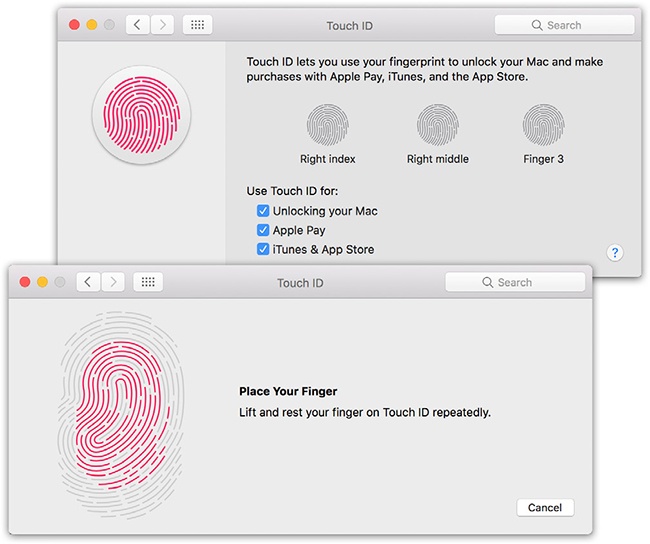
As you could probably guess, this panel appears only if your laptop has a Touch Bar and Touch ID fingerprint sensor.
This sensor is built right into the power button (clever!). It reads your finger at any angle. It can’t be faked out by a plastic finger or even a chopped-off human finger. You can teach it to recognize up to five different fingerprints. They can be a few of your fingers or, for example, you could teach it one finger each for five family members.
Before you can use your fingertip as a password, though, you have to teach the Mac to recognize it, and here’s where you do it:
Create a password.
That’s right: You can’t use a fingerprint instead of a password; you can only use a fingerprint in addition to one. You’ll still need a password from time to time to keep the Mac’s security tight. For example, you need to enter your password if you can’t make your fingerprint work (maybe it got encased in acrylic in a hideous crafts accident).
So open System Preferences→Accounts and create a password (Phase 2: Name, Password, and Status), if you haven’t already.
Click the “Add a fingerprint” button.
Start by entering your account password, to prove that you’re not a sinister spy. Click OK.
Now place the finger you want to train onto the power button—your index finger is the most logical candidate. You’re asked to touch it to the power button over and over, maybe six times. Each time, the gray lines of the onscreen fingerprint darken a little more (Figure 10-20).
Once the registration is complete, the screen says “Touch ID is ready.”
Click Done.
You return to the Touch ID panel, where your fingerprint is now represented by an icon named something like “Finger 1.” Feel free to click those words and type a better name (“Right-hand pointer” or whatever). To delete one, point to its icon and then click the
 that appears; click Delete to confirm.
Tip
It’s perfectly legal to register the same finger several times. That technique makes Touch ID more reliable if it seems to be having trouble recognizing that finger.
Figure 10-20. Each time you touch your finger to the power button, a little more of the fingerprint map gets filled in. Once you’ve filled in the fingerprint, the dialog box advises you to keep going, this time tipping the finger a little each time so the sensor gets a better view of your finger’s edges.
You can register your toes instead of fingers, if that’s helpful. Or even patches of your wrist or arm, if you’re patient (and weird).
Anyway, you are now ready to start using the fingerprint. Try it: Put the Mac to sleep. Then press the power button with your very special finger. The Mac reads your fingerprint and instantly unlocks itself.
And now, a few notes about using your fingerprint as a password:
Apple says the image of your fingerprint is encrypted and stored in the Touch Bar’s dedicated processor chip. It’s never transmitted anywhere, it never goes online, and it’s never collected by Apple.
The Touch ID scanner may have trouble recognizing your finger if it (your finger) is wet, greasy, or scarred.
The finger reader isn’t just a camera; it doesn’t just look for the image of your fingerprint. It’s actually measuring the tiny differences in electrical conductivity between the raised parts of your fingerprint (which aren’t conductive) and the skin just beneath the surface (which is). That’s why a plastic finger won’t work—and even your own finger won’t work if it’s been chopped off (or if you’ve passed away).
If you’ve registered fingerprints belonging to several account holders, then fast user switching (Figure 13-11) is really fast. All Person B has to do is click the power button with the registered finger, and boom: Person A’s account world slides away, and Person B’s heaves into view.
At the bottom of the System Preferences→Touch ID screen, you see the on/off switches for the three things your fingerprint can do: It can unlock the computer (Unlocking your Mac), pay for things (Apple Pay—see Tip), and serve as your password when you buy books, music, apps, and videos from Apple’s online stores (iTunes & App Store). That last feature is handy: At the moment when you’re usually asked to type your iCloud password, you’re asked to touch the fingerprint sensor to authorize the purchase instead.
All of this is great news. Most of us would be happy if we never, ever had to type in another password.
