For many years, the Notes app was a simple bucket for pages of text: lists, recipes, driving directions, and brainstorms. They all synced effortlessly among your Apple phones, tablets, and other computers.
Today, Notes has sprouted an array of formatting features that practically turn it into OneNote or Evernote. Now there’s full type formatting, bulleted lists, checklists, web links, and pasted graphics, videos, or maps. In macOS Sierra, you can collaborate on a Notes page with other people across the Internet—or, on the other end of the paranoia scale, you can password-protect certain Notes pages for privacy.
All of this gets synced automatically to your iPhone or iPad, too, if it has iOS 9 or later on it.
Note
The first time you ever open Notes in Sierra, it invites you to upgrade your Notes collection to the new, more flexible format. There’s no downside to accepting this one-way conversion—if all your Macs run El Capitan or later, and all your phones and tablets run iOS 9 or later. Earlier versions, however, won’t be able to open your Notes once you’ve performed this conversion.
To create a new page in your digital notepad, choose File→New Note ( -N), or click the
  button on the top toolbar.
Once the new page appears, type away (Figure 12-25).
Tip
Notes works with Handoff (Figure 9-5). So if you’re editing a note on your Mac, iPhone, or iPad, you’ll be offered the chance to jump to the same note on any other Mac, iPhone, or iPad you own (if it’s on the same Wi-Fi network).
The buttons on the toolbar offer useful formatting options. For example:
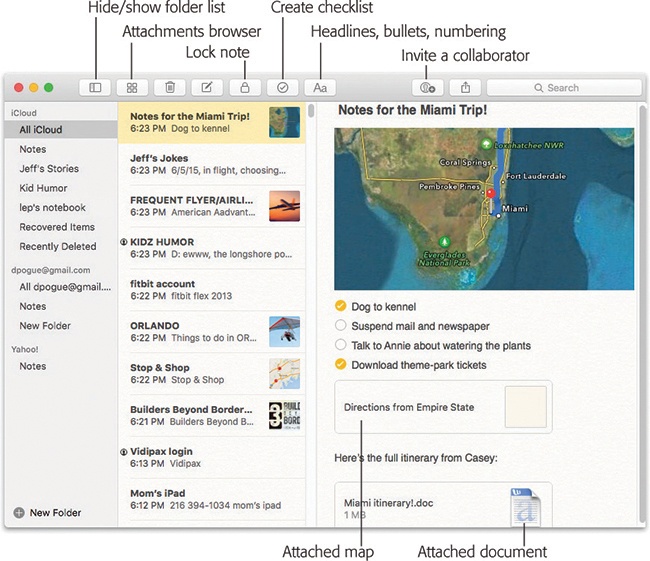
Checklists. The Checklist button turns any selected paragraphs into a checklist with little circles that you can check off, as shown in Figure 12-25.
Attachments. You can paste or drag photos and other graphics into your notes, too—and links, maps, and even documents, like PDF files, Word documents, or Excel spreadsheets. Drag such a document into a note from the desktop; there it becomes an icon that you can double-click to open later.
Paragraph formatting. The Aa button gives you one-click access to paragraph styles like Title (big and bold), Heading, or lists with automatic bullets, dashes, or numbering.
Text formatting. You have control over fonts, type sizes, colors, paragraph alignment, and indentation, using the commands in the Format menu.
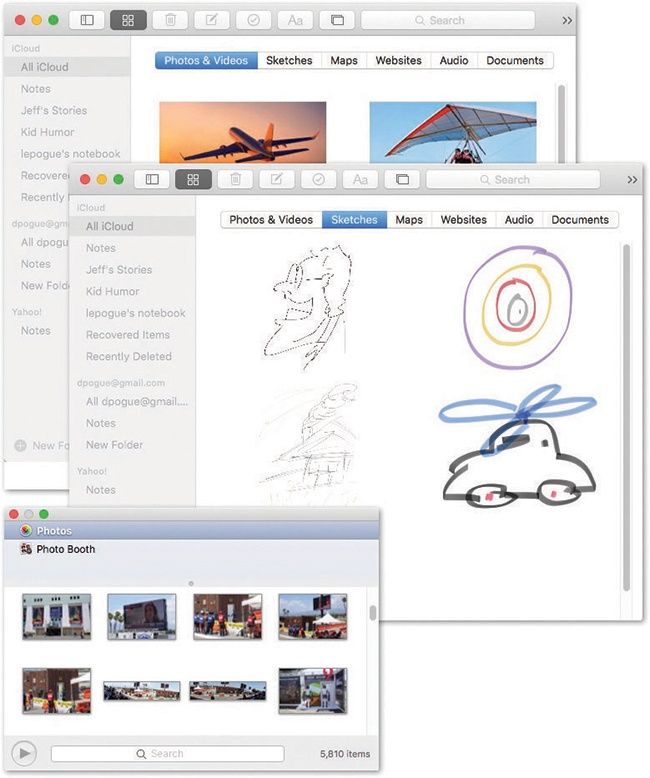
Photos and videos. This toolbar button (identified in Figure 12-25) opens the Photos browser, shown at bottom in Figure 12-26. Here you can scroll through all the photos and videos from Photos and Photo Booth—and drag them into a note.
All of this, of course, syncs flawlessly with your iPhone, iPad, or iPod Touch (running iOS 9 or later).
Note
To make sure that syncing takes place, make sure Notes is turned on in System Preferences→iCloud (on your Mac), and in Settings→Mail, Contacts, Calendars→iCloud (on your phone or tablet). The rest is automatic.
Figure 12-25. The first line of each page becomes the name of that note, as represented in the searchable list of notes (center column).
A couple of handy icons appear at the top of each Notes page. You can click  to delete the current note. Or you can click
  to send the note to someone, either by email or in Messages (Chapter 20).
Conversely, the  button in lots of other programs now lists Notes, meaning that you can send material (map, photo, link, text, address, phone number…) directly to either a new note page or an existing one.
As you create more pages, the Notes list (the center column in Figure 12-25) becomes more useful. It’s your table of contents for the Notes pad. It displays the first lines of your notes (most recent at the top), along with the time or date you last edited them. (The + button appears here, too.) To open a note, click its name.
There’s a search box, too. You can search all your notes instantly.

Shown here: The Photos & Videos tab (top) and the Sketches tab (middle), which displays drawings you’ve made on your iPhone or iPad. (You can’t create a sketch on your Mac.)
Bottom: Here’s the Photos browser. It lets you add a photo or video to a Note from Photos, Photo Booth, or other compatible photo apps.
Figure 12-26. The Notes attachments browser lists every photo, video, sketch, map, website, audio file, and other document that appears in any note in your Notes, all in one place (use the tabs at top). Click one to jump to the note that contains it—a great way to find something you’re looking for without having to know when you wrote it or what it said.
In macOS Sierra, for the first time, you and your buddies can edit a page in Notes simultaneously, over the Internet. It’s great when you and your spouse are planning a dinner party and brainstorming about guests and the dinner menu, for example. Also great for adding items to the grocery or to-do list even after your spouse has left the house to get them taken care of.
Figure 12-27 shows the procedure.
Once you’ve shared a note, the person icon at the top turns dark, and a matching icon appears next to the note’s name in the master list (Figure 12-27, bottom). At any time, you can stop sharing the note—or add more people to its collaboration—by clicking that person icon again and editing the sharing panel that appears.
It took until Sierra for Apple to add locked, hidden, password-protected Notes pages. But they’re here at last, suitable for listing birthday presents you intend to get for your nosy kid, the formula for your top-secret invisibility potion, or your illicit lovers’ names.
Note that you hide and show all your locked notes with a single password. You can’t (that is, don’t have to) make up a different password for every note.
To lock a note, click the  button in the toolbar (Figure 12-27); from the shortcut menu, choose Lock This Note. Enter a password for locking/unlocking all your notes (or, if you’ve done this before, enter the password).
As long as your locked notes are all unlocked, you can still see and edit them. But when there’s any risk of somebody else coming along and seeing them (on your Mac, iPhone, iPad, or any other synced gadget), click the  again—and this time, choose Close All Locked Notes.
Now all you see of the locked notes are their titles. Everything on them is replaced by a “This note is locked” message (and a password box).
If you correctly enter the password, then all your hidden notes are suddenly viewable and editable.
Use your power wisely.
Here’s an undocumented special: If you double-click a note’s name, it opens into a new window, floating on your screen. You can open multiple notes this way, drag them around the screen, and leave them floating there permanently, as though held by magnets on the great refrigerator door of life.
Tip
Notes is a card-carrying full-screen app, as described in Full Screen Button.
The Attachments Browser in Notes is a single screen, showing all attachments from all notes, all rounded up on one scrolling screen (see Figure 12-26). Just as in Messages, it’s often incredibly convenient to scan the visual attachments as a way to find a particular note.
You can organize your notes into folders, for ease of wading through them. Any folders you create on the Mac also show up on your iPhone/iPad.
The key to understanding this feature is the slide-out Folders list, which you can see at left in Figure 12-25. You can make it appear by choosing View→Show Folders List, or by clicking the first icon on the toolbar. Then you can adjust the Folder list’s width by dragging the vertical line at its right edge.
To make a new folder, choose File→New Folder, or click New Folder below the list; name the folder and then press Return. You can then drag existing notes into its name in the Folders list. (The usual rules apply: You can select a swath of notes in a list by clicking the first and then Shift-clicking the last. Or you can click individual, nonconsecutive notes by clicking with the  key pressed.)
Tip
If you press Option as you drag a note, you make a copy of it in the new folder instead of moving the original.
Click a folder’s name to see the notes inside it. (Click “All [account name]” to see all the notes in that account. Note accounts are covered in the next section.)
To create a new note within a folder, click the folder’s name first. If you don’t click any folder’s name before you create the note, then it goes into the general Notes category.
You can also rename a folder (right-click or two-finger click its name; choose Rename Folder), delete one (right-click or two-finger click its name; choose Delete Folder), put one inside another (drag its name), and move a folder to a different account—for example, from your iCloud account to your Google one—by dragging it.
Notes also can show you the contents of the Notes modules on Google, Yahoo, AOL, or another IMAP email account. You’ll see each account’s notes in the Folder list, as you can see in Figure 12-26—and from there, you can drag notes hither and yon, among accounts, with abandon.
To set this up, open System Preferences→Internet Accounts. Click the account you want (Exchange, Gmail, Yahoo, AOL, or whatever); finally, turn the Notes switch On.
That should do it. Now each account’s notes appear under their own heading in the Folders list. And your notes are synced, both ways.
All of this makes life a little more complex, of course. For example, when you create a note, you have to worry about which account it’s about to go into. To do that, be sure to specify an account name (and a folder within it, if necessary) before you create the new note.

