AirDrop is one of macOS’s star attractions. It’s a breakthrough in speed, simplicity, and efficiency. There’s no setup, no passwords involved. It lets you copy files to someone else’s Mac, iPhone, iPad, or iPod Touch up to 30 feet away, instantly and wirelessly; you don’t need an Internet connection or even a Wi-Fi network. It works on a flight, a beach, or a sailboat in the middle of the Atlantic. It also works if you’re on a Wi-Fi network, doing other things online.
You can exchange files with any Mac running macOS Lion or later, and any i-gadget running iOS 7 or later.
Usually, you begin the sending process in one of two ways:
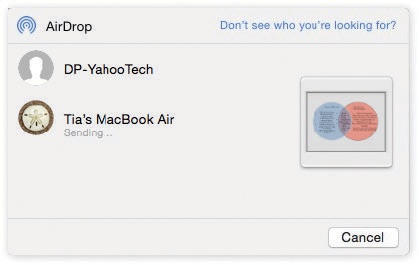
From the Finder. Right-click (or two-finger click) the file’s icon. From the shortcut menu, choose Share→AirDrop. The box shown in Figure 14-2 appears.
Figure 14-2. The icons of nearby AirDrop-friendly Apple gadgets and Macs show up in this fun-sized window. You’ve already said what you want to send; now you just have to specify who gets it. Click the destination device’s icon and then click Send.
Note
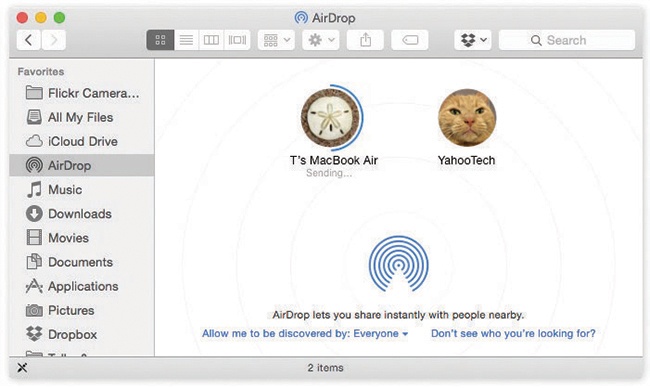
Here’s a second way to send something in the Finder: Open the AirDrop window. (It’s listed in the Sidebar at the left side of every Finder window. Or choose Go→AirDrop, or press Shift-
 -R.) Drag the icon(s) you want to send onto the icon of the receiving device (Figure 14-3).
From an app. When you’re looking at whatever you want to send, click the
 button. From the shortcut menu, choose AirDrop.
And where is that
button? Everywhere. It’s at the top of every Finder window and at the top of every Quick Look window. It’s in Open and Save boxes. It’s available on every page in Safari, map in Maps, photo in Photos, contact in Contacts, and note in Notes. Lots of non-Apple apps offer that button, too. (See Notes on Disk Swapping for more on the Share button.)In each case, you should now proceed as shown in Figure 14-2.
A message appears on the other gadget’s screen, asking if the owner wants to accept your file. If she chooses Accept, then the transaction is complete. Quick, effortless, wireless, delightful.
Miraculous though AirDrop may seem when it’s working, certain stars do have to be in alignment. If AirDrop isn’t working as advertised, here are some things to check:
Both sender and receiver must have Bluetooth and Wi-Fi turned on. They also have to be within about 30 feet of each other.
AirDrop doesn’t work with really old Apple models. It does work with the MacBook Pro (made since late 2008), MacBook Air (since late 2010), MacBook (late 2008), iMac (early 2009), Mac mini (mid-2010), and Mac Pro (mid-2010).
And among i-devices, it requires an iPhone 5 or later, iPad mini (any generation), iPad (4th generation or later), or iPod Touch (5th generation or later).
On the Mac, AirDrop requires macOS Lion or later. On an iPhone, iPad, or iPod Touch, it requires iOS 7 or later.
If your Mac can’t seem to “see” other nearby, older Macs (pre-2012 models)—either when sending or receiving an AirDrop file—the process may require an extra step. If you’ve right-clicked (or two-finger clicked) an icon or used the
button in a program, click “Don’t see who you’re looking for?” at top right (see Figure 14-2) and then click Search for an Older Mac.The “Don’t see who you’re looking for?” link also appears in the AirDrop window in the Finder (you can see it in Figure 14-3). Here again, only by clicking Search for an Older Mac will you see the icons for pre-2012 Mac models show up.
And, by the way: When your Mac is seeing those older Macs, it can’t see newer ones—and vice versa.
If you don’t see the AirDrop icon in your Finder’s Sidebar, it’s because somebody turned off its checkbox in Finder→Preferences→Sidebar. (You can still use AirDrop, though.)
If your lucky recipient’s icon still isn’t showing up on your Mac, he may have AirDrop turned off or restricted.
Ask him to swipe up from the bottom of his screen and tap AirDrop (iOS device) or open the AirDrop window (Mac). Here you can control who can see you: Off (nobody), Contacts Only (people in your address book), or Everyone. It’s supposed to be a security precaution, but you may as well leave it set to Everyone; after all, you have to approve every file individually, so it’s not as though some passing hacker can shove evil files down your throat without your knowing.
And if one of you has turned on Contacts Only, you still won’t be able to participate in AirDrop transactions unless you’re also logged into your iCloud account.
AirDrop doesn’t work if you’ve turned on “Block all connections” in your firewall (Figure 13-14).
AirDrop requires both sending and receiving gadgets to be on (awake).
If someone’s sending you a file by AirDrop, the steps depend on whether you’re using a Mac or an i-device:
Receiving on the Mac. You get a notification (see Figure 14-4).
Tip
Actually, if you’re sending something to yourself—from your phone to your Mac, for example—this confirmation doesn’t appear. Apple notices that both devices are signed into the same iCloud account and figures that you don’t need protection from yourself. So it just dumps the incoming file directly into your Downloads folder without making you accept it first. (You still get a notification that the transaction has happened.) It’s very nice.
The file winds up in your Downloads folder. This folder generally sits on the Dock, so it’s easy to find. But you can also choose Go→Downloads, or press Option-
-L, to jump there.Receiving on an iPhone/iPad/iPod Touch. A message says “[Other guy’s name] would like to share [the file’s name].” Tap Decline or Accept.
If your iOS device knows what to do with the file, it opens automatically in the appropriate app (a photo in Photos, a web page in Safari, and so on). If it’s not sure what to do with the file, then it offers a list of apps that can open it. For example, suppose someone’s just sent you a Word document. You’re offered a choice of apps that can handle Word files (either to open them or to store them), like Evernote and Dropbox. Tap the one you want.
If you don’t have any app that can open the file, iOS sometimes offers you the chance to download one that can. And if even that trick comes up empty-handed, your i-device rejects the incoming file altogether.

Figure 14-4. A file arriving on your Mac via AirDrop announces itself with a notification. You can click either Decline (you don’t want the file) or Accept. If you click Accept, the file transfer proceeds automatically. The transfer is encrypted, so evildoers nearby have no clue what you’re transferring (or even that you’re transferring). It winds up in your Downloads folder.
There’s a lot of great stuff in AirDrop:
If you see someone’s name beneath her icon in the AirDrop window, that means that she’s in your Contacts and has signed in with her Apple ID. That’s an extra bit of confidence that she is who her icon says she is.
AirDrop creates a temporary two-computer wireless network. That’s why it works even if you’re not in a Wi-Fi hotspot.
If you’re the one receiving a file, you can cancel a half-finished transfer by clicking the
 button on the progress bar that wraps around the sender’s icon in the AirDrop window. (Another way: If your Downloads folder is set to Stack view, then you can click the button in the corner of the file’s icon.)