MacOS has answered the prayers of baffled beginners and exasperated experts everywhere. Now, when a novice needs help from a guru, the guru doesn’t have to run all the way downstairs or down the hall to assist. Thanks to macOS’s screen-sharing feature, you can see exactly what’s on the screen of another Mac, from across the network—and even seize control of the other Mac’s mouse and keyboard (with the newbie’s permission, of course).
(Anyone who’s ever tried to help someone troubleshoot over the phone knows exactly how helpful this is. If you haven’t, this small example may suffice: “OK, open the Apple menu and choose About This Mac.” Pause. “What’s the Apple menu?”)
Nor is playing Bail-Out-the-Newbie the only situation when screen sharing is useful. It’s also great for collaborating on a document, showing something to someone for approval, or just freaking people out. It can also be handy when you are the owner of both Macs (a laptop and a desktop, for example), and you want to run a program that you don’t have on the Mac that’s in front of you. For example, you might want to adjust the playlist selection on the upstairs Mac that’s connected to your sound system.
Or maybe you just want to keep an eye on what your kids are doing on the Macs upstairs in their rooms.
The controlling person can do everything on the controlled Mac, including running programs, messing around with the folders and files, and even shutting it down. You can even press keystrokes on your Mac— -Tab, -space, -Option-Escape, and so on—to trigger the corresponding functions on the other Mac.
MacOS is crawling with ways to use screen sharing. You can do it over a network, over the Internet, and even during a Messages chat.
Truth is, the Messages method, described in Chapter 20, is much simpler and better than the small-network method described here. It doesn’t require names or passwords, it doesn’t require the same macOS version on both Macs, it’s easy to flip back between seeing the other guy’s screen and your own, and you can transfer files by dragging them from your screen to the other guy’s (or vice versa).
Then again, the small-network method described here is built right into the Finder and doesn’t require logging into Messages.
In modern macOS screen sharing, you can log into a distant Mac and control it as though you were logged into your own account—while somebody else is using it and seeing a totally different screen! Read on.
Trying to understand meta concepts like seeing one Mac’s screen on the monitor of another can get confusing fast. So in this example, suppose that you’re seated at Your Mac, and you want to control the Other Mac.
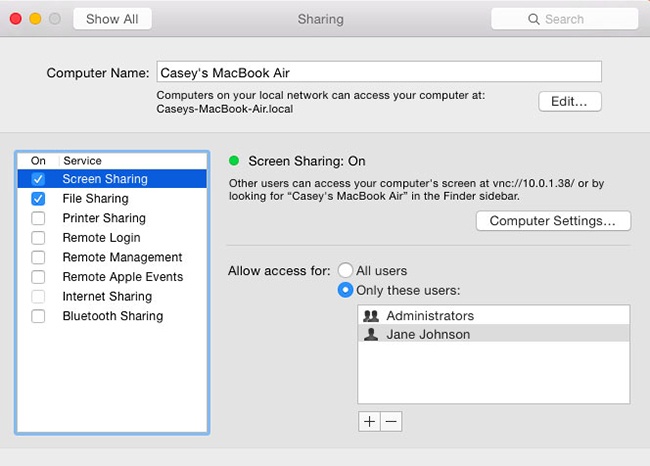
Now, it would be a chaotic world if any Mac could randomly take control of any other Mac (although it could be fun). Fortunately, though, nobody can share your screen or take control of your Mac without your explicit permission. To give such permission, sit down at Other Mac. Choose  →System Preferences→Sharing, and then turn on Screen Sharing.
At this point, there are three levels of security to protect the Mac against unauthorized remote-control mischief:
Secure. If you select All Users, then anyone with an account on your Mac will be able to tap in and take control anytime they like, even when you’re not around.
They’ll just have to enter the same name and password they’d use if they were sitting in front of your machine.
If “anyone” means “you and your spouse” or “you and the two other fourth-grade teachers,” then that’s probably perfectly fine.
Securer. For greater security, though, you can limit who’s allowed to stop in. Click “Only these users” and then click the + sign. A small panel appears, listing everyone with an account on your Mac. Choose the ones you trust not to mess things up while you’re away from your Mac (Figure 14-17).
Tip
You can permit people to see your Mac’s screen remotely by entering their Apple ID and passwords. That’s a lot simpler and uses less disk space than before, when each person had to have a full-blown account on your Mac, complete with Pictures folder, Movies folder, and so on. To set this up, see the box in Screen sharing the manual way.
Securest. If you click “Only these users” and then don’t add anyone to the list, then only people who have Administrator accounts on your Mac (Administrator accounts) can tap into your screen.
Alternatively, if you’re only a little bit of a Scrooge, you can set things up so that they can request permission to share your screen—as long as you’re sitting in front of your Mac at the time and feeling generous.
To set this up, click Computer Settings and then turn on “Anyone may request permission to share screen.” Now your fans will have to request permission to enter, and you’ll have to grant it (by clicking OK on the screen), in real time, while you’re there to watch what they’re doing.
All right, Other Mac has been prepared for invasion. Now suppose you’re the person on the other end. You’re the guru, or the parent, or whoever wants to take control.
Sit at Your Mac elsewhere on your home or office network, and proceed like this:
Open a Finder window. Expand the Shared list in the Sidebar, if necessary, so that you see the icon of Other Mac. Click it.
The strip at the top of the main window displays a button that wasn’t there before: Share Screen (Figure 14-18, top).

Middle: If you’ve been pre-added to the VIP list of authorized screen sharers, then you can sign in with either your account name and password or your Apple ID. If not, then you can request permission to share Other Mac’s screen (provided the Mac owner has turned on that option in System Preferences→Sharing→Screen Sharing→Computer Settings). You’ll be granted permission only if Other Mac’s owner is present and OKs you.
Bottom: If you request permission, the other person (sitting at the Other Mac) sees your request like this.
Figure 14-18. Top: Start by clicking Share Screen in the strip at the top of your Mac’s window.
Click Share Screen.
Now you see the box shown at middle in Figure 14-18. It offers as many as three different ways for you to prove that you’re not some German teenage hacker.
“By requesting permission” sends the other Mac’s current operator a message asking if it’s OK for you to take over. If that person grants permission, that’s it; the Other Mac’s screen image appears on your screen, and you can skip the rest of these steps.
But what if nobody’s seated at the other Mac to grant permission? If you sometimes use the Other Mac yourself, and you have an account on it, then you can choose “Registered user.”
And what if nobody’s at the other Mac to grant you permission and you don’t have a user account on that machine? In that case, you may be able to use the Using an Apple ID option. If Other Mac’s owner wants you to have access and has set you up that way (following the steps in the box in Screen sharing the manual way), then you can connect just by entering your Apple ID and password.
Tip
In theory, you can also connect from across the Internet, assuming you left your Mac at home turned on and connected to a broadband modem, and assuming you’ve worked through the port-forwarding issue described in Remote Access with SSH.
In this case, though, you’d begin by choosing Go→Connect to Server in the Finder; in the Connect to Server box, type in vnc://123.456.78.90 (or whatever your home Mac’s public IP address is). The rest of the steps are the same.
If you have a user account on the Other Mac, then click “Registered user” and log in. If not, but your Apple ID has been preapproved, click Using an Apple ID and supply your sharing password.
Your Mac, of course, knows your Apple ID already (because you’ve entered it in your account screen in System Preferences→Users & Groups). It shows up here in the dialog box; all you have to do is enter your password.
Click Connect.
If you’ve signed in with the same account that’s already logged into the Other Mac (for example, if they’re both your Macs), then that’s all there is to it. The Other Mac’s screen image fills yours.
But if you’ve just connected using a different account, you see the dialog box shown in Figure 14-19. If you choose “Connect to a virtual display,” then you can use your account on the Other Mac even while somebody else is using her account. Simultaneously. Crazy stuff.
(The only evidence she’ll have that you’re rooting around behind the scenes is a tiny menu-bar icon that looks like this:
 .)
.)Click either “Ask to share the display” (to see the same thing as the Other Mac person) or “Connect to a virtual display” (to log into a different account and work independently).
And now a weird and wonderful sight appears. As shown in Figure 14-20, your screen now fills with a second screen—from the Other Mac. You have full keyboard and mouse control to work with that other machine exactly as though you were sitting in front of it.
Figure 14-19. The Mac wants to know if you want to view or control the screen that’s in use right now by whomever’s using the Other Mac—or if you want to use the “virtual display” option, where you take control of your account on the Other Mac without disturbing the totally different activity of whomever is seated there.
Well, maybe not exactly. There are a few caveats and options.
Full Screen mode. There it is, in its customary upper-left spot: the green
 button. If you click it, then your view of the Other Mac expands to fill your screen, edge to edge; now there’s no sign at all that you’re actually using a different computer.
The speed-vs.-blurriness issue. Remember, you’re asking the Other Mac to pump its video display across the network—and that takes time. Milliseconds, in fact.
So ordinarily, the Mac uses something called adaptive quality, which just means that the screen gets blurry when you scroll, quit a program, or do anything else that creates a sudden change in the picture. You can turn off this feature by choosing View→Full Quality. Now you get full sharpness all the time—but things take longer to scroll, appear, and disappear.
Mismatched screen sizes. If the other screen is smaller than yours, no big deal. It floats at actual size on your monitor, with room to spare. But if it’s the same size as yours or larger, then the Other Mac’s screen gets shrunk down to fit in a window.
If you’d prefer to see it at actual size, choose View→Turn Scaling Off. Of course, now you have to scroll in the Screen Sharing window to see the whole image.
Tip
Another way to turn scaling on and off is to click the “Fit screen in window” button on the Screen Sharing toolbar (identified in Figure 14-20).
Figure 14-20. Don’t be alarmed. You’re looking at the Other Mac’s desktop in a window on your Mac desktop. You have keyboard and mouse control, and so does the other guy (if he’s there); when you’re really bored, you can play King of the Cursor. (Note the Screen Sharing toolbar, which has been made visible by choosing View→Show Toolbar.)
Observe Mode. In Observe Mode, your cursor turns white, and you give up all your typing and clicking powers. In other words, you’re playing “Look but don’t touch.” (To enter this mode, choose View→Switch to Observe Mode, or click the corresponding toolbar icon.)
This is a handy option when the person at the Other Mac just wants to give you a slideshow or a presentation, or when you just want to watch what he’s doing when you’re on a troubleshooting hunt, or when he’s freaked out by having you move the mouse or type stuff by remote control.
Manage the Clipboard. You can actually copy and paste material from the remote-controlled Mac to your own—or the other way—thanks to a freaky little wormhole in the space-time continuum. In the Edit menu, choose Send Clipboard to put what’s on your Clipboard onto the Other Mac’s Clipboard, or Get Clipboard to copy the Other Mac’s Clipboard contents onto your Clipboard. Breathe slowly and drink plenty of fluids, and your brain won’t explode. (There are toolbar-button equivalents, too.)
Dragging files between computers. You can now transfer files from one Mac to the other, just by dragging their icons. Drag the icon from the distant Mac clear out of its window, and pause over your own desktop until your cursor sprouts a green
 icon. When you let go, the files get copied to your own Mac.
Quitting. When you hit the
-Q keystroke, you don’t quit Screen Sharing; you quit whatever program is running on the Other Mac! So when you’re finished having your way with the other computer, choose Screen Sharing→Quit Screen Sharing to return to your own desktop (and your own sanity).


If you don’t see the screen-sharing toolbar, you can summon it by choosing View→Show Toolbar. It starts out with buttons for Control (click to enter Observe Only mode), Fit to Window, Screen Capture (takes a picture of the screen), Get Clipboard, and Send Clipboard.
But if you right-click (or two-finger click) the toolbar, you’re offered a shortcut menu containing the usual controls over how the toolbar buttons appear (Icon and Text, Icon Only, Use Small Size, and so on), plus a Customize Toolbar command that produces the box shown in Figure 14-21.
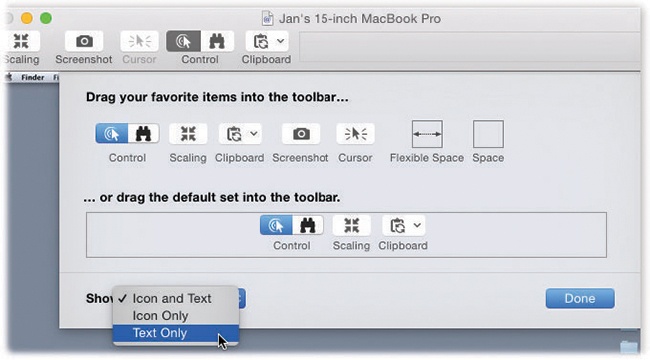
Figure 14-21. In here, you can move the toolbar buttons around by dragging, change the assortment of available buttons, add gaps between the buttons (drag a space or a flexible space into position—see Tip, and modify how the buttons appear.
The previous steps guide you through screen sharing between two Macs running OS X 10.5 or later. But screen sharing is based on a standard technology called VNC, and macOS is bristling with different permutations.
Two people who both have OS X 10.5 or later can perform exactly the same screen-sharing stunt over the Internet. No accounts, passwords, or setup are required—only the granting of permission by the other guy. Just initiate a Messages chat, and then proceed as described in Tip. It’s really awesome.
Screen Sharing is an actual, double-clickable program, with its own icon on your Mac. (It’s in the System→Library→CoreServices folder.) When you double-click it, you can type in the public IP address or domain name of the computer you want to connect to, and presto: You’re connected!
Back to My Mac is intended to simplify the nightmare of remote networking. It works only if you have two Macs (OS X 10.7.2 or later), and you’ve signed into the same iCloud account on both. Also, open System Preferences→iCloud on each machine and turn on Back to My Mac. Finally, set up the “Allow access for” settings in System Preferences→Screen Sharing.
Once that’s all in place, your Macs behave exactly as though they’re on the same home network, even though they can be thousands of miles apart.
Now, suppose you’re on your laptop in New Zealand. Choose Finder→Preferences→Sidebar; turn on Back to My Mac.
Now an entry for Back to My Mac is supposed to appear in the Sharing section of your Sidebar. Click to see the icon of your Mac back at home. At this point, you can connect to it for file sharing by clicking Connect As or take control of it by clicking Share Screen.
In theory, Back to My Mac spares you an awfully long visit to networking hell (including the port-forwarding headache described in Remote Access with SSH), because Apple has done all the configuration work for you.
In practice, not everyone can get Back to My Mac to work. Apple says the problems are related to firewalls, port-forwarding issues, and router incompatibilities. Apple also says you’ll have the best luck on networks that involve only an AirPort base station—and not a hardware router.
All the technical details are available online. Visit http://support.apple.com/kb/HT1109 to read more about the Back to My Mac issues.