SPRING
Roasted Carrot Soup
Lamb Merguez
Tangerine and Almond Shortbread Tart
Roasted Butterflied Chicken with Cardamom and Yogurt
Louisa’s Cake
Grandma DiLaura’s Ricotta Gnocchi
Flamin’ Cajun Shrimp
Grown-Up Birthday Cake
Herbed Beef Skewers with Horseradish Cream
Afghan Dumplings with Lamb Kofta and Yogurt Sauce
Morel Crostini
Late-Night Coffee-Brined Chicken
Sunday Pork Ragu
Sweet-and-Spicy Calamari
Shaved Asparagus and Mint Salad
Sausage and Kale Dinner Tart
WEEK 27 YOUR BEST CARROT RECIPE
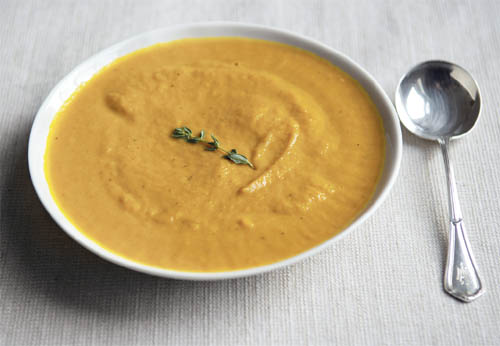
Roasted Carrot Soup
By Reeve / Serves 4
WHO: Reeve lives in Los Angeles.
WHAT: A simple yet complex-seeming rendition of a traditional soup.
HOW: Broil carrots to soften and sweeten them, infuse vegetable broth with fresh ginger, then whiz everything up with onions, garlic, and thyme.
WHY WE LOVE IT: It’s dairy-free but supple and creamy, and roasting the carrots gives them sweet, earthy depth.
6 to 8 large carrots (about 1¾ pounds), peeled and cut into ½-inch-thick slices
¼ cup olive oil
Salt
6 cups vegetable stock, or as needed
One 1-inch-long piece fresh ginger, peeled
1 fresh thyme sprig, plus chopped thyme for garnish
½ large sweet onion, chopped
2 large garlic cloves, chopped
Fresly ground black pepper
1. Set an oven rack 6 to 8 inches from the heat source and turn on the broiler. On a large rimmed baking sheet, toss the carrots with 2 tablespoons of the olive oil and sprinkle generously with salt. Broil the carrots until they brown and soften, turning them over with a spatula every 5 minutes or so; this should take 15 to 20 minutes.
2. Meanwhile, bring the stock to a boil in a medium saucepan. Add the ginger and sprig of thyme, turn down the heat, and simmer gently for 15 minutes.
3. Just before the carrots are done put the onion in a large saucepan with the remaining 2 tablespoons olive oil and brown over medium heat, stirring frequently. Add the garlic and cook for a minute, then add the carrots.
4. Remove the ginger and thyme from the stock and add the stock to the onions and carrots. Bring to a boil and simmer for 5 to 10 minutes, until the carrots are very soft.
5. Use an immersion or a standard blender to puree the soup until smooth. If the soup seems too thick, add more stock or water and reheat gently. Add salt and pepper to taste.
6. Serve garnished with chopped thyme.


WHAT THE COMMUNITY SAID
EMILYC: “I’ve made many roasted vegetable soups (carrot, squash, and so on), but this one has a nice unique flavor from broiling/charring the carrots.”
JSAEZ: “Simply amazing! I love how healthy, simple, and tasty it is. Thank you.”
TOTALNOMS: “Thank you so much for this delicious recipe! I recently made it as my submission for my company’s monthly Iron Chef competition…and won! The secret ingredient was ginger, so I grated some fresh ginger into the soup after blending, and it really added a great twist.”
TIPS AND TECHNIQUES
A&M: We used a good-quality vegetable stock, and we recommend you do the same—since there are so few ingredients here, each one really counts.
WEEK 27 WILDCARD WINNER
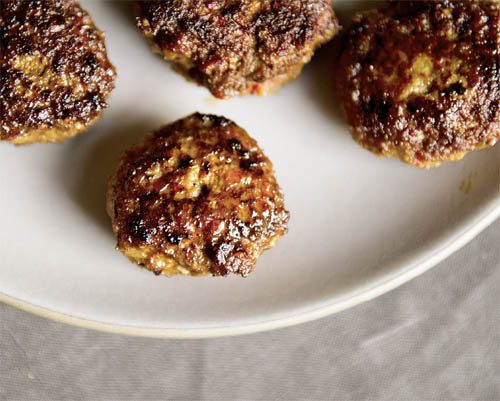
Lamb Merguez
By MrsWheelbarrow / Makes 1 pound bulk sausage (or a coil to serve 4)
WHO: MrsWheelbarrow is a landscape designer in Washington, DC. She blogs at www.mrswheelbarrow.com, where she hosted Charcutepalooza, a year-long charcuterie challenge in 2011.
WHAT: Homemade lamb sausage, perfectly spiced and perfumed with a custom spice blend.
HOW: No need to fuss with casings here: you just mix, make patties, and fry them up.
WHY WE LOVE IT: This recipe reminded us how simple making your own sausage can be. And these are so good—ready to join poached eggs and toast or get stuffed into a pita with tzatziki and fresh veggies.
1 pound freshly ground lamb shoulder
2 garlic cloves, finely minced
1 teaspoon grated fresh ginger
1 tablespoon Spice Mixture (recipe follows)
2 tablespoons harissa (I prefer fresh harissa, as opposed to what is available in a can or a tube)
1 tablespoon tomato paste
Ice water as needed
¼ teaspoon salt, or more to taste
1. Combine all the ingredients except the ice water and salt in the bowl of a stand mixer fitted with the paddle attachment and mix on low speed. Add ice water a tablespoon at a time, mixing until the mixture is well combined. Add salt. (If you have ground the meat yourself, you probably won’t need much ice water.)
2. Form a little patty of the mixture and cook it in a small frying pan over medium-high heat. Taste the patty and adjust the seasoning as you see fit.
3. Cover the mixture and refrigerate for at least an hour, preferably overnight, to help the flavors develop.
4. Dip your hands in ice water as you form sausage patties, about 2 inches in diameter and ½ inch thick. Refrigerate the patties if you are not going to cook them right away. (Or, if you like, you can stuff the sausage mixture into a casing to form a long coil.)
5. Fry the patties in a heavy frying pan over medium-high heat for 3 to 4 minutes per side until browned. (Or grill the merguez coil for 10 to 12 minutes, turning once.)
Spice Mixture
1 tablespoon coriander seeds, toasted
1 tablespoon cumin seeds, toasted
1 tablespoon anise seeds (or fennel seeds in a pinch), toasted
1 tablespoon ground cinnamon (I used Ceylon)
½ to 1 teaspoon cayenne pepper, depending on the spiciness of your harissa
2 teaspoons turmeric
1. Combine all the ingredients and finely grind using a spice grinder or a mortar and pestle. The extra can be stored in a lidded glass jar.
WHAT THE COMMUNITY SAID
CREAMTEA: “I made a big batch of these for a luncheon yesterday, and they were a big hit. I seasoned them with Aleppo pepper instead of cayenne. One guest couldn’t stop eating them! Fortunately there are two patties left over for a midnight nibble—don’t tell.”
BELLA S.F.: “This was really wonderful! I am so looking forward to having the merguez again tonight. You really do need to let it sit for a day to let the flavors infuse.”
TIPS AND TECHNIQUES
A&M: Since harissa brands can vary, we recommend starting with the minimum amount of cayenne and salt in the sausage and searing off a patty to taste test (lucky you!).
MRSWHEELBARROW: “Merguez is traditionally made with lamb. More specifically, it’s made without added fat, so it’s the leanest sausage I know. I did try making it with goat and thought it was great, but leg of lamb is a little lean for the sausage. Shoulder is the best cut—actually, neck! If you’re not grinding it yourself, ask the butcher to grind up lamb stew meat. They make a spectacular dinner party offering with lentils de Puy, crusty bread, and a green salad with figs and Marcona almonds.”
WEEK 28 YOUR BEST LATE-WINTER TART
Tangerine and Almond Shortbread Tart

By lorigoldsby / Serves 12
WHO: lorigoldsby lives in Fishers, Iowa. She made this winning tart recipe on The Martha Stewart Show.
WHAT: Reminiscent of a big, chewy, fragrant Florentine cookie tucked into a rich, buttery crust.
HOW: Make a press-in shortbread crust, fill it with a fragrant caramel filling chock-full of sliced almonds, and bake!
WHY WE LOVE IT: Lori’s technique of applying judicious amounts of juice and/or zest to all of the components ensures a decidedly tangerine-flavored tart.
Tart
2 tangerines
1¾ cups all-purpose flour
1/3 cup confectioners’ sugar
1 teaspoon kosher salt
12 tablespoons (1½ sticks) chilled unsalted butter, diced
½ cup superfine sugar
¼ cup packed dark brown sugar
¼ cup orange blossom honey
1 cup heavy cream
3 cups sliced almonds, toasted
Optional Garnish
1 cup heavy cream
½ teaspoon vanilla extract
1 tablespoon superfine sugar
Small fresh mint sprigs
1. Zest the tangerines and juice them. Chill the juice.
2. Pulse the flour, confectioners’ sugar, salt, butter, and tangerine zest in the bowl of a food processor until combined and the butter pieces are pea-size. Add tangerine juice by the tablespoon, pulsing, until the dough looks like wet sand (reserve the remaining juice). Pulse just until the dough starts to form a ball.
3. Line the bottom of a 10-inch tart pan with a removable base with buttered parchment paper. Pat the dough into the tart pan, being careful to press it up and into the sides. Chill the crust for at least 1 hour, and up to 4.
4. Heat the oven to 375°F.
5. In a heavy saucepan, mix together the superfine sugar, brown sugar, honey, and 2 teaspoons of the reserved tangerine juice and cook over medium-low heat, swirling the pan gently, until the sugars and honey dissolve, then cook for 5 to 7 minutes, until the mixture darkens and caramelizes. (Tip: You can use the leftover tangerine juice mixed with some warm water to brush down the sides of the pan to remove any sugar crystals.)
6. Add the cream, increase the heat to medium, and cook the mixture at a low boil for 8 to 10 minutes, until it is richly caramelized and thick, making sure it doesn’t boil over. Stir in the almonds and spread the mixture in the chilled tart crust.
7. Bake the tart for 30 minutes, then lower the temperature to 350°F and bake for another 15 minutes, or until the crust is richly browned. Cool the tart completely on a rack.
8. To make the optional whipped cream: Whip the cream, vanilla, and sugar together.
9. To serve, remove the sides of the pan and, using a long-bladed spatula, slide the tart off the pan bottom and onto a cake stand or platter. Serve with sweetened whipped cream and a mint garnish.


WHAT THE COMMUNITY SAID
A&M: Don’t be intimidated by the huge pile of almonds you’re instructed to toast—they fit perfectly in our 10-inch tart shell.
STEVEMR: “Came out perfectly, and looked beautiful too. Didn’t last long, though. The ‘one-more-thin-slice’ gremlin decimated it quickly.”
TIPS AND TECHNIQUES
LORIGOLDSBY: “I use superfine sugar out of habit when making caramel or candies. It melts so much more easily, without you having to worry about a grainy texture.”
WEEK 28 WILDCARD WINNER
Roasted Butterflied Chicken with Cardamom and Yogurt

By TasteFood / Serves 2 to 4
WHO: TasteFood resides in the San Francisco Bay Area and blogs at www.tastefoodblog.com. She studied at Le Cordon Bleu and lived in Europe with her family for seventeen years.
WHAT: An everyday roast chicken turned on its head.
HOW: Bathe the bird in a spiced yogurt marinade, butterfly it, and flatten it into a cast iron skillet to roast.
WHY WE LOVE IT: The incomparably crispy skin is brightened by the fragrant rub, a testament to the benefits of grinding whole spices—you get so much more flavor and aroma.
Seeds from 6 cardamom pods
1 teaspoon black peppercorns
2 teaspoons sea salt
1 teaspoon freshly ground coriander
1 teaspoon freshly ground cumin
3 garlic cloves
1 tablespoon olive oil
½ cup whole milk yogurt
1 tablespoon grated fresh ginger
1 tablespoon fresh lemon juice
One 3- to 4-pound chicken, butterflied
Fresh cilantro leaves for garnish
1. Grind the cardamom seeds and peppercorns to a fine powder in a mortar and pestle or a spice/coffee grinder. Stir in the salt, coriander, and cumin, then add the garlic and smash it. Add the olive oil and work everything together to form a paste. Transfer to a small bowl and stir in the yogurt, ginger, and lemon juice.
2. Place the chicken in a large bowl or a baking dish. Rub about half the yogurt mixture between the skin and the meat over the breasts and thighs. Then smear the remaining yogurt all over the chicken, front and back. Refrigerate for at least 3 hours, and up to 24 hours.
3. Thirty minutes before roasting, remove the chicken from the refrigerator and let it sit at room temperature. Heat the oven to 425°F.
4. Place the chicken breast side up in a cast iron skillet or baking pan. Roast for 45 minutes to 1 hour, until the internal temperature of the thickest part of the thigh registers 165°F. Let the chicken rest for 15 minutes before carving.
5. Serve the chicken garnished with cilantro leaves.
WHAT THE COMMUNITY SAID
COOKBOOKCHICK: “The juices from the pan are wonderful over rice.”
EMILYC: “I made this tonight for the first time and absolutely loved it! The marinade is full of flavor and is well balanced—and it’s great to be able to fully prep the chicken the night before. I’ll be making this again and again!”
TIPS AND TECHNIQUES
A&M: If you have only 3 hours to marinate, that’ll do, but in our experience, overnight is well worth the wait. Depending on your oven, you might need to cover the chicken with foil for the last 15 minutes of cooking if it’s getting too brown.
AMANDA: “My easy method for butterflying a chicken: Using poultry shears, cut the backbone out of the chicken. Turn the chicken skin-side up and press down on the breast bone to flatten the chicken.”
WEEK 29 YOUR BEST RECIPE WITH FRESH RICOTTA
Louisa’s Cake

By SML Office / Serves 6
WHO: SML Office is an American art director and graphic designer living in Zurich.
WHAT: An airy, lightly sweet cake suited equally to breakfast and dessert.
HOW: Ricotta, eggs, and plenty of butter give the cake richness, grated apple lends heft, and lemon zest keeps things zippy.
WHY WE LOVE IT: SML Office got the recipe for this cake from Louisa, a family friend in Chianti, and no wonder: only a true Italian nonna could produce something this ethereal from such a simple list of ingredients.
9 tablespoons unsalted butter, at room temperature, plus more for the pan
1¼ cups all-purpose flour, plus more for the pan
1 cup plus 2 tablespoons sugar
3 large eggs
Pinch of salt
1 cup fresh ricotta
Grated zest of 1 lemon
1 tablespoon baking powder
1 apple, peeled, cored, and grated (should yield about 1 cup)
Confectioners’ sugar for dusting (optional)
1. Heat the oven to 400°F. Butter and flour a 9- or 10-inch springform pan.
2. In the bowl of a stand mixer fitted with the paddle attachment, cream the butter and sugar on medium speed until light and fluffy, 3 to 5 minutes. With the mixer on the lowest speed, add the eggs one at a time, mixing well after each addition. Add the flour, then add the salt, ricotta, lemon zest, baking powder, and apple, mixing well after each addition.
3. Scrape the batter into the prepared pan and smooth the top. Bake for 25 to 35 minutes, until the cake is golden brown and is starting to pull away from the sides of the pan. Cool in the pan on a wire rack for 10 minutes.
4. Turn the cake out of the pan and cool completely on the rack.
5. Sift confectioners’ sugar over the top of the cake and/or serve with your favorite seasonal fruit.

WHAT THE COMMUNITY SAID
LOUISA: “I made this cake last week—doubled the recipe and baked it in a Bundt pan. It looked and tasted wonderful and was fragrant and delicious. Everybody loved it, and it was even better the second and third day.”
PHINNEYCOOK: “This is a great cake! Beautiful, dense, moist, and the perfect foil for a fruit topping, either fresh or compote. I served it last night with fresh figs…perfect.”
RYANBISSOON: “Such a simple, elegant, and delicious cake. It’s excellent just on its own, but I’ve also used it as the layers for a strawberry shortcake. Amazing!”
WEEK 29 WILDCARD WINNER
Grandma DiLaura’s Ricotta Gnocchi

By cdilaura / Serves 4
WHO: cdilaura now works at Food52 and blogs at www.8ateATeight.com.
WHAT: Foolproof homemade gnocchi, perfect for a weeknight dinner.
HOW: Mix, shape, boil, and dinner’s on the table in a flash.
WHY WE LOVE IT: These light ricotta dumplings won’t weigh you down like their potato-based counterparts. We love them nearly bare—just tossed in some brown butter—so you really taste the ricotta and speckles of nutmeg.
1 pound fresh whole milk ricotta
1 large egg
1 tablespoon olive oil
¼ cup finely grated Parmesan cheese, plus more for serving
Freshly grated nutmeg
2 cups all-purpose flour, sifted, plus more for rolling the dough
Salt
Browned butter or other sauce of your choice
1. In a large bowl, mix together the ricotta, egg, and olive oil. Add the Parmesan and a few sprinkles of nutmeg to taste. Add the flour a little at a time, stirring until the dough comes together.
2. Dump the dough out onto a generously floured surface and work it with your hands to bring it together into a ball. Add more flour as necessary until the dough is smooth and no longer sticks to your hands.
3. Cut slices of dough as if you’re cutting a loaf of bread and roll each one into a rope about as thick as your thumb by spreading your hands and fingers and rolling from the center out to the ends of the rope.
4. Line up 2 ropes parallel to one another and cut them into 1-inch pieces. Gently roll a piece down the back of a fork to make an impression in the gnocchi to help hold the sauce, and transfer to a lightly floured or nonstick baking sheet. Repeat with the remaining pieces, then put them in the freezer while you make the rest of the gnocchi. (If you plan to save any gnocchi for future use, allow them to freeze entirely on the baking sheet, then store in a zip-top bag.)
5. When you’re ready to cook the gnocchi, bring a large pot of generously salted water to a boil over high heat. Add the gnocchi to the boiling water in batches and gently stir once with a wooden spoon to create movement and prevent the gnocchi from sticking to the bottom of the pot. As they rise to the top (a sign they are cooked), scoop them out with a strainer or a wire skimmer and place in a warm serving bowl, shaking off the excess water.
6. To serve, gently toss the gnocchi in brown butter (or other sauce) in a large sauté pan, and return to the serving bowl. (Alternatively, scoop some warm sauce on top of each layer of gnocchi as you place them in the bowl to eliminate the need to stir them with the sauce at the end and risk damaging or smashing them.) Sprinkle grated Parmesan generously over the top and serve.
WHAT THE COMMUNITY SAID
CURIOUSANYONE: “So bloody easy to make. You’ll never make the potato version again! Easily something that could be made on a weeknight, no problem. I served mine with roasted mushrooms and white truffle butter.”
SPAETZLEGIRL: “I made these last night, and the thrill of eating one’s own homemade gnocchi should not be underestimated. Great recipe; I have a feeling I’ll be doing these again and again.”
TIPS AND TECHNIQUES
CDILAURA: “Freezing the Gnocchi is not necessary if you’re cooking them right away, but it does help prevent them from sticking together when you add them to the water. All you really need is about 10 to 15 minutes to give them a chance to firm up on the outside before dropping them in the pot.”
WEEK 30 YOUR BEST DISH YOU (INTENTIONALLY) SET ON FIRE
Flamin’ Cajun Shrimp

By fiveandspice / Serves 2 to 4
WHO: fiveandspice is a grad student in food policy and a self-dubbed Renaissance woman living in Boston.
WHAT: Tender, garlicky shrimp that skew more toward gumbo than other boozy shrimp dishes like scampi.
HOW: The shrimp get a quick marinade of herbs and spices before they are cooked in a wash of butter, garlic, shallot, lemon juice, and Worcestershire. A generous hit of cognac, a quick flame job, and another swirl of butter finish off the dish.
WHY WE LOVE IT: The Worcestershire and paprika give the sauce an earthy quality, while the cognac envelops the shrimp like a warm, sweet blanket. And we love any recipe that embraces the ritual of peel-and-eat.
25 to 30 large shrimp (3 to 4 pounds) in the shell (though this also works with peeled shrimp, if you must)
1 teaspoon sweet paprika
¾ teaspoon freshly ground black pepper
½ teaspoon salt
¼ teaspoon dried oregano
1/8 teaspoon dried thyme
1/8 teaspoon cayenne pepper
Grated zest of ½ lemon
5 tablespoons unsalted butter, cut into chunks
4 garlic cloves, finely minced
1 tablespoon minced shallot
3 tablespoons fresh lemon juice
3 tablespoons Worcestershire sauce
¼ cup cognac or other brandy
French bread for serving
1. In a large bowl, combine the shrimp with the paprika, pepper, salt, oregano, thyme, cayenne, and lemon zest and toss to coat well.
2. In a large frying pan, heat 2 tablespoons of the butter over medium-high heat until foaming. Stir in the garlic, shallot, lemon juice, and Worcestershire sauce and sauté for 2 to 3 minutes, until the garlic and shallot have softened. Add the shrimp and sauté until just turning pink, about 3 minutes.
3. Carefully tilt the pan away from you, pour in the cognac with a ladle, and use a long match or a long-handled lighter to light the cognac, then let it blaze out—this should take only 15 seconds or so. (I once had a friend add way too much cognac to a flambé and the fire just kept going and going—if this happens, please just blow it out!)
4. Take the pan off the heat and stir in the remaining 3 tablespoons butter until it melts. Serve with lots of crusty French bread, a big green salad (heck, why not eat that with your fingers too?), and some cold beer.


WHAT THE COMMUNITY SAID
FIVEANDSPICE: “Actually, I think the spicing of these shrimp is a little more Creole than Cajun, but that doesn’t make a slant rhyme with flamin’, now does it? You can use peeled shrimp, but I really recommend shell-on shrimp because the shrimp meat cooks to a nicer texture, while the sauce also winds up with better flavor.”
BRICKSOJ: “Made this over the weekend for a dinner party—amazing. The best part was sopping up the sauce with warm French bread. Will definitely add into heavy rotation in my kitchen!”
LORIGOLDSBY: “We make a very similar dish with dark beer—but, like a fool, I’ve been peeling the shrimp for everyone!”
WEEK 30 WILDCARD WINNER
Grown-Up Birthday Cake

By Midge / Makes enough for a birthday party (serves 8 to 10)
WHO: Read more about Midge and see her recipe for Burnt Caramel Pudding; see her recipe for Okonomiyaki.
WHAT: A sweet spongy cake filled with jam and iced with a rich chocolate buttercream.
HOW: Make a classic two-layer sponge cake, adding white wine and olive oil to the batter, then quickly assemble with jam and a chocolate icing.
WHY WE LOVE IT: Olive oil and wine make the cake fruity and complex (do use good ones, as you’ll taste all of their delicious nuances); the jam layer swings in with a little flash and tartness; and the thin coat of creamy chocolate icing seals the deal.
Cake
Butter for the pans
2½ cups all-purpose flour, plus more for the pans
½ teaspoon salt
1 tablespoon baking soda
2 cups sugar
4 large eggs
1 teaspoon vanilla extract
1 cup dry white wine
1 cup olive oil
1 cup raspberry jam (preferably homemade, of course, but I use Bonne Maman)
Chocolate Buttercream Icing
8 tablespoons (1 stick) unsalted butter, at room temperature
1 cup confectioners’ sugar
½ cup Dutch-processed cocoa powder
¼ cup whole milk
1 teaspoon vanilla extract
1. To make the cake: Heat the oven to 350°F. Butter and lightly flour two 9-inch round cake pans.
2. Sift the flour, salt, and baking soda into a bowl. Set aside.
3. In the bowl of a stand mixer fitted with the paddle attachment, beat the sugar and eggs on medium-high speed for a minute. On low speed, mix in the vanilla, wine, and oil. Remove the bowl from the mixer stand and, using a rubber spatula, gently fold the dry ingredients into the batter just until smooth.
4. Pour the batter into the prepared pans. Bake for 25 to 30 minutes, until a cake tester inserted in the center comes out clean. Cool the cakes in the pans on wire racks.
5. To make the icing: Using a stand mixer or a hand mixer, cream together the butter and sugar until light and fluffy. Mix in the cocoa powder, then gradually add the milk, beating until it looks like icing. Mix in the vanilla.
6. To assemble the cake: Spread a layer of jam over the top of one of the layers, then top with the other layer. Frost the top with the icing.
WHAT THE COMMUNITY SAID
MIDGE: “I’ve used reasonably priced Grüner Veltliner and French Sauvignon Blanc. My sister likes to use Chardonnay. Really, whatever you like to drink and have on hand!”
FRAN MCGINTY: “Made this but used an orange olive oil. I didn’t know how it would work with the wine, but it was fabulous! The orange and chocolate went very well together. I made the chocolate frosting and added some grated orange zest to it. I used apricot jam. I am going to have fun playing with this one.”
TIPS AND TECHNIQUES
A&M: Line your cake pans with parchment circles to make sure the layers turn out without a hitch. And if you run into any trouble with lumps in the icing, just whisk like mad till it smooths out.
WEEK 31 YOUR BEST RECIPE WITH HORSERADISH
Herbed Beef Skewers with Horseradish Cream

By Oui, Chef / Serves 2 to 3
WHO: Read more about Oui, Chef and see his recipe for Roasted Red Pepper Soup with Corn and Cilantro.
WHAT: A clever riff on the traditional Sunday rib roast.
HOW: Marinated sirloin strips are threaded onto rosemary sprigs before meeting up with a hot grill pan. While the steak marinates, you whip up a bright, creamy horseradish sauce.
WHY WE LOVE IT: These sirloin roll-ups are tender and succulent, and the rosemary skewers make for a pretty sensational presentation; the horseradish cream is both tangy and lush.
Marinade
2 tablespoons Dijon mustard
2 garlic cloves, minced
1 tablespoon soy sauce
1 teaspoon minced fresh thyme
1/8 teaspoon pimentón (sweet smoked paprika)
1/3 cup extra virgin olive oil
Horseradish Cream
½ cup crème fraîche
2 tablespoons heavy cream
2 to 3 tablespoons prepared horseradish (to taste)
Finely grated zest of 1 lemon
Kosher salt and freshly ground black pepper
A few pink peppercorns (optional)
Beef Skewers
1 sirloin steak (3 to 4 pounds), about 1½ inches thick
3 long, sturdy rosemary sprigs (or metal skewers)
About 12 large fresh basil leaves
Canola oil
Maldon salt or fleur de sel
1. To make the marinade: Whisk together the mustard, garlic, soy sauce, thyme, pimentón, and olive oil in a bowl. Set aside. (This will make enough marinade for 2 steaks.)
2. To make the horseradish cream: Whisk together the crème fraîche, cream, horseradish, and lemon zest. Season to taste with salt and pepper. Sprinkle with a few pink peppercorns if you have them. Cover and refrigerate until ready to serve.
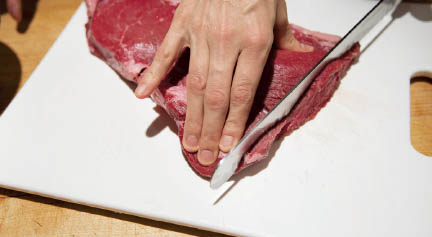
3. Slice the sirloin against the grain into 1/8-inch-thick planks (it helps to throw the steak into the freezer to firm up for 45 minutes to 1 hour before you attempt to slice it this thin). Brush each slice of steak on both sides with the marinade and place on a platter. Cover and refrigerate for 1 hour. (Reserve the remaining marinade for another use.)
4. Prep the rosemary skewers by pulling off the lower leaves and sharpening the naked ends of the sprigs with a paring knife. Lay the marinated steak strips on a cutting board and top each with a fresh basil leaf. Roll up tightly and skewer onto the rosemary sprigs, leaving some breathing room between each roll. Wrap the exposed rosemary leaves in aluminum foil to keep them from getting totally charred when you cook the skewers.
5. Heat a grill pan over high heat, and when it is very hot, coat with a thin layer of canola oil. Lay the skewers in the pan with the foiled ends hanging out, lower the heat a touch, press the meat down against the pan with tongs, and cook for 1½ to 2 minutes per side, flipping once.
6. Remove the skewers to a cutting board, sprinkle lightly with Maldon salt, and serve with the horseradish cream.


WHAT THE COMMUNITY SAID
LASTNIGHTSDINNER: “My husband made these Saturday night, and we loved them. I was scooping up that horseradish cream with the beef, my roasted potatoes, and, yes, my fingers! What a great dish.”
TIPS AND TECHNIQUES
A&M: It’s up to you and your taste buds, but we used the maximum amount of horseradish. Because that’s how we roll.
OUI, CHEF: “I cooked mine on a gas cooktop in a Le Creuset grill pan, though I’m sure they would be fine on an outdoor grill if that is what you choose. I found that at 1½ minutes per side, the inside was nicely medium-rare but the outside wasn’t overdone. Slicing the meat thin and against the grain helps the outer layer of the roll maintain a tender feel, even though it does cook more. You may want to cook a lone roll with a toothpick through it first, to get the timing right.”
WEEK 32 YOUR BEST DUMPLINGS
Afghan Dumplings with Lamb Kofta and Yogurt Sauce

By Katie Morford and Humaira Ghilzai / Serves 5
WHO: Katie is a food and nutrition writer who blogs at www.momskitchenhandbook.com; Humaira is a cultural consultant and founder of Afghan Friends Network. Together they write the blog www.afghancooking.net.
WHAT: An Afghan dish (known as aushak) much like a meaty ravioli, only deconstructed.
HOW: Wonton wrappers are filled with a sharp, peppery scallion paste, and then both a cooling yogurt sauce and a warmly spiced tomato lamb ragu are spooned across the top.
WHY WE LOVE IT: According to Katie and Humaira, “Aushak is traditionally made in community: Families gather and assemble the dumplings.” The magical part? All of the pieces come together swiftly, so then you can all sit down and enjoy each other’s company.
Dumplings and Kofta
¼ cup extra virgin olive oil
1 large yellow onion, finely chopped
2 garlic cloves, minced
1 pound ground lamb
1 cup tomato sauce
2½ teaspoons kosher salt
1½ teaspoons sweet paprika
1½ teaspoons ground coriander
½ teaspoon freshly ground black pepper
1 pound scallions
½ teaspoon red pepper flakes
About 25 wonton wrappers
1 teaspoon white vinegar
Sauce
1 cup plain whole milk yogurt
½ teaspoon dried ground granulated garlic
½ teaspoon kosher salt
1 tablespoon dried mint
1. In a large sauté pan, heat 3 tablespoons of the olive oil over medium heat. Add the onion and sauté until tender and translucent, 3 to 5 minutes. Add the garlic and sauté for another minute. Add the lamb and sauté until cooked through, breaking up the lumps with the back of a spoon. Add the tomato sauce, 1½ teaspoons of the salt, the paprika, coriander, and pepper and cook over low heat, stirring regularly, for 20 minutes. Set aside.
2. While the meat is cooking, trim the root ends off the scallions and finely chop them, including both white and dark green parts; a food processor is useful here. Heat the remaining tablespoon of olive oil in a large sauté pan over medium heat. Add the scallions, the remaining 1 teaspoon salt, and the red pepper flakes, turn the heat to low, and cook until the scallions are tender, about 10 minutes. Set aside, covered, and keep warm.
3. To assemble the dumplings: Fill a small bowl with water and put it at your work station. Set a wonton wrapper on your work surface, dip your finger into the water, and moisten the edges of two connecting sides of the wrapper (the water will serve as glue for the dumpling). Put about a teaspoon of sautéed scallions in the center of the wrapper. Fold the dough over in the shape of a triangle and use the tip of your finger to firmly press the edges of the dough together to form a tight seal. Next, lift the two longest points of the triangle, moisten them and press them together, creating a little circle over the dumpling (it will look like a fancy napkin fold). Repeat with the remaining wrappers.
4. Meanwhile, bring a large pot of water to a gentle boil.
5. Add the vinegar to the boiling water, then add the dumplings and boil until the wontons are tender, about 4 minutes.
6. While the dumplings are cooking, make the sauce: Stir together the yogurt, dried garlic, and salt in a bowl.
7. Gingerly scoop the cooked dumplings out of the water with a slotted spoon, a few at a time, and arrange them on a large warm platter. Spoon the yogurt over the dumplings and the ground meat on top of that. Sprinkle with the dried mint and serve immediately.


WHAT THE COMMUNITY SAID
HOLLOWLEG: “This was amazing. And I added some of the leftover garlic yogurt to my scrambled eggs this morning. Some of the best scrambled eggs I’ve ever made!”
SAM1148: “That’s a wonderful recipe. I think it would make a great bento box lunch item, packing the sauce in the little compartments and the dumplings and meat in the main container for rewarming.”
WEEK 33 YOUR BEST MUSHROOMS
Morel Crostini

By Waverly / Serves 4 to 6
WHO: Waverly, formerly a lawyer, is now a mother living in Texas. She blogs at www.peaceandloveinthekitchen.com.
WHAT: A simple and versatile preparation for fresh morels.
HOW: Sauté the morels in butter with lemon juice, sliced leeks, and herbs, then use them to top homemade crostini along with some soft goat cheese.
WHY WE LOVE IT: When we announced this contest, we were hoping someone would submit a recipe that really embraced the rich, loamy quality of morels, rather than dousing them in cream or mixing them with other types of mushrooms, and this dish does just that.
Toasts
1 baguette, thinly sliced
Extra virgin olive oil
Topping
3 tablespoons unsalted butter
6 ounces fresh morels, cleaned and sliced lengthwise
2 teaspoons fresh thyme leaves
Salt and freshly ground black pepper
¾ cup thinly sliced leeks (white and pale green parts only)
1 teaspoon fresh lemon juice
2 tablespoons roughly chopped fresh flat-leaf parsley
Soft goat cheese
1. To make the toasts: Heat the oven to 350°F.
2. Arrange the sliced bread on a baking sheet and brush each slice with olive oil. Bake until the bread is lightly toasted, 10 to 15 minutes. Arrange the toasts on a serving tray.
3. In a large skillet, melt the butter over medium-high heat. Add the morels and sauté for 2 to 3 minutes, until they soften. Add the thyme, season with salt and pepper, and sauté until the morels are tender, about 3 minutes.
4. Add the leeks and sauté until soft, 3 to 4 minutes more. Stir in the lemon juice and parsley. Season to taste with salt and pepper.
5. Pour the mixture into a small serving bowl and put the bowl on the serving tray with the toasts. Put the goat cheese on the serving tray. Let everyone assemble their own crostini: Smear a bit of goat cheese on toast, then top with a spoonful of morels.


WHAT THE COMMUNITY SAID
WAVERLY: “You can use this delicious concoction many ways—in an omelet, over pasta, or as a side to beef.”
BOULANGERE: “The bright spring flavors here are lovely.”
OUI, CHEF: “Morels are precious, which is why if you are lucky enough to score some lovely fresh ones, you should put them to their highest and best use in a recipe like this one.”
WEEK 34 YOUR BEST RECIPE WITH COFFEE
Late-Night Coffee-Brined Chicken

By gingerroot / Serves 4
WHO: Read more about gingerroot and see her recipe for Roasted Radish and Potato Salad with Black Mustard and Cumin Seeds; see her recipe for Chèvre Devils.
WHAT: We nicknamed this recipe Breakfast Chicken, since it includes the morning triumvirate: coffee, orange juice, and milk.
HOW: You brine a whole chicken in spiced coffee and orange juice, rub it with brown sugar and brown the skin, and then cook it in milk.
WHY WE LOVE IT: Like pork braised in milk, gingerroot’s roast chicken emerges from the pot tender and melting, and it has a beautiful burnished exterior wherever the skin hasn’t been submerged in the liquid. The smoky flavor is subtle but discernable—and unlike anything we can recall.
Brine
½ cup kosher salt
2 teaspoons black peppercorns
3 star anise
1 teaspoon whole cloves
2 juicy navel oranges, halved
2 cups hot strong coffee
3 cups ice cubes
Chicken
One 4- to 5-pound chicken, preferably organic
2½ tablespoons brown sugar
1½ tablespoons unsalted butter
2 cups 1% milk
1. To make the brine: Combine the salt, peppercorns, star anise, and cloves in a medium saucepan. Lightly crush the spices with the back of a large spoon. Squeeze the oranges over the spices, then add the orange halves themselves. Pour the coffee over the mixture, stir, and cover the pan. Allow the brine to steep for 10 minutes.
2. Meanwhile, pat the chicken dry. Place the chicken in a 2-gallon plastic bag.
3. Put the ice in a large bowl. Add the coffee brine and stir until the ice melts. Pour the brine (including the orange halves) into the bag with the chicken, seal the bag, and allow to sit at room temperature for 2 to 3 hours.
4. Remove the chicken from the brine, pat dry, and put in a large bowl. Let dry out for an hour in the refrigerator.
5. Heat the oven to 375°F.
6. Remove the chicken from the refrigerator and pat dry. Rub all over with the brown sugar.
7. Melt the butter in a Dutch oven or other heavy ovenproof pot over medium heat and brown the chicken well all over.
8. Add the milk, cover the pot, and transfer it to the oven. Cook for 1 hour, then remove the lid and continue to cook for another 20 to 40 minutes, or until the internal temperature of the chicken thigh registers 165°F.
9. Serve the chicken whole, or pull the meat off the bones and serve with wilted greens and rice. Be sure to spoon some of the cooking liquid over the meat.

WHAT THE COMMUNITY SAID
JONAHGAIL: “I’ve been dreaming about this recipe since you posted it, and the chicken defrosting in my fridge whispered the same thing to me: ‘It’s now or never.’ So, despite the blistering heat wave, I turned on the oven and brined me a bird…and, wow, was it ever worth it! (And, as an added bonus, the stock made from the carcass was also amazing!)”
MOTHERWOULDKNOW: “With a shorter brining time than most brined-poultry recipes, it’s doable for the folks like me who can’t get it together to prepare a brine the night before.”
WEEK 35 THE RECIPE YOU WANT TO BE REMEMBERED FOR
Sunday Pork Ragu

By cookinginvictoria / Serves at least 4, with lots of leftover sauce
WHO: cookinginvictoria is an editor, writer, and mom who lives in Victoria, British Columbia.
WHAT: An old-school pork ragu that calls for actual bones.
HOW: Roast the pork bones with both hot and sweet sausage before bathing them in tomatoes and aromatics and then letting everything bubble gently for several hours.
WHY WE LOVE IT: It’s uncomplicated, and nothing is done without good reason. It’s a Sunday sauce worthy of passing on.
12 ounces meaty pork rib bones, cut into approximately 2-inch pieces (have your butcher cut them)
Salt
5 links sweet Italian sausage, casings removed
3 links spicy Italian sausage, casings removed
2 tablespoons extra virgin olive oil
1 medium yellow onion, cut into medium-small dice
6 small garlic cloves, coarsely chopped
One 5½-ounce can tomato paste
Two 28-ounce cans whole tomatoes
1 bay leaf
Freshly ground black pepper
½ cup chopped fresh flat-leaf parsley
1 pound dried pasta (rigatoni or penne rigate are best)
½ cup freshly grated Pecorino Romano cheese, plus more for serving
½ cup fresh basil leaves, cut into chiffonade
1. Heat the oven to 400°F.
2. Line a rimmed baking sheet with aluminum foil. Put a baking rack over the foil and arrange the bones on the rack. There should be a little space between them. Sprinkle with ½ teaspoon salt. Roast the bones for 30 to 40 minutes (you may have to turn any bigger pieces halfway through), until nicely browned and caramelized. Remove the pan from the oven and use tongs to transfer the ribs to a paper-towel-lined plate. Set the pan aside.
3. Slice each sausage link into 4 pieces (or simply pinch off chunks of sausage). Set the pieces of sausage on the rack (no need to wash it in between) and roast for about 30 minutes, or until browned and caramelized.
4. Heat a large Dutch oven over medium-low heat. Add the olive oil. When the oil has warmed, add the onion and sauté until just beginning to turn golden brown, about 10 minutes, stirring occasionally with a wooden spoon. Add the garlic and stir frequently until the aroma becomes heady and fragrant (watch carefully to make sure the garlic doesn’t brown too quickly). Clear a spot in the pot with your wooden spoon, add the tomato paste (reserving the can) to the spot, and sauté for 1 to 2 minutes, just until it begins to release its fragrance. Mix the tomato paste into the onion and garlic mixture, then fill the tomato paste can with water and add it to the pot.
5. Drain the juice from the canned tomatoes and reserve about a cup of it. Add the bay leaf and the drained tomatoes to the pot: You can add the tomatoes whole—they will cook down; or simply cut each tomato into about 4 pieces with kitchen shears before adding them to the pot. Bring the mixture to a simmer and add the pork bones and sausages, nestling them carefully into the sauce. Lower the heat and cook at a low simmer for about 2 hours, stirring occasionally. During the first hour of cooking, if the sauce in the pan begins to reduce too much, add the reserved tomato liquid as needed. After the first hour of cooking, add water to the sauce instead if it’s looking too thick. The sauce will smell wonderful as it cooks, infusing your home with pork and tomato aromas. Inhale and savor, and pour yourself a glass of your favorite red wine.
6. After about 2 hours of cooking, begin to add salt to the sauce, about 1 teaspoon at a time; let the sauce cook for about 15 minutes each time before tasting and adding more. Add a few grinds of black pepper and the parsley. Taste and adjust the seasonings until the flavors are to your liking. The total cooking time should be at least 2½ to 3 hours, but, honestly, you cannot cook this sauce too much. The longer it simmers, the better it will taste.
7. Meanwhile, about half an hour before you are ready to eat, fill a large pot with water. Bring to a boil and add a tablespoon or two of salt. Taste it and see if you can taste the salt—if you can’t, add a little more. When the water is rapidly boiling, add the pasta. Give it a good stir with a slotted spoon and bring back to a boil. Cook for about 8 minutes, then begin tasting the pasta. When it is al dente, drain it, reserving a cup or two of the cooking water.
8. If the sauce looks too thick, add a ladleful or two of pasta water. Warm a big serving bowl with some of the pasta water, then drain it. Add a ladleful of sauce to the bowl. Top with a tablespoon or two of pecorino. Add a few large spoonfuls of pasta. Top with sauce, more cheese, and a sprinkling of basil. Add another layer of pasta, sauce, cheese, and basil. Keep layering the ingredients, then arrange the bones and sausage around the edges of the bowl. Top with a handful of basil and more cheese.
9. Serve the ragu with additional grated cheese and basil. Pour some red wine, and serve with warm bread. Enjoy!

WHAT THE COMMUNITY SAID
GINGERROOT: “I made this yesterday for Mother’s Day dinner, and what a lovely way to spend the day! The aroma as the ragu bubbles away is amazing and definitely had everyone eager for dinner. Everyone was rewarded for their patience—it was so good!! I was able to source neck bones, and you’re right: Enjoying them is a wonderful part of this recipe. Thank you again for sharing this. My family will enjoy this for years to come.”
TIPS AND TECHNIQUES
A&M: You can pluck out the bones before serving, but we preferred to leave them in—just make sure to warn your eaters!
WEEK 36 YOUR BEST SQUID OR OCTOPUS RECIPE
Sweet-and-Spicy Calamari

By SouffleBombay / Serves 6
WHO: SouffleBombay lives in Pennsylvania. She coauthored a cookbook for kids called Picture Me Cooking.
WHAT: A delicate version of fried calamari with a lively chile dipping sauce.
HOW: The calamari is simply tossed in flour, salt, black pepper, and cayenne before frying, allowing it to take center stage. The chile sauce is spiked with honey and sesame oil.
WHY WE LOVE IT: We liked SouffleBombay’s technique of soaking the calamari rings in club soda before dredging them in the seasoned flour—it seemed to firm up the rings (in a pleasant way) before frying. The crisp coating is thin and delicate, swaddling the calamari like a silk scarf rather than a wooly muffler.
Calamari
¾ cup club soda
1 pound calamari tubes (frozen is fine), sliced into rings about ¼ inch wide
1 cup all-purpose flour
½ teaspoon cayenne pepper
3 dashes each salt and freshly ground black pepper
Vegetable oil for deep-frying
Sesame seeds for garnish (optional)
Sauce
¼ cup chile garlic sauce
6 tablespoons honey
½ teaspoon Asian sesame oil
1. Pour the club soda into a medium bowl, add the calamari rings, and stir until all are submerged. Let sit for 10 minutes.
2. Meanwhile, combine the flour, cayenne, salt, and pepper in another medium bowl and toss until combined. Set aside.
3. To make the sauce: In a small bowl, combine the chile garlic sauce, honey, and sesame oil. Mix well and set aside.
4. Drain the calamari and blot dry.
5. Heat 1 to 2 inches of oil to 375°F in a deep heavy pot. Dredge the rings in the flour mixture and set on a plate. Add one-quarter of the calamari to the hot oil and fry for 1½ to 2 minutes, or until golden; don’t overcrowd the pot. Using a slotted spoon, lift out the calamari, put on a paper-towel-lined plate, and blot gently. Repeat.
6. Toss the calamari with the sauce and garnish with sesame seeds if you happen to have them on hand, or serve the sauce alongside the calamari. Enjoy!


WHAT THE COMMUNITY SAID
CHEFMOMMY: “I think this would be an excellent appetizer for someone who has never tried squid such as myself. I love the sweet-spicy combination as well as the delicate crunch of the calamari rings.”
WEEK 37 YOUR BEST SPRING VEGETABLE RECIPE
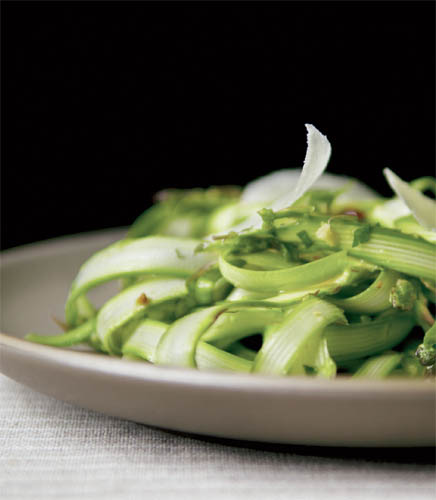
Shaved Asparagus and Mint Salad

By meatballs&milkshakes / Serves 4
WHO: meatballs&milkshakes lives in New York. She blogs at www.meatballsandmilkshakes.wordpress.com.
WHAT: A crisp, bright salad of shaved asparagus, Parmesan, mint, and hazelnuts.
HOW: Get out your keenest vegetable peeler. It does double duty here, first with the asparagus and then with the Parmesan cheese.
WHY WE LOVE IT: The pert, woodsy flavor of asparagus is sometimes lost once it’s cooked—this salad preserves that flavor, and the long ribbons give each bite a wholesome crunch.
1 bunch asparagus, tough ends removed
A handful of roughly chopped toasted hazelnuts
1 tablespoon chopped fresh mint
3 tablespoons fresh lemon juice
2 tablespoons sherry vinegar
1 teaspoon honey
3 tablespoons extra virgin olive oil
Salt and freshly ground black pepper
A chunk of Parmesan or pecorino cheese for shaving
1. Using a vegetable peeler, shave the asparagus lengthwise into long strips. Toss in a bowl with the hazelnuts and mint.
2. In a small bowl, whisk together the lemon juice, vinegar, honey, and olive oil. Pour the dressing over the asparagus and toss gently, adding salt and pepper to taste. Shave some Parmesan on top and serve.

WHAT THE COMMUNITY SAID
MEATBALLS&MILKSHAKES: “This also makes fantastic leftovers the next morning. Just put a little on top of a buttered, toasted piece of nice bread or brioche, and top with a poached or fried egg and a little more of the vinaigrette.”
LMAYB6: “Love the idea of shaved asparagus for the foundation of a salad. It puts a whole new twist on salad greens!”
NANP: “This is my new favorite late-spring and summer meal. I add ribbons of summer squash to give some color contrast.”
WEEK 38 YOUR BEST DIRT-CHEAP DINNER
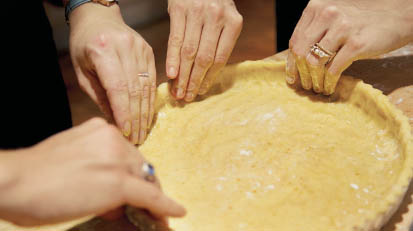
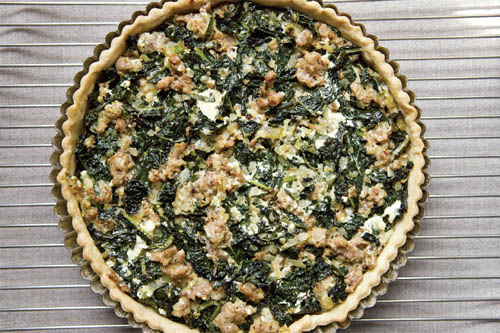
Sausage and Kale Dinner Tart
By My Pantry Shelf / Serves 6
WHO: My Pantry Shelf is a science teacher living in Sonoma County, California. She blogs at www.mypantryshelf.com.
WHAT: A lazy meal in its own right that makes for an instant dinner party—all that’s needed is a big green salad and plenty of wine.
HOW: A flaky pastry base and judicious amounts of ricotta, white wine, and fresh basil go a long way in dressing up the rustic kale and sausage filling.
WHY WE LOVE IT: You can impress dinner guests without chipping away at your bank account: This beauty coaxes luxury out of spare ingredients and bends readily to adaptation, depending on what looks good at the market and what you have on hand.
Tart Shell
8 tablespoons (1 stick) chilled unsalted butter, cut into small cubes
1½ cups all-purpose flour, plus more for rolling
Pinch of salt
3 to 4 tablespoons ice water
Filling
1 tablespoon olive oil
1 tablespoon unsalted butter
2 cups minced onions
2 garlic cloves, minced
Salt and freshly ground black pepper
8 ounces sweet Italian sausage, casings removed
1 large bunch dinosaur (or cavalo nero) kale, stemmed and roughly chopped
¼ cup dry white wine
½ cup fresh basil leaves, slivered
1 large egg
¼ cup ricotta or other fresh cheese, such as feta or goat cheese
1. To make the tart shell: Combine the butter, flour, and salt in the bowl of a food processor. Pulse until the butter is in pea-sized pieces. While pulsing, slowly drizzle the ice water through the top feed tube into the food processor; you have added enough water when the dough sticks together when pressed.
2. Remove the dough and shape it gently into a disk. Wrap the disk in plastic and chill for at least 30 minutes.
3. Unwrap the dough and place it on a lightly floured board. Using a floured rolling pin, roll the dough into a circle about 12 inches in diameter. Press it gently into the bottom and up the sides of a 10-inch tart pan with a removable bottom. Prick the bottom of the crust all over with a fork. Lay a piece of parchment paper or foil over the dough and fill it with beans or pie weights. Refrigerate for at least 20 minutes.
4. Heat the oven to 400°F.
5. Bake the tart shell for 20 minutes, then remove the parchment and weights and bake for an additional 5 minutes, or until the crust no longer looks wet and has begun to brown. Set the tart shell on a rack to cool while you prepare the filling. Leave the oven on.
6. To make the filling: Heat the oil and butter in a large skillet over medium heat. Once the butter melts, add the onions and garlic, reduce the heat to medium-low, and cook until the onions are soft and light brown, 5 to 7 minutes. Season with salt and pepper. Remove the onions with a slotted spoon and place in a large bowl.
7. Increase the heat to medium and add the sausage. Brown it well, breaking it up into small pieces, about 5 minutes. Remove the sausage from the pan and put in the bowl with the onions. Drain all but 1 tablespoon of the fat from the pan.
8. Add the kale to the pan. Pour the wine over the kale, scrape up any bits from the bottom of the pan, and cover it. Cook for 3 to 5 minutes, until the kale is wilted. If the kale is still very wet, cook it uncovered for another minute or two, until it’s quite dry. Season with salt and pepper.
9. Add the kale to the onions and sausage, toss everything together, and allow the mixture to cool for 5 minutes.
10. Add the basil, egg, and ricotta to the kale mixture and toss gently to combine. Season with salt and pepper. Spoon the mixture into the cooked tart shell, making sure to cover the bottom evenly.
11. Put the tart on a baking sheet and bake for 10 to 15 minutes, until the filling is set and the tart shell is nicely brown. Cool the tart for a few minutes on a wire rack, then slice and serve.


WHAT THE COMMUNITY SAID
DABBLINGS: “I made this tonight for dinner using some homemade Italian sausage and some of the first kale of the season from our garden. My two-year-old son liked it so much he put down his dessert and asked for more. Thanks for sharing!”
MARIARAYNAL: “I made this yesterday, and it was wonderful. Just wonderful. It would be excellent at brunch as well, and I also think the filling would be terrific over pasta.”