THERE ARE ONLY A FEW SPECIALIST TOOLS YOU WILL NEED TO GET STARTED ON YOUR CREATIVE JOURNEY WITH WEAVING, AND THE TECHNIQUES ARE ALL VERY SIMPLE.
This list outlines the essentials and how they are used to create woven projects.

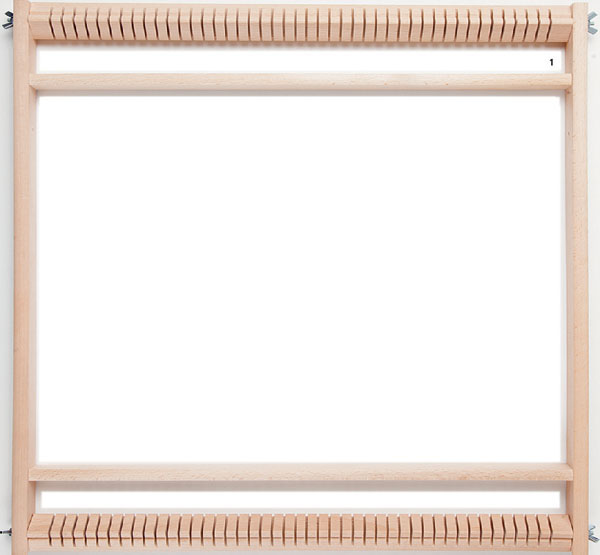
WEAVING LOOM (1)
This is the frame onto which the foundation warps are secured and which will hold the weaving as you work. You can make a simple frame (see page 8) or buy an inexpensive one if you are new to the craft (see page 8).
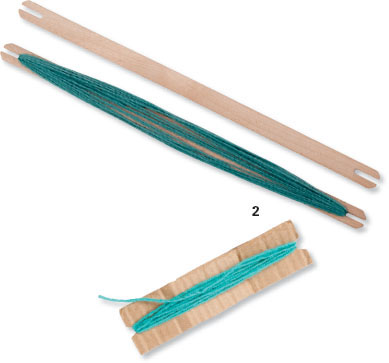
WEAVING SHUTTLE (2)
This is commonly a piece of flat wood with indents or grooves at each end. The yarn is wound around it (see page 12) and then it is used for passing the yarn through the warps. If you don’t have a wooden shuttle, you can create your own by cutting notches in a strong strip of card.
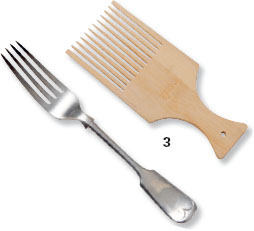
BAMBOO COMB (3)
Weaving combs come in a range of styles and sizes, and you can use a table fork instead of a purchased comb. A comb is used to beat down the wefts with each row of weaving (see page 13).

WEAVER’S NEEDLE AND TAPESTRY NEEDLE (4)
A weaver’s needle is an extra-long needle with a blunt or rounded tip and a large eye. These needles are used to guide the yarn through the warps when working smaller areas (see page 13). A tapestry needle is a blunt-tipped, large-eyed embroidery needle, used to weave in ends of warps and wefts (see pages 20 and 21).
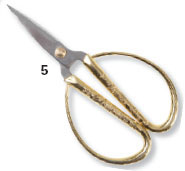
SHARP SCISSORS (5)
Short, sharp-bladed scissors are ideal as they will be able to snip through the different materials without difficulty, and the shorter length of the blades makes them easier to use precisely.
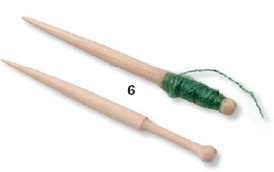
BOBBINS (6)
These are available in different styles, designs, and finishes, and are used for carrying smaller volumes of yarn (see page 11). They have a pointed tip to make it easy to work through the warps, and an indented section around which yarn can be wrapped.
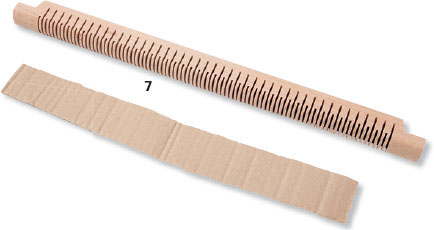
SHED STICK (7)
Often this is just a thin strip of wood, although more complex designs are available, such as the notched version below. However, a simple strip of cardboard will also work. A shed stick is used to speed up the process of weaving, reducing the need to feed the shuttle through the warps (see also page 14).
You can work with a wide variety of fibers and yarns to create weavings, and with some more non-traditional items, too!
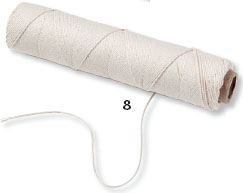
COTTON WARP THREAD (8)
The warp are the threads that run up and down on the loom, and through which the wefts are worked. A medium-weight warping cotton is a good choice for many weavings, as it will provide the required amount of strength to support the wefts and woven work, but without being too bulky. Commonly, warping threads are a neutral color and a natural fiber—such as cotton—as they can sometimes be visible through the work. However, there is no reason why you can’t work with brightly colored warping cottons if you want to make a feature of this in your designs. Be cautious about straying away from cotton fibers for warping as other materials might not have the same strength, or might not have a smooth finish, making it difficult to draw the weft yarns smoothly through the warps.
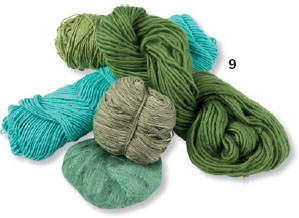
YARNS (9)
Yarns in all colors, weights, fibers, and styles can be used in weavings. Remember that chunkier yarns will create larger areas of weaving than lighter-weight yarns worked over the same number of rows.
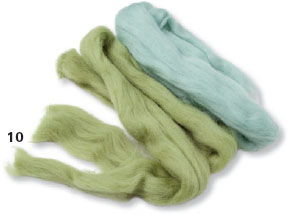
ROVING (10)
Wool roving is the natural wool fiber that is used in the process of making yarns. The ultra-soft, voluminous fibers come in bundles and can be eased out to create lengths of different dimensions. Roving is available in a natural/undyed color, and also in a wide range of dyed shades to add dimension to your weavings.

EMBROIDERY FLOSS (11)
You can weave with stranded or perlé embroidery flosses, and they can also be used to wrap pairs of warp threads together (see page 20). Stranded floss—as shown here—is widely available in hundreds of different shades.
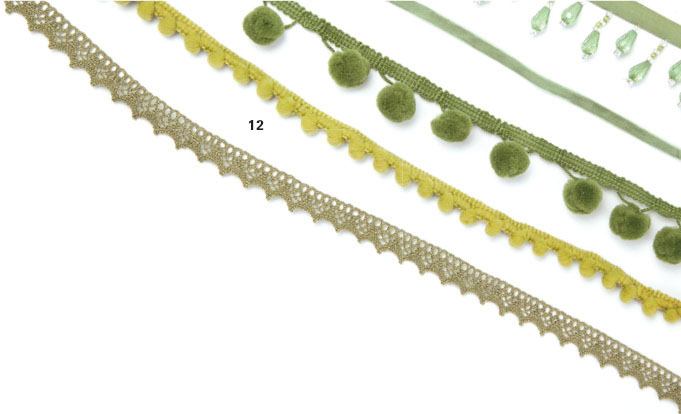
TRIMMINGS (12)
Most notions (haberdashery) or craft stores will have a selection of trimmings including lace, ribbons, beaded accent trimmings, sequin strips, and pom-pom trimmings. Lengths of these are ideal for adding to different weaving projects to add a striking feature to the finished piece.
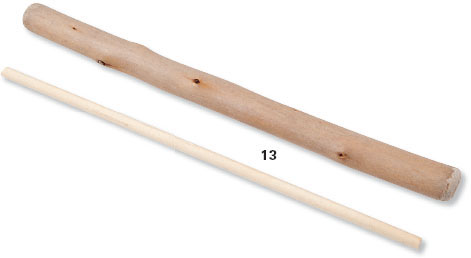
HANGING DOWELS AND STICKS (13)
If you are creating a wall hanging you can use a length of wooden dowel—readily available from craft and hardware stores—to hang the weaving from. Dowel can be easily cut down to size; aim to have around 1in (2.5cm) of dowel protruding at either side of the hanging to make sure the weaving doesn’t slide off. Dowels can be painted or colored with wood stain to create different finishes. Alternatively, make a hanging stick from a wide range of different materials, including copper piping, driftwood, vintage knitting needles, sticks, or even antlers!
You can easily create your own ready-to-use weaving loom with just a few simple supplies.
MATERIALS AND EQUIPMENT
✦ Wooden picture frame with the glass and the backing removed
✦ Ruler
✦ Pencil
✦ Small hammer
✦ Pin nails
If you want to invest in your new hobby, there are a few things that you should consider when buying a loom.
SIZE: The size of the loom ultimately defines the size of the weavings that you will be able create. While it is possible to make small items on a larger loom, a small loom can end up being frustratingly restrictive.
STYLE: Some looms have pins around which to wrap the warps, others have grooves; some are solid frames, while others can be taken apart for easy storage; some are rectangular, while others can have the upper and lower bars supported on a central strip of wood (this design is more lightweight and more portable than a solid frame). Larger looms often have the option of a stand or side supports that allow them to be positioned on a table, which is idea for larger-scale makes.
KITS: Many looms can be bought in a kit format, meaning that not only is the loom included but also a number of items to get you started—such as shuttles, needles, and scissors; some kits might include warping cottons, yarns, and roving, too.
PRICE: The price for a loom can vary considerably, from a basic kit purchased at a hobby store to handmade looms available from online artisan craft stores; your budget for your new creative pastime will often dictate your options.
MATERIAL: Commonly looms will be made from wood or bamboo, but they can also often be made from plastic. The material choice is down to personal preference, although many weavers find that wooden or bamboo looms are more robust and more comfortable to work with.
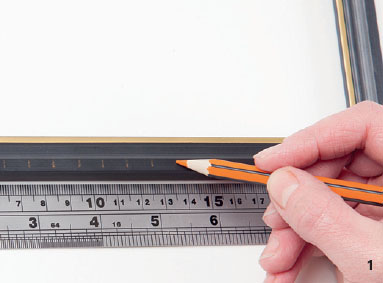
1 With the glass and backing removed, use the ruler and pencil to measure out and mark equal spaces along the upper edge of the picture frame. The distance between the marks will be the distance between the warps; aim for around ¼–⅜in (0.5–1cm); here the spaces are ⅜in (1cm).
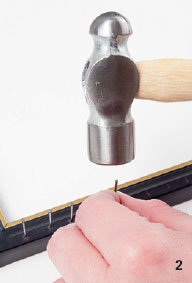
2 Use the hammer to carefully tap in a pin nail at the first marked point. The nail must not be tapped down fully into the wood; it needs to be straight and secure, but with a portion of the shaft protruding from the frame.
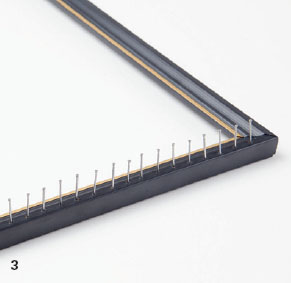
3 Work along the row of marks, tapping in a pin at each marked point to create pegs around which the warps will be wrapped.
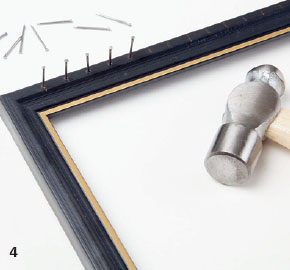
4 Using the ruler and pencil and working to the same spacing, hammer in a row of pins along the opposite end of the frame. Your loom is complete!
The warps are the threads that run up and down the loom vertically; these are the foundation of every project.
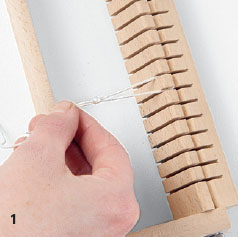
1 Draw out the start of a length of warping cotton from the skein or cone. Tie a small loop using an overhand knot (see page 21). Hook the loop around a peg or groove on one side at the bottom of the loom. You can make only as many warps as needed, though it’s usually easier to center the warped area on the loom.
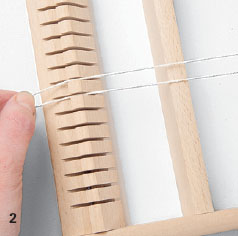
2 Draw the length of warping cotton up to the peg or groove directly above at the top of the loom. Pass the warping cotton around that peg or groove, then bring it back down.
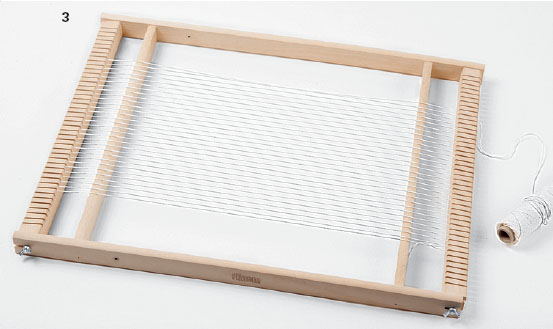
3 Wrap the warping cotton around the next peg or groove on the bottom of the loom before again drawing it up to the top. Continue working up and down the loom, wrapping the warping cotton around each upper and lower peg or groove in turn.
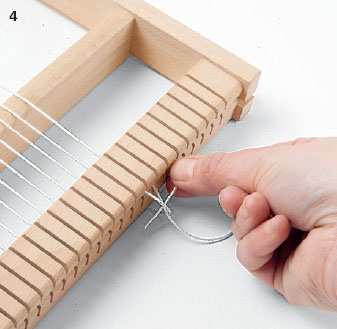
4 Once the desired number of warps has been created, cut the cotton leaving an 8-in (20-cm) tail. Make a loop around the last peg or groove and knot it securely in place.
It is important to maintain a taut, even tension across the loom when you are warping it. The warps should not be too tight or too loose, and tension variations across the loom can make the process of weaving trickier, and can affect the finished appearance of the piece. Try to always keep hold of the warping cotton as you warp the loom, as releasing it between each wrapped peg or groove can effect the tension.
To test the tension, place the flat of your hand on the warps and press down lightly; the threads should have a slight give to them, a little springiness. If your hand sinks down dramatically when you press the warps then the tension is too slack, and if your hand bounces off then the warps are too tight. The more frequently you warp a loom the easier it will become to create a correct and consistent tension.
A twisted header is often used at the start and end of a weaving. At the start of a weaving this header provides a firm base line upon which to work, and the first row of tabby weaving can be beaten down (see page 13) onto it to form a neat, straight line. The header should be positioned at least 3in (7.5cm) from the base of the loom to allow you to cut and knot the warps once the weaving is completed (see page 21).
At the end of a piece of weaving a twisted header is used to secure the work, providing a firm line against which to knot the warps.
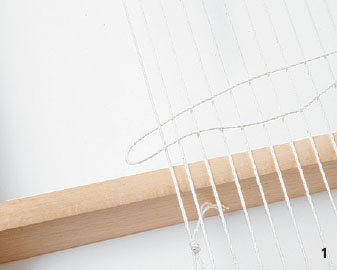
1 Cut a length of warping cotton approximately three times the width of the warping area. Fold the length in half to find the center. Place the center over the outermost warp on one side of the loom, so that one end lies over the warp and the other end comes up under the warp back to the top.
2 Take the upper end of the cotton down between the first and second warps; this will create a twist in the warping cotton between the first two warps.
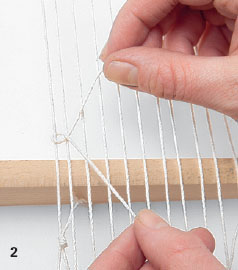
3 Take the lower end of the cotton and bring it upward while passing the upper section downward, creating another twist between the next two warps.
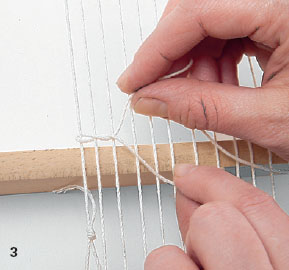
4 Continue in this manner to create twists between each of the warps across the entire width of the loom.
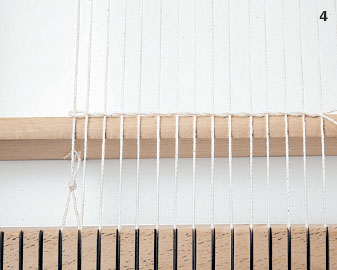
5 Work a final twist after the last warp and bring the upper thread below the header and weave it over and under four or five warps to secure it. Weave the other end of the cotton over and under four or five warps below the header and trim away the excess.
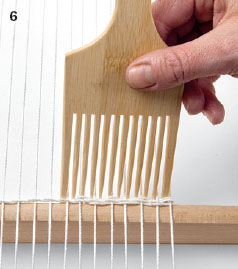
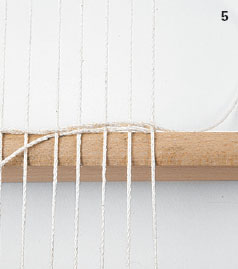
6 Use the comb to beat the twisted header into a straight line across the width of the loom. This loom has a structural strut that a header can be beaten against, but you can just ease the header into a straight line in any position on the warps. If you want the finished piece to have tassels made from the warp threads (see page 18), then you need to leave enough of the warps free to do that with.
The projects in this book are accompanied by charts—as well as written step-by-step instructions—to help you create the weavings. The charts are direct representations of the construction of the design, not illustrations of the finished result, so don’t worry if the charts and photographs appear to look dissimilar.
Each of the squares in a chart represents a stitch, and each of the vertical rows represents a warp. Weavings are worked from one side to the other and then back again, and in the same manner the chart is read from one side to the other then back again—rather than always from right to left as though reading text. The weaving starts at the bottom of the chart and works up to the end of the design, at the top of the chart.
The colors in the chart represent the different yarns featured in the design and are shown in the key, which cross-refers to the materials list given at the start of the project. The symbols on the charts represent different techniques or styles of weaving and they are explained in the key.
In many of the projects different weight yarns are used in adjacent areas, and as chunkier yarns take up more space than lighter-weight yarns, so 10 rows of tabby in a thick yarn will measure more than 10 rows of light worsted (double knitting) tabby. However, the charts show a single row of squares per line of weaving, no matter how thick the yarn is. Where there are areas of very different weights of yarn beside one another across a row, the fact that one area will need a different number of rows of weaving to fill it is noted on the chart.
PREPARING BOBBINS AND SHUTTLES
Shuttles, bobbins, and weaver’s needles are used to carry the yarn across the width of the loom, working up and down between the warps to create the wefts. The weaver’s needle is used for color work or for filling in small areas, and a length of yarn is simply threaded through the eye of the needle.
BOBBINS
These are often used when there are lots of color changes in repeated patterns.

1 Lay the end of the yarn down the length of the carrying section and hold it in place with your fingertips. Begin winding the yarn around the carrying section of the bobbin, working from the top to the bottom
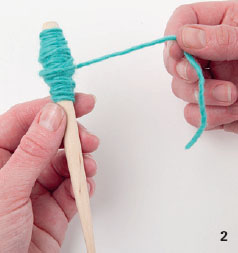
2 The more neatly the yarn is wound, the more you will be able to fit onto the bobbin. Cut the yarn, leaving a long tail ready to begin the weaving.
WARPS AND WEFTS
To tell the difference between warps and wefts, remember that “weft” rhymes with “left,” and so the wefts run horizontally from left to right across the loom. The warps are the vertical elements.
WARPING LEFT TO RIGHT, OR RIGHT TO LEFT?
There is no real reason why you should warp your loom in one direction or the other. The main objective is to work the warps neatly over the pins or grooves, without missing any, and to maintain an even tension throughout. You might find that you are able to warp more quickly and more consistently in one direction than the other, or it might be that you find it more comfortable working toward or away from your dominant hand—either is fine!
These are long, flat lengths of wood or thick card with grooves or notches cut in the top and bottom. There are two ways to load a shuttle with yarn: the simple wrap method is very quick and is suitable for carrying a fairly small amount of yarn. However, as the yarn is wrapped over the central part of the shuttle it can become bulky very quickly, especially with heavier weight yarns, so try preparing a shuttle with a figure-8 wrap.
SIMPLE WRAP

1 Hold the yarn end in the center of the flat section of the shuttle and bring it up and over the end of the shuttle, passing it though the groove or notch. Draw the yarn along the length of the shuttle and pass it back through the groove or notch at the other end.
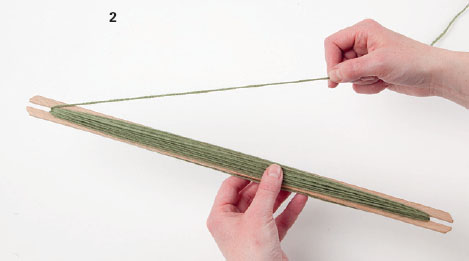
2 Continue wrapping the yarn around the shuttle, catching it in the grooves or notches at each end. Cut the yarn, leaving a long tail ready to begin the weaving.
FIGURE-8 WRAP

1 Hold the yarn tail in the center of the shuttle and bring it over the upper groove or notch. With the shuttle on its side, draw the yarn in a figure-8 around the shuttle, passing it through the grooves or notches at each end.

2 Wind a second figure-8 around the shuttle to lock the end of the yarn in place.

3 Flip the shuttle and work a figure-8 over the second side.

4 Repeat the process, flipping the shuttle over and over to make single figure-8 wraps on alternate sides until the shuttle is filled with yarn. The bulk of the yarn is held at the sides of the shuttle, making it easier to pass it between the warps (see page 13).
The most commonly used weaving stitch is tabby weaving, which is both easy and quick to master. The weft rows need to be kept at an even tension throughout the weaving. If the yarns are too loose then there will be excess loops at the sides of the loom, and if the tension is too tight, then the sides of the weaving will begin to pull in.
The process of pushing each row of tabby down to meet the one below is called “beating down.” This is done with the teeth of a bamboo comb, or even a table fork.
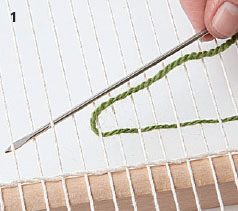
1 The shuttle, bobbin, or needle is passed across the width of the loom, taking it over and under alternate warps. The length of a shuttle or needle (shown here), allows you to work through a number or warps at a time. Work across the row, pulling the length of yarn through when you reach the other side of the loom.

2 The next row is worked in the same manner, but the yarn is taken over the warps that it went under on the previous row, and under the warps that it went over.
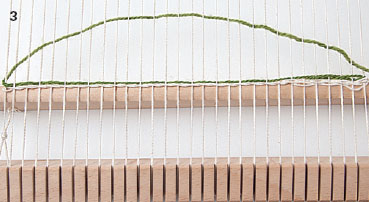
3 The easiest way to maintain tension across the row is to draw the weft yarn through the warps creating a shallow arc across the center of the loom, rather than just drawing it across in a straight line.
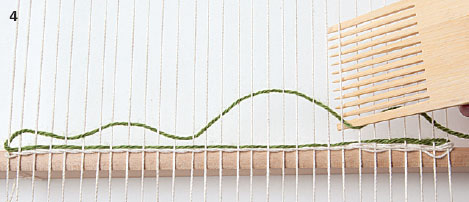
4 Use the teeth of the comb to beat the arc of yarn down in a series of small arcs across the row.
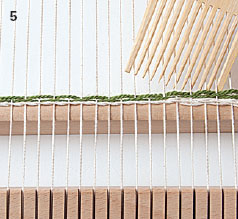
5 Using an even pressure, work across to push the arcs of weft yarn neatly down along the row. Don’t squash the yarn tight, just make sure it is flat and smooth and butted up against the previous row.
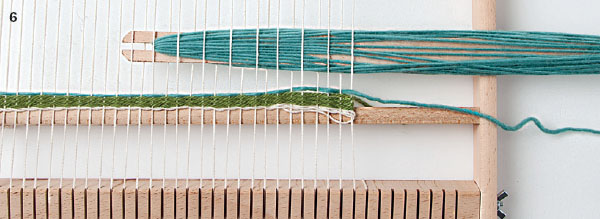
6 If you are using a shuttle filled with yarn (see page 12), then that is worked over and under alternate warps in the same way as a needle is (see Step 1).
A shed stick can be as simple as a piece of thick card (as used here), a wooden stick, or even a ruler.

1 Pass the shed stick through the loom, weaving it under and over alternate warp threads.
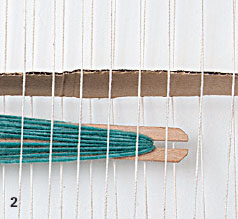
2 Rotate the shed stick onto its side, this will open up a space between the alternate warps; this space is called the “shed.” The shuttle, bobbin, or needle with yarn can be passed straight through the shed to the other side of the loom.
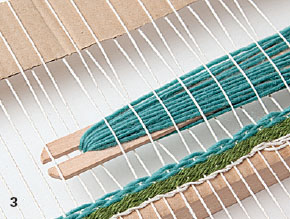
3 The following row is worked by rotating the shed stick back to its flat position and working the shuttle, bobbin, or needle back across the row, working over and under the opposite warps to the previous row.
Contrast can be added to simple tabby weaving by working over and under the warps in pairs, or in uneven increments such as over two warps and under three. This is often a great way to accommodate chunkier yarns or lengths of roving. Work in the same manner as for standard tabby weaving (see page 13), using a shuttle, bobbin, or weaver’s needle—or your fingers if you prefer when using roving.
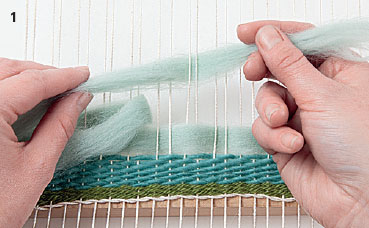
1 Work the yarn over two warps before passing it under the next two warps, and continue in this way across the row. The next row will be worked in the same manner, but working over the two warps that were worked under on the previous row, and under the two warps that were worked over.
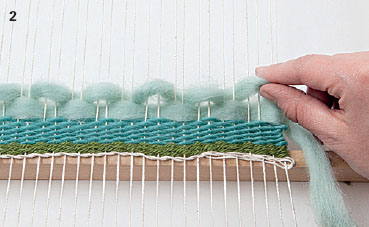
2 To create more puffed out or voluminous sections of tabby with roving, pinch the roving on the surface before working the next pair of warps and don’t draw the roving through too firmly because this will smooth it out.
You can create different colored shapes by working in tabby weaving (see page 13) and increasing or decreasing the numbers of warps that are worked on each row.
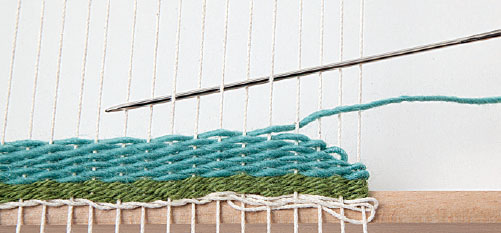
DECREASING
This is a very simple process. Remember to beat each row down after weaving it (see page 13).
On the decrease row, work tabby over one or two warps fewer on either side—or one side—as specified. Continue in this manner to create the required amount of decreasing.
INCREASING
This is just as simple as decreasing; again, remember to beat each row down before turning to weave the next one.
On the following row, work tabby over one or two warps more on either side—or one side—as specified. Continue in this manner to create the required amount of increasing.
INTERLACING
Where a section of increasing and a section of decreasing meet—usually at a color change—you can interlace the rows to ensure that there are no gaps in the tabby weaving. However, this does create a “blurred” join between colors, so for a crisp edge to color sections, don’t interlace them.
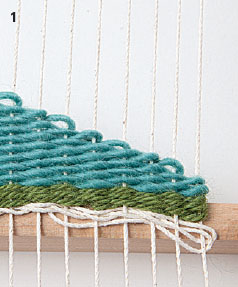
1 Work one of the sections; here a decrease section (see above) has been worked.

2 Start the new color yarn by looping it under the outermost warp, as shown; the end will be taken to the back and woven in later.
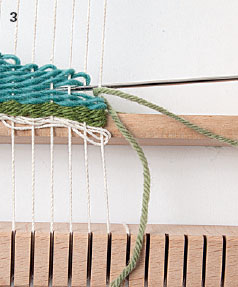
3 Weave the first row of the new color yarn in the usual way (see page 13), ending the row by taking the yarn around the last warp the aligning row in the first color ended around. You can ease the ends of the rows of the first color apart a little if it makes it easier to see what you are doing; just don’t forget to ease them back into place when the next row is finished.

4 Continue in this way, weaving each row of the new color to finish wrapped around the same warp as the last row of the first color.
Roving is a wonderful way to add volume, color, and texture to a weaving. The fibers are light and fluffy and are easy to shape and manipulate.
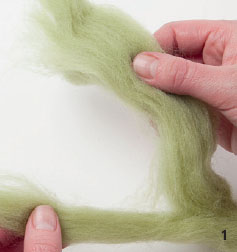
1 Roving is commonly sold in a skein or twist, and is unwound to reveal a length. It is unlikely that you will want to use a whole length, so you will need to split it by pinching the amount required from one end and carefully drawing it out to release a strip of the required size.
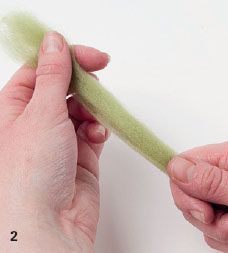
2 Once you have drawn out a piece of roving, you might want to smooth it to ensure that the fibers are lying flat—not only does this look neater, but it also makes it easier to weave the roving through the warps without any stray fibers getting tangled. Hold the length securely at one end and draw it through your hands a few times to neaten and smooth the fibers.
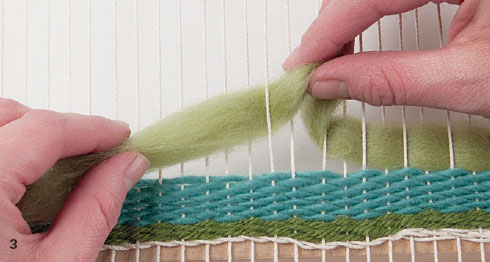
3 A length of roving can be wound around a shuttle (see page 12) or used with a weaver’s needle (see page 13), however it might be easier too simply use your fingers to pinch and pull the roving over and under the warps across the loom. Using your fingers allows you to draw out and shape the fibers of the roving as you want, and you’ll be better able to maintain the tension and not rip the roving as you work.
Soumak is a technique that creates a rope-like twist that stands proud above the surface of the work. This weaving stitch can be worked in one of two ways.
SINGLE SOUMAK
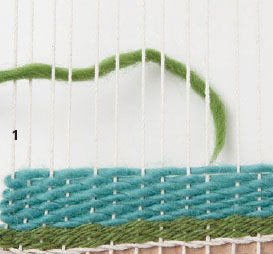
1 Draw out a length of yarn that is three to four times the width of the weaving area. To start from the left-hand side of the loom, lay the end over the two warps (or the number stated in the instructions) on the furthest left, leaving a tail pointing to the right at the back of the work to be woven in later.
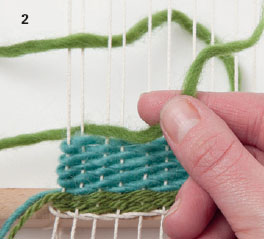
2 Pass the yarn under the same two warps and then bring it up between the second warp and the next one.
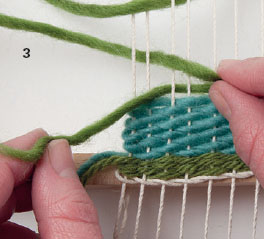
3 Take the yarn over the next two warps, then under them and back up to the front to make a single soumak knot.
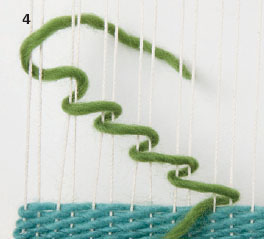
4 Repeat Step 3 across the row to create single soumak. Here the knots have been spread out so that you can see how they are worked across the row.

5 When the row of single soumak is complete, use the comb to press the knots gently against the previous row of weaving. To start a row of single soumak from the right, just reverse the process.

1 Draw out a length of yarn that is three to four times the width of the weaving area and fold in half to make a loop. To start from the left-hand side of the loom, pass the loop under the two warps (or the number stated in the instructions) on the furthest left.

2 Draw the ends of the length through the loop to secure it.
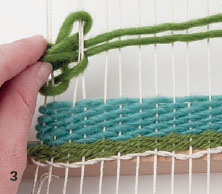
3 Take the two ends of yarn over the next two warps (or the number stated in the instructions) and, separating the ends, pass them under the same two warps and back up to the front.
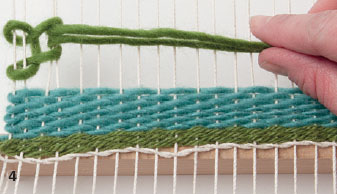
4 Gently pull the ends to tighten the loop and make a double soumak knot.

5 Repeat Steps 3–4 across the row to create double soumak. Here the knots have been spread apart so that you can see how they are worked across the row.

6 When the row of double soumak is complete, use the comb to press the knots gently against the previous row of weaving. To start a row of double soumak from the right, just reverse the process.
Lengths of yarn can be looped and knotted over pairs of warps to create striking tassels. These can be worked at the bottom of a design, or at any point on the surface for added texture and to add movement to the weaving. Work a couple of rows of tabby weaving (see page 13) before and after rya knots to help lock the knots into position.
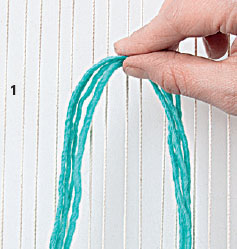
1 Cut several pieces of yarn to the required length—this needs to be at least twice as long as the desired finished length of the tassel. Fold the bundle in half to find the center.

2 Lay the center of the bundle over a pair of warps.
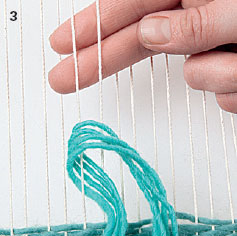
3 Take the left-hand side of the yarn bundle and pass it under and around the left-hand warp of the pair, then bring it up to the surface between the two warps.
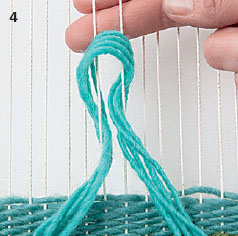
4 Take the right-hand side of the yarn bundle and pass it under and around the right-hand warp of the pair, then bring it up to the surface between the two warps.
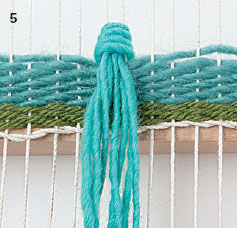
5 Holding the two ends of the bundle together at the center, carefully slide the knot down to the required position. Pull gently on the ends to tighten the knot.

6 To make a series of knots across a row, work each one over two adjacent warps.
Texture can be added to the weaving by working a variation of tabby weaving; this can be worked with a single strand of yarn or roving, or with multiple strands held together.
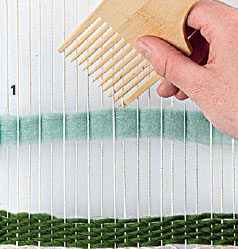
1 Work the yarn under and over the warps as for tabby weaving (see page 13). Use the comb to ease the yarn across the row, but don’t beat it down fully.
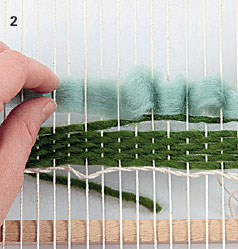
2 With your finger tips—or with a pencil or piece of dowel if you want to create exactly even loops—begin lifting the yarn running over the warps on the surface of the weaving, drawing it up to make loops. Ensure that the warps on the sides of the loom are not being drawn inward.
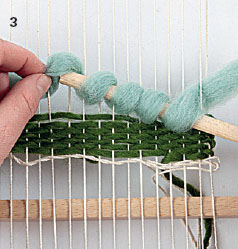
3 Continue along the length of the row, drawing up the yarn over the warps to create loops. If you are using a pencil or a piece of dowel, simply rotate it to catch the next loop and leave all the loops on the pencil or dowel until the row is complete.

4 Remove the pencil or piece of doweling if you have been using one, and use the teeth of the comb to ease the yarn into position against the previous row.
VOLUME WITH ROVING
When working with roving to create looped weaving and soumak (see page 16), be sure not to pull the roving too firmly at each stage as this can flatten it too much. Ease the fibers as you make each knot or loop for a more voluminous finish.
There are lots of things that can be incorporated into a weaving project—pom-pom trim, ribbons, and beaded trims are just some of the items that you will be able to find in your local notions store. These can be woven in to your work using the tabby weaving technique (see page 13). You can decide if you want to work over and under each warp, or whether a particular trim will look better passed over and under the warps in pairs.
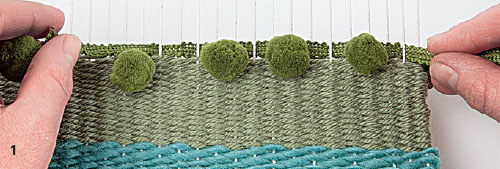
1 Larger elements—such as the pom-poms shown here—can get caught on the warps as you work, so it is usually easier to use your fingers to push and pull the trim through the warps, rather than trying to drag it through with a shuttle or using a needle. Ease the individual pom-poms to the front of the work so that they lie on the surface.
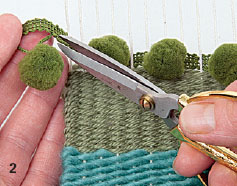
2 Ensure that there is about 2in (5cm) of the trim free on either side of the loom to make securing it at the back of the work easier. With sharp scissors, trim away the pom-poms from the excess heading tape at either side.
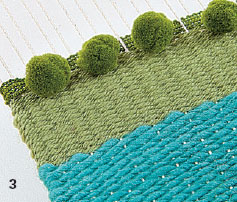
3 Use your fingers to weave the trimming in at the back of the work to secure it. You can always use a dab of fabric glue or a spritz of fabric adhesive to secure an end if needed.

4 The same principles apply when weaving with beaded trim. Sometimes the beaded elements will naturally fall between warps, but often you’ll need to spend time easing and adjusting them to lie neat and flat.
You can use embroidery floss or fine yarn to wrap pairs of warp threads together. First complete the section of weaving, leaving the appropriate sections of the warp threads exposed.

1 Cut a long length of yarn or embroidery floss. Pinch two warps together and tie them at the center with the floss.
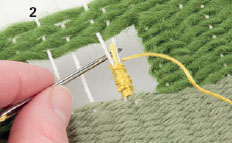
2 Starting at the lower end and working upward, wind the floss around the two warps to create a neat wrap; you can do this with your fingers, or by threading the floss into a tapestry needle. Lay the tail of the knot against the warps so that it will be covered by the wraps. Work up to the top of the bare warps, and if need be, work back down in a continuous wrap to ensure the warps are covered.
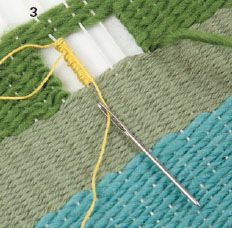
3 If you haven’t already threaded the floss into a tapestry needle, then do so now. On the back, take the needle down through a few of the wraps at the top of the section. Slip the needle through the loop of floss and pull it tight to knot it.
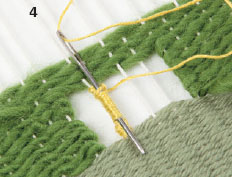
4 Thread the floss through a few more wraps and cut off the end right up against the wraps.
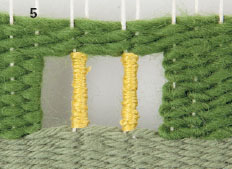
5 Wrap all the bare pairs of warps in the same way.
Once you have completed the weaving you will want to neaten and secure the yarn ends that are visible at the back of the work. The easiest, most secure, and discreet way to do this is to weave them in before taking the work off the loom.
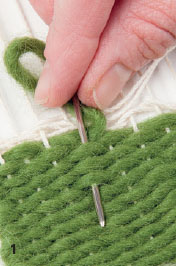
1 At the end of a section of tabby weaving (see page 13), weave the yarn end over four or five warps so that it is not sticking out at the edge of the weaving. On the back of the work, thread the yarn end into a tapestry needle. Pass the yarn down through the woven stitches for three or four rows.
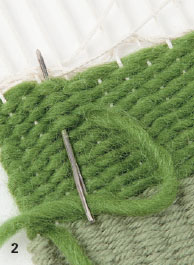
2 Turn and at the next warp along, bring the yarn back through the woven stitches. Trim the end short. The ends of roving can be eased through the warps and you can always use a dab of fabric glue or a spritz of fabric adhesive to secure them if needed.
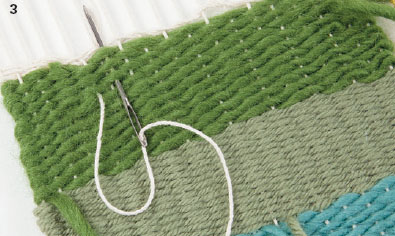
3 Thread in the ends of the twisted headers (see page 10) in the same way.
MAKE IT EASY
Leaving the work on the loom to weave in the weft ends means that it is held firmly while you neatly conceal and secure the weft ends on the wrong side.
Once the weaving is completed you will need to remove it from the loom. This can be done by easing the loops off the pegs or out of the grooves at the top or bottom. Alternatively, you can snip the warps to release them. There are a couple of ways of knotting the warps, depending on the look you want.

1 If you are cutting the warps, be sure to cut them as close to the top and bottom of the loom as possible, so you have enough length of warp thread to allow you to knot and secure them easily.
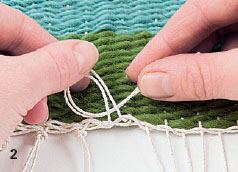
2 The warps can be tied in an overhand knot. Hold the warps in pairs and curl them round to make a loop before passing the ends through the loop and drawing it up to tighten the knot.
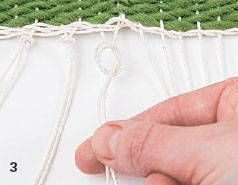
3 Before the knot is fully tightened, you can slide it into the position you want, then pull the ends to secure it fully. Do not push the knot too tightly against the twisted header or you will pull on the warp threads and distort the weaving. Knot warps in pairs across the work. The ends can be trimmed short, or left longer to create a simple decorative fringe.
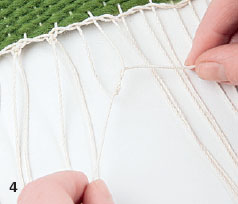
4 Or you can pass one warp over the other and pull them taut to make a half knot. Do not pull this knot too tight or you will distort the weaving. The knot needs to sit against the twisted header without pushing it out of line.

5 Then you can pass the other warp over the first to make a second half knot, and pull the whole knot tight.

WEAVING IN WARP ENDS
Once you have knotted the warps, you might want to conceal the ends on the back of the work.
Thread the warp end onto a tapestry needle, then weave it through the rows for seven or eight rows. Trim off the excess.
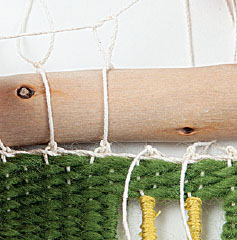
ADDING A HANGING STICK
This can be done in a few ways, and individual projects will tell you how it was done for that piece of work. However, the principle is simple.
Lay the project flat. Fold one of the top warps in each pair down over the weaving and stretch the other warp out above the work. Lay the dowel or stick over the stretched-out warps. Working across the row, tie each pair of warps around the stick, using either an overhand knot (see Step 2, left), or two half knots (see Steps 4–5, left).