
When you first look in the /etc directory, you might feel a bit overwhelmed. Although most of the files that you see affect a system’s operations to some extent, a few are fundamental.
The subject material in this chapter covers the parts of the system that make the infrastructure discussed in Chapter 4 available to the user-level tools covered in Chapter 2. In particular, we’re going to look at the following:
Configuration files that the system libraries access to get server and user information
Server programs (sometimes called daemons) that run when the system boots
Configuration utilities that can be used to tweak the server programs and configuration files
Administration utilities
As in previous chapters, there is virtually no networking material here because the network is a separate building block of the system. In Chapter 9, you’ll see where the network fits in.
Most system configuration files on a Linux system are found in /etc. Historically, each program had one or more configuration files there, and because there are so many packages on a Unix system, /etc would accumulate files quickly.
There were two problems with this approach: It was hard to find particular configuration files on a running system, and it was difficult to maintain a system configured this way. For example, if you wanted to change the system logger configuration, you’d have to edit /etc/syslog.conf. But after your change, an upgrade to your distribution could wipe out your customizations.
The trend for many years now has been to place system configuration files into subdirectories under /etc, as you’ve already seen for the boot directories (/etc/init for Upstart and /etc/systemd for systemd). There are still a few individual configuration files in /etc, but for the most part, if you run ls -F /etc, you’ll see that most of the items there are now subdirectories.
To solve the problem of overwriting configuration files, you can now place customizations in separate files in the configuration subdirectories, such as the ones in /etc/grub.d.
What kind of configuration files are found in /etc? The basic guideline is that customizable configurations for a single machine, such as user information (/etc/passwd) and network details (/etc/network), go into /etc. However, general application details, such as a distribution’s defaults for a user interface, don’t belong in /etc. And you’ll often find that noncustomizable system configuration files may be found elsewhere, as with the prepackaged systemd unit files in /usr/lib/systemd.
You’ve already seen some of the configuration files that pertain to booting. Now we’ll look at a typical system service and how to view and specify its configuration.
Most system programs write their diagnostic output to the syslog service. The traditional syslogd daemon waits for messages and, depending on the type of message received, funnels the output to a file, the screen, users, or some combination of these, or just ignores it.
The system logger is one of the most important parts of the system. When something goes wrong and you don’t know where to start, check the system log files first. Here is a sample log file message:
Aug 19 17:59:48 duplex sshd[484]: Server listening on 0.0.0.0 port 22.
Most Linux distributions run a new version of syslogd called rsyslogd that does much more than simply write log messages to files. For example, you can use it to load a module to send log messages to a database. But when starting out with system logs, it’s easiest to start with the log files normally stored in /var/log. Check out some log files—once you know what they look like, you’ll be ready to find out how they got there.
Many of the files in /var/log aren’t maintained by the system logger. The only way to know for sure which ones belong to rsyslogd is to look at its configuration file.
The base rsyslogd configuration file is /etc/rsyslog.conf, but you’ll find certain configurations in other directories, such as /etc/rsyslog.d. The configuration format is a blend of traditional rules and rsyslog-specific extensions. One rule of thumb is that anything beginning with a dollar sign ($) is an extension.
A traditional rule has a selector and an action to show how to catch logs and where to send them, respectively. For example:
The selector is on the left. It’s the type of information to be logged. The list on the right is the action: where to send the log. Most actions in Example 7-1 are normal files, with some exceptions. For example, /dev/console refers to a special device for the system console, root means send a message to the superuser if that user is logged in, and * means message all users currently on the system. You can also send messages to another network host with @host.
The selector is a pattern that matches the facility and priority of log messages. The facility is a general category of message. (See rsyslog.conf(5) for a list of all facilities.)
The function of most facilities will be fairly obvious from their name. For example, the configuration file in Example 7-1 catches messages carrying the kern, authpriv, mail, cron, and local7 facilities. In this same listing, the asterisk at ➋ is a wildcard that catches output related to all facilities.
The priority follows the dot (.) after the facility. The order of priorities from lowest to highest is debug, info, notice, warning, err, crit, alert, or emerg.
Note
To exclude log messages from a facility in rsyslog.conf, specify a priority of none, as shown at ➊ in Example 7-1.
When you put a specific priority in a selector, rsyslogd sends messages with that priority and all higher priorities to the destination on that line. Therefore, in Example 7-1, the *.info for the line at ➊ actually catches most log messages and puts them into /var/log/messages because info is a relatively low priority.
As previously mentioned, the syntax of rsyslogd extends the traditional syslogd syntax. The configuration extensions are called directives and usually begin with a $. One of the most common extensions allows you to load additional configuration files. Check your rsyslog.conf file for a directive like this, which causes rsyslogd to load all .conf files in /etc/rsyslog.d into the configuration:
$IncludeConfig /etc/rsyslog.d/*.conf
Most of the other extended directives are fairly self-explanatory. For example, these directives deal with users and permissions:
$FileOwner syslog
$FileGroup adm
$FileCreateMode 0640
$DirCreateMode 0755
$Umask 0022
One of the easiest ways to test the system logger is to send a log message manually with the logger command, as shown here:
$ logger -p daemon.info something bad just happenedVery little can go wrong with rsyslogd. The most common problems occur when a configuration doesn’t catch a certain facility or priority or when log files fill their disk partitions. Most distributions automatically trim the files in /var/log with automatic invocations of logrotate or a similar utility, but if too many messages arrive in a brief period, you can still fill the disk or end up with a high system load.
Note
The logs caught by rsyslogd are not the only ones recorded by various pieces of the system. We discussed the startup log messages captured by systemd and Upstart in Chapter 6, but you’ll find many other sources, such as the Apache Web server, which normally records its own access and error logs. To find those logs, see the server configuration.
The syslog service has evolved over time. For example, there was once a daemon called klogd that trapped kernel diagnostic messages for syslogd. (These messages are the ones you see with the dmesg command.) This capability has been folded into rsyslogd.
It’s a near certainty that Linux system logging will change in the future. Unix system logging has never had a true standard, but efforts are underway to change that.
Unix systems allow for multiple independent users. At the kernel level, users are simply numbers (user IDs), but because it’s much easier to remember a name than a number, you’ll normally work with usernames (or login names) instead of user IDs when managing Linux. Usernames exist only in user space, so any program that works with a username generally needs to be able to map the username to a user ID if it wants to refer to a user when talking to the kernel.
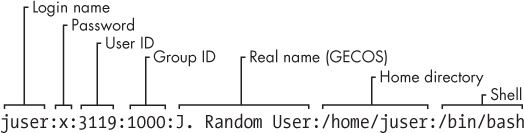
The plaintext file /etc/passwd maps usernames to user IDs. It looks something like this:
Each line represents one user and has seven fields separated by colons. The fields are as follows:
The username.
The user’s encrypted password. On most Linux systems, the password is not actually stored in the passwd file, but rather, in the shadow file (see 7.3.3 The /etc/shadow File). The shadow file format is similar to that of passwd, but normal users do not have read permission for shadow. The second field in passwd or shadow is the encrypted password, and it looks like a bunch of unreadable garbage, such as
d1CVEWiB/oppc. (Unix passwords are never stored as clear text.)An
xin the second passwd file field indicates that the encrypted password is stored in the shadow file. A star (*)indicates that the user cannot log in, and if the field is blank (that is, you see two colons in a row, like::), no password is required to log in. (Beware of blank passwords. You should never have a user without a password.)The user ID (UID), which is the user’s representation in the kernel. You can have two entries with the same user ID, but doing this will confuse you, and your software may mix them up as well. Keep the user ID unique.
The group ID (GID). This should be one of the numbered entries in the /etc/group file. Groups determine file permissions and little else. This group is also called the user’s primary group.
The user’s real name (often called the GECOS field). You’ll sometimes find commas in this field, denoting room and telephone numbers.
The user’s home directory.
The user’s shell (the program that runs when the user runs a terminal session).
Figure 7-1 identifies the various fields in one of the entries in Example 7-2.
The /etc/passwd file syntax is fairly strict, allowing for no comments or blank lines.
You will find a few special users in /etc/passwd. The superuser (root) always has UID 0 and GID 0, as in Example 7-2. Some users, such as daemon, have no login privileges. The nobody user is an underprivileged user. Some processes run as nobody because the nobody user cannot write to anything on the system.
The users that cannot log in are called pseudo-users. Although they can’t log in, the system can start processes with their user IDs. Pseudo-users such as nobody are usually created for security reasons.
The shadow password file (/etc/shadow) on a Linux system normally contains user authentication information, including the encrypted passwords and password expiration information that correspond to the users in /etc/passwd.
The shadow file was introduced to provide a more flexible (and more secure) way of storing passwords. It included a suite of libraries and utilities, many of which were soon replaced by pieces of PAM (see 7.10 PAM). Rather than introduce an entirely new set of files for Linux, PAM uses /etc/shadow, but not certain corresponding configuration files such as /etc/login.defs.
Regular users interact with /etc/passwd using the passwd command. By default, passwd changes the user’s password, but you can also use -f to change the user’s real name or -s to change the user’s shell to one listed in /etc/shells. (You can also use the commands chfn and chsh to change the real name and shell.) The passwd command is an suid-root program, because only the superuser can change the /etc/passwd file.
Because /etc/passwd is plaintext, the superuser may use any text editor to make changes. To add a user, simply add an appropriate line and create a home directory for the user; to delete, do the opposite. However, to edit the file, you’ll most likely want to use the vipw program, which backs up and locks /etc/passwd while you’re editing it as an added precaution. To edit /etc/shadow instead of /etc/passwd, use vipw -s. (You’ll likely never need to do this, though.)
Most organizations frown on editing passwd directly because it’s too easy to make a mistake. It’s much easier (and safer) to make changes to users using separate commands available from the terminal or through the GUI. For example, to set a user’s password, run passwd user as the superuser. Use adduser and userdel to add and remove users.
Groups in Unix offer a way to share files with certain users but deny access to all others. The idea is that you can set read or write permission bits for a particular group, excluding everyone else. This feature was once important because many users shared one machine, but it’s become less significant in recent years as workstations are shared less often.
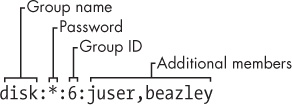
The /etc/group file defines the group IDs (such as the ones found in the /etc/passwd file). Example 7-3 is an example.
Like the /etc/passwd file, each line in /etc/group is a set of fields separated by colons. The fields in each entry are as follows, from left to right:
The group name. This appears when you run a command like
ls -l.The group password. This is hardly ever used, nor should you use it (use
sudoinstead). Use*or any other default value.The group ID (a number). The GID must be unique within the
groupfile. This number goes into a user’s group field in that user’s /etc/passwd entry.An optional list of users that belong to the group. In addition to the users listed here, users with the corresponding group ID in their passwd file entries also belong to the group.
Figure 7-2 identifies the fields in a group file entry.
To see the groups you belong to, run groups.
getty is a program that attaches to terminals and displays a login prompt. On most Linux systems, getty is uncomplicated because the system only uses it for logins on virtual terminals. In a process listing, it usually looks something like this (for example, when running on /dev/tty1):
$ ps ao args | grep getty
/sbin/getty 38400 tty1
In this example, 38400 is the baud rate. Some getty programs don’t need the baud rate setting. (Virtual terminals ignore the baud rate; it’s only there for backward compatibility with software that connects to real serial lines.)
After you enter your login name, getty replaces itself with the login program, which asks for your password. If you enter the correct password, login replaces itself (using exec()) with your shell. Otherwise, you get a “Login incorrect” message.
You now know what getty and login do, but you’ll probably never need to configure or change them. In fact, you’ll rarely even use them, because most users now log in either through a graphical interface such as gdm or remotely with SSH, neither of which uses getty or login. Much of the login program’s real authentication work is handled by PAM (see 7.10 PAM).
Unix machines depend on accurate timekeeping. The kernel maintains the system clock, which is the clock that is consulted when you run commands like date. You can also set the system clock using the date command, but it’s usually a bad idea to do so because you’ll never get the time exactly right. Your system clock should be as close to the correct time as possible.
PC hardware has a battery-backed real-time clock (RTC). The RTC isn’t the best clock in the world, but it’s better than nothing. The kernel usually sets its time based on the RTC at boot time, and you can reset the system clock to the current hardware time with hwclock. Keep your hardware clock in Universal Coordinated Time (UTC) in order to avoid any trouble with time zone or daylight savings time corrections. You can set the RTC to your kernel’s UTC clock using this command:
# hwclock --hctosys --utcUnfortunately, the kernel is even worse at keeping time than the RTC, and because Unix machines often stay up for months or years on a single boot, they tend to develop time drift. Time drift is the current difference between the kernel time and the true time (as defined by an atomic clock or another very accurate clock).
You should not try to fix the drift with hwclock because time-based system events can get lost or mangled. You could run a utility like adjtimex to smoothly update the clock, but usually it’s best to keep your system time correct with a network time daemon (see 7.5.2 Network Time).
The kernel’s system clock represents the current time as the number of seconds since 12:00 midnight on January 1, 1970, UTC. To see this number at the moment, run:
$ date +%sTo convert this number into something that humans can read, user-space programs change it to local time and compensate for daylight savings time and any other strange circumstances (such as living in Indiana). The local time zone is controlled by the file /etc/localtime. (Don’t bother trying to look at it; it’s a binary file.)
The time zone files on your system are in /usr/share/zoneinfo. You’ll find that this directory contains a lot of time zones and a lot of aliases for time zones. To set your system’s time zone manually, either copy one of the files in /usr/share/zoneinfo to /etc/localtime (or make a symbolic link) or change it with your distribution’s time zone tool. (The command-line program tzselect may help you identify a time zone file.)
To use a time zone other than the system default for just one shell session, set the TZ environment variable to the name of a file in /usr/share/ zoneinfo and test the change, like this:
$ export TZ=US/Central
$ date
As with other environment variables, you can also set the time zone for the duration of a single command like this:
$ TZ=US/Central dateIf your machine is permanently connected to the Internet, you can run a Network Time Protocol (NTP) daemon to maintain the time using a remote server. Many distributions have built-in support for an NTP daemon, but it may not be enabled by default. You might need to install an ntpd package to get it to work.
If you need to do the configuration by hand, you’ll find help on the main NTP web page at http://www.ntp.org/, but if you’d rather not read through the mounds of documentation there, do this:
Find the closest NTP time server from your ISP or from the ntp.org web page.
Put that time server in /etc/ntpd.conf.
Run
ntpdateserverat boot time.Run
ntpdat boot time, after thentpdatecommand.
If your machine doesn’t have a permanent Internet connection, you can use a daemon like chronyd to maintain the time during disconnections.
You can also set your hardware clock based on the network time in order to help your system maintain time coherency when it reboots. (Many distributions do this automatically.) To do so, set your system time from the network with ntpdate (or ntpd), then run the command you saw back in Note:
# hwclock --systohc –-utcThe Unix cron service runs programs repeatedly on a fixed schedule. Most experienced administrators consider cron to be vital to the system because it can perform automatic system maintenance. For example, cron runs log file rotation utilities to ensure that your hard drive doesn’t fill up with old log files. You should know how to use cron because it’s just plain useful.
You can run any program with cron at whatever times suit you. The program running through cron is called a cron job. To install a cron job, you’ll create an entry line in your crontab file, usually by running the crontab command. For example, the crontab entry schedules the /home/juser/bin/spmake command daily at 9:15 AM:
15 09 * * * /home/juser/bin/spmake
The five fields at the beginning of this line, delimited by whitespace, specify the scheduled time (see also Figure 7-3). The fields are as follows, in order:
Minute (0 through 59). The cron job above is set for minute 15.
Hour (0 through 23). The job above is set for the ninth hour.
Day of month (1 through 31).
Month (1 through 12).
Day of week (0 through 7). The numbers 0 and 7 are Sunday.
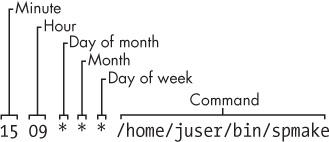
A star (*) in any field means to match every value. The preceding example runs spmake daily because the day of month, month, and day of week fields are all filled with stars, which cron reads as “run this job every day, of every month, of every week.”
To run spmake only on the 14th day of each month, you would use this crontab line:
15 09 14 * * /home/juser/bin/spmakeYou can select more than one time for each field. For example, to run the program on the 5th and the 14th day of each month, you could enter 5,14 in the third field:
15 09 5,14 * * /home/juser/bin/spmakeNote
If the cron job generates standard output or an error or exits abnormally, cron should mail this information to you. Redirect the output to /dev/null or some other log file if you find the email annoying.
The crontab(5) manual page provides complete information on the crontab format.
Each user can have his or her own crontab file, which means that every system may have multiple crontabs, usually found in /var/spool/cron/crontabs. Normal users can’t write to this directory; the crontab command installs, lists, edits, and removes a user’s crontab.
The easiest way to install a crontab is to put your crontab entries into a file and then use crontab file to install file as your current crontab. The crontab command checks the file format to make sure that you haven’t made any mistakes. To list your cron jobs, run crontab -l. To remove the crontab, use crontab -r.
However, after you’ve created your initial crontab, it can be a bit messy to use temporary files to make further edits. Instead, you can edit and install your crontab in one step with the crontab -e command. If you make a mistake, crontab should tell you where the mistake is and ask if you want to try editing again.
Rather than use the superuser’s crontab to schedule recurring system tasks, Linux distributions normally have an /etc/crontab file. Don’t use crontab to edit this file, because this version has an additional field inserted before the command to run—the user that should run the job. For example, this cron job defined in /etc/crontab runs at 6:42 AM as the superuser (root, shown at ➊):
42 6 * * * root➊ /usr/local/bin/cleansystem > /dev/null 2>&1
The cron utility is one of the oldest components of a Linux system; it’s been around for decades (predating Linux itself), and its configuration format hasn’t changed much for many years. When something gets to be this old, it becomes fodder for replacement, and there are efforts underway to do exactly that.
The proposed replacements are actually just parts of the newer versions of init: For systemd, there are timer units, and for Upstart, the idea is to be able to create recurring events to trigger jobs. After all, both versions of init can run tasks as any user, and they offer certain advantages, such as custom logging.
However, the reality is that neither systemd nor Upstart currently has all of the capabilities of cron. Furthermore, when they do become capable, backward compatibility will be necessary to support everything that relies on cron. For these reasons, it’s unlikely that the cron format will go away anytime soon.
To run a job once in the future without using cron, use the at service. For example, to run myjob at 10:30 PM, enter this command:
$ at 22:30
at> myjob
End the input with CTRL-D. (The at utility reads the commands from the standard input.)
To check that the job has been scheduled, use atq. To remove it, use atrm. You can also schedule jobs days into the future by adding the date in DD.MM.YY format, for example, at 22:30 30.09.15.
There isn’t much else to the at command. Though at isn’t used that often, it can be handy for that odd time when you need to tell the system to shut down in the future.
We’ve discussed how setuid programs such as sudo and su allow you to change users, and we’ve mentioned system components like login that control user access. Perhaps you’re wondering how these pieces work and what role the kernel plays in user switching.
There are two ways to change a user ID, and the kernel handles both. The first is with a setuid executable, which is covered in 2.17 File Modes and Permissions. The second is through the setuid() family of system calls. There are a few different versions of this system call to accommodate the various user IDs associated with a process, as you’ll learn in 7.8.1 Process Ownership, Effective UID, Real UID, and Saved UID.
The kernel has basic rules about what a process can or can’t do, but here are the three basics:
A process running as root (userid 0) can use
setuid()to become any other user.A process not running as root has severe restrictions on how it may use
setuid(); in most cases, it cannot.Any process can execute a setuid program as long as it has adequate file permissions.
Note
User switching has nothing to do with passwords or usernames. Those are strictly user-space concepts, as you first saw in the /etc/passwd file in 7.3.1 The /etc/passwd File. You’ll learn more details about how this works in 7.9.1 Using Libraries for User Information.
Our discussion of user IDs so far has been simplified. In reality, every process has more than one user ID. We’ve described the effective user ID (euid), which defines the access rights for a process. A second user ID, the real user ID (ruid), indicates who initiated a process. When you run a setuid program, Linux sets the effective user ID to the program’s owner during execution, but it keeps your original user ID in the real user ID.
On modern systems, the difference between the effective and real user IDs is confusing, so much so that a lot of documentation regarding process ownership is incorrect.
Think of the effective user ID as the actor and the real user ID as the owner. The real user ID defines the user that can interact with the running process—most significantly, which user can kill and send signals to a process. For example, if user A starts a new process that runs as user B (based on setuid permissions), user A still owns the process and can kill it.
On normal Linux systems, most processes have the same effective user ID and real user ID. By default, ps and other system diagnostic programs show the effective user ID. To view both the effective and real user IDs on your system, try this, but don’t be surprised if you find that the two user ID columns are identical for all processes on your system:
$ ps -eo pid,euser,ruser,commTo create an exception just so that you can see different values in the columns, try experimenting by creating a setuid copy of the sleep command, running the copy for a few seconds, and then running the preceding ps command in another window before the copy terminates.
To add to the confusion, in addition to the real and effective user IDs, there is also a saved user ID (which is usually not abbreviated). A process can switch its effective user ID to the real or saved user ID during execution. (To make things even more complicated, Linux has yet another user ID: the file system user ID [fsuid], which defines the user accessing the filesystem but is rarely used.)
The idea of the real user ID might contradict your previous experience. Why don’t you have to deal with the other user IDs very frequently? For example, after starting a process with sudo, if you want to kill it, you still use sudo; you can’t kill it as your own regular user. Shouldn’t your regular user be the real user ID in this case, giving you the correct permissions?
The cause of this behavior is that sudo and many other setuid programs explicitly change the effective and real user IDs with one of the setuid() system calls. These programs do so because there are often unintended side effects and access problems when all of the user IDs do not match.
Note
If you’re interested in the details and rules regarding user ID switching, read the setuid(2) manual page and check the other manual pages listed in the SEE ALSO section. There are many different system calls for diverse situations.
Some programs don’t like to have a real user ID of root. To prevent sudo from changing the real user ID, add this line to your /etc/sudoers file (and beware of side effects on other programs you want to run as root!):
Defaults stay_setuid
Because the Linux kernel handles all user switches (and as a result, file access permissions) through setuid programs and subsequent system calls, systems developers and administrators must be extremely careful with two things:
The programs that have setuid permissions
What those programs do
If you make a copy of the bash shell that is setuid root, any local user can execute it and have complete run of the system. It’s really that simple. Furthermore, even a special-purpose program that is setuid root can pose a danger if it has bugs. Exploiting weaknesses in programs running as root is a primary method of systems intrusion, and there are too many such exploits to count.
Because there are so many ways to break into a system, preventing intrusion is a multifaceted affair. One of the most essential ways to keep unwanted activity off your system is to enforce user authentication with usernames and passwords.
A multiuser system must provide basic support for user security in terms of identification and authentication. The identification portion of security answers the question of who users are. The authentication piece asks users to prove that they are who they say they are. Finally, authorization is used to define and limit what users are allowed to do.
When it comes to user identification, the Linux kernel knows only the numeric user IDs for process and file ownership. The kernel knows authorization rules for how to run setuid executables and how user IDs may run the setuid() family of system calls to change from one user to another. However, the kernel does not know anything about authentication: usernames, passwords, and so on. Practically everything related to authentication happens in user space.
We discussed the mapping between user IDs and passwords in 7.3.1 The /etc/passwd File; now we’ll explain how user processes access this mapping. We’ll begin with an oversimplified case, in which a user process wants to know its username (the name corresponding to the effective user ID). On a traditional Unix system, a process could do something like this to get its username:
The process asks the kernel for its effective user ID with the
geteuid()system call.The process opens the /etc/passwd file and starts reading at the beginning.
The process reads a line of the /etc/passwd file. If there’s nothing left to read, the process has failed to find the username.
The process parses the line into fields (breaking out everything between the colons). The third field is the user ID for the current line.
The process compares the ID from Step 4 to the ID from Step 1. If they’re identical, the first field in Step 4 is the desired username, and the process can stop searching and use this name.
The process moves on to the next line in /etc/passwd and goes back to Step 3.
This is a long procedure that’s usually much more complicated in reality.
If every developer who needed to know the current username had to write all of the code you’ve just seen, the system would be a horrifyingly disjointed, buggy, bloated, and unmaintainable mess. Fortunately, we can use standard libraries to perform repetitive tasks, so all you’d normally need to do to get a username is call a function like getpwuid() in the standard library after you have the answer from geteuid(). (See the manual pages for these calls for more on how they work.)
When the standard library is shared, you can make significant changes to the implementation without changing any other program. For example, you can move away from using /etc/passwd for your users and use a network service such as LDAP instead.
This approach has worked well for identifying usernames associated with user IDs, but passwords have proven more troublesome. 7.3.1 The /etc/passwd File describes how, traditionally, the encrypted password was part of /etc/passwd, so if you wanted to verify a password that a user entered, you’d encrypt whatever the user typed and compare it to the contents of the /etc/passwd file.
This traditional implementation has the following limitations:
It doesn’t set a system-wide standard for the encryption protocol.
It assumes that you have access to the encrypted password.
It assumes that you want to prompt the user for a password every time the user wants to access something that requires authentication (which gets annoying).
It assumes that you want to use passwords. If you want to use one-time tokens, smart cards, biometrics, or some other form of user authentication, you have to add that support yourself.
Some of these limitations contributed to the development of the shadow password package discussed in 7.3.3 The /etc/shadow File, which took the first step in allowing system-wide password configuration. But the solution to the bulk of the problems came with the design and implementation of PAM.
To accommodate flexibility in user authentication, in 1995 Sun Microsystems proposed a new standard called Pluggable Authentication Modules (PAM), a system of shared libraries for authentication (Open Source Software Foundation RFC 86.0, October 1995). To authenticate a user, an application hands the user to PAM to determine whether the user can successfully identify itself. This way, it’s relatively easy to add support for additional authentication techniques, such as two-factor and physical keys. In addition to authentication mechanism support, PAM also provides a limited amount of authorization control for services (for example, if you’d like to deny a service like cron to certain users).
Because there are many kinds of authentication scenarios, PAM employs a number of dynamically loadable authentication modules. Each module performs a specific task; for example, the pam_unix.so module can check a user’s password.
This is tricky business, to say the least. The programming interface isn’t easy, and it’s not clear that PAM actually solves all of the existing problems. Nevertheless, PAM support is in nearly every program that requires authentication on a Linux system, and most distributions use PAM. And because it works on top of the existing Unix authentication API, integrating support into a client requires little, if any, extra work.
We’ll explore the basics of how PAM works by examining its configuration. You’ll normally find PAM’s application configuration files in the /etc/pam.d directory (older systems may use a single /etc/pam.conf file). Most installations include many files, so you may not know where to start. Some filenames should correspond to parts of the system that you know already, such as cron and passwd.
Because the specific configuration in these files varies significantly between distributions, it can be difficult to find a common example. We’ll look at an example configuration line that you might find for chsh (the change shell program):
auth requisite pam_shells.so
This line says that the user’s shell must be in /etc/shells in order for the user to successfully authenticate with the chsh program. Let’s see how. Each configuration line has three fields: a function type, control argument, and module, in that order. Here’s what they mean for this example:
Function type. The function that a user application asks PAM to perform. Here, it’s
auth, the task of authenticating the user.Control argument. This setting controls what PAM does after success or failure of its action for the current line (
requisitein this example). We’ll get to this shortly.Module. The authentication module that runs for this line, determining what the line actually does. Here, the pam_shells.so module checks to see whether the user’s current shell is listed in /etc/shells.
PAM configuration is detailed on the pam.conf(5) manual page. Let’s look at a few of the essentials.
A user application can ask PAM to perform one of the following four functions:
authAuthenticate a user (see if the user is who they say they are).accountCheck user account status (whether the user is authorized to do something, for example).sessionPerform something only for the user’s current session (such as displaying a message of the day).passwordChange a user’s password or other credentials.
For any configuration line, the module and function together determine PAM’s action. A module can have more than one function type, so when determining the purpose of a configuration line, always remember to consider the function and module as a pair. For example, the pam_unix.so module checks a password when performing the auth function, but it sets a password when performing the password function.
One important feature of PAM is that the rules specified by its configuration lines stack, meaning that you can apply many rules when performing a function. This is why the control argument is important: The success or failure of an action in one line can impact following lines or cause the entire function to succeed or fail.
There are two kinds of control arguments: the simple syntax and a more advanced syntax. Here are the three major simple syntax control arguments that you’ll find in a rule:
sufficientIf this rule succeeds, the authentication is successful, and PAM does not need to look at any more rules. If the rule fails, PAM proceeds to additional rules.requisiteIf this rule succeeds, PAM proceeds to additional rules. If the rule fails, the authentication is unsuccessful, and PAM does not need to look at any more rules.requiredIf this rule succeeds, PAM proceeds to additional rules. If the rule fails, PAM proceeds to additional rules but will always return an unsuccessful authentication regardless of the end result of the additional rules.
Continuing with the preceding example, here is an example stack for the chsh authentication function:
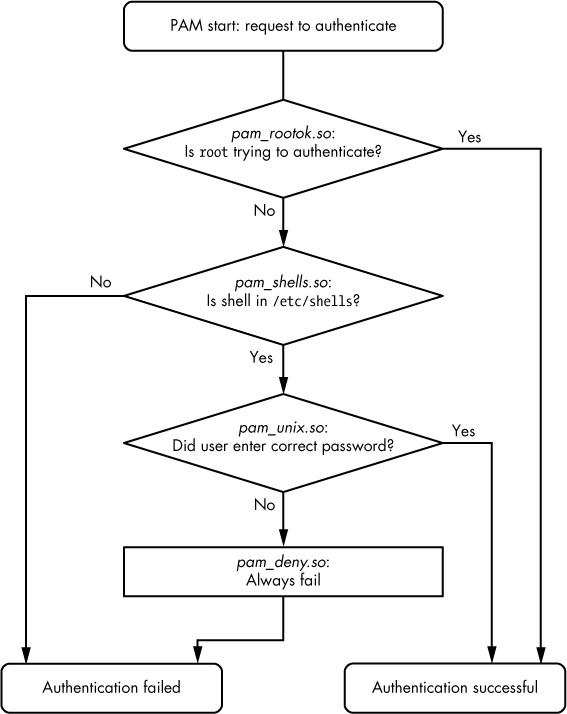
auth       sufficient      pam_rootok.so
auth       requisite       pam_shells.so
auth       sufficient      pam_unix.so
auth       required        pam_deny.so
With this configuration, when the chsh command asks PAM to perform the authentication function, PAM does the following (see Figure 7-4 for a flowchart):
The pam_rootok.so module checks to see if the root user is the one trying to authenticate. If so, it immediately succeeds and attempts no further authentication. This works because the control argument is set to
sufficient, meaning that success from this action is good enough for PAM to immediately report success back tochsh. Otherwise, it proceeds to Step 2.The pam_shells.so module checks to see if the user’s shell is in /etc/shells. If the shell is not there, the module returns failure, and the
requisitecontrol argument indicates that PAM must immediately report this failure back tochshand attempt no further authentication. Otherwise, the shell is in /etc/shells, so the module returns success and fulfills the control flag ofrequired; proceed to Step 3.The pam_unix.so module asks the user for the user’s password and checks it. The control argument is set to
sufficient, so success from this module (a correct password) is enough for PAM to report success tochsh. If the password is incorrect, PAM continues to Step 4.The pam_deny.so module always fails, and because the
requiredcontrol argument is present, PAM reports failure back tochsh. This is a default for when there’s nothing left to try. (Note that arequiredcontrol argument does not cause PAM to fail its function immediately—it will run any lines left on its stack—but the report back to the application will always be of failure.)
Note
Don’t confuse the terms function and action when working with PAM. The function is the high-level goal: what the user application wants PAM to do (authenticate a user, for example). An action is a specific step that PAM takes in order to reach that goal. Just remember that the user application invokes the function first and that PAM takes care of the particulars with actions.
The advanced control argument syntax, denoted inside square brackets ([]), allows you to manually control a reaction based on the specific return value of the module (not just success or failure). For details, see the pam.conf(5) manual page; when you understand the simple syntax, you’ll have no trouble with the advanced syntax.
Due to its control flow capability and module argument syntax, the PAM configuration syntax has many features of a programming language and a certain degree of power. We’ve only scratched the surface so far, but here are a few more tips on PAM:
To find out which PAM modules are present on your system, try
man -k pam_(note the underscore). It can be difficult to track down the location of modules. Try thelocate unix_pam.socommand and see where that leads you.The manual pages contain the functions and arguments for each module.
Many distributions automatically generate certain PAM configuration files, so it may not be wise to change them directly in /etc/pam.d. Read the comments in your /etc/pam.d files before editing them; if they’re generated files, the comments will tell you where they came from.
The /etc/pam.d/other configuration file defines the default configuration for any application that lacks its own configuration file. The default is often to deny everything.
There are different ways to include additional configuration files in a PAM configuration file. The
@includesyntax loads an entire configuration file, but you can also use a control argument to load only the configuration for a particular function. The usage varies among distributions.PAM configuration doesn’t end with module arguments. Some modules can access additional files in /etc/security, usually to configure per-user restrictions.
Due to the evolution of Linux password verification over the years, a number of password configuration artifacts remain that can cause confusion at times. The first to be aware of is the file /etc/login.defs. This is the configuration file for the original shadow password suite. It contains information about the encryption algorithm used for the shadow password file, but it’s rarely used on a modern system with PAM installed, because the PAM configuration contains this information. This said, the encryption algorithm in /etc/login.defs should match the PAM configuration in the rare case that you run into an application that doesn’t support PAM.
Where does PAM get its information about the password encryption scheme? Recall that there are two ways for PAM to interact with passwords: the auth function (for verifying a password) and the password function (for setting a password). It’s easiest to track down the password-setting parameter. The best way is probably just to grep it:
$ grep password.*unix /etc/pam.d/*The matching lines should contain pam_unix.so and look something like this:
password sufficient pam_unix.so obscure sha512
The arguments obscure and sha512 tell PAM what to do when setting a password. First, PAM checks to see if the password is “obscure” enough (that is, the password isn’t too similar to the old password, among other things), and then PAM uses the SHA512 algorithm to encrypt the new password.
But this happens only when a user sets a password, not when PAM is verifying a password. So how does PAM know which algorithm to use when authenticating? Unfortunately, the configuration won’t tell you anything; there are no encryption arguments for pam_unix.so for the auth function. The manual pages also tell you nothing.
It turns out that (as of this writing) pam_unix.so simply tries to guess the algorithm, usually by asking the libcrypt library to do the dirty work of trying a whole bunch of things until something works or there’s nothing left to try. Therefore, you normally don’t have to worry about the verification encryption algorithm.
We’re now at about the midpoint in our progression through this book, having covered many of the vital building blocks of a Linux system. The discussion of logging and users on a Linux system has introduced you to what makes it possible to divide services and tasks into small, independent chunks that still know how to interact to a certain extent.
This chapter dealt almost exclusively with user space, and we now need to refine our view of user-space processes and the resources they consume. To do so, we’ll go back into the kernel in Chapter 8.