Microsoft makes the Windows operating system, but other companies make the actual computers.
That’s why Apple has an unfair advantage: It makes both the hardware and the software. It can design them to work well together, to work consistently, to work easily. It’s that polish and elegance that explains why Mac owners tend to be an especially passionate bunch. People don’t just call them “Mac users”; they get special names like fanboys, Macolytes, and Macheads.
Which is usually fine with the Macheads.
Chapter 5 teems with juicy tidbits that are equally useful no matter which kind of computer you use.
But Macs teem with secrets all their own.
(A note: Many of them are in the Mac’s settings program, called System Preferences. To open it, click the ![]() at the top left of your screen; from the menu, choose System Preferences. Or, if your Dock is visible—the row of icons across the bottom of your screen—you can generally open System Preferences by clicking its icon, which looks like silvery gears.)
at the top left of your screen; from the menu, choose System Preferences. Or, if your Dock is visible—the row of icons across the bottom of your screen—you can generally open System Preferences by clicking its icon, which looks like silvery gears.)
How to skip the password screen
Should you password-protect your Mac?
If it’s a laptop, yes. It might get stolen, and people might root through your stuff. If it’s a desktop Mac, maybe—for example, if you’d rather not have your family members or coworkers snooping.
But what if it’s your kitchen computer, and there’s nothing especially private on it? Or what if it’s just you and your spouse, and you have nothing to hide from each other? In those cases, there’s no particular reason to password-protect your Mac. The only person inconvenienced by a password is you.
To set up no password, open System Preferences. Click your name, then Change Password. (Click the second Change Password button too, if one appears.) If you already have a password, you’re asked to supply it now, in the Old Password box. Leave the “New password” box and the Verify box empty.
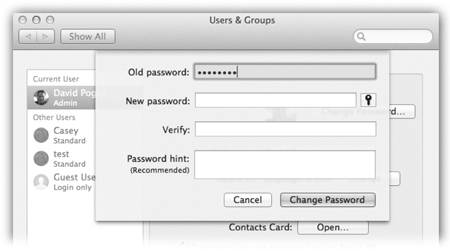
From now on, whenever you’re asked for your password, just leave the Password box empty. You’ll be able to log in faster.
Scrolling on the trackpad
These days, 75 percent of all Macs sold are laptops. So you’re much more likely to be using a trackpad than a mouse.
Therefore, a crash course in using your trackpad is in order.
• You can scroll through a page by dragging two fingers up or down your trackpad.
• You can right-click by clicking the trackpad with two fingers.
• You can go Forward or Back between Web pages by swiping horizontally with two fingers.
• You can click without any sound. That’s handy when you’re working in bed beside a light sleeper. To set this up, open System Preferences (here). Click Trackpad. Turn on “Tap to click.”
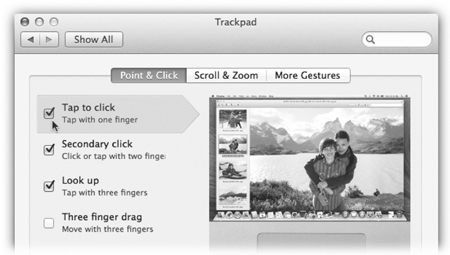
From now on, you can trigger a click just by touching the trackpad rather than pushing down the clicking surface fully. It’s totally silent.
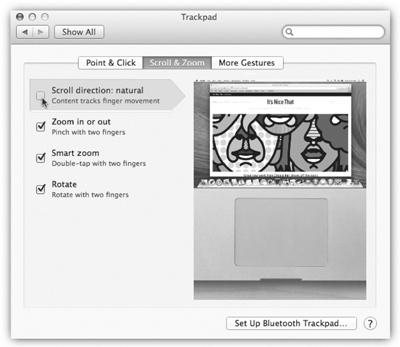
How to fix the reversed scrolling
On a new Mac, dragging two fingers down the trackpad moves you down in a document. That’s quite a switch from the way Macs have worked since their invention, in 1984. Until now, scrolling down has moved you up in a document. (Easier to see than to read.)
It is now, however, more like the iPhone or the iPad, and that consistency is what Apple was going for.
Which way do you want it to work? That’s up to you. Open System Preferences (here). Click Trackpad. Click the Scroll & Zoom tab.
See the option Scroll Direction: Natural? That should be on if you like the newer arrangement but off if you prefer the older one.
Make your windows stop reopening
In recent versions of the Mac operating system, you may have noticed a quirk: The documents that were open when you last quit a program magically reopen, ready for you to get back to work. Everything is exactly as it was.
If you tend to work on the same documents day after day, all of this can be handy; the auto-reopened document helps you remember what you were in the middle of doing.
Then again, maybe this feature drives you crazy.
Fortunately, it’s easy to turn it off: globally, on a per-program basis, or on a per-Quit basis.
• Turn off all auto-reopening: Open System Preferences (here). Click General. Turn on “Close windows when quitting an application.”
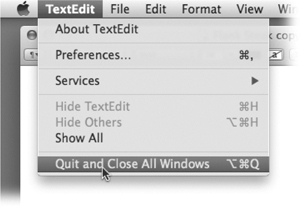
• Turn off reopening next time: If you hold down the Option key while quitting a program (for example, when you open the Safari menu to quit, the Quit command changes to Quit and Close All Windows. The next time you open the program, it won’t remember your window setup.
(Unless you’ve turned off the “Restore windows” feature in System Preferences, as described above. In that case, pressing Option makes the Quit command read Quit and Keep Windows.)
• Forget the window setup as you open a program: If you forgot to use the tip in the previous paragraph, you can force a program to forget its previous window setup by pressing the Shift key as the program opens.
Make the Mac read anything out loud to you
Your Mac can read aloud to you. It’s a great way to catch up on the news while you’re making breakfast, or to proofread something you’ve written. You’ll catch all kinds of mistakes when it’s read to you out loud.
Many Mac programs have a Start Speaking command right there in the Edit menu. From the Edit menu, choose Speech, then Start Speaking. These programs include Mail, Safari, Messages, Stickies, Pages, and TextEdit.
But in fact, the Mac can read anything to you, in any window of any program.
To set this up, open System Preferences (here) and choose Dictation & Speech. Click the Text to Speech tab at the top of the window. Here’s where you choose which voice you want the Mac to use—you get a choice of 18 different voice styles, ages 8 to 50—and how fast it should speak.
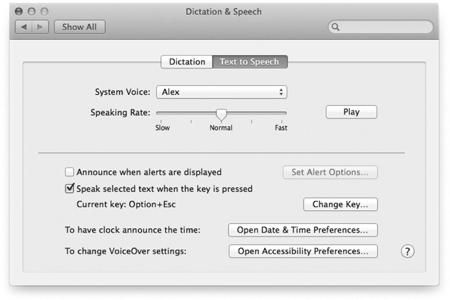
Your main job, though, is to turn on “Speak selected text when the key is pressed.” By “the key,” it means the keystroke Option-Esc (while pressing Option, tap the Esc key at top left).
(The Change Key button lets you replace that combo with a different one; just choose a keystroke that doesn’t conflict with the program you’re using. Try Control-T, for example.)
In any case, you can now close the System Preferences window.
Now you’re ready for the magic. Find some text worth reading. Drag your cursor through some text to highlight it, and then press Option-Esc (or whichever keystroke you use). Instantly the Mac begins reading it aloud. To stop the playback, press the same keystroke again.
Pretty cool, huh?
Sign a contract electronically
These days, contracts and agreements are going electronic. Fortunately, your Mac can take a picture of your actual written signature. You can then zap it onto whatever PDF contract may come your way.
To teach it your signature, sign your name on a piece of white paper. Open the Preview program (it’s in your Applications folder).
Open the Edit toolbar, which looks something like this:

If you don’t see it, open the View menu and choose Show Edit Toolbar (or Show Markup Toolbar).
Now click the Sig button (shown by the arrow above). If there’s a pop-up button, choose Create Signature from Camera. (You’ll see your actual camera name.) Hold up your signed paper to the Mac’s camera. When the positioning looks good, click Accept or Done. You’ve just stored your signature.

When the time comes to sign a document, make sure the Edit toolbar is visible. Open the pop-up menu shown by the arrow on the previous page, choose your signature’s name, and then click on the document where you want to sign it. Boom—you’ve just signed the form.
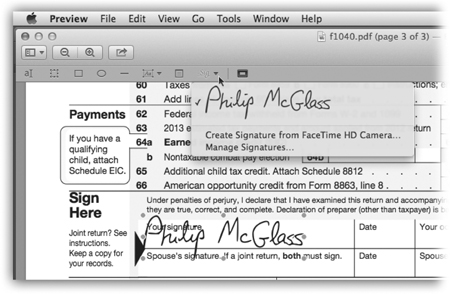
You can delete signatures (and add new ones), if you like. Open the Tools menu; choose Annotate, then Tools, then Manage Signatures. There are your + and – buttons.
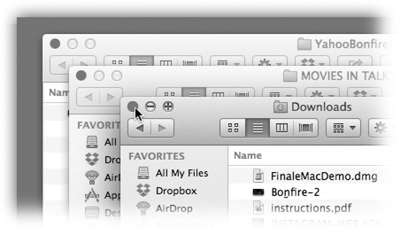
See what’s in a file without opening it (Quick Look)
The Mac’s Quick Look feature is so useful and amazing, there ought to be a shrine to it.
Quick Look is a Finder desktop feature that lets you see what’s in a document—see what’s behind its icon—without having to open a program. Read the text inside it, play the movie, admire the photo, right there on the desktop.
It’s so important, in fact, that Apple has devoted the keyboard’s biggest key to activating Quick Look: the Space bar. Click any document icon once and then press the Space bar to get a quick look, thanks to Quick Look. You get a huge, instantaneous preview of the document.
For example, you can read the fine text in a Word or PowerPoint document without actually having to open Word or PowerPoint, which saves you about 45 minutes. If it’s a movie or a sound, it plays instantly.
If it’s a PDF, Word, PowerPoint, Excel, Keynote, or Pages document that’s several pages long, you can actually turn the pages to read it. If you hold down the Option key, you can zoom in and out by swiping two fingers up or down your trackpad (or by scrolling the mouse wheel, ball, or scroll surface).
Once the Quick Look preview is open, you have two choices. You can press the Space bar again to close it—or you can click Open With [Program Name], the button in the top right. It might read, for example, “Open with Preview.” And it means “Go ahead and open this file as though I’d double-clicked it in the first place.” (And if you click and hold your cursor on that “Open with” button, you get a pop-up menu of other programs that could open this file.)
Type half as much
The Mac has an automatic abbreviation-expander feature. You can set it up so that when you type addr, the Mac types out:
Taylor DeLorenzo
12883 South New American Terrace
Southwest Flintrock, AZ 85003
Maybe you just set up one auto-expanding abbreviation; maybe you set up dozens. The point is that whatever you type regularly, your Mac can fill in for you.
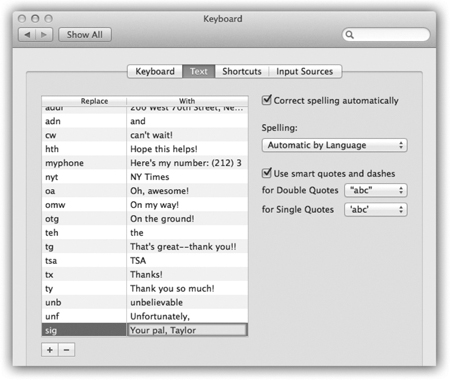
To set this up, open System Preferences (here). Click Keyboard, then click Text. There’s your list of ready-to-use abbreviations. Add a new one by clicking the + button below the list. Fill in the Replace and With columns with the abbreviation and the expanded version you want. Close the window.
From now on, that abbreviation expands automatically, anywhere you can type.
How to type accents and symbols
The Mac has always been a typographical powerhouse, and part of the reason is its ability to type all the symbols that don’t appear on the keyboard: ©, ™, ¨, and so on.
The key to unlocking them is the Option key. Whenever you press Option, your ordinary, mild-mannered alphabet keys suddenly type fascinating, exotic symbols like these:
Option-g |
|
© |
Option-r |
|
® |
Option-2 |
|
TM |
Option-4 |
|
¢ |
Option-1 |
|
¡ (Spanish exclamation) |
Option-3 |
|
£ (pounds) |
Option-7 |
|
¶ (paragraph break) |
Option-8 |
|
• (bullet) |
Option-0 |
|
º (degrees) |
Option-p |
|
π (pi) |
Option-/ |
|
÷ (division symbol) |
The Option key gets you diacritical (accent) marks, too. The trick is to hold down the key for the letter you want to accent. For example, to type the last letter of café, hold down the letter e key until you see this palette pop out:
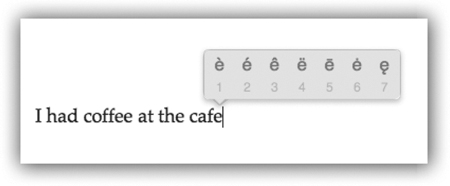
Click the symbol you want. (The same palette pops out of all five vowel keys, plus S, Z, C, and N.)
There are dozens more, though: math symbols, international symbols, fancy brackets, stars, and on and on. You’ll never remember them all.
Fortunately, there’s a cheat sheet. Here’s how to set it up:
Open System Preferences (here). Click Keyboard. Click Input Sources. Turn on “Show Input menu in menu bar.” Now look at the top right of your screen: You’ve installed a new mini-menu.
Next time you want to type a special symbol, open this menu and choose Show Character Viewer. The cheat sheet appears. (If it’s full of smileys, click the tiny ![]() icon at the top right.)
icon at the top right.)
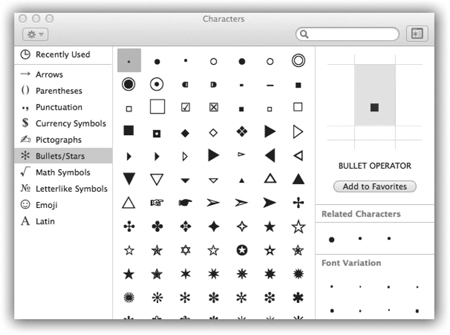
The symbols are arrayed before you in various category headings: Arrows, Bullets/Stars, Math Symbols, and so on.
Double-click a symbol to type it into your document.
Talk to type on your Mac
Not only can your Mac read text aloud to you—it can also write down what you say. You can speak to type.
The dictation feature is much faster than typing. And it’s incapable of misspelling a word (although it may sometimes write the wrong word entirely).
To try it out, open any program where you can type, like your e-mail program or Word. Now tap the Fn key twice. (It’s in the lower-left corner.)
The first time you try this, the Mac asks if you’re sure you want to turn on dictation, and it offers to turn on Enhanced Dictation (a mode that doesn’t require an Internet connection).
When you double-press the Fn key, a tiny microphone button appears next to the insertion point, and you hear a xylophone note. Now you can speak. Talk normally—don’t be loud or slow. But do speak your punctuation, like this:
Dear John (comma) (new paragraph),
I’ve always loved you (dash)—well (comma), at least I’ve always liked you (period).
You can also speak symbols like “percent sign” (%), “at sign” (@), “dollar sign” ($), and so on. And you can say “cap” right before the word, like this: “Dear (cap) John, I forgot to mention that you’re in my new book, (cap) The (cap) Loser.”
After you finish speaking, click Done or press the Return key.
The Mac plays another xylophone note—higher, this time—and then the transcribed text appears, exactly as though you’d typed it. (By the way: You’ll be far more accurate if you wear a headset microphone. You can buy one inexpensively from emicrophones.com, for example.)
The calculator staring you in the face
On your Mac, calculators are all around you. There’s a Calculator program in your Applications folder. There’s a mini-calculator on your Dashboard.
But when you need some quick math, the easiest-to-find calculator is the one that’s on your screen all the time: the ![]() in the upper-right corner of your screen.
in the upper-right corner of your screen.
That, of course, is the Spotlight icon, the one you usually use for searching your Mac. But as it turns out, it’s a dandy little calculator, too.
To open the ![]() feature, click it, or press
feature, click it, or press ![]() -Space bar. Now type (or paste) the equation you want to solve. You might type, for example, 234+923-12*25. And there it is, the first item in the Spotlight results: 857.
-Space bar. Now type (or paste) the equation you want to solve. You might type, for example, 234+923-12*25. And there it is, the first item in the Spotlight results: 857.
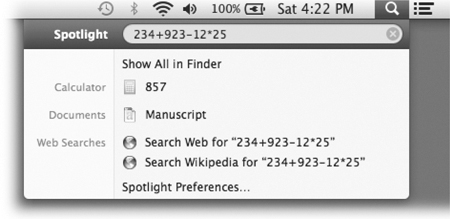
There’s more to it than the four basic math functions. You can use square roots, for example: Type sqrt(49), and you’ll get the answer 7. It also works with the functions log(x), exp(x), sin(x), sinh(x), and e. You can even type pi when you need it (3.14159…).
Magnify the screen
There are all kinds of situations in which you might want to magnify the Mac’s screen. Sometimes there’s a video that you’d like to play bigger. Sometimes there’s tiny type that you can’t read. Sometimes you want to study how some icon or font character was designed, pixel by pixel. In any case, this fantastic feature lets you zoom way in—so much that a single word fills your entire screen.
You have to turn on this option in System Preferences (here). Click Accessibility, and then click Zoom. Finally, turn on “Use scroll gesture with modifier keys to zoom.” Close this window.
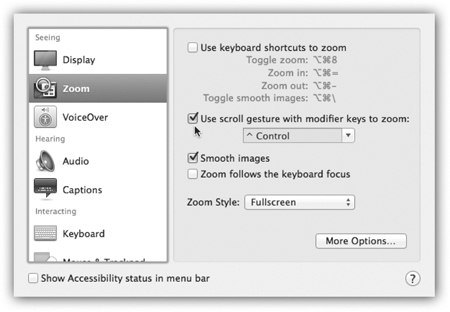
From now on, whenever you want to zoom into your screen, hold down the Control key—and drag two fingers up the trackpad. Or, if you have a mouse, hold down the Control key and turn the scroll wheel away from you. (If you have an Apple mouse, it may have a tiny scroll ball on top instead—or even a nonmoving scroll area on top. That’s if you have the cordless, flattened-looking Magic Mouse.)
Control-drag downward (or Control-scroll downward) to zoom out again.
Take a picture of the Mac screen
No computer on earth offers more built-in methods for taking a screenshot—that is, capturing a printable picture of what’s on the screen. Screenshots are great. You can take one when you want some tech-support person to see how messed up your software looks. Or when you see something online that you want to save forever. Or when you’re writing up computer instructions for someone else, or maybe a review of some new software.
Here’s how to capture:
• The whole screen: While holding down Shift and ![]() , press the number 3 key. You hear a snap! camera-shutter sound. And presto: There’s a new graphics file on your desktop, called something like “Screen shot 2015-4-14 at 5.18.12 PM” (or whatever the date and time is).
, press the number 3 key. You hear a snap! camera-shutter sound. And presto: There’s a new graphics file on your desktop, called something like “Screen shot 2015-4-14 at 5.18.12 PM” (or whatever the date and time is).
You can open this file, copy it, edit it, print it, e-mail it, and so on.
Bonus tip: You can change that keystroke to something easier to remember. See the tip here.
• A rectangular area: While holding down Shift and ![]() , press the number 4 key. Your pointer is now a + symbol, accompanied by tiny digital readouts—the coordinates of your cursor on the screen at that moment.
, press the number 4 key. Your pointer is now a + symbol, accompanied by tiny digital readouts—the coordinates of your cursor on the screen at that moment.
Now drag diagonally across the screen, enclosing a rectangular area. When you let go, the camera-click sound plays and the screenshot file appears on your desktop—containing only the area you selected.
Bonus tip: If you press Shift once you start dragging, the Mac limits your mouse movements to perfectly horizontal or perfectly vertical.
Bonus tip 2: If you press Option once you start dragging, your selected rectangle grows from the center instead of the corner.
Bonus tip 3: If you press the Space bar while you’re dragging, the shape of your box freezes—but you can move it around the screen with your mouse.
Bonus tip 4: If you chicken out, tap the Esc key at any time during your drag. You’ve just canceled the whole business.
• A neatly snipped window or open menu: Once again, press Shift-![]() -4. When your pointer is a + symbol, press the Space bar. Your pointer now looks like a tiny camera!
-4. When your pointer is a + symbol, press the Space bar. Your pointer now looks like a tiny camera!
Move your cursor so that blue foggy highlighting fills the window or menu you want to capture, then click. The resulting picture file snips the window or menu neatly from its background.
Finally, a bonus tip: If you hold down the Control key as you click or drag using any of those methods, the Mac copies your screenshot to the invisible Clipboard, ready for pasting, instead of saving it as a new graphics file on your desktop.
Take a movie of the Mac screen
You can also record a movie of screen activity. It’s a quick, easy way to “film” something for later: to demonstrate a technique, to preserve some glitch you want to complain about later, or even to save an online video (a YouTube video, for example) as a file to play back later.
The key to all of this is QuickTime Player, a program in your Applications folder. Open it. From the File menu, choose New Screen Recording. Click the red Record button.
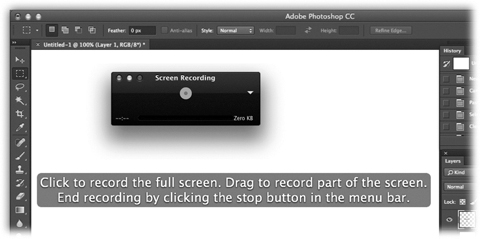
A message appears now, letting you know that you can record either the entire screen (just click to begin) or only a part of the screen (drag diagonally to form a box around the part you want).
When you’re finished recording, click the ■ button in the menu bar.
Click the Play button to make sure you’ve captured what you wanted—and then save it by opening the File menu and choosing Save. You wind up with a movie file that you can play any time you like, e-mail to someone, post to Facebook, or whatever.
How to copy files by dragging them
It’s been confusing from the beginning: When you drag icons from one window to another on the Mac, are you moving them or making copies?
• If they’re going to a different disk, you’re copying them. (A green + symbol lets you know.)
(Manual override: If you press the ![]() key as you release the mouse, you move the files or folders instead, deleting them from the original disk.)
key as you release the mouse, you move the files or folders instead, deleting them from the original disk.)
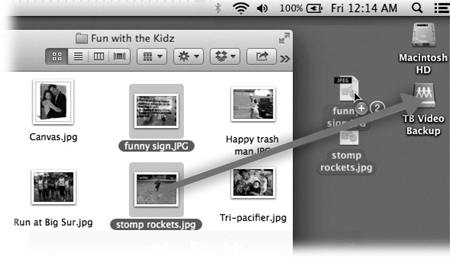
• If they’re going from window to window on the same disk, you’re moving them.
(Manual override: If you press the Option key as you release the mouse, you copy them instead of moving them—even if they’re on the same disk or in the same window.)
In any of these cases, if you realize you’ve just made a mistake, press ![]() -Z (the shortcut for the Undo command) rewinds time to the moment just before your errant drag.
-Z (the shortcut for the Undo command) rewinds time to the moment just before your errant drag.
Close all windows at once
One of the Mac’s best features is its consistency. In every program, the same keystroke—![]() -W—closes any window.
-W—closes any window.
But if you add the Option key, you close all windows in whichever program you’re using. All your Web browser windows, all your desktop windows, all your e-mail windows.
The Option key often has that effect—making a window command apply to all open windows. For example, pressing ![]() -M usually minimizes a window (shrinks it into an icon on your Dock). But if you press Option-
-M usually minimizes a window (shrinks it into an icon on your Dock). But if you press Option-![]() -M, you minimize all windows simultaneously.
-M, you minimize all windows simultaneously.
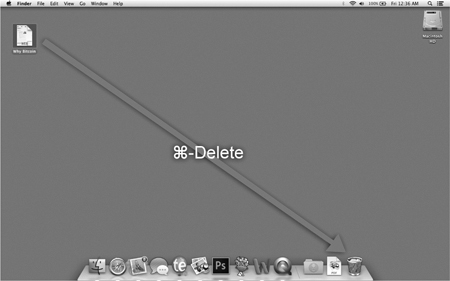
Toss an icon into the Trash without the mouse
You know how to throw away a file or a folder, right? You drag it onto the Trash icon on your Dock.
That, however, can get old quickly—if you have a big screen, for example, or if you’re working through folders full of stuff and discarding one icon after another.
An amazing keystroke awaits: ![]() -Delete. Click the icon (or icons) you want to throw away, then press
-Delete. Click the icon (or icons) you want to throw away, then press ![]() -Delete. They fly into the Trash all by themselves—no mousing required.
-Delete. They fly into the Trash all by themselves—no mousing required.
Send a file to a nearby Mac wirelessly
This is the greatest.
When you want to send a file or folder to someone else’s Mac, you don’t have to fiddle with e-mail, or networking, or setup. Thanks to a feature called AirDrop, your Mac can “see” any other Macs, iPhones, and iPads within 30 feet—and you can toss files their way, wirelessly, without any passwords or fuss. No Wi-Fi network is required; it works on the beach, on an airplane, or in a tent in the mountains.
(The Macs have to be running Mac OS X Lion, the 2011 Mac software, or later. AirDropping between Macs and iPhones requires the latest software on each—Yosemite and iOS 8.)
To use AirDrop, open any Finder (desktop) window. Click the AirDrop icon at the left side. (Or open the Go menu and choose AirDrop, if that’s easier.) Your lucky recipient must do that, too. Now you both have the AirDrop windows open. After a moment, it shows icons for both of you.

Now you can drag a file or folder icon (or a bunch of them) onto the other person’s icon.
On both ends, the Mac asks if you want to proceed. You should click Send (or press Return); the recipient should click Save (or “Save and Open”).
A progress bar curls around the other person’s icon. The transfer is encrypted, so NSA spies can’t intercept your files. Finally, the transferred file winds up in your buddy’s Downloads folder.
Turn any document into a PDF file with one click
You’ve seen PDF files. They’re great. They’re incredibly common. People send around flyers, user guides, school papers, and all kinds of other documents in PDF format.
Why are they so handy? Because when you send other people a PDF file, they see exactly the same fonts, colors, and layout that you’ve created—even if their computers don’t have the same fonts or software that you used.
PDF files are universal, too. Every kind of computer, phone, and tablet can open them. And you can search a PDF for certain words; it’s not just a frozen picture.
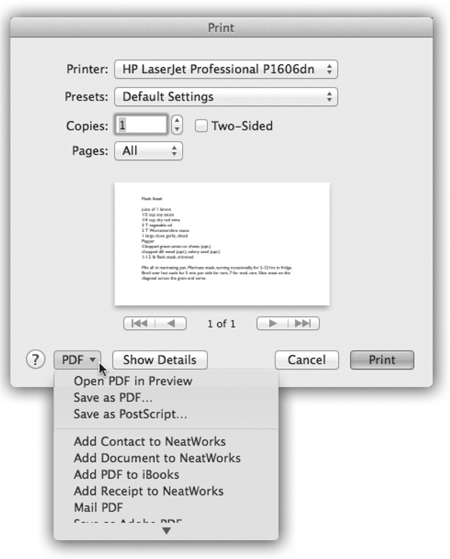
Best of all, the Mac can turn any document into a PDF file. You don’t have to buy a program to create PDF files, as Windows PC owners must.
And how do you do that? Print the document. That is, from the File menu, choose Print. In the dialog box that appears, inspect the lower-left corner: There’s a PDF menu button. From it, choose Save as PDF—and the deed is done.
The best (and least known) Mac feature ever: Web receipts
Here’s the unsung feature of the year: The “Save as Web Receipt” command.
Every time you buy something online, the transaction wraps up with a “Print this receipt for your records” screen. But don’t. You’ll waste paper and ink, and you won’t be able to find the printout later.
Instead, open the File menu and choose Print. In the Print dialog box, click the PDF button and choose “Save PDF to Web Receipts Folder.”
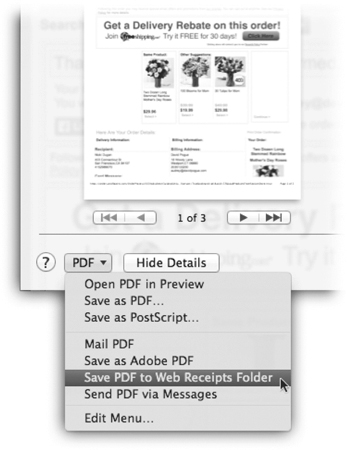
Instantly, the Mac creates a PDF version of your receipt and puts it into a special Web Receipts folder. (It’s inside your Documents folder; see here.)
If you never need that receipt again, you can open the folder to read it or print it—or, better yet, you can find it by looking for words inside it. Just use the Mac’s search feature (click the ![]() icon in the upper-right corner of your screen).
icon in the upper-right corner of your screen).
The universal fix-it step: Repair Disk Permissions
No computer works flawlessly all the time and forever. Too many cooks are working in that kitchen: the programmers who wrote the operating system, the ones that make the program you’re using, and so on. All kinds of glitches, freezes, and visual oddities can occur.
You’d be surprised at how often you can clear up the problem using the Disk Utility program that came with your Mac. It’s incredibly effective in fixing just these sorts of mysterious problems.
You’ll find Disk Utility in your Applications folder, inside its Utilities folder. Next time you experience some mystifying glitch on your Mac, open that program. On the left side, click the name of your hard drive (it’s probably Macintosh HD). Then click Repair Disk Permissions.
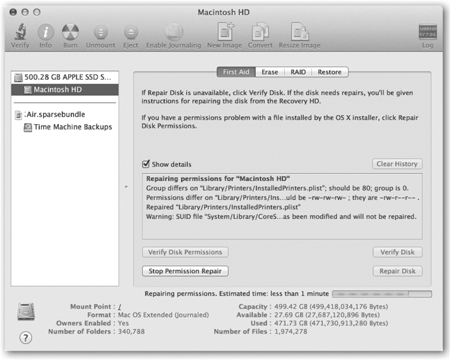
The fixing process takes a few minutes. But when it’s all over, you’ll probably see a list of things that Disk Utility has fixed—and you’ll probably find that the mysterious problem has disappeared.
Change your keystrokes
If you’re a keyboard-shortcut lover—and you should be!—it might come as a delightful surprise that you’re allowed to change the key combination shortcut for any command in any program. Or, if there’s some command that doesn’t have a keyboard shortcut, you can add one.
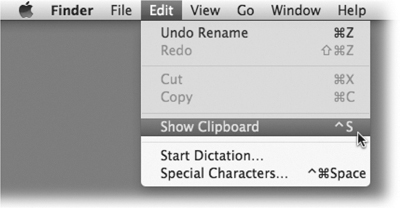
At the desktop (in the Finder), for example, there’s no keyboard shortcut for the Show Clipboard command. Maybe you think there should be!
Open System Preferences (here). Click Keyboard, then Shortcuts; click App Shortcuts in the left-side list.
Click the + button just beneath the list. From the Application pop-up menu, choose the program whose command you want to change. In this example, that’d be Finder. (If the program’s name doesn’t appear in the pop-up menu, then choose Other; navigate to, and double-click, the program you want.)
In the Menu Title box, type in the name of the menu command whose keyboard shortcut you want to change or add—Show Clipboard, for example. It must exactly match the spelling and capitalization as it appears in the menu, complete with the little three-dot ellipsis symbol (…) that may follow it. (You make that character by pressing Option-semicolon.)
Next, click in the Keyboard Shortcut box. Press the new or revised key combo you want. For Show Clipboard, you might choose Control-S.
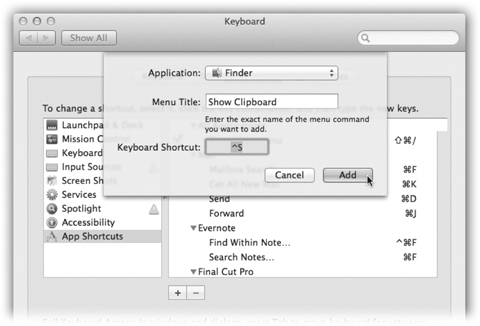
The Mac writes down your keystroke combo in the Keyboard Shortcut box, using the symbol notation described here—unless, of course, the program already uses that combination for another command. In that case, you hear only an error beep; try again with a different combo.
Finally, click Add.
Scroll down in your Keyboard Shortcuts list; the keystroke you selected now appears under the appropriate program’s flippy triangle. The next time you open the program you’ve edited, you’ll see that the new keystroke is in place.
Let the Mac turn itself on and off each day and night
Your Mac can turn on and off automatically each day, according to your schedule. That arrangement conserves electricity, saves money, and reduces pollution. Since the Mac does all the starting up and shutting down automatically, you won’t be inconvenienced in the least. You might actually never see it turn off again.
This option makes the most sense for desktop Macs; if you have a laptop, you should finish each work session by just closing the lid. (The laptop goes into low-power Sleep mode, and it will wake instantly the next time you open the lid to work.)
To set things up, open System Preferences (here). Click Energy Saver. Click Schedule.
In the box that appears, turn on both checkboxes. Set up the pop-up menus and the times. For example, if you work from 8:30 a.m. to 5:30 p.m., you might want to set things up like this:

Understanding the F-keys at last
Each key on the top row of a Mac keyboard bears two painted labels. For example, the first three keys are labeled F1, F2, and F3—but also ![]() ,
, ![]() , and
, and ![]() .
.

That’s Apple’s way of telling you that each key has two personalities.
Out of the box, those keys control the Mac’s hardware functions: screen brightness, keyboard brightness, speaker volume, and music playback. Press ![]() and
and ![]() to fiddle with the screen brightness,
to fiddle with the screen brightness, ![]() and
and ![]() to adjust the speaker volume, and so on.
to adjust the speaker volume, and so on.
But some programs, especially Microsoft’s, rely on those keys to trigger common commands. For example, F1 means Undo, F2 means cut, F3 means Copy, and F4 means Paste.
But how are you supposed to press F1 for Undo, when pressing that key dims the screen instead?
In those situations, you can just add the Fn key (lower left on Mac laptop keyboards, center block of keys on big Mac keyboards). It switches the function of the function keys; it lets F-keys be F-keys.
In other words, if you press Fn and F1, you get Undo, not the Dim Screen symbol (![]() ) function.
) function.
And what if you use those F-keys more often for Microsoft commands than you do for features like brightness and volume?
In that case, you can reverse the logic, so that the F keys usually operate as menu-command shortcuts, and require the Fn key only when you want the brightness/volume features.
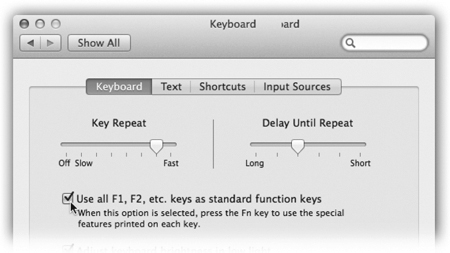
To do that, open System Preferences. Click Keyboard. Turn on “Use all F1, F2, etc. as standard function keys.”
And that’s it. Now pressing the F-keys alone will trigger software functions. They control brightness and audio only when you’re pressing Fn at the same time.
$100 for a year of private lessons
If you live near an Apple store, boy, does your computer company have a deal for you.
Apple’s One to One program, which costs $100, gives you weekly, hour-long private lessons in the store with an Apple genius—for a whole year. That’s $100 for the year, not per lesson.
If you want to get up to speed on your Mac or any of its programs, this, brothers and sisters, is the deal of the century.