Chapter 8: Word Processing, Number Crunching, Slideshowing
Microsoft Office is the set of programs that towers over the world’s corporate workers like Godzilla. It’s available in similar versions for both Mac and Windows.
Office comes in different versions, but all of them include the Big Three: Word (for word processing), Excel (for spreadsheets and number crunching), and PowerPoint (for business slideshows). All three are crawling with secrets.
The five very, very basic keystrokes worth learning
When you’re in Word, Excel, or PowerPoint, a few important keyboard shortcuts can save you all kinds of time and give you a glowing sense of mastery. Here they are:
Ctrl+S |
| Save (any changes you’ve made; press this frequently). |
Ctrl+F |
| Find (some words or numbers in the document). |
Ctrl+O |
| Open (another document). |
Ctrl+Z |
| Undo (the last change you made). |
Ctrl+Y |
| Redo (the change you just undid). |
On the Mac, press the ![]() key in place of Ctrl in the list above.
key in place of Ctrl in the list above.
Turn off automatic bullets, lists, and links
It’s nice that Microsoft Word is the Word Processor. You never have to worry that your colleagues won’t be able to open your document; they all own the same program.
What’s less nice is how aggressively Microsoft Word tries to format what you type. Suppose, for example, that you’re writing a stern note to your kid. You type this:
Chris: As we’ve discussed, I’m happy to offer you an allowance. But in order to earn that $1.25 a week, I expect you to perform certain chores around the house. As we’ve discussed, those tasks include:
1. cleaning the gutters
Now you press Return to type the second item—and Word does something alarming. It indents your first item and adds a “2”. on the next line—without so much as asking you. Now you’ve got this:
1. cleaning the gutters
2.
Microsoft thinks it’s doing you a favor by auto-numbering your list. And that’s just the beginning. It changes *phrases like this* into boldface. It turns two hyphens (--) into long dashes (—). When you type an Internet address, it turns it blue and underlined and clickable (http://www.wordisannoying.com).
Millions of people suffer in silence. But you have two weapons of resistance.
First, you can press Ctrl+Z (on the Mac, ![]() -Z) to undo the formatting each time Word does it.
-Z) to undo the formatting each time Word does it.
Second, you can turn off this behavior for good.
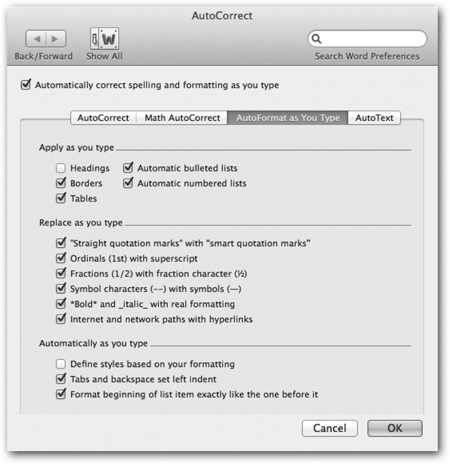
• In the Mac version of Word: Open the Tools menu and choose AutoCorrect. Click the “AutoFormat as You Type” tab, as shown here.
• In the Windows version: At the top of the screen, click File. Then click Options. Then Proofing. Then AutoCorrect Options.
In both cases, you can now start turning off the checkboxes of the things that annoy you, and then click OK.
Auto-column widths in Excel
Excel is a spreadsheet: a grid of rows and columns intended for analyzing and processing numbers.
Clearly, you want the columns to be as wide as necessary to show you everything in them—but no wider, so you can fit as much information onto the screen as possible.
You can adjust their widths manually—if you have all day—by dragging the tiny divider line at the right side of any column’s identifying letter, as shown here at top:
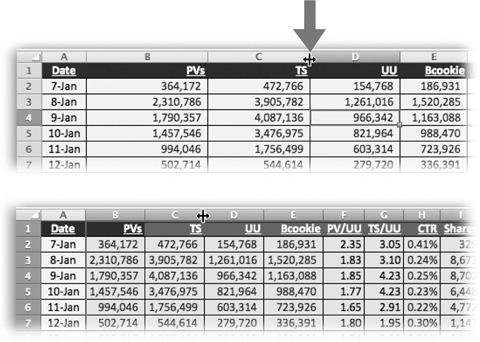
Excel is happy to do that job automatically. Position your pointer on that divider line—and double-click. Presto: Excel auto-adjusts the width of the column to exactly accommodate the widest cell.
You can auto-widen lots of columns at once, too. Just drag through the column titles (A, B, C, and so on) to highlight them, and then double-click any one of the divider lines (as shown at bottom).
Jump among Excel sheets
An Excel spreadsheet may actually be spreadsheets. Take a look at the bottom edge. If you see several tabs, then you’ve got several spreadsheets stapled together into a single document.
That’s the first tip—just to be aware. More than one baffled coworker has stared at the first spreadsheet page, trying in vain to find numbers that are supposed to be there, unaware that they’re behind that first sheet on one of the other tabs.

The second tip is to use the keyboard shortcut to switch sheets. While holding down the Ctrl key (![]() on the Mac), press the PageUp or PageDown key.
on the Mac), press the PageUp or PageDown key.
Paste without the formatting
Here’s a tip for Microsoft programs like Word, PowerPoint, and Outlook: When you paste in text from another document—say, a Web site—you might not want all the boldface, fonts, and other formatting from the original source. It often clashes with the text that’s already there, as shown here at top.
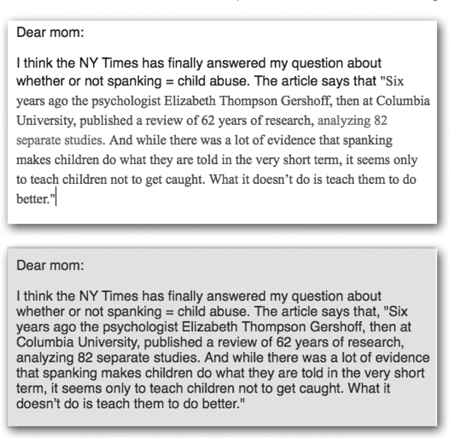
To avoid that problem, open the Edit menu and click Paste Special. Click Unformatted Text. You get just the text, without the fanciness (shown at bottom).
Many other programs have similar commands. In Apple Mail, it’s called Paste and Match Style. In Adobe InDesign, it’s Paste Without Formatting. You get the idea.
The quick way to edit a spreadsheet cell
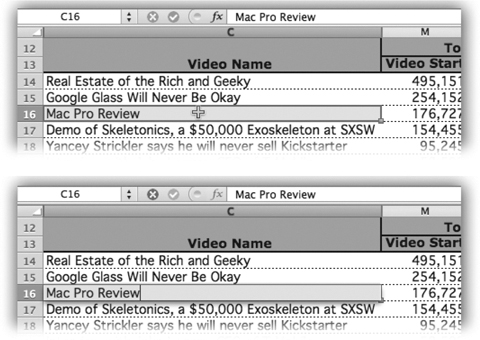
When you want to change the number or formula in an Excel cell, you might be inclined to double-click it. That, after all, is how you usually “open it” for editing (shown here at top).
But experienced spreadsheet jockeys also know about the F2 trick.
If you click the cell and then tap the F2 key (top of your keyboard), the cell opens and the blinking insertion point appears at the end of whatever’s in it (shown here at bottom). You’re all set to type something more, or to press Backspace and edit what’s there.
On the Mac, press Control+U for this function.
The panic of Insert mode
You’re typing along in Word, and you suddenly realize that something is seriously wrong. When you type, you don’t push the existing words off to the right, as usual. Instead, what you type replaces what’s already there, eating it up with each keystroke. It’s the freakiest darned thing, and very upsetting.
You’ve somehow entered Overstrike mode, which is not, ahem, one of Microsoft’s finest inventions. It does exactly what you’ve discovered: turns your computer into a text-eating monstrosity, in which each letter you type gobbles up another letter you had already typed.
What has happened, probably, is that you accidentally hit the Insert key. (You were probably reaching for the Backspace key right next to it.) The Insert key turns on Overstrike mode.
Fortunately, the Insert key also turns it off. So press the Insert key again to return to the land of the sane.
(In recent versions of Word, it’s harder to turn on Overstrike mode, thank goodness.)
Fine-tuning PowerPoint positioning
When you’re designing a PowerPoint slide, you probably know that you can drag a picture or a text box around with your mouse. PowerPoint makes the object snap into positions it thinks you want, which you might find helpful and might find infuriating.
You might also know that for finer positioning, you can select an object and then tap your arrow keys to move it more precisely. This trick, too, has its downsides; each arrow-key press moves the object a fraction of an inch—not one pixel, as you might imagine.

But you probably didn’t know that if you’re pressing the Ctrl key while using the arrow keys, PowerPoint stops trying to outthink you. It moves the object in very, very fine increments, so you can drop it exactly where you want it.
Copying down from a cell
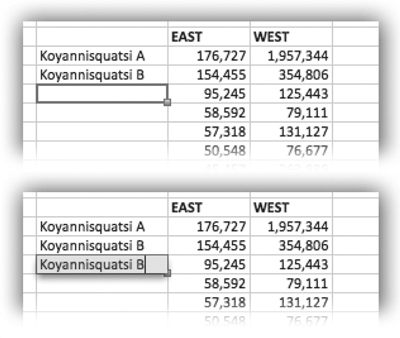
As you work on a spreadsheet cell, you may sometimes want to duplicate what’s in the cell above it—sometimes because you want the two to be identical, and sometimes because you want to edit the lower cell slightly.
In any case, you’ll love this: If you click into a cell and press Ctrl+quote mark ("), Excel slaps in whatever’s in the cell above it. (It’s easy to remember, because the quote mark is like a ditto mark.)
On the Mac, it’s the same thing: Control+quote mark.
Handy!
Secrets of the Format Paintbrush
Nobody uses the Format Painter, because nobody understands it. But one demonstration, and you’ll be a believer.
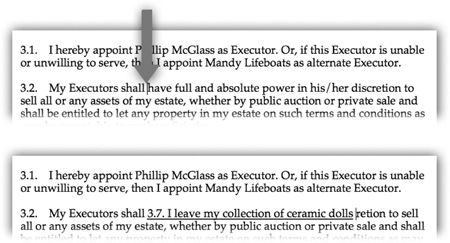
The Format Painter is a button on the toolbar of Word, Excel, and PowerPoint (shown by the arrow on the facing page).
You can use it to transfer the formatting from one bit of text—font, size, color, underlining, indentation, and so on—to another. You may have put quite a bit of effort into formatting some paragraph, so the Format Painter can save you an incredible amount of Format Pain.
Here’s how it goes:
1. Select the text that already looks the way you want it. You can highlight just a word, a whole line, a spreadsheet cell—anything, as shown on the facing page at top.
If you want whole-paragraph formatting transferred—aspects like indentation, bullets, numbering, line spacing, and centering—make sure that your selection also includes the invisible paragraph marker after the last period, as shown on the facing page.
2. Click the tiny paintbrush on your toolbar—the Format Painter button. Nothing happens yet. But your cursor has sprouted a + symbol. It’s loaded.
3. Select the text that isn’t yet formatted correctly. And just like that, the new text takes on the formatting of the first (facing page, bottom).

You can save even more time when there are several new blobs to be formatted. In that case, in step 2, double-click the Format Painter button. Now it’s never off. You can sweep through your document, joyfully dragging through text or cells, reformatting as you go, without ever having to re-click the Format Painter button.
When you’re good and done with the reformatting, press the Esc key to turn off the paintbrush.
Bonus tip: If you forgot to double-click in step 2, all is not lost. Once you’ve reformatted one blob of text, you can highlight another and then press Ctrl+Y (on the Mac, ![]() -Y), which means “repeat whatever I just did.” The new text takes on the formatting, without the Format Painter’s even knowing about it.
-Y), which means “repeat whatever I just did.” The new text takes on the formatting, without the Format Painter’s even knowing about it.
Navigate Word with the keyboard
In the early days of computing, the only way to move around the screen was to use keystrokes. Then the mouse was invented, and everybody cheered—much easier, right?
But the thing is, keyboard control has a lot to say for itself. It can be faster and more comfortable than taking your hand off the keyboard and reaching for the mouse. It can be more precise: A single keystroke can jump directly to the next word, line, or paragraph.
If you’re persuaded, here’s the scheme of keyboard navigation in Word. (On the Mac, substitute the ![]() key for the Ctrl key.)
key for the Ctrl key.)
To move to… |
| Press this |
The previous or next letter |
|
|
The previous or next word |
| Ctrl+ |
Previous or next paragraph |
| Ctrl+ |
The beginning or end of line |
| Home or End |
Beginning/end of document |
| Ctrl+Home or Ctrl+End |
Up or down a screenful |
| PageUp key, PageDown key |
Up or down a page |
| Ctrl+PageUp, Ctrl+PageDown |
OK, that’s all great for moving the insertion-point cursor around. But here’s the megatip:
Add the Shift key to any of those to select text as you go. Here’s how it works:

You can use these tricks in Excel, too. For example, the “end of document” keystroke (Ctrl+End) takes you to the very last cell of your spreadsheet—and adding Shift highlights all of the cells to the very last one.
Changing the case, the quick and easy way
IT’S NOT SO MUCH FUN READING THINGS WRITTEN IN ALL CAPITALS, IS IT? ONLINE, THEY’LL HATE YOU FOR THIS. IT FEELS LIKE YOU’RE SHOUTING.
BUT WHAT IF YOU’VE TYPED A COUPLE OF PARAGRAPHS IN ALL CAPS BY MISTAKE?
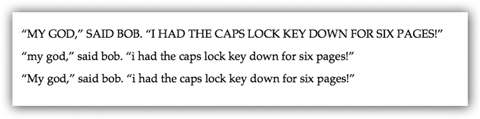
You don’t have to delete it and retype it all. In Word, Excel, and PowerPoint, a secret keystroke lets you convert the capitalization of any highlighted text.
Ready? It’s Shift+F3. (On a Mac, you’ll probably have to press the Fn key, too; see here.)
Each time you press that keystroke, you cycle among three capitalization styles, shown here in order: All capitals, all lower-case, and sentence case (first word capitalized).
(There is also, by the way, a command in the Format menu called Change Case. It offers even more variations of capitalization. But it’s not as quick and slick as the keystroke.)
The quick way to e-mail an open document
What do you do with a document once you’re finished with it?
Maybe you print it. Maybe you save it. Maybe you delete it as soon as possible.
But often, what you want to do is e-mail it to someone—a boss, an editor, a colleague.
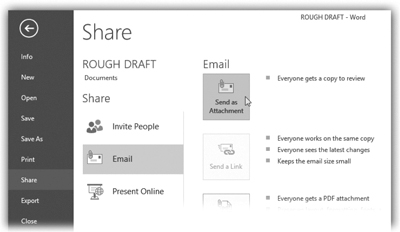
Microsoft realizes that. So each of its programs—Word, Excel, PowerPoint—offers a “Send as Attachment” command right in the program. You don’t have to save it, name it, find it, or attach it to an e-mail message.
So: Once you’re finished editing a document, open the File menu. From the Share or Send To submenu, choose “E-mail (as attachment).”
Like a good little minion, your computer automatically opens up your e-mail program (Outlook or Apple Mail, for example), creates an outgoing message, and attaches the document you worked on. All you have to do is address it, add a cheerful message, and click Send.
Split the screen
In a spreadsheet, you can see right away why you might want to split your screen into separately scrolling halves: so that you can remember the column names as you scroll down.
But it can also be useful to split a Word document this way—when you want to refer back to something earlier in the document as you write:

Splitting your window like this is easy. At the top of the vertical scroll bar on the right, a tiny, special, draggable handle appears. Grab it and drag it downward to split the window.
You can now scroll each half independently.
There is, of course, a keyboard shortcut for this. In Windows, press Alt+Ctrl+S. On the Mac, it’s Option-![]() -S. In both cases, the same keystroke unifies the window once again.
-S. In both cases, the same keystroke unifies the window once again.
What the squiggly underlines mean
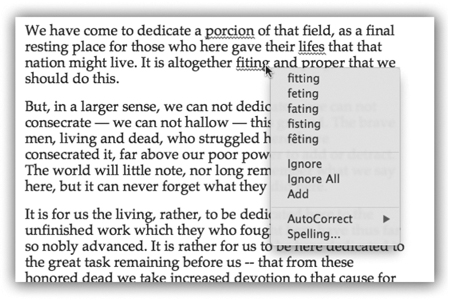
While editing your Word, Excel, or PowerPoint documents, you’ve probably seen the red wavy lines that appear under certain words. That’s Microsoft’s gentle way of pointing out questionable spellings.
Microsoft isn’t saying you’ve written something wrong necessarily—only that you’ve typed a word it doesn’t recognize.
The beauty of this system is that you usually don’t even have to know the correct spelling or grammar rule. Just right-click the underlined word (here). Like magic, the software offers a pop-up menu of correctly spelled suggested replacements. Choose the correct option to fix the spelling.
Other times, you’ll know that what you wrote was correct the first time. (Maybe you’re writing a novel about somebody with bad spelling, and you’re misspelling words on purpose.)
In that case, right-click the word; from the shortcut menu, choose Ignore (this occurrence of the word), Ignore All (occurrences of the word in this document), or Learn (this word, so it’s considered correct from now on).
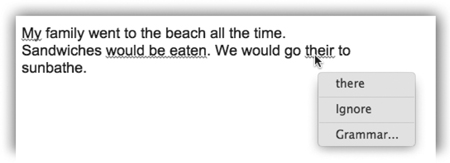
And when you see green squiggles, that’s Word’s grammar checker finding something it doesn’t like. Maybe it’s a word you typed twice accidentally, for example, or you used passive voice. The fix is the same: Right-click to see Word’s suggestions.
The logic of the Z, X, C, V keystrokes
If you’re using a computer instead of a typewriter, it may be because it’s so much easier to edit your work. You can cut and paste sections and move them around.
If you do a lot of that, then it’s worth learning the shortcuts:
• Cut is Ctrl+X (or ![]() -X on the Mac)
-X on the Mac)
• Copy is Ctrl+C (or ![]() -C on the Mac)
-C on the Mac)
• Paste is Ctrl+V (or ![]() -V on the Mac)
-V on the Mac)
• Undo is Ctrl+Z (or ![]() -Z on the Mac)
-Z on the Mac)
These are pretty easy to remember. X looks like a pair of scissors Cutting; C stands for Copy; V points downward, where you’re laying the copied material (or maybe looks like an upside-down “insert” proofreader’s mark).
And Z? Well, it’s the last letter of the alphabet—and the keystroke undoes the last thing you did.
It’s kind of cool that on your keyboard, all four of those letters sit in a row. And they’re conveniently installed just above the Ctrl or ![]() key, too.
key, too.
Excel’s automatic list maker
You can probably think of many times when you might want to create a list of sequential cell labels in a spreadsheet. Maybe it’s Jan., Feb., Mar.… or Mon., Tues., Weds.… or 2015, 2016, 2017.
Excel can do the typing for you.
Start it out by manually filling in the first two cells of the series—enough to establish the pattern. Highlight them.
Then grab the tiny handle in the corner of the last cell—and drag it. In any direction. As you drag across other cells, Excel fills them in automatically, continuing your sequence.
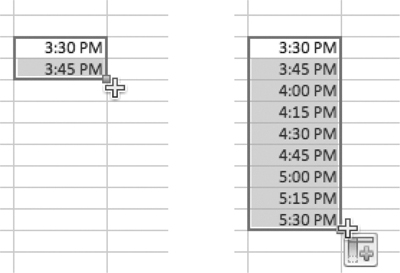
It’s incredibly smart. If you filled in 1 and 3, it knows you want the following cells to go 5, 7, 9, 11. If you filled in Lesson 1 and Lesson 2, it knows to fill in Lesson 3, Lesson 4, Lesson 5, and so on. If you filled in 3:00 p.m. and 3:15 p.m., it fills in 3:30 p.m., 3:45 p.m., and so on.
The time you save could be your own.
Press the B key to black out a slide
If you’re giving a presentation in PowerPoint or Keynote, press the B key to black out the slide. That’s handy when you want your audience to pay attention to you instead of your slide. Press B again to bring the picture back.
The W key works, too—to white out the slide.

Start the slideshow—right now
When it’s time to start your PowerPoint slideshow, don’t bother hunting for a command or a little icon; just press the F5 key. The slideshow starts at the beginning.
And if you don’t want the beginning, don’t embarrass yourself by starting at the beginning and frantically clicking your way back to the slide you really want. Instead, press Shift+F5. PowerPoint hops into presentation mode—beginning with the slide you had up.
Jump to a certain slide
You’re at the end of your PowerPoint slideshow, taking questions, and somebody asks you about a point you made back on slide 6. Or you’re giving your presentation, and you realize that you need to skip a slide.
Either way, it’s useful to be able to leap directly to a certain slide without making your audience watch you flip through all of them in sequence.
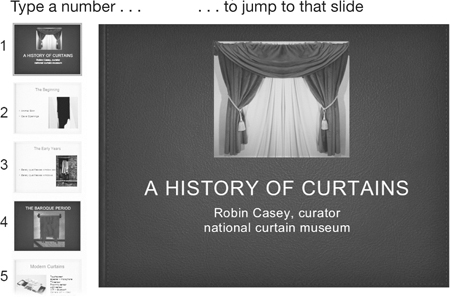
All you have to do is type the slide number and then hit Enter. You don’t have to exit slideshow mode, and you won’t see your typing on the screen. Just type the number 1 (and then hit Enter) to jump back to the start, or 17 (and Enter) to go to that slide, and so on.
The free versions of Microsoft Office
Most of the business world pays for Microsoft Office. Year after year. Billions of dollars.
But it’s perfectly possible to create, open, and edit Word, Excel, and PowerPoint documents without every buying Microsoft Office. All you need is one of the free alternative suites, like Apache OpenOffice and Libre Office. (You can get them right now from www.openoffice.org and www.libreoffice.org.)
Those are full-blown, full-featured suites—not as polished-looking as Microsoft Office but plenty powerful for what most people do most of the time.
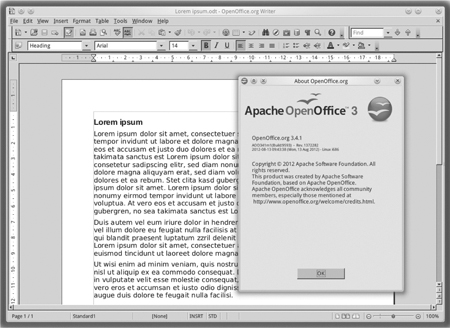
Don’t miss Google Drive, either (formerly Google Docs). It’s a free online set of programs that let you work with Word, Excel, and PowerPoint files. You can try it out at drive.google.com.