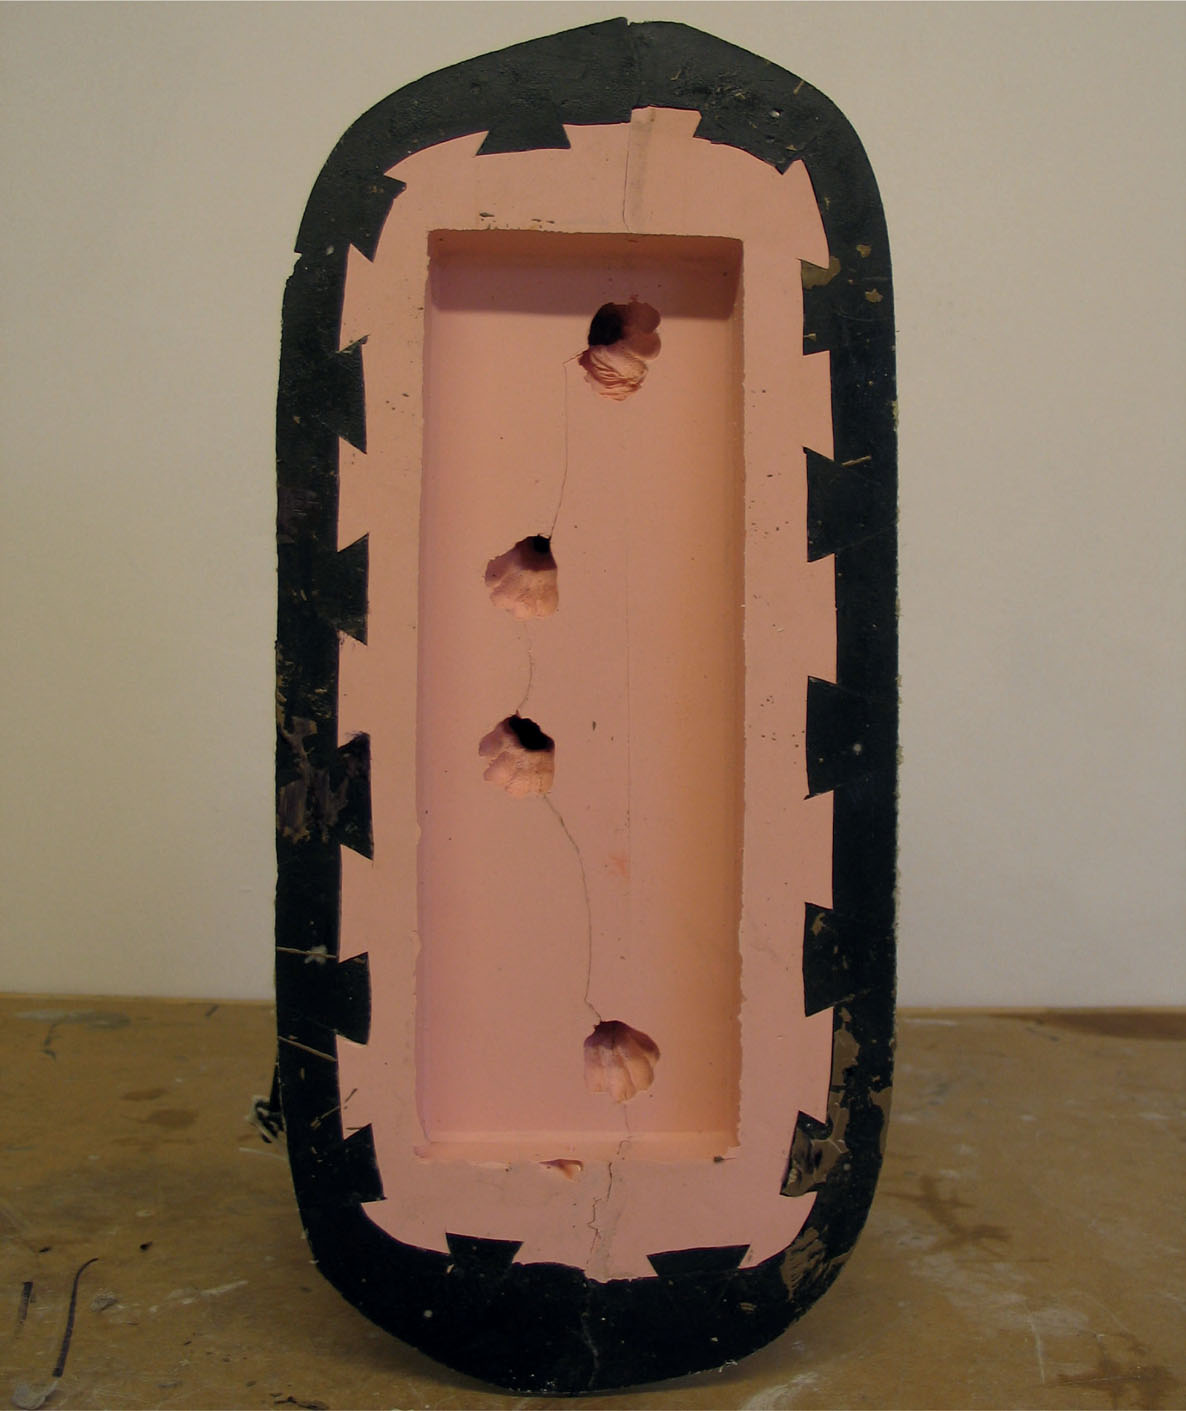
Multiple piece ‘cored’ silicone rubber mould.
Multiple piece ‘cored’ silicone rubber mould.
CHAPTER ONE
MULTIPLE-PIECE ‘CORED’ SILICONE RUBBER
Creating multiple-piece ‘cored’ moulds can be quite complex to execute so the aim of this book is to cover the process in detail. Silicone rubber as a versatile and accurate mouldmaking material has been around on the domestic market for a long time and has been a key part of the generic mouldmaking process in the commercial trade for years.
From very simple blocks to highly complex multiple-piece moulds, silicone rubbers can cover almost every mould making eventuality. The ‘cored’ mould allows the mouldmaker to aspire to ever more complicated mouldmaking challenges.
The Core
The ‘core’ refers to a separate internal mould piece that cannot be reached from outside the original form being moulded. The core is supported by external mould pieces that hold it in place within the mould. To understand this fully and to proceed at this level of mouldmaking it is important to have at least an academic understanding, or preferably practical experience, of the principles of mouldmaking and casting and multiple-piece mouldmaking that are explained in the precursor to this book, Mouldmaking and Casting.
A mould core allows the mouldmaker to capture an area of difficult-to-access detail on an original that cannot be captured with other pieces. Access to this sort of area may be difficult because of undercutting into it that would not allow removal of the mould pieces, or demoulding of castings from the mould. A core may not always be strictly necessary but it can sometimes help greatly in the production of a mould and subsequent casting from it.
The necessity or usefulness of a core is best illustrated with a practical example: in this case, creating a mould from a model of a four-legged animal. If a mould were to be taken in two pieces on either side of the animal, as may seem logical, each mould piece would have the negative space of two whole legs of the animal within in them. This would work as a mould in principle, but it would make removal of the mould from the original difficult and the demoulding of a cast, in a less durable material, even more so. With the legs of an animal being much thinner than the body the mould pieces would have to be pulled down each leg and removed like a sock. On a large scale this may be practical, but on a smaller scale the removal of the mould in this way, particularly if the casting material is not very durable, may be problematic if not impossible. The answer is to create a seam down either side of each leg using one core mould piece that creates the inside leg seam of all four legs.
The core piece is created first, as one whole piece. The outside two pieces are then created over this to make the outside seam lines of the legs and the rest of the body.
This will allow the mould to be separated from either side of each leg and the core piece to be pulled away from between them. Demoulding in this way will create minimal stress on the relatively delicate leg sections of the casting.
Understanding the principles of this example will hopefully help in making decisions on the potential advantages of creating cored moulds in other mouldmaking situations. See Chapter 8 for an illustrated example of casting in this mould.
PROJECT
Specification
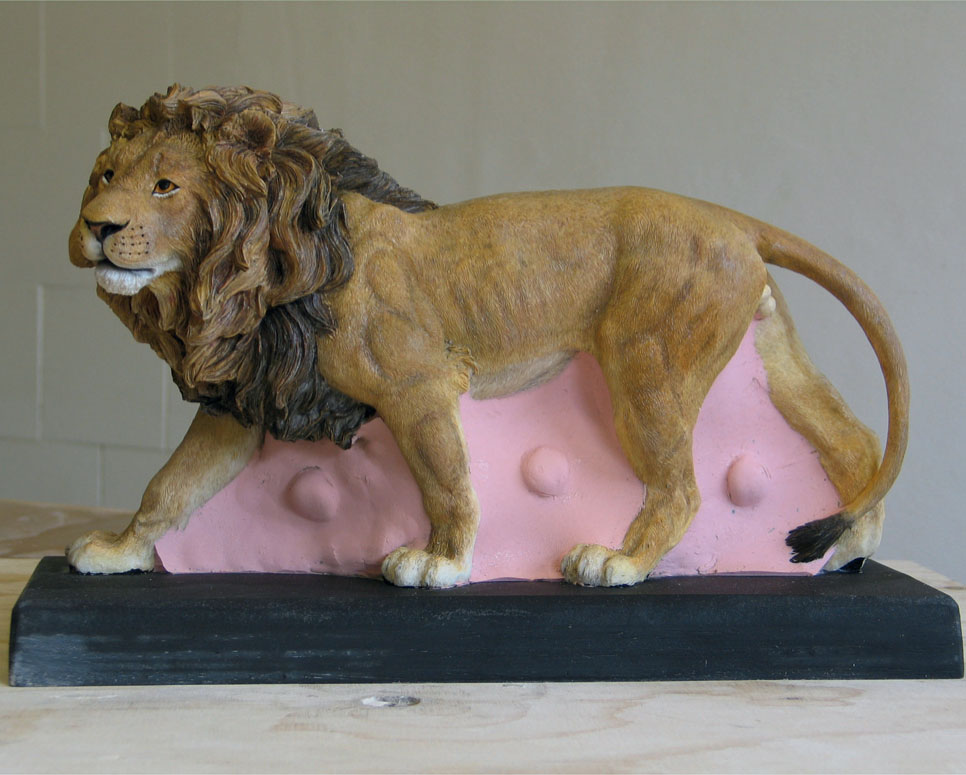
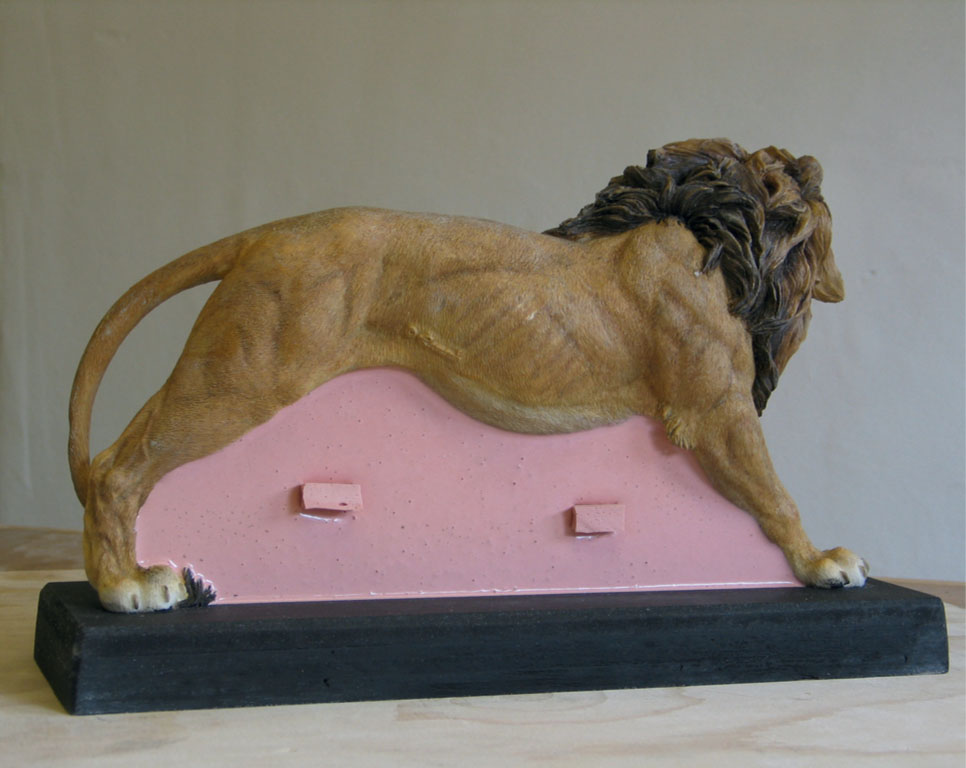
A three-piece silicone rubber and two-piece fibreglass case mould. From Polyurethane resin model figure of a lion on a base. Size: 320mm (L), 110mm (W) and 200mm (H).
Time Required
Approximately 7–8 hours of working time.
Materials
■ Silicone rubber (Siliastic 3495, supplied by Notcutt Ltd);
■ gel coat polyester resin (all polyester resin products supplied by Alec Tiranti Ltd);
■ general-purpose polyester resin;
■ polyester resin pigment;
■ polyester resin catalyst;
■ a heavy fibreglass mat;
■ acetone;
■ vegetable oil;
■ spray wax release agent;
■ grey clay; and
■ roofing bolts and wing nuts.
Tools
■ A modelling board;
■ dispensing and mixing containers;
■ wooden spatulas;
■ brushes (1in and ½in);
■ scissors;
■ a palette knife;
■ a craft knife;
■ wooden clay tools;
■ a rubber kidney clay tool;
■ a looped wire clay tool;
■ a clay harp;
■ disposable rubber gloves;
■ a spirit level;
■ an electric jigsaw or hacksaw blade in a holder; and
■ an electric drill.
Method
SET-UP AND PREPARATION
As with any project, careful preparation before the start of the job is crucial. Knowing the material quantities and tools needed, undertaking repairs to the original and setting-up the working area will all help to complete the job accurately and efficiently. (Tip: make sure you have enough materials to complete the job before you start. Running out of material halfway through the job is at least a waste of time and, at worst, a loss of previously executed work.)
THE MOULD CORE
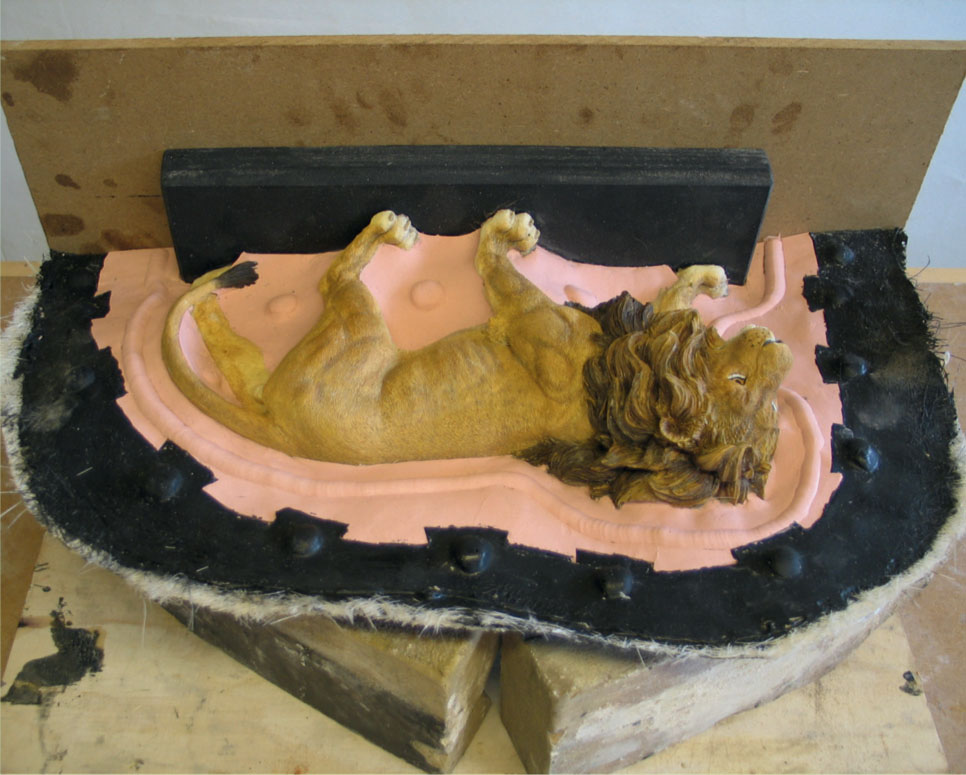
The first piece of the mould to be created is the core piece, around which the other two mould pieces will be made. This is created in the space in between all four of the animal’s legs.
1. Apply a clay wall onto one side of the animal to block off the outside area of the legs on that side. Make sure the clay wall only covers the outside half of the two legs. Seal the clay wall from the outside by pinching it to the surface of the original model.
2. Ensure that the area of contact on the inside of the clay wall and the original is at right angles using a clay tool.
3. Create registration indents on the inside surface of the clay wall. This will provide ‘nipple and cup’ registration between the mould core and the outside mould piece.
4. Set the original on its side, clay wall down, on a modelling board. With a spirit level ensure that it is level between the two lowest points of the legs. (Silicone rubber will be poured into the void between the legs of the animal so it will need to rise to a ‘level’ within.)
5. Spray wax release agent within the core space.
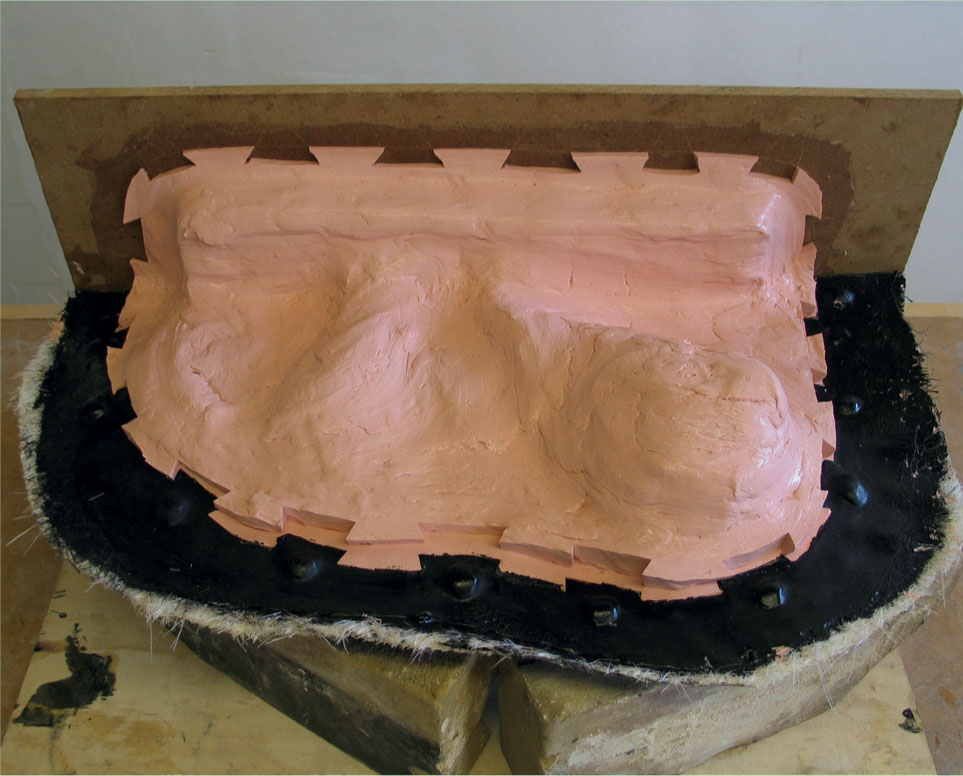
6. Mix a batch of silicone and pour it into the core space to a midway line on the outside of the top two legs.
7. Allow to set fully.
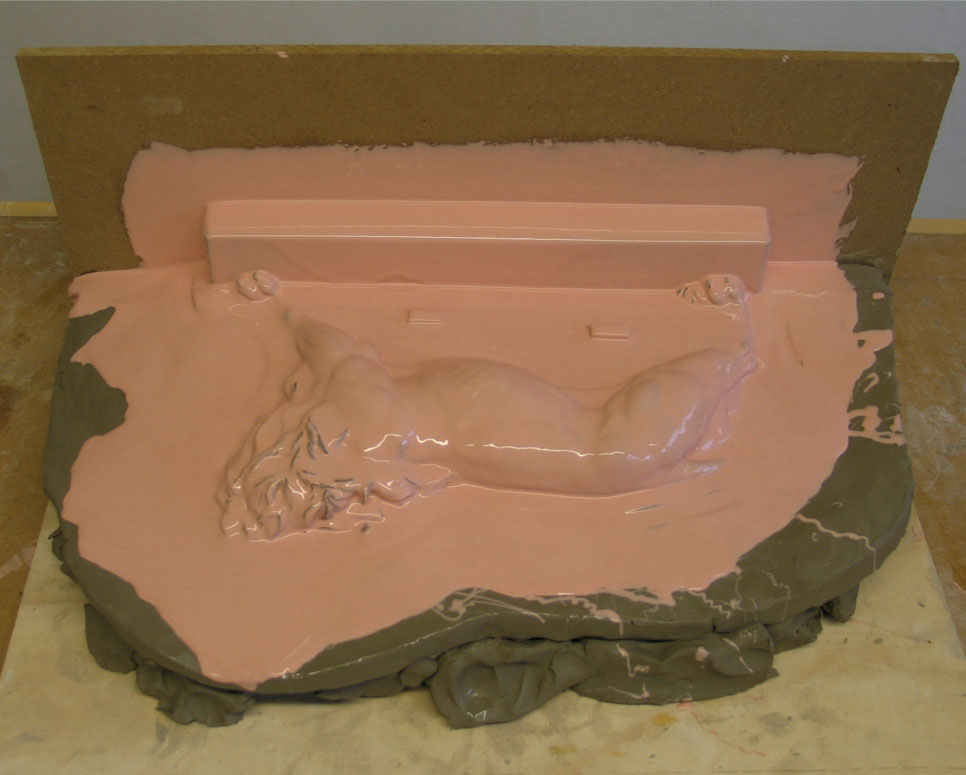
8. With a small mix of silicone, stick pre-set and cut registration blocks on the top surface of the core. This will provide registration of the core into the other outside mould piece.
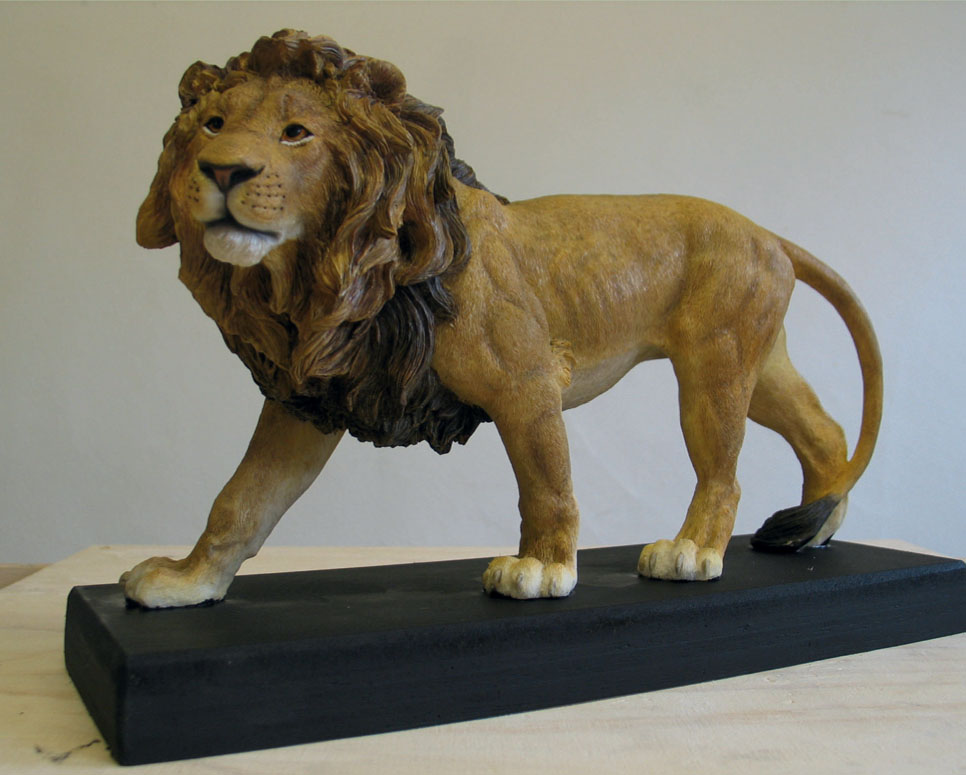
Original model.
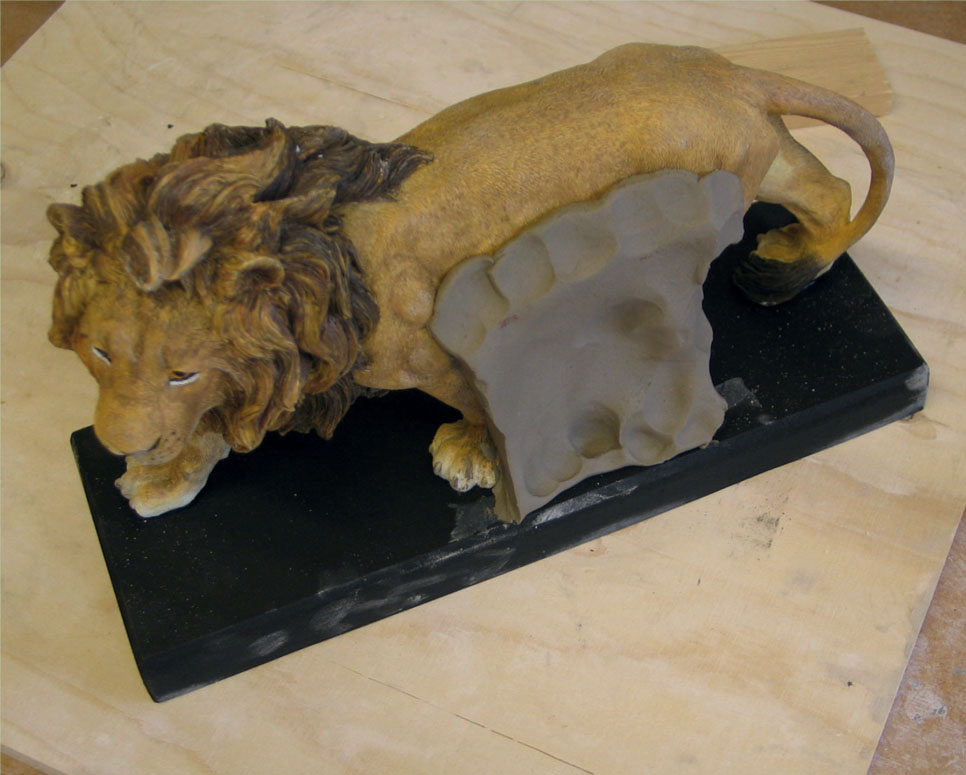
The first wall is placed to define the ‘core’.
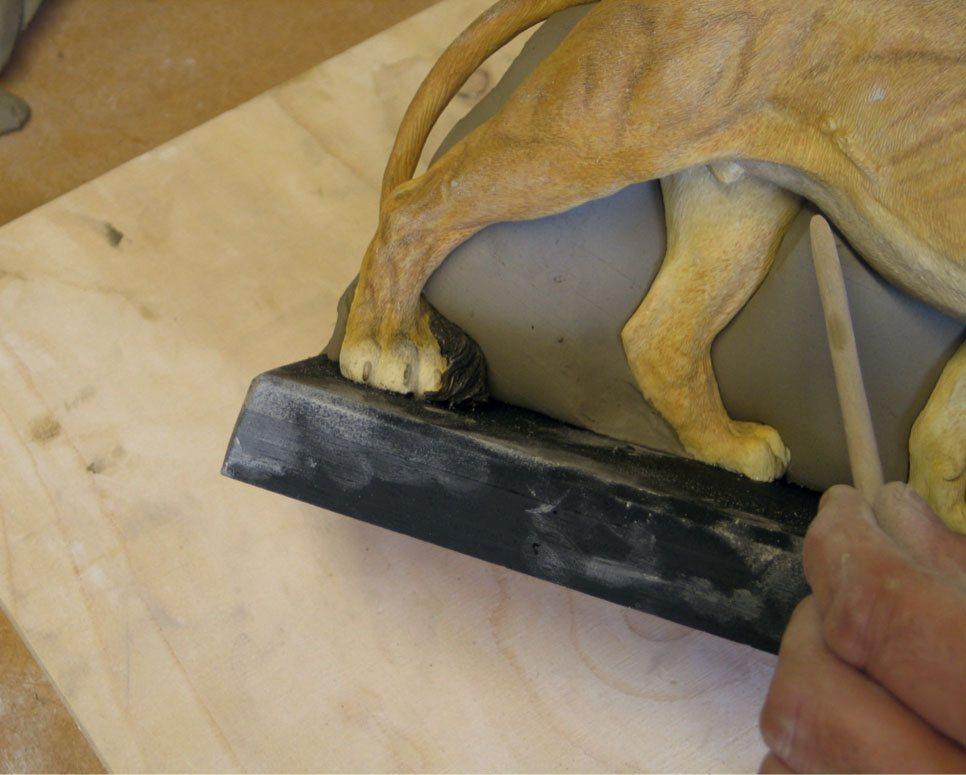
A clean perpendicular join is created on the inside of the wall.
Registration indents are applied.
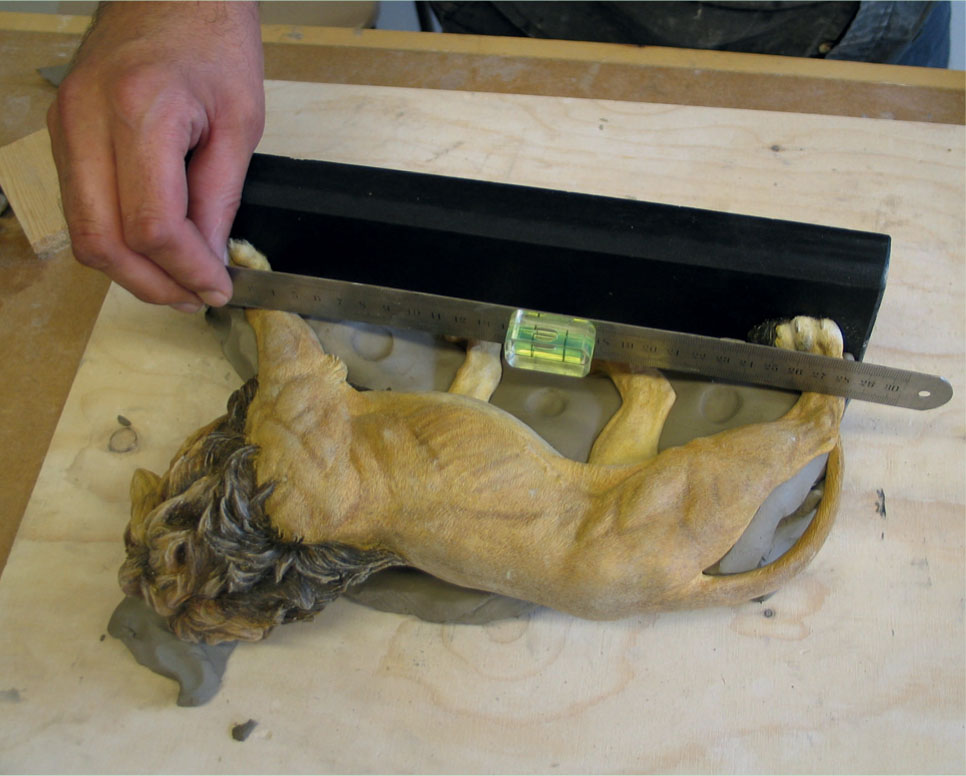
A level is set across the legs.
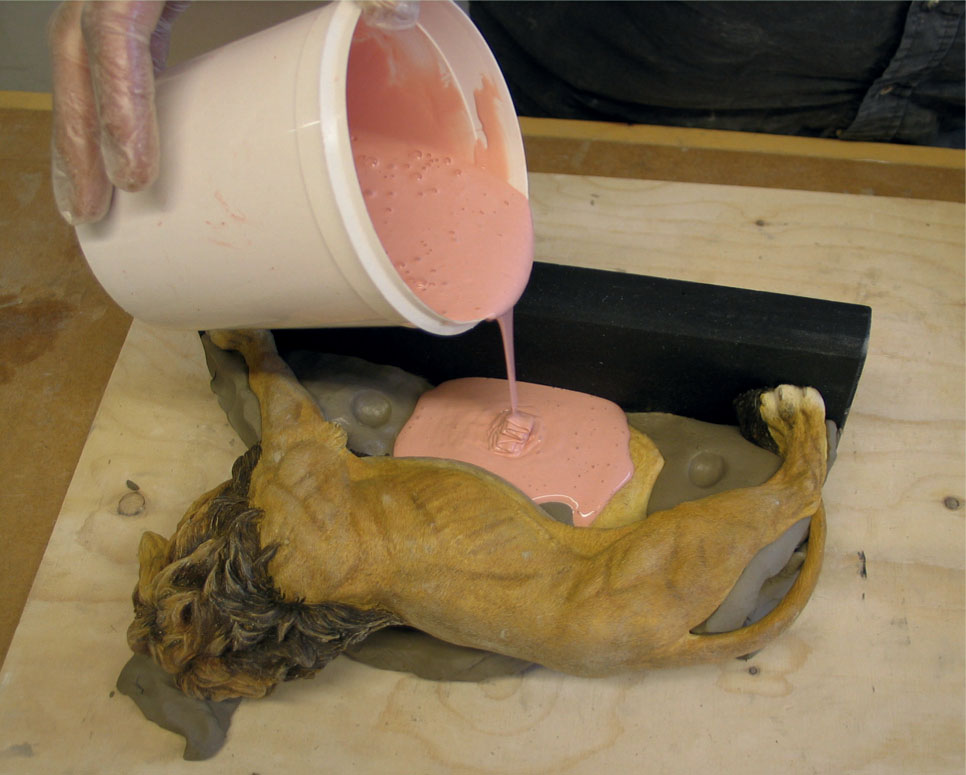
The liquid silicone core is poured.
The set core, showing registration indents.
The set core, showing registration blocks.
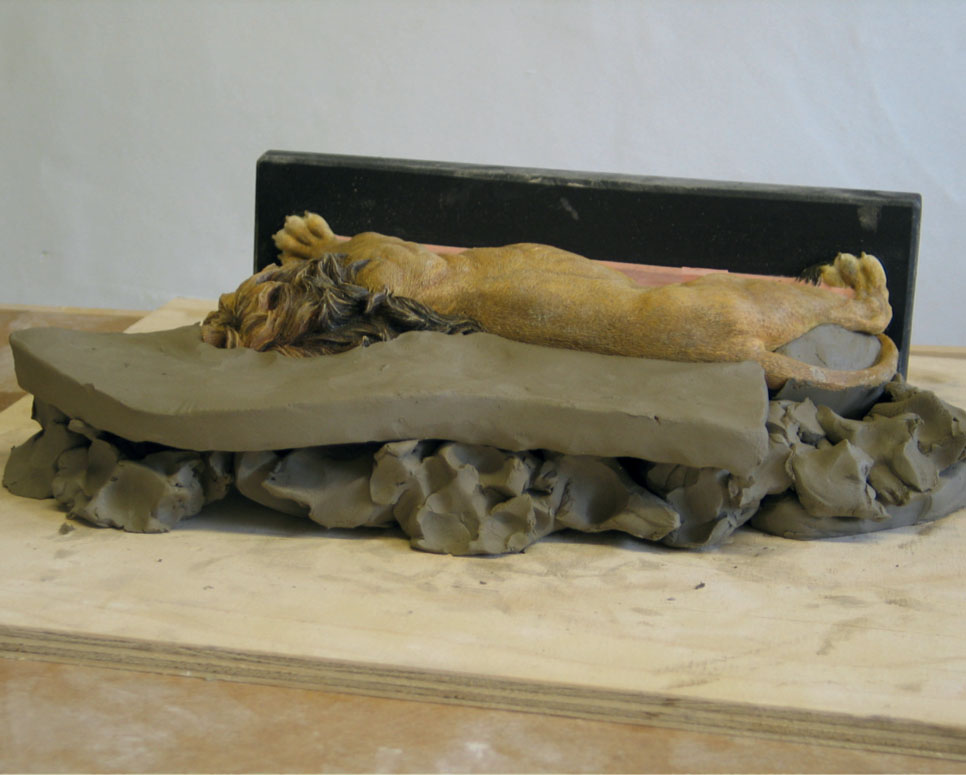
A clay bed and top slap are created.

A registration ‘pinch line’ is cut.
The first silicone coat is applied and allowed to set.

A thixotropic coat is applied, allowed to set and registration dovetails are cut.
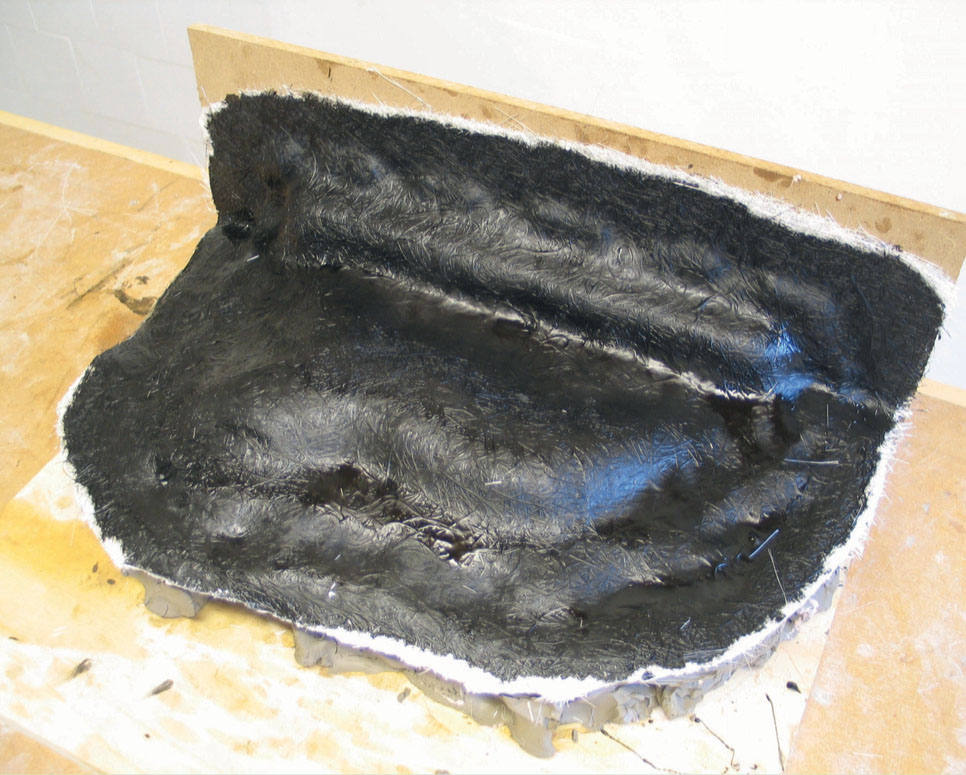
A polyester resin and fibreglass case is created.
The mould is flipped ready for the second half of the mould to be made.
The second silicone half is created.
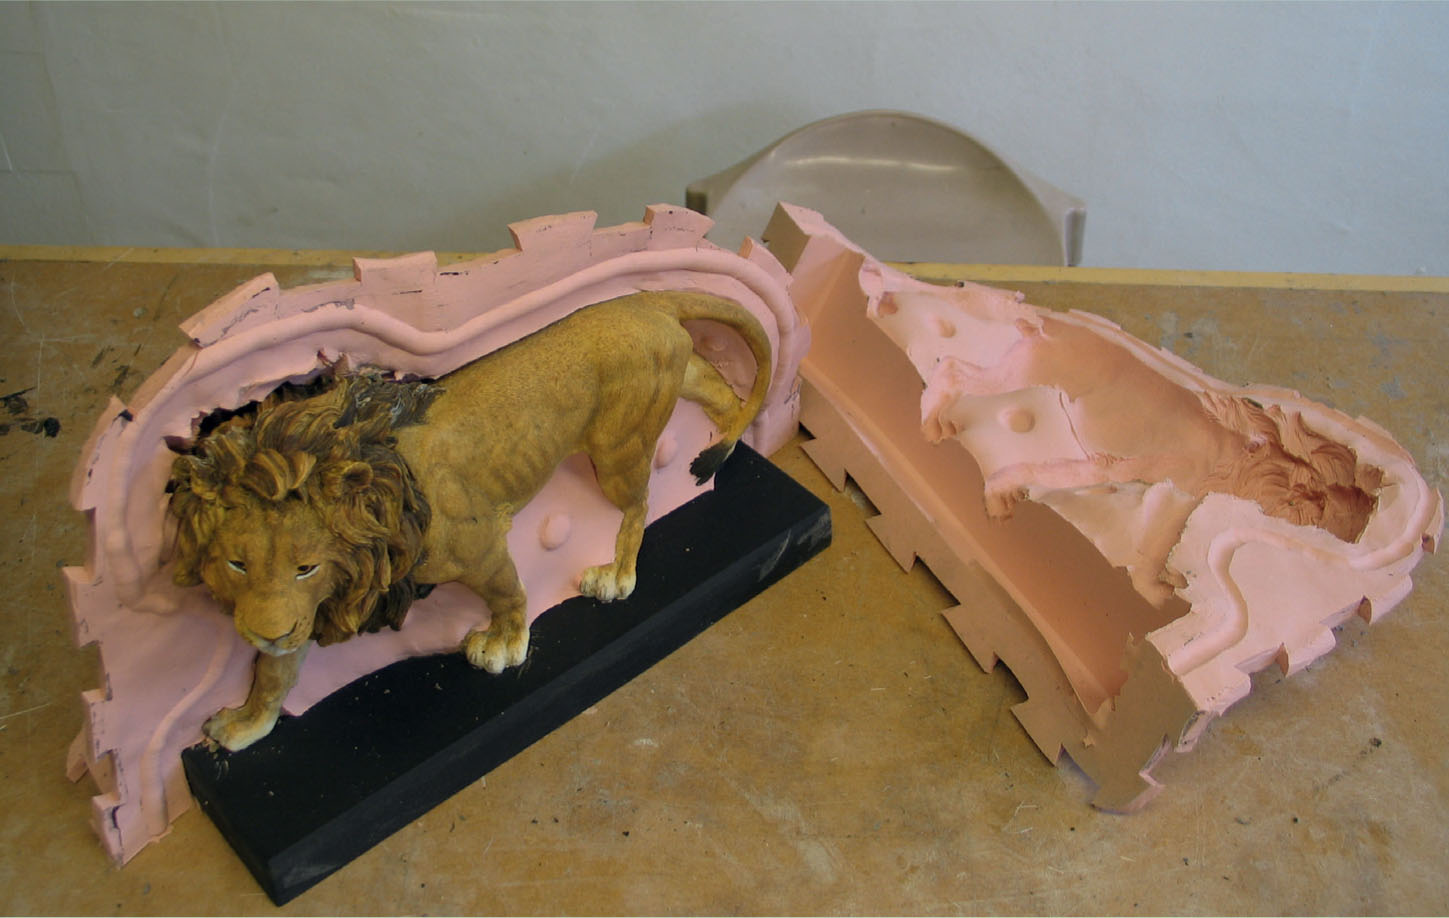
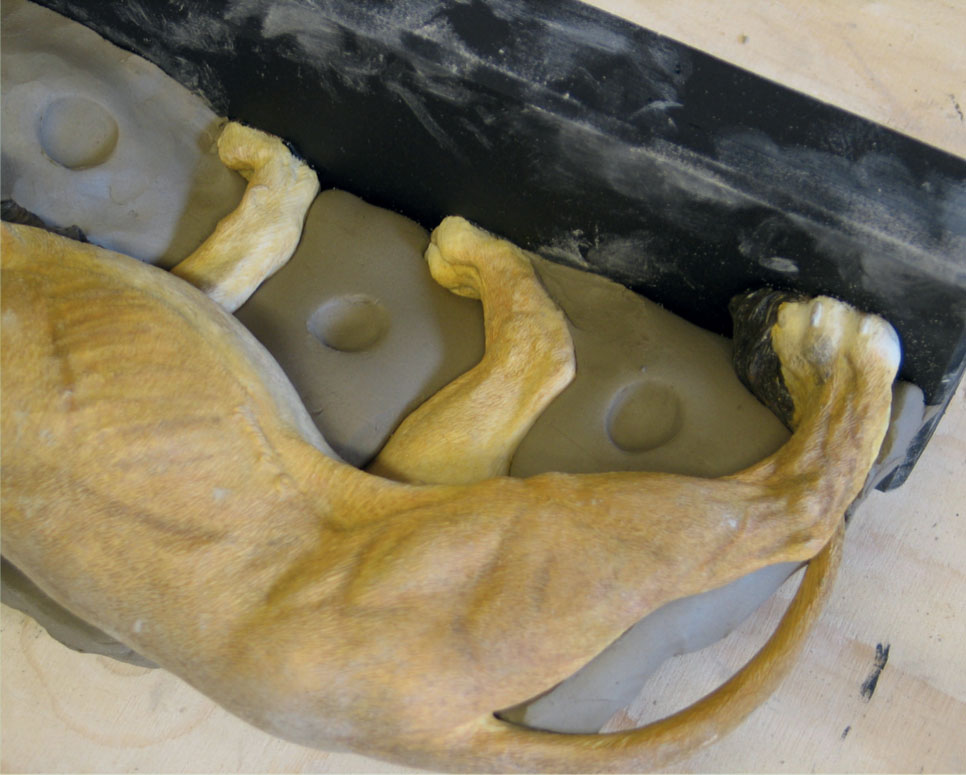
The two outside mould pieces are removed to reveal the core inside.
THE CLAY BED
With the mould core created, the first side mould piece enclosing it can be made. A clay bed needs to be created to build to a midway point around the original.
1. Define where the midway point surrounding the original is and mark it or commit it to memory.
2. With small pieces of clay build up a rough clay bed to within 10mm of the division line.
3. Smooth the top surface.
4. Using a clay harp set at 10mm, cut a slab of clay.
5. Roughly cut to shape and place it on top of the rough clay bed.
6. With a clay tool make the connection of the clay bed and the division line around the original. Ensure that the point of connection between the clay bed and the original is at a right angle.
7. Smooth the surface of the clay bed with a rubber kidney clay tool. Use vegetable oil to allow the kidney to smooth the surface without dragging.
8. Using a looped wire clay tool, create a pinch line in the clay bed around the original 10–15mm out from the point of connection with the clay bed.
9. Because the model has a base the mould will need to encompass this. Secure a board against the underside of the base so the mould can be created around it.
10. Apply spray release agent to exposed surfaces of the core, original and board against the base.
THE FIRST SIDE MOULD PIECE AND CASE
The next task is to create the first side mould piece against the exposed area of the mould core and exposed half of the original using the brushable thixotropic silicone paste method and fibreglass case methods (see Mouldmaking and Casting for details).
1. Apply wax spray release agent to the exposed clay bed.
2. Paint on silicone detail coat and allow it to set fully.
3. Lay up the thixotropic coat to mould thickness and allow it to set fully.
4. Cut registration ‘dovetails’ around the silicone extending on to the clay bed. This will register the silicone into the fibreglass case.
5. Create the fibreglass case to support the silicone. Allow it to set fully.
THE SECOND SIDE MOULD PIECE AND CASE
1. Remove the board against the base of the original.
2. Keeping the previously created core, mould piece and case and the original together, carefully flip the whole mould over to reveal the second side of the original.
3. The second side of the original and mould core can now be seen sitting within the first side mould piece and case.
4. Remove the clay bed and mould core clay wall.
5. Carefully clean any clay debris off the exposed original, mould core and exposed flange of the first side mould piece with a sponge. Ensure all surfaces are dry.
6. Reset the board against base of the original.
7. Apply spray wax release agent to all surfaces.
8. Create the second side silicone piece and supporting fibreglass case as above.
TRIMMING, DRILLING AND OPENING THE MOULD
Now the mould is complete it can be trimmed, drilled and opened.
1. Remove the board against the base of the original.
2. With an electric jigsaw or hacksaw blade in a holder trim approximately 10mm off the outside edge of the fibreglass case flange. This is to remove the rough edge of the case flanges to a good edge and expose the seam line between the pieces of the case.
3. Trim the case flange around the opening of the mould in the same way.
4. Sand the surface of the fibreglass case for safe handling.
5. Drill 6.5mm holes at 40–50mm intervals, approximately 20mm out from the original around the case flange. These will accommodate M6 nuts and bolts to secure the mould pieces together.
6. Introduce a thin blade knife between the two case pieces and separate them.
7. Remove the case pieces from the silicone and peel away the two outside silicone mould pieces from the original. Sometimes the case including the silicone will come away in one operation.
8. Carefully remove the mould core from the original. There will be an ‘easy’ direction to pull the mould core away from the original, depending upon the position of the legs.
9. With the mould removed, all pieces can be washed, dried and reassembled with the nuts and bolts ready for use.
10. When reassembling first secure both side pieces of silicone into their supporting cases. Next secure the mould core into one of the side pieces. Lastly secure the second side piece.
11. When tightening nuts and bolts secure them in opposite pairs in sequence a little at a time until firm. This will ensure the seam line of the mould is secured evenly all round and not squeezed tighter at one point.
12. Do not over-tighten the nuts and bolts as it may distort the core inside and compromise the seam lines.