
COMPOST STRUCTURES
Gardeners have designed a host of imaginative structures for composting. Compost can be made in cages, in block or brick bins, in pits and holes, in revolving drums, in garbage cans, and even in plastic trash bags. A compost structure can be designed to be beautiful, to make compost in the shortest possible time, or to be moved from place to place with the least effort. It can be designed to make compost with no turning required or to suit the needs of earthworms. Compost structures, in short, are designed to suit the user’s needs and resources.
For most home composters, building a bin that makes use of existing or readily available materials is the most practical course. A composter in California constructed a bin using the aluminum sides of an old aboveground swimming pool. Even using bales of spoiled hay to form a temporary structure is a way to make the most of your resources in creating a composting structure, as well as the compost pile itself.
The choice of compost structure is, then, a personal decision, one that should not be made without some prior research and, perhaps even more important, some experimentation. It is experimentation that leads to new structures.
The first decision to be made is whether a structure is needed at all. The gardener or farmer with plenty of room, ample materials, and sufficient time may need no compost enclosure of any kind. In this case, the traditional Indore heap is quite suitable.
If yours is a city or suburban lot, however, you might find that the open heap takes up too much room or offends neighbors and family. If space is limited, an enclosure can produce more compost in a smaller land area. It can be more attractive and keep out animals and flies. If you cannot devote a permanent spot to compost making, you will want to investigate portable structures that can be broken down and moved in minutes. If your garden is located where winter temperatures are severe, a compost pit dug below the frost line can enable you to compost all winter long. If you want to work with earthworms in composting, then you will need to consider some special outdoor structures, and perhaps others for basement composting. Perhaps a commercially built revolving drum suits your needs because age or infirmity prevents you from turning the heap, or simply because the drum produces quick compost and attracts no pests. Perhaps you even prefer to make compost in plastic bags because of its simplicity.
It is certainly true that one compost structure is not best for everyone. It may even be that everyone needs a structure designed especially for him or her. We hope that by describing different structures, we will give you some insight into matching construction with your individual needs. If you are like most gardeners, you will take one of these suggested forms, adapt it to your needs, use it for a year or two, and then make your own adjustments until you have evolved the perfect structure for you.
PENS AND BINS
By far the most common compost forms are bins and pens. To simplify, let us call a bin any container with concrete, brick, wood, or masonry sides that is fairly substantial and permanent, and a pen any structure with wire or hardware cloth sides that is a less permanent installation. Not that they’re that easy to classify—there are many kinds of structures called bins and pens.
In general, pens have the advantage of allowing for free circulation of air. Their disadvantage is that they also allow for free circulation of flies and four-footed pests. Bins are more stable and protecting structures, but they are often insufficiently ventilated. Neither the bin nor the pen has as great a tendency to go anaerobic as the pit, and both are easier to keep tidy than open composting forms.
A shady, sheltered spot not far from either garden or kitchen is an ideal location for either pen or bin. Often, a space between house and garage or garage and shed allows the right amount of room. A three-compartment bin with tight floor and sides and with each compartment measuring a cubic yard in size makes for the neatest and easiest handling for turning. In such a structure, there is at all times one batch working and one being used.
The Lehigh bin uses alternating 2×4s held together with ⅜-inch rods.
An advocate of bottom aeration claims to have made a free compost bin in 1 hour using available cement blocks and some leftover strong iron piping, plus surplus 1- by 2-inch wire mesh. The 4- by 8- by 16-inch cement blocks were laid horizontally with plenty of air between each block.
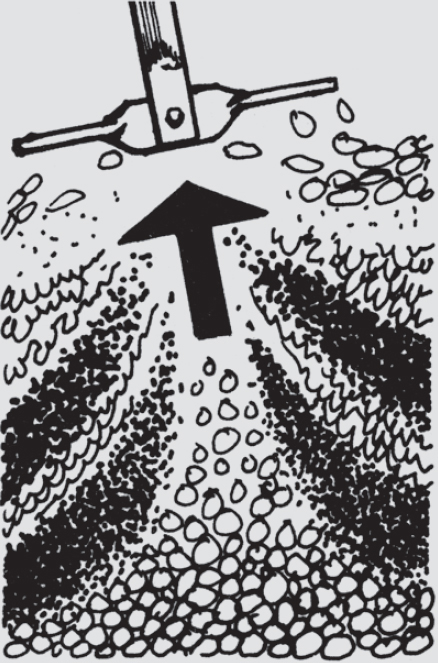
The pipes were thrust across the bin from side to side over the third course of blocks, to provide the pile with a strong bed. On top of the pipes, two lengths of wide wire mesh were laid to hold a bottom layer of coarse garden debris and twigs. This layer and the mesh and pipes held back finer material and allowed for bottom aeration. The gardener never turns his compost but mixes materials together.
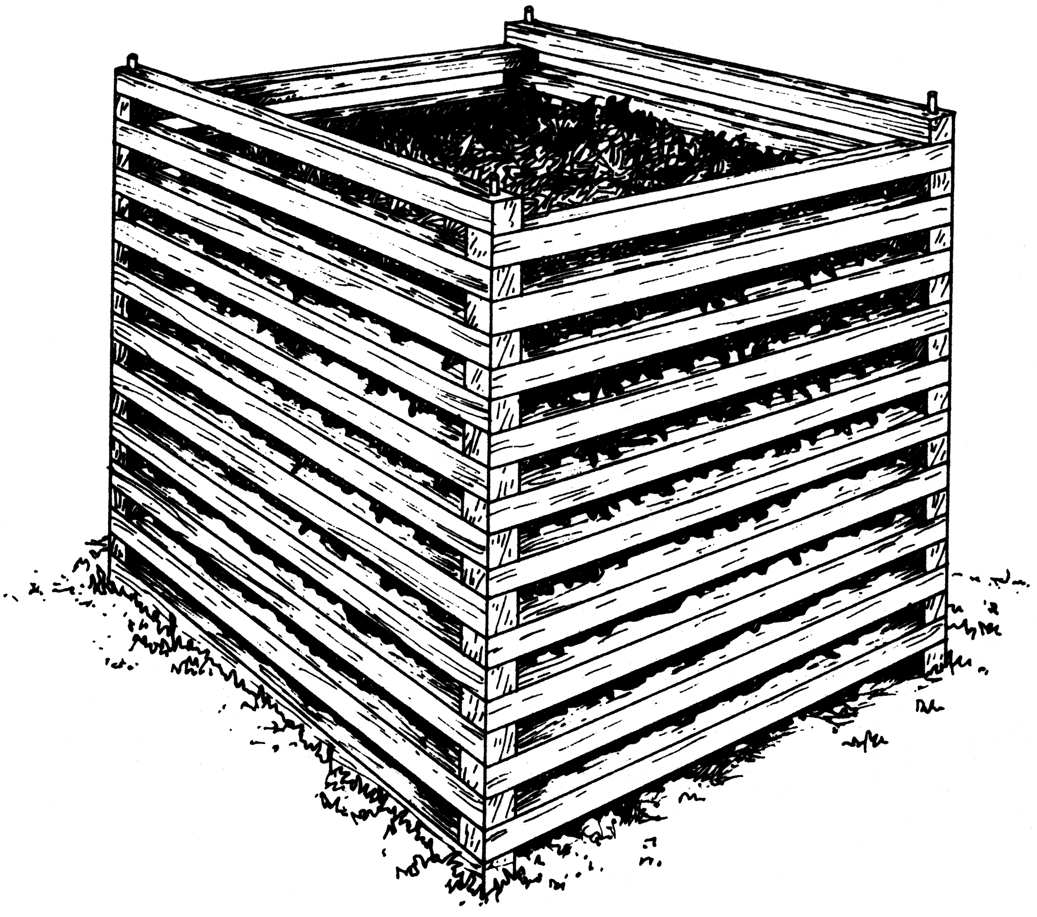
Lehigh-Type Bins
The Lehigh-style bin is easy to erect and disassemble. It is adjustable in size, attractive, portable, and long lasting, and it provides for proper ventilation and protection.
Construction is of alternating 2x4s with the corners drilled out and held together with ¾-inch rods. Five 36-inch 2x4s to a side will make a bin capable of producing approximately 1 cubic yard of compost at a time.
There have been several variations of the Lehigh bin, some using logs or poles instead of 2x4s. However it is designed, the low cost, effectiveness, and portability of this structure has made it one of the most popular in use today.
Cage-Type Bins
Cage-type bins are simple and inexpensive to build, allow good air circulation, are portable, and enable quick turning of the heap because of a removable front panel. The Lehigh bin lacks this last feature.
There are many variations of cage-type bins, all of which require relatively little lumber, since wire screening forms most of the panels.
The wire-and-wood bin shown on this page can be built using scrap 2-inch lumber covered with ½-inch chicken wire mesh. The bin is formed by two L-shaped sections held together with screen-door hooks.
To turn the pile, unhook the sides and reassemble the two sections next to the now freestanding pile. Layers can be easily peeled off with a pitchfork and tossed into the empty cage. Keep a hose handy during turning, to add moisture as needed. A properly built and maintained pile in this well-aerated bin can produce 18 to 24 cubic feet of finished compost in 14 days.
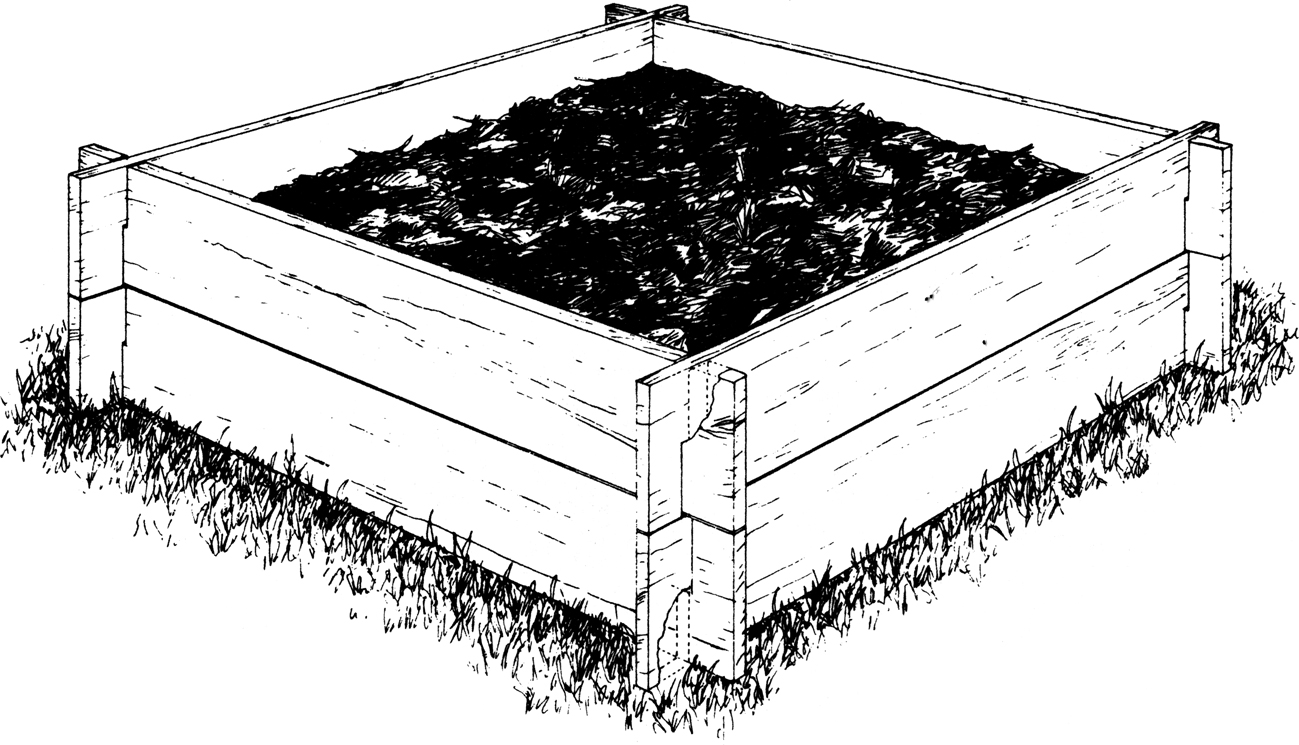
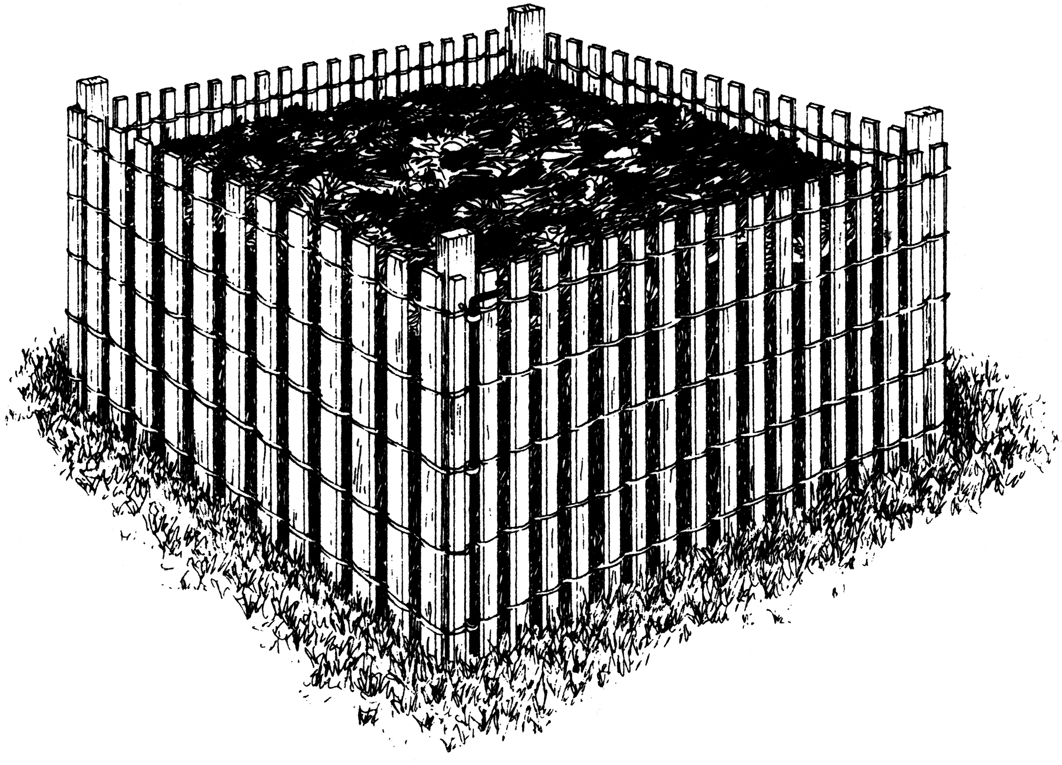
The New Zealand Bin
Perhaps the classic among compost bins is the wooden New Zealand box that was originally designed by the Auckland Humic Compost Club to admit as much air as possible from all sides. It can be used to make several batches of compost in different stages of decomposition, ensuring a continuous supply, and it can be a very attractive structure.
There are several variations of this box, but the simplest one is a wooden structure 4 feet square and 3 feet high or higher with neither top nor bottom. The frame is held together by 2x4s. The wooden sides consist of pieces of wood 6 inches wide by 1 inch thick. A ½-inch air space is allowed between every two boards so that air may penetrate into the heap from all sides. The boarding in front slides down between two posts so that boards can be removed one by one when complete access to the contents is needed for turning or loading. The open side may also be built up gradually as the pen is filled. Cover the top of the pen with hardware cloth, rolled canvas, burlap, or screen.
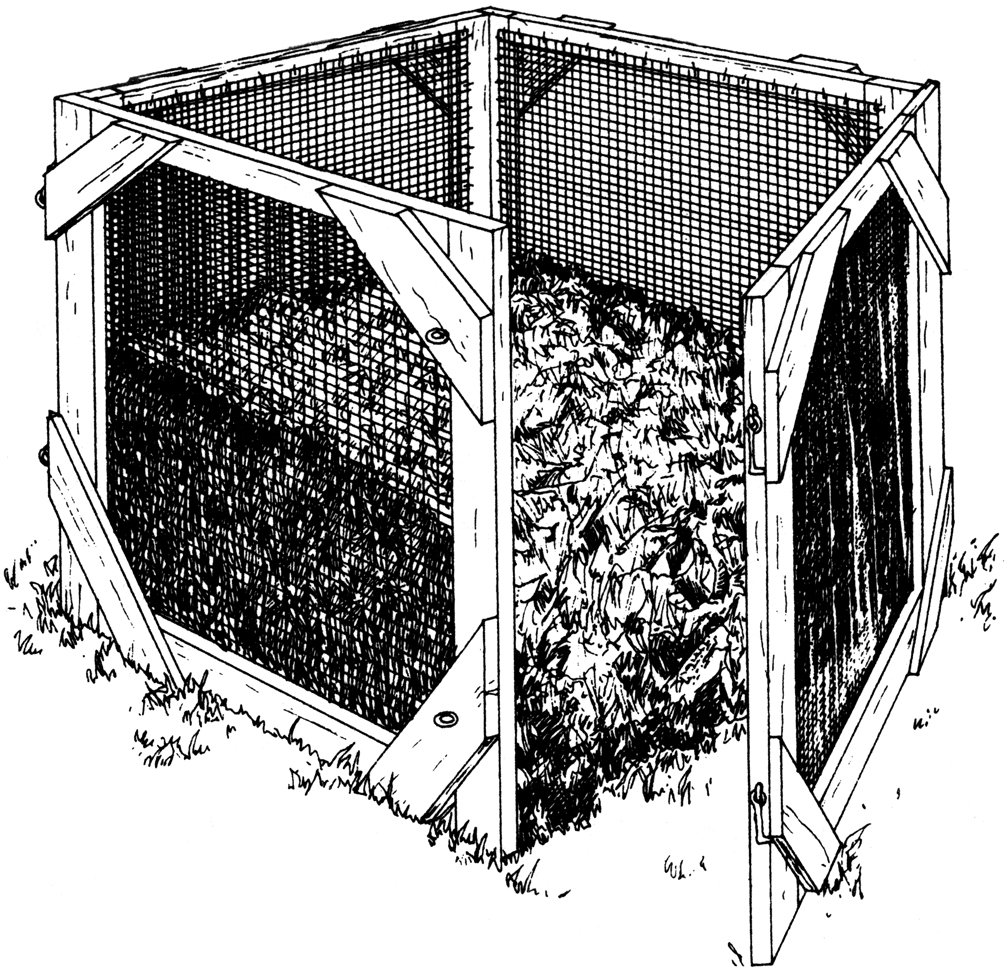
The wire-and-wood cage-type bin is inexpensive and portable.

The variation on the standard New Zealand box is divided to allow production of several successive batches of compost at once.
Project
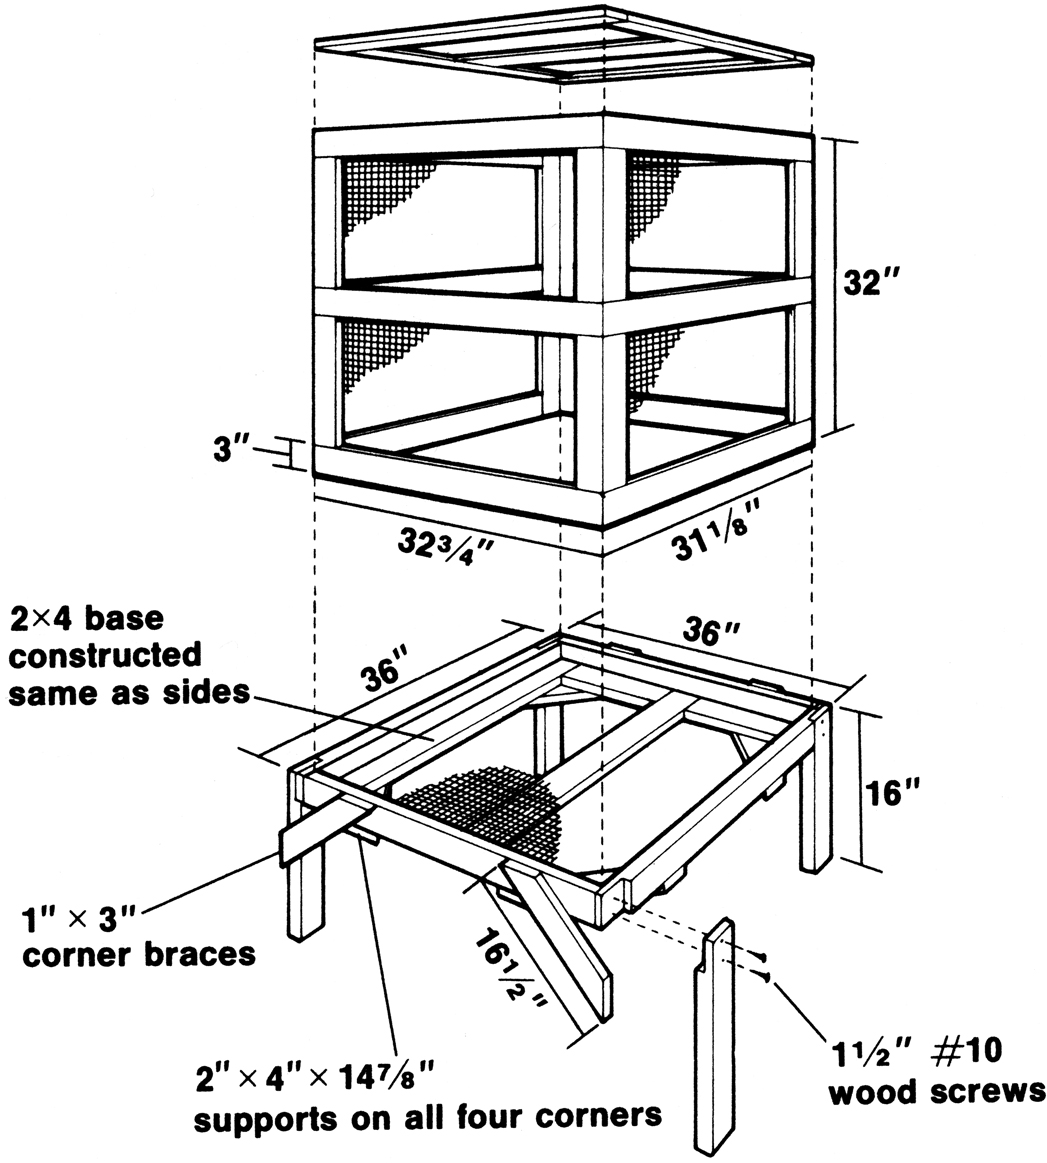
Building a Rodent-Proof Composter
Before rodents discover that your compost is a steady supply of kitchen leftovers, you may want to consider building this caged compost bin. Lap-joint construction for the 2x4 framing was chosen for its simplicity and strength. A hardware-cloth lining supported by 1- by 3-inch and 1- by 2¼-inch stock keeps the pile neatly contained and animals out.
Tools required
Electric drill
Screwdriver
Saw (circular saw or handsaw)
Hammer
Paintbrush
Wire cutters
Materials
Lumber—cut list
Cut lumber into the following lengths. Use untreated pine painted with a preservative or flat black paint. Measure and cut the pieces as you assemble them, to be sure they fit together correctly.
2 pcs. 36″ × 2″ × 4″ (frame sides)
2 pcs. 33″ × 2″ × 4″ (frame sides)
4 pcs. 16″ × 2″ × 4″ (legs)
4 pcs. 14⅞″ × 2″ × 4″ (support braces)
5 pcs. 32¾″ × 2″ × 4″ (bottom frame)
4 pcs. 16½″ × 1″ × 3″ (corner braces)
11 pcs. 32¾″ × 1″ × 3″ (top and horizontal large frame sides)
4 pcs. 31⅛″ × 1″ × 3″ (horizontal small frame sides)
4 pcs. 32″ × 1″ × 3″ (vertical large frame sides)
4 pcs. 32″ × 1″ × 2¼″ (vertical small frame sides)
Hardware
4 medium hasps
2 hinges, 1½″ × 2½″
36 wood screws, #10 × 1½″
16 pcs. 16d common nails
1 pound 4d common nails
16′ × 36″ hardware cloth ½″ × ½″
½″ staples
Construction
1. Assemble the base as shown in the illustration using #10 by 1½-inch wood screws at the corners. The 2x4 pieces bearing the load of the compost are cut at 45-degree angles at both ends and nailed across the corners with four 16d common nails in each piece. The leg braces are also cut at 45-degree angles and fastened with #10 by 1½-inch wood screws as shown.
2. To construct the bottom support frame, remove half the thickness of the wood on each end to a length that is equal to the width of the 2x4 (usually 3½ inches) on all five pieces. On two pieces, cut a groove (dado) half the thickness of the stock at the center to accommodate the middle support. Use #10 by 1½-inch wood screws for assembly, two per joint.
3. The remaining side frames and top are cut and assembled the same way as the base with the exception of using 4d common nails instead of screws at each joint and clinching on the reverse side.
4. For easy access to the compost, hasps are fastened to the top corners of the side frames, and two 2½- by 1½-inch hinges are attached to the top. Paint the entire unit with a good grade of enamel paint or a nontoxic wood preserver. After the paint has dried, cut pieces of ½- by ½-inch hardware cloth to fit the interior of all frames, and attach them with ½-inch staples.
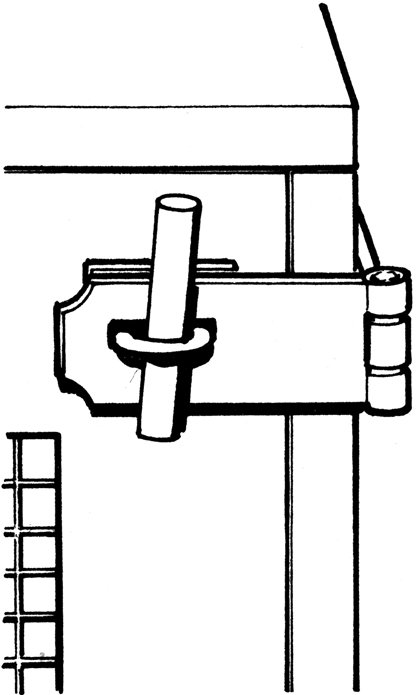
The four side frames are joined at their tops with hasps and easily removed pegs.
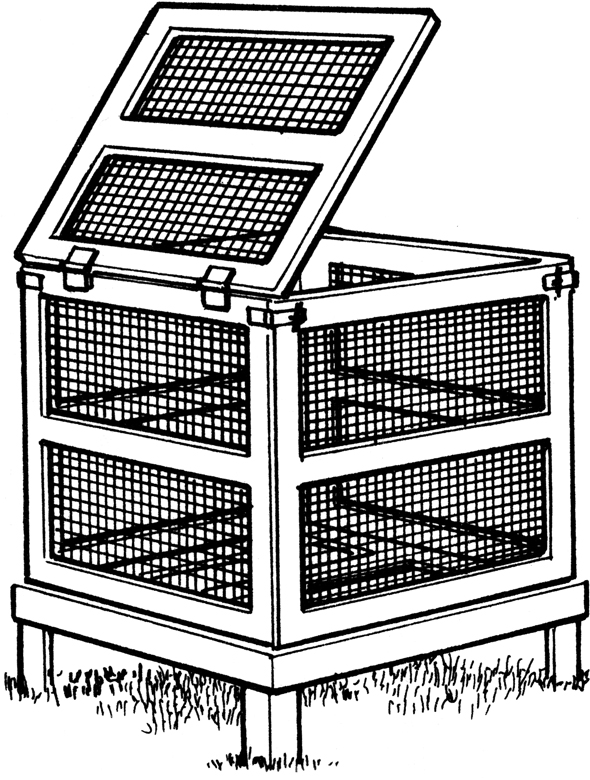
The hinged top frame permits easy access to compost.
If you are using a single bin like the New Zealand box, be sure to allow for a working space in front of the box equal to two or three times the floor area of the box. This much space is needed for turning the pile. You pile up the material outside the bin and then replace it within the bin, mixing so the outside material is placed toward the inside of the new pile.
One variation on the New Zealand box holds four separate bins for compost in different stages. The dividers between the compartments are removable to permit quick and easy shifting of compost from one bin to another.
 USING YOUR THREE-BIN COMPOSTER
The following week-by-week schedule will help you get the most from your three-bin composter. The schedule is self-perpetuating. Check moisture content when you transfer compost from bin to bin. Add dry material if it seems soggy; water if it’s too dry. To boost microbial activity, mix some soil or active compost into the material from the holding bin when you transfer it to the center bin.
Week 1: In the center bin, build a traditional layered compost heap, including high-nitrogen materials such as manure or alfalfa meal. Spread a base layer of dry leaves or straw in the holding bin; toss in kitchen wastes or garden trimmings every day or so.
Weeks 2 and 3: Remove a few front boards from the center bin and stir the compost. Keep adding to the holding bin.
Week 4: Remove all front boards from the center and end bins, and transfer the compost to the end bin to speed the composting process. Then remove the front boards from the holding bin and shovel that material into the center bin. Finally, spread a new layer of dry matter in the holding bin.
Week 5: Check the compost in the end bin. It should be ready to use on your garden.
Block and Brick Bins
Block and brick bins are permanent if mortared, but cement block bins can be constructed without mortar and can then be moved at will.
The block or brick bin is easily constructed. Usually, blocks are laid to permit plenty of open spaces for air circulation. But they can also be closely stacked, set into the ground, and mortared together, or formed into a cylindrical shape with an access gate at the bottom.
Gardeners who insist on a well-groomed compost area may prefer to have a large, rectangular, brick or block, chimneylike structure with several compartments. Use wooden hinged lids to cover the structure. In a three-bin unit, the first two bins are used in turning while the third stores finished compost. The bottom of the bin, if made of concrete, should slant one way so drainage may be caught in a gutter leading to storage cans. A combination of bricks and boards may be used, with boards set into slots along the front opening. Boards can be removed for access to the compost.
Rough stones laid with or without mortar in an open-fronted, three-fourths cylinder shape (like a larger edition of a state park barbecue pit) make an attractive rustic bin.
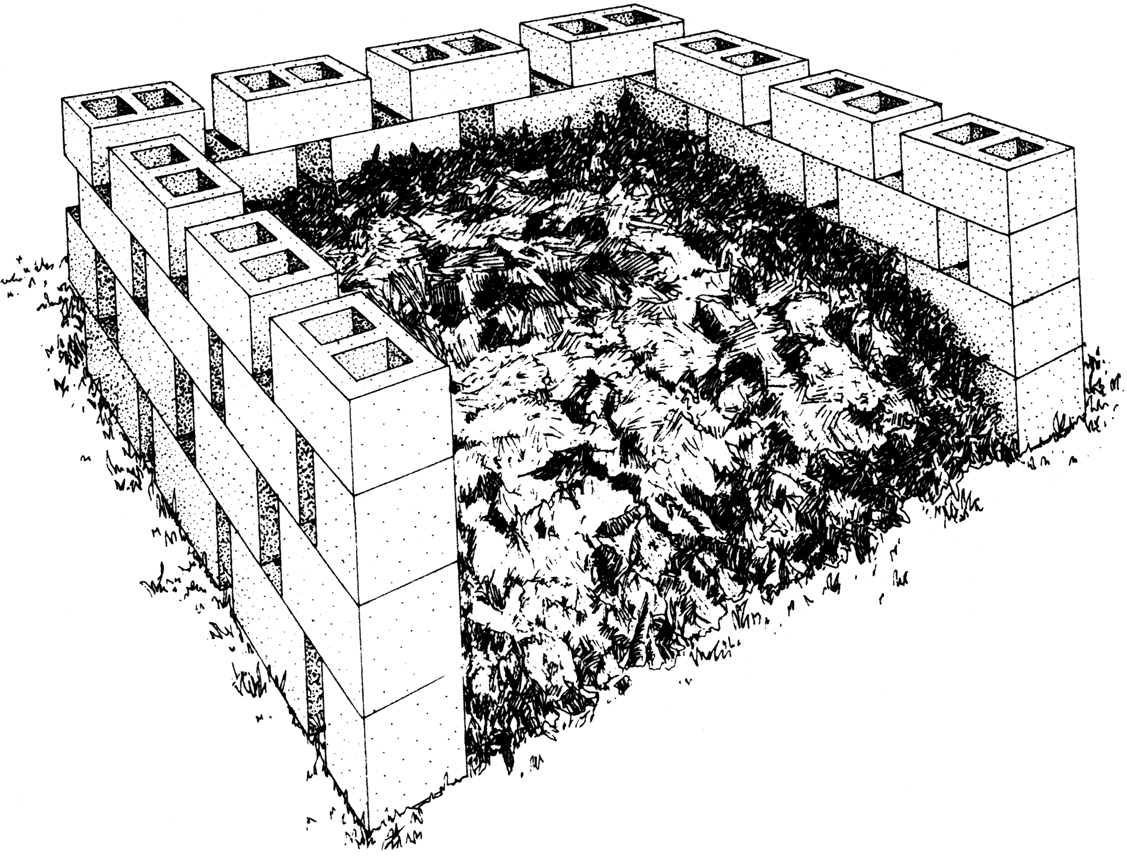
A simple block bin looks tidy and may be portable if blocks are not mortared together.
This simple bin is made from slotted boards and can be easily moved.
The Movable Slat Bin
Another type of portable bin can be constructed of wooden slats. This bin needs no hardware for support—no hooks, nails, or screws.
To make it, cut 10-foot-long 1- by 10-inch boards into 60-inch lengths. Slot each board 4 inches in from the end, 4⅝ inches across its width, so the boards can be nested, as shown. The finished bin is 5¼ inches square and 18¼ inches high inside—perfect for even the smallest lot.
Winter Bins
Winter composting does not have to be confined to a pit. An existing compost bin, well insulated with bales of straw or hay and covered for protection from the elements, can continue the composting process during cold temperatures, although at a slower rate than during warmer weather. Structures similar to cold frames can also be used for cold-weather composting, using south-slanting glass lids to catch the rays of the sun and protect the heaps from rain, snow, and drying winds. Manure added to such bins helps to keep temperatures high enough for microbial activity.
PENS
The very simplest pen can hardly be called a structure at all. It is, however, quick to make, neat to use, and it costs little. You just buy a length of woven-wire fencing and, at the site of the compost heap, bring both ends of the fencing together to form a cylinder large enough to surround the heap. Fasten the ends of the cylinder together with three or four small chain snaps that you can find in a hardware store. Move the cylinder to a freestanding position and start building the heap inside the cylinder. When it is half full, drive a stake into the pile. The stake should be as long as the total desired height. You can disassemble the cylinder for easy turning by removing the snaps. You set the cylinder up again and once more turn into it, shifting the ingredients from outside layers to inside, reversing the position of the material. The stake not only helps maintain the shape of the pile but also aids in directing water into the heap.
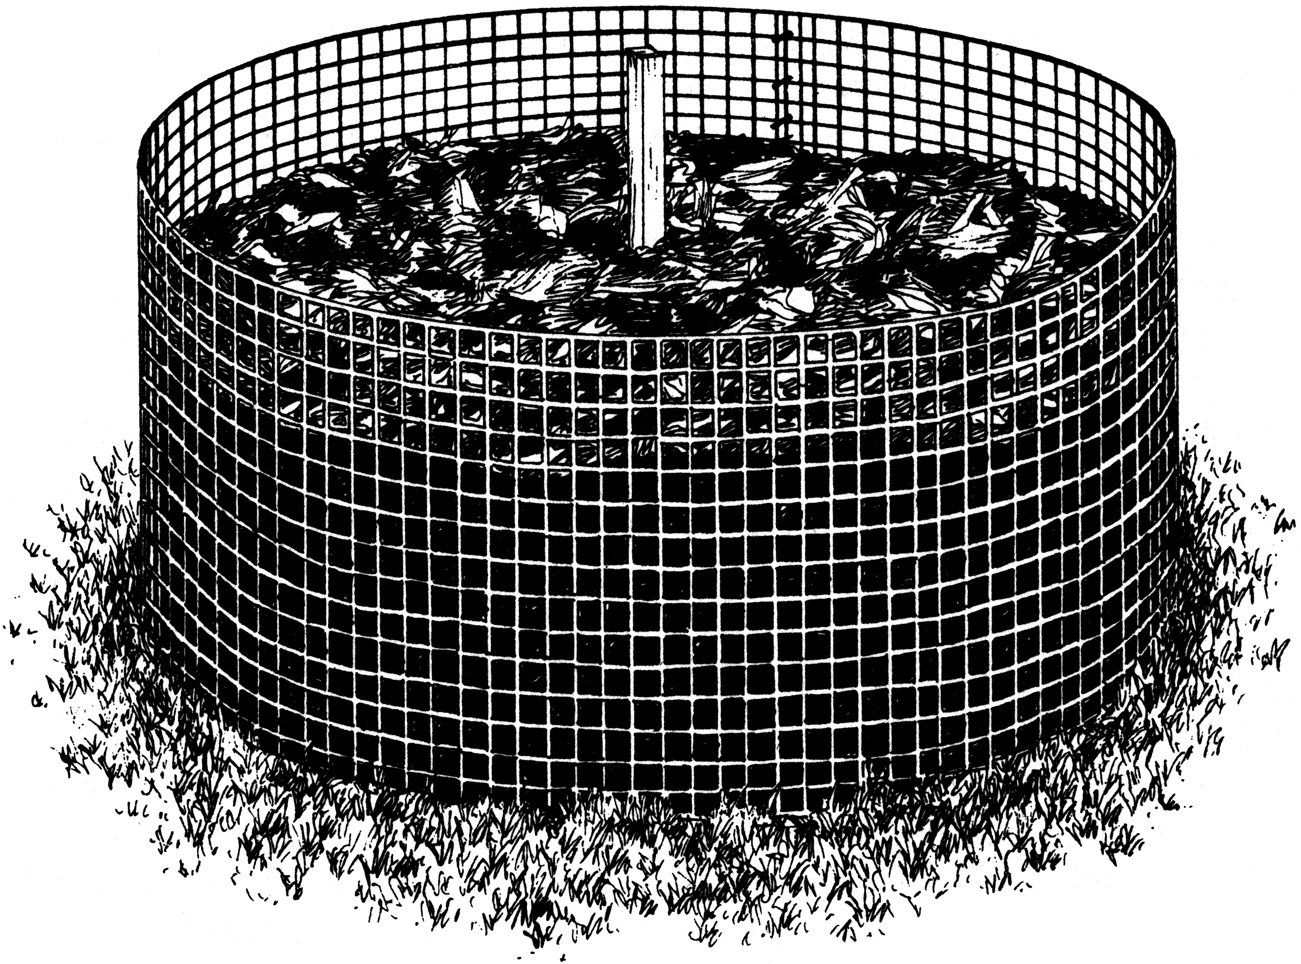
A hardware-cloth cylinder forms a very simple, movable pen.
Recycled materials, such as snow fence, can be used to construct a compost pen.
A partly anaerobic version of the woven-wire cylinder is lined with a length of roll roofing that is wired to the fencing. The roofing is durable and prevents small bits and pieces from falling out of the bin.
After the bin is full, it is covered with a layer of 6-mil black plastic and left to decompose. Turning is not necessary with this system, although composting will take longer and high temperatures will not last long enough to kill weed seeds.
A refinement of the all-wire pen is the wire-and-tomato-stake pen in which ½-inch-mesh poultry netting is placed inside an enclosure made by driving 4-foot tomato stakes 1 foot apart in a 10- by 5-foot rectangle and looping baling wire around the top of each stake to weave all stakes together. Small pieces of wire hold the poultry netting to the stakes. Use additional lengths of wire to reinforce the top. These pass from side to side and keep the stakes from spreading apart under the pressure of the compost. These wires are removed when the compost is turned. This type of structure is movable and reusable. However, neither pen will resist large dogs or tunneling rats.
Recycled hardwood pallets make excellent compost bins. They can be quickly assembled by driving in fence posts at the corners. A chicken wire or hardware-cloth liner serves as a rodent barrier.
Other materials that can be used to construct pens include snow fences, lattice fencing, steel posts and chicken wire, furring strips, prefabricated picket fence sections, woven-reed or rattan fence sections, heavy window screens, storm windows with hardware cloth replacing glass, and louvered house blinds.
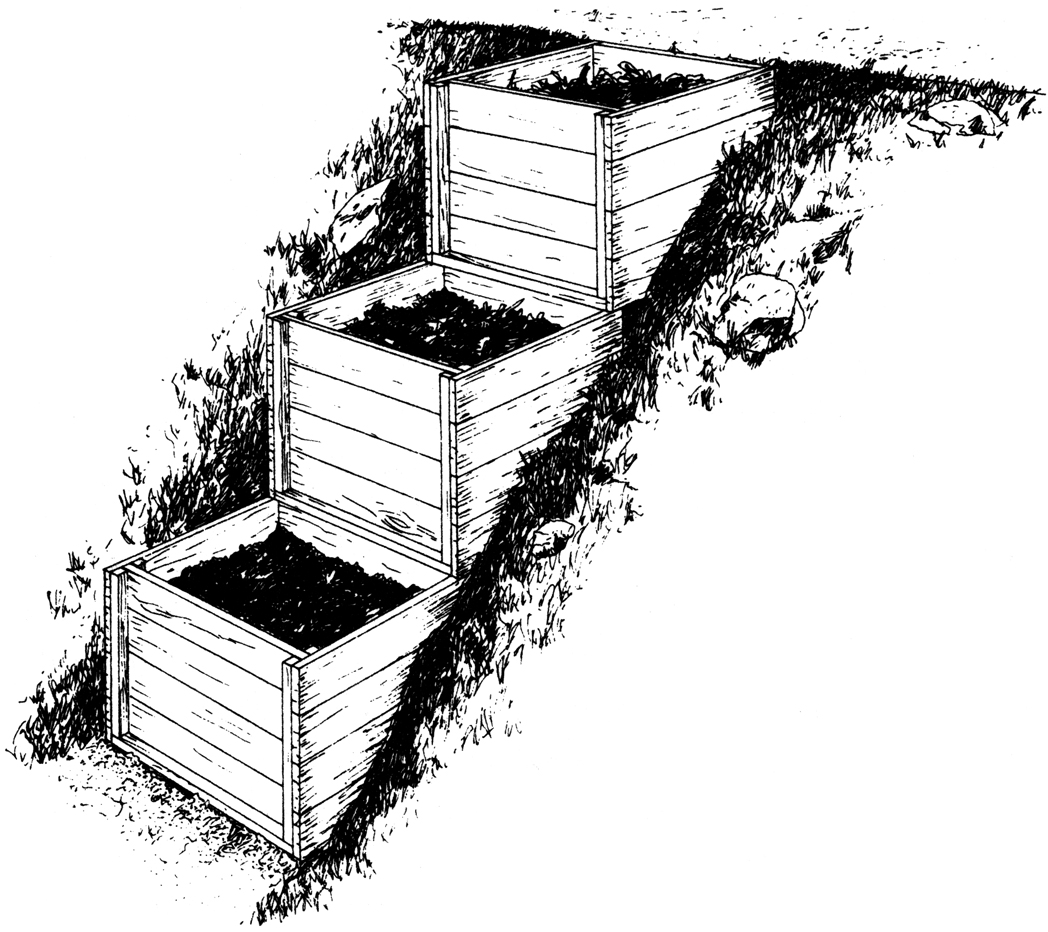
Stair-stepped bins make use of a sloped area.
Pens and bins can be made to fit the contours of uneven land. One such structure consists of three bins in stair-step order going up a hill, partially cut into the bank. This can work well if your home sits on a rise above the location of the garden. Composting starts in the highest bin. The pile is turned by dropping the partially decomposed compost down a step, inverting it in the process. The second turning goes into the third box. The finished compost can then be removed from the lowest box.
PITS
Pits for composting are dug into the ground and may be partially—or wholly—underground. The chief advantage of the pit form is its stable, secure, insulated structure. A masonry-lined, covered or coverable pit is secure from dogs, rats, clever raccoons, most flies, and wind and rainstorms. Pit composting is ideal for severe winter weather because subsurface ground warmth and the heat-retaining properties of concrete enable bacteria to go on working longer. Some Northern composters have a pen for summer and a pit for winter.
However, proper composting does not take place in a pit when compost becomes soggy and anaerobic. Provide some drainage to lessen the possibility of anaerobic conditions. Improper aeration and the greater possibility of anaerobic conditions remain, however, the two greatest drawbacks to pit composting. If you have the time to turn frequently and don’t mind the extra strain on your back muscles in raising forkfuls of material from a lower-than-normal position, you may find ways to avoid these problems. Some pits are large and wide enough so that a person can stand at pit-bottom level while turning.
A compost pit can be built of concrete or masonry. It is not advisable to use pressure-treated wood, which generally contains toxic heavy metals that can leach into the compost, as a pit liner. A pit must have subsurface walls to prevent drainage water from entering the compost from the soil or the ground surface. Such drainage water would leach nutrients from the compost.
A useful combination of a composting method and a compost-containing structure is the earthworm pit. Earthworms aid in aerating and mixing the materials, thus eliminating some of the drawbacks of anaerobic pits. The pit, in turn, helps protect the worms from cold weather. More details on earthworm composting are given in Chapter 9.
One gardener combined the earthworm pit with the movable-box method. He dug a rectangular hole about 18 inches deep in a flowerbed. At earth level over the pit he placed a rectangular, bottomless, and topless wooden box of slightly larger dimensions than the hole. The hole was filled in layer style with kitchen garbage, manure, and green matter. When the frame was filled, too, the composter placed a board over the top and watered well. In 3 weeks, when the heat of the pile had decreased, earthworms were added.
Another successful pit is the one used by a New York State gardener. It is 4 feet wide, 4 feet deep, and 6 feet long with concrete sides and bottom. The bottom has an inset drainage grid similar to those used in basements and showers. Walls are 8 inches thick and project 18 inches above the ground. The top is made of tongue-and-groove boards nailed to 2x4s. A hinged lid provides access. Earthworms do the work of aeration in this pit, and garbage and leaves are the chief materials used.
An inexpensive pit may be made by digging a section of a masonry flue liner into the soil, leaving about 3 inches of it projecting above ground level. A thin layer of concrete poured into the pipe serves as the floor. A small flue liner 2 feet square may not require bottom drainage if earthworms are used, but check frequently for anaerobic conditions. Terra-cotta tiles are also useful for lining pits. These can be used for the sides in combination with a hardware cloth bottom to prevent rats from getting in from underneath. Build twin pits to make the turning job easier.
DRUMS
Where space limitations or offending odors are concerns, composting in drums provides an alternative to bins, pens, and pits. A metal or plastic barrel, with drainage holes in the bottom, can be raised off the ground with bricks or blocks to permit aeration. Layering kitchen wastes with absorbent materials like shredded paper or straw can help control odors; without turning or rolling, this method produces compost slowly but does provide a place for waste disposal.
STRUCTURES FOR CITY COMPOSTING
Is there any perfect form of compost making for a city gardener? Helga and Bill Olkowski, in The City People’s Book of Raising Food, suggest a well-built two- or three-bin brick structure set between two houses. Runoff is caught in sawdust at the bottom of the bin, and the sawdust is turned with the pile. As garbage accumulates on its way to the bin, the Olkowskis layer it with sawdust in 5-gallon cans with tight-fitting lids. Sawdust is added every time fresh garbage is put into the can. The sawdust controls odor and putrefaction. In loading the bins, however, you should remember to compensate for the high-carbon content of the sawdust by using more high-nitrogen wastes.
Other city gardeners, who lack even a small space between houses, have composted successfully in garbage pails and metal drums. The danger with these methods is that they may quite easily become anaerobic and ferment. If you think it is hard enough dealing with garbage in a city, you should try to take care of a huge drum of fermented garbage. If, however, you really need to try these methods, provide aeration and drainage with holes in the bottom and sides of the drum or can. Set it in the basement or another protected area, preferably outdoors. Elevate the can or drum on bricks or concrete blocks, and set a pan, larger in diameter than the drum, underneath it to catch drainage. Layer garbage with high-carbon-content materials just as you would in a regular pile. Composting is not really an indoor activity, and turning is especially hard to do in a limited space.
GARBAGE CAN COMPOSTING
Use this system to compost kitchen scraps during winter, or use it year-round to compost all the waste produced by a small yard and garden.
Directions
Use a hammer and a large nail to punch holes in the bottom, sides, and lid of a garbage can. Place the can on a large tray to catch draining liquid if desired.
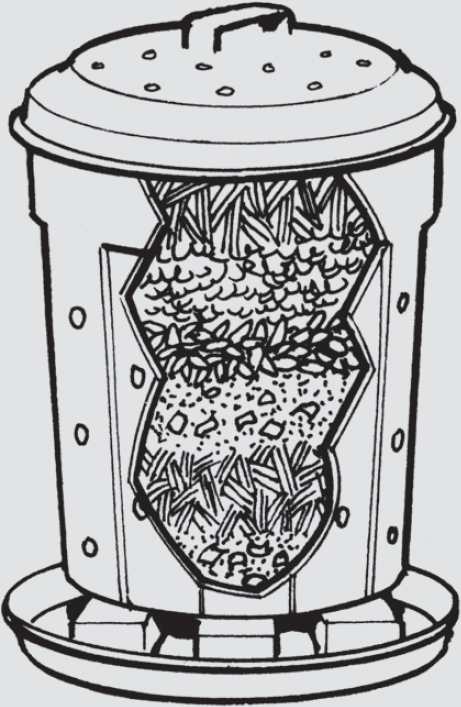
To start the composting, place a 3-inch layer of finished compost or soil in the bottom of the can. Add finely chopped kitchen scraps followed by an equal amount of shredded newspaper, grass clippings, and/or shredded leaves. Add more material as available until the can is full, then layer new materials into another can and allow the first to finish composting—about 3 to 4 months.
Tips to Make Your Composter Work Its Best
• Protect the composter from freezing temperatures—put it in a garage or cellar.
• Start with soil or finished compost, and add a little more on top of each addition.
• Chop, shred, or even blend all additions as finely as possible.
• Add kitchen scraps before they start to smell.
• Mix the composting material after each addition and every few days. If you don’t, it may produce unpleasant odors. Stir with a stick, roll the can back and forth on its side a few times, or use a compost-turning tool.
• Add water sparingly and only if your materials are very dry.
Trash cans can be used more readily for outdoor composting by cutting out the bottoms and setting them firmly into the ground to prevent tipping. California composter Helene Cole suggests using several of them and simply waiting 6 to 12 months for the finished product. Chopping your wastes first will speed up the process. A few air holes drilled in the lid will keep the earthworms that do most of the work in this system happy.
Another much more sensible indoor method is the earthworm box discussed in Chapter 9. Worms are easily raised in basements where fairly stable temperature conditions can be maintained. Worms do the turning in worm boxes, and the results of their labors are rich worm castings for compost and perhaps a little extra income for you during fishing season. If you live in an apartment, discuss composting or worm-raising plans with your landlord before launching your career. In mild climates, a worm box can work happily on a balcony or terrace.
Refer to the Appendix for sources of nifty urban-appropriate barrel composters and fully enclosed bins that are vermin-proof and may also include odor-control structures.
COMMERCIAL COMPOSTERS
A number of very good commercially produced composting units are now on the market. Generally built on the revolving-drum or upright-cylinder principle, these structures are designed to produce high-quality compost quickly and with a minimal effort on the part of the user. Articles in the Wall Street Journal have noted that commercial composting units represent overkill for most people, since similar composting conditions can be created without a commercial bin. Constraints on space, time, and physical ability, however, will continue to make such products appealing to many home composters.
The Green Cone is a smaller, cone-shaped composter designed to decompose kitchen wastes. This closed, sun-heated composter features a belowground basket for contact with the soil and a double-walled plastic cone to collect heat from the sun. Relatively small and innocuous looking, the Green Cone can be located close to the kitchen for easy waste disposal, but it is not meant to handle yard wastes and produces very little compost. These Green Cones are sometimes distributed by local waste management offices to help reduce the amount of organic materials heading to the landfill.
A list of online retailers of composting units and supplies is included in “Equipment and Tool Sources” starting on this page. In general, these composters are designed for small-lot gardeners who want to make compost quickly and without offending the neighbors or attracting animals. Although such conditions can be met with a homemade bin, commercial composters offer valid alternatives for an efficient, attractive composting unit.
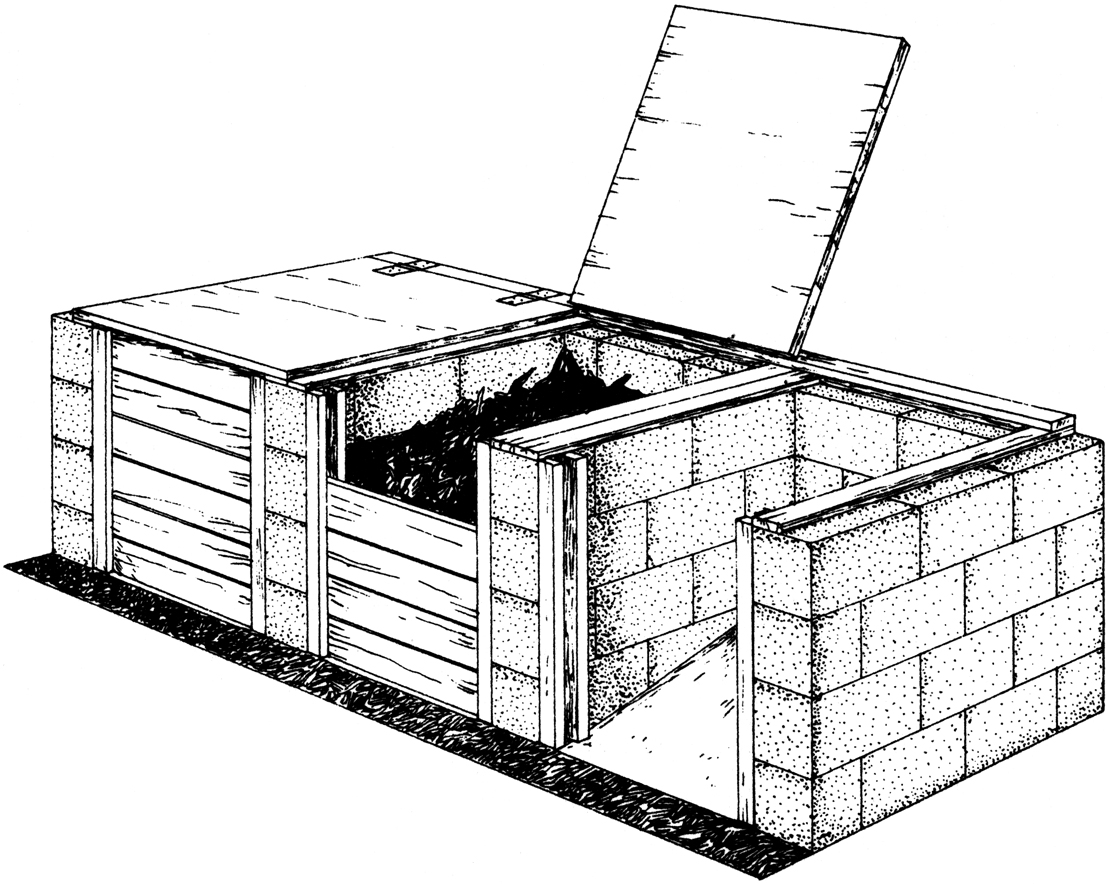
A covered, multi-bin structure works well for urban and suburban composting.