
Materials & Tools

This chapter describes and illustrates the materials and tools necessary for the tile projects presented throughout the book. Most homeowners already own many of the tools and materials necessary for tile projects. From the saws and flat bars needed to remove old surfaces, to the drills and utility knives handy for repairing and installing substrates, these are basic components of a standard toolkit. Others, such as a snap cutter, are not common, but nor are they expensive or difficult to use.
Materials for tile projects range from cementboard to cork, from thinset mastic to grout. These are widely available and reasonably priced. Most importantly, you should match the product to the project. This chapter will help you do exactly that.
There are a few less common and more expensive tools that, while not strictly necessary, will simplify large projects to such a degree that you may want to add them to your arsenal. A wet saw, for example, cuts even heavy tile easily and simplifies tricky cuts. For small projects you may want to rent a tile saw; for large projects it can make sense to purchase the saw.
In this chapter:
• Safety
• Materials: Levelers & Resurfacers
• Tools for Removing Old Surfaces
• Tools for Working with Substrates
• Tools for Installing Substrates
• Tools for Setting & Grouting Tile

Safety
Working safely includes such obvious but important factors as wearing the right protective gear and staying alert. But it also means taking the time to think about what you’re doing. Most people have watched a home improvement show on the topic of renovation and the first tool to be put into use is a sledge hammer, swung haphazardly into the nearest available wall. A competent renovator would not begin a demolition in this fashion. What if there had been a gas line, electrical junction box, or water pipe behind that wall? The consequences of such impetuous actions could be quite costly, if not deadly.
Before attempting to open up any wall or floor for repairs, visually inspect all sides of the structure you will be working on. Check for evidence of plumbing, electrical wiring, phone lines, gas lines, or anything else that may look out of place. Make a note of any locations you find, and exercise care when working around them.
If the project requires you to work around exposed electrical wiring, turn the power off at the main breaker box and verify it is off by using a circuit tester or voltage meter to individually test each outlet. Turn the water off before working around plumbing pipes, but remember to turn it back on later to check for leaks before the work is covered back up.
More importantly, invest in high quality safety gear. Tile work can be a very dusty job, so protect your lungs by wearing a NIOSH-approved respirator rated type N-95 or higher when working around fine particles such as airborne dust from cut tiles. Keep the work area well ventilated. A pair of heavy-duty work gloves is essential for protecting your hands while carrying heavy materials and jagged work debris such as fractured tile. Take extra care when handling broken shards of tile. Latex gloves will protect your hands from the high-alkalinity and abrasiveness of wet cementitious mortar. Safety glasses will protect your eyes from tile dust and shards. You will be spending a fair amount of time crawling around on your knees, so pick out a pair of comfortable knee pads and wear them.
As a rule, take your time and keep your work area clean and uncluttered. Whenever possible, divide each task into portions you can easily manage within a short time frame. Your confidence to take on bigger projects will grow as you gain experience, as will the quality of your work.
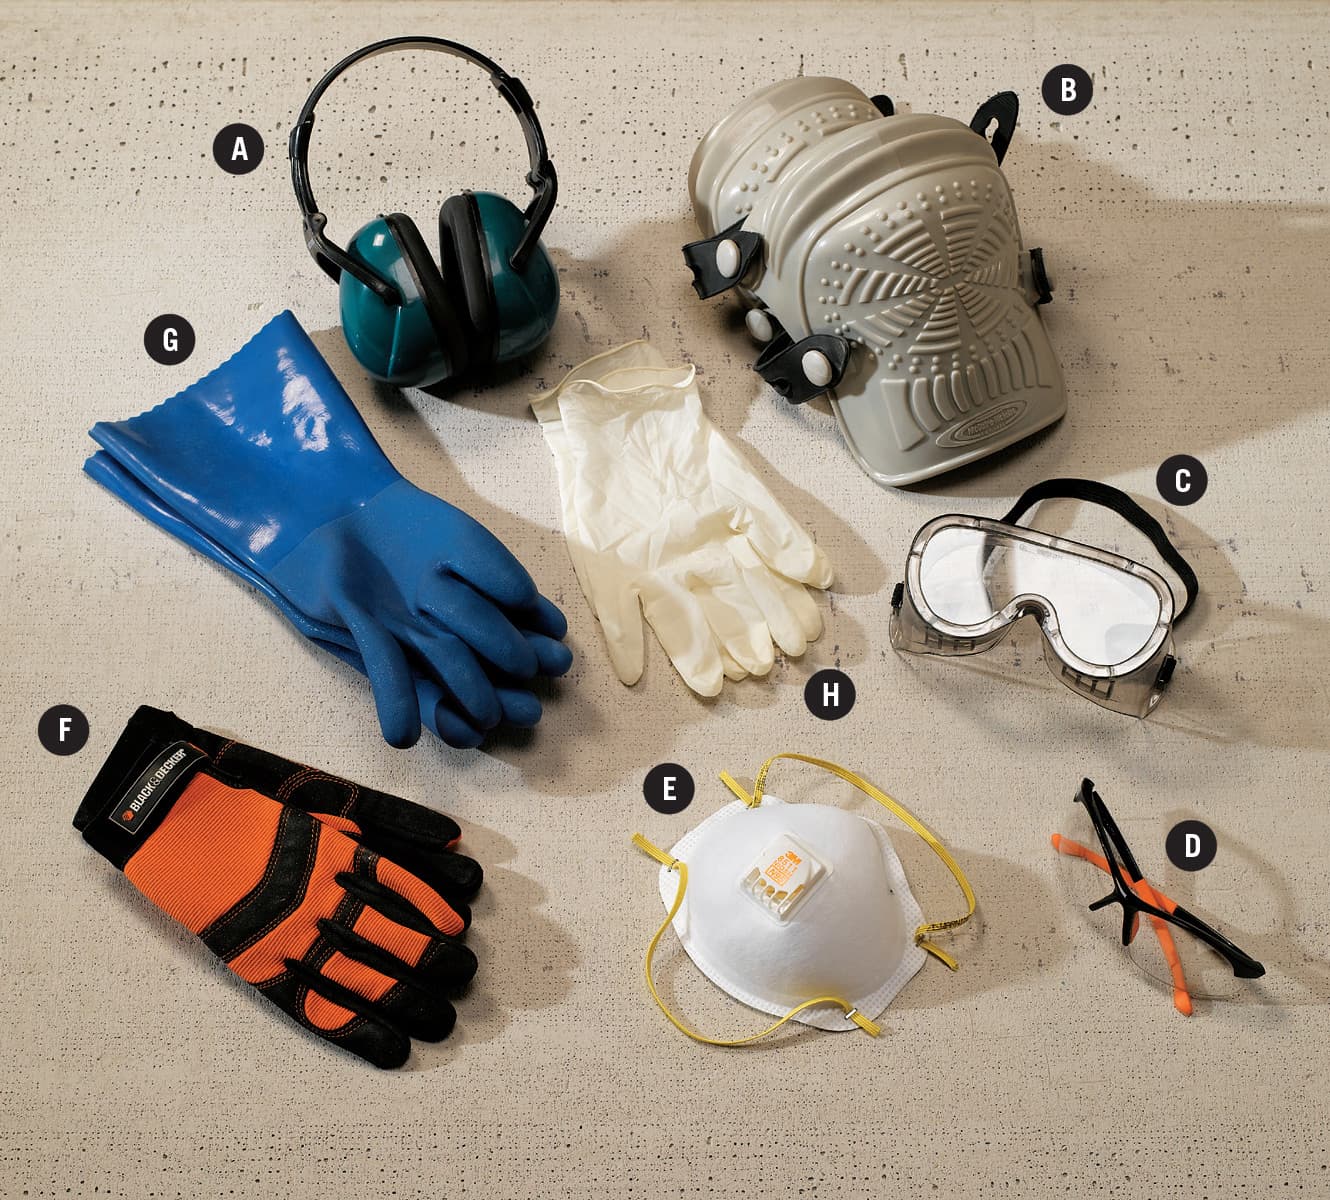
Basic safety equipment for use when working with tile includes: Ear protection to be worn when operating power tools (A); knee pads for comfort (B); safety goggles (C) or glasses (D); a NIOSH N-95 rated particle mask (E) or respirator to be worn when cutting tiles with a tile saw; work gloves for handling materials and working with sharp objects (F); rubber gloves (G) or latex gloves (H) to be worn when handling cementitious products such as thinset mortar.
 FIRST AID KITS
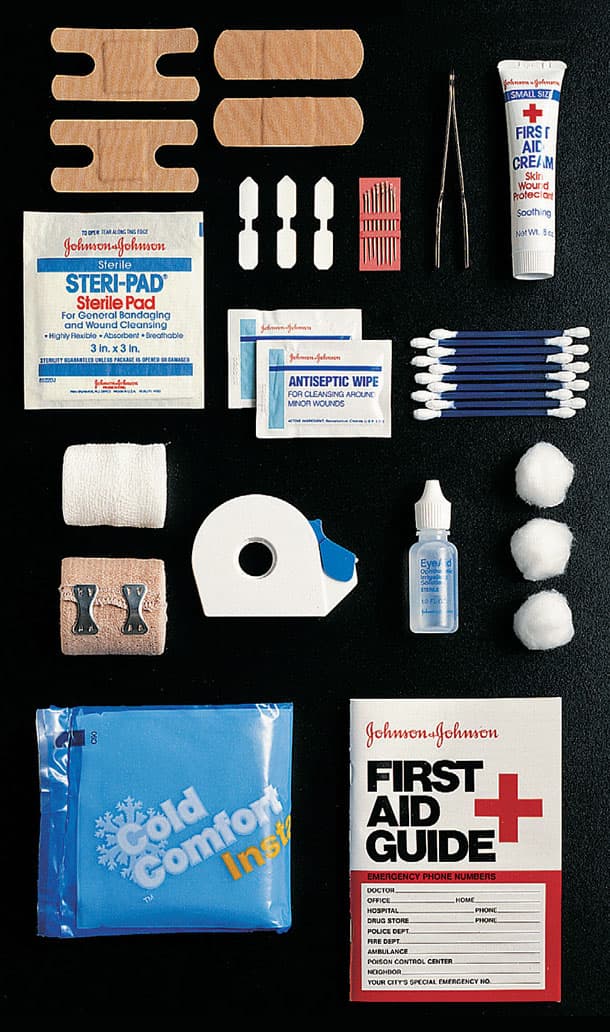
Always keep a well-equipped first aid kit close at hand when doing any home improvement work.
Cuts from using sharp tools such as a grout tool, or from the many sharp edges you may encounter in working with tile, often require prompt attention to ensure they don’t become infected and a more serious health problem. Your first line of treatment for “on-the-job” injuries is a well-stocked first aid kit. The kit should be self-contained—preferably in some sort of light box or pack with its own handle. (Portability is useful, allowing you to take the kit with you on long road trips or to off-site improvement projects.) Place it where you can easily get to it when needed.
Equip your kit with a variety of items, including bandages, needles, tweezers, antiseptic ointment, cotton swabs, cotton balls, eye drops, a first aid handbook, a chemical-filled cold pack, elastic bandages, first aid tape, and sterile gauze.
For puncture wounds, cuts, burns, and other serious injuries, always seek medical attention as soon as first aid—such as washing and wrapping of cuts—has been provided.
Working Safely
Keep your tools sharp and clean. Accidents are more likely to occur when blades are dull and tools are filled with sawdust and dirt.

Use a GFCI receptacle, GFCI receptacle adapter, or GFCI extension cord to reduce the risk of shock while operating a power tool in wet conditions.

Check outlets with a circuit tester to make sure the power is off before removing cover plates, exposing wires, or drilling or cutting into walls that contain wiring.
Materials: Levelers & Resurfacers
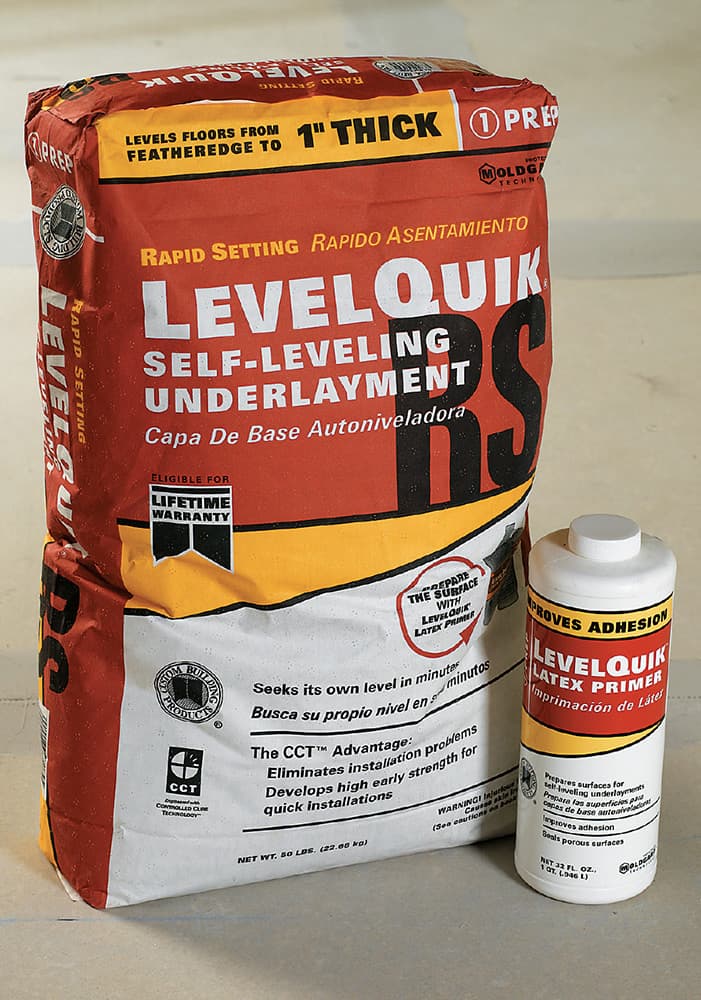
Self-leveling underlayment, otherwise referred to as self-leveling cement, is applied over uneven surfaces, such as cementitious backers and concrete slabs, to make them level prior to tile application. A similar product called concrete resurfacer accomplishes essentially the same thing. Levelers and resurfacer have fairly liquid viscosities. They are poured onto uneven surfaces, where gravity directs them to fill in the low areas of a subfloor. One 50-pound bag of floor leveler will typically cover a surface area of approximately 50 square feet, at 1/8-inch thick. Leveler can be applied in layers as thin as a feather edge and as thick as one inch, depending on the specific product you buy. Self-leveling underlayment cures very quickly, usually within a few hours of application. In some cases, multiple applications are required to build up to the desired thickness.
A coat of paint-like primer should be applied prior to the leveler in almost all cases. This is usually rolled onto the substrate using a short-nap roller. The primer seals the substrate, which helps keep it from absorbing the moisture in the cement mixture too rapidly. It also improves the adhesive bond between the self-leveling cement and the surface it is applied to.
The leveler compound is best mixed using a 1/2-inch corded drill fitted with a mixing paddle. A garden rake and a trowel will also be necessary to spread the batch over the area in need of repair.
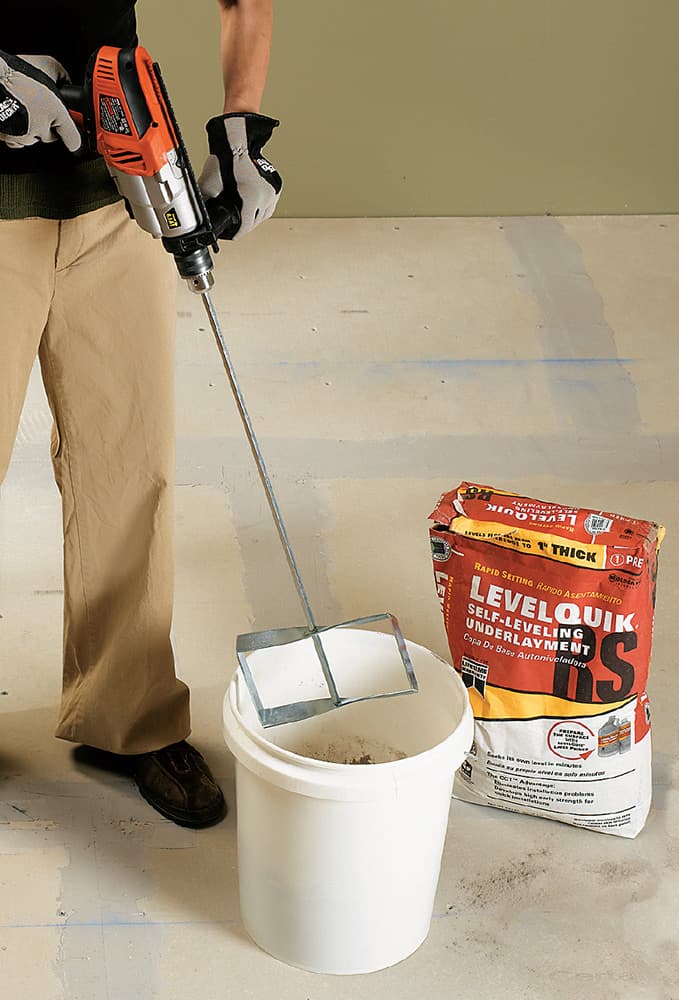
Cement-based tile products such as this floor leveler must be mixed well with water. A 1/2" power drill with a mixing paddle attachment is a great help in this regard.
Floor levelers and resurfacers are applied prior to installing tile backer to address dips, valleys, and other uneven areas in a concrete floor or subfloor. An acrylic or latex fortifier helps the product flow more smoothly and gives it some extra flex, without sacrificing hardness.
 How to Apply Leveler
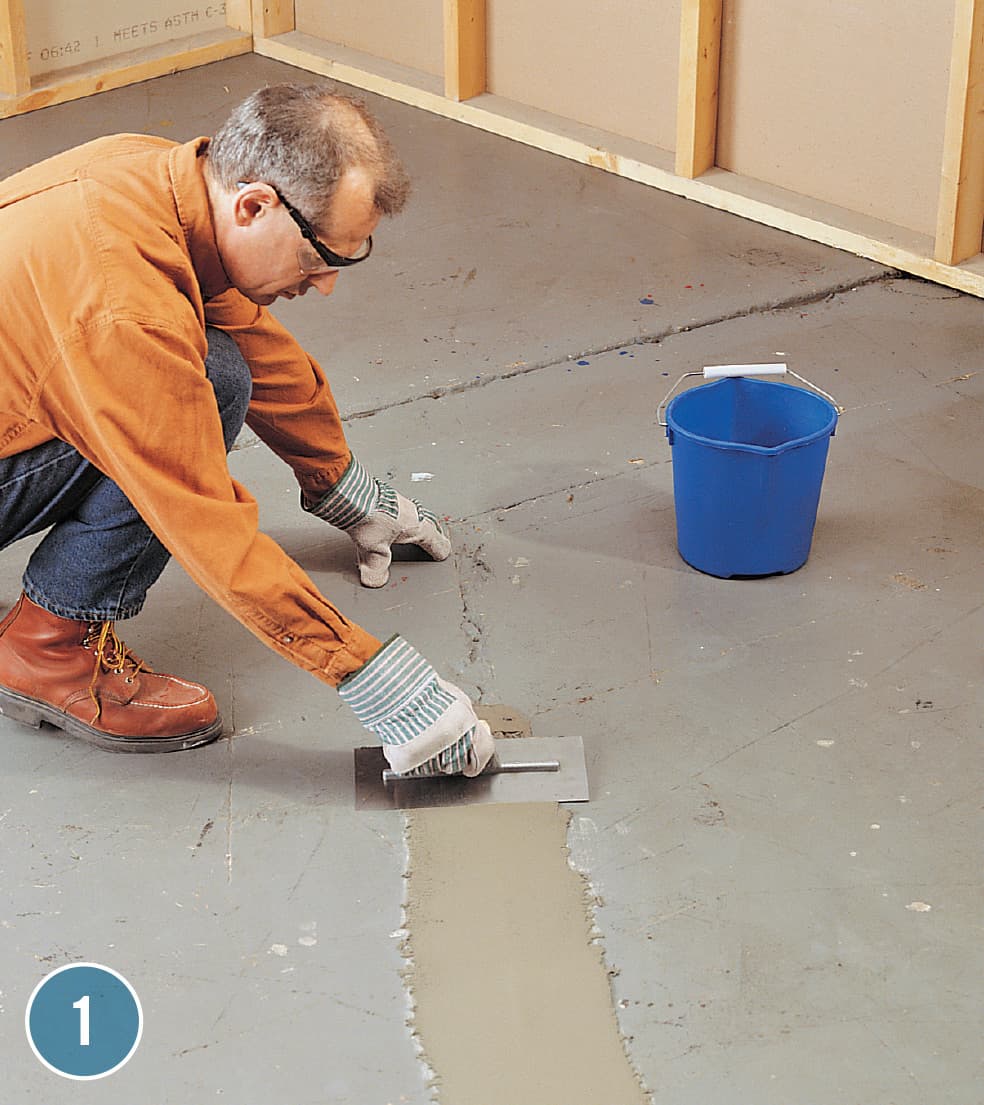
Patch any major cracks or large popouts with concrete patching compound before you apply the leveler. Once the patch dries, wash and rinse the floor according to the instructions on the leveler package. This may include the use of grease cutters and pressure washers.
Apply an even layer of concrete primer to the entire surface using a long-nap paint roller. Be careful to avoid painting yourself into a corner—don’t walk on wet primer. Let the primer dry completely.
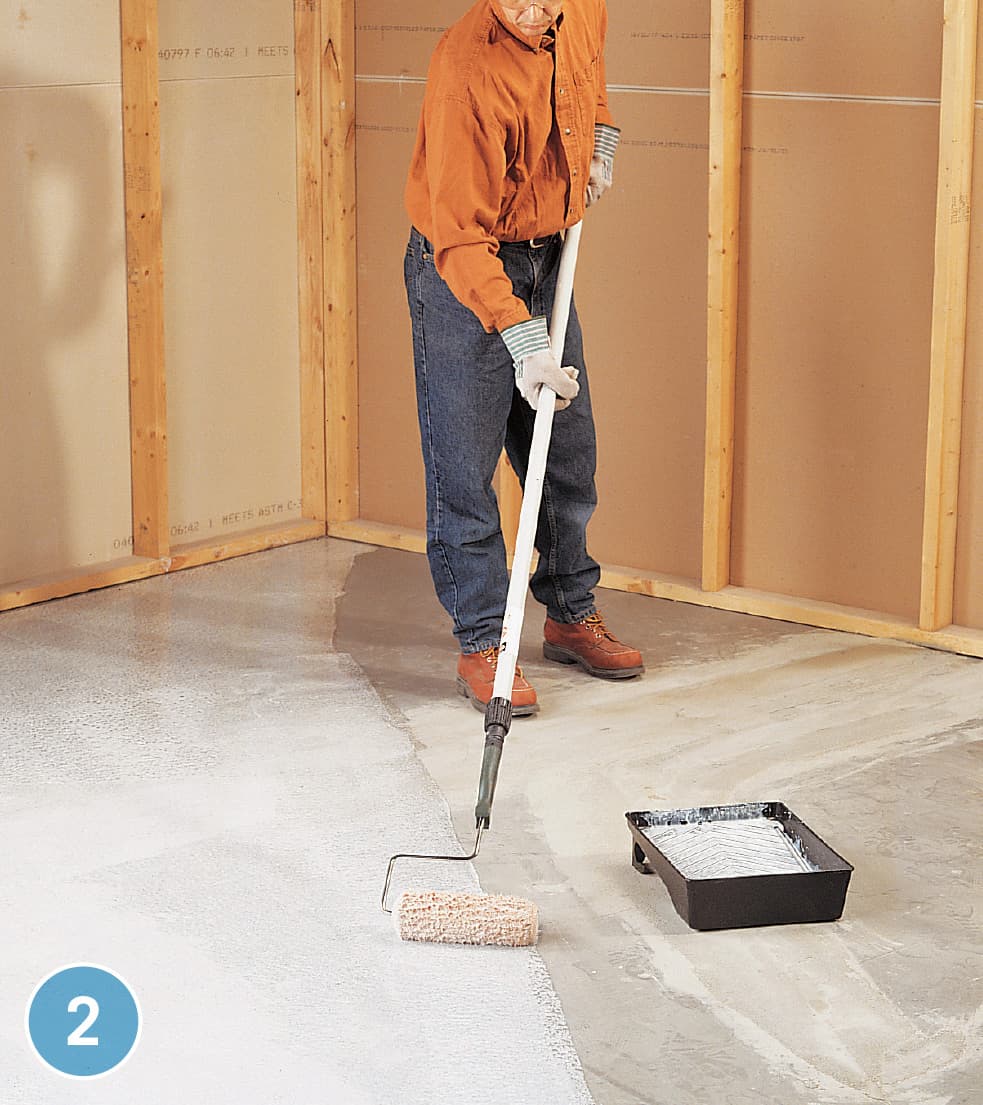
Following the manufacturer’s instructions, mix the floor leveler with water. The batch should be large enough to cover the entire floor area to the desired thickness (up to 1"). Pour the leveler over the floor.

Distribute the leveler evenly, using a rake or spreader. Work quickly: the leveler begins to harden in 15 min. Use a trowel to feather the edges and create a smooth transition with an uncovered area. Let the leveler dry for 24 hrs.
Materials: Tile Backer
Tile backer is any approved sheet panel that is installed on a subfloor, countertop, or wall surface to serve as underlayment for the installation of tiles. Most commonly today, that means cementboard. Cementboard was invented in the early 1960s by Paul Dinkel, a tile contractor determined to develop a tile substrate to replace drywall, which is prone to deterioration in wet areas. His solution was a thin, precast, strong concrete-base panel that has come to be known as cementboard.
The projects in this book employ cement and fiber/cement backer boards. They are commonly sold in 3 × 5-foot panels in thickness of 1/2-inch or 1/4-inch. For walls, 1/2-inch-thick backer board is installed over wall studs spaced 16 inches on center. For horizontal applications (floors, countertops, and tub decks), either 1/4- or 1/2-inch-thick cementboard may be used. For floors, the joists should be spaced 16 inches on center and there should be a subbase of 3/4-inch-thick sheathing. Unless otherwise allowed by the manufacturer, use 1/2-inch-thick cementboard for all other applications.
On horizontal surfaces, the backer board panel may be laminated to the subbase using a dry-set or modified thinset mortar bed and then fastened with screws or nails. This setting bed is required by some local codes, but may not be required in your area. It is a good idea regardless, as it eliminates voids under the panels and provides a dimensionally stable surface for the application of tile. This greatly reduces tile cracking.
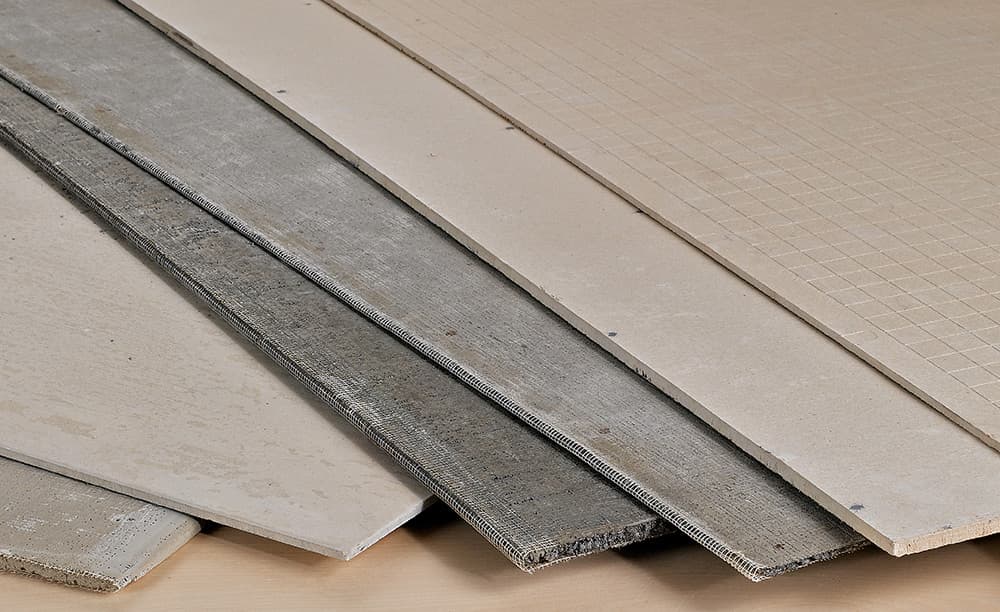
Tile backer board is designed to retain its rigidity when damp—whether the dampness is from the thinset mortar during the application, or the conditions of the location. Cement or fiber/cement base backer (cementboard) is made in 1/4 and 1/2" thicknesses. Other fiberglass-based tile backers are lighter than cementboard and some installers find them easier to work with.
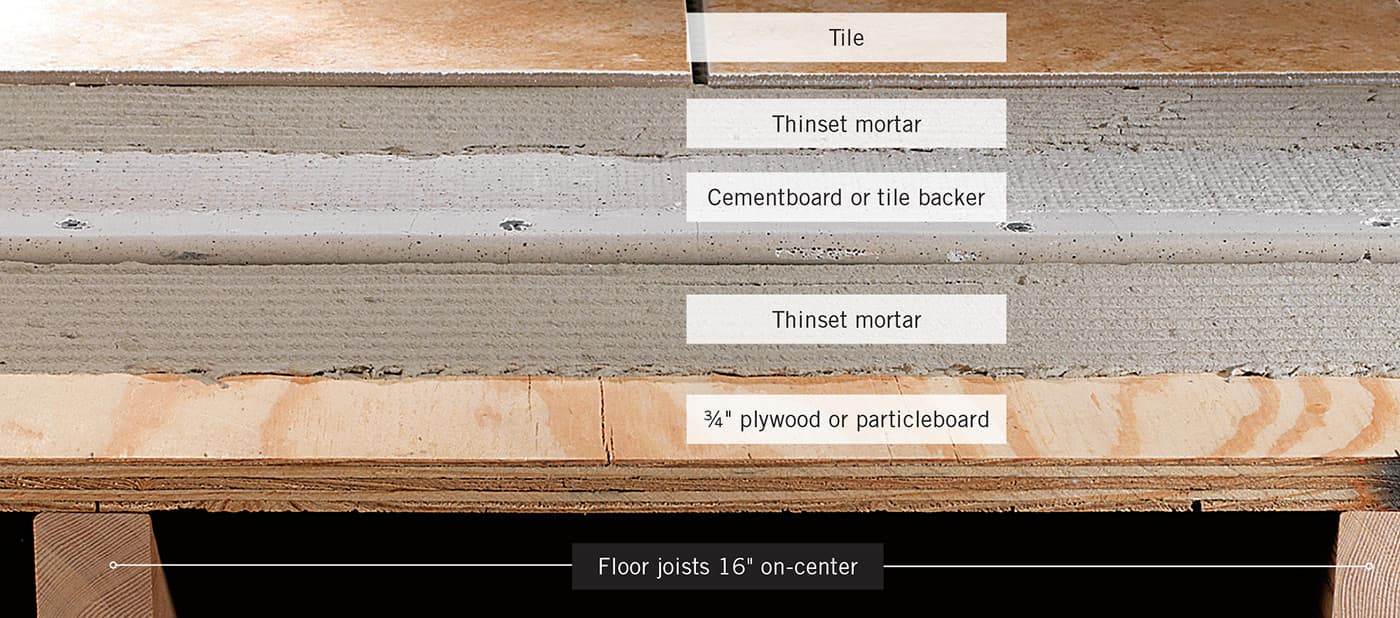
Peelback of a typical tile floor. The subfloor of 3/4" plywood or particleboard sheathing is covered with a layer of cementboard (you may use 1/4 or 1/2") or tile backer is set into a bed of thinset mortar (in most cases) and fastened down with screws. The tile floorcovering is laid into another bed of thinset on top of the cementboard.
Proper fastener selection is critical for the long-term success of any backer board installation. Use 1 1/4-inch, corrosion-resistant backer board screws with a minimum of a 3/8-inch-diameter head. A full-sized backer board panel installed over a floor or countertop will require up to 60 screws. Wall applications will require up to 30 screws per panel, and ceiling applications will require up to 42 screws per panel. Many backer boards are manufactured with predrilled screw holes around the edges.
Alkaline-resistant, 2-inch-wide fiberglass mesh tape is used in conjunction with a modified thinset mortar to reinforce the adjoining edges between backer board panels. Fiberglass tapes that are not alkaline resistant will degrade over time, become brittle, and lose their reinforcing strength.
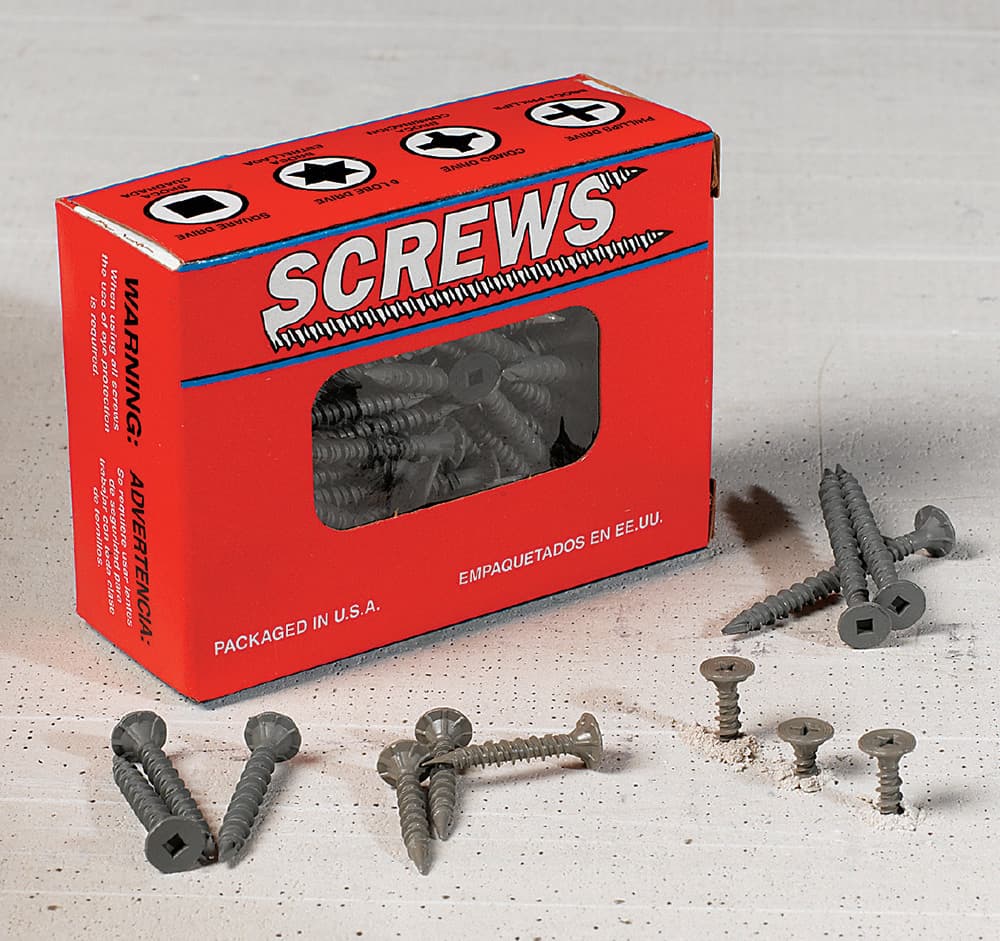
Cementboard screws are specially designed to penetrate the cementitious material without cracking it. They are also corrosion-resistant, which is important given the moisture in mortar.
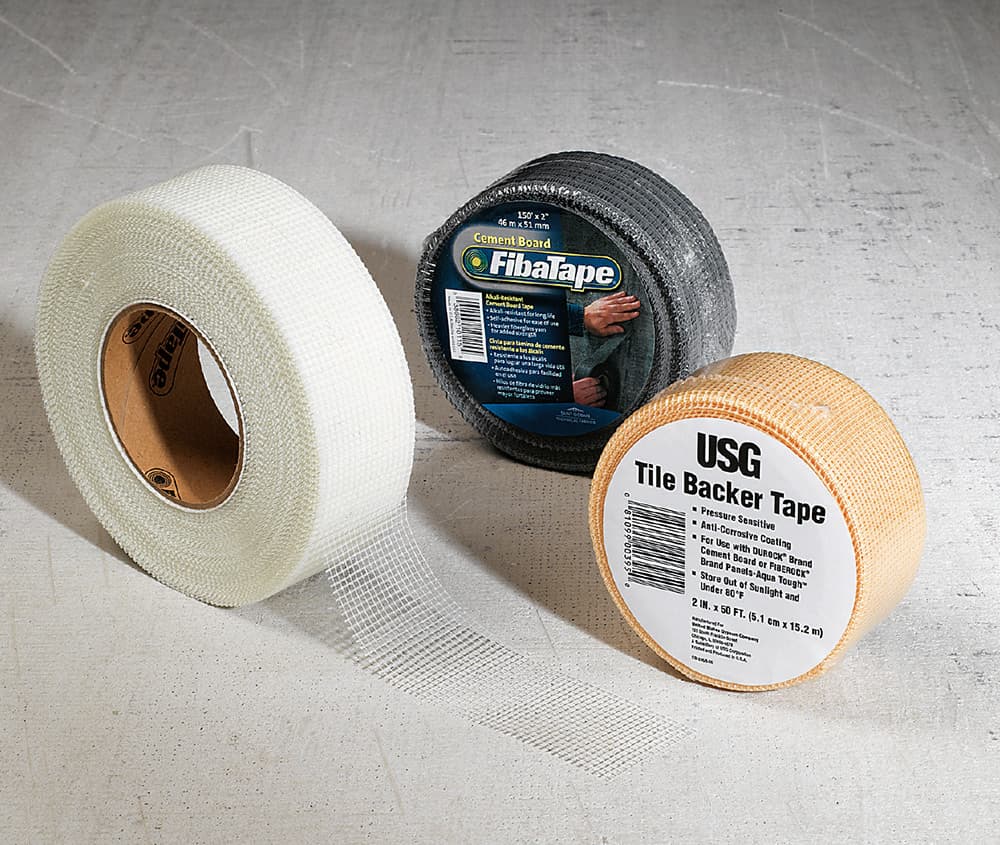
Cementboard mesh tape is used to cover and reinforce the seams between cementboard panels. Don’t use regular mesh tapes for this job: they are not alkali-resistant and will degrade.
Cutting Cementboard
Even though cementboard is a rigid material that breaks or crushes fairly easily, with the right tools, it can be cut to fit with little difficulty. The most low-tech way to make straight cuts in cementboard is to use a carbide scoring knife for cutting shallow guidelines in the panel, which can then be snapped and broken accurately. With practice and patience, L-cuts and cutouts are also possible using this tool. This method generates no dust.
Carbide and diamond-tipped hole saws are useful for boring smaller diameter holes in tile and cementboard to accommodate items such as water pipe and valve protrusions. Spraying the bit with water while you are drilling will help to reduce dust and lubricate the cutting edge of the bit.
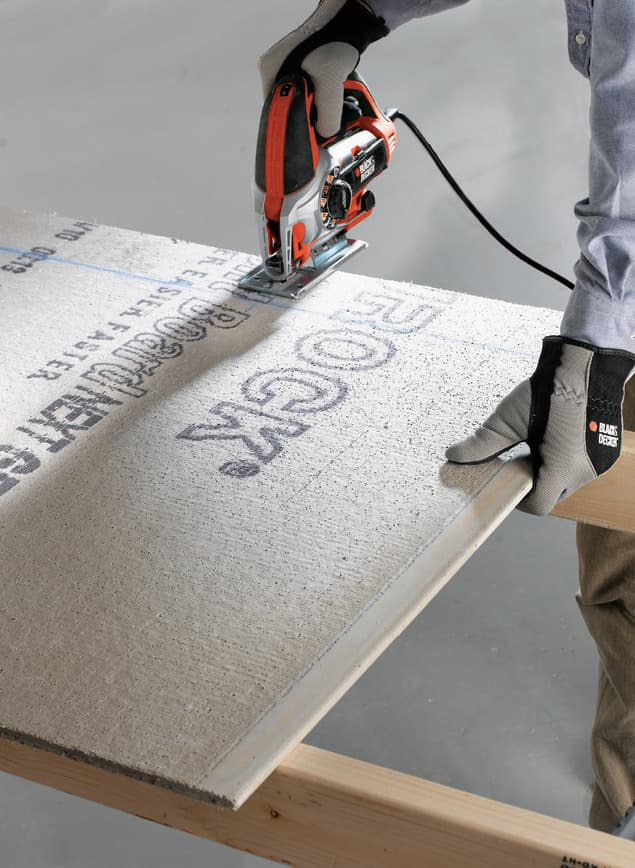
A jigsaw fitted with a carbide tungsten grit blade is a versatile power tool capable of making curved and straight cuts in cementboard. Purchase some extra blades though, because they tend to wear out quickly.
A rotary tool fitted with a tile-cutting bit is useful for making round cutouts for toilet flanges. These saws are often supplied with a circular cutting guide for making custom-sized radial cuts. With a little practice, a rotary tool (also called a spiral-cutting tool) can be used to make L-cuts and rectangular cutouts for electrical boxes. The tile cutting bits are prone to breakage due to heat and the high torque generated by the saw, so set it to a low working speed and periodically lubricate the bits with all-purpose oil.
An angle grinder fitted with a four-inch dry-cutting diamond blade is an all-purpose tile saw useful for making a wide range of linear cuts in tile and backer board, including square cutouts for water valves and electrical boxes.
Although the blade is too large to make small cutouts, circular saws fitted with a carbide-tipped fiber cement blade are useful for making linear cuts in backer board panels.
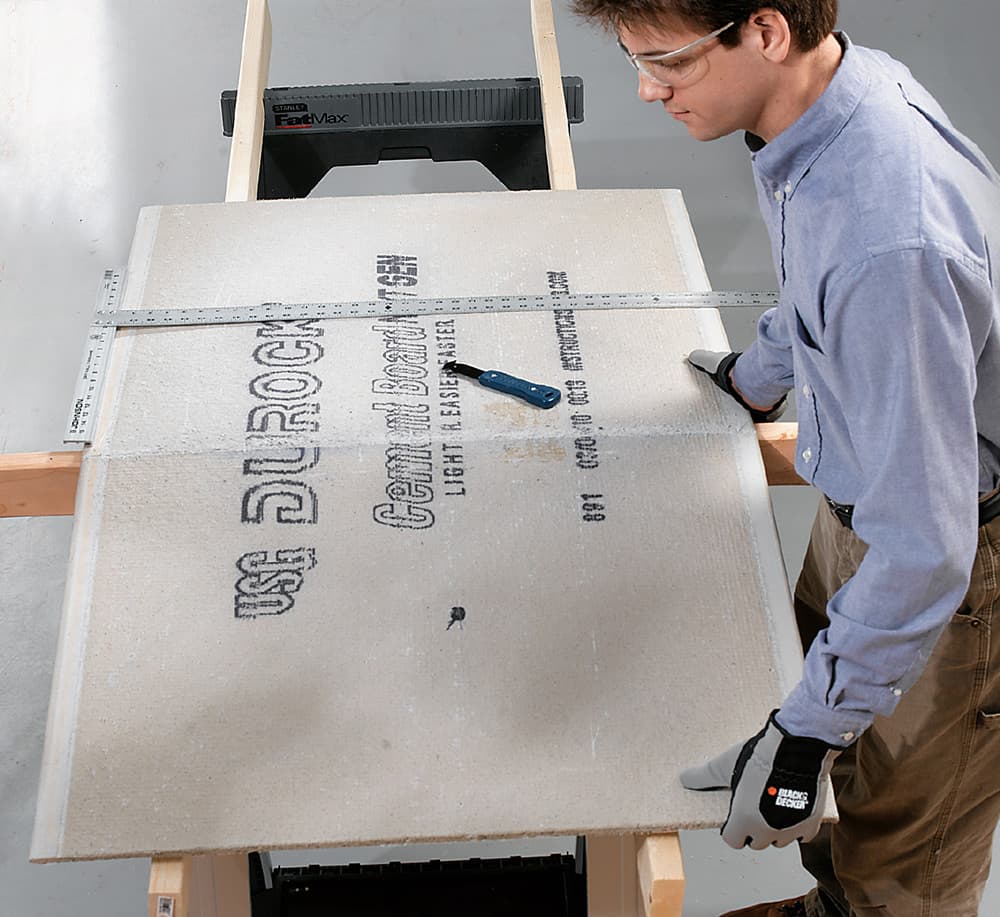
To score and snap cementboard using a scoring tool, measure and mark the rough side of the cement board to the desired size. Using a straightedge as a guide, score the board with a carbide scoring tool, then snap the panel evenly along the scored line. Score the panel deep enough to penetrate the glass-fiber mesh layer just below the surface of the cementboard.
 SAFETY TIP
Dry-cutting tile or cementboard with any power tool will produce harmful silica dust. Wear a respirator and safety glasses while cutting and make tile and cementboard cuts outdoors in a well-ventilated area whenever possible. A fan is recommended to provide additional ventilation and to help blow dust away from the workspace.
Tools for Cutting Cementboard

Angle grinder. Snap reference lines using chalkline and cut along the line with an electric angle grinder equipped with a diamond blade. Use this tool only in a well-ventilated area and be sure to wear full safety protection.
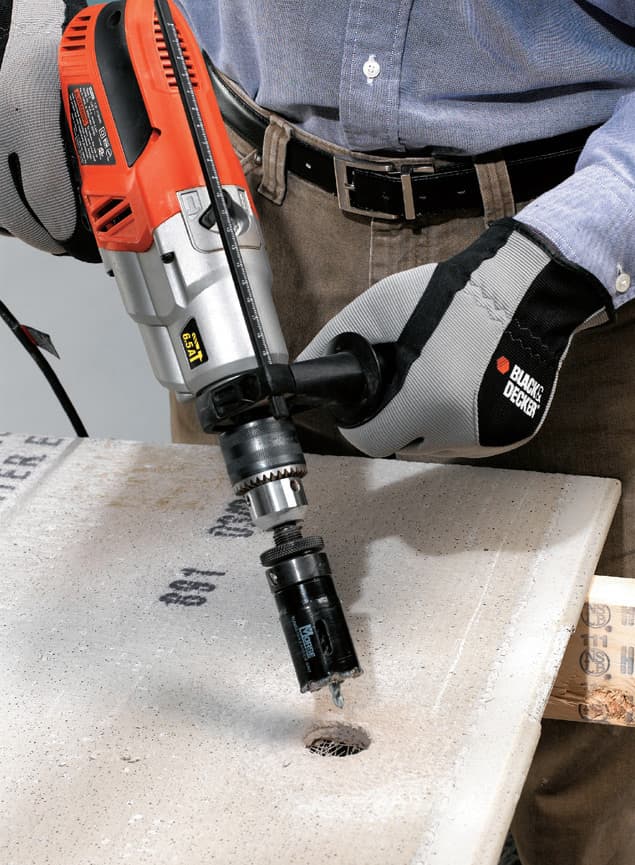
Hole saw. To make round and curved cutouts in cementboard, try using a power drill fitted with a carbide or diamond-tipped hole saw. Mark the centerpoint of the cut on the panel and bore the hole at low speed. To improve performance, use a spray bottle filled with water to periodically moisten the cutting edge of the bit.
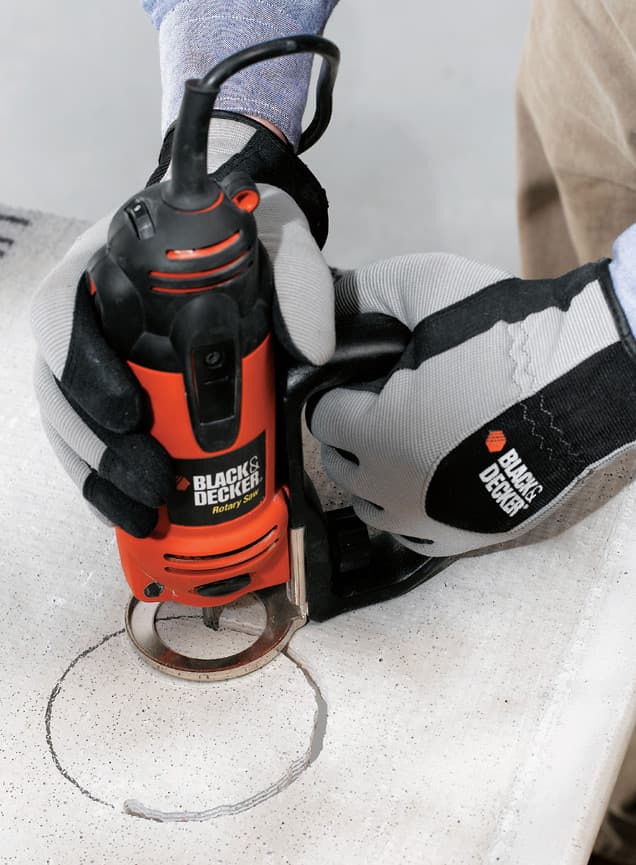
Rotary tool/spiral cutting saw. To make round cuts in cementboard using a rotary saw fitted with a tile cutting bit, adjust the circle cutter guide to the desired hole size and drill a pilot hole in the perimeter of the desired cut. Insert the pivot foot of the guide and the bit into the pilot hole and complete the cut.
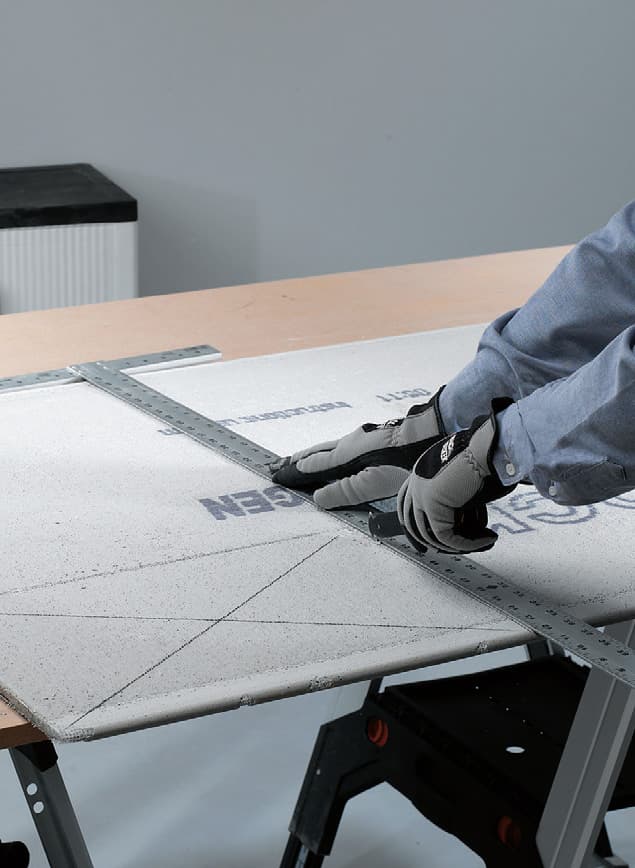
Scoring tool. To make L-cuts in cementboard with a carbide scoring tool, mark the outline of the cut on both sides of the panel. Using a straightedge as a guide, score both sides of the panel and punch the waste material out from the back side of the panel using a hammer.
Jigsaw for straight cuts. To make L-cuts in cementboard with a jigsaw, mark the outline of the desired cut on the panel with a pencil. Fit the jigsaw with an abrasive blade and cut out and remove the waste material.

Jigsaw for rounds cuts. To make round cuts in cementboard using a jigsaw fitted with a carbide blade, mark the starting point of the cut on the panel and drill a starter hole. Insert the jigsaw blade into the pilot hole and complete the cut.
Materials: Tile Membranes
Tile membranes are thin, flexible tile underlayment materials designed to isolate tile installations from problematic substrates, provide for sound abatement, or waterproof and vapor-proof tile installations in wet areas and steam rooms. There are dozens of different types of tile membranes on the market. Please refer to the manufacturer for specific information pertaining to the limitations, benefits, and installation of the membrane selected.
Waterproofing membranes are installed in wet areas and are designed to prevent the migration of water beyond the membrane. They often provide additional benefits, including crack suppression. Tile installed in steam rooms, wet saunas, and steam showers requires the installation of a membrane that is both vapor-proof and waterproof.
Sound isolation membranes are designed to reduce the transmission of impact sounds from hard surface flooring to lower level living spaces. This type of membrane is usually installed in apartment dwellings and condominiums (and behind drywall in home theaters).
Crack isolation and anti-fracture membranes, also called crack suppression membranes, isolate tile installations from tile substrates that are susceptible to stresses that produce horizontal movement. They can absorb movement of as much as 1/8- to 3/8-inch. Some membranes are liquid applied to the substrate with a trowel or roller, others are sheet applied. There are even anti-fracture thinset mortars, eliminating the need, in some cases, for a separate sheet or liquid membrane.
Uncoupling membranes isolate the finished tile installation from the substrate while allowing both to move independently. This type of membrane is typically installed over problematic sub-floors and newly installed or problematic concrete slabs.
NOTE: Crack suppression and uncoupling membranes are not intended to be a substitution for sound building practices. Tile installations that exceed structural recommendations may see little benefit with the installation of these types of products. Likewise, marginal installations will benefit more from structural reinforcement or repairs. Whenever possible, reinforce weak wall framing and floor joists with wood blocking and install an additional layer of plywood over wood sub-floors if needed.
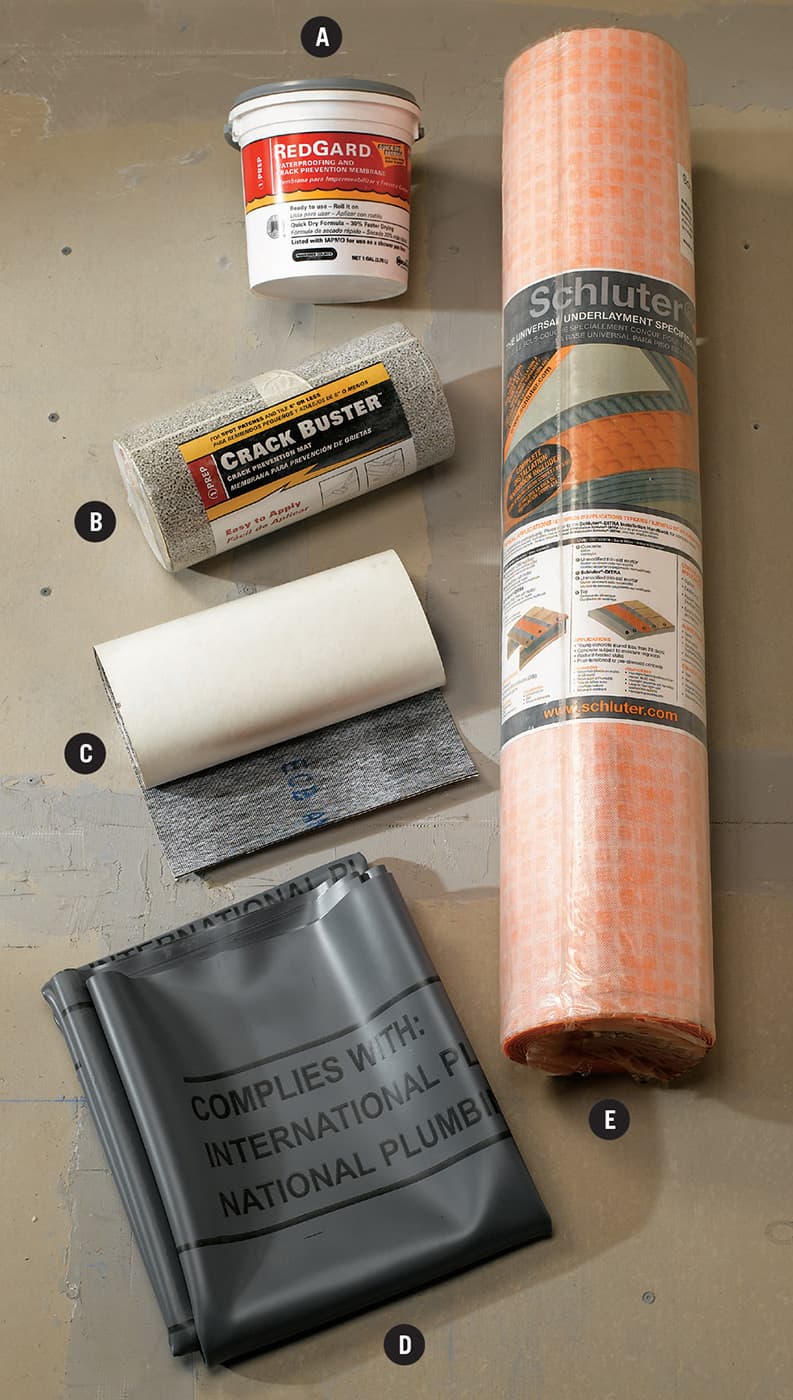
Tile membrane products include: Liquid roll-on waterproofing and crack prevention membrane (A); 40-mil crack prevention underlayment for repairs (B); waterproof tile membrane (C); shower pan liner (D); uncoupling membrane (E).
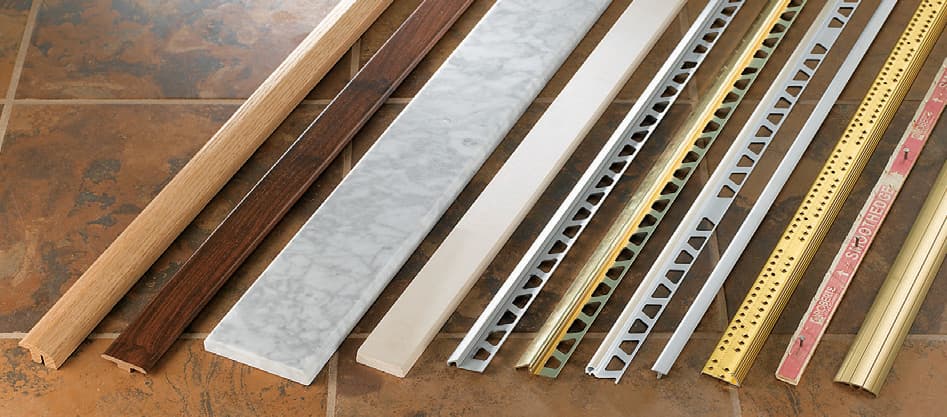
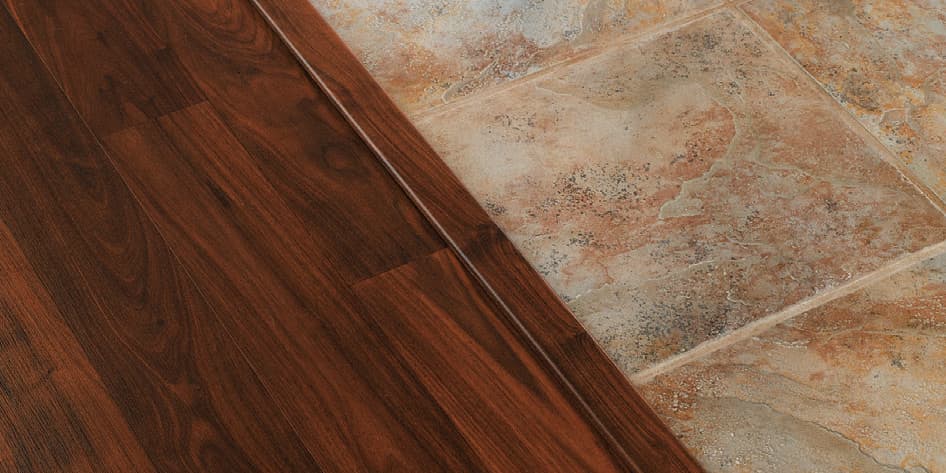
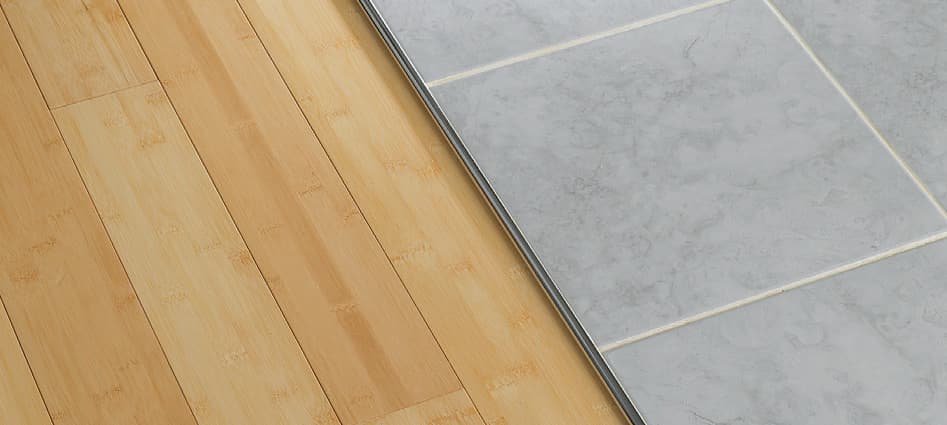
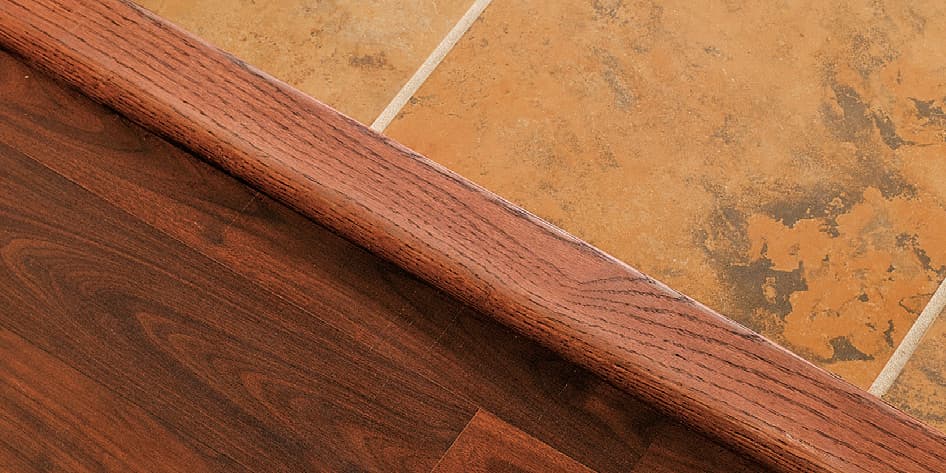
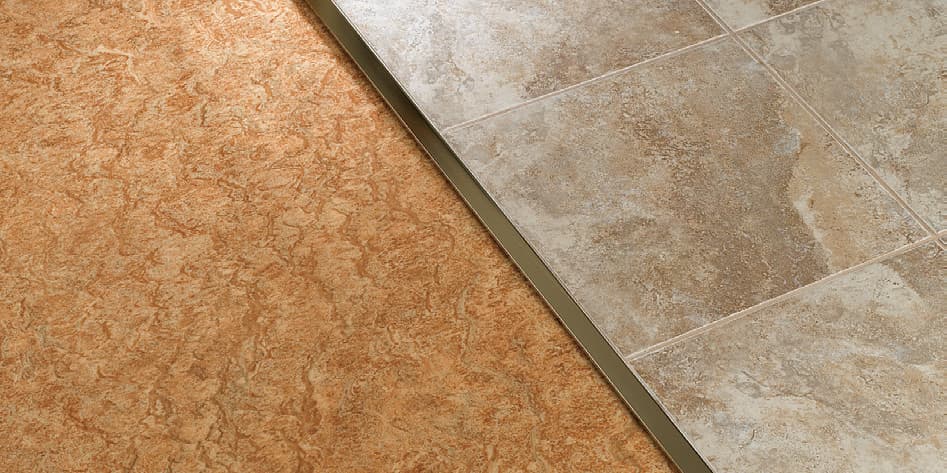
TILE TRANSITIONS STRIPS
Available in numerous materials and profiles, transition strips are installed to create a smooth bridge from one floor covering to another. They are typically installed in doorways or in any open area where a newly installed tile floor will abut another floor covering. The type of profile required will depend largely on the floor surfaces being transitioned. Height-reducing thresholds, or reducer strips, have a profile with a beveled edge and are used to transition between two floors of differing height. Gradual transition strips have a sloped profile, making them wheelchair friendly. T-molding is used to transition between two floors of even height. Transition strips can often be omitted on transitions between carpet and tile.
Usually found in doorways, transition strips are installed after the tile layout is completed to create a bridge between floor coverings. Individual strips are engineered for specific transitions: for example, ceramic tile to hardwood or tile to carpeting.
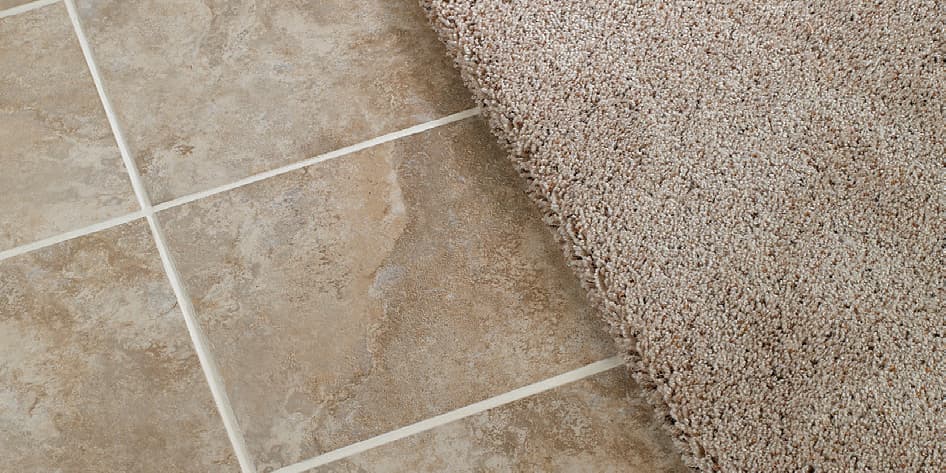
Carpet is usually tucked right up to the edge of a tile installation.
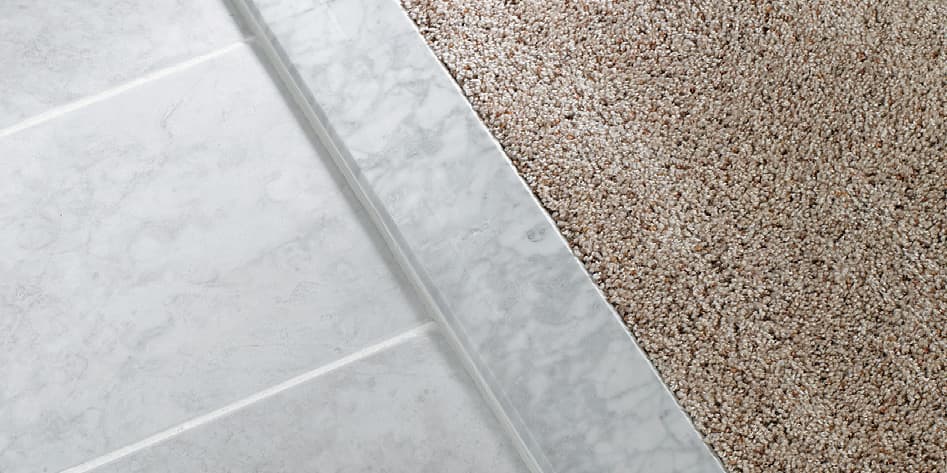
Carpet can also be tucked into a threshold, as shown here.
T-molding is used to transition between two floors of even height.
Transition strips with an edge profile do not have a height-adjusting profile. They are used to protect the edges of exposed tile.
Height-reducing thresholds are used to transition between two floors of differing heights.
To make a room accessible to wheelchair users, use a gradual transition strip with a sloped profile.
Materials: Thinset Mortar
Introduced in the early 1950s, thinset is an adhesive mortar consisting of Portland cement, a water-retentive agent, sand or aggregate (optional), and other additives. Prior to thinset, tiles were installed with a thick paste consisting of Portland cement and water. Unless they were soaked in water prior to installation, absorbent tiles would quickly soak up the moisture in the paste and fail to bond to the substrate. Thinset mortar made it possible for installers to install tile over a variety of cementitious substrates without needing to soak the tile beforehand.
Thinset mortars have improved substantially in quality and ease of use over the years. Because no two products are exactly alike, you should always read the package label carefully to make sure the product you select is an appropriate adhesive for the tile and the substrate to which it will be applied.
The adhesive mortars used for the projects in this book include dry-set thinset mortar, polymer-modified thinset mortar, and latex-modified thinset mortar. Modified thinset, the most common adhesive used, is widely employed to adhere a variety of different types of tile to cementboard and concrete substrates. Use gray thinset for darker grout selections and white thinset for lighter grout selections.
Dry-set mortars are mixed with potable water and used as a setting bed to seat backer board panels. In special circumstances, it can also be used as an adhesive to set tile.

Thinset mortar is applied in a thick layer to make a bed for setting tile. It is sold in premixed tubs and in dry powder forms—most professionals prefer to mix their own. If the product you buy has not been modified with polymer additive, you can mix in latex additive yourself. Different thinset mortars have different ratios of additives and fortifiers for specific purposes. You will also find some color variation. Most is cement gray, but white thinset intended for use with glass tile is also available. You can also use white thinset to reduce the chance of color bleedthrough if you are applying a light-colored grout.
Polymer-modified thinset mortar contains dry-polymer additives. It also should be mixed with potable water. Latex-modified thinset is prepared by mixing dry-set thinset mortar with a liquid latex additive. Although more costly and difficult to work with than conventional modified blends, liquid-latex-modified mortars usually offer higher bond strengths, higher flexural values, and increased water and chemical resistance.
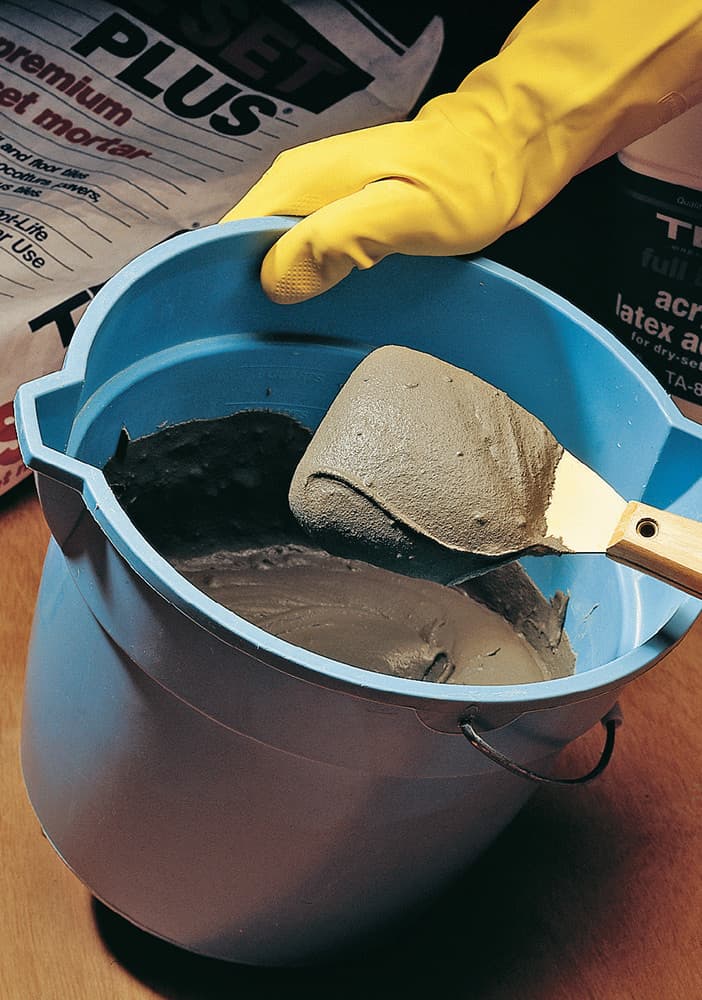
Small quantities of mortar can be mixed by hand to a smooth and creamy consistency using a margin trowel. Larger batches of mortar can be mixed at speeds of less than 300 rpm, using a 1/2-inch drill fitted with a mixing paddle.
Cementboard setting beds are applied using a 1/4-inch square notch trowel. Use a 1/4-inch V-notch trowel to install mosaic tiles two inches square or less. Most varieties of larger tile can be installed using a 1/4-inch or 3/8-inch square or U-notch trowel. Very large tiles and certain types of stone may require larger trowel sizes.
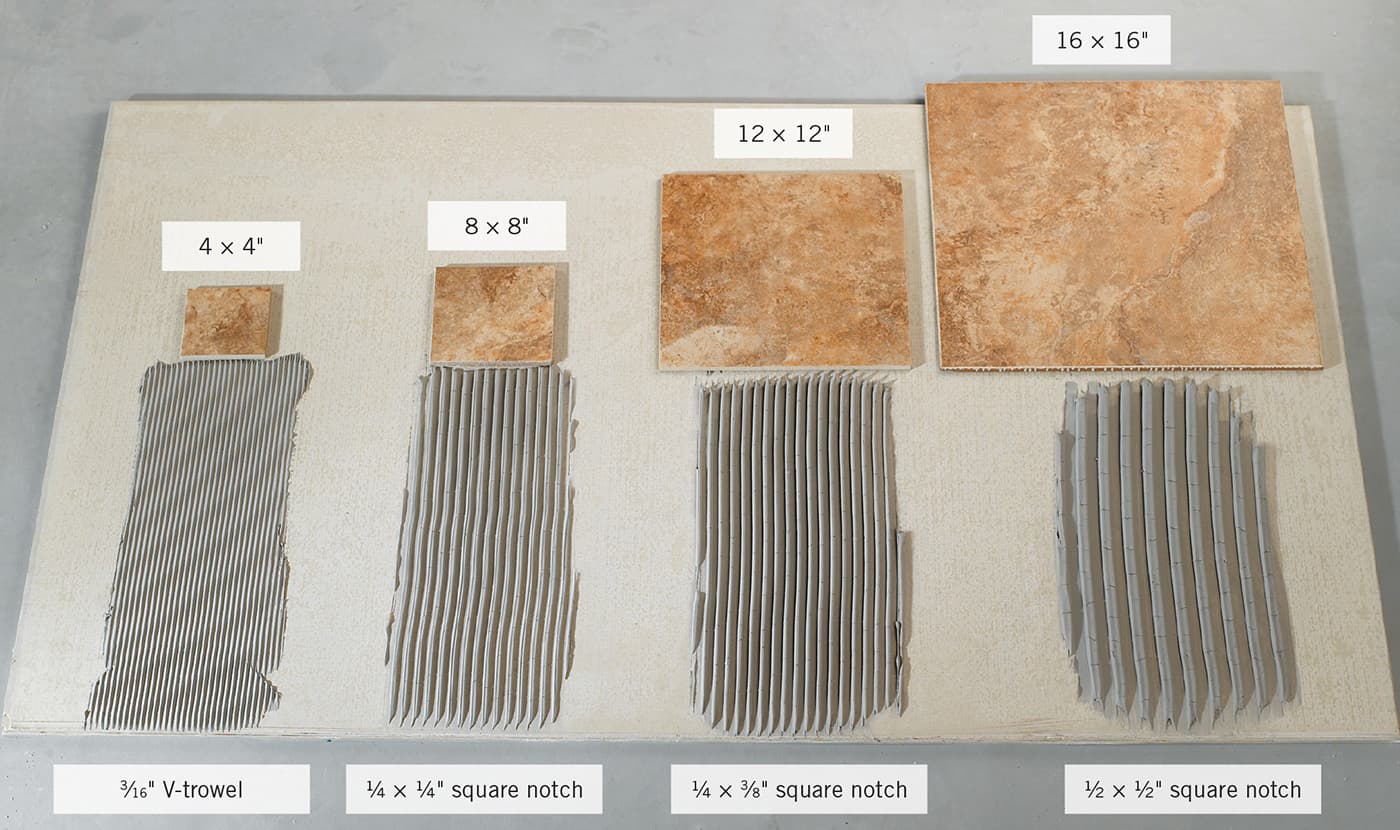
The type of trowel used to apply thinset is dictated mostly by the size of the tile being installed.
PREMIXED THINSET MORTAR
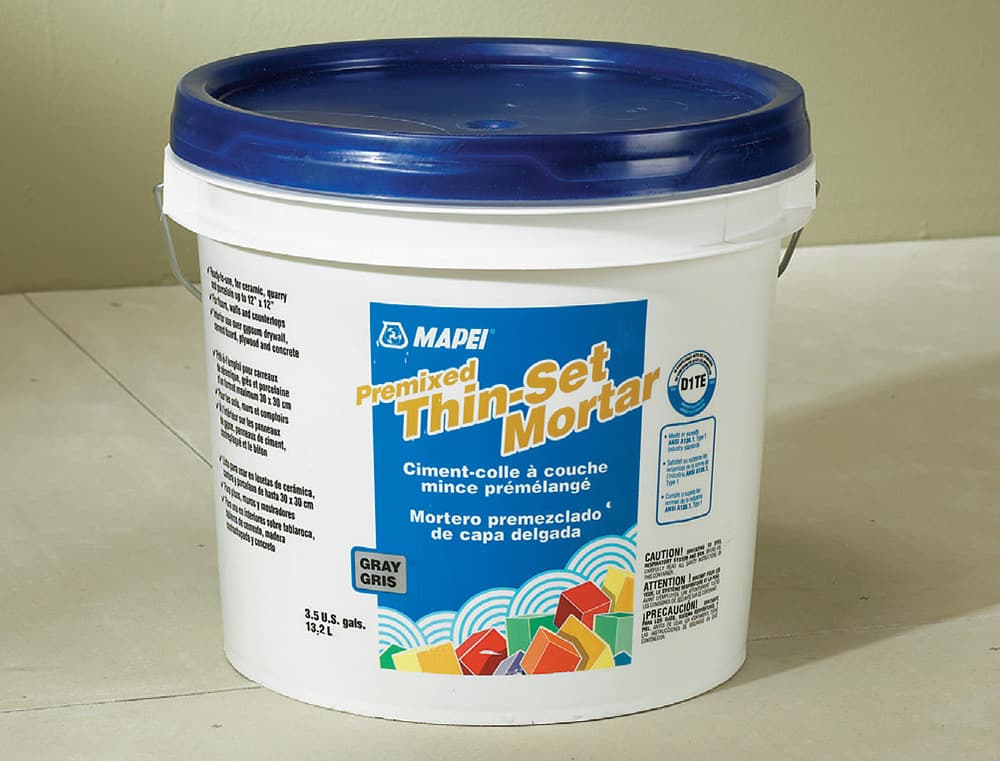
Most professionals prefer to mix their own thinset mortar because it is considerably cheaper than premixed material. But homeowners who are only tiling a small area should consider purchasing tubs of premixed thinset mortar. Not only is it a convenience, you are assured that the material contains an adequate ratio of latex additive and is blended to the proper consistency.
Materials: Grout
Grout (or “grout mortar”) is available in dozens of stock colors and can be tinted to an unlimited variety of tones. Beyond color, grout has several other features that differ, making some types more appropriate for various applications than others.
The projects in this book use polymer-modified grout or dry-set grout mixed with a liquid latex additive. Polymer-modified grout contains an additive in dry form that is activated when mixed with water. Latex-modified grout is prepared by mixing a dry-set grout with a liquid latex additive. These additives aid in increasing the water and chemical resistance, bonding, and compressive strength of the grout.
To apply grout to floor or wall tile installations, a rubber grout float is needed, along with a minimum of one or two large grout sponges for every 150 square feet of tile installed. A margin trowel is also useful for spreading grout under kitchen or bathroom cabinet toe kicks and other hard-to-reach areas.
A few days after installation, a water-based silicone grout sealer may be applied to finished grout joints. Keep in mind, these types of sealers will not waterproof the grout. They are designed to be vapor transmissive and allow moisture to evaporate from the surface of the grout joint. Grout sealers do help to prevent some mild blemishing and, at the very least, they allow for a little leeway for cleaning up spills before they have time to permanently stain the grout.
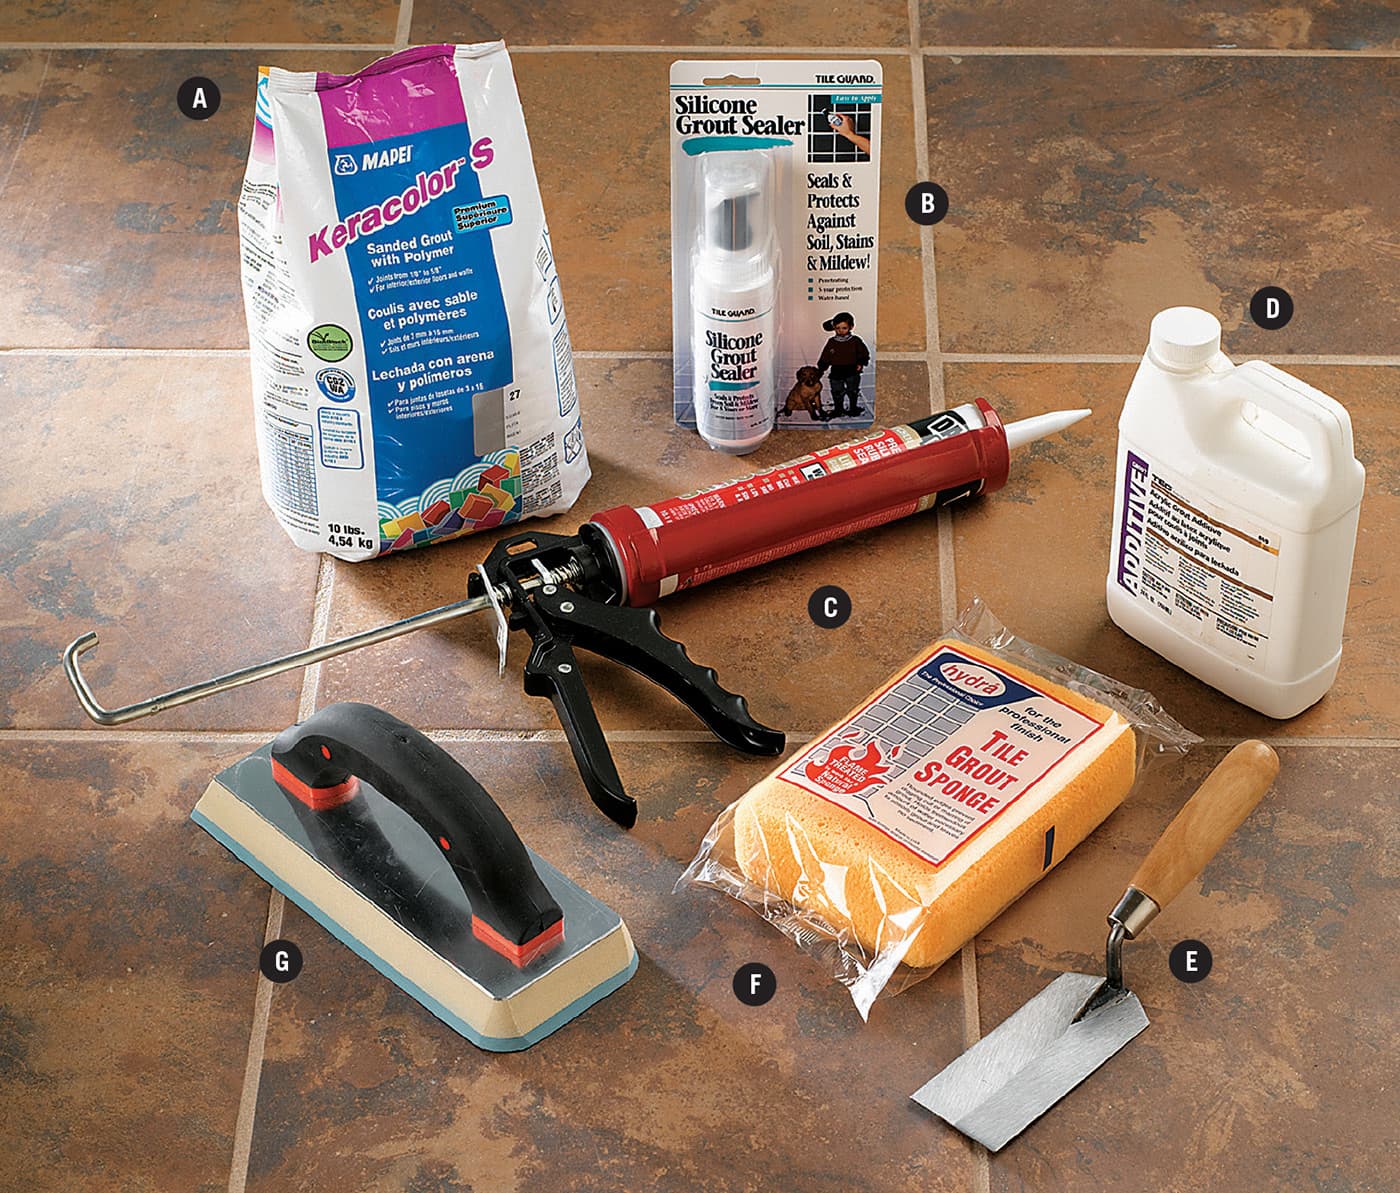
Materials and tools for grouting tile joints include: Dry mix, sanded grout (A); silicone grout sealer (B); tub-and-tile caulk (C); latex grout fortifier (D); margin trowel (E); grout sponge (F); grout float (G).
GROUTING TIP
• The spacing of the tiles will determine the type of grout to be applied. Unsanded grout is used with grout joints 1/8" wide or narrower. Sanded grout is used for grout joints that will be wider than 1/8".
• Remember to treat any gaps between the tile and walls, tubs, cabinets, and other hard surfaces as expansion joints. Do not apply grout in these areas. Instead, cover them with molding or fill them with a flexible, mildew-resistant silicone, urethane, or latex caulk.
How to Mix Thinset & Grout
On the back of each bag of thinset mortar or grout you will find instructions detailing the amount of water or liquid additive required, slake time, mixing speeds, and other important guidelines. These recommendations should always be followed carefully. Any variation in the mixing guidelines can create problems, ranging from uneven or washed out grout colors to weakened mortars that lack compressive strength or fail to adequately bond to tile and substrates.
To mix a full bag of mortar, add one half of the amount of potable water or liquid additive recommended by the manufacturer to a five-gallon bucket. Slowly add a half bag of mortar while mixing the water and dry mix together with a 1/2-inch electric drill fitted with a mixing paddle. Keep the paddle turning slowly. Repeat the process, mixing the entire batch thoroughly and uniformly for several minutes to a smooth, paste-like consistency.
If recommended by the manufacturer, allow the batch to slake. This is simply a waiting period that allows the dry mortar to more thoroughly absorb the liquid that was added to it. After the batch has slaked for the appropriate amount of time, mix the mortar once more and it will be ready for use.
Stiffened batches of thinset and grout mortars that have become too difficult to work with may be mixed again to loosen them up. However, this should be done without adding additional water or liquid additives.
Options for Mixing Thinset Mortar & Grout
To make a small batch of mortar, add the proper ratio of water or liquid additive and dry powder to a container and stir by hand.
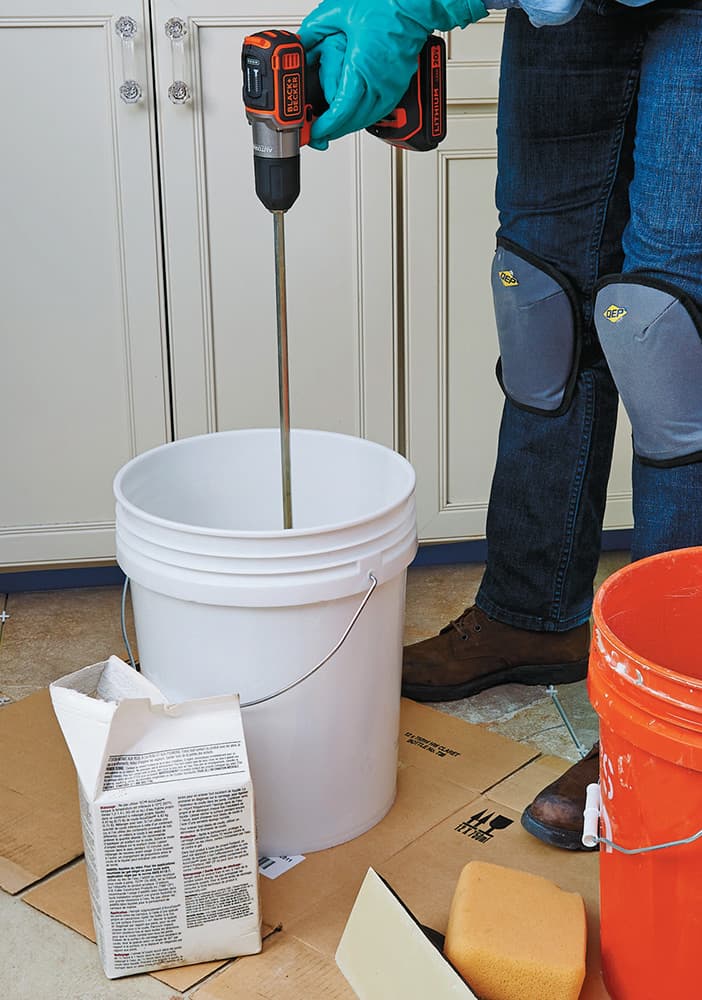
A power drill fitted with a mixing paddle is useful for mixing large quantities of mortar or grout at one time.
Tools for Removing Old Surfaces
Quality tools remove old surfaces faster and leave surfaces ready to accept new tile. Home centers and hardware stores carry a variety of products for surface removal. Look for tools with smooth, secure handles and correctly weighted heads for safety and comfort.
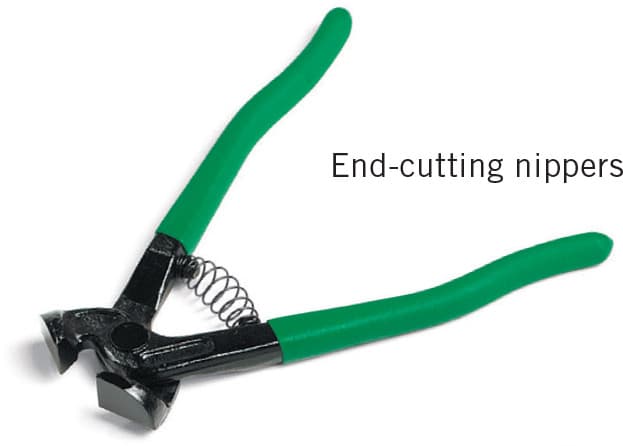
End-cutting nippers allow you to pull out staples remaining in the floor after carpeting is removed. This plier-like tool can also be used to break an edge on old tile so a chisel or pry bar can be inserted.

Heat guns are used to soften adhesives so vinyl base cove moldings and stubborn tiles can be pryed away from the wall. They are also used to remove old paint, especially when it is heavily layered or badly chipped.
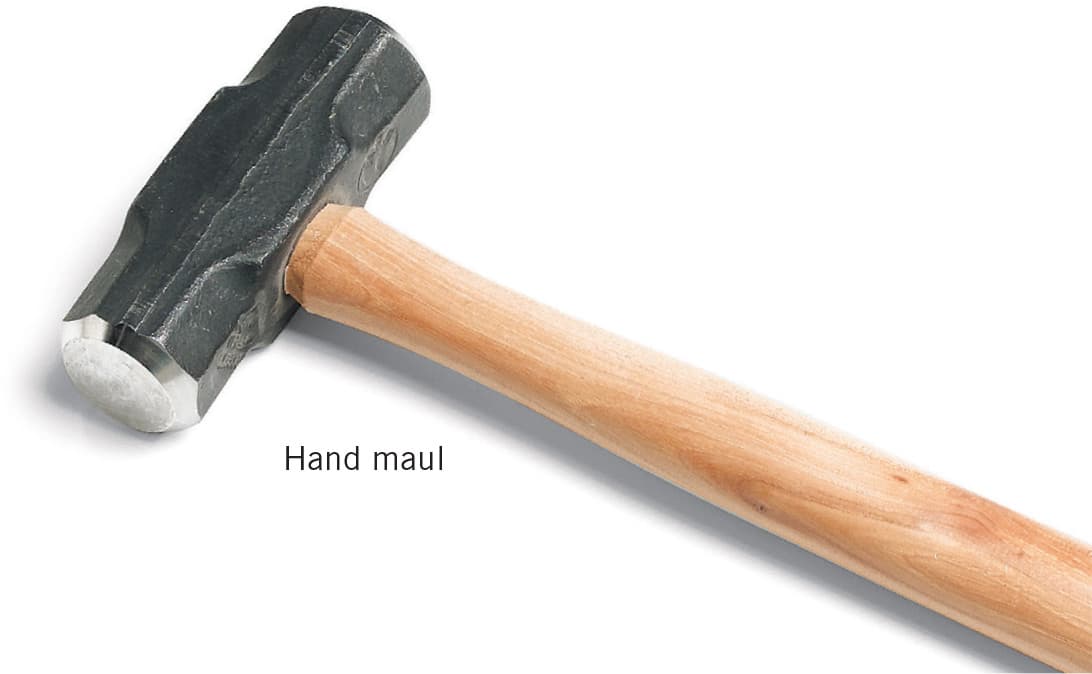
Hand mauls are often used in combination with pry bars and chisels to remove old flooring and prepare surfaces for tile. They are helpful for leveling high spots on concrete floors and separating underlayments and subfloors.
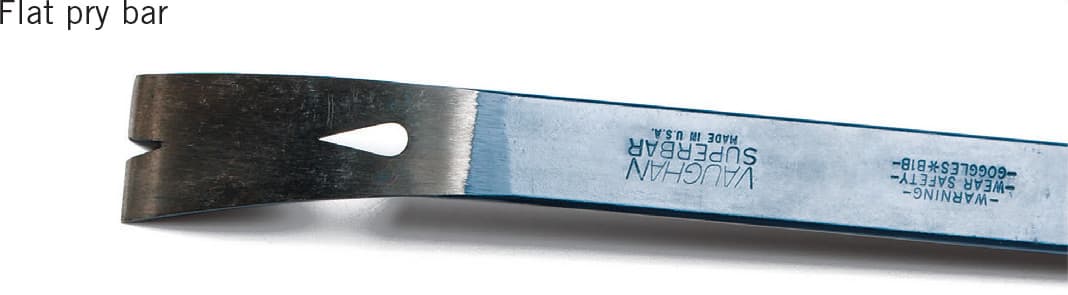
Flat pry bars are used to remove wood base moldings from walls and to separate underlayments and floor coverings from subfloors. This tool is also effective for removing tiles set in mortar.
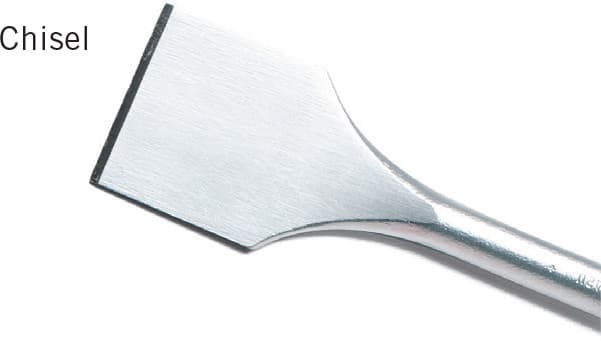
Chisels come in a variety of sizes for specific jobs. Masonry chisels are used with hand mauls to remove high spots in concrete. Cold chisels are used with hand mauls or hammers to pry tiles from mortar.

Floor scrapers are used to scrape and smooth patched areas on concrete floors, pry up flooring, and scrape adhesives and backings from underlayments.
Tools for Working with Substrates
Surfaces and substrates must be in good condition before new tile can be installed. Use the tools below to create stiff, flat surfaces that help prevent tiles from cracking and enhance the overall appearance of your finished project.
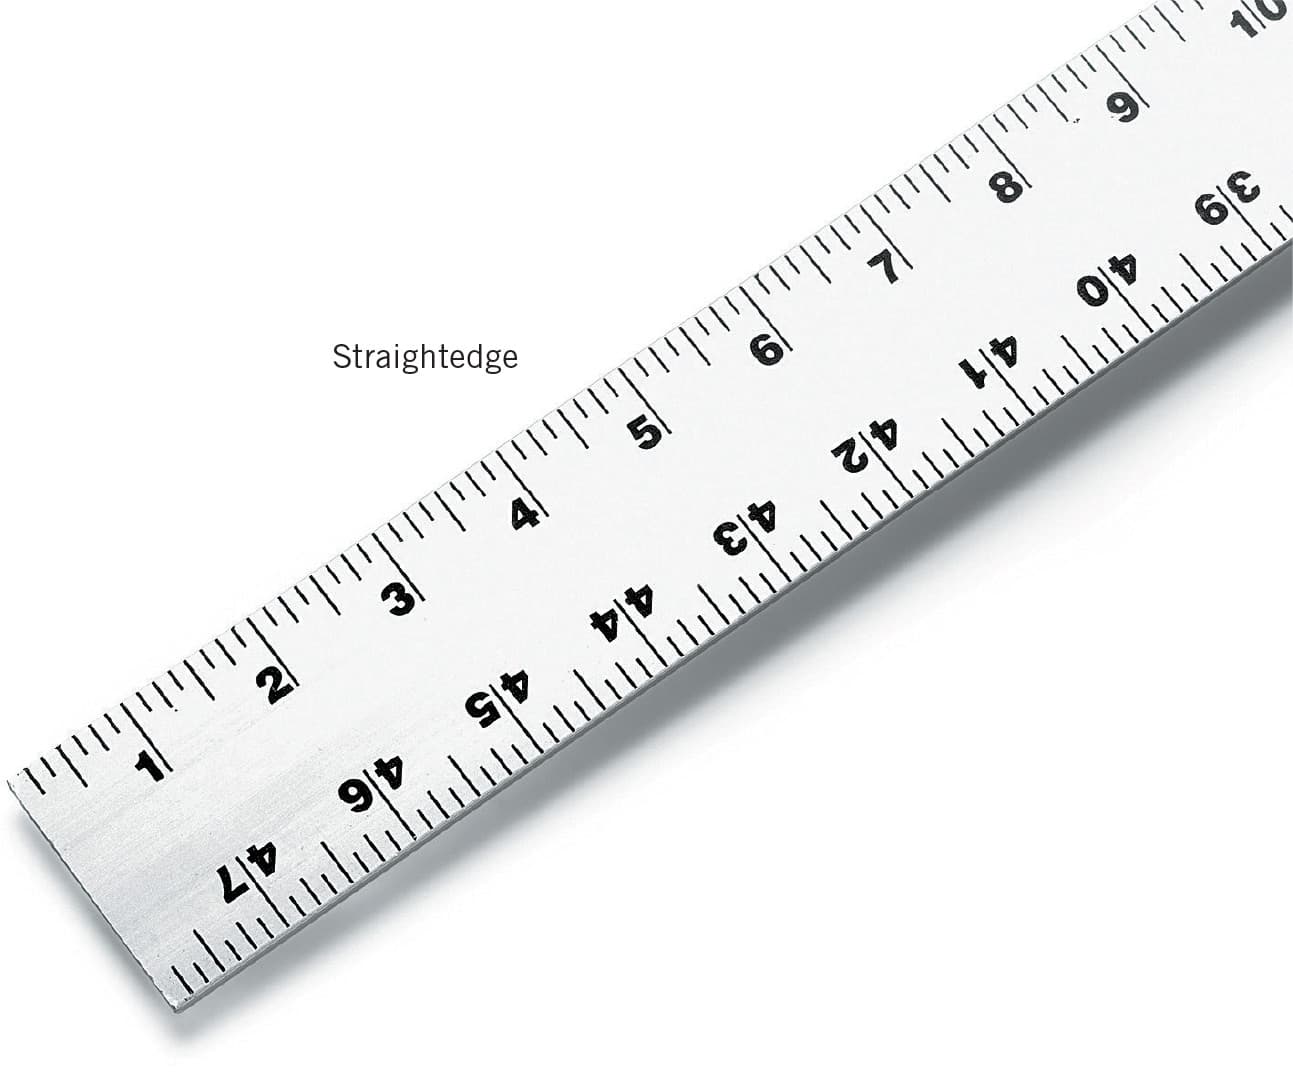
Straightedges are used to mark damaged areas of substrate for removal. They are also used to measure and mark replacement pieces for cutting.

Jigsaws are handy when cutting notches, holes, and irregular shapes in new or existing substrates. They are also used to fit new substrate pieces to existing doorways.

Portable drills secure substrates to subfloors with screws selected for the thickness and type of substrate used.

Circular saws are used to remove damaged sections of subfloor and cut replacement pieces to fit.
Tools for Installing Substrates
Depending upon your application, you may have to cut and install a substrate of cementboard, plywood, cork, backer board, greenboard, or moisture membrane. Whichever your tiling project demands, the tools shown here will help you measure, score, cut, and install substrate material with precision.
Drywall squares are used to measure and mark substrates, such as cementboard, fiber-cementboard, and isolation membrane. They can also be used as straightedge guides for scoring and cutting substrates with a utility knife.

Utility knives are usually adequate for scoring straight lines in wallboard, cementboard, fiber-cementboard, and for cutting isolation membrane substrates. However, because cementboard and fiber-cementboard are thick, hard substrates, utility knife blades must be replaced often for best performance.
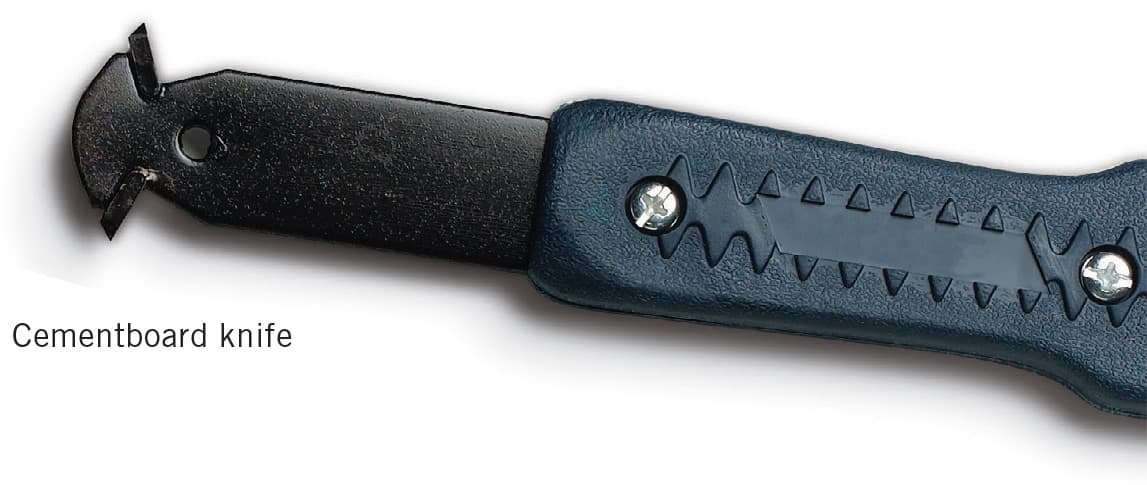
Cementboard knives are the best choice for scoring cementboard and fiber-cementboard. The blades on these knives are stronger and wear better than utility knife blades when cutting rough surfaces.
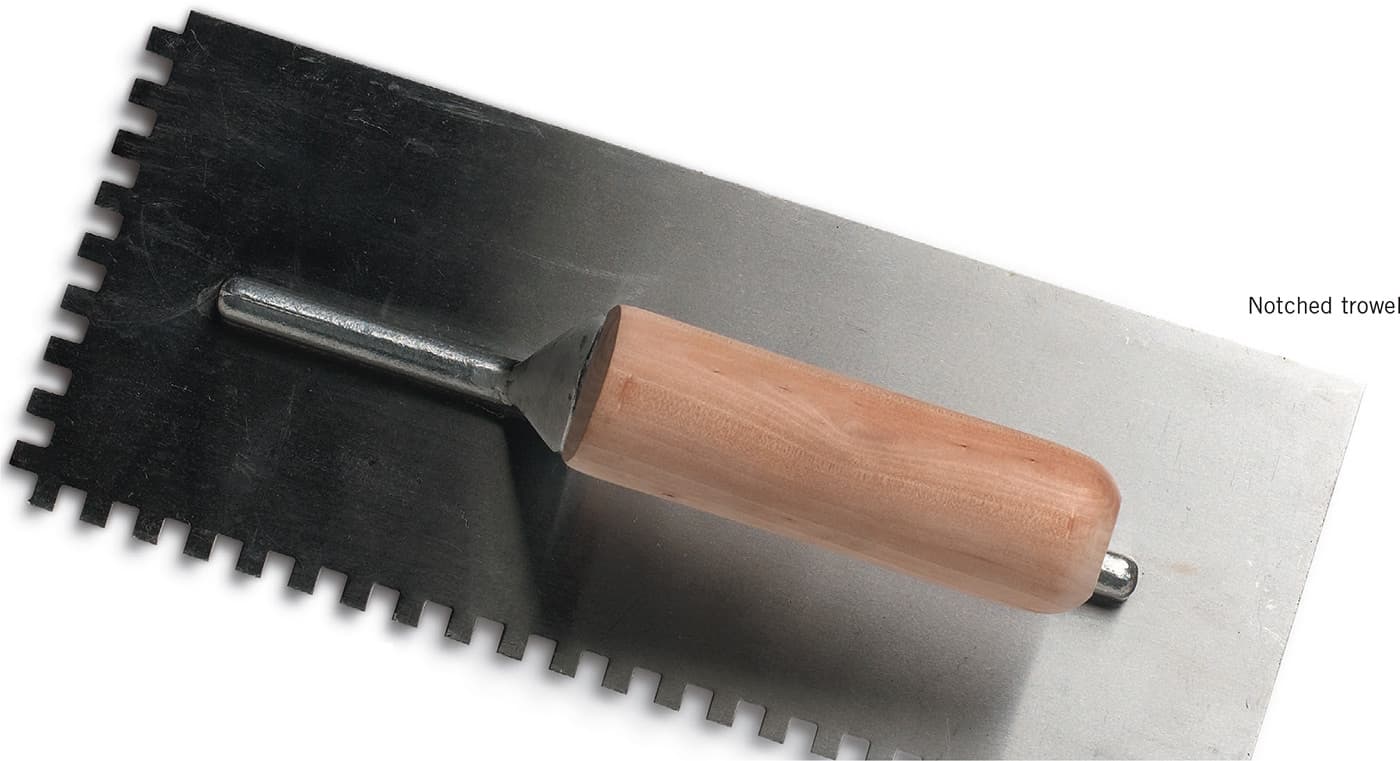
Trowels are useful for applying leveler on existing floors and for applying thinset mortar to substrates. Trowels can also be used to scrape away ridges and high spots after levelers or mortars dry.
Tools for Layout
Laying tile requires careful planning. Since tile is installed following a grid-pattern layout, marking perpendicular reference lines is essential to proper placement. Use the tools shown here to measure and mark reference lines for any type of tiling project.
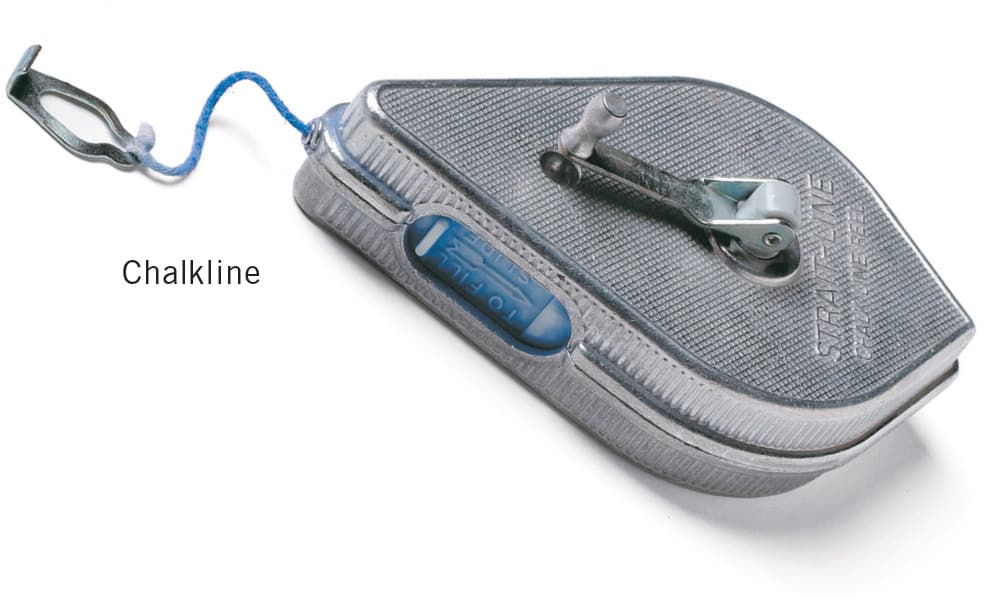
Chalklines are snapped to mark the reference lines for layouts.
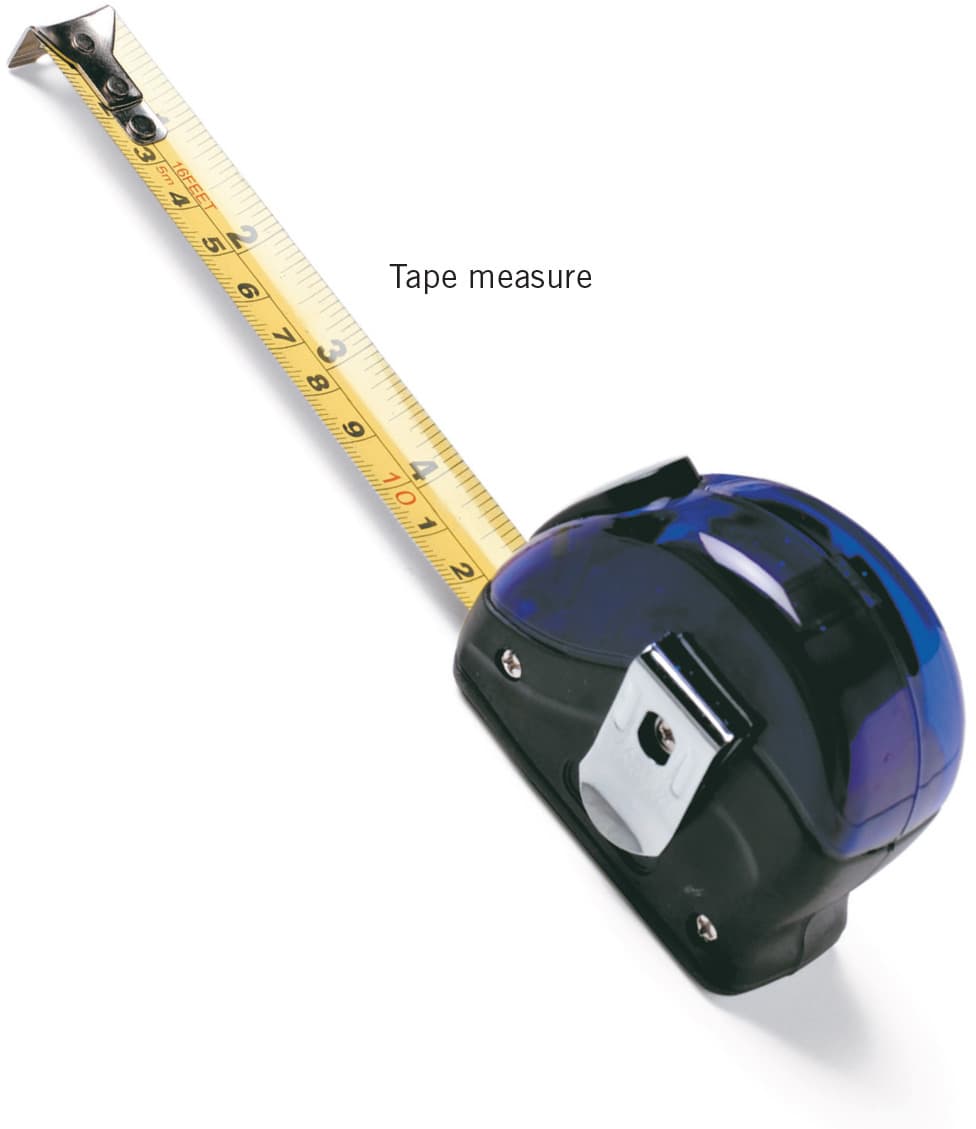
Tape measures are essential for measuring rooms and creating layouts. They’re also used to make sure that reference lines are perpendicular by using the 3-4-5 triangle method.
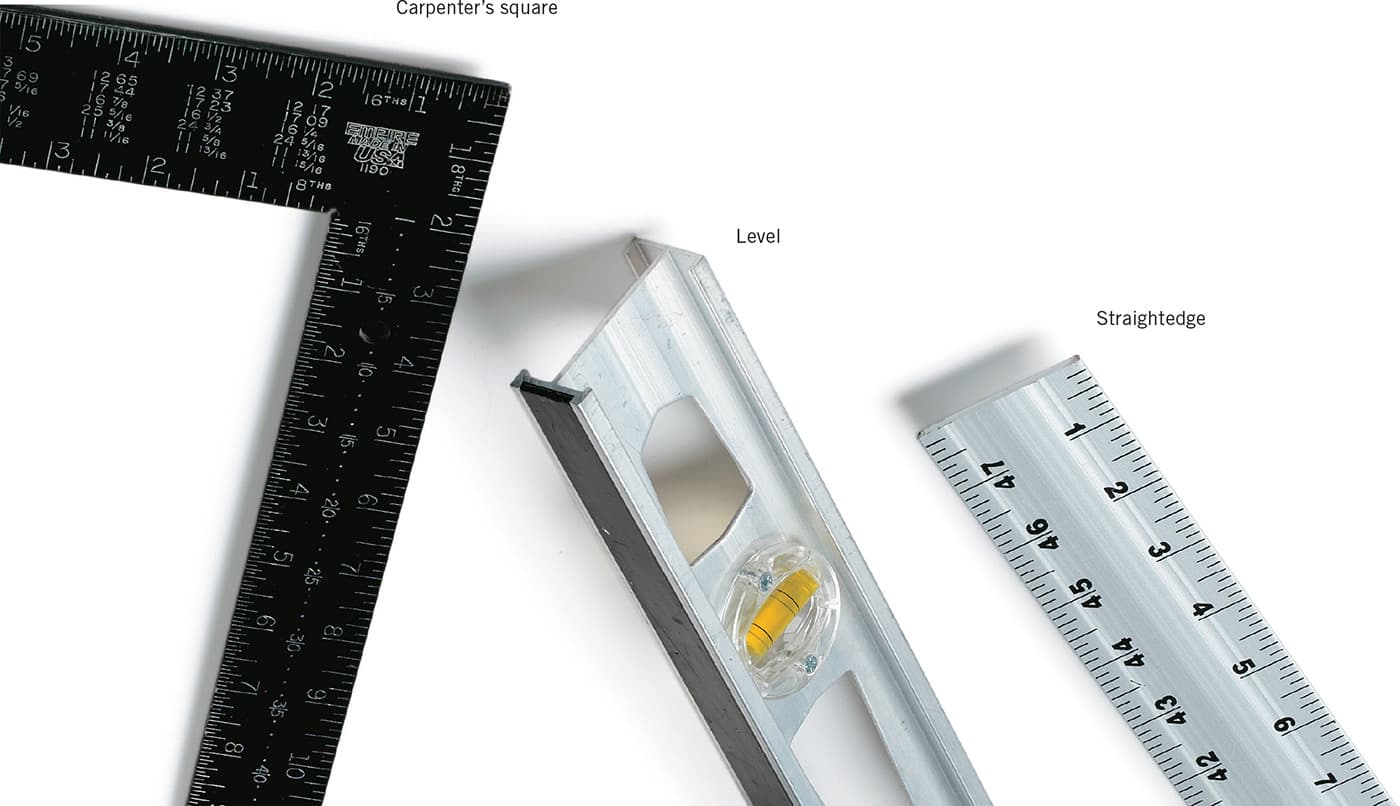
Straightedges are handy for marking reference lines on small areas. They can also be used to mark cutting lines for partial tiles.
Levels are used to check walls for plumb and horizontal surfaces for level before tile is laid. Levels are also used to mark layouts for wall tile installations.
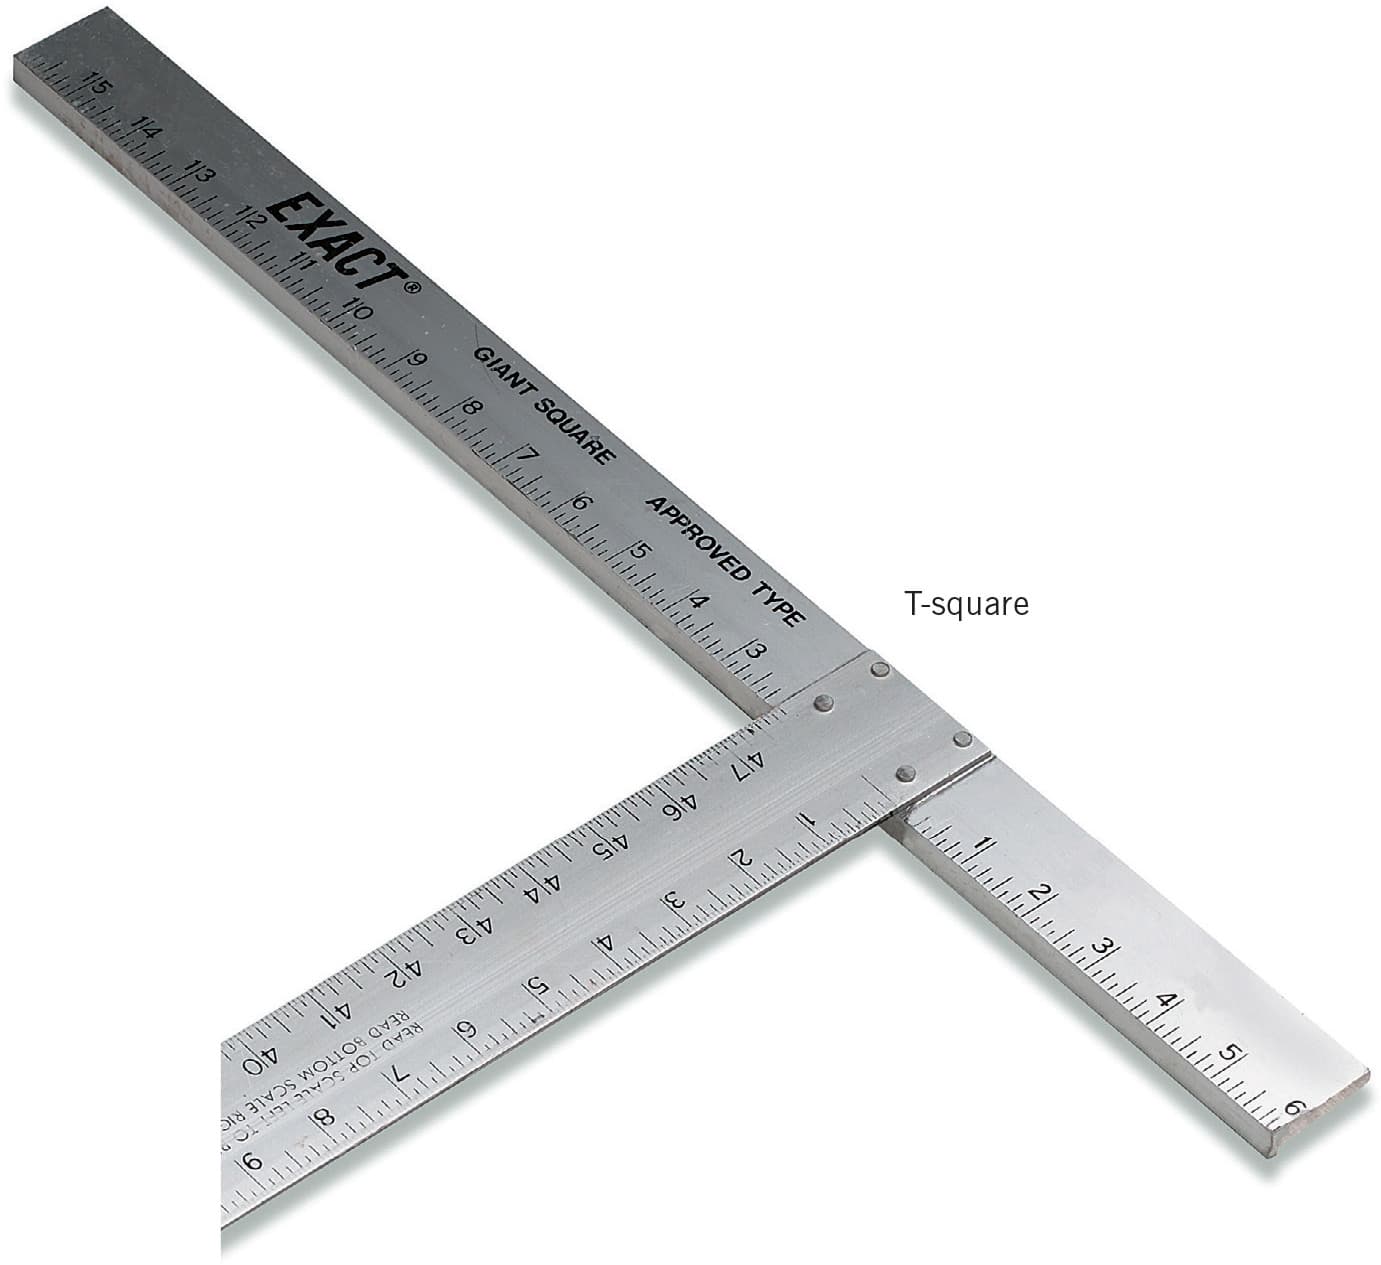
Carpenter’s squares are used to establish perpendicular lines for floor tile installations.
Tools for Cutting Tile
Even though tile is a rigid material, it can be cut to fit a variety of applications. With the proper tools, tile can be trimmed, notched, and drilled. If you’re planning only one tile project, consider renting the more expensive pieces of equipment.
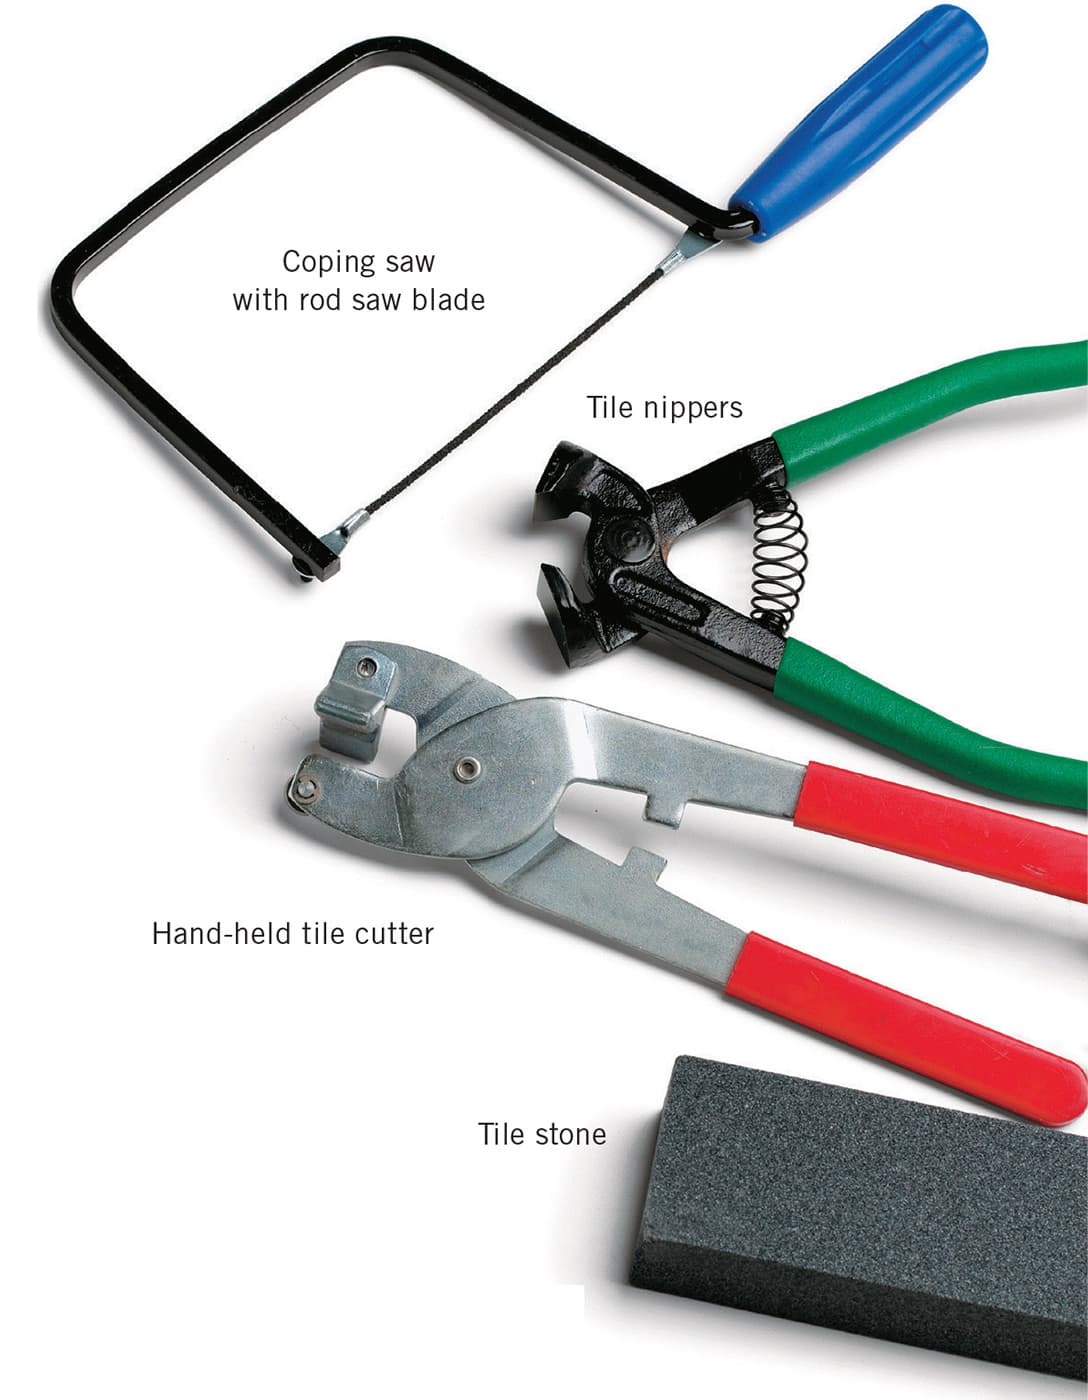
Coping saws with rod saw blades are usually adequate for cutting soft tile, such as wall tile.
Tile nippers are used to create curves and circles. Tile is first marked with the scoring wheel of a hand-held tile cutter or a wet saw blade to create a cutting guide.
Hand-held tile cutters are used to snap tiles one at a time. They are often used for cutting mosaic tiles after they have been scored.
Tile stones file away rough edges left by tile nippers and hand-held tile cutters. Stones can also be used to shave off small amounts of tile for fitting.
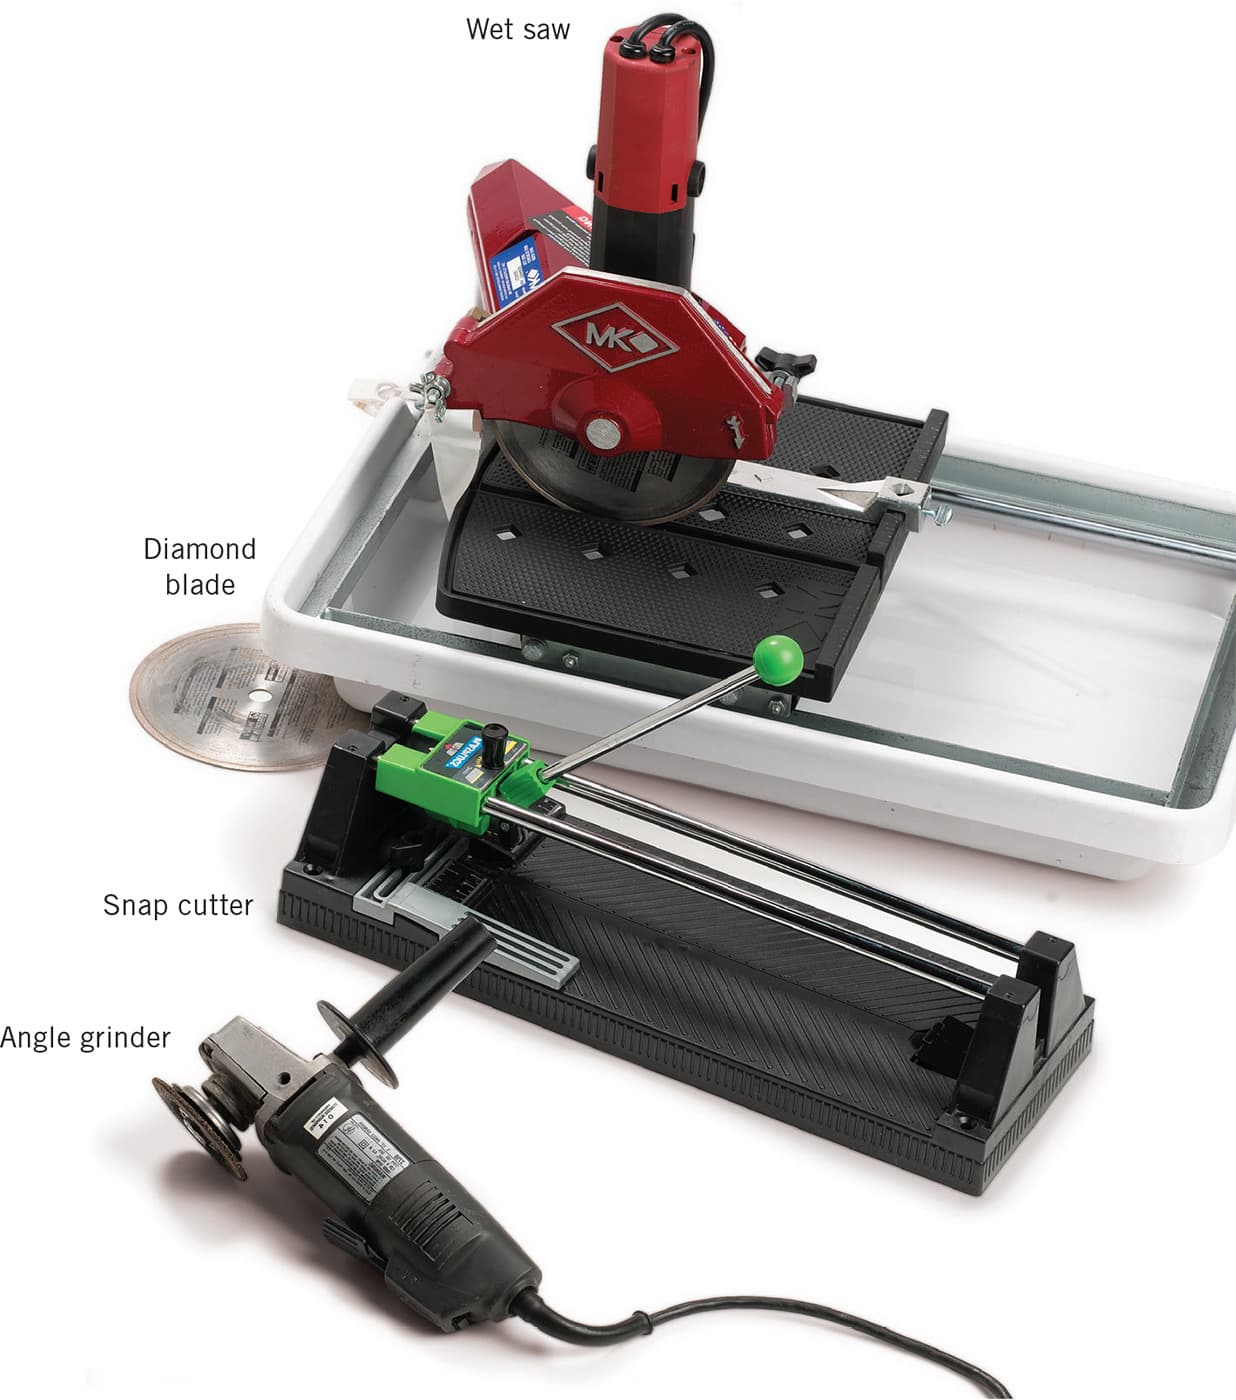
Wet saws, also called “tile saws,” employ water to cool both the blade and the tile during cutting. This tool is used primarily for cutting floor tile—especially natural stone tile—but it is also useful for quickly cutting large quantities of tile or notches in hard tile.
Diamond blades are used on hand-held wet saws and grinders to cut through the hardest tile materials such as pavers, marble, granite, slate, and other natural stone.
Snap cutters are quick, efficient tools for scoring and cutting straight lines in most types of light- to medium-weight tile.
Grinders come in handy for cutting granite and marble when equipped with a diamond blade. Cuts made with this hand tool will be less accurate than with a wet saw, so it is best used to cut tile for areas that will be covered with molding or fixtures.
Tools for Setting & Grouting Tile
Laying tile requires quick, precise work, so it’s wise to assemble the necessary supplies before you begin. You don’t want to search for a tool with wet mortar already in place. Most of the tools required for setting and grouting tile are probably already in your tool box, so take an inventory before you head to the home center or hardware store.
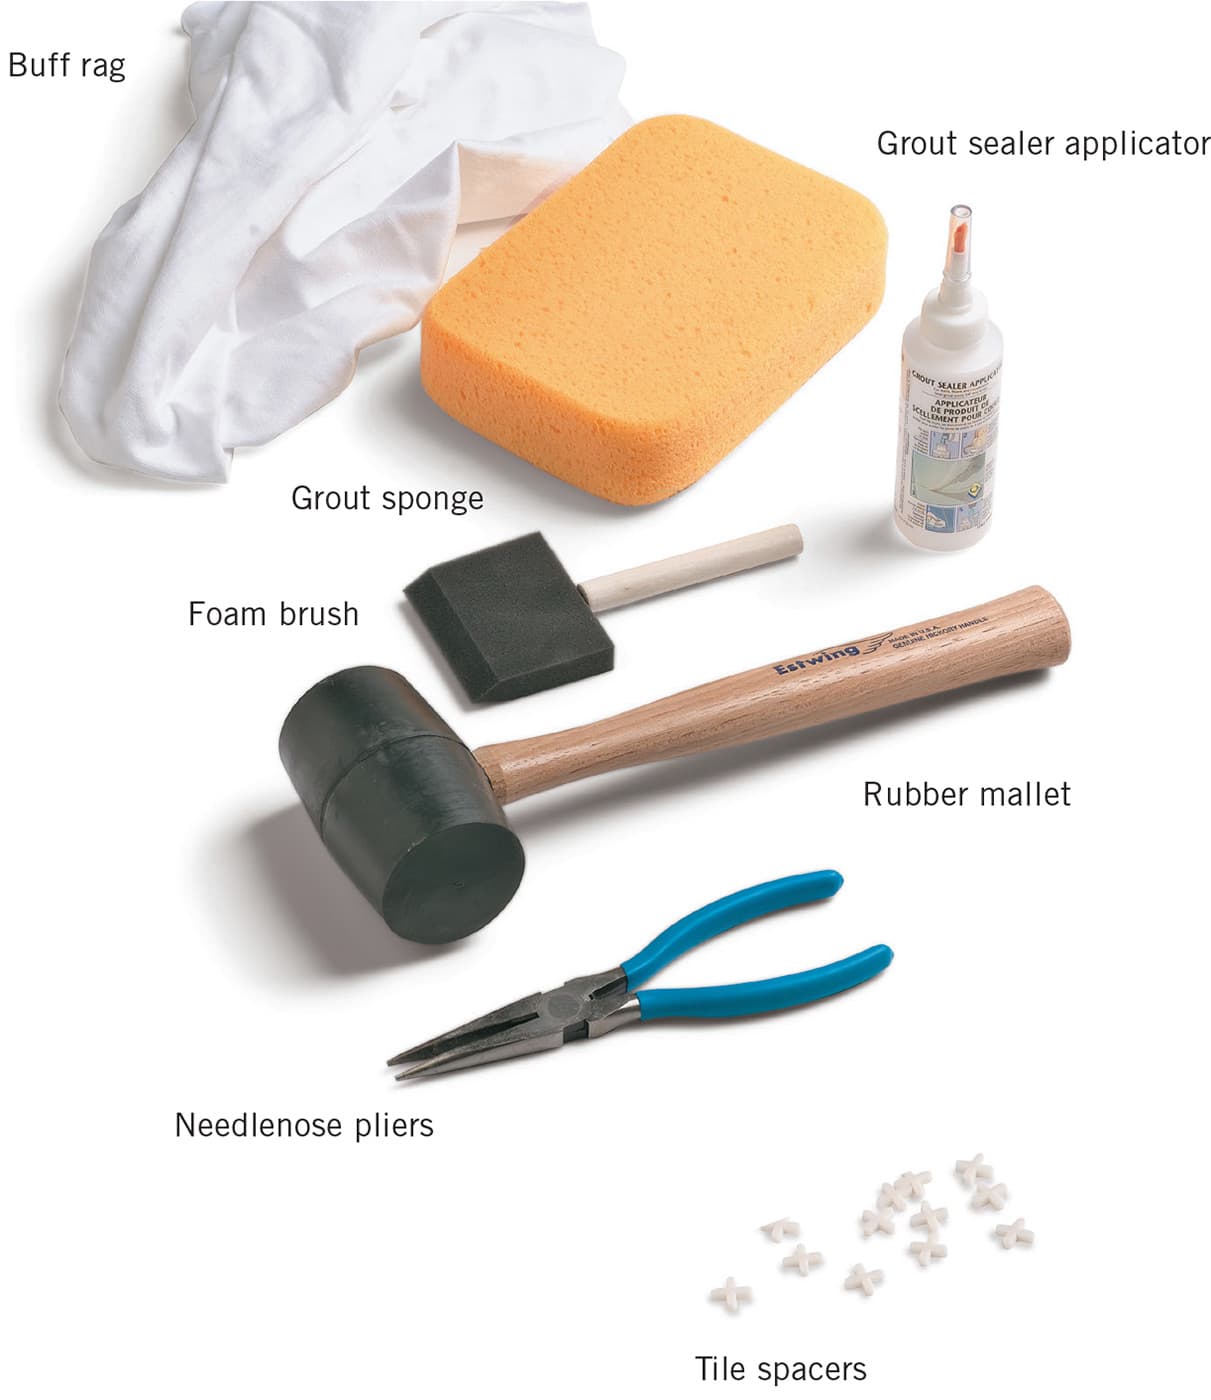
Grout sponges, buff rags, foam brushes, and grout sealer applicators are used after grout is applied. Grout sponges are used to wipe away grout residue, buff rags remove grout haze, and foam brushes and grout sealer applicators are for applying grout sealer.
Rubber mallets are used to gently tap tiles and set them evenly into mortar.
Needlenose pliers come in handy for removing spacers placed between tiles.
Tile spacers are essential for achieving consistent spacing between tiles. They are set between tiles and are later removed so grout can be applied.
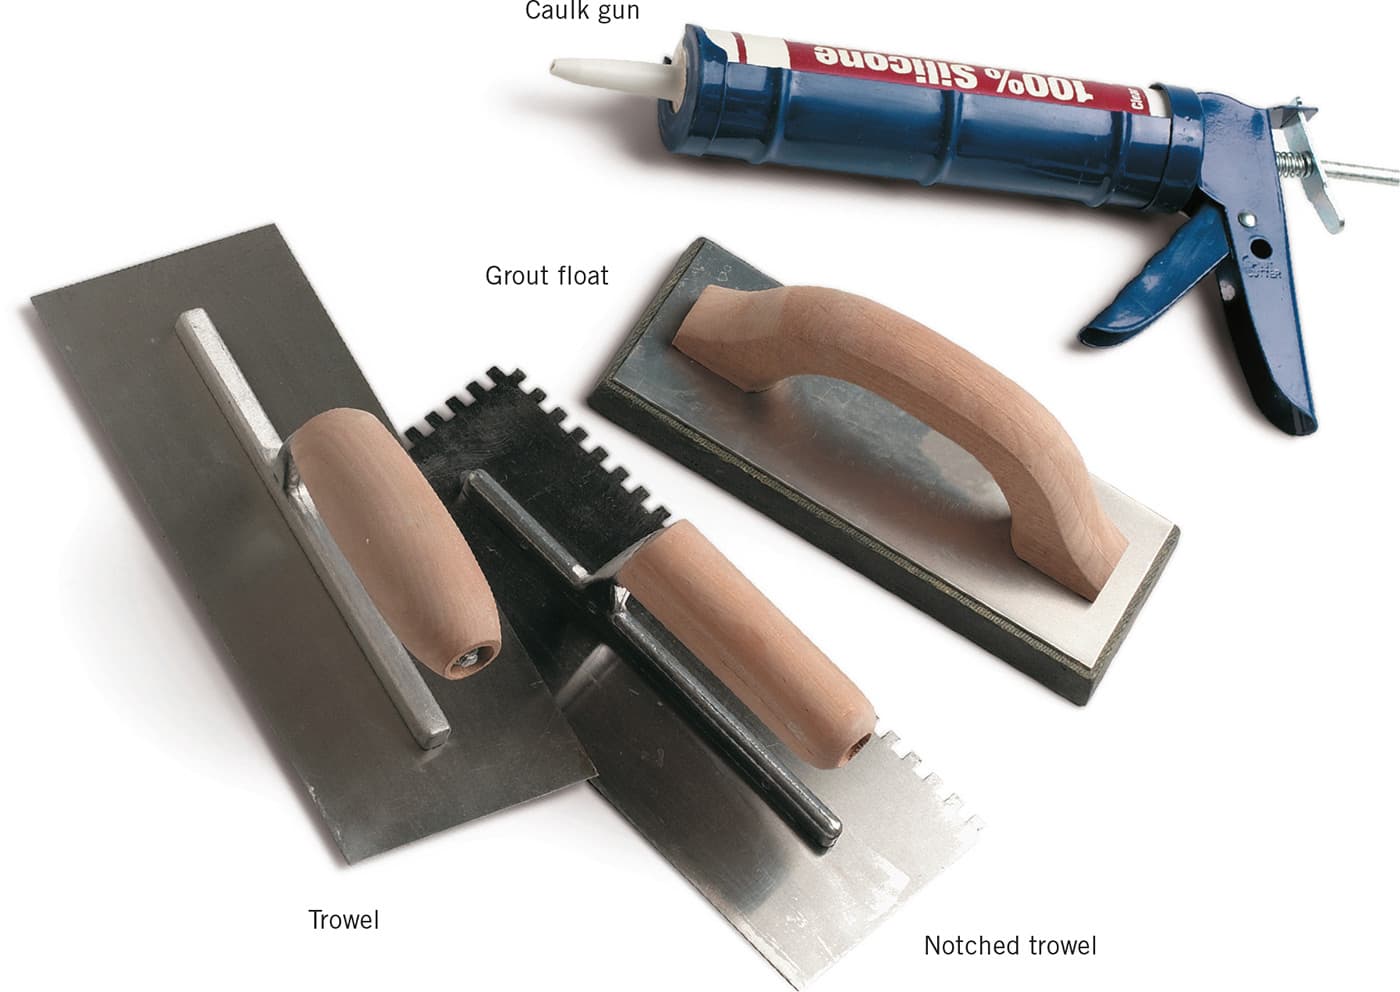
Caulk guns are used to fill expansion joints at the floor and base trim, at inside corners, and where tile meets surfaces made of other materials.
Grout floats are used to apply grout over tile and into joints. They are also used to remove excess grout from the surface of tiles after grout has been applied. For mosaic sheets, grout floats are handy for gently pressing tile into mortar.
Trowels are used to apply mortar to surfaces where tile will be laid and to apply mortar directly to the backs of cut tiles.