CHAPTER 6
THE TRANSMISSION
6:1 General description
6:2 Routine maintenance
6:3 Precautions before dismantling transmission
6:4 Removing and refitting transmission
6:5 Dismantling gearbox (type 741)
6:6 Servicing mainshaft
6:7 Servicing pinion shaft
6:8 Reconditioning differential
6:9 Adjusting crownwheel and pinion
6:10 Servicing intermediate plate
6:11 Reassembling gearbox (type 741)
6:12 Renewing mainshaft oil seal
6:13 Gearbox variations (types 644, 716 and 741)
6:14 Gearlever and shift rod
6:15 ZF limited slip differential
6:16 Special gear combinations
6:17 Fault diagnosis
6:1 General description
The complete transmission system should rightly include the drive to the rear wheels, but it has been decided to cover the gearbox and the final drive gears in this chapter and devote the next chapter to the drive shafts and rear suspension.
There are three types of gearbox, the 644, the 716 and the 741, and it is fortunate that they are similar in general characteristics, the greatest change in design being the introduction of an improved synchromesh device when type 716 was launched. This also saw the change from twin mountings to a single type, but a return to the twin type was made at a later date.
To clarify the position concerning types, the following information will be found useful:
Transmission 644 from No. 11,001 to 24,999 as fitted to 356A 1600 and 1600S after September 1957.
Transmission 716 from No. 25,001 to 31,999 fitted to 356A 1600 and 1600S until September 1959.
Transmission 741 with single mounting from No. 32,001 to 34,999 introduced in September 1959. Fitted to 356B 1600, 1600S and 1600S.90.
Transmission 741 with twin mountings from No. 35,001 to 49,999 introduced during 1960 and fitted to same models as preceding type 741.
Transmission 741A with twin mountings from No. 50,001 introduced in September 1961 and fitted to 356B 1600, 1600S and 1600S.90 and also to 356C 1600C and 1600SC (see inset top right in FIG 6:1).
Gearbox construction:
FIG 6:1 is a cutaway view of type 741 showing the latest form of synchromesh in component form. Type 716 is much the same, but the twin mountings and different gearshift mechanism at the front end are shown in the bottom righthand view. The synchromesh parts for Type 644 are shown in FIG 6:2.
On all models the four forward speeds have synchromesh engagement, the pinions being in constant mesh. Reverse is the only gear selected by a sliding pinion. A tunnel-type light alloy housing carries the mainshaft, the pinion shaft 7 and the final drive with differential 9 and 10. Detachable side covers incorporate ball housings for the axle tubes, inside which are the axle shafts 13.

FIG 6:1 Main illustration is transmission type 741, introduced in September, 1959. Note single front mounting and synchronizing components. Inset (top right) shows latest twin mountings on type 741A, introduced in September 1961. Inset (bottom right) shows twin mountings on earlier transmission, type 716
Key to Fig 6:1
1 Oil seal
2 Front transmission mounting
3 Front cover
4 Axle tube end flange with damper extension
5 Intermediate plate
6 Mainshaft
7 Pinion shaft and pinion
8 Breather
9 Differential pinion
10 Crownwheel (ring gear)
11 Differential side gear
12 Clutch release bearing guide
13 Rear axle shaft
14 Clutch release bearing
15 Clutch release pivot shaft
16 Spider
17 Sliding sleeve
18 Selector fork
19 Lock ring
20 Brake band stop
21 Brake band
22 Synchronizing ring
23 Third gear on pinion shaft with synchronizing element
24 Slider
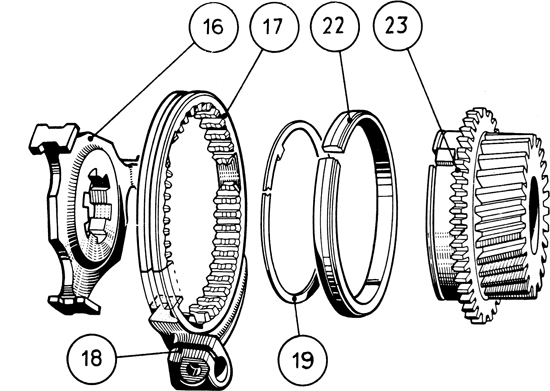
FIG 6:2 Synchronizing components in gearbox, type 644. Compare with later design shown in FIG 6:1
Key to Fig 6:2
16 Spider
17 Sliding sleeve
18 Selector fork
19 Lock ring
22 Synchronizing ring
23 Gear with synchronizing clutch shoulder
The greatest single difference between the early gearbox, type 644 and the later ones, is in the synchromesh mechanism which is illustrated in FIG 6:2. This chapter will cover type 741 in detail and give any variations for the other models.
6:2 Routine maintenance
The clutch is closely associated with the transmission, so carry out maintenance as described in Section 5:2.
Check transmission oil every 3000 miles, removing level plug on righthand side. Top-up with SAE.90 Hypoid oil to the bottom of the hole. Use SAE.80 in very cold climates. Change the transmission oil every 6000 miles (12,000 miles on 356C cars). Capacity is 3½ litres (6.16 pints). Drain plug is to rear of differential.
Lift rubber cover of gearchange lever and apply engine oil to the shift mechanism. Use lithium-based grease on other external moving parts.
6:3 Precautions before dismantling transmission
When the pinion and crownwheel (ring gear) are produced, they are tested to determine the correct relative positions in which they will run with the minimum of noise. In an assembled transmission, this position is obtained by the use of shims and spacers. Porsche agents use precision tools and gauges to assess the amount of shimming required, and if these are not available to the owner, he is strongly recommended to leave this operation to the experts. However, it is possible to reach the same conclusions using Plastigage, or accurate caliper gauges, and we will explain the procedure for the benefit of readers with the requisite skills and equipment. It is, of course, possible to overhaul the gearbox and renew many of the parts such as the mainshaft and gears, the reverse gears, the selector mechanism and some synchromesh parts without upsetting the relative positions of the crownwheel and pinion. Renewal of the intermediate plate, the transmission housing or the pinion and crownwheel calls for checking and adjustment of the meshing. If in doubt, consult a Porsche agent so that there can be no possibility of noisy transmission, or at the worst, a ruined pair of expensive drive gears.


FIG 6:3 Releasing axle tube flange from radius arm (arrowed in top view). Releasing front transmission mounting (lower view)
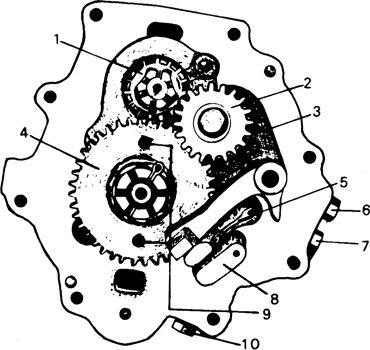
FIG 6:4 Reverse gears and selector rods on front face of intermediate plate
Key to Fig 6:4
1 Reverse gear 1 (on mainshaft)
2 Reverse gear II (held by selector fork)
3 Selector rod for reverse gear
4 Reverse gear III (mounted on pinion shaft)
5 Selector rod, 1st and 2nd gear
6 Plug for selector rod lock, reverse gear
7 Plug for selector rod lock, 1st and 2nd gear
8 Selector rod 2nd and 4th gear
9 Tapped holes to extract gear
10 Plug for selector rod lock, 3rd and 4th gear
In any case, during complete dismantling of the pinion shaft and the differential mechanism, make a careful note of the shims 10 in FIG 6:8 and of spacers S1 and S2 and any shims in FIG 6:11. It is also possible that extra paper gaskets have been used under the side cover flanges or intermediate plate to alter the position of the differential assembly. If parts which affect meshing are not renewed, reassembly of the gearbox with all shims and spacers correctly located should then give the same results as before dismantling.
6:4 Removing and refitting transmission
Loosen rear axle nuts while car is on the ground as they are very tight. Jack up rear end with front wheels chocked. Disconnect battery, close fuel tap and remove engine as described in Chapter 1. Remove rear wheels. Remove rear cover from floor tunnel inside car. Push back bellows and release shift rod from flexible connector (locking bolt). Use a puller to remove brake drum.
Remove brake shoes, springs and pressure rods (see Chapter 10). Remove brake pipes from connections behind backplates and fit bleedscrew caps to keep out dirt. Remove brake hose clamps from axle tube. Release handbrake cables from brackets.
The backplate and the outer bearing for the axle shaft are secured by a cap and four bolts. When the bolts are removed, transmission oil will run out. Remove the backplates and refit the caps. Lift radius arms with a jack and remove dampers. Remove flange bolts (top view in FIG 6:3) but do not disturb front bolt, which is an adjustable stop. Remove angle bracket and rubber buffer. Remove nuts from front mounting (lower view in FIG 6:3). On some models there will be two mountings. Remove earthing strap and disconnect throttle linkage. Remove torque rod between gearbox and body bracket on models so fitted.
Disconnect starter cable and plug for reversing light switch. Release clutch cable from lever. Remove coverplates from mounting bolts. Check whether clutch cable bracket is slotted. If it is not, unscrew clevis from cable end so that cable can be drawn through bracket. Remove transmission, then remove starter, shift rod connector, and bellows from selector shaft. Do not place transmission face downwards on clutch housing flange.
Refitting:
Reverse the removal process, taking care not to turn the axle tubes, in order to prevent damage to the rubber bellows. When connecting cables to starter solenoid do not overtighten nuts, or terminal studs may be loosened.
The torque rod bolt should fit freely. Adjust length by slackening locknuts and turning hexagonal rod.
Adjust gear shift by placing gearlever in 2nd gear, and engaging 2nd gear in the gearbox. Connect shift rod to selector shaft without preload. Tighten clamp nuts and check gearshift.
Outer casing of clutch cable must be bowed about ¼ inch (15 to 20 mm) between the body and the bracket on the transmission. Install engine and check clutch free play as described in Chapter 5.
Adjust and bleed brakes (see Chapter 10). When car is on the ground tighten rear axle nuts to 400 lb ft and fit new splitpins. Tighten wheel nuts to 95 lb ft. Fill transmission with 3½ litres (6.16 pints of SAE.90 Hypoid oil). After a road test, have the rear suspension angles checked by an agent equipped with the official optical measuring devices. After the road test, check and if necessary adjust the torque rod (if fitted) with the rear wheels on the ground.
Note that exchange transmission assemblies are supplied without brake backplates or drums.
6:5 Dismantling gearbox (type 741)
In cases where the mainshaft alone needs attention, the differential need not be disturbed but the gearbox must be partially dismantled. Work on the axle tubes and shafts will be covered in Chapter 7.
Replacement parts for the housing, the intermediate plate and the front cover can be fitted separately, but renewal of the housing calls for fresh calculations and adjustments of the pinion and crownwheel position and the preload on the bearings. If a new intermediate plate or double row pinion bearing is fitted, the pinion and crownwheel position must again be checked and if necessary adjusted. Note that the pinion and crownwheel must be fitted as a pair.
Dismantling:
Drain oil out of transmission, remove starter if still fitted and remove clutch release bearing. If necessary, remove clutch release shaft as described in Chapter 5. Remove front mountings. Remove axle tubes (see Chapter 7). Then proceed as follows:
1 Remove front cover 3 with selector rod (see FIG 6:1). see Section 6:11 for further details. Refer to FIG 6:4 and lift idler 2 out of fork. The large nut on the pinion shaft is very tight. Agents use a special plate P.37 bolted across the clutch housing flange and engaging the mainshaft splines to hold the mainshaft stationary. 4th speed gear is then engaged, the splitpin removed and the nut unscrewed. Reverse gear 4 is then pulled off. If tight, use bolts in holes 9. Remove key.
2 Remove nut and pull off gear 1. Prise out key. Pull off intermediate plate 5 (see FIG 6:1), complete with two dowels. Note thickness of gaskets for correct reassembly. Hold plate between soft jaws in a vice. Remove plugs 6, 7 and 10 (see FIG 6:4). Remove balis springs and spacer tube (see FIG 6:5). Release selector fork 18 (see FIG 6:1) and pull out rods. This will release interlocks 8 and 10 (see FIG 6:5).
3 Mount plate under press and push shafts out simultaneously. Remove rear axle and differential assembly (see Chapter 7).
4 From inside the housing remove lock rings 3, 4 and 6 from the mainshaft and pinion shaft bearings (see FIG 6:6). If necessary, use an extractor to pull out the bearing and race. The operation will be easier if the housing is heated to 212° to 240°F or 100° to 120°C. Remove oil deflector plate from differential housing and mainshaft oil seal if necessary.
Clean and inspect all the parts and if serious gear fracture was the reason for dismantling, check the housing for cracks or damage. Check bushes for starter and for clutch release shaft. Check bearings when dry.
6:6 Servicing mainshaft
FIG 6:7 shows the shaft and its components. Having pressed the shaft 13 out of the intermediate plate as in preceding operation 3, remove spacer in front of gear 6. Remove bearing 4 and outer race of bearing 11 from plate and housing in order to check mainshaft runout. Press bearing 4 lightly onto shaft again if shaft passes following tests.
Clean shaft and check clutch plate splines and pilot spigot for wear. Check surface which runs inside oil seal. Check gears for wear and damaged teeth. Shaft must be renewed if first gear 10 is defective. Always renew worn gears in pairs, as they are matched with the pinion shaft gears.
With bearings fitted to shaft, mount them on V-blocks and use a dial gauge to check runout. Maximum permissible runout of pilot spigot at rear end is .10 mm or .004 inch. Of the gear teeth it is .03 mm or .0012 inch. If in excess of this, up to .20 mm (.0079 inch), the shaft may be straightened by an agent with the necessary equipment. The tools are VW.400, VW.405 and VW.406.
Gears 6, 8 and 9 may be pressed off the shaft. Inner race 11 may also be pressed off after removing lock ring 12 (refer to FIG 6:15).

FIG 6:5 Section through intermediate plate showing selector rods and locking balls, and the interlock pins which prevent engagement of more than one gear at a time
Key to Fig 6:5
1 Intermediate plate
2 Selector rod for reverse gear
3 Bore for reverse gear interlock (seat for part 5)
4 Locking ball
5 Guide bushing
6 Reverse gear lock spring (free length 25.7 mm, 1.012 inch)
7 Retaining plug
8 Interlock pin
9 Selector rod for 1st and 2nd gear
10 Interlock pin
11 Selector rod for 3rd and 4th gear
12 Bore for 3rd and 4th gear interlock
13 Lock spring for 3rd and 4th gear (free length 23.2 mm, .913 inch)
14 Spacer tube
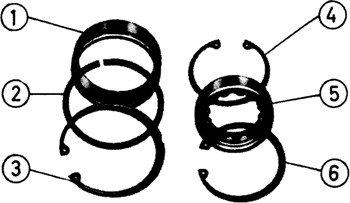
FIG 6:6 Pinion shaft and mainshaft roller bearing outer races showing locating lock rings
Key to Fig 6:6
1 Roller bearing outer race for pinion shaft
2 Lock ring (installed on bearing race)
3 Lock ring
4 Lock ring
5 Roller bearing outer race with cage and rollers for mainshaft
6 Lock ring

FIG 6:7 The mainshaft assembly, showing location of gears, bearings and oil seal
Key to Fig 6:7
1 Castle nut
2 Reverse gear
3 Key
4 Double-row ballbearing
5 Intermediate plate
6 4th gear
7 Key
8 3rd gear
9 2nd gear
10 1st gear
11 Inner bearing race
12 Lock ring
13 Mainshaft
14 Oil seal
15 Splines for clutch plate
Reassemble in the reverse order, heating the gears in an oil bath to 150°C or 300°F. Gears and bearings must be a press fit.
6:7 Servicing pinion shaft
FIG 6:8 shows the shaft and gears in section. The position of gear 12 is determined by the length of the assembled components and by the front bearing (not shown). Roller bearing 11 does not locate the gear endwise, but simply takes radial loads.
Dismantling:
1 Mount assembly under press and push out the pinion shaft. Remove 4 mm and 2 mm washers 13 and 14, gear 1, bearing 16 and sleeve 15. Remove sliding sleeve 17 and spider 2. Remove 3rd speed gear 4, with bearing 19 and sleeve 18.
2 Remove washer 5, 2nd speed gear 6, bearing 20 and sleeve 21. Remove sliding sleeve and spider. Remove 1st speed gear 8 and bearing 23. Press sleeve 22, thrust washer 9 and roller bearing 11 off shaft, taking careful note of the number of shims 10 between washer and inner race.
Clean the parts and check for wear, renewing worn gears for 2nd, 3rd and 4th speeds in pairs with those on the mainshaft. Oversize needle rollers are available if clearance is excessive. If the pinion is worn it must be renewed as a pair with a new crownwheel (ring gear). If the pinion is sound, check that it has the same numbers on the face as those on the crownwheel (see FIG 6:10). If noisy gear changing has been a problem and the clutch has been correctly adjusted, check the synchronizing parts arid renew if worn. The following notes on the synchronizing mechanism will enable the function of it to be understood.
The synchronizing mechanism:
The assemblies for 2nd, 3rd and 4th speed gears are shown in FIGS 6:8 and 6:9. The variation in the arrangement for 1st speed gear is shown on the right in FIG 6:9.

FIG 6:8 Section through pinion shaft assembly, with rear bearing in position
Key to Fig 6:8
1 4th gear
2 Spider
3 Brake band
4 3rd gear
5 Thrust washer
6 2nd gear
7 Synchronizing ring
8 1st gear
9 Thrust washer
10 Shim
11 Roller bearing
12 Pinion gear
13 Spacer
14 Thrust washer
15 Needle bearing sleeve 4th gear
16 Needle bearing
17 Sliding sleeve
18 Needle bearing sleeve 3rd gear
19 Needle bearing
20 Roller cage, 2nd gear
21 Roller bearing sleeve 2nd gear
22 Roller bearing sleeve 1st gear
23 Roller cage, 1st gear
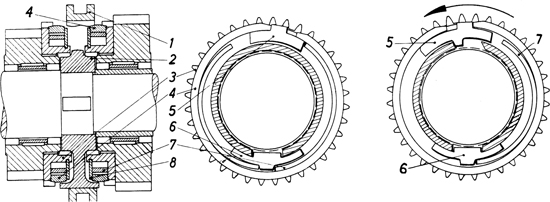
FIG 6:9 Lefthand and central views show synchronizing mechanism for all forward gears except 1st and 2nd, which is shown on the right. Slider 5 (right) brakes gear for silent engagement of 1st, brake band 7 brakes gear for 2nd
Key to Fig 6:9
1 Sliding sleeve
2 Spider
3 Toothed ring on gear
4 Synchronizing ring
5 Slider
6 Stop
7 Brake band
8 Lock ring
When gear changing with the car in motion, the selector fork moves sliding sleeve 1 away from one gear towards ring 4 on the adjacent gear. The sleeve is carried on a hub which is keyed to the pinion shaft so that it is turning as it engages the synchronizing ring of the next gear. The friction between the ring and the sleeve exerts a torque on the ring which is transmitted by brake band 7 to stop 6. The band is thus expanded to prevent the ring from contracting inwards to allow the sleeve to pass over it. The sleeve is thus forcing the gear to be engaged to turn at the same speed, and this continues all the time there is a difference in speed and the pressure on the brake band prevents the ring from being compressed.
As the difference in speed diminishes, this pressure is reduced. When speeds are equal, the brake band contracts to allow the ring to be compressed by the sleeve, which then moves into engagement. All the parts mentioned can be identified in the lower half of FIG 6:1. In the case of 1st speed gear, a powerful synchronizing effect is not required, owing to low engine speeds, especially when engaging the gear from neutral. The simpler arrangement is shown on the right in FIG 6:9.
To service the mechanism, remove the lock ring and separate the parts. Renew the synchronizing ring if action has been faulty. When reassembling, use an oil stone to take off sharp edges on the long ends of the stops. Where the stops contact the inner surfaces of the bands a ridge may form. Renew the bands if there is a ridge about 18 mm ( inch) from the ends. When installed, the synchronizing ring should measure 76.44 ± .20 mm (3.012 ± .008 inch) in diameter.
Reassembling pinion shaft:
If any part has been renewed which is likely to alter the relative positions of the pinion and crownwheel, the correct shimming behind the pinion must be determined. Refer to FIG 6:10 which shows that R is the distance between centre line of differential assembly and face of pinion. This dimension is marked on both gears as shown.
The first step is to make a provisional determination of the shimming required. For the standard final drive gear ratio of 7 to 31, the basic dimension R is 59.80 mm (2.354 inch). Any difference between this and the marking on the gears must be made up with shims. These are available in thicknesses of .10, .15 and .30 mm (.004, .006 and .012 inch). They fit between the roller bearing inner race and the thrust washer as shown at 10 in FIG 6:8. If, for example, the difference between the basic dimension and the marked one is .55 mm then one shim of each thickness will be required. Use the next larger shim for values above .05 mm and the next lower when the value is below .05 mm. Choose a combination so that any future adjustment can be made with the smallest possible value of .05 mm, by changing one shim. It is also advisable to fit too thick a pack of shims, rather than one which is too thin, because too much shimming can be rectified by fitting gaskets under the intermediate plate. In this way, dismantling of the pinion shaft can be avoided. Continue assembling as follows:

FIG 6:10 Gear markings for correct meshing of crownwheel (ring gear) and pinion (right). Lefthand view shows pinion relationship to differential centre line
Key to Fig 6:10
R Distance from pinion face to differential centre line
1 Dimension R stamped on gears
2 Matching set number
3 Backlash between gears at setting R
4 Pinion and shaft
5 Transmission housing
6 Lefthand side cover

FIG 6:11 Section through differential assembly showing spacers S1 and S2 for setting crownwheel position correctly and for preloading the differential bearings
Key to Fig 6:11
S1 Spacer (crownwheel side)
S2 Spacer
R Distance from pinion face to differential centre line
L Length of differential carrier
J Total width of housing
1 Pinion shaft
2 Gearbox casing
3 Righthand side cover
4 Ballbearing 6210
5 Righthand axle shaft
6 Differential carrier
7 Crownwheel (ring gear)
8 Lefthand thrust bearing 7210
9 Lefthand axle
10 Lockpin
1 Press inner race of roller bearing onto shaft. Fit selected shims, followed by thrust washer. The side cover of the roller bearing cage must be fitted away from the pinion. Continue to refit the sleeves, starting with 22 in FIG 6:8 and assembling the gears and synchronizing mechanisms as shown. Lubricate all parts well.
2 After fitting thrust washer 5, fit the splined bearing sleeve 18 for 3rd speed gear, noting that it is 24 mm (.945 inch) long. When it comes to fitting the bearing sleeve 15 for tha 4th speed gear, note that it is 28 mm (1.102 inch) long (see Section 6:13 for variations). It will be seen that the needle rollers do not lie centrally in the cage. Fit them so that the wide part of the cage goes on first. The rollers will then be centrally placed under the gear teeth. Gears should turn freely, but with practically no clearance. Fit oversize rollers if necessary.
3 Fit the 2 mm thrust washer 14, followed by the 4 mm washer 13. Do not fit the sliding sleeve for 3rd and 4th gear.
4 Fit a suitable length of thick-walled tubing over the shaft so that the nut can be fitted and tightened to a torque of 115 lb ft and check the end float of the gears. It should be .25 to .35 mm (.0098 to .0138 inch) for 1st gear, and .20 to .30 mm (.0079 to .0118 inch) for 2nd, 3rd and 4th gears. After checking, loosen the nut.
5 When fitting the roller bearings it may be helpful to know that 1st and 2nd gears have double row caged rollers, 3rd and 4th have single row needle rollers. 3rd gear bearing is symmetrical, while 4th gear bearing is offset as explained in operation 2, but refer to Section 6:13 for details of possible variations.
6:8 Reconditioning differential
Removing and dismantling:
Remove brake backplates and axle tubes as described in Chapter 7. Remove lefthand transmission side cover which is the one seen in section in FIG 6:1. With an assistant to hold the lefthand axle assembly, drive the righthand axle shaft inwards with a soft-faced hammer and the whole assembly will emerge from the transmission casing. Refer to FIG 6:11 and hold carrier 6 in a vice. Remove bolts from crownwheel (ring gear) 7. Lift off the cover to the carrier complete with the axle and side gear. Remove crownwheel. Drive out lockpin 10 and then the differential pinion shaft to release the pinions (see part 9 in FIG 6:1). Remove axle and side gear. During these operations it is most important to identify spacers S1 and S2 and possible shims and record their positions correctly, assuming that no new parts are fitted that call for remeshing of the drive gears. Also check any gaskets under the side cover flanges.
Clean the parts and check for wear, referring to Chapter 7 for details concerning the axle shafts and fulcrum plates in the side gears. Check the differential carrier for wear of the bearing surfaces for the pinions and side gears. Renew worn or damaged gears and pinion shaft. When renewing axle shafts and side gears, refer to colour markings given in Chapter 7. Renew worn drive gears only as a pair and follow the meshing procedure given in Sections 6:7 and 6:9.
Reassembling:
If new bearings are to be fitted in the side covers note that thrust bearing 7210.DIN.628 is fitted on the crownwheel side and refer to part 8 in FIG 6:11 to make sure that it is fitted correctly, with the wide face of the outer race outwards. Heat covers to 212° to 230°F (100° to 110°C) and press bearings fully home. Use genuine gaskets .20 mm (.008 inch) under the cover flanges.
Oil the parts and fit lefthand axle and side gear to carrier. Fit pinions and shaft, securing with lockpin. Peen hole after driving lockpin below surface. Clean all burrs from carrier and crownwheel and fit bolts to a torque of 43½ lb ft, bending up lockplates afterwards. On gearboxes after No. 39645 use safety wire, fitted so that a bolt which tries to unscrew will tighten the wire.
6:9 Adjusting crownwheel and pinion
As mentioned before, any renewal of parts which will affect the meshing of the gears means re-adjustment after precision measurements have been made. If the equipment is not available, the work must be entrusted to a Porsche agent. Failure to set the gears correctly will lead to noisy operation and possible damage to the teeth.
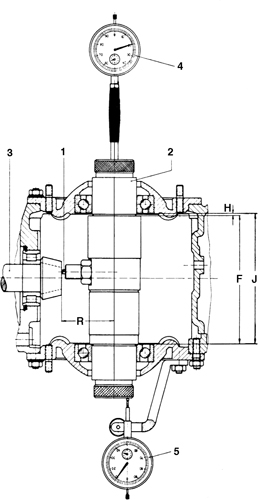
FIG 6:12 Gauge P.33 in position to check distance between differential bearings, and dimension R from pinion face to differential centre line
Key to Fig 6:12
R Distance from pinion face to differential centre line
H Free end play of gauge in differential bearings
F Length of gauge (stamped on)
J Total width of housing
1 Feeler for gauge 4
2 Gauge P.33
3 Pinion
4 Dial gauge for measuring R
5 Dial gauge for measuring H
Adjusting position of crownwheel (ring gear):
This operation includes finding the correct preload for the bearings in the side covers. Refer to FIGS 6:11 and 6:12.
To find the required thickness of spacers S1 and S2, measure width of housing J and length of differential carrier L to an accuracy of .01 mm or .0004 inch. The preload on the carrier bearings is to be .13 to .17 mm (.005 to .007 inch). Accurate measurements depend on cleanliness, freedom from burrs and on ball races being properly seated.
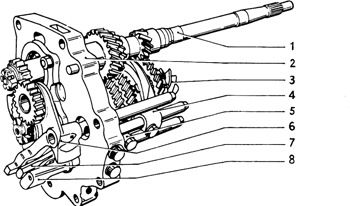
FIG 6:13 Intermediate plate assembly of mainshaft, pinion shaft, reverse gears and selector mechanism
Key to Fig 6:13
1 Mainshaft
2 Intermediate plate
3 Pinion gear
4 Selector fork 1st and 2nd gear
5 Selector fork 3rd and 4th gear
6 Selector rod with fork for reverse gear
7 Selector rod for 1st and 2nd gear
8 Selector rod for 3rd and 4th gear
The official gauging device is P.33 and its use is illustrated in FIG 6:12. Fit lefthand cover, using correct gasket .20 mm (.008 inch) thick. Insert the gauge body in the lefthand bearing and fit the righthand cover on a correct gasket. Secure dial gauge 5 to one of the cover studs and set at zero. Turn housing so that body of gauge is vertical with weight resting on inner race of righthand bearing. Read gauge and add result H to length of gauge body F, which is marked. This gives width J. Example, F=143.50 mm + H=1.71 mm gives J=145.21 mm.
Now measure width of differential carrier assembly to determine L (see FIG 6:11) and say that the result is 137.85 mm. Take L from J and the answer is 7.36 mm. Add to this the average preload figure of .15 mm and the total thickness of spacers S1 and S2 required is 7.51 mm, giving a thickness of 3.755 mm for each. But we now have to take .10 mm off the thickness of S2 and add .10 mm to that of S1 so that the result is 3.655 mm and 3.855 mm respectively. This will ensure a preliminary setting of gear backlash.
Spacers are available in .10 mm (.004 inch) steps from 2.90 mm to 4.50 mm (.104 to .177 inch). The use of a shim .25 mm (.010 inch) thick makes it possible to vary spacers within .05 mm (.002 inch). In all calculations, ensure that the preload on the bearing lies within the tolerance of .13 to .17 mm (.005 to .007 inch). Measure spacer width at four places 90 deg. apart. Maximum permissible deviation is .02 mm or .0008 inch.
The adjustment of the crownwheel position is finalised after the next operation, so that backlash between the gears can be checked.
Adjusting pinion gear:
A provisional setting was made when reassembling the pinion shaft as described in Section 6:7. Refer to FIG 6:12 and assemble the gauge P.33 by fitting dial gauge 4 and setting it to zero by using the master ring gauge. Fit the gauge body into the housing as described when adjusting the position of the crownwheel. Determine distance J as instructed. Note when setting zero using the ring gauge, to record that this will give a setting to feeler 1 of (say) 59 mm or half the inside diameter of the master, as marked on it.
Turn the gauge body until the feeler contacts the pinion face and turn it to and fro to record the minimum reading. Example, initial dial gauge setting 59.00 mm, actual gauge reading 59.06 mm and required dimension R (as marked on pinion face of crownwheel) is 59.24 mm. Difference between actual reading and required dimension is .18 mm (.007 inch) so that pinion must be moved away from crownwheel centre by that amount. This is done by inserting under the intermediate plate, a paper gasket .20 mm (.008 inch) thick, which is the nearest available.
If the gauge reading exceeds that required, the pinion must be moved towards the crownwheel centre by the difference between the gauge and required dimensions. This is done by dismantling the pinion shaft and inserting shims 10 in FIG 6:8.
Paper gaskets for insertion under the intermediate plate are available in thicknesses of .10, .15 and .20 mm (.004, .006 and .008 inch). Shims for the pinion shaft are available in thicknesses of .10, 15. and .30 mm (.004, .006 and .012 inch).
Checking adjustment of crownwheel:
Having carried out all the preceding settings satisfactorily, the next and final step is to measure the backlash between the drive gears. Prepare for this by fitting the pinion assembly and intermediate plate, using any paper gaskets the calculations required. Secure the plate by two bolts. Fit righthand transmission cover with correct gasket and secure. Fit differential assembly with spacers correctly placed. Clamp the nut on the end of the pinion shaft so that it is immovable. The official tool is P.34a. In the absence of tool No. VW.288b, arrange to clamp a dial gauge to the bore of the differential carrier with the feeler contacting a fixed point on the transmission housing such as an axle flange stud at the same radius as the crownwheel teeth. If the gauge and differential carrier are now moved lightly in both directions, the pointer will record the amount of backlash. Repeat at four positions of the crownwheel 90 deg. apart. The readings must not differ by more than .05 mm (.002 inch). Compare the mean value with that marked on the gear (see 3 in FIG 6:10).
If the backlash is not within the required figure, rearrange spacers S1 and S2 until correct.
6:10 Servicing intermediate plate
If the plate, the bearing retaining plate or the bearings are damaged or worn, the plate must be dismantled. To do this, remove the bearing retaining plate from the front face. Press out the bearing(s) as required. If tight, heat the intermediate plate to 212° to 230°F (100° to 110°C). Clean bearing(s) and check for wear and roughness when dry.
Refit the bearing(s) after heating the plate as just suggested. Fit so that the cut-out in the outer race of each bearing faces outwards and is reasonably adjacent to the other. The bearings must be fully seated.
The next step is to calculate the thickness of gasket required under the retaining plate so that the outer races are nipped by a specified preload. Measurements are made with a micrometer depth gauge. Check the depth of the recess in the retaining plate for the pinion shaft bearing. Measure the protrusion of the bearing from the intermediate plate. Dimension one subtracted from dimension two gives the clearance between the two plates. Say that the answer is .20 mm (.008 inch). This is not, however, the thickness of gasket required because the outer races must be preloaded by .08 ± .05 mm (.003 ± .002 inch). This is therefore subtracted from .20 mm to give a figure of .12 ± .05 mm, or .0047 ± .002 inch. As the gaskets have a thickness of .10 mm (.004 inch) it can be seen that one gasket will lie within the limits of tolerance.
Fit the gasket and retaining plate, tighten the bolts to 14.5 lb ft and turn up the lockplates. Oil the bearings liberally.
6:11 Reassembling gearbox (type 741)
The gearbox should now be ready for reassembling, but before the front cover is fitted, check the fit of the selector rod, and the reverse idler and shaft. Also check oil seal 1 (see FIG 6:1). The reverse idler shaft is secured with a roll-pin and the hollow shaft is closed by an aluminium plug.
Fit lock ring 2 to the outer race of pinion shaft roller bearing 1 (see FIG 6:6). Fit rear lock ring into transmission housing for rear mainshaft bearing 5. Heat case to 212° to 230°F (100° to 110°C) and press bearing races into place using tools P.60 and P.61 or suitable drifts. For the mainshaft, the fitted parts will be the outer race with cage and rollers, and for the pinion shaft the outer race with mounted lock ring. Fit lock rings for both bearings. Refit the oil deflector plate and secure it with a copper lockwasher. Fit the mainshaft oil seal using a similar procedure to that described in Section 6:12.
Set mainshaft and pinion shaft under a press so that the faces of the 4th speed pair of gears are flush. Press intermediate plate onto both shafts simultaneously until there is at least .20 mm (.079 inch) clearance between the front faces of the 4th speed gears and the rear face of the plate. Hold intermediate plate between soft jaws in a vice.
Refer to FIG 6:13 and fit reverse selector rod 6 and insert interlock pin (part 8 in FIG 6:5). Fit 1st and 2nd gear rod and fork 4 followed by another interlock pin (part 10 in FIG 6:5). Fit 3rd and 4th gear rod 8 and fork 5. If removed, restore bushings 5 (see FIG 6:5) using tools P.57 and P.58. Check condition of springs and renew damaged ones, then fit a locking ball 4 and a spring 6 or 13 in each bore. Note that the free length of spring 13 and for 1st and 2nd rod should be 23.2 mm (.915 inch) and not less than 22.7 mm (.895 inch). For reverse spring 6 the free length is 25.7 mm (1.012 inch) with a minimum of 25.2 mm (.992 inch). Do not forget spacer tube 14. Fit retaining plugs 7.
Check that dowels are a tight fit in intermediate plate than install it together with the main and pinion shafts after cleaning the joint faces. Hold rear end of mainshaft with tool P.37 as originally described during dismantling, and then engage 1st speed using a screwdriver. Fit gear 1 to the mainshaft (see FIG 6:4) and tighten the nut to 18 lb ft. Fit gear 4 to the pinion shaft and tighten to 145 lb ft. Loosen nut and retighten to 70 lb ft.
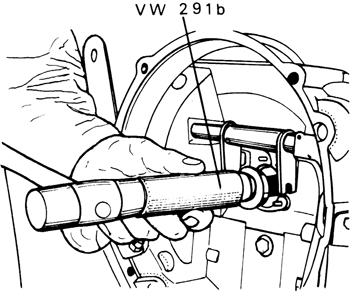
FIG 6:14 Driving home mainshaft oil seal
Leaving selector forks free on rods, check the interlocking. When any gear is engaged the other rods must be locked. Now remove intermediate plate and mount between soft jaws in a vice. Fit gear 2 in its selector fork and insert shaft.
It is best when positioning the selector forks to use guide P.68. This locates the rear ends of the rods correctly. Adjust each fork so that the sliding sleeve 1 (see FIG 6:9) is in the neutral position centrally between the synchronizing rings 4. Be careful to set this position accurately so that proper gear synchronizing is obtained. Tighten each fork clamping bolt to 18 lb ft, setting the heads of rods 3, 5 and 8 (see FIG 6:4) so that they are parallel to each other. Refit the intermediate plate and gasket and fit new splitpins to the two castle nuts. The disposition of the various parts can also be seen in FIG 6:13.
Refit the differential assembly in the reverse order to dismantling as covered in the preceding Sections. Any work in connection with the axle shafts, axle tubes, differential side gears and rubber bellows will be found to be described in Chapter 7. When fitting the side covers, make sure the joint faces are clean and free from burrs.
If the selector rod was removed from the front cover (see part 3 in FIG 6:1), refit it. If burrs were removed before the rod was withdrawn during dismantling, there should be no damage to the bore in the cover. Clean all the joint faces and use a new gasket. For other details concerning the cover see the beginning of this section.
Before fitting the cover, apply graphite grease to the selector rod forks and the reverse idler shaft. As the cover is pushed home, check that the selector finger engages in the selector rods and that the reverse idler shaft enters the hole in the reverse idler and is properly guided into the opening in the intermediate plate. Tighten cover bolts to 14.5 lb ft. Check the engagement of all gears.
6:12 Renewing mainshaft oil seal
A leaking mainshaft oil seal can be renewed as follows:
1 Remove the engine as described in Chapter 1.
2 Remove the clutch release bearing as described in Chapter 5.
3 Remove the relase bearing guide by unscrewing the retaining nuts.
4 Prise out the old seal with a screwdriver but be careful not to damage the seat in the housing.
5 Use sealing compound between new oil seal and housing.
6 Lubricate the mainshaft and lip of new seal with engine oil.
7 Drive seal home using tool VW 291b as shown in FIG 6:14, but be careful not to dislodge the seal spring.
8 Reassemble the remaining parts in the reverse order of dismantling.

FIG 6:15 Variations in installation of roller bearing on mainshaft
Key to Fig 6:15
1 Intermediate ring 741.302.296.00 between gear and bearing from transmission No. 51017 and mainshaft No. 741.302.101.10
2 Intermediate ring fitted to mainshaft 741.302.101.10 in housing 644.20.010 or 716.301.010 or 741.301.010.00
3 Intermediate and distance rings installed with mainshaft 519.20.249 in housing No. 741.301.010.10. Part number of distance ring, 644.20.209
6:13 Gearbox variations, types 644, 716 and 741
From September 1957 the gearboxes have changed in minor ways, but the servicing instructions given in Sections 6:4 to 6:12 can be followed without difficulty when dealing with any type. The following additional information will clarify most points of difference.
Type 644:
This has two mountings and the early form of synchromesh which resembled parts 16, 17, 18, 19, 22 and 23 in FIG 6:1 (see FIG 6:2 for the same parts). Because there are no brake bands 21 or stops 20 and 24, the action is different, ring 22 being contracted when sleeve 17 tries to pass over it. This makes the ring grip the clutch surface of gear 23 so that the gear is speeded up or slowed down as required when changing gear. When speeds are matched the sleeve slides over the ring and engages the dogs on the gear to complete the drive. Noticeable differences between FIG 6:1 and the actual parts shown in FIG 6:2 is that there are lugs on the arms of the spiders, the lock ring is narrower and has no lug, and thrust washers are fitted to the spiders.
One essential point to observe when assembling the pinion shaft on this model is that the inner race of the rear roller bearing must be refitted in the same direction that it faced when dismantled, so make a careful note.
Unlike later models, there is no seal in the front cover where the shift rod passes through.
Type 716:
This type has two mountings at the front and the improved synchronizing device shown in FIG 6:1. An oil seal for the shift rod is fitted in the front cover and the inner race of the rear roller bearing for the pinion shaft can be fitted either way round.
Type 741:
From transmission No. 32,001 to 34,999 the front mounting was of the single type shown in the main illustration of FIG 6:1. After No. 34,999 there was a return to the twin mountings. The torque rod on the side of the transmission was then discontinued. When installing the transmission, the rubber mounts and sockets must be fitted to the brackets on the front cover. When engaging the mountings with the body brackets, note that the body part lies between the two clamping plates.
There was also a change in the throttle bell crank mounting. The mounting was transferred from the cover to the intermediate plate which meant that an extension had to be fitted between the cable and the bell crank ball joint.
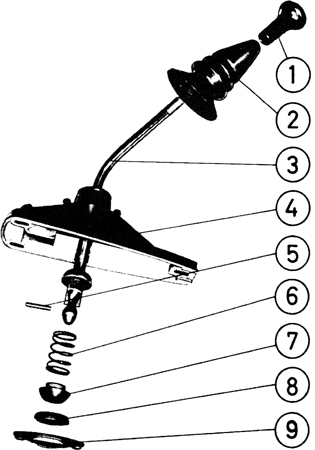
FIG 6:16 Later type of gearlever, showing component parts
Key to Fig 6:16
1 Gearlever knob
2 Rubber boot
3 Gearlever
4 Gearlever bracket
5 Roll-pin
6 Spring
7 Ball
8 Socket
9 Retaining plate
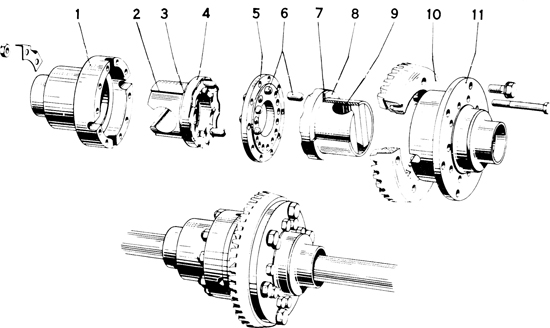
FIG 6:17 Components of ZF limited slip differential gear
Key to Fig 6:17
1 Carrier half without flange
2 Axle joint body
3 Brake ring
4 Cam track element
5 Driver plate
6 Plunger
7 Cam track element
8 Brake ring
9 Axle joint body
10 Ring gear (crownwheel)
11 Carrier half with flange
When removing the shift linkage as described in the following Section, after removing the lever and base, remove the shaft guide and tensioner (socket-head screws). The shaft can be pulled forward after disconnecting the rear connector, which now incorporates a sliding coupling. The sliding coupling will be ineffective unless the instructions contained in Section 6:14 are followed. Spare parts are available only as a complete coupling.
Before transmission No. 33,391 the 3rd and 4th speed gears on the pinion shaft had roller bearings with either a single continuous track or double tracks. If it is desired to convert to needle bearings, this is only possible on gears with the single continuous track on the inside. The change requires needle bearings and a new inner race which is 35 mm in diameter. Inner races for roller bearings are 34 mm in diameter.
Beginning with transmission No. 50,001 there are the following modifications:
1 Synchronizing brake band and stop redesigned. New parts interchangeable with old in correct pairs, that is new band 741.302.316.00 must be used with stop 741.302.317.00.
2 Lock ring for synchronizer reinforced.
3 Differential housing increased in width so that a new mainshaft is needed. Use new housing 741.332.101.00 with new shaft 741.302.101.10.
4 1st speed gear on pinion shaft increased in width to 12.4 mm. This gear cannot be fitted in gearbox housings before No. 51,017.
Note that the last two items were fitted to cars with the 1600S.90 engine, that is, the differential housing and the gear.
FIG 6:15 shows three variations in the mainshaft assembly, as follows:
1 Standard location of intermediate ring between first speed gear and roller bearing. Mainshaft 741.302.101.10, intermediate ring 741.302.296.00. From transmission No. 51,017.
2 Location of ring with mainshaft 741.302.101.10 in transmission housing 644.20.010, or 716.301.010, or 741.301.010.00.
3 Location of ring and distance piece when fitted to mainshaft 519.20.249 in transmission housing 741.301.010.10. Part No. of distance piece, 644.20.209.
6:14 Gearlever and shift rod
Most of the work of removing and dismantling the gearlever has been covered in Chapter 4, because the heater control forms part of the assembly. FIG 6:16 shows the lever dismantled so that any trouble such as a broken spring can be readily rectified. The rear end of the shift rod has a flexible connector which can be reached after removing the tunnel cover in the rear compartment and pulling back the bellows. A sliding coupling is fitted to later models as described under ’Type 741’ in the preceding Section.
To ensure equal loading of the shift mechanism in the gearbox, engage 1st or 2nd gear. Loosen the coupling at the connection with the selector rod so that all pre-loading is released. Tighten the clamp and test the control in all gears.
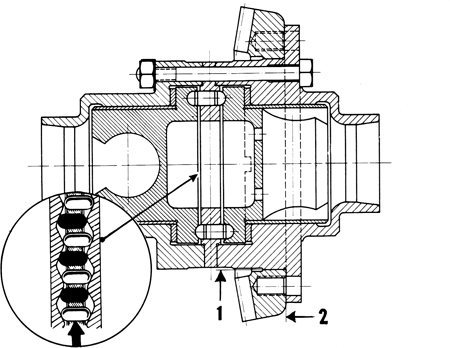
FIG 6:18 Section through ZF limited slip differential gear. Inset shows black plungers transmitting drive. Maximum permissible runout at 1 is .05 mm (.002 inch). At 2 it is .03 mm (.0012 inch)
6:15 ZF limited slip differential
This has been available as an optional extra and is intended to provide a drive to both rear wheels with very little slip, in conditions where the orthodox type would allow one wheel to spin without giving traction. FIG 6:17 shows the components and FIG 6:18 a section through the assembled device with an inset of the plungers 6 between tracks 7 in the first illustration.
One track has eight cams and the other nine, so that the spaces between are not identical. If the rear wheels are turning at the same speed, the plungers which are black in FIG 6:18 are transmitting drive to both tracks. The others are in spaces which prevent driving. On a curve, the different wheel and track speeds causes the plungers to reciprocate in plate 5 (see FIG 6:17) so that some will press hard on the cam faces of the outer wheel track and make it turn faster, while the retreat of the plungers from the cam tracks for the inner wheel will make it turn slower. This reciprocating action is accompanied by considerable friction due to the high loading on the plunger ends and the shape of the cams. This prevents easy movement and stops excessive differential action if one wheel tries to slip and turn much faster than the other. The reciprocating action may give rise to clicking sounds from the differential but this is normal and not a sign of excessive wear. The correct lubricant is SAE.90 Hypoid gear oil.
Rotational play can become as high as 3 to 4 mm, but this will not affect the action of the differential.
Removal:
This operation is the same as that described in earlier Sections.
Dismantling:
Unlock the through-bolts and separate the differential carrier by removing the nuts. Mark the cam track elements for correct reassembly. Clean the parts and examine for wear, renewing any which may be necessary but bearing in mind the preceding remarks about rotational play. The plungers must not vary in length more than .05 mm (.002 inch).
Reassembling:
With plungers and cam tracks free of oil, coat them with Molykote G paste. Insert the plungers in the drive plate. Fit the axle joint bodies 2 and 9 and brake rings 3 and 8 to the carrier halves 1 and 11, using lubricant. Tighten the through-bolts and check the end float of the axle joint bodies. If in excess of .20 to .30 mm (.008 to .012 inch), fit thicker brake rings. With correct end float the differential gear must turn freely by hand.
When reassembling is complete, hold the carrier and one axle joint body stationary and turn the other joint to check the free travel. By observing the travel through the openings in the carrier, note whether the outer circumference of the cam track has no more free travel than 1 to 1.2 mm (.040 to .047 inch). As already stated, travel can reach a limit of 3 to 4 mm (.118 to .158 inch) without affecting the action, but the unit will become noisy.
The through-bolts must be tightened to 16½ to 18 lb ft and the nuts locked by turning up the tabs of the lock-washers. This completes the reassembly.
6:16 Special gear combinations
These may be used in competition events. It is possible to use special third gear pairs in place of the normal fourth speed gears by following the original instructions for assembling the pinion shaft, with the following changes:
Select the required ratio. Both gears must have the same pairing number. Keep bearings, sleeve, and gear as a unit and never run gears on a needle bearing from another gear. Fit a new 4th speed gear inner sleeve, followed by a needle bearing for a 3rd speed gear. This has a smaller cage. In some cages such as type 3E, the sliding sleeve will not pass over the teeth. In this case fit the sleeve before the gear.
Having fitted the synchronizing parts, fit a cup-shaped spacing washer to the shaft and tighten the shaft nut.
Type 741 transmissions after No. 33,392 can be converted by following the preceding instructions. The differences are that a 3rd speed gear needle bearing is used on the 4th speed inner race, a 3rd gear replaces the 4th speed gear and the cup shaped washer replaces the flat spacer and thrust washer. On the mainshaft, a 3rd speed gear replaces the 4th speed gear. It is narrower and therefore requires a spacer ring. Refer to Section 6:13 under ’Type 741’ for details of precautions when changing from roller bearings to needle rollers.
Converting the mainshaft:
Follow the instructions in Section 6:6 but note that 3rd speed gears come in two widths, 30 mm and 35 mm (1 and 1⅜ inch). When two 3rd speed gears are used together in both 3rd speed and 4th speed positions, one of the two gears must be 30 mm (1
 inch) wide. A 3E gear is always that width but other combinations require that one of the gear hubs be precision-ground to the correct width.
When assembling the mainshaft, heat the 3rd speed gear and fit it. Heat the selected 4th speed gear and fit it, followed by a 5 mm (.197 inch) spacer. If, however, the 4th speed gear is a normal one and not a 3rd speed pair specially selected, fit a 5 mm (.197 inch) spacer before the 4th speed gear is pressed on. This will compensate for the 30 mm width of the 3E or ground down 3rd speed gear.
6:17 Fault diagnosis
(a) Difficulty in changing gear
1 Bent or worn gear shift mechanism
2 Faulty synchronizers, worn selector forks and sleeves
3 Faulty clutch, or release bearing
4 Clutch cable not properly adjusted
(b) Noisy gearchange
1 Check 2, 3 and 4 in (a)
2 Transmission oil too thick
(c) Slipping out of gear
1 Weak synchronizer rings, weak or broken selector rod detent springs
2 Worn dog teeth on gears
3 Excessive end float of gears
4 Worn bearings
5 Selector fork wrongly positioned
6 Gear shift mechanism worn
(d) Gearbox noisy in neutral
1 Worn bearings
2 Bent mainshaft, excessive end float
3 Incorrect or insufficient lubricant
(e) Gearbox noisy in gears
1 Check (d)
2 Worn gears
3 Incorrectly meshed crownwheel and pinion
(f) Oil leaks
1 Damaged or worn mainshaft oil seal, scored shaft
2 Worn shift rod and front cover, defective seal
3 Warped or damaged joint faces, faulty gaskets
4 Loose cover nuts, perforated axle tube bellows
NOTES


 inch) from the ends. When installed, the synchronizing ring should measure 76.44 ± .20 mm (3.012 ± .008 inch) in diameter.


 and 1⅜ inch). When two 3rd speed gears are used together in both 3rd speed and 4th speed positions, one of the two gears must be 30 mm (1