 Getting Started
 Getting Started
THIS SECTION will teach you what you need to know about preparing your surfaces for painting, repairing problem areas, and how to use basic painting tools and techniques. You’ll also discover a wide variety of specialized products and tools that artists have developed over the years to help them create many of the spectacular decorative painting finishes featured in this book. Some are tex-turizing products such as Venetian plaster, one of the most beautiful and popular wall finishes used in homes today. Others are metallic paints and foils that lend a rich sheen to almost any surface. If you decide to try some of the finishes in this book for yourself, take advantage of all the products and tools that are available these days to help ensure your success. You’ll find complete product listings in the Resources section in the back of this book.
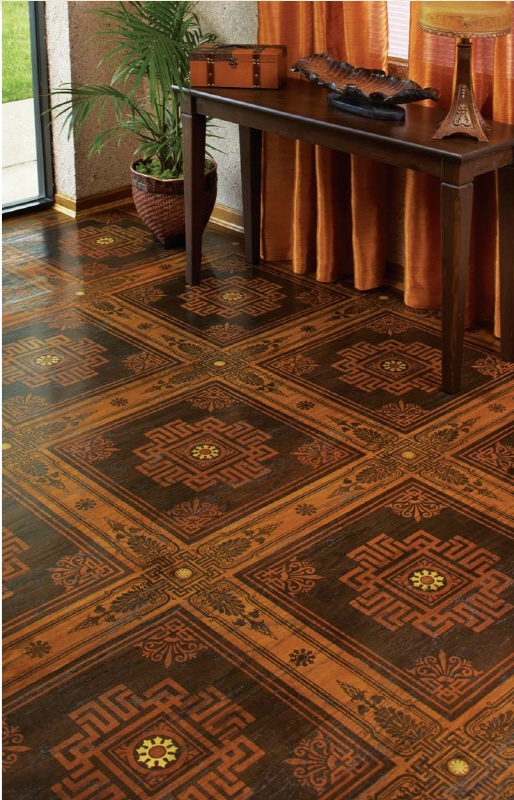
STAINED WOOD MODELLO FLOOR Today’s faux finishes are no longer limited to walls and ceilings. Now you can paint on any surface you want, including floors (indoor and outdoor), furniture, doors, cabinets, and so much more. The stunning floor treatment shown here can be achieved using familiar products like wood stains combined with new techniques like Modello Designs decorative vinyl patterns. You’ll find this floor design demonstrated.
SURFACE INSPECTION
General surface preparation should start with a close inspection of the areas you are painting. You want to look for any nail pops, stress cracks, dings or dents in the walls, previous patch jobs, loose or bad caulking around moldings, flaking or cracking paint, water marks, smoke damage or dirty surfaces. Make sure you do these inspections while the lighting in the room is good, as it is very easy to miss spots in poor lighting. You could also use a halogen lamp and shine it on your surfaces to help find any problem areas. Usually when I am making my inspection, I use small pieces of blue low-tack adhesive tape to mark any areas in need of repair. I also keep this tape by the areas being repaired until the repair work is complete, since it is often hard to see your spackled spots on white walls. Please note that you should not begin repairing the walls until you have completed the room preparation described below.
PROTECT THE FLOORS
Cover the floors with drop cloths. Use butyl rubber-backed drop cloths so paint can’t soak through them. For hardwood floors or wall-to-wall carpet, I cover the baseboards using a tape dispenser and 6- to 12-inch (15cm to 31cm) kraft paper that extends beyond the baseboard to cover the edge of the floor. This saves me a tremendous amount of cleanup in the long run. Even though I put drop cloths over the entire floor, they tend to pull away from the wall, allowing the floor to be exposed to the risk of paint spatters. The paper shield helps protect the floors from paint spatters even if the drop cloth shifts.
PROTECT TRIM & CEILINGS
If I am doing a basecoat, I don’t mask out the trim and ceiling areas. I just carefully cut into them with my cut brush. But if I am applying a decorative paint finish, which can be messy, I protect these areas using 2-inch (5cm) blue tape on the trim and, for the ceilings, either 2-inch (5cm) blue tape or 6-inch (15cm) kraft paper applied with a tape gun and 1-inch (2.5cm) blue tape. I then use a 4-inch (10cm) Whizz roller and roll my basecoat right against the tape. This is much faster than cutting the trim in by hand with a brush.
PROTECT THE FURNITURE
I try to move all small pieces of furniture and pictures out of the room. I throw 9 x 12-foot (3m x 4m) sheets of plastic over all of the furniture remaining in the room. This may sound like a lot of work, but I have found that if you paint often enough, you will spill paint at some point. (For any of my clients who are reading this, I did not spill paint on your job.) However, it is better to be safe than sorry. In my career I have spilled paint dozens of times. But because of my good prep work, I have never had to buy a new carpet or piece of furniture.
SURFACE REPAIR
Once you prepare the room, you can then attend to the areas that need repair. If the walls are extremely dirty or greasy, wash them first. You can use a product like Soilax or TSP (tri-sodium phosphate) to clean the surfaces. Make sure you clean the walls from the floor up to the ceiling. When you clean this way, you avoid streaking the walls with cleaning solution. If you have bare drywall, lightly dust the walls before you prime them to make sure your paint will bond properly to the drywall board.
REPAIR CRACKING PAINT
Next, I scrape off any loose or cracking paint and then use spackling compound and a putty knife to fill any surface irregularities. Most compounds shrink a little, so leave more on the surface to account for this possible shrinkage. Once the areas are dry, sand them with medium to fine sandpaper until smooth. Sometimes it’s easier to feel the texture with your hands than to see it with your eyes. You can spot-prime these areas if there are only a few, but if there are a lot, it’s easier just to prime the whole wall.
REPAIR CAULKING
If the caulking is bad, remove any loose areas and re-caulk with a good tube of paintable acrylic caulking. It is worth buying the better caulking product because it lasts longer than the inexpensive brands.