[8]
Bamboo Noire
DONNA PHELPS
Bamboo Noire is a rich and elegant finish that’s a perfect fit for one of today’s most popular design trends—contemporary tropics. With the look of rare black bamboo and the smooth and shiny texture favored in modern stylings, Bamboo Noire is a great way to create sophisticated drama in a casually chic environment.
MATERIALS
 Basecoat: SetCoat Black
Venetian Gem Black Onyx
LusterStone: Antique Parchment
SoSlow Super Extender
Stain & Seal: Rich Brown
Varnish Plus gloss sealer
Low-tack painter’s tape
2 low nap or seamless foam paint roller covers
Several small polystyrene trowels cut into various widths
Stainless steel trowel
Foam brush
Toweling
Badger brush or other softening brush
Natural Accents Stencil #SB-278 Small Bamboo (2 branches)
 PRO TIPS
1. Extending the Open Time
The addition of SoSlow Super Extender will extend the open (working) time of the Venetian Gem and Luster-Stone, making it easier to manipulate these products during application.
2. Using Two Sets of Stencils Two sets of stencils will provide you with a left and right facing version of each stencil and will give you more design options when stenciling an overall pattern.
3. Stencil Placement Tips
To plan your stencil placement, stencil a right and left facing image of the two stencil patterns on paper, then photocopy each in multiples. Using a low-tack tape at the top of each photocopy, place them around the room in various positions and groupings so that you can visualize the spacing and balance of your overall design. As you work around the room and arrive at each pre-positioned photocopy, just lift the bottom of the copy and slide your actual stencil into position. Gently remove the taped photocopies, taking care to not damage your finish underneath, and you’re off to the races with no funky placements to haunt you later!

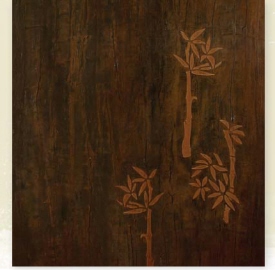
STEP 1: Basecoat your surface with 2 coats of SetCoat Black, allowing it to dry at least 2 hours between coats and at least 24 hours before applying the first layer of the faux finish (the black basecoat can be seen on the right side of the photo). For best results, be sure to use a low nap or seamless foam roller cover.
Add 5 percent SoSlow Super Extender with Venetian Gem Black Onyx and mix well. Using the various sizes of small polystyrene trowels, apply this mixture in a vertically pulled manner (as shown on the left side of the photo). Do this by picking up some of the Venetian Gem Black Onyx and Extender mix on one end of a small poly trowel. Apply that end to your surface and pull down as you offload the material. Alternate the different sizes of the small polystyrene trowels and vary your pressure and the angle at which you hold the trowel to the surface to create the look of bamboo with raised vertical striations and variations in width and texture that will enhance your final finish. Allow to dry completely.
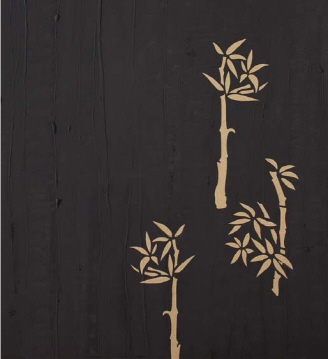
STEP 2: Determine the placement of the bamboo stencils (see Pro Tip #3). After plotting the overall design, position the first stencil and gently adhere it to the surface. Use a small polystyrene trowel to apply the LusterStone Antique Parchment through the stencil, being careful to not overload the stencil with material. Once you have completed the stenciling of that image, anchor it at the top with one hand and gently lift the bottom straight up and away, being careful to not let the stencil slide or drop back in to the wet image. Wipe any residue from the back of the stencil after each use and continue around the room in the same manner. Allow to dry completely before going on to the next step.
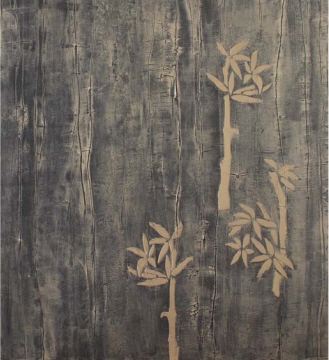
STEP 3: Add 5 percent SoSlow Super Extender with LusterStone Antique Parchment and mix well. Apply a tight skim coat of this mixture using a stainless steel trowel. Do this by loading a small amount to one edge of the trowel, then place that edge against the surface. Move the trowel across the surface at an almost flat angle, offloading the material. After each application stroke, skim off the excess by dragging the edge of your trowel blade along the same line. Use a small polystyrene trowel to remove the halo effect from around the stenciling. Finish each section by running the edge of the trowel vertically down the surface to burnish the highs. Allow to dry completely.

STEP 4: Glaze the surface with a mixture of the following: Stain & Seal Rich Brown + 10 percent extender + 10 percent water. Use a foam brush to apply the mix following the vertical lines of the finish. Remove the excess by stippling with a slightly damp towel. Soften and remove application marks using a badger brush or other softening brush. Allow to dry completely.

FINISH: Spray or roll a finish coat of Varnish Plus gloss sealer. Strive for an evenly applied, moderately wet coat to allow the product to self-level. If rolling on, use a low-nap or seamless foam roller. Allow to dry completely. Repeat if desired and again allow to dry completely.