[9]
Hip to Be Square
MINDY GIGLIO
This technique uses a basic rag finish and a stencil in a way that gives it a more urban, sophisticated appeal. Neutrals combine for a dramatic look that remains simple and pleasing. Luster-Stone is used to add texture and shimmer, yet allows walls to stay clean and fresh looking. The rag technique was used all around the room, while the stencil was added on one wall for drama and a focal point. This technique is neutral in a sense that any color can be brought into the room as an accent color.
MATERIALS
 Basecoat: SetCoat White
“Decodence” two-part overlay stencil and Topper™ from Wallovers™ (Wallovers. com)
Stencil brushes (3)
LusterStone: Snowflake White, Antique Parchment, Champagne Mist, Espresso, Ebony Frost Black
SoSlow Super Extender
2-inch (51mm) low-tack tape
Whizz Rollers (3)
Chip brushes (2)
Stainless steel trowel or Japan scraper
Cotton rags
Buckets in various sizes for thinning LusterStone
Plastic one-gallon grids (3)
Dropcloths
 PRO TIPS
1. Preparing for Stenciling
Prepare the room as you would for any painting job, taping off trim and putting down canvas dropcloths. Decide where you want to start your first stencil overlay, taking into consideration the design repeat and the shape of your walls. I started in the center top and worked around the wall on both sides to allow the stenciled areas time to dry. For example, I stenciled left of center, then moved to the right, then back to the left, etc. so I didn’t have any downtime waiting for the LusterStone to dry.
2. Keep Your Stencils Clean
You will be reusing the same stencils over and over as you work so set up a stencil cleaning station. Cover a table with plastic and have a bucket of water with a green scrubby sponge and some dry rags handy. After each repeat, clean your stencil using the water and sponge, then dry it with a clean rag. If you clean the stencil every time, the LusterStone comes off easily and your stencil stays quite clean. If you wait and use the stencil a few times before cleaning it, the LusterStone builds up and dries on the stencil, making it much more difficult to clean—and to use.
3. Blend Any Lap Lines
Once your rag finish has dried, you can go back over areas with a lightly loaded Snowflake White roller to blend any lap lines.
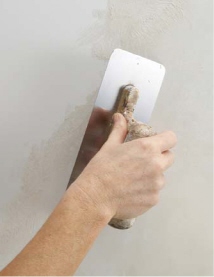
STEP 1: Basecoat the walls with SetCoat White and let dry. Apply a skimcoat of Snow-flake White LusterStone. Thin the LusterStone with water until it has a yogurt-like consistency. Apply the LusterStone to the edge of a stainless steel trowel and pull a tight skimcoat across the surface. Hold the trowel at about a 45° angle to ensure that you get a tight skim and are not leaving too much product on the wall. Lap lines are okay in this step. Let dry.
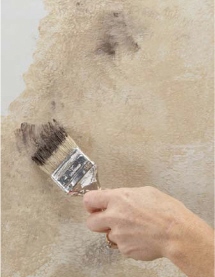
STEP 2: In different buckets, thin Luster-Stone Snowflake White, Champagne Mist, Antique Parchment and Espresso, using water and some extender for a yogurt-like consistency. Start rolling on Snowflake White randomly over the area. Using new rollers, do the same with Antique Parchment and then Champagne Mist. Use a chip brush to add a touch of Espresso LusterStone here and there. Using the roller from the Champagne Mist, lightly roll over the entire area to blend.
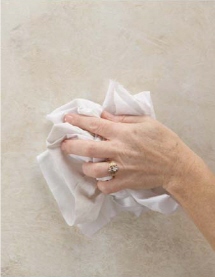
STEP 3: While the colors are still wet, using light pressure and moving quickly, pat the surface with a loosely bunched-up rag while twisting your hand to create movement across the area. Blend the colors, but allow individual colors to still show. You can increase the pressure of your hand to blend more. Feather out your wet edges to avoid lap lines, changing to clean rags often. Let dry. If needed, go over with the Snowflake White roller to blend out any remaining lap lines (see Pro Tip #3).
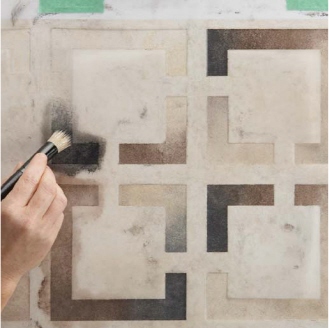
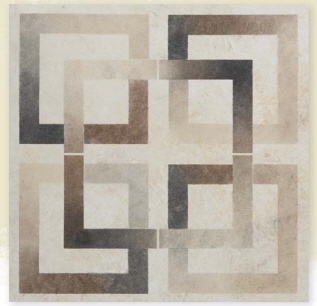
STEP 4: Tape the first stencil overlay to the wall and work on one square at a time. Randomly tap on each of the five LusterStone colors, fading them in and out of each other. Use one stencil brush for the Ebony Frost Black, one for the Espresso, and one for the three light colors. Blot your brushes on a rag to clean as needed.
STEP 5: Continue this until you have completed the entire first overlay. Make sure you keep your LusterStone thinned by adding more to your palette. It tends to thicken up from the stencil brushes absorbing the liquid.

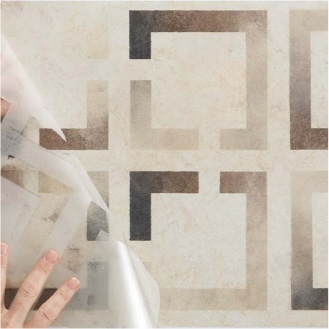
STEP 6: The second overlay is for the large center square that overlaps the four smaller squares. Place the second overlay precisely using the register marks and tape into place.

STEP 7: Tap on the five colors of LusterStone to the second overlay the same as you did for the first one in Step 4. Keep your color pattern random. Step back and check your color pattern to make sure it is pleasing to your eye.
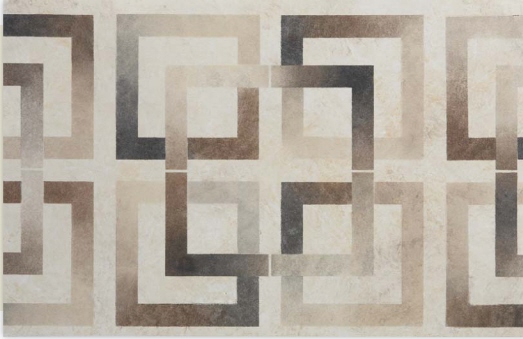
FINISH: Do you see how the large center square fits neatly into the openings on the four smaller squares? Be sure to plan your colors before you start the center square so that the same colors are not overlapping each other. This helps the design to pop, almost as if it were three dimensional.