65
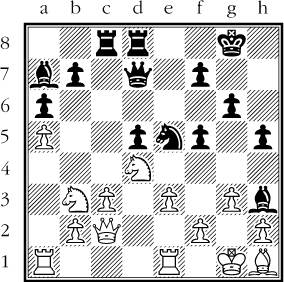
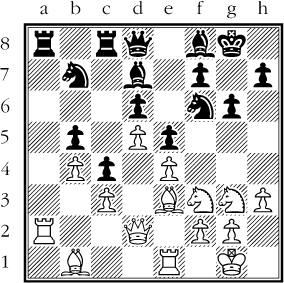
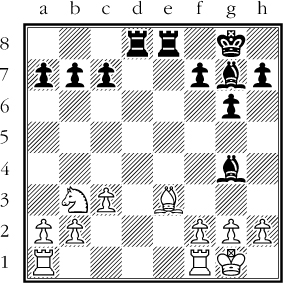
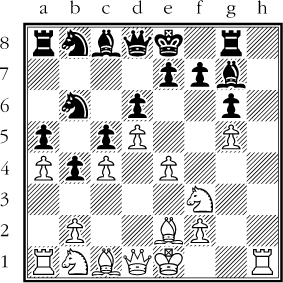
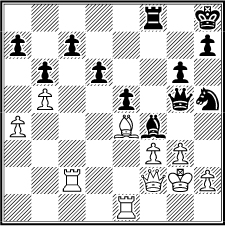
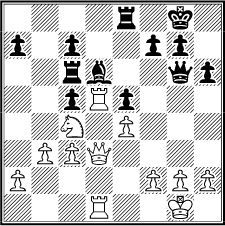
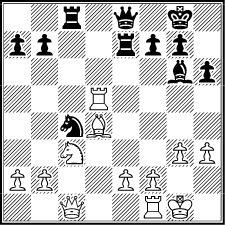
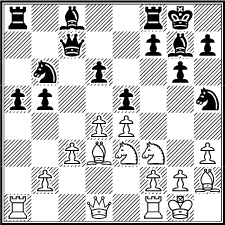
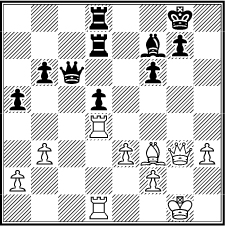
Engqvist – Matros
Stockholm 1998
Black to move
All pieces have a specific task and this is most clearly seen in the manoeuvre. It is particularly in closed or locked positions that manoeuvring skill becomes most important. Other situations are when one of the players has the initiative or more space, since then it’s easier to regroup one’s forces more efficiently.
First the knight’s capabilities are shown, then the capabilities of the bishop, rook and queen. Two examples of king manoeuvring can be found in positions 87 and 88.
Another aspect of manoeuvring involves several pieces where one important concept is the principle of exploiting two weaknesses and playing over the whole board.
65-78: The Knight Manoeuvre
With its exotic way of moving, the knight is the most magical piece on the chessboard and most of us have problems dealing with it optimally. Bronstein wrote that we usually devote our main attention to the long-range pieces (the queen, rooks and bishops) and discover too late the danger of pawns and knights when they have already crossed the fifth rank. “What evidently operates here is the same law as in life, which forces us when crossing the street to keep a constant look out for a speeding cyclist, in order to avoid having an accident.”
Such an “accident” has happened to me more than once and a typical example is the following:
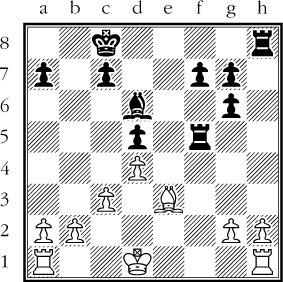
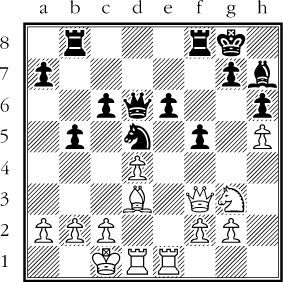
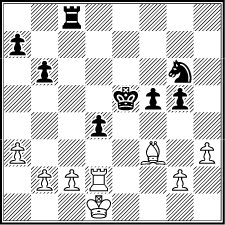
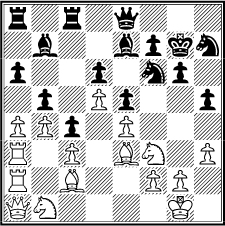
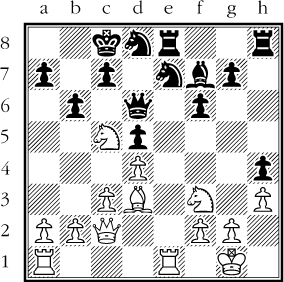
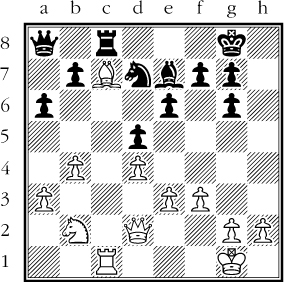
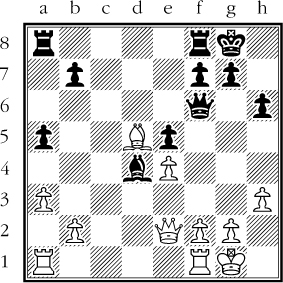
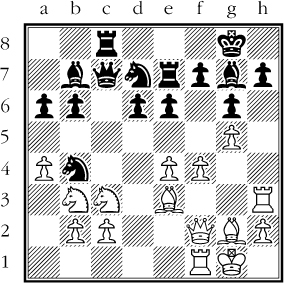
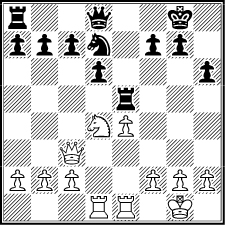
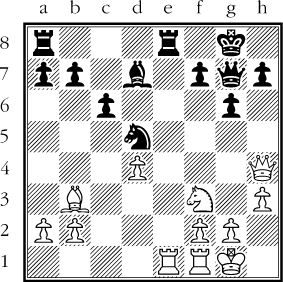
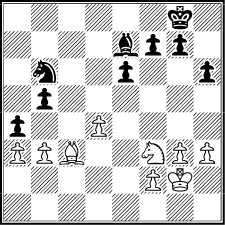
65
Engqvist – Matros
Stockholm 1998
Black to move
Black crossed the “equator”, to use Bronstein’s terminology, with 16...♘b4! and I played 17 a3 expecting something like 17...♘a6, but instead the knight dug deeper with 17...♘a2!!.
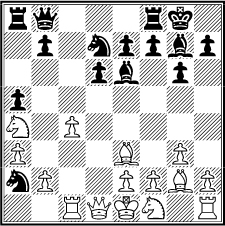
This was obviously a shock to me so I replied 18 ♖c2? My opponent Matros expected me to play 18 ♖a1 and analysed 18...♗xc4 (18...b5 might be more precise.) 19 ♗d4 b5 20 ♗xg7 ♔xg7 21 ♗xa8 ♕xa8 22 ♖g1 bxa4? (22...f6 or 22...♔g8 was correct with excellent winning chances.) 23 ♕d4+ ♘e5 24 f4 with counterplay. 18 ♖b1 might have been the best reply but Black still takes over the game after 18...♗xc4 19 b3 ♗e6 20 ♕c2 b5.
18...b5! 19 ♗xa8?
19 ♘c3 was better.
19...♕xa8 20 f3 bxa4 21 ♕a1
21...♘b4!
This knight is unbelievable!
22 axb4 axb4 23 ♕d1 b3 24 ♖d2 ♘e5
And here comes the other knight – and very fast!
25 ♗d4 ♘xc4
A second knight crosses the equator as well.
26 ♗xg7 ♔xg7 27 ♖d4 ♘xb2
This knight is also placed on the seventh rank.
28 ♕c1 a3 29 ♖h4 and White resigned because of 29...♕a5+ 30 ♔f2 ♕c5+.
The moral of this “accident” is that it’s vital to observe the knight’s movements as early as possible, otherwise it may be too late...
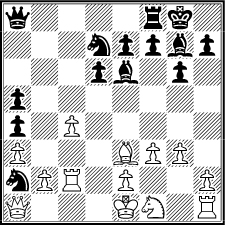
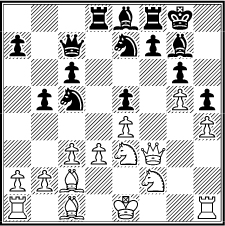
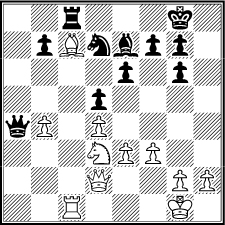
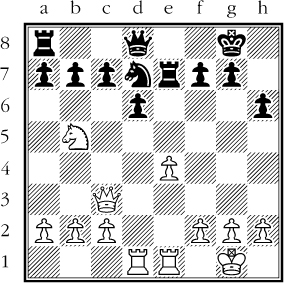
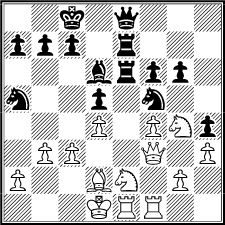
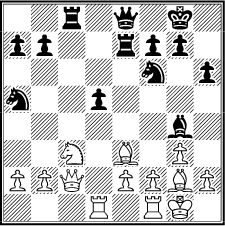
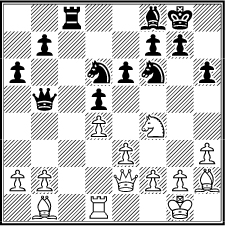
66

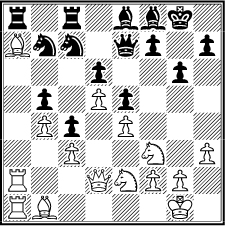
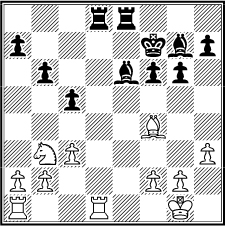
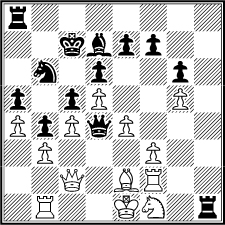
Benko – Stein
Interzonal, Amsterdam 1964
Black to move
A simple form of manoeuvring is when a player seeks to improve the position of a certain piece in a few moves. Stein played 35...♘e8. The knight is better placed on d6 where it not only puts pressure on the e4-pawn and the c4-square but also prepares a future ...f7-f5 at a suitable moment.
One might also say that this manoeuvre is in accordance with Philidor’s principle which states that the mobility of the pawns is the most important factor. This principle is normally valid in closed positions but sometimes also in semi-closed positions like here.
36 ♗g2 ♘d6 37 ♗h3 ♕a2+ 38 ♕c2??
38 ♔f3 would have kept the balance.
It is always important to have a good eye for such tactical shots, especially in time pressure. Stein won the game easily after 62 moves.
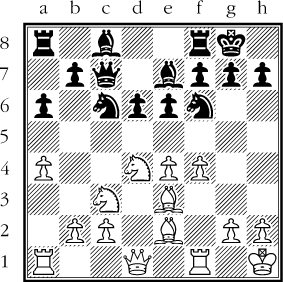
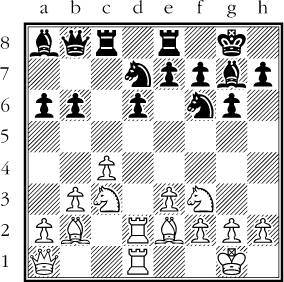
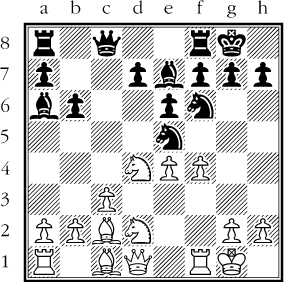
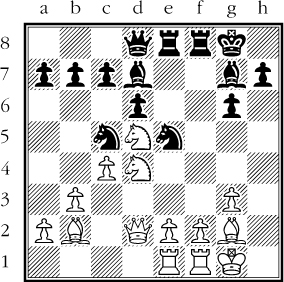
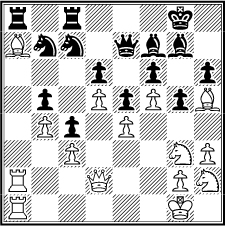
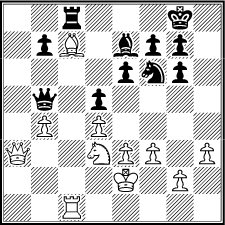
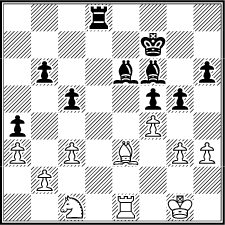
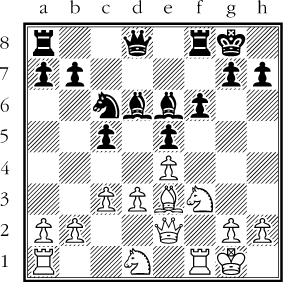
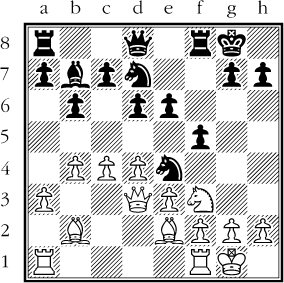
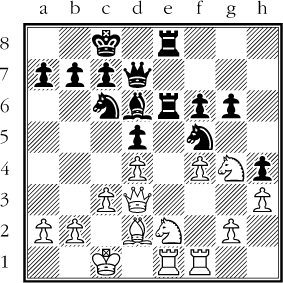
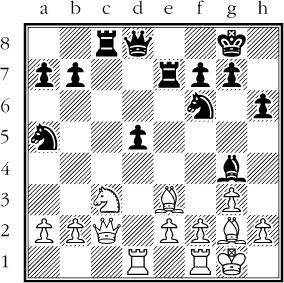
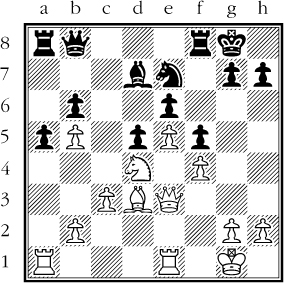
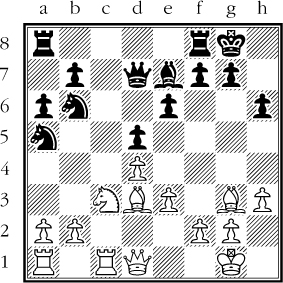
67
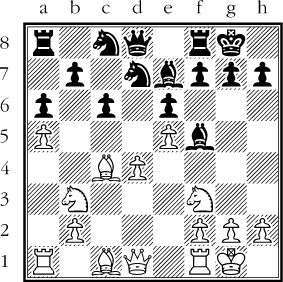
P. Carlsson – E. Agrest
Sweden 2016
Black to move
12...♘a7
Black plans the seemingly slow manoeuvre ...♘a7-b5-c7-d5 but it works, since the game has a closed character and the value of a lead in development decreases.
The game continued 13 ♕e2 ♘b5 14 ♖d1 ♘c7 15 ♘fd2 when the best was 15...♘d5 after which Black has equalised thanks to the well-placed centralised knight.
In the game the inferior 15...b5?! 16 axb6 ♘xb6 17 ♘a5 ♕d7 18 ♘db3 was played with a slight advantage to White. But Agrest managed to win the game anyway after 38 moves.
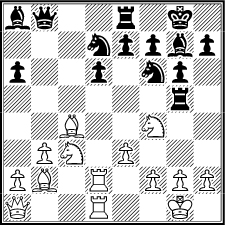
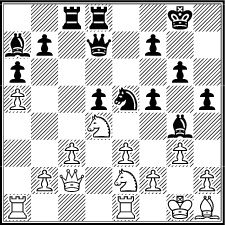
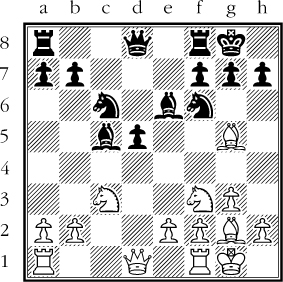
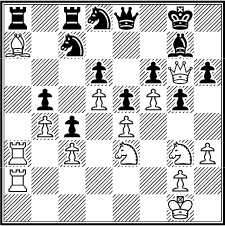
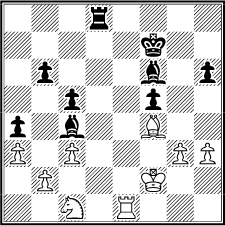
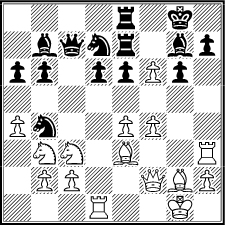
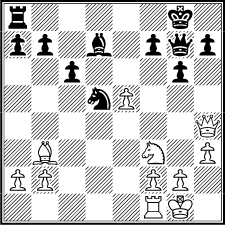
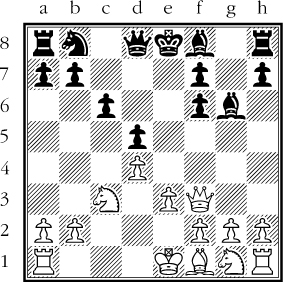
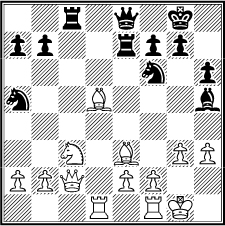
68
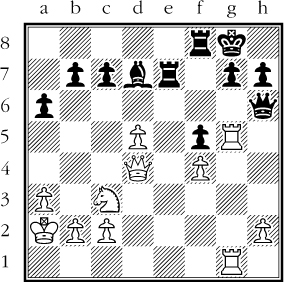
J. Polgar – D. Wood
Hastings 1988
White to move
Judit Polgar played 24 ♘b1!!. Black has a big hole on e5 so the knight manoeuvre ♘b1-d2-f3-e5 isn’t so difficult to find. You need to be familiar with such patterns as well as calculating four moves ahead. Note the really nice preparatory move ♔a2 which vacated the b1-square for the knight.
24...♕f6 25 ♕b4 b6 26 ♘d2 ♖ff7 27 ♘f3 ♖e4 28 ♕d2 ♖fe7 29 ♘e5
Now that the knight is placed on e5 all Black’s counterchances are completely gone.
29...♗b5 30 ♔b1 ♖4xe5?
A natural reaction which shows the strength of the knight but of course doesn’t solve Black’s problems. It would be better to play a waiting game with 30...♗e8 but of course that is easier said than done in the heat of the battle.
31 fxe5 ♕xe5 32 ♖d1 h6 33 ♖gg1 ♕f6 34 ♕f4 ♖e4? 35 ♕xc7 Black resigned.
In Karpov’s most famous game from the Candidates in 1974, against Spassky, Karpov played a similar manoeuvre ♘b1-d2-f3. I’m pretty sure Polgar was already familiar with the idea due to that game. You should look it up if you haven’t already seen it.
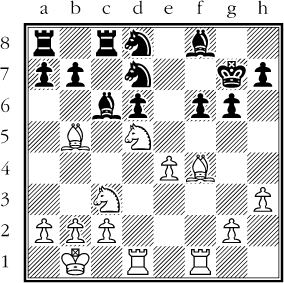
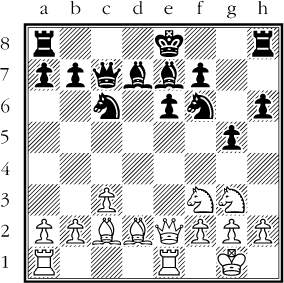
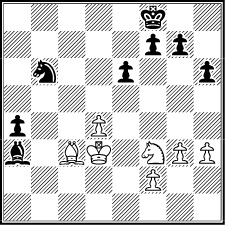
69
Fischer – Mobley
Simultaneous Exhibition,
USA 1964
White to move
Compared with the previous examples 18 ♘e2! represents a slightly more complicated manoeuvre. First of all White manoeuvres his worst placed piece but the dream or long-term plan is to manoeuvre to either the e5 or c5 square. Let’s see how Fischer managed this because for the moment it’s not clear how it can be done.
The game continued 18...♘b4 19 ♔b1 ♘xd3 20 ♖xd3 f4 21 ♖dd1 b4 22 ♘c1!
Now the picture is clearer. Fischer wants to place the knight on b3 or d3.
22...a5 23 ♕e2 ♖f6 24 ♕e5 ♕d8 25 b3 ♖b5 26 ♕e2 ♕a8 27 ♕c4 ♗f5
The moment has come for our hero.
28 ♘d3! ♖d5?
Black should have eliminated the knight with 28...♗xd3. Now the strongest move was 29 ♘e5! with a clear advantage to White.
Instead Fischer played 29 ♘xf4 and won quickly after 29...♗xc2+ 30 ♕xc2 ♖xf4 31 ♖xe6 ♖fxd4 32 ♖xd4 ♖xd4 33 ♖xc6 ♕d8? 34 ♖c8 ♖d1+ 35 ♔b2 a4 36 ♖xd8+ ♖xd8 37 bxa4 Black resigned.
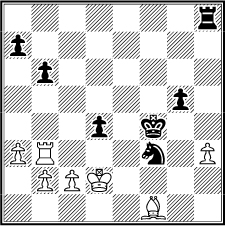
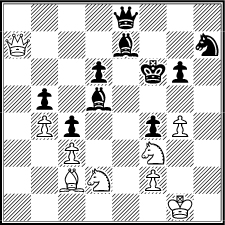
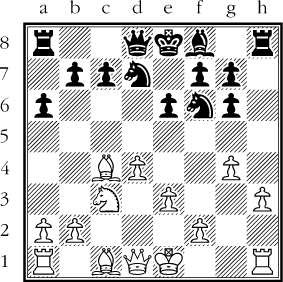
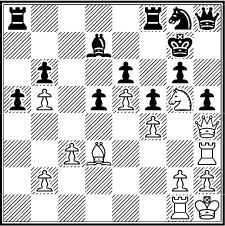
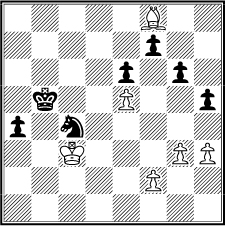
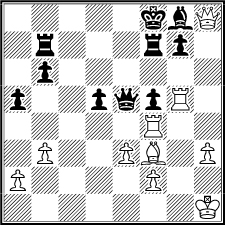
70
Kramnik – Grischuk
Candidates tournament,
Berlin 2018
White to move
The knight isn’t doing anything on f3 so where should it manoeuvre?
18 ♘g5!?
A more conservative move was 18 ♘e1 but Kramnik plans the mini-manoeuvre ♘h3-f4 with an eye on d5.
If Black tries to cut off the knight from the central squares with 18...h6 19 ♘h3 g5?! White responds 20 f3 followed by ♘f2 and then he can enjoy the weakened state of Black’s kingside. The most critical move however was 18...b5!, exploiting the fact that if White takes twice on b5 Black sets up a double threat on g5 and b5 by ...♖c5.
19 ♘h3 b5 20 ♘f4 bxc4 21 ♗xc4 ♖g5!?
Grischuk has been creative and manoeuvred his rook to g5 where it wants to provoke weaknesses on the kingside. However, here it risks becoming cut off. A safer move was 21...♘e5.
22 ♘cd5
Note how active and easy to play White’s position becomes. The battery on the long dark-squared diagonal is opened, exerting positional pressure on the black position.
22...♘e5 23 ♗e2 ♘e4?
23...♗c6 with the idea ...♕b7 was correct.
24 ♖d4 ♘c5 25 h4 ♖f5 26 e4
The computer recommends 26 g4! with a clear advantage but that move introduces glaring weaknesses on the kingside and is apparently not for humans.
26...♖xf4 27 ♘xf4 ♘xe4 28 ♘d5
Kramnik managed to exploit his small material advantage and won after 48 moves in a superbly played game.
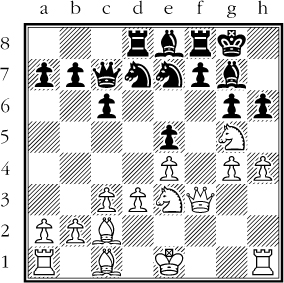
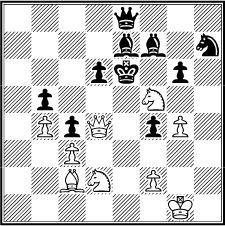
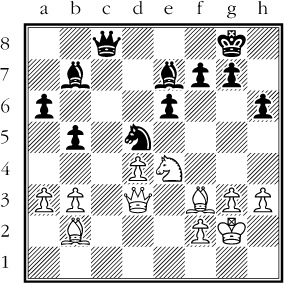
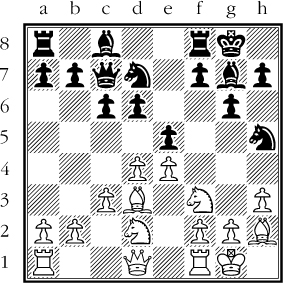
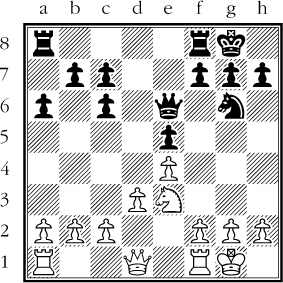
71
Lékó – Kramnik
Budapest 2001
Black to move
Kramnik is especially skilful when it comes to knight manoeuvres so let’s see one more example.
Here he played 22...♘e7!!. What’s going on, since the e4-bishop dominates the knight?
During the press conference Kramnik said that he wanted to be active on the kingside. And what activation! This is an instructive example showing how much kinetic energy a knight really can possess when the circumstances are right. Bronstein once wrote that “what is difficult is to see a knight from afar, when this piece is only preparing for a deep raid into your defensive lines.” We are actually missing the fact that the knight is a long-range piece in slow motion.
23 ♖e2 f5
This is the point.
24 ♗f3
24 ♗d3 obviously allows the strong activation 24...♘d5.
24...g5 25 fxg5 hxg5 26 h3 ♔f7 27 ♔e1 ♔f6 28 ♖d2 ♔e5 29 ♔d1 ♘g6
The knight is on its way...
30 g3?
White creates an unnecessary weakness on the wing where Black aims his attack.
30...♖h8 31 ♗g2 f4 32 ♖d3 fxg3?
Even stronger was actually to return with 32...♘e7!.
33 ♖xg3 ♔f5 34 ♔d2 ♘e5 35 ♗f1?
35 ♗d5 was correct.
35...♔f4 36 ♖b3 ♘f3+
The equator has been crossed with devastating effect. If one compares this position with that in the initial diagram then it can be seen that an incredible metamorphosis has taken place. It’s rare to see a knight manoeuvre like this and one that is so decisive.
37 ♔e2 g4! 38 hxg4 ♖h2+
With the help of the pawn break Black obtained good winning chances and Kramnik won after 133 moves.
72
Steinitz – Lasker
World Championship match,
New York 1894
White to move
Steinitz played the retreating knight manoeuvre:
According to Steinitz’s theories a flank attack can only succeed with a secure centre. Note that the Spanish bishop was previously placed on b3, exerting pressure on f7, and that the knight was placed on g5 in an attacking position. Now these two pieces have the defensive functions of securing the central structure, in particular the d3-square. The flexibility of how to use the pieces, the oscillation between attacking and defending, is typical of Steinitz.
19...b5 20 g5 h5
21 ♘f5!
Now there is a switch from defence to attack. Another passive knight suddenly springs to life as well as the c1-bishop.
21...gxf5 22 exf5 f6 23 g6 ♘xg6 24 fxg6 ♗xg6 25 ♖g1 and Steinitz had a strong attack resulting in a win after 42 moves.
The process of manoeuvring a knight to g5 and then back to h3 is also a modern idea explored in detail by GM Adrian Michalchisin on one of his DVDs about making plans. Among other modern players, Korchnoi has been an exponent of this interesting idea.
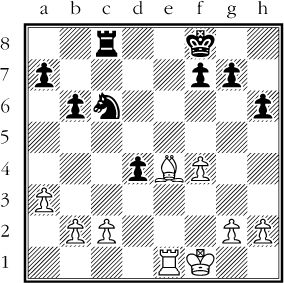
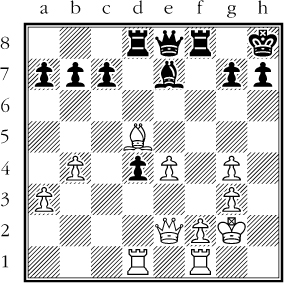
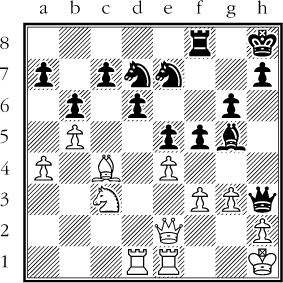
73
Engqvist – Heinola
Stockholm 2008
White to move
According to a famous Russian rule, if it’s not possible to find an appropriate plan one should improve the worst placed piece – because this is an effective mini-plan in itself.
But what to do if you are saddled with two passive pieces as in this position? White’s problem pieces are the rook on a1 and the knight on b3. Which of these pieces ought to be moved?
A classical principle is to move the minor piece before the major piece but of course this must be checked when making calculations. In the game I didn’t play the best move.
I continued with 24 ♖ad1?! when my opponent responded 24...♗g4. While I was thinking whether to play the weakening 25 f3 or the tempo losing 25 ♖a1 my opponent’s cell phone rang so I won the game immediately, in accordance with the strict rules we had for this occasion. I was lucky because Black’s position is to be preferred. The rook move to d1 invited dynamics but these were only in Black’s favour as his bishops are strong, particularly the one on the a7-g1 diagonal.
Correct was 24 ♘e2!
Another solution to the problem was 24 ♘c1! ♗g4 25 ♘ce2 which I missed during the game.
24...♗g4 25 ♘bd4
For some inexplicable reason I completely overlooked this possibility of manoeuvring one of the knights to e2.
White’s position is advantageous from a static perspective and the knight manoeuvre is in accordance with the static nature of the position.
It’s sometimes easy to make routine moves, bringing the rook from the left hand corner into the centre, but on this occasion it wasn’t the best option. What is correct is to manoeuvre the wrongly placed knight on b3 to e2 and this could have been achieved in two different ways! Knights are peculiar pieces indeed and we must always treat them in the way they deserve. This is also the main reason we have several examples with knight manoeuvres.
74
Colle – Capablanca
Carlsbad 1929
Black to move
What to do with the threatened knight when there are several options? Capablanca’s solution was...
13...♘c6!.
Of course Black should pressurise the strong d4-knight. It’s stronger than the bishop on c1. 13...♘d3? is a positional mistake due to 14 ♖f3 ♘xc1 15 ♖xc1 and White is happy as he no longer has to worry about the problem bishop on c1.
14 ♖f3 g6!
This move explains one of the reasons Capablanca didn’t want to place the knight on g6 at move 13. Black is playing in a prophylactic manner against White’s planned e4-e5. 14...♘xd4 15 cxd4 ♗e2 16 ♕xe2 ♕xc2 17 ♖c3 ♕a4 was another option.
15 ♘2b3
15 ♘xc6 ♕xc6 16 f5 ♗c5+ 17 ♔h1 ♘g4 is in Black’s favour. 15 f5 gxf5 16 exf5 e5 17 ♘xc6 ♕xc6 followed by ...♔h8 and ...♖g8 gives Black strong pressure on the g-file.
15...♘xd4
15...d5 was also good.
16 ♘xd4 ♗b7! 17 ♕e2 ♗c5!
A move with multiple ideas. It stops the c1-bishop from coming out and it plans ...♕c6! with strong pressure on the classical diagonal as well as the long diagonal.
18 ♖h3?
18 ♖e3 with overprotection of the e4-pawn was necessary!
18...♕c6!
…and Black won after only 34 moves. After the game Colle uttered the legendary words: “It seems to me I did not make a weak move, but that my opponent played some very strong ones.”
75
Fischer – Spassky
Sveti Stefan 1992
White to move
27 ♘f1!!
The beginning of an extraordinary knight manoeuvre to a3 via d2 and b1. Another way of tackling the position was 27 axb5 axb5 28 ♗a7 (Karpov’s ingenious idea which we will discuss later in more detail.) followed by ♖a5, ♘d2-b1-a3 and the b5-pawn will be difficult to defend in view of the black army’s limited room for manoeuvre.
27...♗e7 28 ♘1d2 ♔g7 29 ♘b1
You often see a Steinitz manoeuvre from b1-d2-f1-g3 but here Fischer does this the other way around, a reversed Steinitz manoeuvre, and that is highly unusual and original!
Spassky was an active player who didn’t like passive positions and that is why the slightly desperate 29...♘xe4!? followed.
You will see more such psychological moves by Spassky when looking at positions 148-149. Spassky wants to sacrifice one of his knights in exchange for smashing White’s strong pawn centre but of course it isn’t correct since White still has his positional pressure.
30 ♗xe4 f5?!
A better continuation was 30...♘f6 31 ♘fd2 ♘xe4 32 ♘xe4 ♗xd5.
31 ♗c2 ♗xd5 32 axb5 axb5 33 ♖a7 ♔f6?
It’s better to manoeuvre the king to the last rank and allow the h7-knight to use this square.
34 ♘bd2 ♖xa7 35 ♖xa7 ♖a8 36 g4!
The king hunt has begun!
36...hxg4 37 hxg4 ♖xa7
Nor does 37...f4 help after 38 ♗e4! fxe3 39 ♗xd5 ♖xa7 40 ♘e4+ and neither does 37...fxg4 due to 38 ♘h2.
38 ♕xa7 f4 39 ♗xf4! exf4
40 ♘h4!!
40 ♕d4+ ♔e6 41 ♗f5+ also won but Fischer’s choice is more aesthetic.
40...♗f7
If 40...♘f8 then 41 ♕d4+ ♔e6 42 ♘xg6 ♘xg6 43 ♗f5+ ♔f7 44 ♕xd5+.
41 ♕d4+ ♔e6
41...♔g5 is answered either by 42 ♘g2 or 42 ♕g7.
42 ♘f5!
42...♗f8
Or 42...gxf5 43 ♗xf5 mate, 42...♗f6 43 ♕xd6 mate, and 42...♔d7 43 ♕a7+ ♔e6 44 ♘g7+.
43 ♕xf4 ♔d7
Or 43...gxf5 44 ♗xf5+.
44 ♘d4 ♕e1+ 45 ♔g2 ♗d5+ 46 ♗e4 ♗xe4+ 47 ♘xe4 ♗e7 48 ♘xb5 ♘f8 49 ♘bxd6 ♘e6 50 ♕e5 and Spassky resigned.
One of Fischer’s immortal games!
76
Engqvist – J. Eriksson
Stockholm 2017
White to move
In this position I unfortunately missed the nice knight manoeuvre:
19 ♘b5!
This concept of a double knight attack on the fifth rank is inspired by the maxim that one should always analyse aggressive variations which lead to a forced entry to the enemy position. This is Fischer’s well-known principle which states that you should only go forward with the pieces, not backwards. With the aggressive knight move White exploits the fact that Black hasn’t yet had time to play one of the moves ...a6 or ...c6 to secure the b5-square.
19...♘e6
19...♗xb5 20 cxb5 leads to a clear positional advantage since f2-f4 will come with a space advantage and more active play. Eventually the c5-knight will be driven away as well after a timely b3-b4.
19...c6? is effectively answered by 20 ♘xd6 ♖e6 (20...cxd5 21 ♕xd5+ would lead to a substantial material advantage since the c5-knight is hanging. If Black places the knight on e6 White captures first on e8 and then on e5.) 21 ♘f4 White has won a pawn for nothing. This variation is the most important and most difficult to foresee since it involves tactical elements.
20 f4 ♘g4 21 ♗xg7 ♔xg7 22 e4 and White has a clear positional advantage.
Remember that knights should move forward in accordance with Fischer’s formula mentioned in position 52!
77
Pomar – Alekhine
Madrid 1945
White to move
Pomar retreated with 19 ♘b3 and that retreat triggered Alekhine to give his student Pomar one really good piece of advice. He said: “There are positions where a combination is obligatory.” The world champion recommended instead 19 b4 and if 19...bxc5 (Alekhine answered 19...♔b8 with 20 ♖eb1 ♔a8 21 ♘a6 c6 with adequate defensive resources but then it would have been more difficult to attack on the kingside.) 20 bxc5 ♕c6 21 ♖ab1 followed by ♗b5 with a very dangerous attack.
Komodo 11 doesn’t agree and mentions 21...a6 with a slight advantage to Black. This correction doesn’t mean that Alekhine’s pedagogic piece of advice was useless, on the contrary. Komodo 11 actually recommends 19 ♘a6 with a slight advantage to White, proving that Alekhine was right after all with his insight that the piece should not have retreated.
After the passive move in the game White’s position lost its sting and following 19...g5 20 ♘h2 ♘e6 21 c4 dxc4 22 ♗xc4 ♔b8 23 ♖ac1 ♘d8 24 ♗xf7 ♘xf7 25 ♕c4 ♘d5 Pomar was outmanoeuvred step by step and Alekhine won after 48 moves.
Alekhine wanted to tell his student that White had to make an important decision: whether to sacrifice the knight with 19 b4, since that was the only way to keep the momentum (energy) in the position, or at worst move the knight. But according to Komodo it was correct to go forward with the knight in the spirit of Fischer.
78
Rubinstein – Tarrasch
Carlsbad 1923
White to move
Rubinstein was a great master of playing against an isolated pawn and he introduced important ideas relating to the appropriate technique. In this classical position he played 11 ♘e1!?. White plans the manoeuvre of the knight to d3 and then to f4 where it pressurises the d5-pawn. It’s not at all mandatory to blockade the isolani with a knight on d4 as Nimzowitsch recommended. A serious alternative option is to follow in Rubinstein’s footsteps and play around the isolani and perhaps even capture the pawn.
The game continued 11...d4 12 ♗xf6 ♕xf6 13 ♘e4 ♕e7 14 ♘xc5 ♕xc5 15 ♘d3 ♕b6 16 ♘f4! ♕xb2?
16...♖fe8 was better.
17 ♘xe6 fxe6 18 ♖b1 ♕xa2 19 ♖xb7 and after 59 moves Rubinstein’s opponent resigned.
This ends the section on knight manoeuvres. We now move on to bishop manoeuvres.
79-87: The Bishop Manoeuvre
Bronstein used to say that “the queen’s bishop will never find a better target than the black g7-pawn.” So here we have a strong argument for 1 b3 if it were not for 1...e5 blocking the diagonal. To find a good diagonal for the bishop, where it can achieve maximum power, is always a matter of adapting to the pawn structure. There is no reason to play, for example, 1 d4 ♘f6 2 ♗f4 if Black can reply 2...d6, literally killing the bishop. So, better to be flexible and play 2 ♘f3 and if 2...d5 then 3 ♗f4.
The first three positions show how the future prospects for a bishop may be improved by a paradoxical retreat of this piece to its starting square. In this way it could well find a more effective diagonal. The next three positions show how to take over a file by placing a bishop on the seventh rank in front of a rook. The last three positions handle a manoeuvre from the classical diagonal to the b1-h7 diagonal, bishops of opposite colour and the bishop pair in a symmetrical position.
79

Andersson – Browne
Naestved 1985
White to move
A bishop manoeuvre to e3 or f4 is a typical idea in the Hedgehog and therefore Andersson played 16 ♗c1! moving back to its original c1-h6 diagonal.
16...♘fe4 17 ♗f4 ♖c8 18 ♘xe4 ♗xe4 19 ♗d6?!
Correct was 19 ♖d2 but if White prefers to manoeuvre his bishop a better try was 19 ♗e5, provoking 19...f6, and only then 20 ♗d6 since the f6-square is not available for the bishop. The exchange of the dark-squared bishops makes it easier for White to exploit the pawn majority on the queenside.
19...♗f6! 20 ♘e5 ♘b7 21 f4 ♘xd6 22 ♖xd6 ♗e7 23 ♖dd1 ♗xg2 24 ♔xg2 f6 25 ♘f3 ♗c5 26 ♖d3 ♖d8 27 ♖ad1
Black’s bishop hampers White’s attempts to mobilise his pawn majority so a draw was agreed.
80
Smyslov – Langeweg
Amsterdam 1981
White to move
30 ♗c1
White plans b2-b3 followed by ♗b2 with pressure against the f6-pawn. This must be a very strong move and you cannot help thinking of Bronstein’s statement: “A bishop, standing on a good diagonal aimed at the opponent’s king, is better than any rook or knight.”
Surprisingly the computer prefers a manoeuvre with the other bishop. After the strong 30 ♗e2! White plans ♗g4 with further pressure on f6. 30...♘f7 (30...h5 31 g4!) is answered by 31 ♗g4 ♘fe5 32 ♗e6. White’s more active pieces decide the game with the main threat being the capture on e5.
30...♘f7 31 b3 ♖ab8 32 ♗b2 ♘fe5 33 a4 a6 34 ♗e2 ♔f7
34...b5 35 axb5 axb5 36 ♘b4 ♗a8 37 ♘cd5 and White has a winning positional advantage.
35 g4 ♔g7 36 a5 ♖d8 37 ♖f2 ♖bc8 38 ♖df1 Black lost on time, but his game was positionally lost anyway, since it’s not possible to save the f6-pawn.
81
Kasparov – Petrosian
Tilburg 1981
White to move
11 ♗f1!
A paradoxical retreat which shows a deep understanding of the requirements of the position. White wants to defend the h3-pawn so it will be possible to castle on the kingside. The bishop will be well placed on g2, observing the long white diagonal, and it will make it more difficult for Black to attack White’s central pawn with ...c5. This clever bishop move helps White to maintain his strong position in the centre.
Kasparov mentions in his annotations that when he stood up from the board after this excellent move, Spassky slapped him on the shoulder saying: “A good manoeuvre!”
It’s noticeable that Petrosian had this position twice with the white pieces but he didn’t play this clever preventive bishop manoeuvre. But, then again, we should remember that Petrosian was famous for his own profound manoeuvring skills. Instead he preferred the space-gaining move 10 g5.
11...c6
Black needs to play a passive move with his c-pawn to neutralise the long white diagonal.
12 ♗g2 ♕c7 13 0-0 ♗e7 14 f4 ♘b6 15 g5
White has a small edge but Black’s position is very solid. Petrosian eventually managed to win the game, which in fact became historic because it featured one of the most famous king moves ever played.
82
Karpov – Unzicker
Olympiad, Nice 1974
White to move
This position arose after the moves 1 e4 e5 2 ♘f3 ♘c6 3. ♗b5 a6 4 ♗a4 ♘f6 5 0-0 ♗e7 6 ♖e1 b5 7 ♗b3 d6 8 c3 0-0 9 h3 ♘a5 10 ♗c2 c5 11 d4 ♕c7 12 ♘bd2 ♘c6 13 d5 ♘d8 14 a4 ♖b8 15 axb5 axb5 16 b4 ♘b7 17 ♘f1 ♗d7 18 ♗e3 ♖a8 19 ♕d2 ♖fc8 20 ♗d3 g6 21 ♘g3 ♗f8 22 ♖a2 c4 23 ♗b1 ♕d8.
Here Karpov played the stunning 24 ♗a7!! – a revolutionary idea which avoids any exchanges of major pieces. Often in the Spanish Game White plays on the kingside while Black gets counterplay on the other flank. But after the original move played in the game Black’s counterplay on the queenside is over. It is an important idea to remember whenever it’s possible to control a file by doubling or tripling.
24...♘e8 25 ♗c2 ♘c7 26 ♖ea1 ♕e7 27 ♗b1 ♗e8 28 ♘e2
White slowly prepares play on the kingside with f2-f4. Black cannot do much and has to adopt a wait and see policy.
28...♘d8 29 ♘h2 ♗g7 30 f4 f6 31 f5
Now White has a space advantage, not only in the centre but also on the kingside.
31...g5 32 ♗c2 ♗f7 33 ♘g3 ♘b7 34 ♗d1 h6 35 ♗h5
It’s fascinating to see how Karpov exploits the edges of the board to achieve his strategic goals. Now Black cannot prevent the exchange of the light-squared bishops.
35...♕e8 36 ♕d1 ♘d8 37 ♖a3 ♔f8 38 ♖1a2 ♔g8 39 ♘g4 ♔f8 40 ♘e3 ♔g8 41 ♗xf7+ ♘xf7 42 ♕h5 ♘d8 43 ♕g6
Only now does White agree to an exchange – when it improves his pawn position. All in accordance with the methods of Capablanca and Fischer!
43...♔f8 44 ♘h5 Black resigned.
A strategical masterpiece by Karpov showing how to manoeuvre with the bishops at the very highest level. Learn the game from the beginning by heart!
What’s so beautiful about chess is that you can steal ideas from its gods without doing anything morally wrong – and that is exactly what I did with my next move 20...♗xh2!.
First I calculated 20...♖xh2 21 ♖xh2 ♗xh2 (21...♖f1+ 22 ♔c2 ♖xa1 23 ♖h7) 22 ♔e2 ♗f4 23 ♖h1 but in both variations I felt White had good chances to draw despite the fact that he was a pawn down. Then I analysed the text move which I immediately associated with the famous bishop move to a7 played in the above-mentioned Karpov – Unzicker game. The point of the move in Karpov’s game was to double rooks on the a-file behind the bishop. Here I was happy to apply the same idea since I wanted to keep the game alive by retaining rooks on the board and playing for an attack.
21 ♔e2 ♖fh5 22 g4 ♖h3 23 ♖af1 f6 24 ♖f3 ♖3h4 25 g5 f5 26 ♔d3 ♗d6
By now I had little time on the clock so I agreed to the exchange of one pair of rooks. A good alternative was 26...♔d7.
27 ♖xh4 ♖xh4 28 b3 f4 29 ♗d2
29 ♗f2 ♖h5 and the g-pawn is lost.
29...♔d7 30 c4 c6 31 cxd5
31 c5 ♗c7 32 ♗e1 ♖h8 33 ♗d2 ♖f8 and Black wins.
31...cxd5 32 b4 ♔e6 33 a4 ♔f5 34 b5 ♔xg5 White resigned.
84
Halkias – Sokolov
Olympiad, Bled 2002
Black to move
23...a5!
White has played in accordance with the Karpov model and tried to take control of the c-file by first blocking it with the bishop deep down the file and then double his heavy pieces behind it. However, the problem is that in this position the concept doesn’t work since Black can just open another file.
24 bxa5 ♗xa3 or even worse 24 ♗xa5? b6 only make Black happy.
24...axb4 25 axb4 ♕a4
The a-file has been opened and Black exploits it while rendering the bishop manoeuvre to c7 completely useless.
26 h3 ♕b5 27 ♔f2 ♖a8 28 ♕c3 ♖c8 29 ♕a3 ♘f6 30 ♔e2?
According to Flear the position would have been equal after 30 ♖c3.
30...♗xb4!
Here the drawback of White’s play is most clearly seen.
31 ♕xb4 ♕xb4 32 ♘xb4 ♘e8 33 ♖a1 ♖xc7
White had to fight hard for a draw but eventually lost. A manoeuvre such as bishop to c7 is only really effective when there is just one open file and the position is locked as in Karpov – Unzicker.
85
Botvinnik – Tal
World Championship match,
Moscow 1961
White to move
35 ♗c4!?
White’s plan is simply to play ♖h1, ♗d3, f4 and e5 with an unstoppable attack. 35 ♗xb7!? wins a pawn but slows down the pace of White’s positional plan. According to Philidor a pawn is worth three tempi in the opening. Here White loses two tempi, one to take the pawn and one to return to base. Philidor’s tempo rule hasn’t the same validity in the middlegame since everything is much more complicated, due to the fact that all the pieces have been mobilised. Yet the question remains whether it is worth two tempi to grab the pawn and apparently Botvinnik didn’t think so.
A flexible move, and probably the most precise, was 35 ♖h1!, keeping Black in the dark somewhat about the light-squared bishop’s intentions.
Botvinnik won quickly after 35...c5 36 b5 ♗f6? (36...a6) 37 f4 d3 38 ♖xd3 ♖xd3 39 ♗xd3 ♗d4 40 e5 g6 41 ♖h1 ♔g7 42 ♕e4 b6 43 ♗c4 Here the game was adjourned but Tal resigned without resuming the game. There is nothing to be done about the march of the e- and f-pawns.
86
Bogoljubow – Alekhine
World Championship match 1929
White to move
Superficially this position looks more equal than it really is since things are not quite what they seem. The reason is the bishops of opposite colours. This means that the player who takes the initiative has an extra piece to play with, since the opposing bishop cannot defend the same coloured squares of his own bishop. 19 ♗xb7? ♖ab8 leads to a position where Black has the initiative after for example 20 ♕a6 ♕xa6 21 ♗xa6 ♖xb2 with pressure on f2. The natural move 19 ♖ac1 only leads to further exchanges after 19...♖ac8. Correct is 19 ♖ad1! planning ♖d3-f3 with pressure on f7.
19...♖ac8 20 ♖d3! ♖c7 21 b3
If 21 ♖f3 then 21...♕b6.
21...b5 22 ♖f3
White is first to exert pressure against f7 since Black doesn’t have corresponding pressure on f2.
22...♕b6 23 a4 bxa4 24 bxa4 ♕b4 25 ♕a2 ♕b2
Alekhine makes a transition to an ending.
26 ♕xb2 ♗xb2 27 ♖b1 ♗d4 28 ♖b5 ♖a7 29 h4 h5?!
Black should keep his pawns on the dark squares.
30 ♖b7!
This exchange is in White’s favour since Black has to take care of two weaknesses on f7 and a5.
30...♖xb7 31 ♗xb7 ♖d8 32 ♗d5 ♖d7
Black’s rook has managed to move from the passive square f8 to a more active one but it remains passive compared with White’s rook, which has more manoeuvrability.
Black’s rook is temporarily trapped and this isn’t a nice position for Alekhine who lacks counterplay. It’s interesting that the computer evaluates the position as 0.00 which only goes to show that computers do not feel either positional or psychological pressure!
35...♔e7 36 g3 ♔d6 37 ♔g2 ♔c7 38 ♗d5 ♔d6 39 f4! f6?
A better defence was 39...exf4 40 gxf4 g6 41 e5+ ♔e7 42 ♔f3 ♔f8.
40 ♗b3?
Stronger was 40 f5! to isolate the h5-pawn by artificial means. With the move played Bogoljubow prepares ♗d1 to put pressure on the h5-pawn. Any ...g6 by Black can be answered by a timely f4-f5.
40...♖a6?
Correct is 40...♗c3!.
41 ♗f7 ♖c6 42 ♖d5+! ♔e7 43 ♗xh5 ♖c5 44 fxe5 fxe5 45 ♗f3! ♔f6
After 45...♖xd5 46 exd5 White is practically two pawns up since the e5-pawn doesn’t mean anything. The possibility of creating two passed pawns is normally enough to win endings with bishops of opposite colours as we will see later in the endgame section.
46 ♖d6+
46 ♖xc5? ♗xc5 is obviously a draw.
46...♔e7 47 ♖g6 ♔f8 48 ♗h5! ♗e3 49 ♔f3 ♖c3 50 ♔e2?
50 ♖e6 g5 51 ♔g4 gxh4 52 gxh4 is winning.
50...♗c5?
Bogoljubow suggested 50...♗d4! with drawing chances.
51 ♖e6!
White wins another pawn so the game is effectively over. It concluded:
51...g6 52 ♗xg6 ♖e3+ 53 ♔d1 ♖xg3 54 h5! ♔g7
Black must prevent h5-h6.
55 ♖xe5 ♗b4 56 ♔e2 ♖a3 57 ♗e8 ♖h3 58 ♗d7 ♖c3 59 ♖e6 ♗f8 60 ♖a6 ♗b4 61 h6+ ♔f7 62 ♗e6+ ♔f6 63 ♗f5+ ♔f7 64 ♖a7+ ♗e7 65 ♖xa5 ♖c2+ 66 ♔d3 ♖b2 67 h7 ♗f6 68 e5 ♗g7 69 ♖a7+ ♔f8 70 e6 ♗e5 71 e7+ Black resigned.
A very instructive example which shows how to play with bishops of opposite colours. Even a small initiative means a lot between humans, especially if the defending player isn’t up to the task.
87
Englisch – Steinitz
London 1883
Black to move
Here Steinitz showed that if Black has the bishop pair in a symmetrical position with an open centre, there is a three-step-plan to exploit his advantage. Black’s main goal is to immobilise White’s minor pieces, especially the knight.
Step 1 is to remove the outposts from the knight, in this case the d4-square.
Step 2 is to drive the knight to a passive position with the help of the rook pawn.
Step 3 is to open the game and exploit the passive knight.
Steinitz played 17...b6!.
This important move immobilises the bishop on the e3-a7 diagonal while the b3-knight cannot go to c5 or a5.
18 h3 ♗e6
Notice how both bishops exert pressure on the white queenside.
19 ♖fd1
19 ♘d4 would have been met by 19...♗c4 followed by ...c7-c5.
19...c5!
This move concludes step 1 in the three-step-plan laid down by Steinitz. The white knight can no longer reach the outpost in the centre.
20 ♗g5 f6!
It doesn’t matter that Black’s king’s bishop for the moment is temporarily passive. The main mission is to immobilise White’s minor pieces.
21 ♗f4 ♔f7
A typical advantage of the bishop pair is that it’s often easier to activate the king than it is for the defender in this type of position. If White’s king goes to f1 Black can check on c4 and if White prepares f3 and ♔f2 White must look out for a check on e2 by a rook defended by a bishop on c4.
22 f3 g5!
White’s bishop is immobilised on the c1-h6 diagonal as well.
23 ♖xd8 ♖xd8 24 ♗e3 h6 25 ♖e1 f5!
Black opens the long diagonal for his bishop and threatens the positionally desirable ...f5-f4.
26 f4 ♗f6 27 g3 a5!
This is the initiation of the second phase in the three-step-plan: to immobilise White’s knight. Black’s threat is to play ...a4 followed by ...a3 when White’s queenside pawns will be destroyed.
28 ♘c1 a4 29 a3
29...♗c4!
This is also a typical move in positions where the bishop is stronger than the knight. Black’s c4-bishop dominates the c1-knight. This ends step 2. Step 3 is to open the position and exploit Black’s more active position.
30 ♔f2 gxf4
A more typical plan was 30...♖d5 to prepare the decisive break ...b5-b4. Nevertheless Steinitz’s continuation is good enough since all kinds of open positions benefit Black who has a superior position where the bishop pair is a decisive factor.
31 ♗xf4
31...♗g5!
One advantage of possessing the bishop pair is that it’s easy to decide when it’s time to make a profitable exchange. It’s not necessary to retain the bishop pair to the end, since sometimes it is important to take advantage of its dynamic function. If Black wanted to keep the two bishops he could always have played 30...♖d5 instead.
32 ♗xg5 hxg5 33 ♔e3 ♔f6 34 h4
34 ♖h1 ♔e5 followed by ...f5-f4 decides the game in Black’s favour since the rook enters d2 after the check with the pawn.
34...gxh4 35 gxh4 ♖e8+ 36 ♔f2 ♖xe1 37 ♔xe1 ♔e5
White’s distant passed pawn is effectively neutralised by Black’s active king.
38 ♘e2 ♗xe2 39 ♔xe2 ♔f4 40 c4 ♔g4 41 ♔e3 f4+ 42 ♔e4 f3 43 ♔e3 ♔g3 White resigned.
This is a very important model game showing how to play and win with the bishop pair. There is another quality game between Rosenthal – Steinitz, Vienna 1873, which the reader should study as it illuminates the same three-step-plan. Don’t miss it!
This ends the section handling manoeuvring with minor pieces. We now move on to major pieces, beginning with the rook.
88-98: The Rook Manoeuvre
The rook is probably the most difficult piece to manoeuvre. In the beginning of the game and in the early middlegame it’s sometimes impossible to know where the rook is best placed from a long-term perspective. In the endgame there are many open files and ranks and it’s not always easy to calculate the correct continuation.
88
Kovačević – Seirawan
Wijk aan Zee 1980
Black to move
If players like Ivanchuk and Shirov seem to come from another tactical planet the same could be said about Seirawan regarding his positional play. It looks like White is controlling the h-file but in reality it’s Black who will take over that file after the highly original 14...♔d7!!.
This creative move prepares not only ...♖h8 but also a king manoeuvre to c7 with the result that Black’s position becomes more harmonious.
The game continued:
15 ♘bd2 ♖h8 16 ♖g1 ♔c7 17 ♖b1 ♖h3 18 b3 ♕h8 19 ♘f1
19 ♗f1 was stronger.
19...♘8d7 20 ♗f4 ♘e5 21 ♘xe5 ♗xe5 22 ♗xe5 ♕xe5
Black’s queen and rook dominate the position.
23 f3 ♗d7 24 ♕c2 ♕d4 25 ♖g2 ♖h1 26 ♖f2
26...♕h8
The trivial 26...♗h3 was better but remember Seirawan is from another positional planet!
27 ♕d2 followed by ♕e3 was a better defence.
27...♕h4 28 ♖d1 f6 29 gxf6 exf6 30 e5 fxe5 31 fxe5 ♖f8 32 exd6+ ♔b7 33 ♗d3 ♖e8+ White resigned.
Seirawan and Petrosian must be regarded as the most original players when it comes to handling their king.
89
Blackburne – Nimzowitsch
Saint Petersburg 1914
Black to move
14...♖e8!
The idea of this mysterious rook move is to make it harder for White to play d3-d4.
15 ♘h4 ♗f8 16 ♘f5 ♔h8 17 g4 ♕d7 18 ♘f2
18 g5 g6 19 ♘h4 f5!.
18...a5 19 a3 b5 20 ♖ad1 ♖ad8 21 ♖d2 b4 22 axb4 axb4 23 c4?
White gives up the d4-square without any fight.
Now the strongest continuation according to Nimzowitsch was 23...g6 24 ♘h4 ♘d4! 25 ♗xd4 exd4 followed by ...♗h6.
90
Bronstein – Petrosian
Moscow 1967
White to move
Bronstein played the mysterious rook move 16 ♖ac1.
Petrosian replied 16...♘d5. The idea behind White’s 16th move is made very clear in the variation 16...g4 17 ♘d4, since the c2-bishop is defended after a black trade on d4.
17 b4
This pawn advance was also made possible by the prophylactic rook move.
17...♘f4 18 ♗xf4 gxf4 19 ♘f5 ♗f8
Or 19...exf5 20 b5.
20 b5 ♘e7 21 ♘xe7 ♗xe7 22 ♘e5 ♗d6 and now the best was 23 ♕h5 ♗xe5 24 ♖xe5 ♕xc3 25 ♖c5 with a clear advantage.
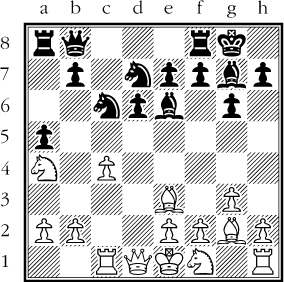
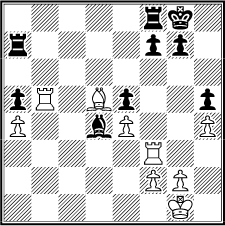
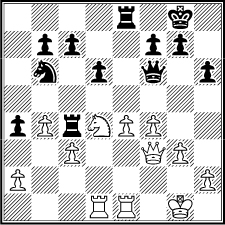
It’s not easy to decide how to develop the rooks in this position. Black wants to expand on the queenside with ...b7-b5 very soon and then b8 would be an attractive square. But if …b7-b5 is met by axb5 you want a rook on a8. The c-file is semi-open and so it’s natural to place a rook on c8. The d8-square also looks useful since most of the time it’s good to have a rook behind a central pawn, especially if it advances. Black can prepare either ...d6-d5 or ...e6-e5 and also be ready in case White plays e4-e5. The e8-square is also interesting since Black can counter White’s f4-f5 advance and prepare ...e6-e5 when the pawn is placed on f4. It’s also good to have a rook on f8 when White goes for g4-g5, since the break ...f7-f6 might become important.
Kasparov played 11...♖e8!. In this position it makes sense to place the rook on e8 in accordance with the general rule that rooks are effective behind advancing pawns.
12 ♗f3 ♖b8
Black moves the rook away from the long white diagonal and prepares a future ...b7-b5.
13 ♕d2 ♗d7 14 ♘b3 b6 15 g4 ♗c8
The bishop evacuates the d7-square for the knight and prepares a later ...♗b7.
16 g5 ♘d7 17 ♕f2 ♗f8 18 ♗g2 ♗b7 19 ♖ad1 g6 20 ♗c1 ♖bc8
The rook no longer has any function on b8 but according to Kasparov it’s a pointless waiting move. He wants to improve with 20...♘c5 hoping for 21 ♘xc5 bxc5 when the rook is well placed on b8.
21 ♖d3 ♘b4 22 ♖h3 ♗g7 23 ♗e3 ♖e7! 24 ♔g1
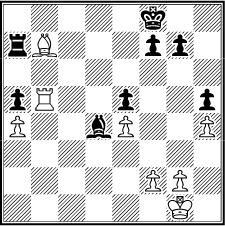
92
Black to move
24...♖ce8!!
Black understands that White wants to break through with f4-f5 and so prepares to make this less appetising by doubling rooks on the e-file. It’s an unbelievable rook manoeuvre never to be forgotten. It might seem strange to double rooks on a closed file but this is how to use rooks at a higher level. Incredibly skilful play by Kasparov even if it’s a slight exaggeration to claim that he became World Champion because of his ability to play with the rooks! Interestingly, though, Kasparov attached the punctuation ?! to his move and sought to improve with the immediate 24…f5.
25 ♖d1
25 ♕h4 ♘f8 is nothing for White.
25...f5! 26 gxf6
26 exf5? exf5 obviously activates both Black’s rooks.
26...♘xf6!?
Kasparov believes that this unexpected pawn sacrifice won the match rather than his skilful play with the rooks. Objectively speaking, 26...♗xf6 was safer, but perhaps it would not have won the game. This is what calculated risk is all about!
27 ♖g3 ♖f7!
Black’s rook no longer has any function on the e-file and so moves to the f-file. Observe Kasparov’s flexibility with the rooks and how he always adapts to new situations arising on the board.
28 ♗xb6 ♕b8 29 ♗e3 ♘h5 30 ♖g4 ♘f6 31 ♖h4? g5! 32 fxg5 ♘g4 33 ♕d2 ♘xe3 34 ♕xe3 ♘xc2 35 ♕b6 ♗a8 36 ♖xd6?
38 ♕xb8 ♖xb8 was better with mutual chances.
36...♖b7!
Black’s king’s rook triumphs and decides the game. This encounter secured the World Championship title for Kasparov.
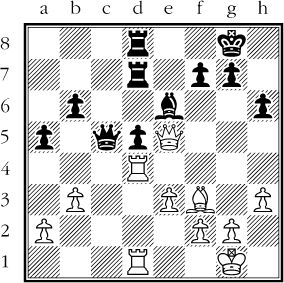
93
Gelfand – Illescas
Madrid 1996
Black to move
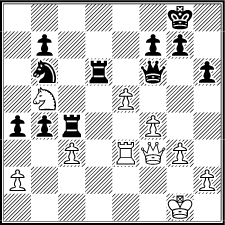
White can play for c4-c5 to open files on the queenside or d4-d5 to immobilise the black bishop and activate the knight on d4. It’s also possible to manoeuvre the knight to d2 and trade it for Black’s centralised knight.
12...♖f6!
A strong attacking plan which prepares the rook manoeuvre to h6. Since Black has an attack in mind against White’s king one can, in accordance with Suetin’s principles, say that the middlegame starts exactly here.
The normal plan is 12...♕e7 followed by ...e5 with play in the centre. 12...g5? followed by ...g4 is far too risky since it weakens the kingside too much.
13 d5 ♖g6!
13...e5 is met by 14 ♘h4!.
14 dxe6
14 ♘e1 or 14 ♘d4 were the alternatives.
14...♘f8! 15 c5
15 ♘e1!?
15...♘xe6 16 cxd6 cxd6 17 ♖ad1 ♔h8 18 ♘e1??
A natural but fatal move! 18 ♔h1 should have been played.

18...♘6g5!
White cannot stop the knight from coming to h3 with decisive effect.
19 ♔h1 ♘h3!
...and White resigned due to 20 gxh3 ♘xf2 mate.
94
Tarrasch – Lasker
World Championship match,
Düsseldorf/Münich 1908
Black to move
Black’s position looks rather inconspicuous and is a good example of how one can turn “nothing” into “something” with the help of piece activity. Lasker played the impressive move 15...♖e5!.
This is the most active as well as the best move, at least from a psychological point of view. It represents the second phase of development where some of the pieces try to penetrate deeper into the position. This is normally something for the knight but here this mission is accomplished by the rook which seeks play on the rank rather than the file. There were several candidate moves such as 15...♘c5 (the computer’s preference) 15...♘f8, 15...♘b6 and 15...a6 with the cheapo 16 ♘xc7?? ♖c8. However, all of these continuations must be regarded as slightly more passive than Lasker’s choice. Lasker understood very well the value of using the rook along the rank, especially when playing against mere mortals!
16 ♘d4
The point of Black’s original and creative rook move wasn’t just to protect the c7-pawn (16 ♘xc7?? ♖c5) but also to be able to play:
16...♖c5!.
A very thoughtful concept by Lasker. White already has two rooks in play and Black tries to compensate for this by playing actively with his only developed rook and by using the e5-square as a pivot (manoeuvring square). Black’s e-file is actually longer than White’s and this fact is exploited to the maximum by Lasker.
17 ♕b3 ♘b6
The knight helps to create an outpost for the rook on c4.
18 f4
Tarrasch plays according to classical principles and tries to cut off the rook from the centre, the e5-square. However, Lasker, who played beyond the classical principles developed by Steinitz and Tarrasch, has other plans for this rook. 18 ♖e3 could have been met by 18...♕e8 19 ♘f5 ♔h7.
18...♕f6 19 ♕f3 ♖e8
Black’s rook number two is in the first phase of its development but here it shows itself to be useful by exerting pressure on the centre.
20 c3 a5 21 b3 a4! 22 b4 ♖c4
With imaginative play Lasker has created a perfect outpost for his rook where it can apply pressure on the c3-pawn and eventually also on the e4-pawn after an appropriate pawn push ...c7-c5.
23 g3
23...♖d8
Black prepares ...c7-c5 but releases the pressure on the e4-pawn. An immediate 23...c5? is premature because of 24 ♘b5 with a clear advantage to White. 23...♕e7!? or 23...♕g6!? were playable moves with a focus on e4. 23...a3!? was also interesting, planning to exert pressure on c3 after ...♘a4.
24 ♖e3?
24 ♕d3 or 24 ♖d2 was better with a small advantage to White.
Now Lasker takes over the game.
25 ♘b5?!
25 ♘c2 or 25 bxc5 with an equal game was better.
25...cxb4 26 ♖xd6?
25 ♖ed3 is better.
26...♖xd6 27 e5
27...♖xf4!
It’s significant that Lasker decides the game with the same rook he has managed so creatively. Presumably it was this move that Tarrasch overlooked with his 24th, 25th or 26th move.
28 gxf4 ♕g6+
...and Lasker won the game after the further moves:
29 ♔h1 ♕b1+ 30 ♔g2 ♖d2+ 31 ♖e2 ♕xa2 32 ♖xd2 ♕xd2+ 33 ♔g3 a3 34 e6 ♕e1+ 35 ♔g4 ♕xe6+ 36 f5 ♕c4+ 37 ♘d4 a2 38 ♕d1 ♘d5 39 ♕a4 ♘xc3 40 ♕a8+ ♔h7 41 ♔h5 a1♕ White resigned.
95
Gligorić – Stein
Lvov 1962
Black to move
Stein was a true master when it came to reaching positions with strong tensions. Superficially it might seem that White’s passed pawns on c4 and d5 are more dangerous than Black’s on d4 and e5, since the bishop on e4 helps to blockade them and can support its own with the c4-c5 push at the right moment. However, it’s not that simple. The natural continuation 18...♖ac8 19 b3 b5 has no point after 20 ♖ac1 bxc4 21 bxc4 ♗xe4 22 ♕xe4 ♖xf1+ 23 ♖xf1! ♕d6 24 ♖c1 and White’s pieces are better than Black’s.
Stein played 18...♖f6! planning a doubling of the rooks and increasing the tension on the f-file.
19 ♖f3! ♖af8
This is where the black queen’s rook really belongs, behind its colleague on the f-file, rather than the c-file.
20 ♖af1 h5 21 c5
21 ♗g5 leads to an equal game after 21...♗xe4 22 ♕xe4 ♖xf3 23 ♖xf3 ♖f5!. Note how Black retains the tension with the rook. However, if White releases the tension this would leave Black with positional gains.
21...♕b5!
A beautiful positional move, threatening to win with ...d4-d3.
22 ♗xf5
22 a4 ♗xe4 23 ♕xe4 ♖xf3 24 ♖xf3 and the position will be equal no matter which pawn Black chooses to take
22...gxf5 23 ♗g5
23 ♖xf5?? d3.
23...♖6f7 and Stein won this highly dramatic game after 57 moves.
96
Bologan – Ruzele
Kramatorsk 1989
White to move
As a rule, positions where White has an isolated d4-pawn versus a c6-pawn are better for White than playing with an isolani against an e6-pawn. The main reason is that White’s bishop, stationed on the classical diagonal, has greater scope all the way to the vulnerable f7-pawn. If Black places his knight on d5 the bishop can switch to the b1-h7 diagonal. White can easily exploit the open e-file and use the e5-square as an aggressive outpost. Despite the fact that Black has the open c8-h3 diagonal at his disposal the bishop is often unable to find a suitable square.
Bologan played the strong 21 ♖e5! which provokes an exchange as the rook is in a strong position where it threatens a doubling of rooks as well as taking twice on d5.
21...♖xe5
21...f6 22 ♗xd5+ cxd5 23.♖xd5 ♗c6 24 ♖d6 ♗xf3 25 gxf3 and White has a sound extra pawn.
22 dxe5
White has used Philidor’s method to improve his pawn structure, i.e. the outpost on e5 was exploited to make possible an exchange which at the same time improved his pawn structure. White’s isolated pawn is certainly artificially isolated on e5, since it is far advanced compared with his other pawns, but it’s easy to protect on e5 and it has an aggressive position which offers dangerous outposts on f6 and possibly d6. White’s next goal is to manoeuvre the knight to f6.
22...♗e6 23 ♖e1
The e5-pawn is overprotected to make the mini-manoeuvre ♘g5-e4 possible.
23...h6 24 ♘d2
The preparation for the decisive manoeuvre to f6 (d6).
24...♕f8 25 ♘e4 ♕b4 26 ♖e3 ♔g7
26...♘xe3?? 27 ♘f6+ and White wins the queen.
27 ♗xd5 cxd5 28 ♕f6+ ♔g8 29 ♘d6 ♕b6 30 ♖g3
White is threatening a sacrifice on g6.
30...♔h7 31 ♘xf7 ♖g8 32 ♖xg6! Black resigned.
Note that the principal reason why all White’s pieces ended up so aggressively placed originated with his 21st move.
97

Reinhardt – Lombardy
Mar del Plata 1958
Black to move
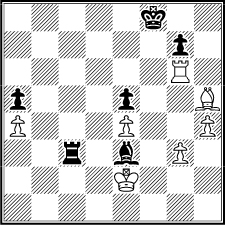
If we ignore the d4-square White has in principle only one other possible weakness and that is the a2-pawn. Black’s general plan is therefore to play ...♖a6 followed by ...♖a4 and ...♕a5 to force b2-b3. After that Black can prepare the break ...a5-a4.
16...♖b6! 17 ♖c1 ♖a6
Many chessplayers have discussed this remarkable idea of Lombardy but it actually originates from the chess master Sidney Bernstein.
18 b3?
It’s better to go back with the rook. One plausible sequence according to Lombardy is 18 ♖a1 ♘d4 19 ♗xd4 ♗xd4 20 ♘e3 ♗g7 21 f5 ♖a4 22 g5 f6 and the game is in a state of dynamic balance. Black will at the right moment play his queen to a5 to force b2-b3. The whole point of Black’s play is to make the a2-pawn a problem for White.
18...♘d4 19 ♗xd4 ♗xd4 20 ♖c2 ♖a3! 21 ♘e3 a5 22 g5 a4 23 f5 axb3 24 axb3 ♖xb3
Black has broken through and won a pawn, whereas White’s attack isn’t at all dangerous.
The game concluded: 25 ♘g4 ♖a3 26 h4 b3 27 ♖b2 ♕a5 28 ♘h6+ ♔g7 29 ♖bb1 b2 30 fxg6 hxg6 31 ♕f3 ♗e5+ 32 ♔h1 ♖a1 33 ♖bd1 ♕b4 34 ♖b1 ♕d2!
Black is approaching White’s king via the queenside.
35 ♕d1 ♖xb1 36 ♕xb1 ♗h3 37 ♖g1 ♕f4 White resigned.
It should be mentioned that this plan impressed Fischer so much that he used it in one of his own competitive games.
98
Carlsen – Ivanchuk
Foros 2008
White to move
28 ♖a1!
Carlsen believes the rook belongs on a2 where it can prepare a4-a5 and manoeuvre to c2 in some variations. This last mentioned idea to get out of the firing line of the bishop on the h6-c1 diagonal, stems from a game Petrosian – Gufeld, played in the Soviet Championship 1960. In that game Petrosian kept clear of the opponent’s dark-squared bishop along the h6-c1 diagonal by playing the moves a2-a4, b2-b3, ♖a1-a2-c2, ♖f1-b1-b2. Notice that by playing on the second rank with the rooks, the last rank is “removed” and so the board is reduced to seven ranks instead of eight. It’s because of such model examples that Carlsen, with his extraordinary memory, can make use of the most important classical ideas from the past.
The game continued 28...♕h6 29 ♖a2! ♘f6?!
Ivanchuk didn’t realise the danger on the c-file because it’s important to block it with a timely ...♘c5.
30 ♔g2 ♘h5?!
30...♘d7 is better.
31 ♘d5! ♘xd5 32 ♗xd5 ♗f4 33 ♕f2 fxe4 34 ♗xe4 ♕g5 35 ♖c2!
35...d5?
35...♖f7 was the best but White has the incredible beautiful bishop manoeuvre 36 ♗b7!! with the idea of ♗c8. Note that White exploits the fact that Black has reduced the board to seven ranks.
36 ♗xd5 ♗xg3 37 hxg3 ♘f4+ 38 ♔f1 ♘xd5 39 ♖ce2! ♕f6
39...♖f5 is answered by 40 g4 or 39...♖e8 by 40 f4.
40 ♖xe5 ♕xf3 41 ♕xf3 ♖xf3+ 42 ♔e2 ♖f5 43 ♖xf5 gxf5 44 ♔d3 c5 45 ♖e5 ♘b4+ 46 ♔d2 Black resigned.
Let’s now move on to queen manoeuvres.
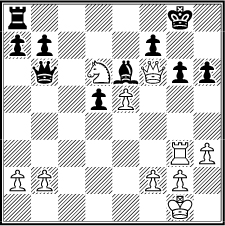
99-102 The Queen Manoeuvre
The queen is the strongest tactical piece on the board and therefore it’s a good idea to centralise it whenever possible. When there are no targets around it must be content with controlling a file and acting like a rook, or controlling a diagonal and assisting or replacing a bishop. However, when there are targets like unprotected pieces, weak pawns or an exposed king, it shows its teeth and then you think: this isn’t a queen, it’s an octopus.
99
Petrosian – Barcza
Budapest 1955
White to move
9 ♕d1
Clarke wrote in his comments: “Such a move shows a far greater understanding than any brilliancy. The queen has already fulfilled its purpose in going to f3 and has nothing else to do there.” The queen goes back to d1 to help defend the weakened queenside. The natural developing move 9 ♘ge2 might have been answered with 9...♘d7 when White has to figure out how to meet ...♕b6.
9...♕b6 10 ♕d2 ♘a6 11 ♘f3 0-0-0 12 a3
The preparation of a minority attack on the queenside. Of course this is far more dangerous when Black’s king is on the same side as the white minority attack. It’s impossible for Black to do likewise on the kingside and the g-file is utterly useless.
12...♘c7 13 b4 ♘e8 14 ♗e2 ♘d6
Black’s knight is placed on its best square but it will not compensate for the other defects in Black’s position.
15 ♕a2
A nice queen move that takes the sting out of a possible ...♘c4.
15...♘e4 16 ♖c1 ♘xc3 17 ♖xc3 ♗d6 18 0-0 ♔d7?
The king should have headed for the queenside with 18...♔b8.
19 ♘h4
White endeavours to control the f5-square.
19...♔e7 20 f4 ♗e4 21 ♗d3 ♗xd3 22 ♖xd3 ♖d7 23 ♘f5+
White is strategically dominant and can win as he pleases. Black resigned after 60 moves.
100
Winter – Alekhine
Nottingham 1936
Black to move
23...♖8e7!
This move prepares to triple on the e-file and is called “Alekhine’s Gun.” It means that the queen will be placed to the rear of the two rooks. The effect will be devastating and this is the strongest pressure that can be created along a file. Note that diagonal pressure can only be created by a battery of queen and bishop.
24 ♔d1
White prepares ♘g1. An immediate 24 ♘g1 is met by the finesse 24...♗xf4! 25 ♖xe6 and now the intermediate move 25...♗xd2+.
24...♕e8 25 ♕f3
25 ♘g1 ♘g3 26 ♖xe6 ♖xe6 27 ♖e1 results in an exchange of rooks but it doesn’t help White since Black’s position is too strong after 27...♘e4 28 ♔c2 ♘e7 followed by ...♘f5 when all Black’s pieces are active.
25...♘a5! 26 b3
26 ♕xd5 ♖xe2 27 ♕xa5 (Or 27 ♖xe2 ♖xe2 28 ♕xa5 ♘g3 29 ♖f3 ♕e4 with a mating attack.) 27...♘g3 with a winning position.
26...♘c4!
The b-pawn is no hindrance for Black’s knight move to c4.
27 ♗c1
27 bxc4 ♕a4+ 28 ♔c1 ♗a3+ 29 ♔b1 ♖b6+ 30 ♔a1 ♕c2 and White is mated in two moves.
27...♘ce3+
27...♕b5 first was even stronger.
28 ♗xe3 ♖xe3
Also 28...♘xe3+ 29 ♘xe3 ♖xe3 30 ♕f2 ♖d3+ 31 ♔c2 ♖ee3 won due to the devastating ...♕e4. It’s not often one sees such a centralisation of the major pieces! Note the doubling on the sixth rank from Black’s point of view.
29 ♕f2?
29 ♘xe3 ♘xe3+ 30 ♔d2 ♘xf1+ 31 ♖xf1 ♖e4 would have prolonged the game.
29...♕b5 30 ♘c1 ♖xc3 and Black won.
101

Capablanca – Berasain
Montevideo 1911
White to move
27 ♕d3!
The reasoning behind this move is that Capablanca had discovered that it’s more effective to have the rook on d5 instead of the queen – and have the queen behind the rook.
27...♕e6 28 ♕e2 ♖c6 29 ♖d5
Note that the queen and rook are manoeuvring back and forth in this game and how they are exploiting d5 as a manoeuvring square, a pivot, to use a term of Nimzowitsch who was the first to document the manoeuvre in his famous classics.
29...♖e8 30 ♕d3
The regrouping is now over. Capablanca has set up “Alekhine’s gun” reversing the positions of his queen and rook. Normally it’s best to have the queen behind the two rooks and second-best is to have it behind the first rook. In this position Black must reckon with the threat on d6.
30...♕g6
31 ♘e3!?
The problem with Black’s position is that it suffers from immobility. In fact White wins the game by exploiting his own superior mobility to carry out purposeful manoeuvres. White doesn’t win a pawn after 31 ♘xd6? cxd6 32 ♖xd6 ♖xd6 33 ♕xd6 because of 33...♕xe4 – for example 34 ♕xc5 ♕c2 35 ♖a1 ♕b2. A sound alternative was to establish a pawn wave on the kingside with 31 g3 followed by h2-h4.
31...♖b8 32 ♕c4
The c4-square is also an important pivot for White’s knight and queen.
32...♖cb6 33 ♘f5 ♔h7
Black places his king out of the range of the knight to avoid a devastating check on e7 after a conceivable sacrifice on d6.
34 ♖5d3! ♖g8 35 ♖g3 ♕f6 36 ♘e3!
The knight is on its way to d5. Soon all of White’s pieces will have visited the d5-square! It’s typical that pieces change places when there are several manoeuvring squares available.
36...♕e6 37 ♕xe6
White sacrifices the d5-square but in exchange he will have the c4-square and the clearly better pawn structure. The black bishop is like a Russian pawn!
37...fxe6 38 ♘c4 ♖a6 39 ♖d2 ♖b8 40 ♖gd3 ♖d8?!
40...g5 followed by ...♔g6 was a better defence even though it will not hold in the long run.
41 ♘xe5 ♖b8 42 ♘c4 ♗f4 43 ♖b2
43 ♖e2? ♖xb3 44 g3 ♖b1+ 45 ♔g2 ♖a4! and White has lost control of the fine manoeuvring square on c4 and also has some weak pawns on the queenside.
43...♗c1 44 ♖c2 ♗g5 45 g3 ♗d8 46 ♖cd2 Black resigned.
A beautiful and almost perfectly played game by Capablanca. It shows not only how to manoeuvre with the queen but also how to manoeuvre with the rooks and the knight and how these pieces make good use of the important manoeuvring squares on d5 and c4.
102
Karpov – Kasparov
World Championship match,
Moscow 1984
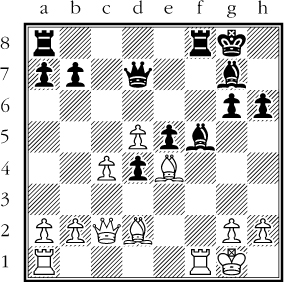
Black to move
Kasparov writes the following after the strong queen manoeuvre 16...♕e8!
“Black has set up an original battery on the e-file and in the best traditions of the Tarrasch Defence he does not intend to defend the d5-pawn with all his might, but wants to initiate play on the c- and e-files, exploiting the activity of his light-squared bishop.”
Note that all Black’s pieces are active with the exception of the f6-knight which has a defensive function. The bishop on g4 exerts pressure on the e2-pawn and this is against Nimzowitsch’s advice that you should place the bishop on e6. In modern chess it’s activity that counts and this is the sole idea of the Tarrasch Defence or whenever you are saddled with an isolani in the middle of the board. Kasparov is playing according to the spirit of the system and therefore applies pressure on the central files as well as controlling the important outposts on c4 and e4.
17 h3
17 ♗xd5?! is strongly answered by 17...b5, for example 18 a3 (18 b4 ♖xe3!) 18...♗h3 19 ♖fe1 (19 ♗g2 ♗xg2 20 ♔xg2 ♖xe3 21 fxe3 ♘c4) 19...♖xe3 20 fxe3 ♕xe3+ 21 ♔h1 ♕f2 22 ♕d2 ♘g4 23 e3 ♘c4 24 ♕e2 ♘cxe3. Note the activity in all Black’s pieces. This is how to play with an isolani! After 25 ♖d2 ♘xd5 26 ♕xf2 ♘xf2+ 27 ♖xf2 ♘xc3 28 bxc3 ♖xc3 it’s White who is happy with a draw. If White plays 17 ♗d4 the pressure is relieved on the d5-pawn and Black can activate his knight with 17...♘e4!.
17...♗h5
17...♗e6? blocks the e-file and upsets the harmony and spirit of Black’s position. Even worse is perhaps the fact that White can play 18 ♗xa7 winning a pawn for virtually nothing.
An exchange sacrifice inspired by Petrosian or Andersson isn’t really necessary here and should therefore principally be avoided. 17...♖xe3 18 fxe3 ♕xe3+ 19 ♔h2 ♗e6 is possible but after 20 ♕c1 Black cannot avoid the exchange of queens. Great exchange sacrificers, like those players just mentioned, made such moves only when it was the best continuation.
18 ♗xd5?!
This isn’t the best move but perhaps it can be regarded as pragmatic due to the fact that Karpov’s style is rather materialistic. The best move was 18 ♕f5 which might lead to equalisation after 18...♖xc3! 19 bxc3 ♗xe2.
18...♗g6
18...b5! might have been an even better way to activate Black’s position. A step in the wrong direction was a natural continuation like 18...♘xd5?! 19 ♖xd5 ♗g6 20 ♕d1! ♘c4 21 ♗c1, since it only helps to introduce some harmony to White’s game. In this position White’s queen and bishop are perfectly placed on their initial squares!
19 ♕c1
19 ♕xg6 ♘xd5 is obviously in Black’s interest, not only because he threatens the queen but also e3 and perhaps also c3.
19...♘xd5
19...♗e4 was playable to maintain the balance but would have led to a different kind of game, less dynamic. 20 ♕d2 is probably best, targeting the unprotected a5-knight.
20 ♖xd5 ♘c4
The quiet move 20...b6 was also good, as it frustrates the white bishop’s prospects on the g1-a7 diagonal.
21 ♗d4
The greedy 21 ♗xa7? b6 22 b3 is answered by the strong 22...♘e3! 23 fxe3 ♖xa7 after which White’s pawn structure and knight become unstable.
21...♖ec7!
Black fully exploits the potential of all his men – major and minor or pieces alike. Nevertheless Karpov still managed to win the game in 42 moves after Kasparov made some mistakes in the time scramble.
We will now concentrate on positions where several pieces are involved in intricate manoeuvring. Not only by using manoeuvring squares but also by making use of the whole board as well as applying the principle of two weaknesses.
103-108 Manoeuvring with Several Pieces
103
Steinitz – Showalter
Vienna 1898
White to move
This position is both a forerunner and a basic example of how White can play on both wings simultaneously.
White has a large advantage in terrain due to the strongly defended pawns on the fifth rank as well as the super knight on d4, hitting the e6-weakness. The best way to exploit the huge space advantage is by opening a file. The important question though is not what to do (c3-c4) but when to do it. Steinitz’s fundamental plan is to commence manoeuvring on the kingside in order to lure the pieces to that sector of the board and then open the queenside. This is in accordance with the concept of two weaknesses.
19 ♕f2!
White prepares ♖e3-h3 and for the moment keeps 19 c4 in reserve, when it will be even more effective. It’s too early to play it now due to 19...♖c8, for example 20 ♖ac1 ♖c5.
19...♕d8 20 ♖e3 g6?
Of course this unprovoked weakness makes White’s task easier.
21 ♖h3 ♖f7 22 ♔h1
22 ♘f3! was more precise.
22...♔g7 23 ♘f3 h6 24 ♖g1
White is now threatening the decisive break g2-g4.
24...h5 25 ♕g3 ♕h8 26 ♘g5 ♖ff8 27 ♕h4 ♘g8
27...♖a7 is answered by 28 c4!.
28 c4!
The moment has come for this long awaited break but ironically there was an even better break, the “impossible break” – 28 g4!!, which would have won more quickly after 28...fxg4 29 ♖xg4.
28...dxc4 29 ♗xc4 ♖fe8 30 ♖d3 ♖a7 31 ♖d6 ♖b7 32 ♖gd1 ♗c8 33 ♘xe6+ ♗xe6 34 ♗xe6 ♕h7 35 ♖d7+ ♖e7 36 ♖xe7+ ♘xe7 37 ♕f6+ ♔h6 38 ♖d8 ♖c7 39 h3 Black resigned.
104
Rubinstein – Lasker
Moscow 1925
Black to move
Just like Capablanca – Berasain, position 101, Black will use the d5-square as a pivot for manoeuvring. Lasker played 27...♘b6 intending to use the d5-square for his other pieces and preparing ...♗d5, ...♕c6 followed ...a5-a4 to create another pivot on c4.
28 ♔h2 ♗d5 29 ♔g2 ♕c6 30 ♘d2 a5! 31 ♕c3 ♗xf3+!
31...♕xc3 32 ♗xc3 ♗xf3+ 33 ♔xf3!.
32 ♘xf3
32 ♕xf3 is met by 32...♘d5!. This is stronger than the immediate 32...♕c2 because of 33 ♕c3 when White cannot prevent the invasion on c2, for example 33 ♕e4 is met by 33...f5.
32...♕xc3 33 ♗xc3 a4
34 bxa4
34 b4 ♘c4 or 34 ♗a5 axb3 35 ♗xb6 and now the beautiful tactic 35...♗g5!! ensures that the b-pawn promotes.
34...bxa4 35 ♔f1
After 35 ♗b4 ♗xb4 36 axb4 a3 37 ♘d2 a2 38 ♘b3 ♔f8 Black wins the knight ending after ...♘d5xb4 etc.
35...♗xa3 36 ♔e2 ♔f8 37 ♔d3
37...♘d5
Note how Black uses the pivot on d5 to decide the game.
38 ♗e1 ♗d6 39 ♔c4 ♔e7 40 ♘e5 ♗xe5 41 dxe5 ♔d7 42 ♗d2 h5 43 ♗c1
43 ♔b5 a3 44 ♗c1 ♘c3+! 45 ♔c4 a2 46 ♗b2 ♘e4 47 ♔b3 ♘xf2 and Black wins another pawn on the kingside.
43...♔c6 44 ♗a3 ♘b6+ 45 ♔d4 ♔b5 46 ♗f8 ♘c4 47 ♔c3 g6
All black pieces are placed on white squares and that’s typical for a light-square strategy.
48 f4 ♘e3 49 ♔d3 ♘d5 50 ♗a3 h4 51 gxh4 ♘xf4+ 52 ♔e4 ♘h5
52...♘xh3?? 53 ♔f3 and Black’s knight will be continually under threat after ♔g3 and ♔f2.
53 ♔f3
Rubinstein’s last chance is to penetrate the black position and catch the f-pawn via g4-g5-h6-h7-g8.
53...♔c4 54 ♗b2 ♔b3 55 ♗a1 a3 56 ♔g4 ♔c2 57 ♔g5 ♔d3! White resigned.
Black’s king can be placed on f5 after White has captured the f7-pawn and then the knight manoeuvre to b3 or c2 wins. Note that the game will be decided on a black square (a1!) and that is also typical of a white-square strategy as Bronstein so insightfully once remarked.
A very nice game played by Lasker who showed how to conduct a white-square strategy when the opponent has an isolani. It’s not necessarily the isolated pawn that is weak but rather the white squares around it. This concept has been very well elaborated by Nimzowitsch in his book My System.
This encounter must be regarded as one of the most important model games to show how to manoeuvre when the opponent has a complex of weaknesses of the same colour. Study it thoroughly and you will be well rewarded in your own games.
105
Bogoljubow – Réti
Berlin 1919
White to move
The move 11 a4! looks like preparation for an attack on the queenside but the move primarily prepares a knight manoeuvre to c4. Later this knight will manoeuvre to g2 via e3 after White has played the g-pawn to g4. You might say that White’s pawn move on the left flank prepares an attack on the right!
11...a5
Obviously 11...♘f4 would have disrupted Bogoljubow’s grandiose plan but on the other hand White would have the possibility of gaining space on the queenside after 12 ♗xf4 exf4 13 a5.
12 ♘c4 b5?
Black understandably doesn’t like the white knight pressurising d6 but nevertheless it would be better to prepare ...♘b6 by playing 12...♖e8.
13 axb5 cxb5 14 ♘e3
14 ♘a3! won a clear pawn on b5 but the win of a pawn doesn’t seem to bother Bogoljubow who is focused on the kingside!
14...♘b6
15 g4
This is the profound point of Bogoljubow’s 11th move. However, do note that 15 ♗xb5, objectively speaking, was a good alternative.
15...♘f4 16 ♗xf4 exf4 17 ♘g2
White’s original knight manoeuvre from c4 to g2 has been successful and White has the slightly better position. Most important here is not the fact that White could play stronger but rather that one should remember to watch out for moves on one side (11 a4) which can help to make progress on the other side (♘c4-e3, g4 and ♘g2). This is the ideal way to play over the whole board and Bogoljubow repeatedly showed that he was a master of this difficult kind of play.
His method of starting an attack on one wing as preparation for an attack on the other was a new strategic idea and it’s only right to mention that Bogoljubow was the first to cultivate play over the whole board. In fact, as we have just seen, this was even more important for him than gain of material.
I recommend a deep study of his best games so you can master the complicated art of playing over the whole board. Apart from Bogoljubow, other great attackers like Alekhine and Kasparov have also embraced this method of combat.
106
Jianjun Xie – Engqvist
Shenzhen 2012
White to move
When I was in China I was stunned by the strong manoeuvring ability of my opponent – a strong FM rated over 2400 Elo points. In this position, which arose in the exchange variation of the Slav, Jianjun Xie continued 18 ♘e2 planning ♘f4-h5 followed by ♕g4 and ♗e5. This is a logical plan in view of the fact that Black has slightly weakened his king’s position with ...h7-h6.
As a matter of a fact one might say that an early exponent of this idea was Rubinstein who, in his game against Sämisch at Carlsbad 1929, induced a black knight to a5 by playing b4-b5 and then started play on the kingside in order to exploit the distant knight’s inability to get over to the defence. Nimzowitsch was very impressed by this idea and described it thoroughly in the book Carlsbad International Chess Tournament 1929. If you are not familiar with it, then it is well worth a look.
The game continued 18...♖fc8 19 ♘f4 ♘ac4 20 ♕e2 ♘d6 21 ♘h5 ♘e8 22 ♕g4 ♗f8 23 ♗e5 with an active position for White. In this way White has involved all his pieces in the kingside operation. By reducing Black’s pieces to passivity, White can more easily choose the best plan. White’s dream, if he cannot break through on the kingside, is to exchange to an endgame where the bishop pair might be a decisive factor.
23...♕d8 24 ♕e2 ♘d7 25 ♗g3 ♘df6 26 ♘f4
Note that White will only agree to an exchange if there is positional gain in return.
26...♘d6 27 ♗h2 ♖xc1+ 28 ♖xc1 ♖c8 29 ♖d1!
It would be a positional mistake to give away the c-file with 29 ♖xc8 ♕xc8.
29...♕a5 30 ♗b1 ♕b5
31 ♘d3
White’s knight endeavours to manoeuvre to c5 at the right moment. When you consider the manoeuvres the c3-knight has been capable of, you can only be impressed. There was no need to go via a4, which is so common in this opening, but rather go via the kingside and in the process activate White’s position much more than by traditional means.
31...♘de8 32 ♕e1
Black’s queen is misplaced on b5 and so it’s now time to go back with the rook to c1, since the queen is unable to defend the rook.
32...♘d6 33 ♖c1 ♖xc1 34 ♕xc1 ♕c4 35 ♕d1! ♕b5 36 ♕c2 ♕c4 37 ♘c5!
Note that White’s queen manoeuvre to c2 has made possible a beneficial queen exchange.
37...♕xc2 38 ♗xc2 ♘c4 39 b3 ♘a5 40 b4 ♘c6 41 a3 ♗xc5 42 dxc5
White has achieved one of his goals and now has the bishop pair against two knights as well as a queenside pawn majority. White won a well played endgame after 87 moves.
Good examples of playing over the whole board as well as showing how the principle of two weaknesses works can be seen in the following two positions.
107
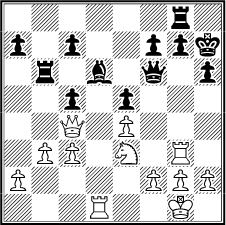
Botvinnik – Zagoriansky
Sverdlovsk 1943
White to move
Black’s weakness on d5 is not enough for White to win the game so he needs to create a second weakness on the kingside. Here White can exploit the fact that Black has already weakened his kingside with ...h7-h6. If this wasn’t the case White would have had to manoeuvre to force Black to weaken himself on the kingside. But now White can open the g-file with g4-g5 and the second weakness will be the vulnerable black king.
GM Baburin writes in Winning Pawn Structures – The Isolated Queen’s Pawn and its Derivatives (1998) that “Computers will not be able to come up with such a move for years to come, at least I hope not!” Twenty years later, he is to a certain extent correct because Komodo 11 suggests moves that mean that White should continue to tack about a little before embarking on his final plan. One of the moves that is suggested is 25 g3 with the idea of securing the kingsde with ♗g2 and ♔h2. Of course 25...♗xh3?? is then out of the question due to 26 g4 followed by ♕g3 or ♕h5 winning the bishop.
25...♕c6 26 g5 hxg5
A more active defence was 26...♕c2 with the idea 27 gxh6 ♕g6+ 28 ♔h2 ♕xh6 and the queen helps in defending the kingside.
27 ♕xg5 f6 28 ♕g6 ♗f7 29 ♕g3
29...f5?
A serious positional mistake due to the dark-square weaknesses on g5 and e5. The pawn in itself also becomes a tactical weakness. Correct was 29...♗e6 deferring any specific course of action until White has shown his cards and revealed how he intends to attack on the kingside. White can attack with his rook(s), bishop or h-pawn. A bishop exchange on g4 is also possible.
30 ♕g5 ♕e6 31 ♔h1 ♕e5 32 ♖g1 ♖f8 33 ♕h6
White is hitting the tactical weakness on b6 while preparing to double on the h-file.
33...♖b8?
A better defence was 33...♗e8 34 ♖h4 (or 34 ♕xb6 f4) 34...g6.
34 ♖h4
34 ♗h5 was also good, stripping Black of a most important defensive piece, and enabling him to exploit the resulting light-square weaknesses in Black’s camp.
34...♔f8 35 ♕h8+ ♗g8 36 ♖f4 ♖bb7 37 ♖g5 ♖f7
38 ♕h5
The f5-pawn is doomed. It’s a matter of taste how to win. 38 ♗h5 ♖f6 39 ♗g6 would also have been a decisive bishop manoeuvre to include the bishop in the attack and threaten 40 ♗h7.
38...♕a1+ 39 ♔g2 g6 40 ♕xg6 ♗h7 41 ♕d6+ ♖fe7 42 ♕d8+
This is good enough since Black resigned, but quicker and more precise was 42 ♗xd5 threatening mate on g8.
Another game to study with this pawn structure and distribution of material is Petrosian – Yudovich, Moscow 1967. It’s not included in the present book but you can easily find it in a collection of Petrosian’s games.
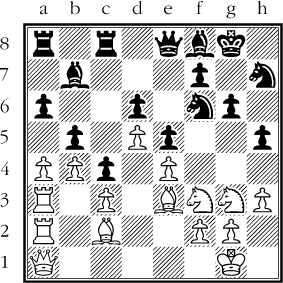
108
Ivanchuk – Short
Amsterdam 1994
White to move
13 a4!
Preparations for f2-f4 can wait, since Black is not keen on playing ...f7-f5. White first wants to immobilise Black’s pawn majority on the queenside. If White manages to generate pressure on the queenside he can shift the attack from that side of the board to the king’s flank. 13 ♘f5 ♘e7 14 ♘xe7+?! (15 ♕g4!) 14...♕xe7 15 f4 exf4 16 ♖xf4 ♕e5 17 ♕c1 f5 is nothing special for White.
13...♖ad8?!
13...a5 was better. Black can then set up the pawn structure b6 and c5. In such a position White’s knight can manoeuvre between the squares c4 and d5.
14 a5! ♖d7 15 ♖a3!
Black has a weakness on b7. If White manages to force Black’s pieces away from the kingside the pawn push to f4 will be more effective. This is the hidden point of the thirteenth move.
15...f6 16 g3 ♘e7 17 ♕e1!
A very nice queen manouevre, preparing ♕b4 hitting the b7-weakness. The time wasn’t ripe for 17 f4 due to 17...exf4 18 gxf4 f5 and Black has the initiative.
17...♖b8
17...♘c8 allows 18 f4.
18 ♕c3 ♔h8 19 ♕c5!
White is threatening to penetrate with ♕a7 next move.
19...♘c8 20 f4!
White has managed his deep positional idea very well and his play on the kingside has become more dangerous than it would have if he had played f4 at an earlier stage.