In 1968, something spectacular happened in Denmark: The LEGO Group opened a unique theme park, called LEGOLAND, not far from its headquarters.
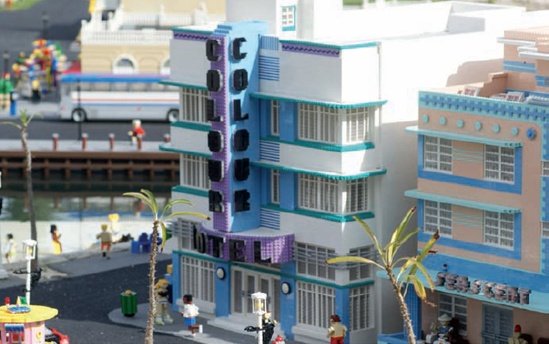
Along with rides and snack shops, LEGOLAND contained an incredible group of LEGO structures in a part of the park that became known as Miniland. In the early days, Miniland creations reproduced many famous Danish landmarks and buildings, but as new theme parks opened around the world, all sorts of Miniland structures were built. In Figure 4-1 you can see an interesting scene captured at LEGOLAND in Winter Haven, Florida.
Although miniland scale is used extensively in LEGO parks, you probably won’t find any official LEGO sets that contain miniland-scale characters. (Unlike minifigs, which are made up of specialized pieces, miniland people are usually built from common LEGO elements.)
Figure 4-1. The colorful facade and sign of the Colour Hotel help add to the Art Deco feel of this Miami-inspired street scene. The models are part of the Miniland exhibit at LEGOLAND in Florida. (Photo by Michael Huffman)
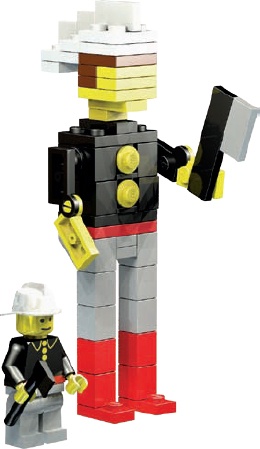
In Chapter 3 you learned how scale relates to minifig models, which are built at a scale of about 1:48. Most of the miniland-sized models at LEGOLAND are built to a 1:20 scale, meaning that an average character (like the fireman shown in Figure 4-2) is about 3.5 inches tall.
Notice that as the scale value (the number on the right) shrinks, the model size increases. The 1:48 minifig characters are about 1.5 inches high, but the 1:20 miniland figures are more than twice as tall.
When building with minifigs, you can mix and match their torsos with various legs or give them different hairpieces and accessories. But in the end, most minifigs end up looking somewhat similar. When you build your own miniland figures, though, the range of characters you can create is virtually unlimited.
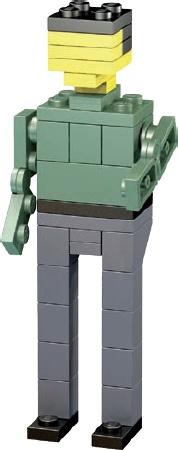
You can build miniland figures with an almost endless variety of poses and outfits, but let’s start with a no-frills figure (Figure 4-3) to give you a sense of how these little folks are constructed.
The head is square and a bit boring, but we’ll add details later to remove some of that blocky feeling. The torso is essentially 2×3 studs, and it’s made up of several small pieces. The arms are just 2×2 hinge plates (there aren’t really any hands). And the legs are nothing more than standard 1×1 bricks with inverted 1×2 45-degree slopes for the hips.
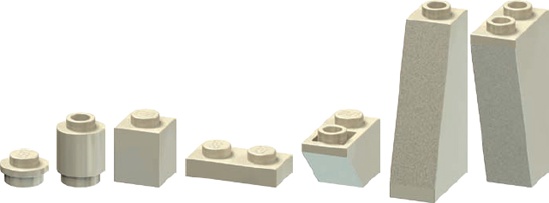
Figure 4-4 through Figure 4-6 show the parts I used to create the basic miniland figure. You may not use each piece in every figure you build, but this should give you a good start.
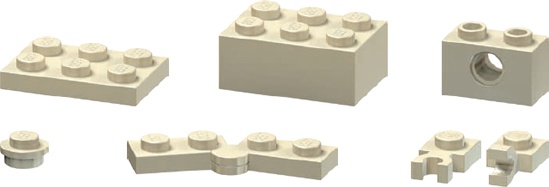
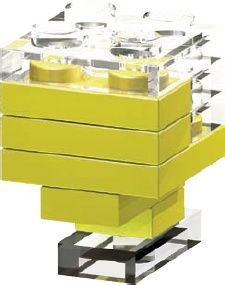
Small plates, like those in Figure 4-4, are key to creating the details of the head and neck.
Figure 4-3. Like a department store mannequin, this figure is just waiting to be attired in any number of outfits.
Figure 4-4. Small plates for making miniland-sized heads (from left to right): 1×1 plates, 1×2 plates, offset plates, and 2×2 plates
Technic bricks, like the ones in Figure 4-5, can be used to attach the arms so they can rotate. (The clip plates—used as hands—are optional.)
Note
Technic refers to both a series of specialized LEGO parts and complete models. Typical Technic kits are modeled after sports cars, construction equipment, aircraft, and so on. Parts like the 1×2 Technic brick offer a twist on the regular LEGO parts we’ve been using so far.
By changing the slopes and bricks you use for the legs, you can create different costumes for your characters. The examples in Figure 4-6 are good choices.
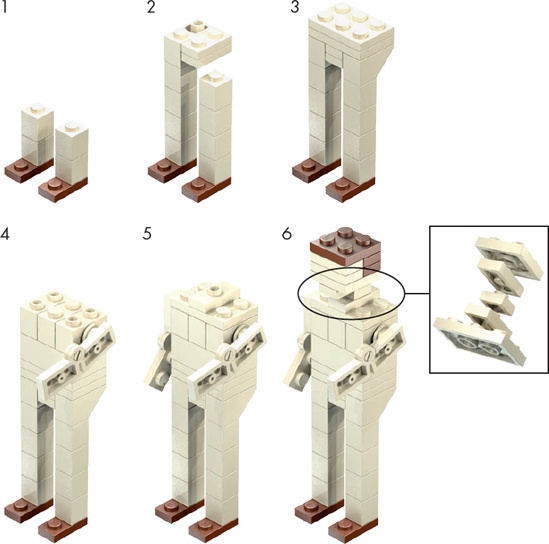
Now it’s time to start building your own characters. In Figure 4-7, I show you six easy steps you can use to make a basic figure, and then we’ll explore variations on hair, outfits, and poses.
You won’t find a BOM for this model, but the elements shown in Figure 4-4 through Figure 4-6 and the images themselves should help you to figure out which pieces you need.
Note
In Figure 4-7 I’m adding more than one layer of parts per step. Because this is such a small model, it should be easy to understand these condensed instructions.
One cool aspect of the basic miniland figure is that you can pose the arms. The hinge elements shown in Figure 4-7 stick into a 1×1 cylinder plate that’s inserted into a 1×2 Technic brick. There is just enough friction between the stud (on the hinge element) and the cylinder plate to hold the arm in position—even straight up in the air!
The head is centered on the torso thanks to a single offset plate.
Now it’s time to make our character come alive by adding details to the head, arms, and legs, as well as clothing and accessories.
Once you get the hang of building these parts, you can use them in different combinations to create your own world of miniland-sized people, each with a unique personality. Think of these examples as submodels.
The faces of miniland people are kind of abstract; they don’t really have eyes or a nose. In fact, they’re really just a representation of a person, without the hands, movable legs, and detailed faces that you see in the minifig world.
That’s why creating a “face” for your miniland person is just a matter of trying to suggest where the skin is located and where things like hair and hats begin. In Figure 4-8, you can see the elements you would use to create the impression of a face and neck. (Use whatever color plates you like to make each character unique.)
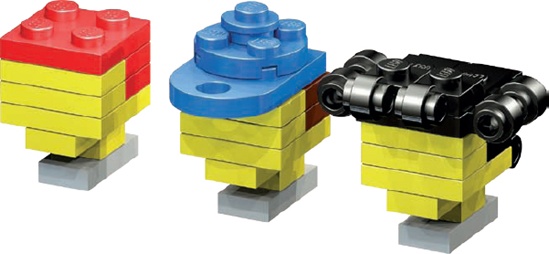
Experiment with combinations of plates, cylinder plates, and other parts, like the 1×1 clip plate with studs, to create items like hats and hair for your miniland people. For example, in Figure 4-9, the head in the middle looks like it’s wearing a blue baseball cap, while the one on the far right looks like it belongs to someone who’s good with a curling iron.
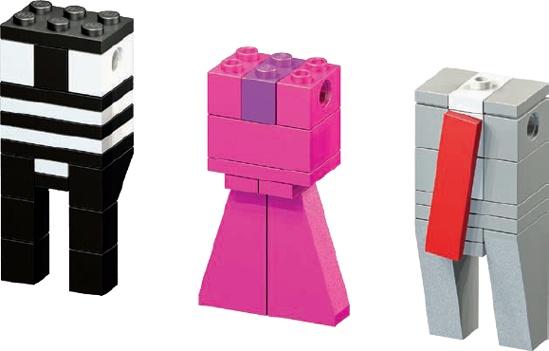
You can give the impression of a miniland person’s career or hobby by combining the parts you use for their clothing with the colors you select for them. For example, Figure 4-10 shows three very different outfits that you could use to help populate your miniland world: a soccer referee’s uniform, a classy fuchsia cocktail dress, and a plain grey suit suggesting a businessman.
Figure 4-10. Clothes do make the miniland person. Remember that little details and careful color choices can add a great deal of realism and charm.
How do you know that that’s a soccer referee’s outfit? The striped shirt and black pants are pretty good clues. You might finish this particular character off by adding a cap, like the one in Figure 4-9, and maybe a whistle or flag in the character’s hands.
The cocktail dress shows how you can use elements like the 2×1×3 75-degree slopes to create a very feminine look. The slopes are centered under two offset plates, which help give this character a more slender waist. The 1×2 brick at the top can be replaced with a brick that matches the figure’s skin color to give the illusion that the dress has an open neckline.
As for the grey suit, don’t be afraid to use little tricks like making his red tie off center in order to let the white of his shirt show a bit and to give the impression that he has just rushed off a busy subway car. Little details like these will add character to your characters.
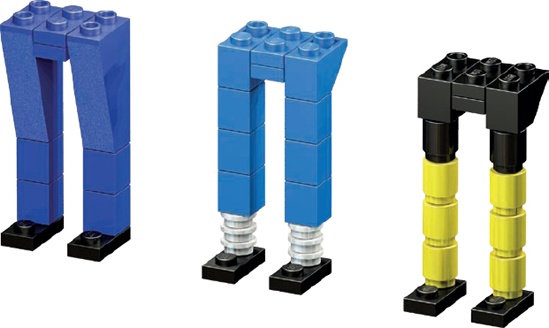
Figure 4-11 shows some simple variations on the basic leg/shoe design from Figure 4-3.
You can use the design on the left for just about any character who wears long pants. To add a little fun, and make the character a little nerdy, maybe make the pants too short (like the ones in the middle). The legs on the right suggest the legs and cycling shorts of an athletic character who just got off a mountain bike. (Be sure to match the lower 1×1 cylinders with the flesh color you choose for the face and arms.)
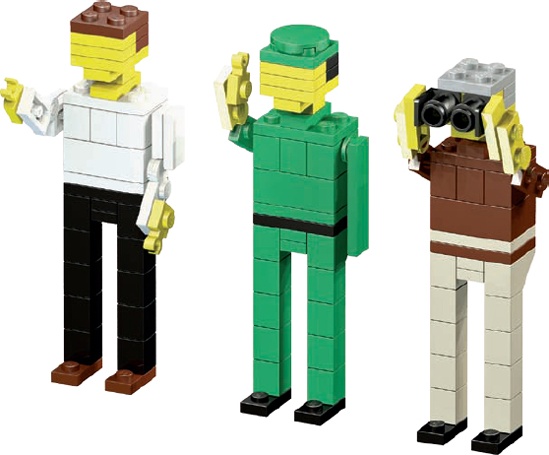
By using some simple part substitutions and setting your character’s arms at different angles, you can create a wide variety of actions or gestures. Figure 4-12 shows how you might add some life to your characters by adding flair to their arms and hands.
Notice that the figures on the left and the middle both have hands made from 1×1 plates with clips on the side. The character on the right has no hands at all. Instead, I’ve used offset plates to extend the arms so they hold the binoculars. As you can see, it’s more important to achieve the look and feel of the thing you’re trying to create rather than to fret over how to model every last detail. The basic miniland character from Figure 4-3 has no hands either, but he looks like a person nonetheless. Keep that in mind as you build.
Now that you know how to model miniland figures and even how to dress them, it’s time to learn how to give them the appearance of motion or action. Unlike minifigs, miniland figures have no hinges on their legs, which makes it tricky to make them look like they’re moving or doing something. The solution is a matter of selecting elements to give the appearance of something that isn’t really there.
As you can see in the following examples, the action being undertaken is implied by the position in which you, the builder, pose the figure.
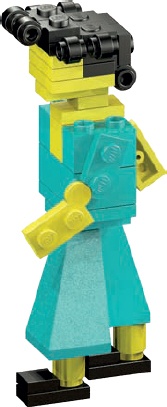
The woman in Figure 4-13, with her arms swinging out from her body, looks like she’s walking. (The 75-degree outer corner slopes create the illusion that her long teal dress is moving with her legs.)
Figure 4-13. You can make a character appear to be walking by simply building the arms and legs slightly ahead of and behind the body.
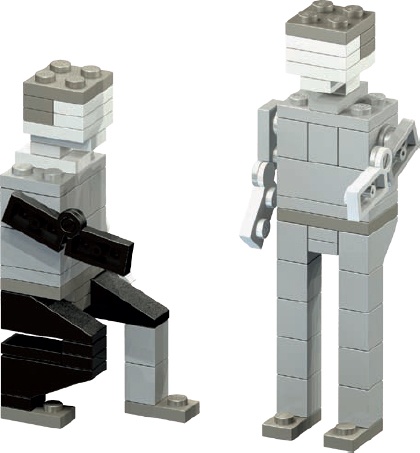
The character on the left in Figure 4-14 is crouching, perhaps calling a pet or watching his bowling ball roll down the lane. But, if you look closely, he’s really not that different from the character in Figure 4-3, shown again on the right of Figure 4-14. To make him crouch, I just changed the black pieces.
Perhaps the only drawback to miniland-style creations is that their buildings need to be a lot larger than the ones for minifigs. Large structures use a lot of bricks, and building them can tax even some larger collections, but that doesn’t mean that you shouldn’t try.
A facade is the detailed front of a building that might have plain sides or even no walls or back at all. Movie studios use facades all the time to re-create things like urban street scenes or the main street of an Old West town, and the only thing behind them is an empty set. Working at miniland scale is a good time to practice creating facades of small buildings rather than building an entire structure.
You can use facades to create a small scene by combining your miniland figures with the facade of a building or two. Focus on just what can be seen from the front; the sides and backs of the buildings are not intended to be part of the scene.
Facades work well in miniland scale because they allow you to create taller and wider models with fewer elements than a complete structure would require. In other words, you can create a whole scene without creating a whole building.
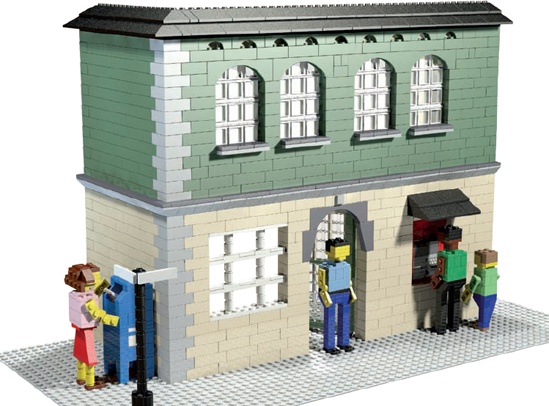
Figure 4-15 shows a simple street scene in front of a small café or shop on a busy downtown corner. You can see a man using the bank machine on the right and a woman about to mail a letter.
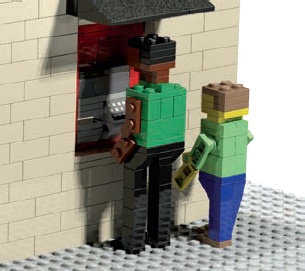
Let’s look at the individual pieces that make up this scene, starting with the characters on our street. In the close-up shown in Figure 4-16, notice the child. To create a small figure like a child, just shrink each of the main features of the larger figures (head, body, arms, and legs) proportionately. If you build a child and her legs look too long, they probably are. Just shorten them until they look right.
The bank machine is built into the wall of the building. Although it may look out of place on an older building, it represents the kinds of changes that are sometimes made to decades-old buildings as their uses change.
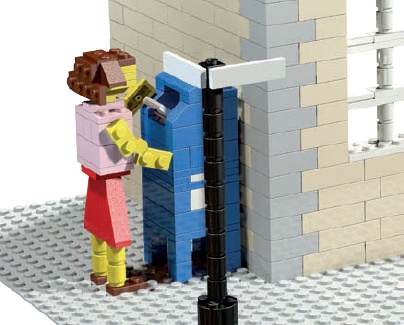
The woman in Figure 4-17 has a letter in her hand that she’s about to drop in the mailbox. (Notice that she’s wearing a variation on the dress from Figure 4-10.)
Note
Your characters will stand up best when anchored to a baseplate, as shown in Figure 4-16 and Figure 4-17. They might wobble if you just place them on a tabletop or other flat surface.
Now to the building’s architecture. Since you’ll want your buildings to look as realistic as possible, draw your inspiration from real shops, banks, and schools near where you live. Look at the way stone and brick are used to create walls. Study the windows of buildings, looking at how many there are, where they’re placed, and how far apart from each other they are. Larger buildings often have more than one entrance, so don’t forget to include enough doors in your scaled-down version. Look for any details you can easily duplicate to add realism, and remember that buildings evolve over time as they’re renovated or restored. Don’t be afraid to incorporate modern items in a building that looks like it was built in the last century.
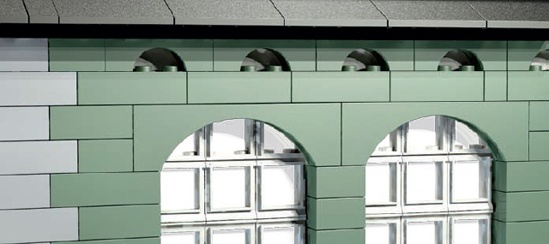
Sometimes using a single piece over and over can add interest to your models. For example, the area above the large second-story windows could have been built with plain bricks, but as you can see in Figure 4-18, by using several 1×4 arches side by side, I’ve created a more attractive pattern.
Figure 4-18. The arches above the large windows could easily be created with inverted slopes if you don’t have the actual arch pieces you need. (See Figure 3-25 in Substitute Windows.)
The larger 1×8×2 arches above the windows are a dramatic feature that adds flair to the model. As you can see, they are positioned just in front of the many 1×2×2 windows, but they also hide a portion of them.
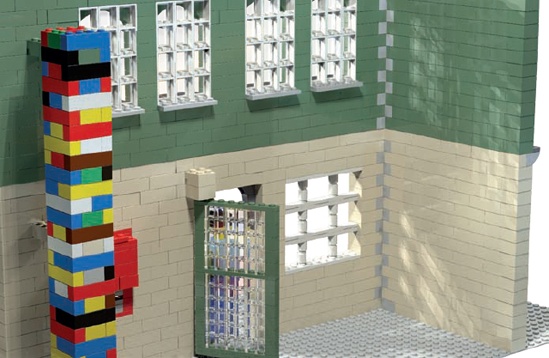
Remember when I mentioned that facades are only pretty from the front? Figure 4-19 shows our street scene from behind.
In this view, you can see clearly that the building is a facade, pretty much just two walls and a support column. There is no roof or second floor, and the walls are far from complete. See? A facade allows you to concentrate only on how things look from the front and not worry about interior details or even walls.
Now let’s look at the building’s structure. I’ve used a column to support the end of the wall that contains the bank machine (see Figure 4-15 for a front view). This sturdy column, linked to the end of the wall, makes an excellent substitute for the side and rear walls that I’ve left out. Using a single column, instead of an entire wall, can save bricks.
Notice the crazy multicolored construction of the column. Internal bracing or any parts of the model eventually hidden by other parts can be made out of whatever color bricks you have left over—just remember to place these pieces behind a solid part of the facade, rather than behind a window where they will be seen.
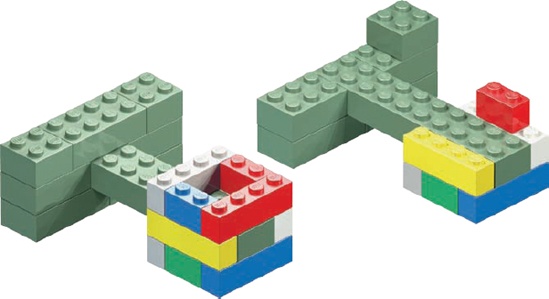
In the close-up in Figure 4-20, you can see that the column is tied to the wall with a simple beam; it’s built into the wall. In fact, that’s the only piece connected to the column where color does matter. That beam should be the same color as the outside wall. In this example it’s light green. Connecting (or tying) the two structures is just a matter of using a 2×8 or 2×10 brick or even a composite beam like the one from Figure 2-21 in How Not to Build a Beam. The beam is built into the column and extended out until it too becomes part of the wall.
The right of Figure 4-20 shows part of both the wall and the column with a few bricks removed from each to show how the 2×10 brick joins the two structures.
In this chapter you’ve seen how unique miniland-scale figures can be created from mostly basic bricks, plates, and slopes. We built a facade of a building at miniland scale and used it to create a street scene with characters going about their business.
In the next chapter we’ll look at scale again, but in a completely different way. You’ll learn how to make some monster-sized LEGO pieces that look like they’ve been blasted with an enlarging ray!
