CHAPTER 12
Advanced Linux Exploits
Now that you have the basics under your belt from reading Chapter 11, you are ready to study more advanced Linux exploits. The field is advancing constantly, with new techniques always being discovered by hackers and countermeasures being implemented by developers. No matter how you approach the problem, you need to move beyond the basics. That said, we can only go so far in this book—your journey is only beginning. The “For Further Reading” section at the end of this chapter will give you more destinations to explore.
In this chapter, we discuss the following topics:
• Format string exploits
• Memory protection schemes
Format String Exploits
Format string exploits became public in late 2000. Unlike buffer overflows, format string errors are relatively easy to spot in source code and binary analysis. In spite of this, they are still common in applications today. Many organizations still don’t utilize code analysis or binary analysis tools on software before releasing it, so these errors still occur in the wild. Once spotted, they are usually eradicated quickly. As more organizations start to use code analysis tools as part of their build processes, these types of attacks will continue to decline. However, this attack vector is still fairly easy to find and can result in some interesting code execution.
Format Strings
Format strings are used by various print functions, and these functions may behave in many ways depending on the format strings provided. Following are some of the many format functions (see the “References” section for a more complete list2):
• printf() Prints output to the standard input/output (STDIO) handle (usually the screen)
• fprintf() Prints output to a file stream
• sprintf() Prints output to a string
• snprintf() Prints output to a string with length checking built in
When someone calls one of these functions, the format string dictates how and where the data is compiled into the final string. Format strings are very versatile, though, and if the creator of the application allows data specified by the end user to be used directly in one of these format strings, the user can change the behavior of the application. This can include disclosing additional information that the creator did not want disclosed, such as memory locations, data variables, and stack memory.
Other parameters can also read and write to memory addresses. Because of this type of functionality, the risk of a string format vulnerability can occur anywhere, from information disclosure to code execution. Throughout this chapter, we’re going to look at both information disclosure and code execution and see how we can combine them to use string format vulnerabilities as part of our exploits.
The Problem
As you may recall from Chapter 2, the printf() function can have any number of arguments. We will discuss two forms here:

In the first example, the programmer has specified a format string and then the variables that will fill in the spaces designated by the format string for data. This prevents unexpected behavior from printf. The second example allows the user to specify the format string. This means that a user can cause the printf function to behave however they want.
Table 12-1 introduces two more format tokens, %hn and %<number>$, that may be used in a format string (the first four symbols, originally listed in Table 2-2, are included for your convenience).
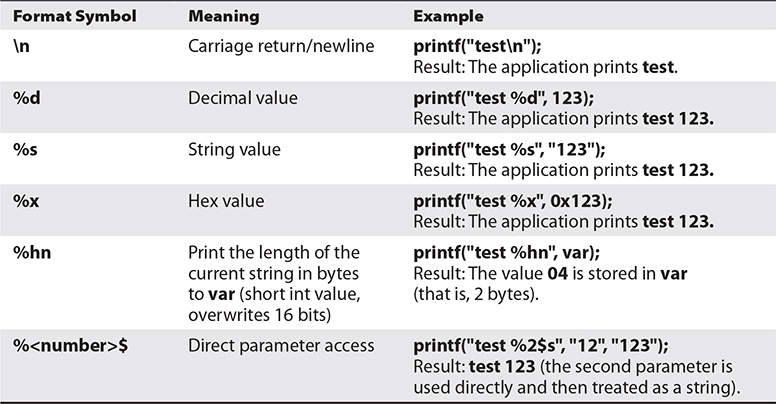
Table 12-1 Commonly Used Format Symbols
The Correct Way
Recall the correct way to use the printf() function. For example, the code

The Incorrect Way
Now take a look at what happens if we forget to add a value for %s to replace:

What’s that? It looks like Greek, but it’s actually machine language (binary) shown in ASCII. In any event, it is probably not what you were expecting. To make matters worse, consider what happens if the second form of printf() is used like this:

The cursor is at the end of the line because we did not use a carriage return (\n), as before. But what if the user supplies a format string as input to the program?

Wow, it appears that we have the same problem. However, as it turns out, this latter case is much more deadly because it may lead to total system compromise. To find out what happened here, we need to look at how the stack operates with format functions.
Stack Operations with Format Functions
To illustrate how the stack works with format functions, we will use the following program:

During execution of the printf() function, the stack looks like Figure 12-1. As always, the parameters of the printf() function are pushed on the stack in reverse order, as shown in the figure. The addresses of the parameter variables are used. The printf() function maintains an internal pointer that starts out pointing to the format string (or top of the stack frame) and then begins to print characters of the format string to the STDIO handle (the screen in this case) until it comes upon a special character.

Figure 12-1 Depiction of the stack when printf() is executed
If % is encountered, the printf() function expects a format token to follow and thus increments an internal pointer (toward the bottom of the stack frame) to grab input for the format token (either a variable or absolute value). Therein lies the problem: the printf() function has no way of knowing if the correct number of variables or values was placed on the stack for it to operate. If the programmer is sloppy and does not supply the correct number of arguments, or if the user is allowed to present their own format string, the function will happily move down the stack (higher in memory), grabbing the next value to satisfy the format string requirements. So what we saw in our previous examples was the printf() function grabbing the next value on the stack and returning it where the format token required.

NOTE The backslash (\) is handled by the compiler and used to escape the next character after it. This is a way to present special characters to a program and not have them interpreted literally. However, if \x is encountered, the compiler expects a number to follow and converts that number to its hex equivalent before processing.
Implications
The implications of this problem are profound indeed. In the best case, the stack value might contain a random hex number that can be interpreted as an out-of-bounds address by the format string, causing the process to have a segmentation fault. This could possibly allow an attacker to create a denial of service for the application.
In the worst case, however, a careful and skillful attacker might be able to use this fault to both read arbitrary data and write data to arbitrary addresses. In fact, if the attacker can overwrite the correct location in memory, they may be able to gain root privileges.
Example of a Vulnerable Program
For the remainder of this section, we will use the following piece of vulnerable code to demonstrate the possibilities:
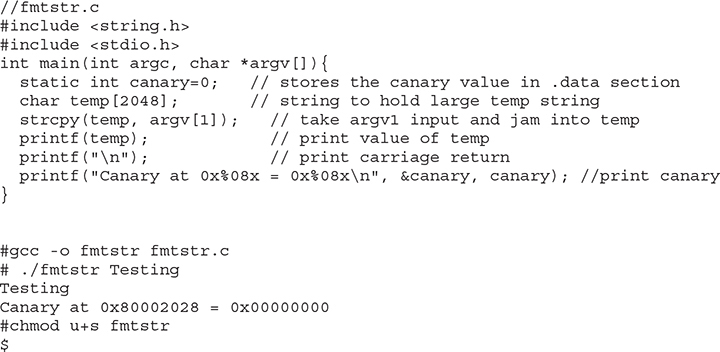
NOTE The canary value is just a placeholder for now. It is important to realize that your value will be different. For that matter, your system might produce different values for all the examples in this chapter; however, the results should be the same.
Lab 12-1: Reading from Arbitrary Memory
We will now begin to take advantage of the vulnerable program. We will start slowly and then pick up speed. Buckle up, here we go!
NOTE This lab, like all the labs, has a unique README file with instructions for setup. See the Introduction for more information.
Using the %x Token to Map Out the Stack
As shown in Table 12-1, the %x format token is used to provide a hex value. So, by supplying a few %08x tokens to our vulnerable program, as shown here, we should be able to dump the stack values to the screen:

In this example, 08 is used to define the precision of the hex value (in this case, 8 bytes wide). Notice that the format string itself was stored on the stack, which is proven by the presence of our AAAA (0x41414141) test string. In our case, it took seven %08x tokens to get to our 0x41414141. However, this may vary from system to system, depending on the OS version, compiler version, or other issues. To find this value, simply start with two %08x tokens and use brute force by increasing the number of tokens, until the beginning of the format string is found. For our simple example (fmtstr), the number of %08x tokens is called the offset and would be defined as an offset of 7.
Using the %s Token to Read Arbitrary Strings
Because we control the format string, we can place anything in it we like (well, almost anything). For example, if we wanted to read the value of the address located in the fourth parameter, we could simply replace the fourth format token with %s, as shown here:

Why did we get a segmentation fault? Because, as you’ll recall, the %s format token takes the next parameter on the stack (in this case, the fourth one) and treats it like a memory address to read from (by reference). In our case, the fourth value is AAAA, which is translated in hex to 0x41414141—and as you saw in the previous chapter, this causes a segmentation fault.
Reading Arbitrary Memory
So how do we read from arbitrary memory locations? Simple: we supply valid addresses within the segment of the current process. We will use the getenv helper program to assist us in finding a valid address:

The purpose of this program is to fetch the location of environment variables from the system. To test this program, let’s check for the location of the SHELL variable, which stores the location of the current user’s shell:

NOTE Remember to disable the ASLR on current Kali versions (see the section “Address Space Layout Randomization (ASLR),” later in this chapter). Otherwise, the found address for the SHELL variable will vary and the following exercises won’t work.
Now that we have a valid memory address, let’s try it. First, remember to reverse the memory location because this system is little-endian:

Success! We were able to read up to the first null character of the address given (the SHELL environment variable). Take a moment to play with this now and check out other environment variables. To dump all environment variables for your current session, type env | more at the shell prompt.
Simplifying the Process with Direct Parameter Access
To make things even easier, you can access the seventh parameter from the stack by what is called direct parameter access. The #$ format token is used to direct the format function to jump over a number of parameters and select one directly. Here is an example:

Now when you use the direct parameter format token from the command line, you need to escape the $ character with a backslash (\) in order to keep the shell from interpreting it. Let’s put all of this to use and reprint the location of the SHELL environment variable:


Notice how short the format string can be now.

CAUTION The preceding format works for bash. Other shells, such as tcsh, require other formats, such as the following:$ ./fmtstr `printf "\x84\xfd\xff\xbf"`'%7\$s'
Notice the use of a single quote at the end. To make the rest of the chapter’s examples easy, use the bash shell.
Using format string errors, we can specify formats for printf and other printing functions that can read arbitrary memory from a program. Using %x, we can print hex values in order to find a parameter’s location in the stack. Once we know where our value is being stored, we can determine how printf processes it. By specifying a memory location and then specifying the %s directive for that location, we cause the application to print out the string value at that location.
Using direct parameter access, we don’t have to work through the extra values on the stack. If we already know where positions are in the stack, we can access parameters using %3$s to print the third parameter or %4$s to print the fourth parameter on the stack. This will allow us to read any memory address within our application space as long as it doesn’t have null characters in the address.
Lab 12-2: Writing to Arbitrary Memory
For this example, we will try to overwrite the canary address (in our case, 0xbffff6dc) with the address of shellcode (which we will store in memory for later use). Remember that your canary address may be different. We will use the canary address because it is visible to us each time we run fmtstr, but later you will see how to overwrite nearly any address.
Magic Formula
As shown by Blaess, Grenier, and Raynal, the easiest way to write 4 bytes in memory is to split them up into two chunks (2 high-order bytes and 2 low-order bytes) and then use the #$ and %hn tokens to put the two values in the right place.1
For example, let’s put our shellcode from the previous chapter into an environment variable and retrieve the location:

If we want to write the value of SC into memory, we would split it into two values:
• Two high-order bytes (HOB): 0xbfff
• Two low-order bytes (LOB): 0xff1c
As you can see, in our case, HOB is less than (<) LOB, so we would follow the first column in Table 12-2, which presents the magic formula to help us construct the format string used to overwrite an arbitrary address (in our case, the canary address, 0xbffff6dc).

Table 12-2 The Magic Formula to Calculate Your Exploit Format String
Using the Canary Value to Practice
Using Table 12-2 to construct the format string, let’s try to overwrite the canary value with the location of our shellcode.
CAUTION At this point, you must understand that the names of our programs (getenv and fmtstr) need to be the same length because the program names are stored on the stack at startup. Therefore, the two programs will have different environments (and locations of the shellcode in this case) if their names are of different lengths. If you named your programs something different, you will need to play around and account for the difference or simply rename them to the same size for these examples to work.
To construct the injection buffer to overwrite the canary address 0xbffff6dc with 0xbfffff1c, follow the formula in Table 12-2. Values are calculated for you in the right column and used in the following command:

Which produces this result:

CAUTION Once again, your values will be different. Start with the getenv program and then use Table 12-2 to get your own values. Also, there actually isn’t a newline between printf and the double quotation mark.
Using string format vulnerabilities, we can also write to memory. By leveraging the formula in Table 12-2, we can pick memory locations within the application and overwrite values. This table makes the math easy to compute what values need to be set to manipulate values and then write them into a specific memory location. This will allow us to change variable values as well as set up for more complex attacks.
Lab 12-3: Changing Program Execution
Okay, so we can overwrite a staged canary value…big deal. However, it is a big deal because some locations are executable and, if overwritten, may lead to system redirection and execution of your shellcode. Now, we just have to find some memory that will allow us to gain control of program execution. To do this, we need to look at how a program executes functions. When a function is executed, a number of things are saved, including where the program was when we went into the function. This data is saved so that we can easily return to our program after a function call and the application will know where we left off.
The state of the application that is saved when going into a function is called a frame. This frame contains important data such as the location of the Extended Instruction Pointer (EIP) before the program call, where variables are stored, and other relevant control information. When we look at this frame, we can take the address of the saved pointer to EIP and then overwrite that pointer. Then, when the function returns back to the application, instead of returning back where it left off, it will execute our shellcode.
Finding a Target
To find a target address to overwrite, we need to use gdb to help us determine the frame information inside a function. When we look at functions that might be handy, we can see after our string format executes in printf that execution will return for additional printf statements. So let’s see what our frame looks like inside printf, because after our code has done its job and overwritten an address, we can immediately take control of program flow by overwriting the printf-saved EIP address.
Let’s take a look at the fmtstr binary again, this time in gdb:

Once we start gdb, we need to set a breakpoint  . This will stop execution when the breakpoint is reached. In this case, we are going to make our breakpoint the printf function. This way, when printf executes, it will pause execution so that we can look at what’s going on.
Next, we run the program  with the argument asdf so that the program will run as expected. When the program starts running, we see the breakpoint
  pop up. From here, we see that the program stopped in printf, and we can see the arguments and line numbers associated with the function.
To figure out where we might want to redirect execution, we need to find the saved EIP address in the frame. To do this, we’re going to use the info command, as shown next:

Note that the info command is called using the shorthand i f  , which is an abbreviation of the command info frame. This command returns frame data that describes the current state. However, we want to know the original EIP address that it will return to. That information is in the “Saved registers” section
  , where we see that the pointer to EIP is set to 0xbfffee8c. This is the address we want to overwrite. The frame also shows other EIP-related information, such as the current EIP value and the saved value of EIP. This is different from the saved registers because those registers are where the values are stored, whereas the preceding saved EIP value is the value stored at the location where the pointer points.
Putting It All Together
Now that we have a target to overwrite, we need to build a new format string. To do this, we must get the address of our shellcode again. We are going to use Aleph One’s shellcode from shellcode.c, and we’re going to save that value into the environment variable SC. Because we are going to be executing this from a non-root account, we’ll assume the following is being done as the joeuser user we created earlier.

Here, you can see that we used the same shellcode as before, but to make this exercise a little more forgiving, we’re padding the beginning with eight NOP instructions so that we can land anywhere in our NOP sled. Because we have a new address to overwrite and a new SC location, we’re going to have to do some recalculation.
Again, follow the first column of Table 12-2 to calculate the required format string to overwrite the new memory address 0xbfffee8c with the address of the shellcode: 0xbfffff2e. We’ll need to perform some additional math to change the position of our shellcode address. To do this, we use the formula from Table 12-2, which tells us the value should be 0xff2e – 0xbfff, which is 16175. We also replace the starting two addresses with our target for overwrite, plus two, and then our actual memory location:

Well, that didn’t work. The reason is that the place where we told it to go, our shellcode location, isn’t in executable memory space. By default, the stack where our environment variables and other variable information are stored is read/write-only. We need it to be read/write/execute. Therefore, we’re going to cheat and recompile the binary with an executable stack. So, as root, let’s re-create our vulnerable binary:

Which produces the following:

Success! You can relax now—you earned it.
Here are some examples of other useful locations to overwrite:
• The global offset table
• Global function pointers
• The atexit handlers
• Stack values
• Program-specific authentication variables
And you can get many more ideas in the “For Further Reading” section at the end of this chapter.
By leveraging string format weaknesses, we have the ability to overwrite memory, including function pointers. By using the techniques from Lab 12-2 along with the information from the frame, we can alter application flow. By putting shellcode into an environment variable and identifying the location of that shellcode, we can know where the application should be diverted to. Using the printf statement, we can overwrite the saved value of EIP so that when execution returns back to the calling function, it executes our shellcode instead.
Memory Protection Schemes
Since buffer overflows and heap overflows have come to be, many programmers have developed memory protection schemes to prevent these attacks. As you will see, some work, some don’t.
Compiler Improvements
Several improvements have been made to the gcc compiler, starting in GCC 4.1.
Libsafe
Libsafe is a dynamic library that allows for the safer implementation of the following dangerous functions:
• strcpy()
• strcat()
• sprintf() and vsprintf()
• getwd()
• gets()
• realpath()
• fscanf(), scanf(), and sscanf()
Libsafe overwrites these dangerous libc functions by replacing the bounds and input-scrubbing implementations, thereby eliminating most stack-based attacks. However, no protection is offered against the heap-based exploits described in this chapter.
StackShield, StackGuard, and Stack Smashing Protection (SSP)
StackShield is a replacement to the gcc compiler that catches unsafe operations at compile time. Once it’s installed, the user simply issues shieldgcc instead of gcc to compile programs. In addition, when a function is called, StackShield copies the saved return address to a safe location and restores the return address upon returning from the function.
StackGuard was developed by Crispin Cowan3 and is based on a system of placing “canaries” between the stack buffers and the frame state data. If a buffer overflow attempts to overwrite the saved EIP, the canary will be damaged and a violation will be detected.
Stack Smashing Protection (SSP), formerly called ProPolice, is now developed by Hiroaki Etoh of IBM and improves on the canary-based protection of StackGuard by rearranging the stack variables to make them more difficult to exploit. In addition, a new prolog and epilog are implemented with SSP.
The following is the previous prolog:

And here is the new prolog:

As shown in Figure 12-2, a pointer is provided to ArgC and checked after the return of the application, so the key is to control that pointer to ArgC instead of the saved Ret.

Figure 12-2 Old and new prolog
Because of this new prolog, a new epilog is created:

Lab 11-4: Bypassing Stack Protection
Back in Chapter 11, we discussed how to handle overflows of small buffers by using the end of the environment segment of memory. Now that we have a new prolog and epilog, we need to insert a fake frame, including a fake Ret and a fake ArgC, as shown in Figure 12-3.

Figure 12-3 Using a fake frame to attack small buffers
Using this fake-frame technique, we can control the execution of the program by jumping to the fake ArgC, which will use the fake Ret address (the actual address of the shellcode). The source code of such an attack follows:


NOTE The preceding code actually works both with and without stack protection on. This is a coincidence that’s due to the fact that it takes 4 bytes less to overwrite the pointer to ArgC than it did to overwrite the saved Ret using the previous way of performing buffer overflows.
The preceding code can be executed as follows:

SSP has been incorporated in GCC (starting in version 4.1) and is on by default. It may be disabled with the –fno-stack-protector flag, and it can be forced by using –fstack-protector-all.
You may check for the use of SSP by using the objdump tool:

Notice the call to the stack_chk_fail@plt function, compiled into the binary.
NOTE As implied by their names, the tools described in this section do not offer any protection against heap-based attacks.
Non-Executable Stack (GCC Based)
GCC has implemented a non-executable stack using the GNU_STACK ELF markings. This feature is on by default (starting in version 4.1) and may be disabled with the –z execstack flag, as shown here:

Notice that in the first command, the RW flags are set in the ELF markings, and in the second command (with the –z execstack flag), the RWE flags are set in the ELF markings. The flags stand for read (R), write (W), and execute (E).
In this lab, we looked at how to determine if stack protections are in place, as well as how to bypass them. Using a fake frame, we can get our shellcode to execute by controlling where the application returns.
Kernel Patches and Scripts
Although many protection schemes are introduced by kernel-level patches and scripts, we will cover only a few of them in this section.
Non-Executable Memory Pages (Stacks and Heaps)
Early on, developers realized that program stacks and heaps should not be executable and that user code should not be writable once it is placed in memory. Several implementations have attempted to achieve these goals.
The Page-eXec (PaX) patches attempt to provide execution control over the stack and heap areas of memory by changing the way memory paging is done. Normally, a page table entry (PTE) exists for keeping track of the pages of memory and caching mechanisms called data and instruction translation look-aside buffers (TLBs). The TLBs store recently accessed memory pages and are checked by the processor first when accessing memory. If the TLB caches do not contain the requested memory page (a cache miss), the PTE is used to look up and access the memory page. The PaX patch implements a set of state tables for the TLB caches and maintains whether a memory page is in read/write mode or execute mode. As the memory pages transition from read/write mode into execute mode, the patch intervenes, logging and then killing the process making this request. PaX has two methods to accomplish non-executable pages. The SEGMEXEC method is faster and more reliable, but splits the user space in half to accomplish its task. When needed, PaX uses a fallback method, PAGEEXEC, which is slower but also very reliable.
Red Hat Enterprise Server and Fedora offer the ExecShield implementation of non-executable memory pages. Although quite effective, it has been found to be vulnerable under certain circumstances and to allow data to be executed.
Address Space Layout Randomization (ASLR)
The intent of ASLR is to randomize the following memory objects:
• Executable image
• Brk()-managed heap
• Library images
• Mmap()-managed heap
• User space stack
• Kernel space stack
PaX, in addition to providing non-executable pages of memory, fully implements the preceding ASLR objectives. grsecurity (a collection of kernel-level patches and scripts) incorporates PaX and has been merged into many versions of Linux. Red Hat and Fedora use a Position Independent Executable (PIE) technique to implement ASLR. This technique offers less randomization than PaX, although both protect the same memory areas. Systems that implement ASLR provide a high level of protection from “return into libc” exploits by randomizing the way the function pointers of libc are called. This is done through the randomization of the mmap() command and makes finding the pointer to system() and other functions nearly impossible. However, using brute-force techniques to find function calls such as system() is possible.
On Debian- and Ubuntu-based systems, the following command can be used to disable ASLR:

On Red Hat–based systems, the following commands can be used to disable ASLR:

Lab 12-5: Return to libc Exploits
“Return to libc” is a technique that was developed to get around non-executable stack memory protection schemes such as PaX and ExecShield. Basically, the technique uses the controlled EIP to return execution into existing glibc functions instead of shellcode. Remember, glibc is the ubiquitous library of C functions used by all programs. The library has functions such as system() and exit(), both of which are valuable targets. Of particular interest is the system() function, which is used to run programs on the system. All you need to do is munge (shape or change) the stack to trick the system() function into calling a program of your choice (say, /bin/sh).
To make the proper system() function call, we need our stack to look like this:

We will overflow the vulnerable buffer and overwrite the old saved EIP exactly with the address of the glibc system() function. When our vulnerable main() function returns, the program will return into the system() function as this value is popped off the stack into the EIP register and executed. At this point, the system() function will be entered and the system() prolog will be called, which will build another stack frame on top of the position marked “Filler,” which for all intents and purposes will become our new saved EIP (to be executed after the system() function returns). Now, as you would expect, the arguments for the system() function are located just below the newly saved EIP (marked “Filler” in the diagram). Because the system() function is expecting one argument (a pointer to the string of the filename to be executed), we will supply the pointer of the string "/bin/sh" at that location. In this case, we don’t actually care what we return to after the system function executes. If we did care, we would need to be sure to replace Filler with a meaningful function pointer such as exit().
NOTE Stack randomization makes these types of attacks very hard (though not impossible) to do. Basically, brute force needs to be used to guess the addresses involved, which greatly reduces your odds of success. As it turns out, the randomization varies from system to system and is not truly random.
Let’s look at an example. Start by turning off stack randomization:

Take a look at the following vulnerable program:

As you can see, this program is vulnerable due to the strcpy command that copies argv[1] into the small buffer. Compile the vulnerable program, set it as SUID, and return to a normal user account:

Now we are ready to build the “return to libc” exploit and feed it to the vuln2 program. We need the following items to proceed:
• The address of glibc system() function
• The address of the string "/bin/sh"
It turns out that functions like system() and exit() are automatically linked into binaries by the gcc compiler. To observe this fact, start the program with gdb in quiet mode. Set a breakpoint on main() and then run the program. When the program halts on the breakpoint, print the locations of the glibc function called system():

Another cool way to get the locations of functions and strings in a binary is by searching the binary with a custom program, as follows:


The preceding program uses the dlopen() and dlsym() functions to handle objects and symbols located in the binary. Once the system() function is located, the memory is searched in both directions , looking for the existence of the "/bin/sh" string. The "/bin/sh" string can be found embedded in glibc and keeps the attacker in this case from depending on access to environment variables to complete the attack. Finally, the value is checked to see if it contains a NULL byte and then the location is printed. You may customize the preceding program to look for other objects and strings. Let’s compile the preceding program and test-drive it:

A quick check of the preceding gdb value shows the location of the system() function isn’t exactly the same. Let’s use gdb to figure out the correct values for our exploit:

As you can see, the value we found for system is 0x1000 off from what search found. When we look at the other values and add in the offset we computed for system, we can see that exit and "/bin/sh" are at the newly computed locations. The reason that these are in a slightly different place is due to how the linker puts together a binary. When we use ldd to look at where the different shared objects are attached to each file, we can see that the location where libc is attached is different for the two binaries, thus leading to this 0x1000 discrepancy:

We can see using ldd that the addresses for libc ,  are different between the two binaries. Through gdb and some math, we now have everything required to successfully attack the vulnerable program using the “return to libc” exploit. Putting it all together, we see this:

Notice that we got a shell that is EUID root, and when we exited from the shell, we got a segmentation fault. Why did this happen? The program crashed when we left the user-level shell because the filler we supplied (0x42424242) became the saved EIP to be executed after the system() function. So, a crash was the expected behavior when the program ended. To avoid that crash, we can simply supply the pointer to the exit() function in that filler location:

Congratulations, we now have a shell with the effective UID (EUID) of root.
Using “return to libc” (ret2libc), we have the ability to direct application flow to other parts of the binary. By loading the stack with return paths and options to functions, when we overwrite EIP, we can direct the application flow to other parts of the application. Because we’ve loaded the stack with valid return locations and data locations, the application won’t know it has been diverted, allowing us to leverage these techniques to launch our shell.
Lab 12-6: Maintaining Privileges with ret2libc
In some cases, we may end up without root privileges. This is because the default behavior of system and bash on some systems is to drop privileges on startup. The bash installed in Kali does not do this; however, in Red Hat and others, it does.
For this lab, we will be using Kali Rolling. To get around the privilege dropping, we need to use a wrapper program that contains the system function call. Then, we can call the wrapper program with the execl() function, which does not drop privileges. The wrapper looks like this:

Notice that we do not need the wrapper program to be SUID.
Next, we’ll call the wrapper with the execl() function, like this:

We now have another issue to work through: the execl() function contains a NULL value as the last argument. We will deal with that in a moment. First, let’s test the execl() function call with a simple test program and ensure that it does not drop privileges when run as root:

Compile and make SUID like the vulnerable program vuln2.c:

Run it to test the functionality:

Great, we now have a way to keep the root privileges. Now all we need is a way to produce a NULL byte on the stack. There are several ways to do this; however, for illustrative purposes, we will use the printf() function as a wrapper around the execl() function. Recall that the %hn format token can be used to write into memory locations. To make this happen, we need to chain together more than one libc function call, as shown here:

Just like we did before, we will overwrite the old saved EIP with the address of the glibc printf() function. At that point, when the original vulnerable function returns, this new saved EIP will be popped off the stack and printf() will be executed with the arguments starting with %6\$n, which will write the number of bytes in the format string up to the format token (0x0000) into the third direct parameter. Because the third parameter contains its own location, the value of 0x0000 will be written into that spot. Next, the execl() function is called with the arguments from the first ./wrapper string onward. Voilà, we have created the desired execl() function on the fly with this self-modifying buffer attack string.
In order to build the preceding exploit, we need the following information:
• The address of the printf() function
• The address of the execl() function
• The address of the %6\$n string in memory (we will use the environment section)
• The address of the ./wrapper string in memory (we will use the environment section)
• The address of the location we want to overwrite with a NULL value
Starting at the top, let’s get the addresses:

We will use the environment section of memory to store our strings and retrieve their location with our handy getenv utility. Remember that the getenv program needs to be the same size as the vulnerable program—in this case, vuln2 (five characters):

Okay, we are ready to place the strings into memory and retrieve their locations:

We have everything except the location of the last memory slot of our buffer. To determine this value, first we find the size of the vulnerable buffer. With this simple program, we have only one internal buffer, which will be located at the top of the stack when inside the vulnerable function main(). In the real world, a little more research will be required to find the location of the vulnerable buffer by looking at the disassembly and using some trial and error.


Now that we know the size of the vulnerable buffer,(8) we can calculate the location of the sixth memory address by adding 8 + 6 * 4 = 32 = 0x20. Because we will place 4 bytes in that last location, the total size of the attack buffer is 36 bytes.
Next, we send a representative-size (52 bytes) buffer into our vulnerable program and find the location of the beginning of the vulnerable buffer with gdb by printing the value of $esp:

Now that we have the location of the beginning of the buffer, add the calculated offset from earlier to get the correct target location (sixth memory slot after our overflowed buffer):

Finally, we have all the data we need, so let’s attack!

Woot! It worked. You may have realized that a shortcut exists here. If you look at the last illustration, you will notice the last value of the attack string is a NULL. Occasionally, you will run into this situation. In that rare case, you won’t care if you pass a NULL byte into the vulnerable program because the string will terminate by a NULL anyway. Therefore, in this canned scenario, you could have removed the printf() function and simply fed the execl() attack string, as follows:

Try it:

Both ways work in this case. You will not always be as lucky, so you need to know both ways. See the “For Further Reading” section for even more creative ways to return to libc.
When privileges are being dropped, we can leverage other function calls to work around the calls that are dropping privileges. In this case, we leveraged the printf memory overwrite capability to null-terminate the options to execl. By chaining these function calls using ret2libc, we don’t have to worry about putting executable code on the stack, and we can use complex options to functions we’ve pushed onto the stack.
Bottom Line
We have discussed some of the more common techniques used for memory protection, but how do they stack up? Of the ones we reviewed, ASLR (PaX and PIE) and non-executable memory (PaX and ExecShield) provide protection to both the stack and the heap. StackGuard, StackShield, SSP, and Libsafe provide protection to stack-based attacks only. The following table shows the differences in the approaches:

Summary
In this chapter, we investigated string format weaknesses and how to leverage those weaknesses to expose data and impact application flow. By requesting additional data through the format string, we can expose memory locations leaking information about the contents of variables and the stack.
Additionally, we can use the format string to change memory locations. Using some basic math, we can change values in memory to alter application flow, or we can impact program execution by adding arguments to the stack and changing EIP values. These techniques can lead to arbitrary code execution, allowing for local privilege escalation or remote execution for network services.
We also looked at memory protection techniques such as stack protection and layout randomization and then investigated some basic ways to bypass them. We leveraged a ret2libc attack to control program execution. By leveraging the libc functions, we were able to redirect application flow into known function locations with arguments we had pushed onto the stack. This allowed the functions to run without executing code on the stack and avoid having to guess at memory locations.
Combining these techniques, we now have a better toolkit for dealing with real-world systems and the ability to leverage these complex attacks for more sophisticated exploits. Protection techniques change, and strategies to defeat them evolve, so to better understand these techniques, the “For Further Reading” section has additional material for you to review.
For Further Reading
“Advanced return-into-lib(c) Exploits (PaX Case Study)” (nergal) www.phrack.com/issues.html?issue=58&id=4#article
Exploiting Software: How to Break Code (Greg Hoglund and Gary McGraw) Addison-Wesley, 2004
“Getting Around Non-Executable Stack (and Fix)” (Solar Designer) http://seclists.org/bugtraq/1997/Aug/63
Hacking: The Art of Exploitation (Jon Erickson) No Starch Press, 2003
Shaun2k2’s libc exploits www.exploit-db.com/exploits/13197/
The Shellcoder’s Handbook: Discovering and Exploiting Security Holes (Jack Koziol et al.) Wiley, 2004
“When Code Goes Wrong – Format String Exploitation” (DangerDuo) www.hackinthebox.org/modules.php?op=modload&name=News&file=article&sid=7949&mode=thread&order=0&thold=0
References
1. Christophe Blaess, Christophe Grenier, and Frédéreric Raynal, “Secure Programming, Part 4: Format Strings,” February 16, 2001, www.cgsecurity.org/Articles/SecProg/Art4/.
2. Wikipedia, “Printf format strings,” https://en.wikipedia.org/wiki/Printf_format_string.
3. Crispin Cowan, Calton Pu, Dave Maier, Heather Hinton , Jonathan Walpole, Peat Bakke, Steve Beattie, Aaron Grier, Perry Wagle and Qian Zhang, “StackGuard: Automatic Adaptive Detection and Prevention of Buffer-Overflow Attacks,” Originally published in the Proceedings of the 7th USENIX Security Symposium San Antonio, Texas, January 26-29, 1998, www.usenix.net/legacy/publications/library/proceedings/sec98/full_papers/cowan/cowan.pdf.