CHAPTER 16
Next-Generation Web Application Exploitation
The basics of web exploitation have been covered in previous editions and exhaustively on the Web. However, some of the more advanced techniques are a bit harder to wrap your head around, so in this chapter we’re going to be looking at some of the attack techniques that made headlines from 2014 to 2017. We’ll be digging into these techniques to get a better understanding of the next generation of web attacks.
In particular, this chapter covers the following topics:
• The evolution of cross-site scripting (XSS)
• Framework vulnerabilities
• Padding oracle attacks
The Evolution of Cross-Site Scripting (XSS)
Cross-site scripting (XSS) is one of the most misunderstood web vulnerabilities around today. XSS occurs when someone submits code instead of anticipated inputs and it changes the behavior of a web application within the browser. Historically, this type of vulnerability has been used by attackers as part of phishing campaigns and session-stealing attacks. As applications become more complex, frequently some of the things that worked with older apps don’t work anymore. However, because with each new technology we seem to have to learn the same lessons about security again, XSS is alive and well—it’s just more convoluted to get to.
Traditionally, this type of vulnerability is demonstrated through a simple alert dialog that shows that the code ran. Because of this fairly benign type of demonstration, many organizations don’t understand the impact of XSS. With frameworks such as the Browser Exploitation Framework (BeEF) and with more complex code, XSS can lead to everything from browser exploitation to data stealing to denial of service. Some folks are using browsers for mining cryptocurrency, and all of this can be executed through XSS.
Now that you know some of the history behind XSS, let’s look at a number of examples in practice. For this section of the chapter, we are going to be walking through progressively more difficult XSS examples to help further your understanding of what XSS is and how you can interact with it in today’s browsers.
Setting Up the Environment
For this chapter, we’re going to be using Kali 64 bit with at least 4GB of RAM allocated for the system. We have most of the software we need already, but to make it easier to work with our environment, we’re going to install a devops tool called Docker that lets us deploy environments quickly—almost like running a virtual machine (VM). We’ll also be using a number of files from the Chapter 16 area on the GitHub repository for this book.
First, clone the GitHub repository for the book. Now we need to set up Docker. To do this, run (as root) the setup_docker.sh program from Chapter 16. This will install the necessary packages after adding the required repositories to Kali, and then it will configure Docker to start upon reboot. This way, you won’t have to deal with the Docker mechanisms on reboot, but rather just when starting or stopping an instance. Once the script is finished, everything should be installed to continue.
We need to install Google Chrome, so go to https://www.google.com/chrome/browser/ inside the Kali browser and download the .deb package. Install Chrome as follows:


NOTE If you get an error with the Chrome package install, it is likely because of a dependency issue. To fix the issue, run the command apt --fix-broken install and allow it to install the prerequisites. At the end, you should see a successful installation of Chrome.
Next, we need to build the Docker image for our website for the XSS portion of this chapter. From the GitHub repository for Chapter 16, cd into the XSS directory, create the Docker image, and then run it, like so:
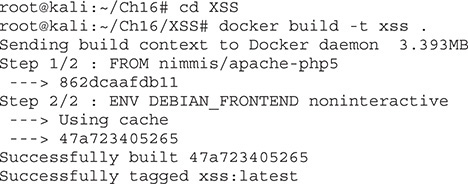
Now, run the Docker:

You can see that our VM is now running and that apache2 has started. We can safely leave this window in place and continue with our XSS labs.
Lab 16-1: XSS Refresher
Our first lab is a basic refresher of how XSS works. At its essence, XSS is an injection attack. In our case, we’re going to be injecting code into a web page so that it is rendered by the browser. Why does the browser render this code? Because in many XSS situations, it’s not obvious where the legitimate code ends and where the attacking code starts. As such, the browser continues doing what it does well and renders the XSS.
We’ll start this lab using Firefox. At the time of writing, the latest version is Firefox 56, so if you have problems with the instructions because things are being filtered, revert back to an earlier version of Firefox.
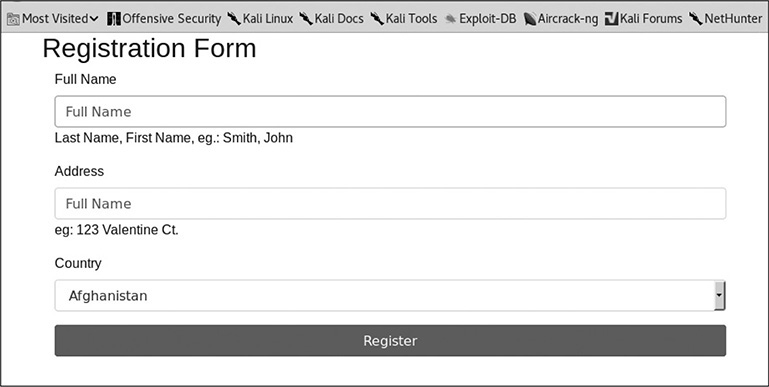
Go to http://localhost/example1.html and you should see the form shown in Figure 16-1. This simple form page asks for some basic information and then posts the data to a PHP page to handle the result.
Figure 16-1 The form for Lab 16-1
To begin, let’s put in some regular data. Enter the name asdf and an address of fdsa and click Register. You should see the following response:

Our next step is to use a string that should help us sort out whether or not the application is filtering our input. When we use a string like asdf<'"()=>asdf and click Register, we would expect that the application will encode this data into a HTML-friendly format before returning it back to us. If it doesn’t, then we have a chance at code injection. Use the preceding string and try it for both the Full Name and Address fields. You should see the following response:

The browser has returned the same string you put in, but this only tells part of the story. Frequently, things may look okay, but when you look at the HTML source of the page, it may tell a different story. In the Firefox window, press CTRL-U to display the source code for the page. When we look at the source code, we see the following:
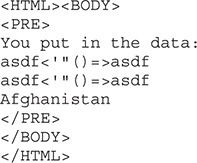
Here, we can see that none of the characters were escaped. Instead, the strings are put directly back into the body of the HTML document. This is an indication that the page might be injectable. In a well-secured application, the < and > characters should be translated to > and <, respectively. This is because HTML tags use these characters, so when they aren’t filtered, we have the opportunity to put in our own HTML.
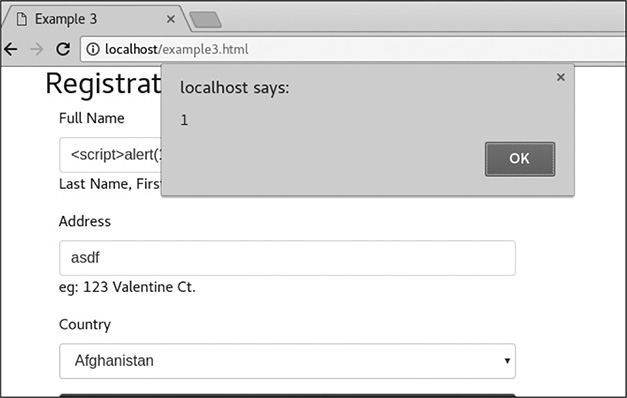
Because it looks like we can inject HTML code, our next step is to try a real example. A simple one that provides an immediate visual response to injection is popping up an alert box. For this example, enter <script>alert(1)</script> in the Full Name field. This will cause an alert box to pop up with a “1” inside, if it is successful. Use the string for just the Full Name; you can put anything you like in the Address field. When you click Register, you should see a box pop up like in Figure 16-2.
Figure 16-2 Our successful alert box
Success! This worked well in Firefox, but Firefox doesn’t put a lot of effort into creating XSS filters to protect the user. Both Internet Explorer (IE) and Chrome have filters to catch some of the more basic XSS techniques and will block them so that users aren’t impacted. To run Chrome, type in the following:

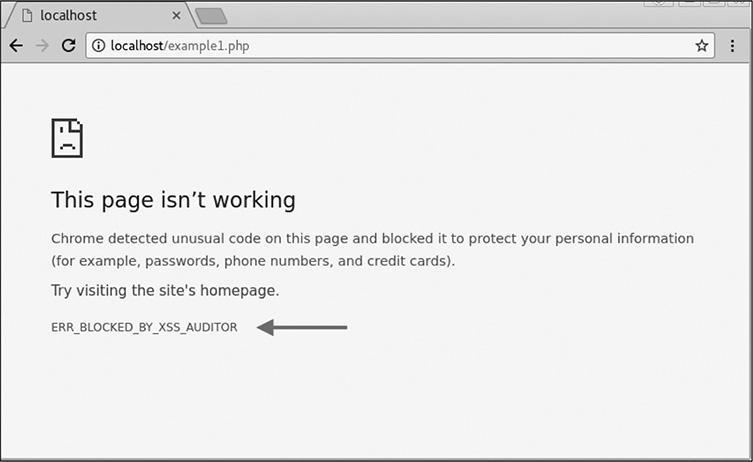
We have to add the --no-sandbox directive because Chrome tries to keep our browser from running as root in order to protect the system. Click through the pop-ups when Chrome starts, and try the steps in this lab again. This time, we get a much different response. Figure 16-3 shows that Chrome has blocked our simple XSS.
Figure 16-3 Our XSS being blocked by Chrome
At first glance, the screen shown in Figure 16-3 looks like a normal page-loading error. However, note the error message “ERR_BLOCKED_BY_XSS_AUDITOR.” XSS Auditor is the functionality of Chrome that helps protect users from XSS. Although this example didn’t work, there are many ways to execute an XSS attack. In the following labs, we’ll see some progressively more difficult examples and start looking at evasion techniques for these types of technologies.
Lab 16-2: XSS Evasion from Internet Wisdom
Many people, when introduced to their first XSS vulnerability, go to the Internet for information on how to defend against XSS attacks. Luckily for us, the advice is frequently incomplete. That’s great for us but bad for the application owners. For this lab, we’re going to look at a PHP page that has some very basic protections in place.
In the previous chapter, we talked about escaping special characters. In PHP, this is done with the htmlspecialchars function. This function takes unsafe HTML characters and turns them into their encoded version for proper display. Let’s start out by taking a look at how our marker from the previous lab is treated in this new environment.
Browse to http://localhost/example2.php in Firefox, and you should see a form that looks similar to the one in the previous lab. To see how the application behaves, we want to see a success condition. Put in asdf for the name and fdsa for the address and then click Register. You should see the following output:

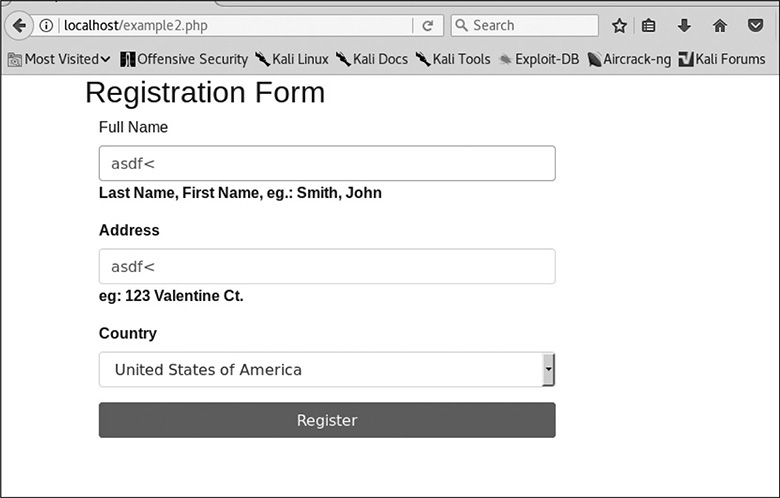
This looks like we’d expect it. When we tried our marker before, we got get an alert box. Let’s see what it looks like now. Submit the page again with asdf<'"()=>asdf for the name and address. Figure 16-4 shows that the page returns with some subtle changes. The first is that the lines that suggest sample input are bolded. The second is that only part of the data that we submitted is shown filled back into the document.
Figure 16-4 Submission using Firefox with the XSS marker
To see what’s really happening, press CTRL-U again to view the source. When we look at the code, we want to find our marker to see where our data has been put in. Therefore, search using CTRL-F for the phrase “asdf.” You should see something similar to the following text:

You’ll notice that some of the characters have been changed in the string. The characters for greater than and less than and the quotation marks have been substituted with the HTML code to render them. In some cases, this might be sufficient to thwart an attacker, but there is one character here that isn’t filtered—the single quote (') character. When we look at the code, we can see that the placeholder field in the INPUT box is also using single quotes. This is why the data was truncated in our output page.
In order to exploit this page, we have to come up with a way of injecting code that will be rendered by the browser without using HTML tags or double quotes. Knowing that the placeholder uses single quotes, though, maybe we can modify the input field to run code. One of the most common ways to do this is using events. There are a number of events that fire in different places in a document when it’s loaded.
For INPUT fields, the number of events is much smaller, but there are three that may be helpful here: onChange, onFocus, and onBlur. onChange is fired when the value of an INPUT block changes. onFocus and onBlur fire when the field is selected and when someone leaves the field, respectively. For our next example, let’s take a look at using onBlur to execute our alert message.
For the name, put in ' onFocus='alert(1) and for address type in asdf. When you click Register, the output for what you submitted to the form is printed out. That’s not really what we wanted, but let’s look to see if the input was altered at all:

The input wasn’t changed at all, so this code might work if we are able to add another element. This time, use the same input as before for the Full Name field, and use >asdf instead of asdf for the Address field. When you click Register, you should see the alert box pop up with the number 1 in it. Click OK and then take a look at our code in the document source and search for “alert”:

We see here that the opening single quote we used closed out the placeholder field and then a new file is created inside the input block called onFocus. The content of the event is our alert dialog box, and then we see the closing quote. We didn’t use a closing quote in our string, but this was part of the initial field for placeholder, so when we left it off of our string, we were using the knowledge that our string would have a single quote appended. If we had put a single quote at the end of our string, it would have been invalid HTML when it was rendered, and our code wouldn’t have executed.
Let’s take a look at the same thing in Chrome. When we submit the same values, we see that our input is blocked by the XSS Auditor again. We’re seeing a trend here. Although Chrome users may be protected, other types of users might not be, so testing with a permissive browser like Firefox can aid in our ability to successfully identify vulnerabilities.
Lab 16-3: Changing Application Logic with XSS
In the previous labs, the web pages were very simple. Modern web applications are JavaScript heavy, and much of the application logic is built into the page itself instead of the back end. These pages submit data using techniques such as Asynchronous JavaScript (AJAX). They change their contents by manipulating areas within the Document Object Model (DOM), the object inside the web browser that defines the document.
This means that new dialog boxes can be added, page content can be refreshed, different layers can be exposed, and much more. Web-based applications are becoming the default format for applications as binary applications are being transitioned to the Web. This push for such full functionality in websites creates a lot of opportunity for oversight. For this example, we’re going to look at an application that uses JQuery, a popular JavaScript library, to interact with our back-end service.
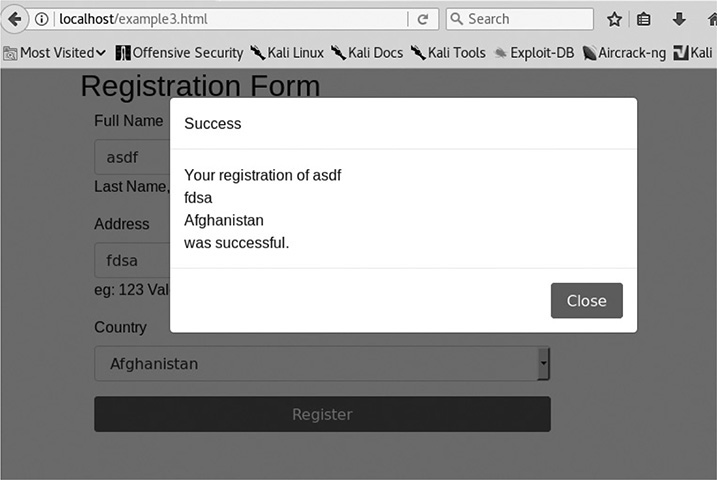
For this lab, use Firefox to load the page http://localhost/example3.html. This page looks like the others, but when we submit data, instead of being sent to a submission page, we are shown a pop-up window with the submission and the status. Once again, let’s try with the values asdf and fdsa for the name and address, respectively. Figure 16-5 shows the output.
Figure 16-5 A successful submission for Lab 16-3
Now change the name to our marker asdf<'"()=>asdf and leave the address as fdsa. When we submit these values, we see a failure message. We could stop there because they blocked our marker, but there’s not much fun in that. When we view the source for the page like we have in previous examples, we don’t see our marker at all.
What has happened here is that the page was modified with JavaScript, so the content we put in was never loaded as part of the source code. Instead, it was added to the DOM. Unfortunately, our old tricks won’t work in determining whether or not this page is vulnerable, so we’ll have to switch to some new tools.
Firefox has a built-in set of developer tools that can help us look at what the current rendered document is doing. To get to the developer tools, press CTRL-SHIFT-I. A box should come up at the bottom of the window with a number of tabs. The Inspector tab allows us to view the rendered HTML. Click that tab and then use CTRL-F to find the string “asdf.” Figure 16-6 shows our code in the Inspector window of the developer tools.
Figure 16-6 Viewing code in the developer tools
Our string looks like it has made it into the dialog box without modification. This is great, because the same trick we used for Lab 16-1 will work here. Let’s go back and try the same thing we used for the name in Lab 16-1: <script>alert(1)</script>. When we submit this value, we get the alert box with a 1, so our code ran successfully. When we close the alert box, we see the fail message, and when we go back to the Inspection tab and search for “alert,” we can see it clearly in the rendered HTML source.
Frequently when new technologies are implemented, knowledge about previous failures hasn’t been incorporated, so old vulnerabilities re-emerge frequently in new technologies. To see how this attack behaves in Chrome, let’s try it again using the same inputs.
When you run this attack in Chrome, you should see an alert box like the one in Figure 16-7, showing that our code ran. The XSS Auditor is good at checking on page load, but dynamically loaded content can frequently prove evasive. We were able to render a very simple XSS string in both browsers. This highlights the fact that when a constraint is blocking exploitation of a page in one browser, others may still be vulnerable—and evasion techniques may be available to get around filtering technology. The short of it is, if you know a page is vulnerable to XSS, fix it; don’t rely on the browsers to keep your users safe.
Figure 16-7 Exploitation of example3.html in Chrome
Lab 16-4: Using the DOM for XSS
In the previous labs, we used some very basic tricks to execute XSS. However, in more secure applications, there is usually a bit more to get around. For this lab, we are going to look at the same app, but with additional checks and countermeasures. Frequently web apps will have data-validation functions, and there are three ways to defeat them: modify the code to remove the check, submit directly to the target page without going through JavaScript, and figure out how to bypass the code. Because we’re talking about XSS, let’s look at how we can get around the filters.
To begin with, let’s try the same tactics from previous labs for the page at http://localhost/example4.html. When we load the page in Firefox, it looks the same as the others at first glance, so we need to figure out what success and error conditions look like with this new version. For our success condition, enter asdf and fdsa again. When you click Register, you see a success message, indicating that our content was valid. Let’s now try throwing a script tag into the Full Name field. Enter <script> for the name and fdsa for the address. Now you should see our error condition. Take note of the error message because we’ll need that to track down in the JavaScript how we got to that point. To do that, go to the source by pressing CTRL-U in Firefox. Then search for the phrase “Please Try.” Here’s the code block that’s returned:
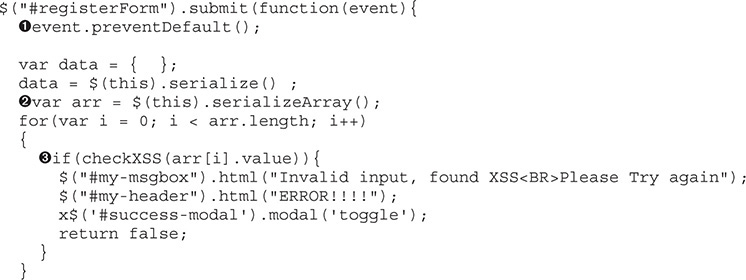
This code block where our error was found is part of the JQuery event that occurs when you submit the form. The first line in the function stops the form from submitting normally u, which means that this function handles the submission of the data for the form. Next we see that the submitted data is being turned into an array v. This array is used to iterate through each item from the form submission.
The checkXSS w function is run against each item in the array, and if true is returned, our error message is printed. The header and the body of the message box are updated and then the message box is turned on x. This is clearly the code that causes the pop-up box with our error. Unfortunately, we don’t know how checkXSS evaluates what we put in, so let’s take a look at that next. When we search for checkXSS in the code, we find the function definition for our code block:
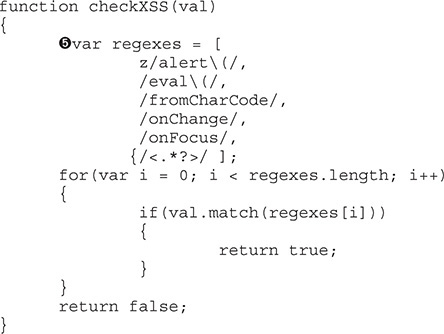
The checkXSS function has a list of regular expressions y it is using to check the inputs. We want to try to pop up an alert box again, but the alert function z is blocked. We also can’t inject an HTML tag because anything that starts or ends with the < or > character is blocked {. So when the data is submitted, each of these regular expressions is checked, and then true is returned if there are any matches. The author of this function has tried to block the most impactful functions of JavaScript and HTML tags.
To figure out how we can get around this, it is worth looking at how the success message is printed to the screen. Understanding how the string is built will help us figure out how to get around some of these protections.

The place where the output string is built { adds the elements in with just <BR> tags separating them. In order for us to get a script tag in, we are going to have to split it between the Full Name and the Address fields, but the <BR> is going to mess everything up. Therefore, to get around this, we’ll create a fake field value in the script tag. Let’s try to see if this will work by making the Full Name field <script qq=" and the Address field "> and then clicking Register.
Pull up the pop-up box in the developer tools in the Inspector tab and search for “registration of.” Looking at the second instance, we see that our script tag was successfully inserted, but now we have to actually create our JavaScript to execute our function. To do this, we need to leverage the DOM. In JavaScript, most of the functions are sub-objects of the window object. There, to call alert, we could use window["alert"](1).
Let’s submit our form with the name <script qq= and the address ">window["alert"](1) and see what happens. We get failure message, but no text. That is likely good, but we won’t know for sure until we look at the code:

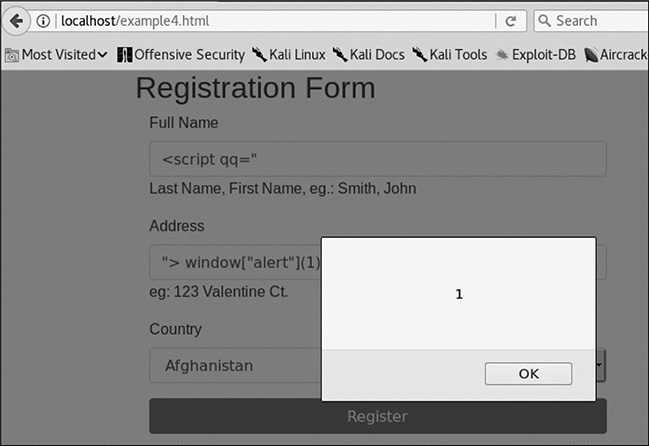
We see here that our alert message was successfully inserted, but there is still text after it. To fix this problem, let’s put a semicolon after our JavaScript and make the rest of the line a comment and then try again. This way, the rest of the line will not be interpreted, our command will execute, and then the browser takes care of closing the script tag for us and we have valid code. To test for this, use <script qq=" for the name and ">window["alert"](1);// for the address.
Figure 16-8 shows that our alert message was successful. When we try this in Chrome, though, what happens? It works as well because the XSS is occurring due to JavaScript manipulation. Now we have some additional ideas on how we can get around different types of XSS protection. This is just the start, though; as technologies change, we will have to keep changing tactics. Thus, understanding JavaScript and common libraries will help make us more proficient at creating XSS in more restrictive environments.
Figure 16-8 Our successful alert message
The alert message is nice, but sometimes we want to do more than just pop up a box. For these instances, we don’t want to have to type all of our JavaScript into the XSS. Instead, we want our XSS to load a remote script and then execute the content. For this example, we’re going to load some code from GitHub directly and then execute the function inside our app. We’ll still use <script qq=" in the Full Name field, but we’re going to use some code from the JQuery library that is included with our example to load remote code.
JQuery is a helper library that has helpers for many different tasks. You can find many tutorials on how to use JQuery, so we won’t get into that now, but we are going to make our address different to show how this technique can work. Our Address field will now read like so:

This loads code directly from GitHub. When the script is loaded, it will execute the success function that we specify. In our case, the success function just runs a function called hacked that’s in the remotely loaded file. When the hacked function runs, it just creates a new alert box, but it can do anything that you can do with JavaScript, such as spoofing a login box or keylogging a victim.
Framework Vulnerabilities
Using frameworks is an amazing way to develop code more quickly and to gain functionality without having to write a ton of code. In 2017, a number of these frameworks were being used, but two of the higher-profile vulnerabilities occurred in a framework called Struts that is part of the Apache projects. Struts is a framework that aids in web application development by providing interfaces such as REST, AJAX, and JSON through the Model-View-Controller (MVC) architecture. Struts was the source of one of the biggest breaches of the decade—the Equifax1 breach that impacted 143 million individuals.
Setting Up the Environment
For the labs in this section, we’re going to use a web server with a vulnerable version of Struts. To do that, we need to build a different Docker image from the GitHub repository for this chapter. To begin with, we need to make sure our previous Docker image is stopped:

If the first command returns a container, then issue the stop for that container ID. That should ensure our previous image is stopped. Next, we need to create our Tomcat image that has the vulnerable Struts libraries installed. The following commands assume that you are in the Ch16 directory of the GitHub repository for this book:

Now our Tomcat instance should be up on port 8080. You can verify it is working by visiting http://localhost:8080 on the Kali 64-bit image.
Lab 16-5: Exploiting CVE-2017-5638
The CVE-2017-5638 vulnerability in Struts is a weakness in the exception handler that is called when invalid headers are put into a request.2 This vulnerability is triggered when the Multipart parser sees an error. When the error occurs, the data in the headers is evaluated by Struts, allowing for code execution. We are able to see the code execution for this example, so we can interactively run commands on the target instance.
One of the demo applications that comes with Struts is known as the Struts Showcase. It showcases a number of features so you can see the types of things you can do with Struts. On vulnerable versions of Struts, though, the Showcase is a great exploit path. To view the Showcase on our VM, navigate to http://localhost:8080/struts-showcase/ and you should see the sample app.
For our exploit, we’re going to use one of the exploits posted to Exploit-DB.com. Exploit number 41570 can be found at https://www.exploit-db.com/exploits/41570/, or you can use searchsploit on your Kali image, and it will show you on the file system where the exploit resides. Exploit-DB exploits are present by default on Kali installs, so you won’t have to download anything special. We’re going to copy the exploit into our local directory first and then try something basic—getting the ID of the user running Tomcat:

When we run our exploit, we’re running it against the showcase.action file in the struts-showcase directory. This is the default action for the Struts Showcase app. We specify the command to use as id, which will retrieve the ID the server is running as. In this case, it’s running as root because we are running this exploit inside Docker, and most apps run as root inside Docker.
Let’s take a look at what’s going on here. To do this, we need to make a quick modification to our script to make it print out debug information. We’re going to use our favorite editor to make the top section of the script look like the following:
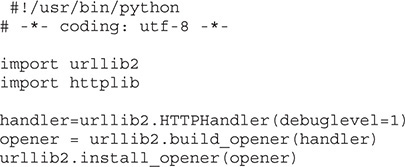
This will cause debug output to be logged when we run our script. Next, we’ll run our script again with the id command and look at the output. The output is going to look pretty jumbled up, but we can just grab the part we’re interested in by filtering the output with the command line:

This looks better, but the exploit code in the middle is a lot to take in, so let’s break down what’s happening here. First, the exploit is being triggered in the Content-Type  header. The value for Content-Type is set to our code that will create the process. The code is creating an action container inside Struts
  and then invoking a utility class that allows us to work within the context of that action
  . Next, the code clears out the blocked functions and specifies the command to run
  .
.
Because the code doesn’t know if the script will be running on Linux or Windows, it has a check for each operating system name and builds either a cmd.exe syntax or bash syntax to run the script. Next, it uses the ProcessBuilder  class, which allows for the creation of a process. The process is then started and the output
  is captured by the script so that it will get all of the output and print it to the screen. Basically, all this is creating a context to run a process in, running it, and grabbing the output and printing it back out to the screen.
Lab 16-6: Exploiting CVE-2017-9805
A few months later in 2017, another Struts vulnerability was released that led to remote code execution. This vulnerability impacts a different part of Struts: the REST interface. This vulnerability occurs because the data sent to the server is deserialized without a check to make sure the data is valid. As a result, objects can be created and executed. Unfortunately, with this vulnerability, we can’t really see the impact. Because of this, we’re going to have to do some additional work to get any sort of interaction with the target system.
To begin, we need an exploit for this vulnerability. Exploit-DB has an exploit that we can use. You can get it from https://www.exploit-db.com/exploits/42627/ or you can use searchsploit again to find the local copy. Let’s take that local copy and copy it into our directory:

With a local copy of the exploit, we need to make sure our target location is correct. To make sure you can get to the page, visit http://localhost:8080/struts-rest-showcase/orders.xhtml. This is the home page for the Struts Rest Showcase, but this page itself doesn’t have what we need to exploit. Because the vulnerability is in the message handling, we need to find a page to which we can submit data. Click view for “Bob” and you’ll see that we’re at the orders/3 page. This is what we’re going to use. Next, let’s do a quick test:


TIP If you get an error about invalid UTF-8 characters, just use your favorite editor to remove the line in 42627.py that reads as follows:

Our test resulted in a ton of errors, but that doesn’t necessarily mean anything. This type of exploit creates an exception when it runs, so the errors might actually mean something good. So how do we tell if our test is working? We can do a ping check for our command. In one window, we’re going to start a pcap capture:

In another window, we’re going to run our exploit. This will call five pings—and if it works, we should see it on our Docker0 interface:

Our Docker instances will be bound to the Docker0 interface, so to verify our exploit is working, we will ping the address of our Docker0 interface five times, and we should see the pings in the pcap capture. The pings show that we are able to successfully run commands on the host. Unfortunately, Docker containers are pretty bare-bones, so we need to put something up there that’s going to allow us to actually interact with the host. With our pcap still running, let’s see what commands we have available to us. The two ideal commands we could use are curl and wget to send data around. First, let’s try curl:

This command will try to ping back to our host, but the trick here is that we’re using the -p payload option for ping to get a success or error condition. If curl doesn’t exist, then we will get pings back; if it does exist, we won’t get anything back because the command will be invalid. We see pings, so curl doesn’t exist in the image. Let’s try wget:

We didn’t get a response back, so it looks like wget exists. In the Vuln_Tomcat directory of the Ch16 directory, we see a file called webcatcher.py. We’re going to run this in order to catch some basic wget data, and we’ll use wget to send POST data with output from commands:

Now for our exploit, we need to build something that allows us to get data back using wget. For this, we’re going to use the --post-data option to send command output back in post data. Our webcatcher will catch that POST data and print it out for us. Let’s build the command to do a basic ls:

We are going to use the wget program to post to our web server. We specify the output file to /dev/null so it doesn’t try to actually download anything, and we set the post data to the command output from our command. We’re starting off with an echo command to give us a new line for easier readability, and then we perform an ls. In our web server, we should see the request and our post data:

It worked, and now even though our exploit doesn’t return data back to the web page, we can create success and error conditions to get information about what’s happening on the back end. We can also use built-in tools to send data around so that we can see the interaction.
The source code is too long to include in this chapter, but if you want to see the code that’s being executed, look at the 42627.py file for the code. At its heart, this exploit is similar to the last one we did in that it’s using ProcessBuilder to execute a command. In this instance, though, the exploit is in XML that’s parsed as part of the exception.
Padding Oracle Attacks
Padding oracle attacks first became mainstream with a .NET vulnerability in 2014 that allowed you to change viewstate information. The viewstate contains information about the user’s state within an application, so the user could potentially change access rights, execute code, and more with this exploit. After the exploit was released, people realized that lots of devices and applications were vulnerable to the same attack, so the exploit got more attention and tools were released to help with this type of attack.
What is a padding oracle attack, though? When an encryption type called Cipher Block Chaining (CBC) is used, data is split into blocks for encryption. Each block is seeded for encryption by the previous block’s data, which creates additional randomness so that the same message sent to different people will appear differently. When there isn’t enough data to fill out a block, the block is padded with additional data to reach the block length. If all the blocks are full at the end, then an additional block is added that is empty.
With the padding oracle attack, we can take advantage of the way the encryption works to figure out the data in the last block based on possible padding values. With the last block solved, we can move back through the data while decrypting it. Once the data is decrypted, we can re-encrypt it and send it in place of the original data. Ideally, the data being sent would have a checksum to identify whether it has been modified, but vulnerable hosts don’t do this computation, so we can modify things at will.

NOTE This is a very complex subject with tons of math at play. A great article by Bruce Barnett on the subject is provided in the “For Further Reading” section. If you want to know more about the math behind the encryption, that’s a great place to start.
Lab 16-7: Changing Data with the Padding Oracle Attack
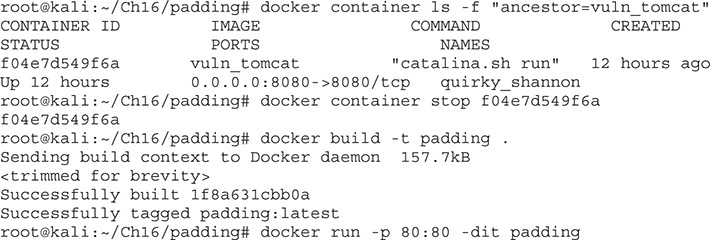
For this lab, we will be changing an authentication cookie in order to demonstrate the attack. We are going to be using a sample web app from http://pentesterlab.com that will act as our target. We’ll be deploying it through another Docker image, so let’s get that set up first. From a new window, execute the following commands from the Ch16/padding directory:
Next, open a web browser to http://localhost to verify that the page is loaded. We’re going to be using Firefox for this lab. The first thing you need to do is create a new account, so click the Register button and create a new account with the username hacker and the password hacker. When you click Register, you should see a page that shows that you are logged in as hacker.
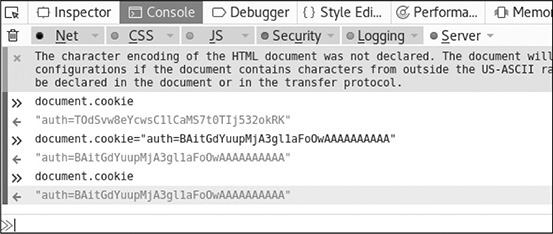
Now that you have a valid account, let’s get our cookie out of the app. To do this, press CTRL-SHIFT-I to get the developer toolbar back up. Click the Console tab and then click in the window at the bottom with the “>>” prompt. We want to get the cookies, so try typing in document.cookie. The output should look similar to Figure 16-9, but your cookie value will be different.
Figure 16-9 The cookie value of our logged-in user

NOTE If nothing shows up for your search, try clearing all the filters in the debugger. This could prevent your content from displaying.
Now that we have the cookie, let’s see if we can abuse the padding oracle to get the data back out of the cookie. To do this, we’re going to use a tool called padbuster. We specify our cookie value, the value we’re trying to decrypt, and the URL that uses the cookie for padbuster to decrypt.
We need to specify a few things for our padbuster script. The first is the URL, and the second is the value we want to change. Because this script is using crypto with a block size of 8, we specify 8. Finally, we specify the cookies and the encoding. An encoding of 0 means Base64 is used. Now we’re ready to try our padding attack:


When padbuster prompted us for the success or error condition, we chose 2 because it was the most frequent occurrence and there should be more errors than successes with the test. It is also the value recommended by padbuster, so it’s a good choice. We see that the cookie was decrypted and that the value was user=hacker.
Now that we know what the value of the cookie looks like, wouldn’t it be great if we could change the cookie so that it reads user=admin? Using padbuster, we can do that as well. We’ll need to specify our cookie again and give it the data to encode, and it will give us back the cookie value we need. Let’s give it a try:

Now we have our encrypted cookie value. The next step is to add that value back into our cookie and reload the page to see if it works. We can copy the output and then set the cookie by running the following two commands:

Our output should show that after we set the cookie and then query it again, the cookie is indeed set to our new value. Figure 16-10 shows the initial query of the cookie, changing the cookie value, and then querying it again. Once the cookie is set, click Refresh in the browser and you should now see that you’ve successfully logged in as admin (in green at the bottom of your screen).
Figure 16-10 Changing the cookie value
Summary
Here’s a rundown of what you learned in this chapter:
• Progressively more difficult methods of attacking cross-site scripting vulnerabilities in web applications
• How to exploit two different types of serialization issues in the demo Struts applications
• How to chain commands together to determine when a command is succeeding or failing when there is a blind attack
• How the oracle padding attack works, and how to use it to change the value of cookies
For Further Reading
“CBC Padding Oracle Attacks Simplified: Key Concepts and Pitfalls” (Bruce Barnett, The Grymoire, December 5, 2014) https://grymoire.wordpress.com/2014/12/05/cbc-padding-oracle-attacks-simplified-key-concepts-and-pitfalls/
OWASP deserialization explanation https://www.owasp.org/index.php/Deserialization_of_untrusted_data
References
1. “Dan Godwin, “Failure to Patch Two-Month-Old Bug Led to Massive Equifax Breach,” Ars Technica, September 9, 2017, https://arstechnica.com/information-technology/2017/09/massive-equifax-breach-caused-by-failure-to-patch-two-month-old-bug/.
2. “An Analysis of CVE 2017-4638,” Gotham Digital Science, March 27, 2017, https://blog.gdssecurity.com/labs/2017/3/27/an-analysis-of-cve-2017-5638.html.
