CHAPTER 20
ATM Malware
The automated teller machine, or ATM, is a major target for criminals, and the reason is simple: it’s loaded with cash! Twenty years ago, the challenge for criminals was to break into a secure ATM vault where the money was kept, but in recent years attackers find a potentially easier path to money by infecting ATMs with malware. In this chapter, we take a look at some of the most dangerous ATM malware in recent years and, more important, techniques that aid in dissecting and identifying indicators of compromise. In addition, we look at ways to mitigate the risks presented by ATM malware.
In this chapter, we discuss the following topics:
• Automated teller machines (ATMs)
• Extensions for Financial Services (XFS)
• XFS architecture
• XFS manager
• ATM malware
• ATM malware countermeasures
ATM Overview
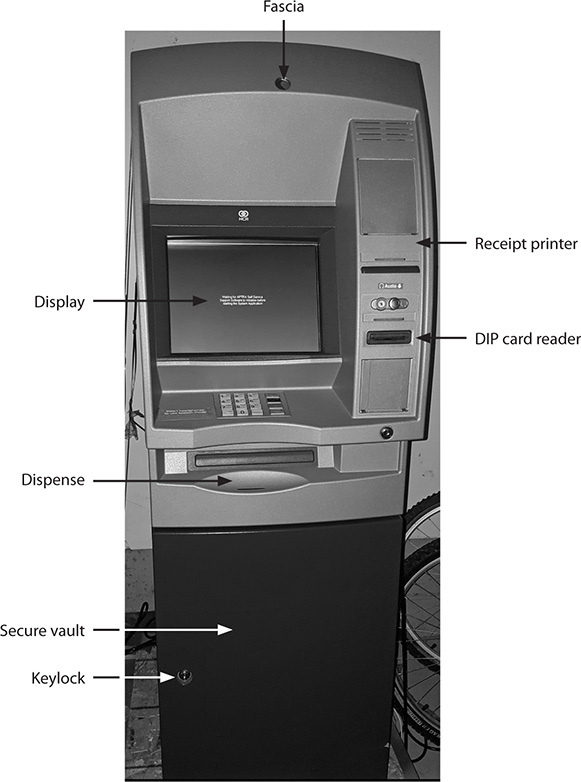
Automated teller machines have existed for more than 50 years now, and their main purpose is to dispense cash. However, nowadays these machines can also be used to pay utility bills, add credit to phones, or even deposit checks. In this chapter, we are going to be working with a real NCR Personas 5877 ATM (P77), which is a Windows PC–based self-service ATM. Figure 20-1 shows the external components of the machine. Some of these components are self-explanatory, but the following deserve more explanation:
Figure 20-1 External view of the NCR Personas 5877
• Fascia The fascia covers only the upper portion of the ATM and allows access to the PC hardware. The fascia is opened via the top lock key.
• Keylock This keylock protects the lower portion of the ATM and is where the secure vault (and money) is located.
• Display/touchscreen Even old monitors have touchscreen support to enable interaction with the ATM.
• Keyboard Also known as the pinpad, the keyboard allows the user to interact with the ATM.
• Dispenser This is the main ATM component for users making cash withdrawals and is described in detail later in this chapter.
Next, Figure 20-2 shows the inside of the ATM once the upper and lower portions are open. The upper portion contains the PC core, which is basically the CPU running the operating system (OS), along with the peripherals and ports, and the following two important components:
Figure 20-2 Internal view of the NCR Personas 5877
• On/off switch Used to turn the ATM on and off
• Supervisor/operator panel Used to put the ATM in configuration mode, normally by technicians who are testing or configuring the machine
The lower portion shows the following components inside the secure vault:
• Purge bin Holds the rejected bills that were not able to be dispensed
• Currency cassettes Hold the cash available in the ATM. Each cassette holds a different denomination (for example, $20, $50, or $100 bills). Depending on the vendor, an ATM can have one or more cassettes.
• Interlock switch This is a sensor that allows the ATM to know when the secure door is open.
Now that we have covered the main components, how do they interact with each other? We can understand this by looking at the steps taken during a cash withdrawal (the ATM components are bolded):
1. The cardholder enters a debit card into the card reader.
2. The cardholder enters his or her personal identification number (PIN) through the keyboard (pinpad).
2. Both the card data and PIN are handled by the XFS manager (PC core) and sent to the bank for validation.
4. The bank validates the card and returns the authorization result.
5. If the card is approved, the XFS manager sends notification to the dispenser, located in the secure vault, to dispense the money.
6. The dispenser interacts with the cassette holding the denomination needed and starts dispensing cash.
7. The receipt printer is called to provide a transaction receipt to the cardholder.
XFS Overview
The Extensions for Financial Services (XFS) were initially created by the Banking Solutions Vendor Council (BSVC), a group started by Microsoft back in 1995 and later adopted in 1998 by the European Committee for Standardization (also known as CEN) as an international standard.
Initially, the BSVC decided to use Microsoft Windows as the operating system for XFS, but then adopted and enhanced the Windows Open Service Architecture (WOSA) with XFS, defining a Windows-based client/server architecture for financial applications, and hence the name WOSA/XFS. The WOSA/XFS contains specifications for access to financial peripherals, which includes but is not limited to the printer, card reader, pinpad, dispenser, and cassettes.
This section provides an overview of WOSA/XFS. For more details, it is recommended that you read the full specification created by CEN, CWA 13449-1.1
XFS Architecture
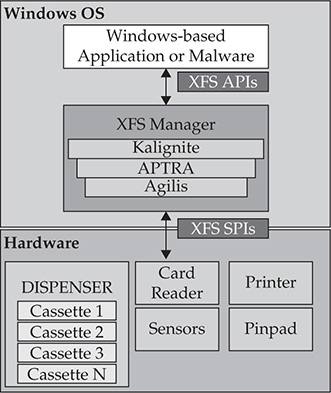
All major ATM vendors nowadays use Windows as the operating system and therefore must adhere to the XFS standard defined by CEN. The workflow is shown in the following steps:
1. The Windows-based application communicates with peripherals via the XFS manager using a predefined set of app-level APIs (WFS prefix).
2. The XFS manager maps the specified app-level API to the corresponding service provider’s APIs (WFP prefix).
a. The XFS manager uses the configuration information stored in the registry for the mapping process.
b. The XFS manager and service provider are vendor-specific implementations.
3. Any results from the peripheral are sent back to the Windows-based application via the XFS manager’s APIs (WFM prefix).
The XFS architecture is shown in Figure 20-3.
Figure 20-3 XFS architecture
The following example shows the common app-level APIs used during an interaction between the Windows-based application and the XFS manager:
• WFSStartUp() Connects the Windows-based application with the XFS manager.
• WFSOpen() Establishes a session between the Windows-based application and the service provider via the XFS manager.
• WFSRegister() Configures messages to receive from the service provider.
• WFSLock() Provides exclusive access to the peripheral.
• WFSExecute() Multiple calls of this function specify different commands, such as Dispense, Read Card, Print, and so on.
• WFSUnlock() Releases control of the peripheral.
• WFSDeregister() Stops the receiving of messages from the service provider.
• WFSClose() Ends the session.
• WFSCleanUp() Disconnects the application from the XFS manager.

NOTE Every XFS API has synchronous and asynchronous versions that, when called, work as follows:
Synchronous call The program will be blocked until the function completes the entire operation. In this case, the application executes in a sequential manner.
Asynchronous call The function returns immediately but will be completed in an uncertain amount of time.
XFS Manager
Every ATM vendor implements its own XFS manager via its own middleware, always following the WOSA/XFS standard defined by CEN. Here is a list of the most notable XFS middleware currently available:
• Diebold: Agilis Power
• NCR: APTRA ActiveXFS
• KAL: Kalignite
• Wincor Nixdorf: Probase (merged with Diebold)
As mentioned in the previous section, the XFS manager is responsible for mapping the API functions (DLLs starting with WFS) to SPI functions (DLLs starting with WFP) and calling the vendor-specific service providers. To see this process in action, let’s use the FreeXFS Framework (OpenXFS_V0.0.0.5.rar), which comes with the full implementation of XFSManager, service provider interfaces (SPIs) of various devices, and sample application code based on CEN XFS 3.0.2
If we look at the XFSManager implementation via FreeXFS, which is located in the \Manager\NI_XFSManager.h file, we can clearly see the definition of the supported WFS and WFM APIs:


NOTE The implementation of these APIs can be found in \Manager\NI_XFSManager.cpp.
Let’s explore the code in \Samples\WosaXFSTest20100106\WosaXFSTestView.cpp to fully understand the XFS manager’s operation.
Step 1: WFSStartUp
The first step is to connect the Windows-based app with the XFS manager:

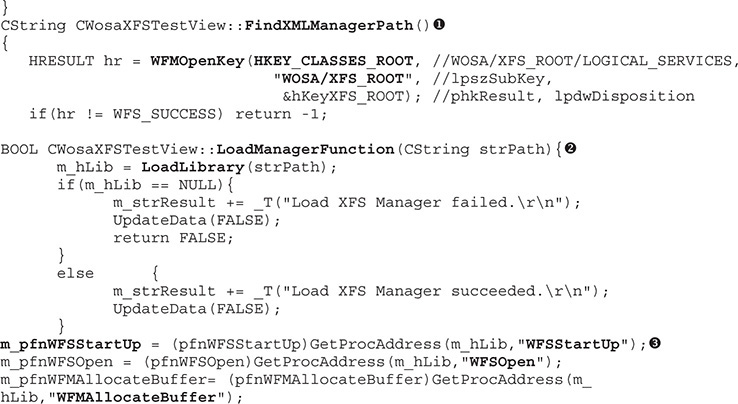
Before anything else, the XFS manager must be loaded in memory; then it is implemented in a DLL and the associated path is stored in the registry. In this example, the FindXMLManagerPath() function  (duplicated to also show the function implementation; the same for callout
  ) helps to retrieve this value. Once the DLL path is identified, the LoadManagerFunction()
  helps to load it in memory via the LoadLibrary API. Within the same function, all WFS* and WFM* functions are supported by the XFS manager and loaded via the GetProcAddress API
  .
.
At this point, the XFS manager is loaded in memory and now needs to be connected with the Windows-based application via the WFSStartUp API  , which passes as its first parameter the range of SPI versions that are expected to be handled by the XFS manager. If those are not supported by middleware, the call will return an error.
Step 2: WFSOpen
Once the Windows-based application and the XFS manager are synchronized, it’s time to interact with an ATM peripheral (also known as logical service) to perform any desired action, such as opening the card reader or dispensing some money. The interaction with the peripheral is done via its SPI, so we first need to identify all the logical services available by querying HKEY_USERS\.DEFAULT\XFS\LOGICAL_SERVICES\ in the Windows registry.
It is important to mention that each ATM vendor has its own naming convention; for example, NCR names its dispenser CurrencyDispenser1, whereas Diebold uses the name DBD_AdvFuncDisp. These indicators are really helpful when we’re trying to identify the target of the ATM malware. Another use of this registry key is to query the status of the peripheral via the WFSGetInfo API before we start interacting with it. More details are provided in the section “ATM Malware Analysis,” later in this chapter.
Once the logical service to interact with is identified, the WFSOpen API (or the WFSAsyncOpen API, depending on the application’s needs) will receive this value as the first argument, following our example based on WosaXFSTestView.cpp. That value is passed via the m_strLocalService variable  , shown next:
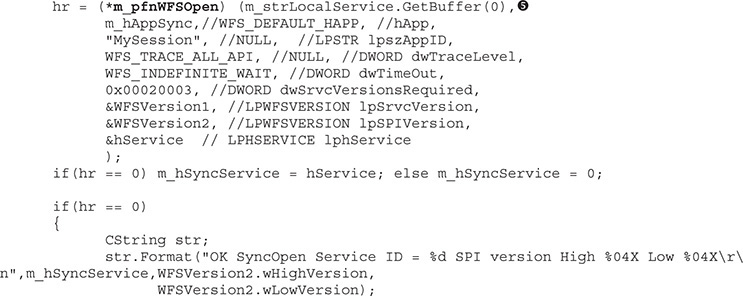
The remaining parameters passed to the function are self-explanatory and are not important for the purpose of our analysis.
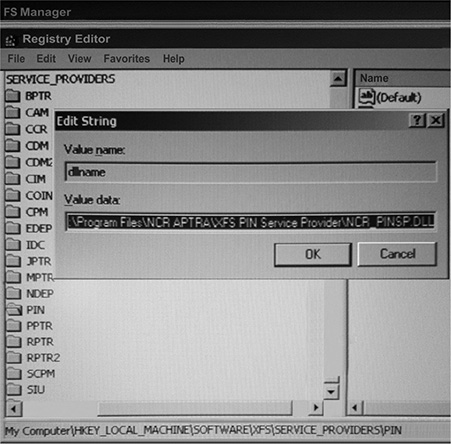
Now, how does the XFS manager know the SPI DLL to interact with? It also comes from the registry key \XFS\SERVICE_PROVIDERS\ and is based on the logical services previously identified. Figure 20-4 shows that the DLL of the pinpad SPI is NCR_PINSP.DLL. Note that the SPIs are independently implemented by every vendor.
Figure 20-4 Identifying the SPI DLL
Step 3: WFSRegister
Now it’s time to configure the messages to receive from the service provider via the WFSRegister API. In the following code, we see that the events from SYSTEM, USER, SERVICE, and EXECUTE are being configured  :
:

Step 4: WFSExecute
Finally, the last main step (we’re skipping some steps not needed for our purposes) is to request the peripheral (or logical service) to execute an action via the SPI implementation. Common actions include asking the card reader to read the data from tracks 1 and 2 on the debit card and asking the dispenser to dispense some money!
Figure 20-5 shows the Ripper3 malware in action (this sample malware, 15632224b7e5ca0ccb0a042daf2adc13, will be used throughout the chapter), calling the WFSAsyncExecute API and receiving in its second parameter the action to be executed (in this case, WFS_CMD_PIN_GET_DATA, to read the information entered at the pinpad).
Figure 20-5 Interacting with the pinpad
We have gone through all details an XFS-compliant ATM follows when dealing with daily operations, and we discussed the importance of the XFS manager in coordinating this effort. In the next section, we look at some techniques for analyzing ATM malware.
ATM Malware Analysis
Now that you understand how the XFS-compliant ATM works from end to end, let’s look at some useful techniques for dissecting ATM malware based on real threats found in the wild.
We’ll take a quick overview of the main features of ATM malware so that you understand what types of threats are seen in the wild, how are they installed in the ATMs, how the malware interacts with the attackers, and how the malware steals information or money!
Types of ATM Malware
There are two types of ATM malware: those affecting cardholders and those affecting banks.
Malware Affecting Cardholders
This type of malware focuses on stealing information from the ATM such as the victims’ full names, debit card numbers, expiration dates, and encrypted PINs. All of this data is then sold on the black market, where cloned cards are created and unauthorized online payments are made. From a malware analysis perspective, these threats act like information stealers—no knowledge about ATMs is necessarily needed during the analysis. Examples of these kind of threats are PanDeBono and NeaBolsa, found in Latin America.4 These threats steal information via a USB device that’s inserted into the machine and is recognized and validated by the malware running inside.
Even though skimmer devices are related to physical attacks, and are therefore outside the scope of this chapter, it is worth mentioning them because they affect cardholders. These devices are physically attached to the ATM in a hidden way so that the victim cannot see them (see Figure 20-6). Those devices can come either with a camera or as a fake pinpad or card reader, mainly to capture entered PIN numbers or steal card data. They are able to send the stolen information in real time to the attackers via Bluetooth, GSM, or any other wireless communication.
Figure 20-6 Skimmers attached to ATMs
There was a known case in Cancun, Mexico, where the skimmers were installed inside the ATMs and communicated with the attackers via Bluetooth. The fact that most of those infected machines were inside hotels and airports suggests that local gangs are supported by people from “legitimate” businesses. “Going to the cops would be useless at best, and potentially dangerous; Mexico’s police force is notoriously corrupt, and for all my source knew the skimmer scammers were paying for their own protection from the police,” wrote Brian Krebs.5
Malware Affecting Banks
This type of malware empties the ATMs; therefore, the cardholders are not affected, but the banks are. This is done either by reusing the XFS middleware installed in the machines or by creating an XFS-compliant application. Examples of these type of threats include Ploutus, Alice, SUCEFUL, Ripper, Padpin (later named Tyupkin by Kaspersky), and GreenDispenser.
Techniques for Installing Malware on ATMs
This section will describe the different techniques that attackers employ to infect ATMs with malicious software.
Physical and Virtual Attacks
For a physical attack, the attackers open the upper portion of the ATM (refer back to Figure 20-1) and transfer the malware via the following techniques:
• Attaching a USB or CD-ROM and rebooting the machine. Once this happens, the BIOS order is changed to boot into the newly attached device and start the malware installation.
• Removing the hard disk of the ATM, connecting it as slave disk on the attacker’s laptop, and transferring the malware. Alternatively, the ATM hard disk is replaced with one from the attacker that is already prepared to work with the targeted model.

NOTE The Ploutus gang is known to use these two techniques in ATMs across Latin America.
For a virtual attack, the attackers break into the bank’s network or payment gateway. Once inside, the goal is to find the network segment where the ATMs are connected and to locate a vulnerability in order to drop the malware through the network to the teller machines. This attack is powerful because it can infect any ATM worldwide. This was the case with the Ripper ATM malware; the attackers infected the machines in Thailand through the bank’s network and then the mules (the people in charge of receiving the cash coming out of the machine) flew to that territory to empty the machines within hours!
Malware Interacting with the Attackers
Once the malware has been installed inside the ATM, the attackers need to have a way to interact with it without getting noticed by the cardholders. This means the malware interface will pop up on the screen only after receiving some sort of activation.
The first known case of interaction (used by Ploutus malware with MD5: 488acf3e6ba215edef77fd900e6eb33b) involved an external keyboard attached to the ATM. Ploutus performs what is known as “keylogging,” which allows the attackers to intercept any keystrokes entered, and as soon as it finds the right combination of keystrokes, it will activate the GUI that allows the attackers to dispense cash on demand. In the following code listing, Ploutus is checking if any of the F keys were entered in order to execute a specific command. The F4  key, for example, will hide the GUI interface.
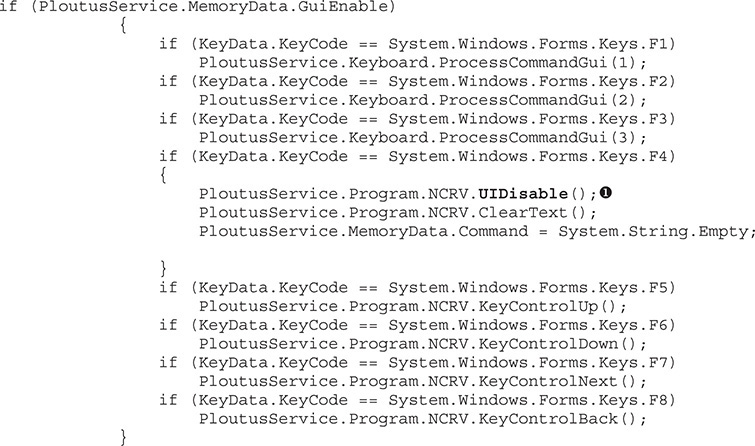
The second form of interaction is via the pinpad, where the attackers enter a combination of numbers in order to bring up the malware interface. In order to accomplish this, the malware needs to use the XFS APIs, as shown earlier in Figure 20-5, where the command PIN_GET_DATA is reading the information entered.
The last form of interaction is via the ATM’s card reader. Similar to the pinpad strategy, the malware uses the XFS APIs, but this time to interact with the target device and read the data on tracks 1 and 2 from the debit card. If the magic number expected by the attackers is provided, the GUI will be activated. In cases like Ripper, that’s the trigger to start emptying the ATM.
How the Information or Money Is Stolen
In cases where the cardholder data is the target, if skimmers are used, these devices already come with wireless protocols such as GSM that allow the attackers to receive the stolen information in real time. When malware is used to accomplish this goal, as in the cases of PanDeBono or NeaBolsa malware, the stolen information is copied into the attackers’ USB that’s plugged into the ATM.
Regarding cash, all the threats interact with the ATM dispenser (no need for an exploit or authentication bypass) just by using the XFS APIs, and without any restrictions the dispenser will start providing money. Refer to the section “ATM Malware Countermeasures,” later in this chapter, for recommendations of how to mitigate these risks.
Techniques for Dissecting the Malware
In this section, we talk about how to dissect ATM malware and extract the most important indicators of compromise (IOCs). The main goals during a malware investigation should be the following:
1. Confirm the sample is targeting ATMs.
2. Confirm the sample is malicious.
3. Identify how the malware was installed. Normally it is very difficult to know this, unless the customer affected provides that information.
4. Identify how the malware interacts with the attackers.
5. Identify the purpose of the malware: either targeting the cardholder or the cash inside the ATM.
All these steps are detailed in this section.
Confirm the Sample Is Targeting ATMs
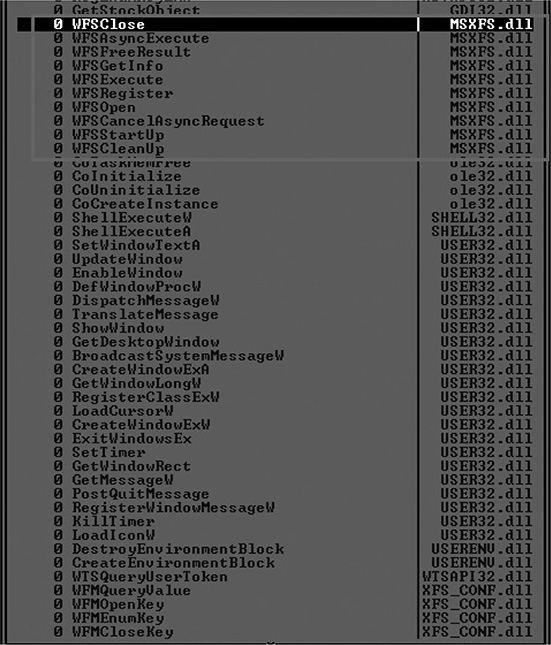
If your job requires you to perform analysis on ATM malware, the first thing you need to do is to confirm that the sample provided is actually targeting these machines. One way to validate this is to check whether the binary in question is importing MSXFS.dll, which is the DLL that implements the default XFS manager in the teller machine (all the WFS* and WFM* functions described earlier in the chapter). This is a strong indicator. Figure 20-7 shows the Import Table from Ripper ATM malware (after UPX has unpacked the malware), and you can see that MSXFS.dll has been imported. This is the case with other malware families as well, such as GreenDispenser, Alice, SUCEFUL, and Padpin.
Figure 20-7 Ripper ATM malware importing MSXFS.dll
Malware such as Ploutus does not follow the same strategy, so you won’t find the same indicator. Instead, you should look for references to the XFS middleware. Ploutus is able to control the APTRA middleware from NCR or the middleware from Kalignite, which is a multivendor solution. For these cases, you should look for the presence of libraries such as NCR.APTRA.AXFS and K3A.Platform.dll and verify them accordingly.

NOTE This approach assumes the malware is not packed or obfuscated. If that is the case (Ploutus always comes highly obfuscated), the first step would be to deobfuscate or unpack the sample and then try to find the aforementioned indicators.
Confirm the Sample Is Malicious
Now that we’ve confirmed the sample we’re dealing with is definitely created to work on an ATM machine, it is important for us to confirm whether it is malicious. Otherwise, we could be dealing with ATM testing tools that use the same libraries for legitimate purposes (for example, to perform withdrawals or card readings to confirm the peripheral works as expected).
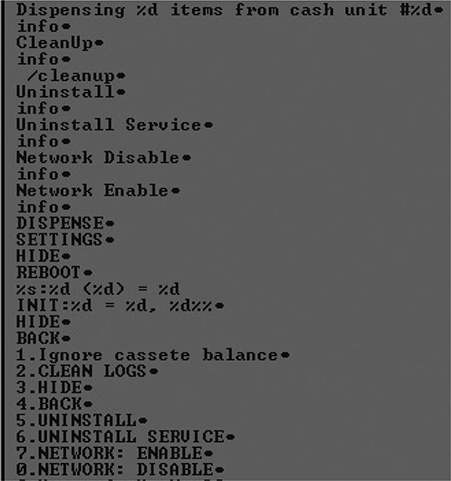
One way to verify maliciousness is by looking for logging or custom error messages in the sample. Sometimes it’s very easy to spot those custom messages. For example, the latest Ploutus-D variant at the time of this writing had the message “PLOUTUS-MADE-IN-LATIN-AMERICA-XD,” which clearly lets us know it is malware. Figure 20-8 shows an extract of strings found in the Ripper malware. When you look at the custom messages here, such as “Dispensing %d items from cash unit” as well as “CLEAN LOGS” and “NETWORK: DISABLE,” you can see that they highly suggest something malicious is being done with this sample.
Figure 20-8 Custom error messages in Ripper
Another important verification is related to the code that is trying to dispense cash (and, even better, if the withdrawal is within a loop attempting to empty the ATM). The following code listing shows the famous loop from the Ploutus version. It retrieves the denomination of Cassette 4 ($5, $20, $50, or $100) and then multiplies by the maximum number of bills allowed by the dispenser (in this scenario, this is 40 for NCR Personas, which is one of the targets of Ploutus) in order to calculate the total amount to withdraw  . If the number of bills in the cassette is less than 40, it moves to the next cassette and performs the same actions
  . Ploutus wants to start with a cassette with more bills loaded! This process is repeated
  until no more cash is left in the cassettes.

Identify How the Malware Interacts with the Attackers
This step separates traditional malware analysis from ATM-based analysis. Here, we focus on the analysis of the XFS APIs to understand the purpose of the malware. The two main APIs to focus on are WFSOpen and WFSExecute (or their asynchronous versions).
As explained in previous sections, the WFSOpen API allows us to know the peripheral the malware is trying to interact with. This will give us a clue as to what the malware is trying to do. For example, if we see only interactions with the pinpad, then that is probably the way to interact with the malware.
If you go to the Imports tab in IDA Disassembler and then press X on the API in question, all the references to that API within the binary will be displayed (see Figure 20-9).
Figure 20-9 Cross-reference feature in IDA
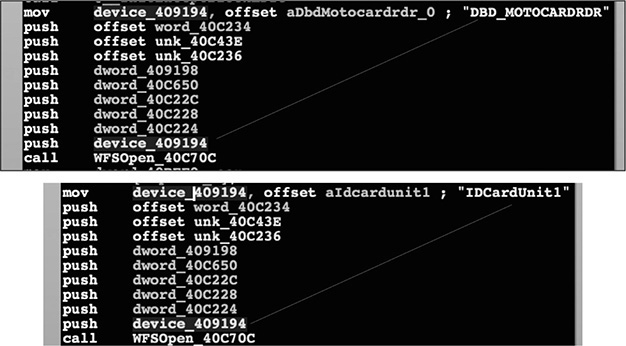
Once you’ve identified the calls to WFSOpen, you just need to look at the content of the first parameter, which is a string identifying the peripheral to interact with (keep in mind this name changes depending on the ATM vendor). In Figure 20-10, an example of the SUCEFUL ATM malware6 is shown interacting with the card reader peripheral of two vendors: Diebold (known as DBD_MotoCardRdr) and NCR (known as IDCardUnit1).
Figure 20-10 WFSOpen calls from different vendors
Once you know the peripheral or logical device the malware is trying to interact with, it’s time to find out the command to execute it, making sure to correlate the WFSOpen calls with the WFSExecute calls to distinguish among the operations requested. Once you identify the WFSExecute calls, you need to focus on the second parameter, which is a number that indicates the action to be performed. Again, let’s take Ripper as an example. In the following code listing, the second parameter being pushed is the number 302 (see line .text:004090B8), but what is the purpose of this number?

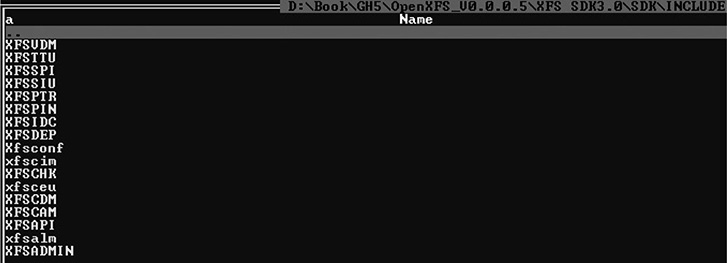
In order to know the answer, you need to have the headers of the XFS SDK ready (see Figure 20-11).
Figure 20-11 OpenXFS header files
Every header represents one of the peripherals and is located within a range as follows:
• 100 - XFSPTR Banking printer definitions
• 200 - XFSIDC Identification card unit definitions
• 300 - XFSCDM Cash dispenser definitions
• 400 - XFSPIN Personal identification number keypad definitions
• 800 - XFSSIU Sensors and indicators unit definitions
• 900 - XFSVDM Vendor-dependent mode definitions
Since the number in question is 302, let’s have a look at the XFSCDM file definition within the SDK. We focus on the “CDM Execute Commands” section because WFSExecute was called (the “CDM Info Commands” section is used when WFSGetInfo is called). Following is the formula to calculate the target number:

We are able to identify the 302 command in question, WFS_CMD_CDM_DISPENSE , which refers to dispensing money.

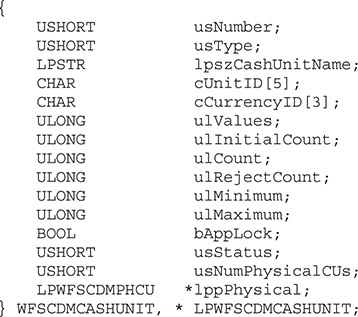
There is more useful information in these definition files that can help the reverser to fully understand the malware logic, such as status messages, error messages, and even structure definitions  .
.
Now you should be able to dissect the command executed in the next code listing taken from Ripper malware:

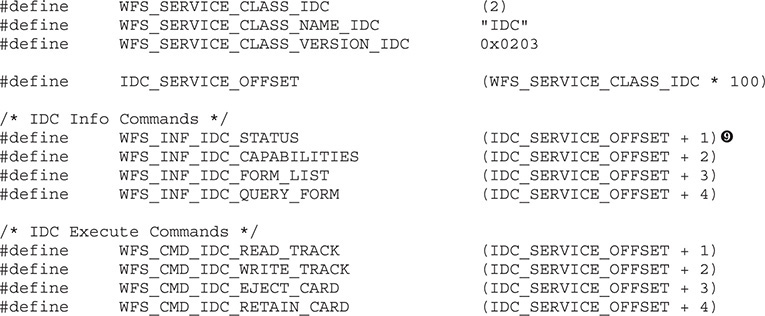
We can see that the command 201  belongs to the XFSIDC definitions file (see Figure 20-11), and because the WFSGetInfo call is being used, we focus on the “IDC Info Commands” section this time. Next, we identify that the WFS_INF_IDC_STATUS
  command is being called, basically to know the status of the card reader!
For malware such as Ploutus that focuses on controlling the XFS middleware (Agilis, APTRA, Kalignite, and so on), this approach won’t work. Fortunately, Ploutus likes .NET. Therefore, once the malware is deobfuscated, full source code is available for analysis, without any need for reversing the majority of the components (although some components are implemented in Delphi and require reversing).
ATM Malware Countermeasures
Here is a list of best practices when dealing with ATM malware that are definitely recommended but not applicable to all attack scenarios:
• An antivirus or Host Intrusion Prevention System (HIPS) is useful if and only if it is “ATM environment” aware. These products normally won’t be able to detect malicious behavior in the dispenser, for example.
• Disk encryption helps with offline attacks that transfer the malware to the teller machine by disconnecting the storage device from the ATM.
• Application whitelisting helps to execute the expected processes only.
• Penetration testing helps to proactively identify issues before hackers do.
• BIOS with password protection should be enabled.
• ATM malware training is useful for understanding how to dissect and detect specific threats.
• The “ATM Software Security Best Practices Guide” and the “ATM Security Guidelines” should be followed. See the “For Further Reading” section for more specifics.
Summary
In this chapter, we described the different components of an ATM and the role that each plays while dispensing money. We explored the different types of malware that affect these teller machines, dissecting their inner workings. Finally we presented countermeasures to try to mitigate the risk of this threat, which has led to the theft of millions of dollars from banks worldwide.
For Further Reading
ATM Security Guidelines https://www.pcisecuritystandards.org/pdfs/PCI_ATM_Security_Guidelines_Info_Supplement.pdf
ATM Software Security Best Practices Guide https://www.atmia.com/files/Best%20Practices/ATMIA%20Best%20Practices%20v3.pdf
XFS middleware https://en.wikipedia.org/wiki/CEN/XFS
References
1. “CWA 13449 - XFS Interface Specification Release 2.0,” European Committee for Standardization, https://www.cen.eu/work/areas/ICT/eBusiness/Pages/CWA13449.aspx.
2. OpenXFS Repository, freexfs, https://code.google.com/archive/p/freexfs/.
3. Daniel Regalado, “RIPPER ATM Malware and the 12 Million Baht Jackpot,” FireEye, August 26, 2016, https://www.fireeye.com/blog/threat-research/2016/08/ripper_atm_malwarea.html.
4. Infostealer.PanDeBono, Symantec, June 26, 2014, https://www.symantec.com/security_response/writeup.jsp?docid=2014-042323-5548-99&tabid=2; Infostealer.Neabolsa, Symantec, April 23, 2014, https://www.symantec.com/security_response/writeup.jsp?docid=2014-042214-1330-99&tabid=2.
5. Brian Krebs, “Tracking a Bluetooth Skimmer Gang in Mexico,” Krebs on Security, September 15, 2015, https://krebsonsecurity.com/2015/09/tracking-a-bluetooth-skimmer-gang-in-mexico/.
6. Daniel Regalado, “SUCEFUL: Next Generation ATM Malware,” FireEye, September 11, 2015, https://www.fireeye.com/blog/threat-research/2015/09/suceful_next_genera.html.
