2
Movement
The Japanese concept of ma, or emptiness of space, has a profound role in ikebana—serving to represent the life force flowing through and around all living things. And if naturalness in the art of arranging (see Naturalness) is an attempt to capture a snapshot in time, the theme of movement sets out to conjure what is invisible—the animated aftereffect of a push or pull from an external source.
Movement is the point at which your arrangement comes to life, and in this chapter we show you ways in which you can render energy visually apparent; each project that follows is dynamic, with an unruly, wind-tousled look. Perhaps the most overt example of this is In the Valley , in which we’ve imagined two powerful currents moving through the arrangement in opposing directions—one expanding palm bark to its fullest and pushing it up and nearly out of the vessel, the other exposing delicate coreopsis to “the elements”—resulting in a composition that looks as though it may be liberated from its home at any moment. But movement need not be on a blockbuster scale. It can also take a quieter form, as in Oudolf’s Meadow , which is composed of dried grasses and purple asters that appear to be gently rustling in the breeze.
Arranging with an attention to motion lends itself to a cinematic inner narrative: You must imagine the “scenes” immediately before and after the one you seek to portray, reflecting on where the arrangement has been and anticipating where it is going, in order to arrive at the present, a moment shot through with signs of life.
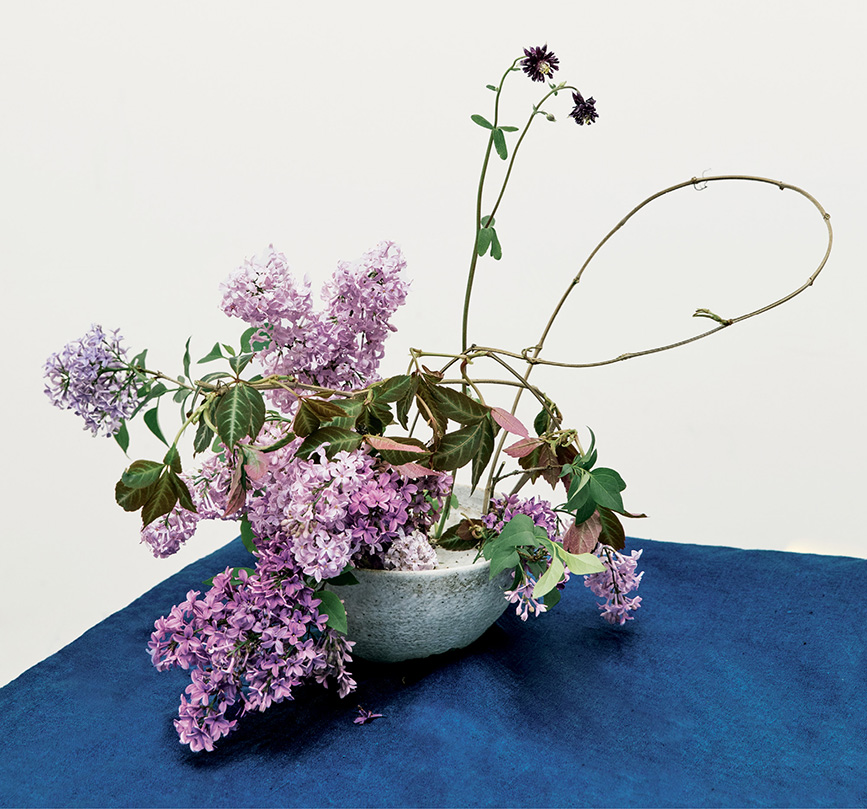
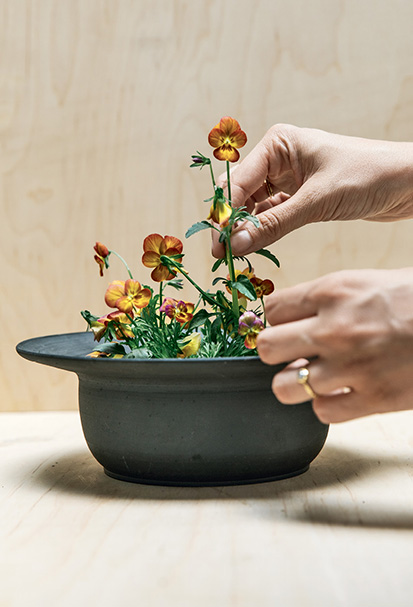
Columbine Offering
Purple Lilacs, Silvervein Creeper Vines, and ‘Black Barlow’ Columbine
This springtime arrangement takes its inspiration from a style of ikebana pioneered by the Ohara school: hana-kanade (hana, “flower,” and kanade, “to dedicate”). The traditional form assumes one of three symbolic shapes: plants sprouting or flowers beginning to bloom, two “hands” in offering, or a step forward. The most striking visual feature of this style that persists into modern arranging is two strong principal stems crossing, moving inward. In our arrangement, the lines of a silvervein creeper vine and a ‘Black Barlow’ columbine stem cross low in the composition. We also used the vine to create a decorative flourish along the right side of the arrangement, representing a step forward (in this case, from winter to spring).
Creating the Arrangement
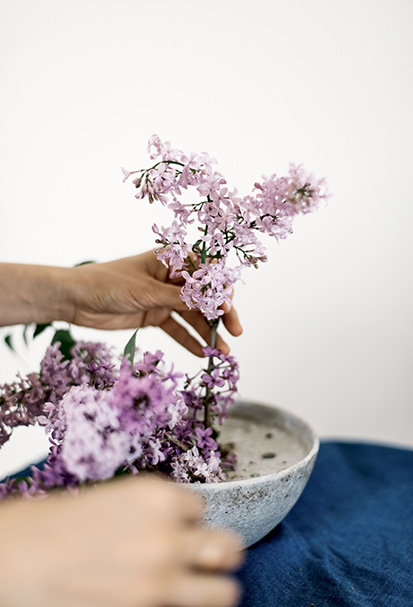
Before they’re cut, lilacs appear full and lush, but each bloom actually grows on its own stick-straight stem. To re-create their natural volume in an arrangement, counter their upright, aggressively vertical growth by carefully stacking the flowering heads on the lid of the vase. The perforated lid of this deep, wide bowl (see photo) meant we could pile up the ingredients directly on the surface of the vessel, lending stability to the arrangement and allowing us to “sculpt” the lilacs into a soft, languid shape. You could also stack a few small rocks inside any low bowl to create a shelf for the lilac blooms to rest on.
1. Fill a deep, wide bowl with water.
2. Working with six stems of lilac, position the first one on the left side of the bowl, leaning it to the left, then arrange a short stem under it, with its blooms touching the top of the bowl. Place another lilac near the front left, letting it cascade out of the bowl. Add another lilac just above it, with the bloom leaning on the other stem to conceal it.
3. Insert a long stem of lilac just left of the center of the vase and orient the blooms inward. Arrange a short stem of lilac on the right side, so that it spills out of the vase, to balance the heavier mass of lilac on the left, visually uniting the left and right sides of the arrangement.
4. Position a vine of silvervein creeper on the right side of the vase and arch it to the left, so that it appears to grow amid the lilac blossoms.
5. Remove the foliage from a long silvervein creeper vine. Tuck it into an opening on the right side of the bowl and bend it to create a loop off the right side of the arrangement. Secure the other end of the stem inside the bowl on the opposite side.
6. Set a long stem of columbine in the center of the arrangement, standing it straight up, to create a sharp line in contrast to the lush lilacs.
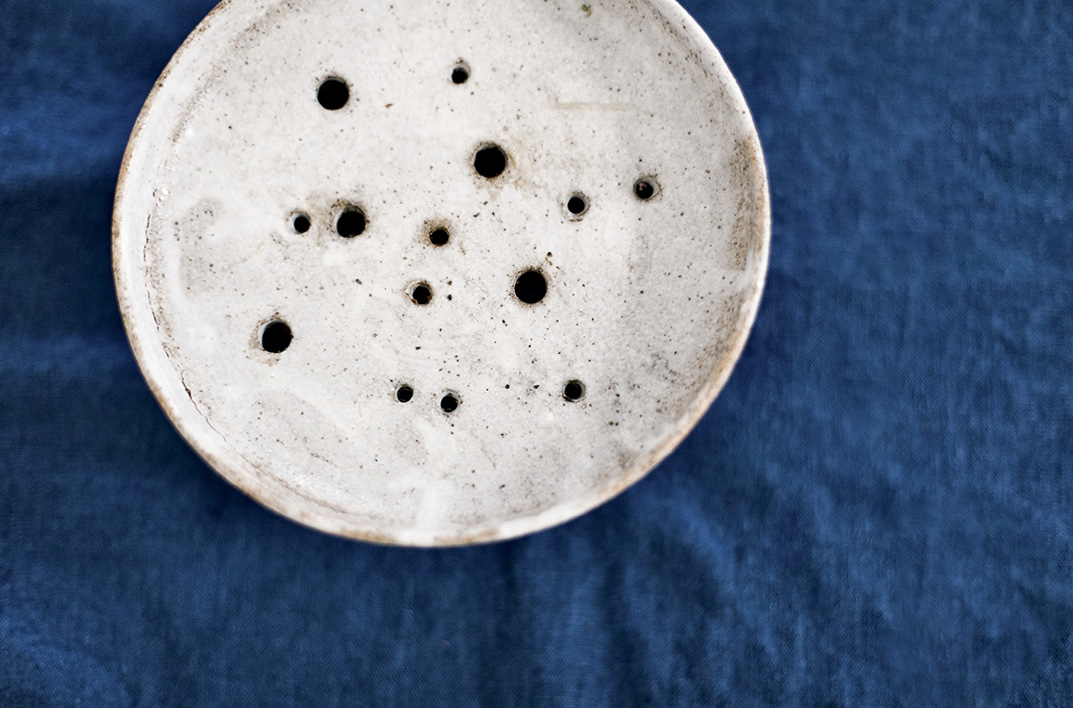
Our friend and frequent collaborator Daniel Karvasales created this deep, wide bowl with a perforated inner lid for us. The randomly sized and spaced perforations create stability for the stems.
While some florists recommend pounding lilac stems to increase the surface area for water absorption, we prefer to just give them a clean cut on a sharp diagonal. As with most flowers and foliage, cutting the lilacs in the very early morning when they are most hydrated, then immediately plunging them in water, will result in the longest vase life.
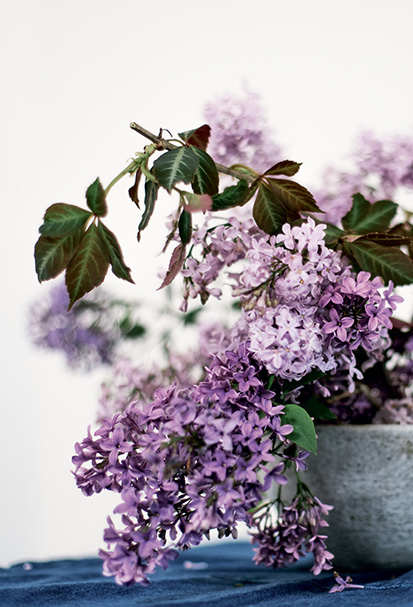
Here we’ve used some silvervein creeper vines with mature foliage, in which the silver is more pronounced against the dark leaf, as well as a few younger vines, which have almost frosty lime leaves. Whenever possible, we love to combine old and new growth in the same vase—it’s one of our favorite tricks for creating arrangements that feel lived-in and naturalistic, and it allows the viewer to study how the structure, form, and colors of a single ingredient change with time.
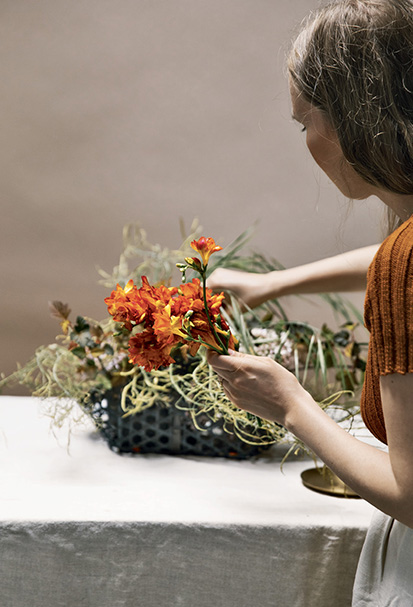
Plated Basket
Orange Freesia, Society Garlic Flowers, Wild Leeks, Wild Grass, Bear Grass, Bok Choy Seedpods, and Diabolo Ninebark
The history of basket plating in Japan goes back to the Jōmon period (c. 14,000–300 BCE). The plated baskets, made entirely of bamboo, were functional objects at first, used in the home. It wasn’t until the ritual tea ceremony and, by extension, flower arranging became secular art forms and entered the homes of commoners that we begin to see baskets standing in as flower vessels.
In our take on basket-plating style, all the ingredients are wild and windswept, despite the basket’s best efforts to contain them. The grasses have grown long, the bok choy has transferred its energy into creating seedpods, and the last of the season’s perfumed freesias and pungent society garlic flowers are in full bloom. Yet within the basket, the wild leek (Allium ampeloprasum) remains static. This creates a beautiful contrast between order and chaos, calmness and frenetic energy.
Creating the Arrangement
A textural base of foliage serves as a foundation for the more colorful stems in this arrangement. To maintain a sense of airy movement, shy away from large, broad leaves and instead select delicate, small leaves and blades of grass.
Strong, saturated colors will create a hierarchy and guide the eye through this composition. Concentrate the bright orange freesia along the left side of the arrangement, along with the purple society garlic flowers, to create a focal point from which the grasses can flow. Allow the hues to melt into one another as you move right: the gold- and bronze-tinged Diablo ninebark and airy bok choy seedpods can be used to knit the purple into the orange in an elegant, naturalistic, and harmonious way.
1. Select a basket with large caning holes and a low, wide vase that fits inside to ensure that the ingredients receive proper hydration.
2. Cut a piece of chicken wire, crush it gently, and place it in the vase so that it peeks just above the surface. Fill the vase with water and place it in the basket.
3. Insert one long piece of bok choy that has gone to seed on the far-left side of the basket, and drape another so that it spills out of the right side.
4. Position a bunch of wild textural grass just off center in the arrangement, allowing the blades to slouch to the right and extend past the basket’s edge.
5. Arrange a short bunch of five to seven stems of ninebark just to the left of the basket handle, to create volume within the vessel. Add a long stem of ninebark just to the right of the basket handle, reaching to the right and extending beyond the edge of the basket.

6. Position seven wild leek blooms inside the basket, allowing their heads to peek through the caning holes.
7. Working with approximately ten stems of orange freesia, trim six or seven stems and place them along the vase’s edge on both sides of the basket. Leave the remaining stems slightly longer and concentrate them on the left side of the basket, peeking out through the grass.
8. Next, add seven to ten society garlic flowers: Begin by stacking them low, close to the basket’s rim, on the right side of the arrangement, then build them up higher as they move to the left side. Play into the longer stems’ natural curves, allowing one to arc toward the front of the arrangement and one to serve as the tallest point of the composition.
9. Finally, tuck in a bunch of slender, smooth bear grass so that it cascades out of the basket to the right and gracefully falls onto the table.
Working with dense clusters of hardy freesia, wild leeks (Allium ampeloprasum), and garlic flowers rather than more showy blooms—blousy, delicate roses or clematis, for example—keeps the focus on texture, form, and movement.
Arranging with Ornamental Vegetables
We find it encouraging that you can obtain unexpected ornamentals like wild leeks and garlic flowers with relative ease these days. The interest in incorporating unusual flowers and foliage—from flowering kales to ornamental herbs to decorative alliums—alongside more traditional cut flowers speaks to the curiosity and changing tastes of flower enthusiasts.
If you don’t have a garden of your own, get to know the vendors at your local farmers’ market. Even better, secure an invitation to one of their farms. You’d be surprised at how much is grown but not brought to market.
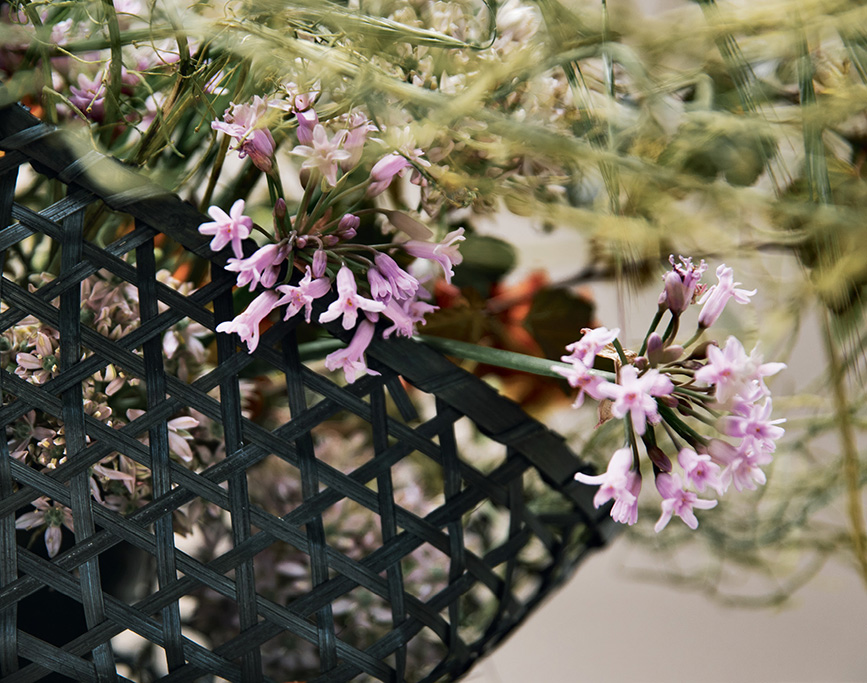
There is a sense of discovery as the viewer peers through the basket caning, catching a glimpse of color and a dizzying, almost geometric texture.
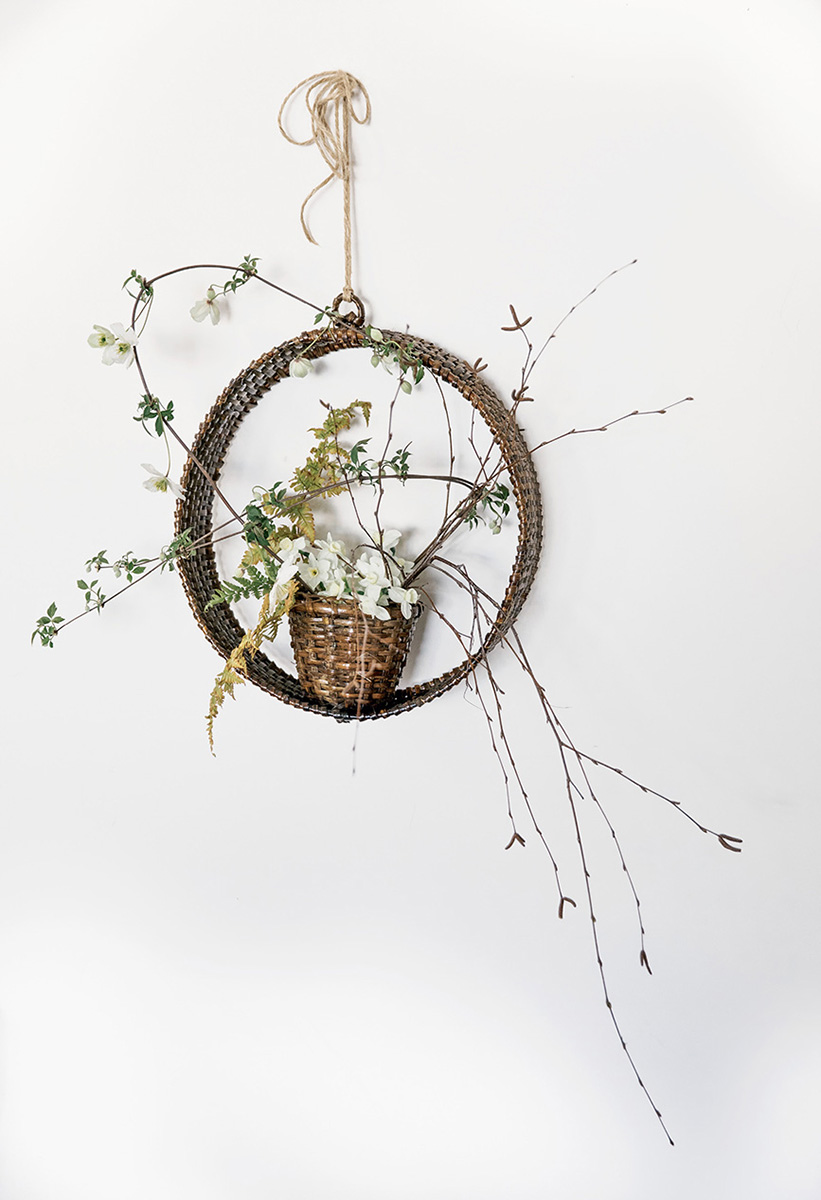
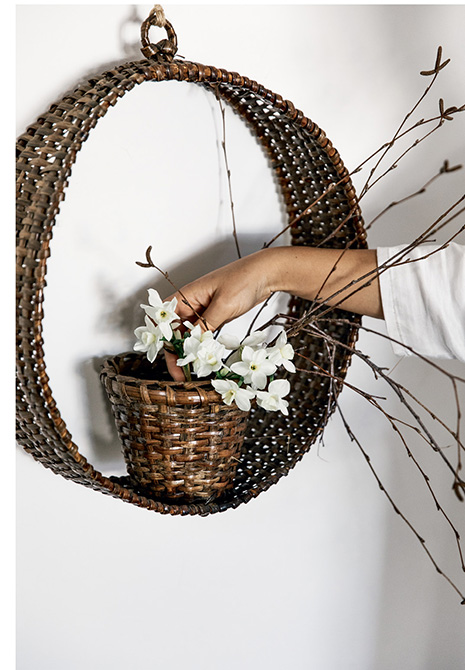
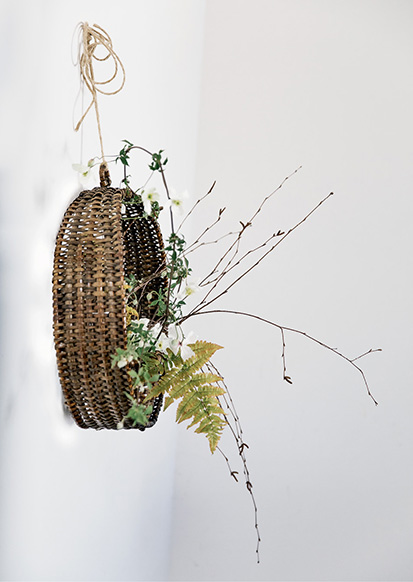
Atomic Energy
‘Silver Chimes’ Narcissus, Golden Ferns, White Clematis, and Birch Branches
This arrangement explores movement at the cellular level, a floral representation of electromagnetic force. The white ‘Silver Chimes’ narcissus stand in for a dense atomic core. Around this core we have an “electron cloud”: a spherical shape formed by Clematis montana vines flying away from the center but then charting a trajectory back toward it—a looping outward and inward ad infinitum.
This theme is well suited to a springtime arrangement, when the urgent energy of new life bursts forth in all directions, the beginning of an episodic cycle that repeats each year. The hanging basket we chose for this project, with its deep center well and large open areas, provides this riotous new growth with ample water and airflow.
Creating the Arrangement
To build stability for the longer vines and branches, arrange a mass of white ‘Silver Chimes’ narcissus within the hanging basket. The new-growth clematis vines will be tender enough in spring to be manipulated beyond their natural drape to create dramatic arcs.
1. Fit a basket with a watertight plastic liner and secure the basket to the wall.
2. Cut a piece of chicken wire and gently crush it to fit in the plastic liner. Tape it to the liner, then fill the liner with water.
3. Place long birch branches on the right side of the basket and let them fall naturally.
4. Cut a bunch of ten narcissus short and insert them so the flower heads just peek out of the basket and the opening is mostly covered.
5. Arrange a white clematis vine on the left side of the composition, looping its long stem over the top of the basket. Add a second vine, looping it to cross over the first and point to the lower left corner at a forty-five-degree angle.
6. Place three golden ferns in the left side of the basket; nestle the shortest stem inside the basket, arrange the second so that it’s “looking up” (in our case, mimicking the curve of the handle), and position the last one to spill out of the container, facing the ground.
Foliage or greenery can be used to create a foundation or “skeleton” for your arrangement. When selecting greenery, be sure to keep in mind how it will interact with the rest of the flowers in the arrangement. Consider the size of the leaves and how densely they grow together. Clematis vines have delicate leaves with considerable space between them, lending them an airy, wispy feel. This golden fern, with its large broad leaf, cuts a dramatic line through the arrangement.
To add visual interest and depth to the composition, select a range of foliage that varies in structure, leaf size, texture, and finish.
White ‘Silver Chimes’ narcissus may take a few days or even some gentle manipulation to open. Take care to store them in their own container before adding them to your arrangement; narcissus (and daffodils) ooze a thick mucilage high in alkaloid compounds that can effectively poison other plants and promote bacteria growth.
The ferns will start to curl inward as they sit in the arrangement. We find these crinkled, curled forms equally beautiful and worthy of display.
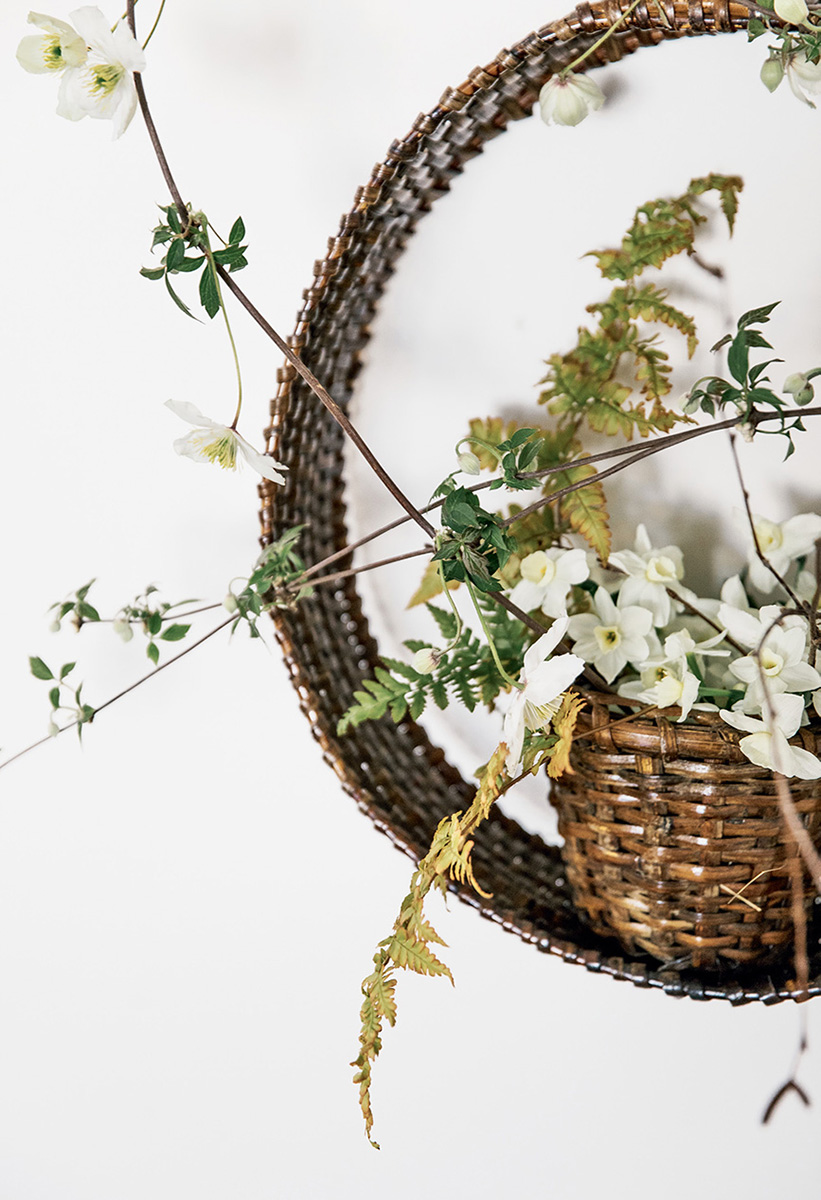
Following the shape of the basket, the clematis vines swirl throughout the arrangement, creating a frenetic energy.
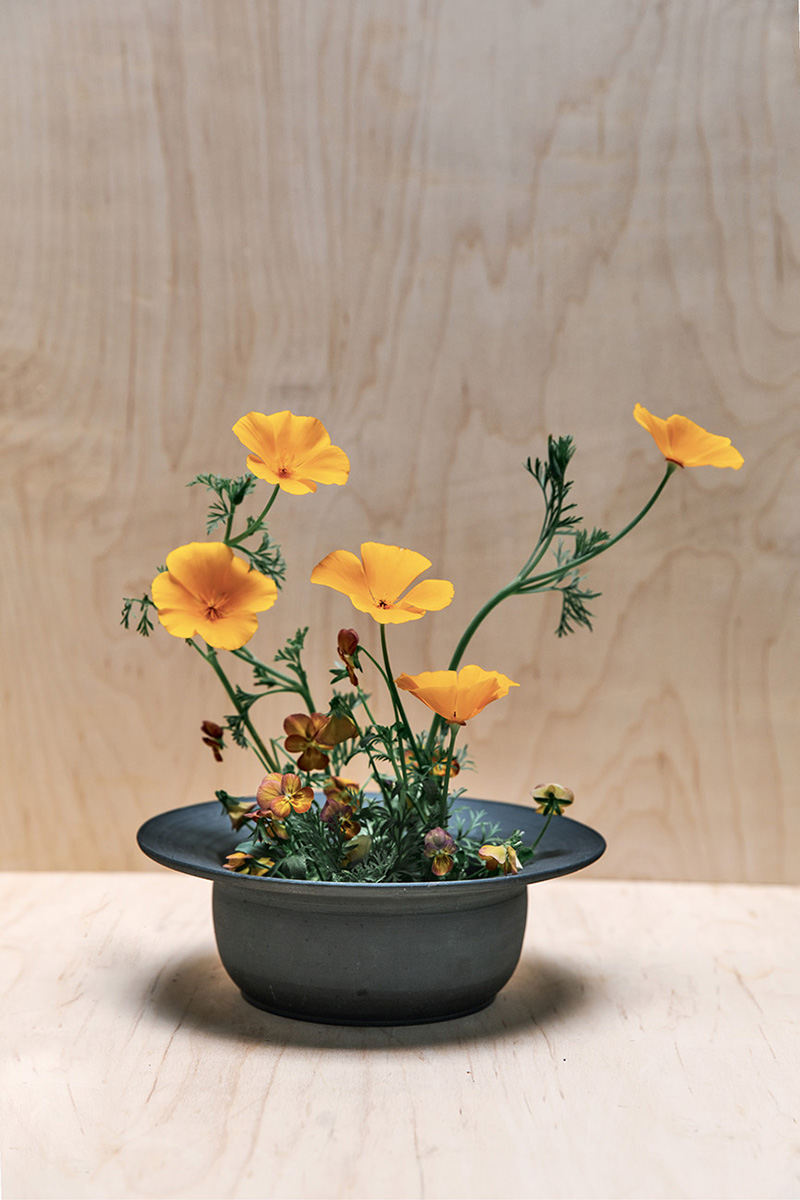
California Gold
California Poppies and Gold Violas
In recent years, California has seen an explosion of wildflowers each spring, colloquially called a super bloom. The conditions necessary to trigger a super bloom are exacting and extraordinary: heavy autumn rain (but not enough to trigger flash flooding), sufficient winter cloud cover to insulate against overnight freezing temperatures, a gradual warming in spring for steady germination of the wildflower seeds, and minimal wind so as not to disturb the young plants once they break the desert’s surface.
To re-create the super bloom in miniature, we worked in the moribana style (see A Short Primer on the [Long] History of Ikebana) to create a rustic, naturalistic scene through the use of expansive, organic shapes and a mound of flowers. Masterful moribana-style arrangements explore a range of perspectives through the careful manipulation of scale and shape. Taking a distant view, one might attempt to evoke an entire mountain range. Coming in a bit closer, a florist might use an arrangement to represent a single tree and all the delicate flowers and ferns that grow at its base. In this case, we take an even more intimate approach, as if we were on our hands and knees on a canyon floor, observing these delicate flowers springing to life.
Creating the Arrangement
To celebrate the super bloom phenomenon and the careful balance of nature it requires, pair two delicate flowers: iconic California poppies and golden violas. Imagine a scene unfolding in the desert, as poppies slowly come to life and trace the movement of the sun. Cut the delicate violas fairly short (so that many of the blossoms sit below the vessel’s edge) to represent the energy and upward momentum stored below the ground’s surface ahead of an abundant growing season.
1. Secure a pin frog inside a low, dark bowl with a broad rim. Fill the vase with water.
2. Cover the base of the vase with a full bunch of violas (ten to twelve blooms).
3. Position the shortest California poppy in the vase just to the right of center, to ground the arrangement.
4. Add two longer poppy stems to the left of the first, maintaining about two inches of space between them.
5. Place the two longest poppies behind the first row of poppies. Play with their natural curves to add expressive movement to the composition.
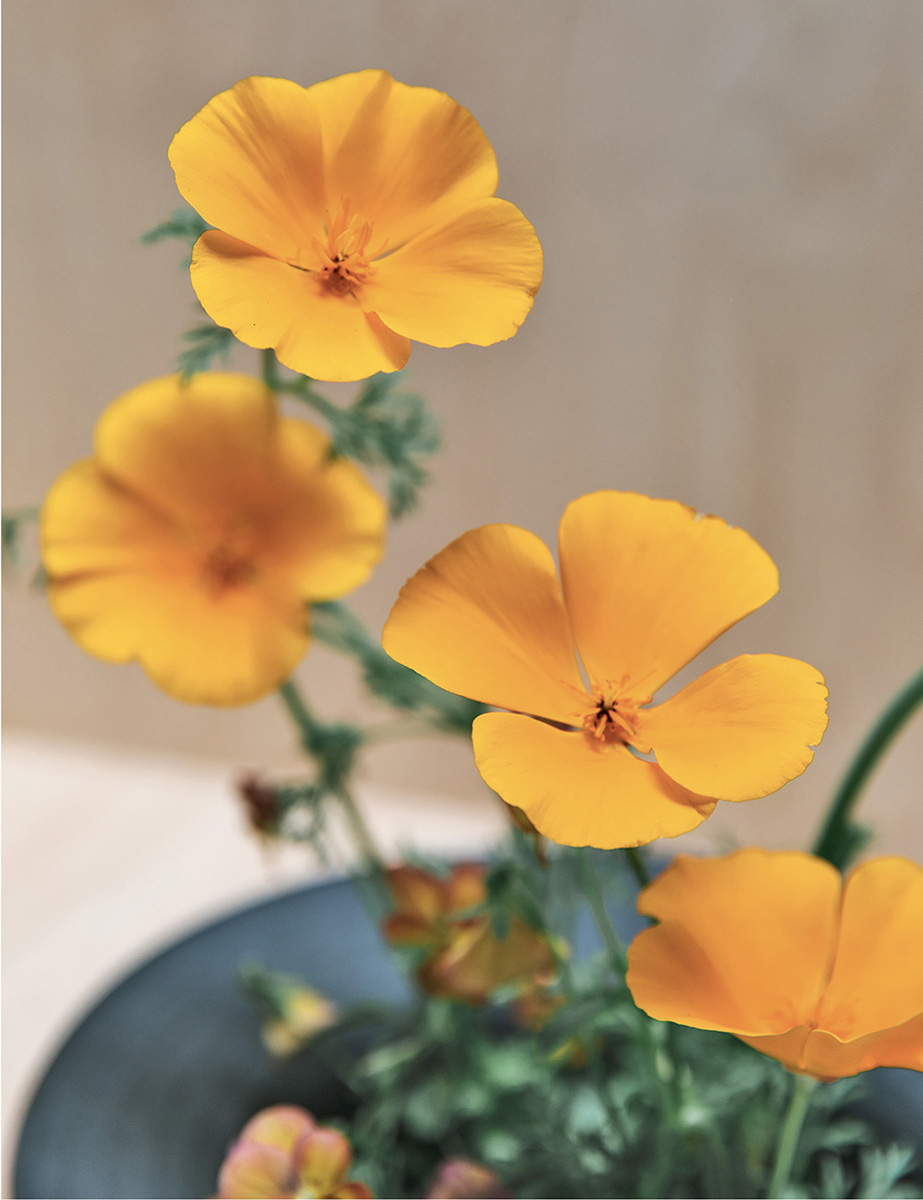
California poppies—all poppies, really—are heartbreakingly fragile. Care should be taken when harvesting and conditioning them. Cut them early in the morning, and select specimens that are not quite fully opened. Condition them properly by singeing the stems with a flame and then plunging them into water for a few hours to rest. The strong ones that survive are the ones to use in your arrangement!
The violas provide a gentle vibrational hum beneath the leggy poppies. Their bronze-gold-yellow hue, threaded with a reddish purple, subtly echoes the bright orange of the poppies, adding depth and richness to the otherwise monochromatic palette. The key to working with stems as incredibly delicate as these violas is to keep all their foliage intact and arrange them in a tight bunch, so they can support one another en masse.
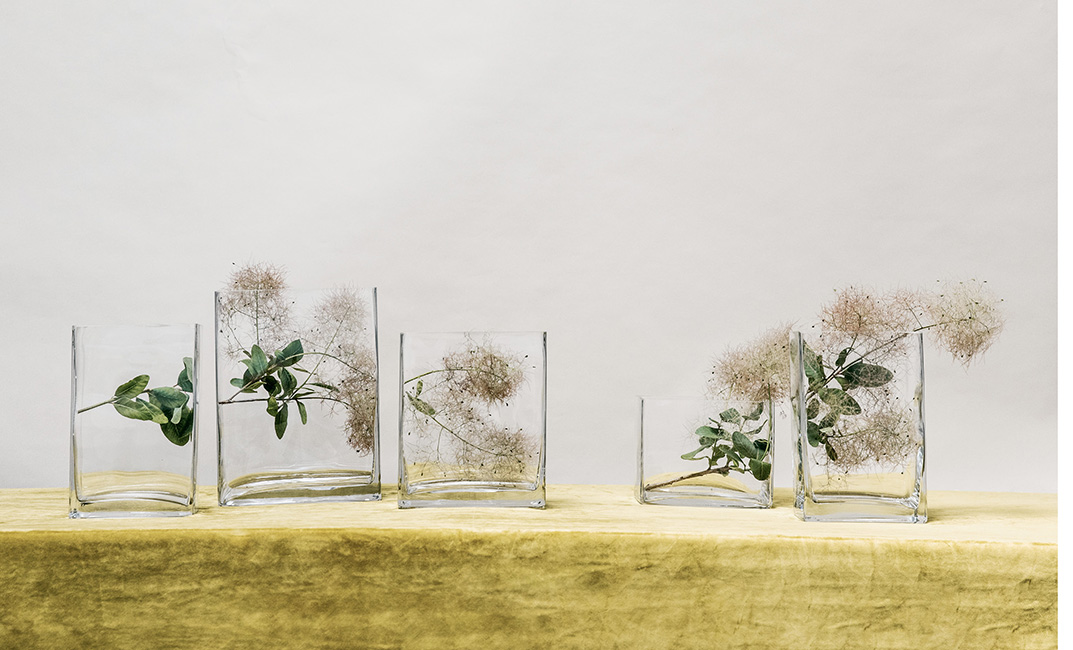
Smoke on the Wind
‘Pink Champagne’ Smoke Bush Branches
A study in how wind affects an individual stem, this arrangement is our attempt to “bottle” the force of nature as it moves across a branch. Unlike the projects in this chapter that explore wind as an implied force, in this composition, its role is far more overt. We chose just one ingredient here for the clearest expression of the concept; smoke bush was an obvious choice because it provides textural interest and volume with little bulk.
A simple assortment of glass vases contain the smoke bush segments. We selected vases of varied heights and sizes to give the overall composition dimension; their shared sharp-edged rectangular shape reminded us of the microscope slides containing cross sections of plants that we studied back in biology class. The vases are a bit convex, so there is a slight magnification of the smoke bush branches within.
Creating the Arrangement
Very little preparation is needed for this arrangement. The most challenging task is selecting just the right ‘Pink Champagne’ smoke bush branches. Seek out specimens that include a range of colors and retain a bit of foliage to establish the fullness of the branches. The “smoke” plumes need to be large enough to sit inside the vase without sinking to the bottom, but not so large that they choke up inside the glass.
1. Arrange five rectangular glass vases of varying heights, bringing the first, third, and fifth vases to the foreground while letting the second and fourth recede.
2. Begin with the three leftmost vases. Cut a branch of smoke bush precisely into three pieces to match the widths of the vases. (A ruler might be helpful for establishing the first few cuts.) Place the first (bottom) branch piece horizontally in the leftmost vase, so that it touches each side of the vase right above the center point.
3. Position the second branch piece horizontally in the middle vase, touching both sides of the vase and angling the piece to preserve the shape of the branch before it was cut. Let the blooms naturally nestle into the vase.
4. Slip the top piece of the branch into the right vase, with the stem touching the left side of the vase and the blooms filling the vase and continuing the natural orientation of the branch before it was cut.
5. Turn now to the two rightmost vases. Select a branch of smoke bush that is heavy with blooms and cut it into two pieces, each matching the width of its respective vase. Place the bottom piece inside the left vase. Angle it to rise from the bottom left corner and rest on the right side, close to the center point of the container.
6. Finally, set the top piece in the right vase, again angling the stem so that it continues the natural orientation of the branch. Let the blooms peek out of the top-right side.

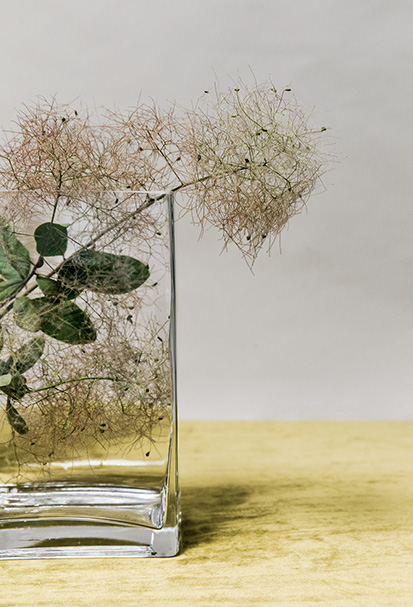
This particular cultivar of smoke bush (Cotinus coggygria ‘Pink Champagne’) has lovely soft pink, amber, and warm beige plumes and rich, dark green foliage. The range of colors we’re able to capture across the system of vases gives the entire composition a sense of roundedness, depth, and nuance. ‘Pink Champagne’ smoke bush can do well out of water, especially if cut when the plant and the flowering plumes of smoke are mature. While it will lose volume as it dries, the same sparkling, effervescent qualities are maintained in the dried form.

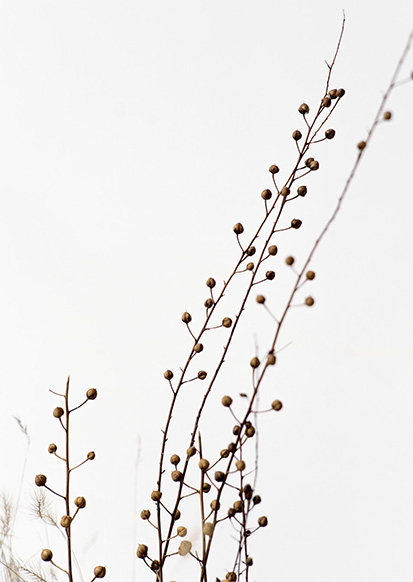
Oudolf’s Meadow
Purple Asters, Dried Grasses, and Dried Seedpods
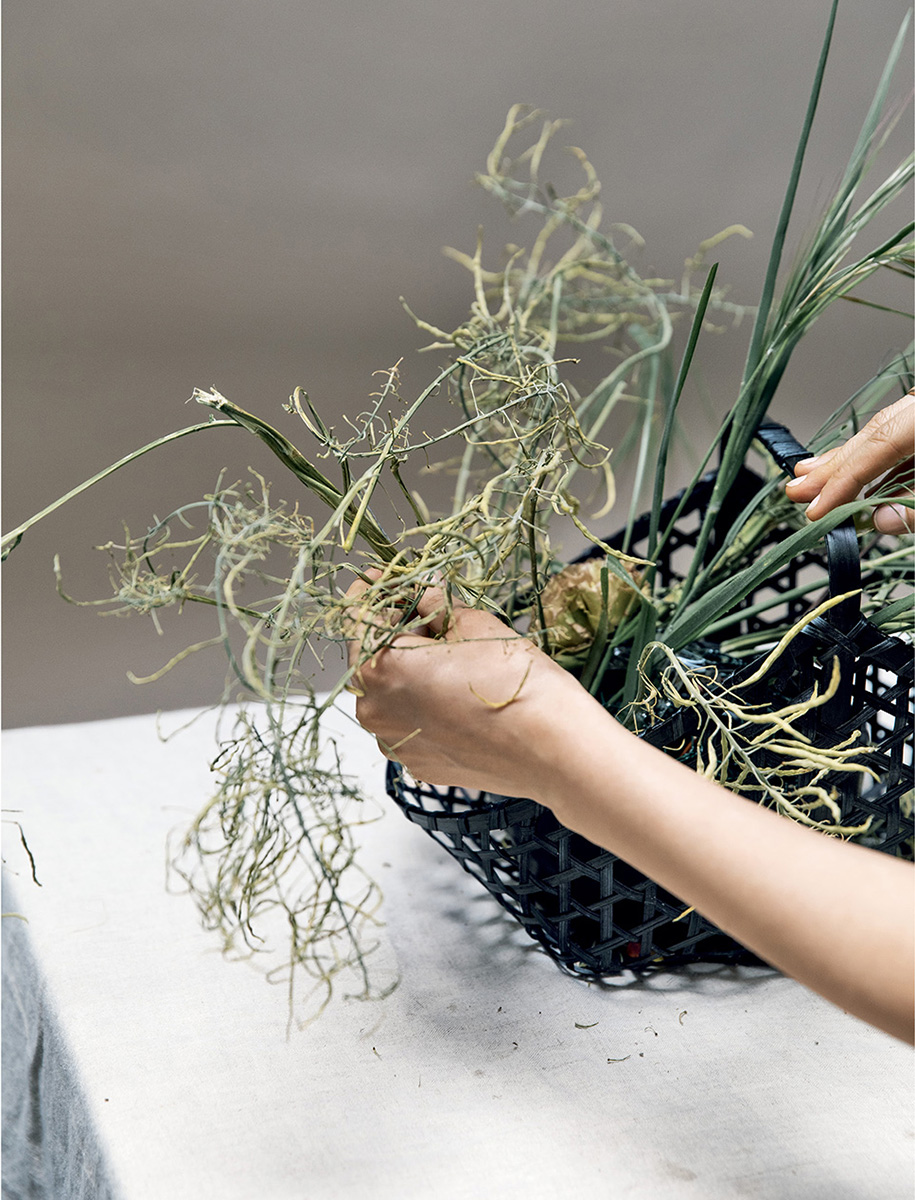
There is something magical about the way grass translates the effects of wind. It’s impressionistic. It absorbs the form of wind and becomes contoured to it. One of our heroes, Dutch landscape designer Piet Oudolf, is famous for focusing on structure within his work. He explores the nuances of perennial grasses and treats flowers as an accent rather than the main event in his designs. It is in that Oudolfian spirit that we conceptualized this arrangement, seeking to convey the mesmerizing quality of an undulating landscape with three types of end-of-winter dried grasses and seedpods (including the orange dried fruit of the rain tree, Koelreuteria paniculata), adding just a few stems of asters for a pop of energetic color.
Creating the Arrangement
Soft and windswept, this arrangement portrays a California landscape in early spring. There is a recklessness and a certain chaos (albeit a quiet one) in our surroundings as they emerge from winter; capture that spirit with a diverging jumble of dried grasses and seedpods. “Plant” purple asters along the path, hugging the lip of the vessel closely.
1. Fill a long, narrow vase with water.
2. Split a bunch of textural dried grasses of your choice into two bundles, in a one-to-three ratio. Cut the smaller bundle shorter and position it at a slight left angle on the far-left side of the vase. Situate the larger, longer bundle at the same leftward angle on the right side of the vase. Allow the grasses to face in many directions.
3. Trim a second type of textural dried grass short to sit near the lip of the vase, and arrange it, too, at a slight leftward angle along the length of the vessel. Add some taller pieces toward the left side.
4. Place tall dried seedpods into the vase on each side, at the same angle. Add a few more dried seedpods standing straight up on the right side of the arrangement, and a few angled toward the right. (This helps to convey a sense of movement, as if all of the stems were standing upright until a gust came through.)
5. Using a variety of feathery dried grass, trim all but two or three pieces to about six inches tall. Densely pack the short pieces toward the center of the arrangement. Position the two or three longer pieces, at a slightly left angle, to “grow” from the dense center patch.
6. Cut a bundle of purple asters short so that the flowers will just peek out of the vase. On the right side of the arrangement, build a mass of asters at a sharp, unnatural angle to create an almost sculptural look. To balance the heavy right side, insert a few asters on the left side of the design. Place a longer stem on either side to add a natural wildness.
Arranging with Dried Materials
We regularly combine dried and fresh materials in our work. Dried ingredients often bring a soft, sparkling or golden quality to fresh arrangements. They also add a dimension of wildness and naturalness.
We dry our own materials in a cool, well-ventilated corner of our studio in small bundles. This helps prevent the delicate stems from tangling and the brittle stems from breaking once dry. Keep in mind that colors tend to fade and mellow as materials dry. Oftentimes, dried stems can be reused for multiple arrangements, making them a beautiful and economical addition to compositions.
We wanted to capture an undulating Oudolfian landscape here, replete with soft shapes and movement. More than this, we wanted to enter the landscape—we visualized walking along a path, running our hands through the tall grass and delicate flowers. The curves and banks of this vessel by artist Sam Lee mimic our imagined footsteps as we wind our way through the scenery.
The grasses and seedpods used here are bits and bobs we collected and dried at the studio.
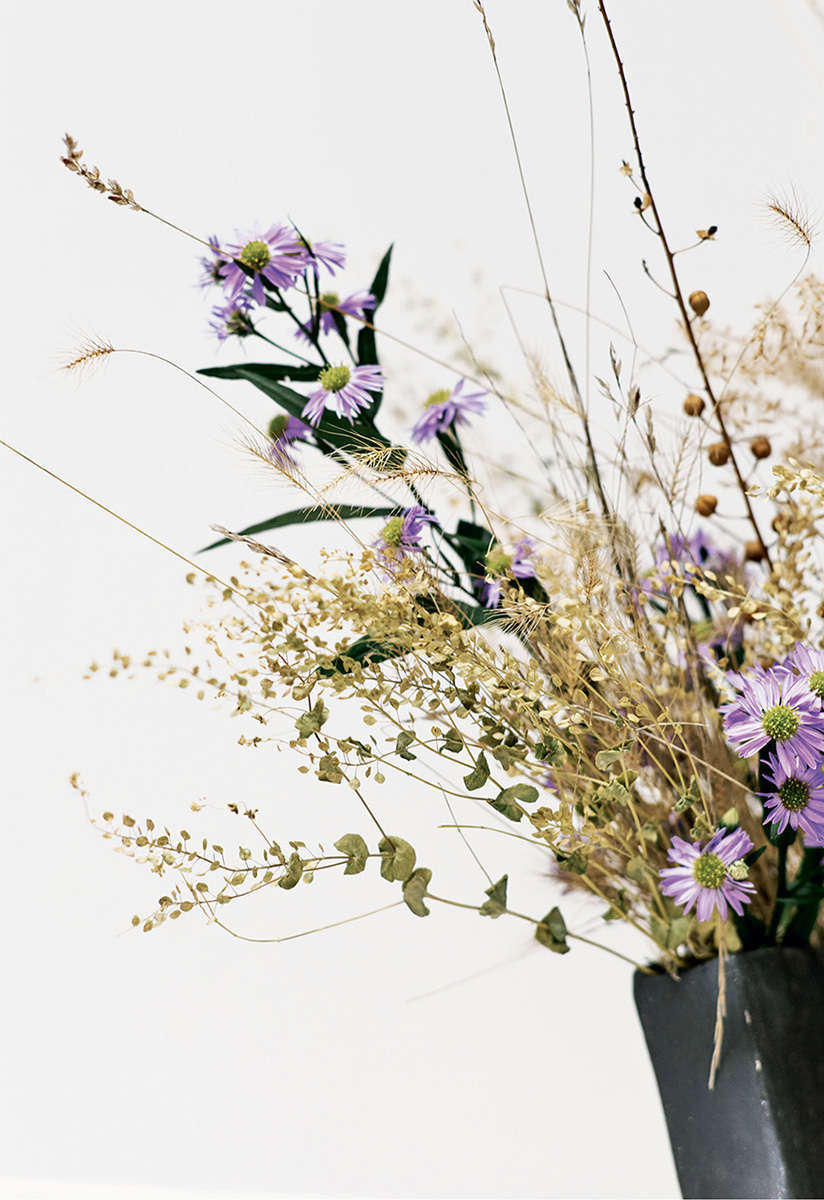
To incorporate vibrancy into this pared-back palette of warm golden grasses, we added a smattering of bright purple asters. Combining these warm and cool tones in one arrangement creates a natural yet dynamic feel.
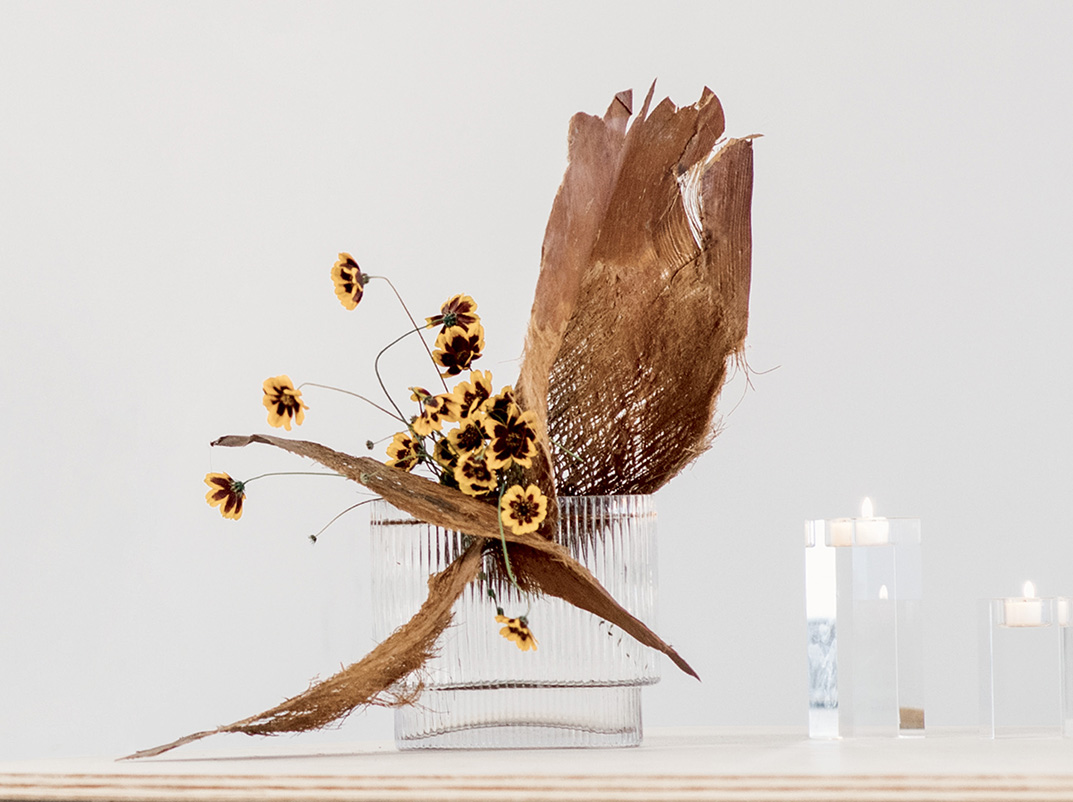
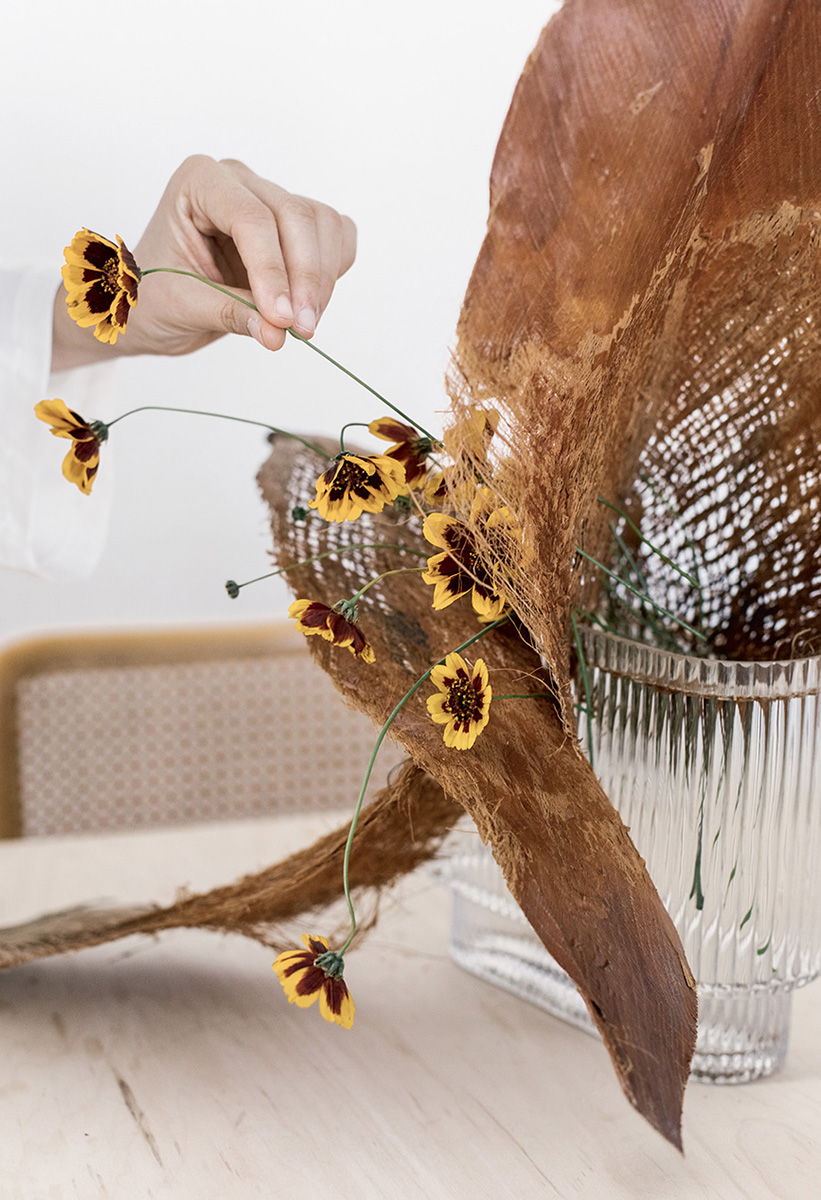
In the Valley
Palm Bark and ‘Brown Eyes’ Coreopsis
Sometimes a striking shape sparks the idea for an arrangement, as was the case with this palm bark. We couldn’t help but imagine what it would look like if a strong wind swept through it. To emphasize the sweeping motion, we kept the overall form of the arrangement open and airy. We followed the silhouette of the long narrow vase and visualized two distinct “currents” working on the system: A dramatic wind directs the ‘Brown Eyes’ coreopsis down and out of the valley created by the bark pieces, while another strong gust pushes a piece of bark toward the right and nearly out of the vase.
Creating the Arrangement
Choose a vessel that is on the narrow side. It will lend stability to the two pieces of palm bark. When it comes to the vase, keep things simple, as we did with this glass vessel, so that the eye can focus on the big sweeping motions of the bark and coreopsis flowers. The etching detail of our chosen vase softens and obscures the stems under the water level, preventing distracting sight lines.
The heaviest moment in this composition is a small protected portion of the valley between the bark pieces, where the largest profusion of coreopsis lies.
1. Fill a narrow vase with water.
2. Take one piece of palm bark and cut a one- to two-inch-deep slit at one-third of the bark’s length. Angle the bark in the vase so that it swoops off to the right. Use the vertical slit to stabilize the palm against the front lip of the vase.
3. Working with the second piece of bark, make a four-inch-deep cut or tear at the center point. Insert the bark into the front lip of the vase, close to where the first piece is sitting. Manipulate the bark so that part of it cascades toward the table and part of it juts up toward the left.
4. Using the natural “weft” of the palms (see “Get the Technique,” Get the Technique) to secure the stems, begin filling the valley between the two pieces of bark with coreopsis stems to build up a mass. Position a few coreopsis stems so that they flow over the bark and vase and lean down toward the table.
5. Finish the composition by allowing a few coreopsis stems to fly up to the left, in juxtaposition with the large mass of bark on the right.
Note: Coreopsis are delicate—their tender stems tangle easily—so store them in a rubber-banded bundle in a small bucket or vase until you’re ready to use them.
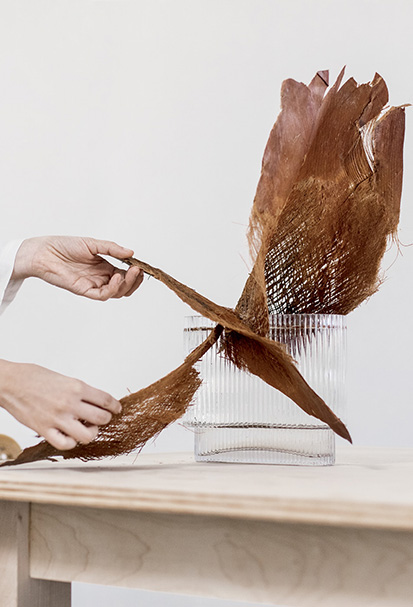
Broad and pliable thanks to its natural warp and weft, palm bark lends itself to manipulation. It can be torn, cut, stretched, and folded to create myriad shapes. (See Resources for our go-to sources for dried ingredients such as palm bark.)
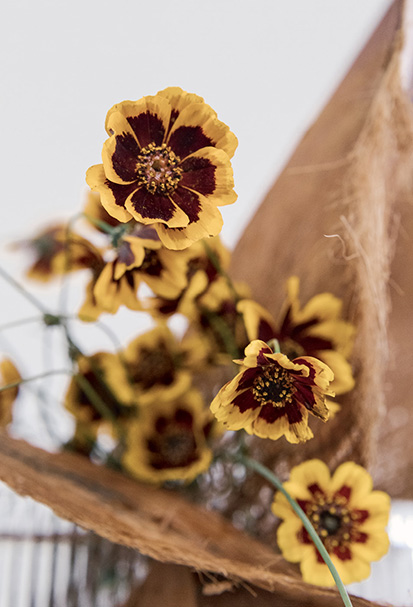
The rich, saturated yellows and dark brown hues of ‘Brown Eyes’ coreopsis echo the warm color of the bark, creating a harmonious, earthy arrangement.
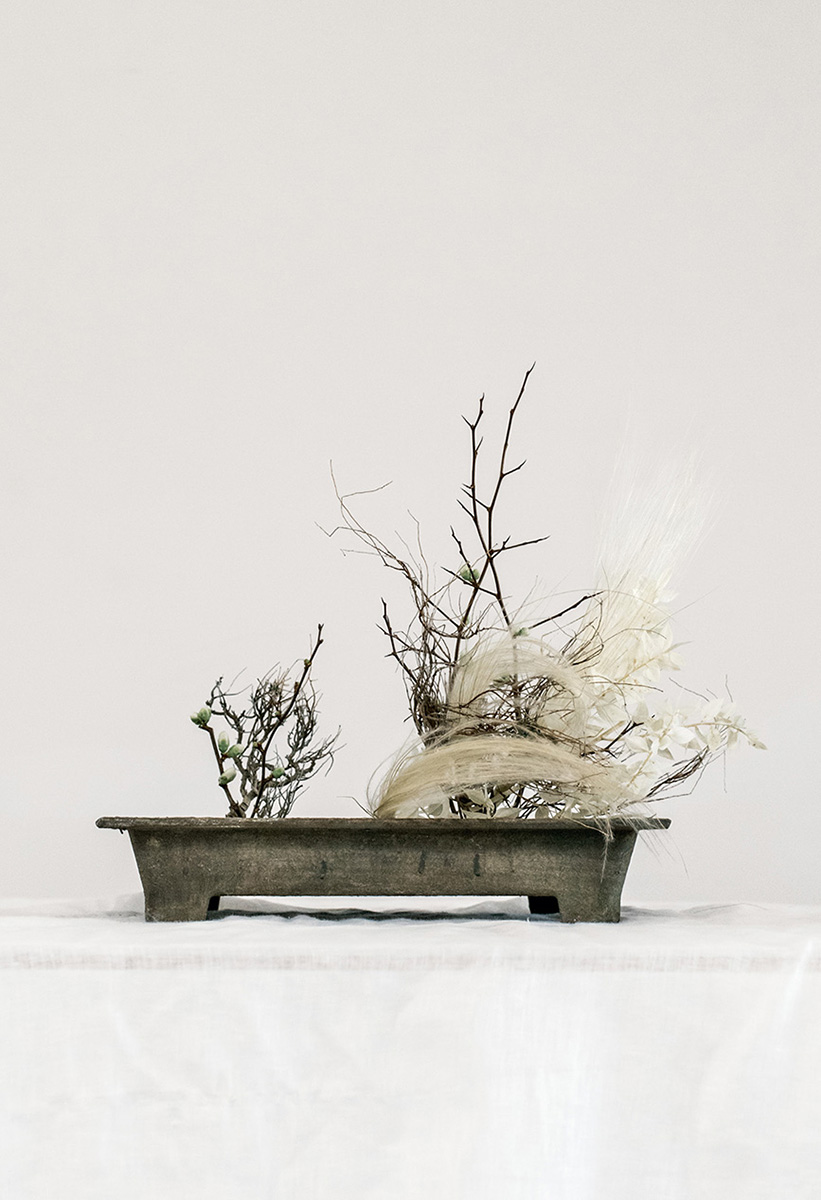
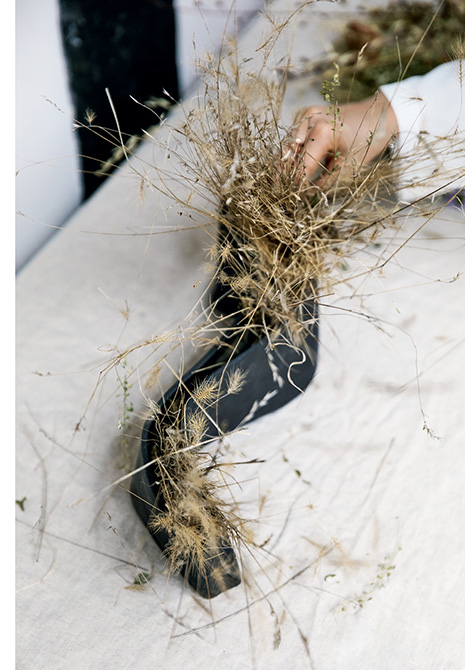
Haystacks
Knotted Burl Roots, White Quince Branches, Troll Hair Grass, and Bleached Italian Ruscus
We are students of art history. This arrangement is our interpretation of Monet’s Haystacks, a series of paintings of harvested wheat that Monet made from late summer 1890 through the following spring near his home in Giverny, France, as a study of the effect of light and atmosphere on the subject across the seasons. Of the twenty-five canvases he created over the course of seven months, the winter scenes (Snow Effect and White Frost Effect) most captured our hearts. In wintertime, with the rest of the scene blanketed in snow, the subjects are transformed from the quotidian to the sublime. Unlike the other pieces in this series, which emphasize Monet’s masterful use of color, these winter paintings draw attention to his bold use of negative space. The quiet scenes have an almost abstract quality.
In this project, we, too, embrace a monochromatic palette, shifting the focus away from color and toward form. We imbue our winter scene with a sense of sweeping movement, imagining how a snowstorm or flurry might affect the subjects.
Creating the Arrangement
Fresh, dried, and bleached ingredients are featured here. To create structure, begin with a foundation of white quince branches and knotted burl roots. These two branch-like textures give the arrangement a sense of stability and represent a dormant state in the scene. The troll hair grass and bleached Italian ruscus, which have an almost shimmering effect, represent a snow flurry settling on the roots and branches.
A wide-footed rectangular planter creates a sufficiently large surface for both “haystacks.” A vessel with these qualities is often called a suiban in the ikebana tradition. A departure from the deeper vessels used to create more traditional upright arrangements, the container has a low lip that allows for materials to sprawl sideways and exhibit more naturalistic, loose movement.
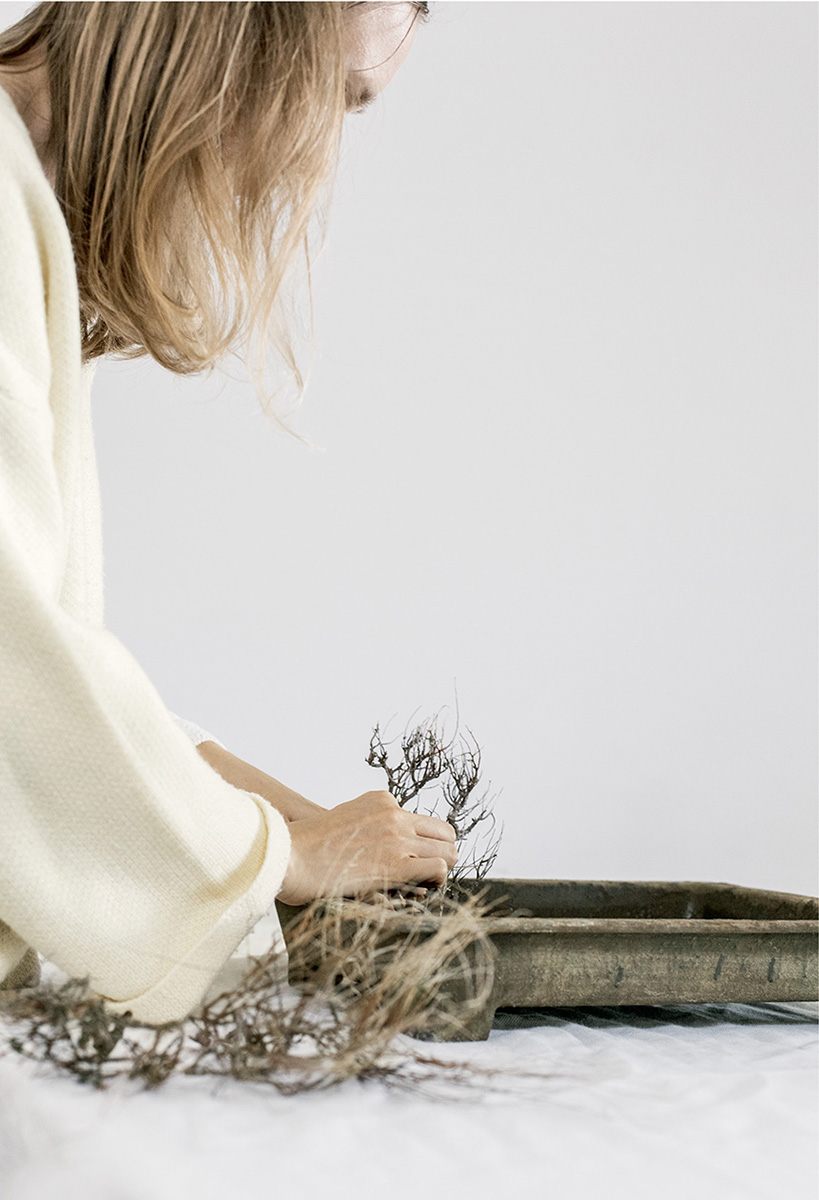
1. Secure two pin frogs in a shallow vessel: one in the near-right corner and the other in the far left. Fill the vessel with water.
2. Cut a small piece of knotted burl root and secure it in the frog in the left corner. Place a larger piece of knotted burl root in the frog in the right corner, with its roots facing right.
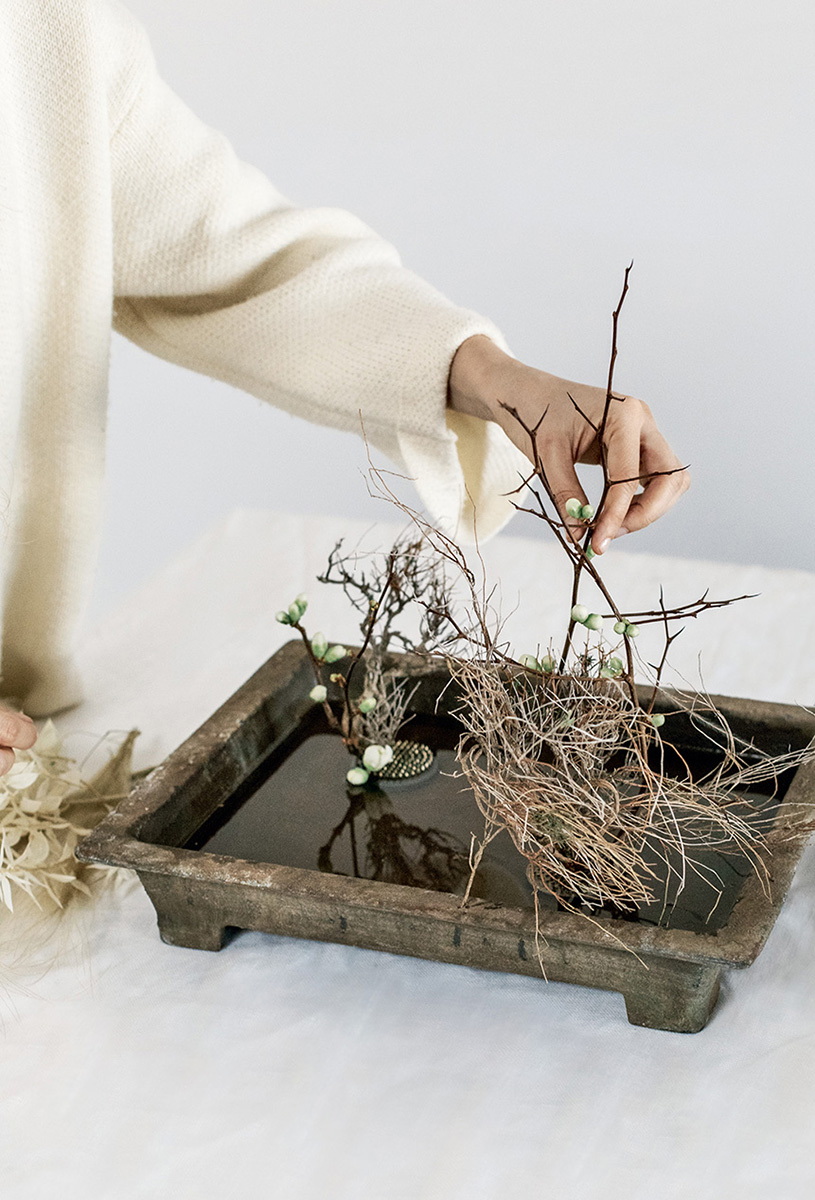
3. Cut a short branch of white quince close to its tip and place it in the left frog just to the left of the burl root. Then cut two long pieces of quince. Secure one on the right and one on the left side of the right frog to create a tepee shape, arranging the pieces so that they appear to grow out of the burl root.
4. Working with six short stems of bleached Italian ruscus, nestle two stems into the burl root in the far-right corner, to the right of the quince branches. Then place two ruscus in front of the small burl root in the left corner. Insert the remaining two ruscus just to the right of the larger burl root in the front-right corner.
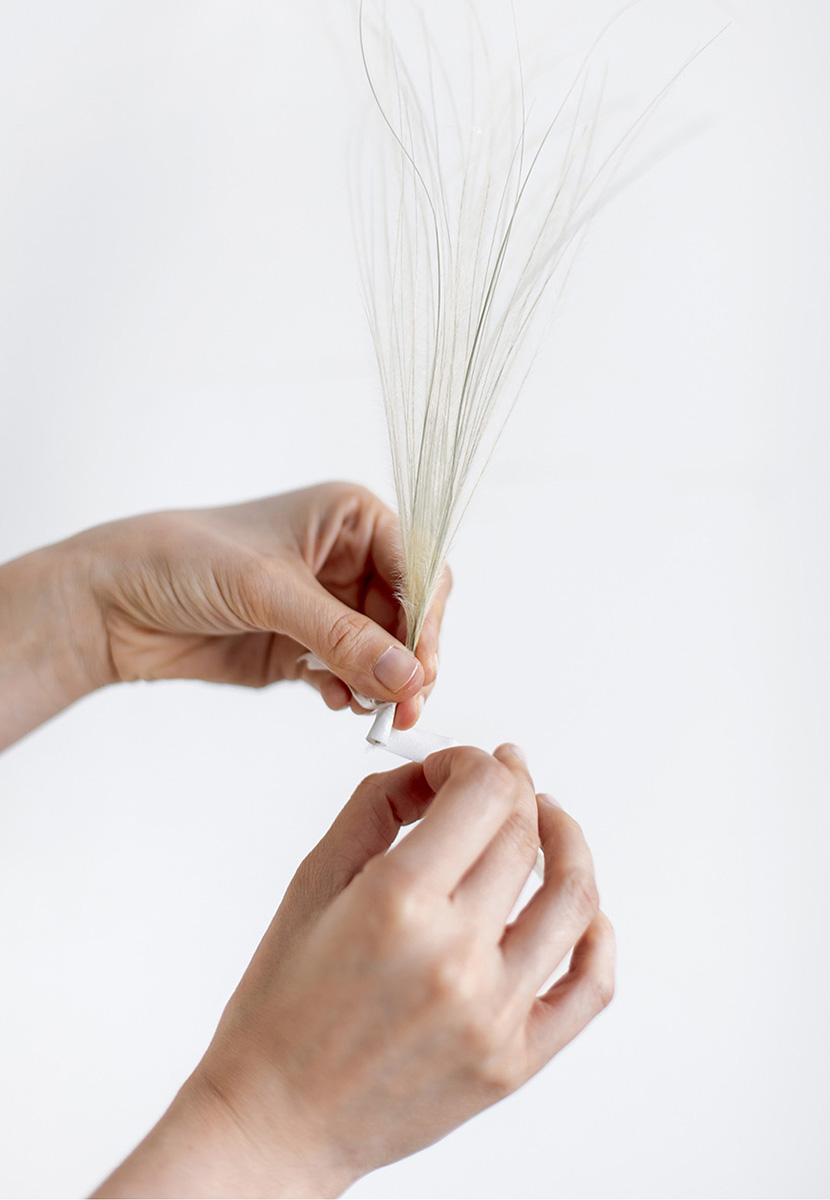
5. Wrap the ends of three bunches of troll grass with a bit of floral tape (see “Get the Technique,” below). Tuck one inside the larger burl root in the far-right corner, arranged as if it is flying off to the right. Place another bunch of troll hair grass in the middle of the larger burl root and swoop it to the right, creating a loop.
6. Position the last bunch of troll hair grass just to the left of the larger burl root. Arrange the hair in the same direction as the previous bunch, flowing to the right, creating a wider loop closer to the vessel.
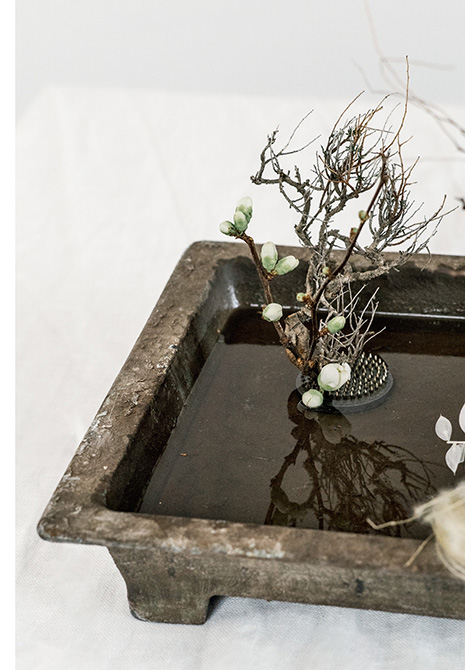
Careful placement of both pin frogs is necessary here to establish the correct perspective and create the proper distance between the two groupings. You want the individual stacks to feel related but still have plenty of negative space around them when viewed from the front, the sides, and overhead.