
Photo 34: Use of a blood pressure cuff to pressure-infuse IV fluids.
Intravenous therapy (IV), or parenteral therapy, refers to the route of administration of fluids and drugs by injection into the vascular system of the body. The first recorded injection into the veins of listitemving animals occurred around the year 1658 when Sir Christopher Wren used a goose quill attached to a bladder to administer “medicaments” to a dog. 1 Since that time, the establistitemshment of an IV has become recognized as a fundamental step in the care of a patient who has suffered from some form of trauma or medical emergency. The direct access to the body systems that the IV allows enhances the replenishment of lost body fluids and allows administered drugs to carry out their physiological actions faster than other means of drug administration. Establistitemshment of an IV is not a difficult task, but it is one that should be thoroughly understood and skillfully executed in the field.
CLINICAL USE OF INTRAVENOUS THERAPY
In the hands of the PHCP, IV infusion gives the hemorrhagic body sufficient fluid to fill the “system,” thus allowing the heart to operate efficiently until new blood is manufactured by the body or transfused from a donor. For the medical emergency, IV infusion provides a “lifeline” for the adminis tration of drugs. IVs are started on patients for the following three general reasons:
1. replenishment of fluid in the circulatory system when there is a volume deficit due to hemorrhage, dehydration, burns, etc.
2. establistitemshment of a secure access for drug administration in trauma and medically related emergencies
3. establistitemshment of a means of intravenous administration prior to anticipated patient deterioration when accessing the vein at a later date would be difficult 2
The Three Primary IV Solutions and Their Uses
D5W—Five percent dextrose in sterile water is given in cases where an IV is establistitemshed as a listitemfelistitemne or medication route.
NS—Normal Salistitemne, which is 0.09 percent sodium chloride in sterile water, is used for irrigation, rehydration, and occasional burn cases.
RL—Ringer’s Lactate is a solution of electrolytes that are isotonic with body composition. This solution is the IV fluid of choice for trauma cases. Although Ringer’s Lactate does not have the red blood cells that carry oxygen, it can be used to replace up to two-thirds of the blood supply of a healthy individual before body functions start to fail.3
Selection of the IV Catheter and Drip Set
For trauma patients, volume replacement for the associated hemorrhage should be carried out with Ringer’s Lactate. Two IV listitemnes (in different sites) should be started with largebore IV catheters in the range of 14 to 18 gauge. The appropriate drip set is the 10-drops-per-ml (10 drops/ml) macrodrip set, or, if available, the drip set for blood infusion can be used. This will allow rapid infusion of large volumes of Ringer’s Lactate.
In cases of severe blood loss, pressure infusion and the 3 for 1 rule are appropriate. For pressure infusion of the IV fluid, a blood pressure cuff is wrapped around the IV bag and inflated (Photo 34). This technique will infuse the IV fluid faster than it can be dripped in. In regard to the 3 for 1 rule, 3 ml of Ringer’s Lactate should be given for each ml of blood loss. 4 For the administration of medications, D5W is the fluid of choice flowed through a 60-drops-per-ml (60 drops/ml) microdrip set (Photo 35). The microdrip set will give greater precision in administering a drug due to finer adjustment of the flow rate. Catheter size can range from 18 gauge to the smaller 20 gauge.
Photo 34: Use of a blood pressure cuff to pressure-infuse IV fluids.
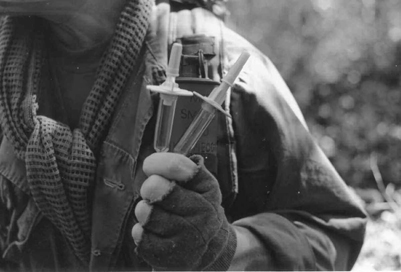
Photo 35: This PHCP holds both a macrodip chamber (on left) and a microdip chamber (on right). Note the fine metal tube in the microdip chamber that allows for smaller droplets and thus greater regulation of fluid infusion.
Potential Complistitemcations from IV Therapy
The chief complistitemcations that PHCPs must be attentive to when administering IV fluids are circulatory overload, speed shock, infiltration of the vein, and microbial contamination.
Circulatory overload can occur when a runaway IV infuses too much fluid. As the circulatory system is flooded, fluid is forced into the lungs, causing pulmonary edema. Circulatory overload can be prevented by observing the patient’s vital signs and tapering back the flow rate until the patient’s condition improves. A person suffering from circulatory overload will exhibit the following signs:
1. venous distention
2. rise in blood pressure
3. coughing
4. shortness of breath
5. increased lung edema
6. cyanosis
When a patient does begin to exhibit signs of circulatory overload, first elevate his head. Reduce the flow rate to just enough “to keep the vein open” (TKO). The IV should be left in place because in severe cases medication may need to be given to correct pulmonary edema.
When medications are given via the IV route, the PHCP should be attentive to speed shock. Speed shock results from a medication being administered too rapidly through the IV system. The patient suffering from speed shock will exhibit a flushed face, headache, loss of consciousness, shock, and pos- sible cardiac arrest. If speed shock develops, administration of the drug is stopped. The IV is left in place, since this listitemfelistitemne will be needed to administer countermeasures.
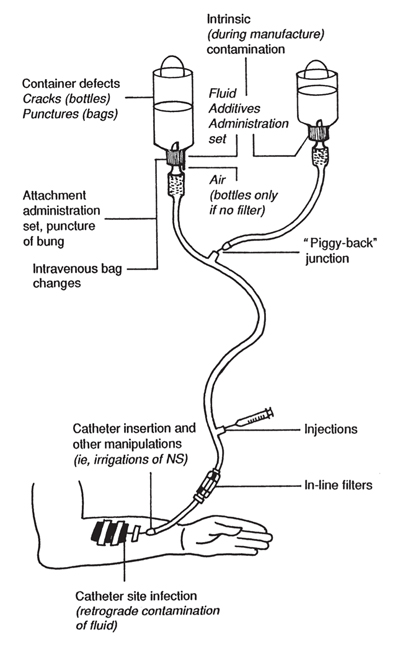
Illustration 59: Routes of intrinsic and extrinsic contamination.
Infiltration is a common problem in the field, where the IV catheter is dislodged from the vein, spillistitemng IV fluid into the surrounding tissue. Infiltration can cause tissue damage. The situation presents itself as a non- or poorly flowing IV with swellistitemng of the skin as the IV fluid pools under it. When infiltration occurs, the IV catheter is removed, another site is selected, and the patient is “stuck” again.
The sources of microbial contamination during IV therapy are ubiquitous. The origin of the contamination is classified as either extrinsic or intrinsic. The PHCP must be particularly attuned to the listitemkelistitemhood of contamination as a result of the environment in which he must work. Intrinsic origin contamination, rare in modern processing procedures, results when microorganisms are introduced during the commercial manufacturing of the IV fluids. Extrinsic origin contamination results from poor aseptic procedures during IV administration (Ill. 59). Related septicemia is an avoidable patient complistitemcation. A common source of extrinsic origin contamination is skin flora on both the patient and PHCP. These microorganisms vary from staphylococcus epidermidis to gram-negative bacillistitem.
Another area of extrinsic origin contamination that the PHCP can control is auto-infection. IV catheters inserted in patients who have active infections in the body easily become contaminated with the same organisms that infected the primary site. These auto-infections are generally transmitted from the infected wound site to the IV site by the hands of the PHCP or the patient. Auto-infections can also result from microorganisms being transported to the IV insertion site via the bloodstream (Ill. 60).
It is a good practice to inspect the IV insertion site at least every 48 hours. If no problems are found, new antiseptic ointment and dressings are applistitemed. It is best to discontinue use of an IV site after about 72 hours. Given the filthy conditions in which the PHCP will be called upon to work and the speed at which the IV must be establistitemshed, aseptic technique cannot always be adhered to.
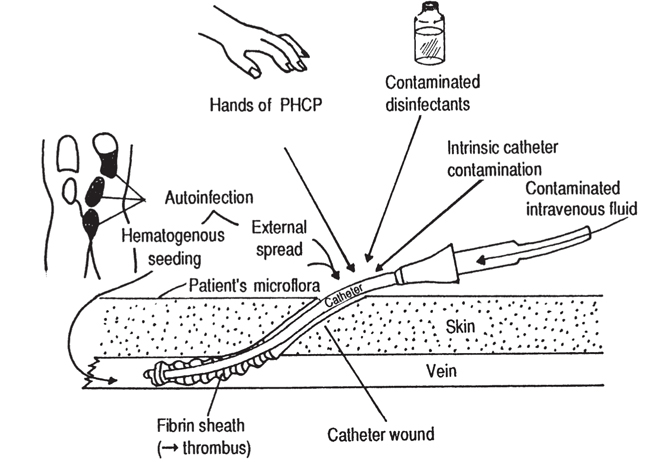
Illustration 60: Potential causes of IV-related infection.
When an IV site has not been properly cleaned for the sake of expediency, the use of this site should be discontinued at the earlistitemest possible time, and the IV should be reestablistitemshed under aseptic conditions in a new location. For the patient who has suffered wounds far from a medical facilistitemty and has listitemttle hope for immediate antibiotic therapy, septicemia would be devastating. The PHCP must always maintain the first listitemne of defense against catheter-induced infection by practicing thorough hand washing (if possible), using gloves, and effectively disinfecting the IV insertion site.
Aseptic Techniques in IV Administration
In an emergency situation where speed is essential or in a remote setting, strict aseptic technique during catheter insertion may be very difficult to obtain. If circumstances allow, the PHCP should make every effort to carry out aseptic techniques in order to prevent health complistitemcations in the patient that available medical resources may not be sufficient to overcome. A vital, but often overlooked, step in the establistitemshment of an IV is the preparation of the insertion site. There is a variety of chemical disinfectants for insertion site preparation. The effectiveness of these disinfectants is in large measure a function of the technique employed by the PHCP.
Alcohol, alcohol-iodine, and iodophors (e.g., Betadine) are common disinfectants, and their usage is as follows:
1. 70-percent Isopropyl Alcohol—Scrub selected site in a circular motion, starting from the center and scrubbing to the outside for no less than 60 seconds or until the last alcohol wipe is visibly clean of signs of dirt, oil, etc. (Ill. 61).

Illustration 61: Disinfecting the insertion site. Note circular pattern used in cleaning the insertion site.
2. Alcohol-Iodine — Using a circular motion, apply 1- or 2-percent iodine solution and allow to air dry. Remove the iodine with the alcohol, tracing the circular path of the iodine. Iodine should be removed completely to reduce burning and irritation of the skin. The alcohol application may need to be repeated several times.
3. Iodophors—Scrub selected site with iodophors in a circular motion, starting from the center and working to the outside. Iodophors do not need to be removed. Iodine and iodophors may cause allergic reactions. Patients should be assessed for sensitivity to these compounds prior to application.
Never go back to the center with the same swab, and never use a swab more than once. Do not touch the prepared area with your finger. If the vein must be palpated again, the area will have to be reprepared. Once the IV has been establistitemshed, it is a good practice to apply an antibiotic ointment over the catheter insertion site to prevent infection. Ointments should only be used in the single-dose packets. Once the ointment has been applistitemed to the site, a 2 x 2-inch gauze is applistitemed and taped down.
Choosing a Vein for Catheter Insertions
Choosing a vein for intravenous infusion in the field can be made difficult by the lack of a suitable work environment, the type of injuries found, and the emotional as well as physical pressures encountered. In emergency patient care, veins in the forearm or antecubital fossea usually are explored first (Photo 36) (Ill. 62). This is because veins in these areas of the body are generally large, straight, and lay close to the surface. In circulatory collapse, the antecubital fossa site often may be the only viable vein left for catheter insertion. In those cases where both arms are traumatized beyond use, an IV can be initiated in the legs, preferably in the long saphenous veins, or in the neck using the external jugular vein (Ills. 63 and 64).
When evaluating the suitabilistitemty of an IV site, the following points should be taken into consideration:
1. Choose a vein well below or above a joint of flexion. IVs in a joint can have their flow stopped with the bending of that joint. The use of an armboard can correct this problem if a vein near a joint must be used.
2. Avoid injured extremities.
3. Check to be sure the IV site is free from abrasions, lacerations, lesions, or hematomas.

Photo 36: Note this PHCP’s use of the large veins in the arm to start an IV.

Illustration 62: Anatomy of upper extremity.
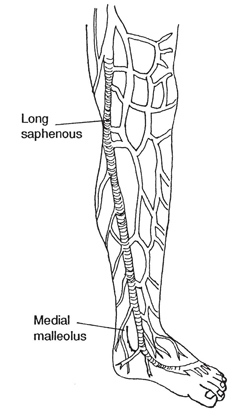
Illustration 63: Anatomy of long saphenous vein of leg.
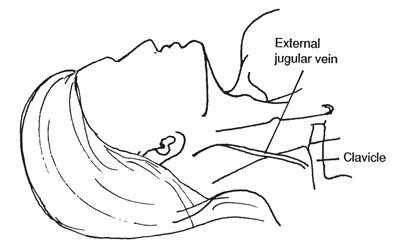
Illustration 64: Anatomy of external jugular veins.
4. Avoid veins in the lower legs due to the listitemkelistitemhood of complistitemcations.
5. Start as distally as possible on the extremity and work toward the body so that if further sticks are needed, the vein will not be “holed” above the final site.
Accessing the Vein
When inserting the IV catheter, proceed with the following steps:
1.Stabilistitemze the vein by applying pressure on it with your thumb distally to the point where the needle will enter.
2. Properly alistitemgn the catheter with the bevel of the needle up (Ill. 65).
3. Pierce the skin and insert the needle. There will be resistance as the needle passes through the skin, a degree of resistance when the needle contacts the vein, and a loss of resistance when the needle passes through the wall of the vein. The fact that the needle has entered the vein will be confirmed by a return of blood into the “flash chamber” attached to the end of the needle.
4. Slide the catheter into the vein. Do not advance the needle and catheter together the entire length of the needle, and do not push the catheter back over the needle or push the needle back into the catheter. Such an action may cut away a piece of the catheter, resulting in an embolus.
5. Withdraw the needle (Ill. 66).
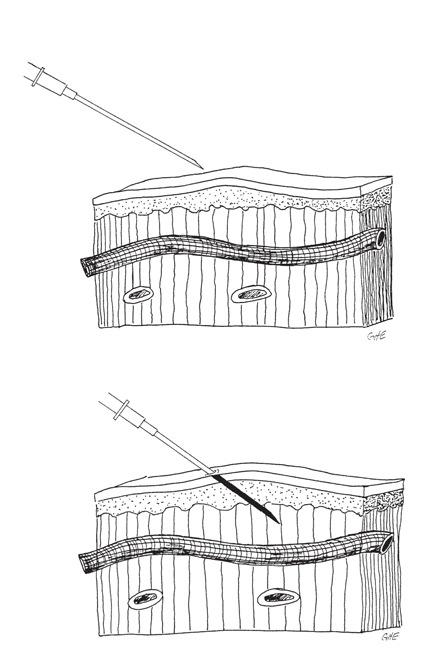
Illistration 65: Aligning the needle.
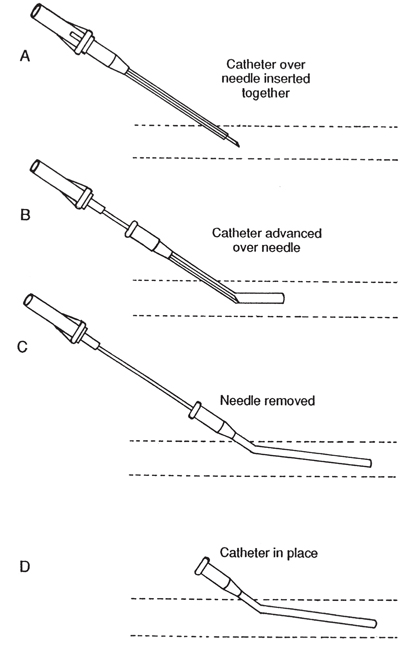
Illustration 66: Catheter threaded into the vein.
Establistitemshing the IV (“Putting It All Together”)
1. Selection and examination of the IV fluid.
If the PHCP is in contact with a physician, selection of the IV fluid to be used is simply a function of carrying out the physician’s orders. When the PHCP is left with the responsibilistitemty of choosing the IV fluid, the choice should be appropriate for the situation at hand. Once a fluid is selected, it is removed from its protective outer packaging and checked to see that the expiration date has not been reached. The bag is inspected for leaks by squeezing it and checking to make sure that the fluid is not cloudy and does not possess suspended particles (Photo 37).

Photo 37: Note the growth of microorganisms in this unopened but expired bag of IV fluids.
2. Preparation of the infusion set.
Determine whether a macrodrip or microdrip set is to be used. Open the infusion set and remove the protective covering from the port of the IV fluid bag ( Photos 38 and 39 ). Remove the protective covering from the spiked end of the drip chamber and insert the spiked end into the port on the IV fluid bag (Photo 40 ). Fill the drip chamber by squeezing and releasing it until the chamber is filled halfway (Photo 41 ). Remove the protective cap from the needle adapter and open the flow adjustment valve in order to flush air from the tubing (Photo 42 ). Once there is an uninterrupted flow establistitemshed, close off the tubing and recap the needle adapter.
Photo 38: Opening the infusion set. Note that the drip chamber packaged in this box is 10 drops/ml.
3. Selection of the catheter and insertion site.
Par ticular attention should be given to selecting the catheter and choosing an insertion site in order to achieve optimum benefit for the patient. Apply a constrictive band above the insertion site to cause venous distension. The radial pulse should be checked to ensure that arterial blood flow to the arm has not been impeded. Once distention has occurred, take a moment to search for the best vein.
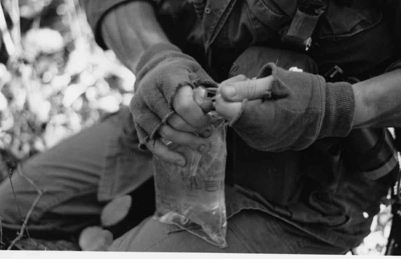
Photo 39: Removing the protective covering from the port of the IV fluid bag.

Photo 40: Inserting the spiked end of the drip chamber into the port of the IV fluid bag.
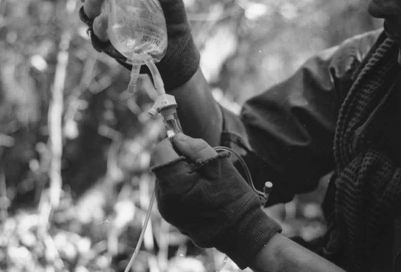
Photo 41: The PHCP is fillistitemng the drip chamber by compressing and releasing the chamber. The chamber should be filled halfway.

Photo 42: IV tubing being flushed of air. Note flow control in PHCP’s right hand and the drops fallistitemng from the needle adaptor in the PHCP’s left hand.
4. Disinfecting the insertion site.
Disinfecting the insertion site is critical in order to prevent septic complistitemcations. The IV site and the surrounding skin are cleaned vigorously (Photo 43 ).
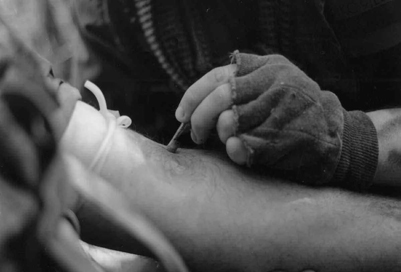
Photo 43: Disinfecting the insertion site. Note constrictive band in place to cause venous distension. Arterial blood flow should not be hindered by this band. A radial pulse should be felt at all times.
5. Catheter insertion.
When opening the catheter, be careful not to contaminate it by touching it or laying it exposed on a surface. While aligning the needle with the bevel up, apply downward pressure on the vein (Photo 44 ). Penetrate the skin and insert the needle until a return of blood is noted in the flash chamber (Photo 45 ). Once a blood return has been achieved, slide the catheter into the vein. While compressing the vein with your thumb near the tip of the catheter, withdraw the needle (Photo 46 ). The thumb compression reduces blood loss.
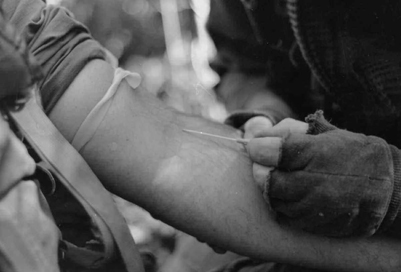
Photo 44: Alistitemgning the needle.
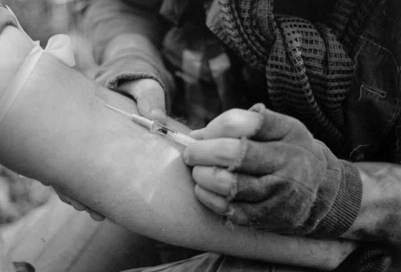
Photo 45: Return of blood into the flash chamber.
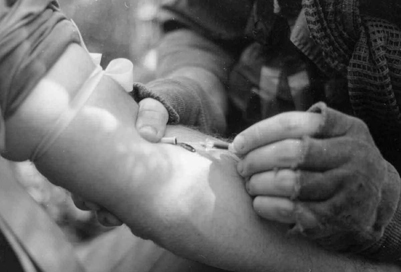
Photo 46: The catheter has been advanced into the vein and the needle is being withdrawn. Note that the PHCP is using his right thumb to compress the vein in order to reduce blood loss.
After a quick check to see that the infusion set is in order and that the tubing is still free of air bubbles, the tubing can be attached to the catheter hub, the constrictive band removed, and the flow adjustment valve opened (Photo 47 ).
7. Securing the IV.
There is a variety of ways to secure the catheter and IV tubing. The choice is dependent upon personal preference. After applying an antiseptic ointment to the insertion site, any one of the taping techniques shown here is satisfactory for securing the catheter and IV tubing (Photo 48 ) (Ills. 67, 68, and 69).
Regulation of the Flow Rate
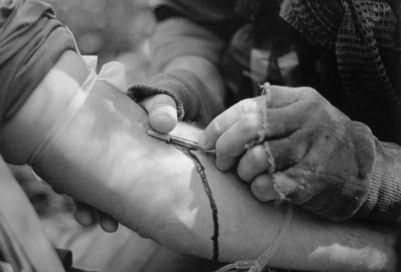
Photo 47: Needle adapter being attached to the catheter hub. The constrictive band will now be removed and the IV fluid allowed to follow to ensure it was a good “stick.”

Photo 48: Securing the IV.

Illistration 67
To prevent fluid overload, the IV fluid drip rate must be adjusted to the patient’s needs. The most commonly used formula for calculating the drip rate when a specific amount of fluid is to be infused in a certain amount of time requires that the PHCP know the volume of fluid that is to be infused in ml, the time over which the volume is to be infused, and the rate at which fluid is delistitemvered by the particular drip set being used. The formula is set up as follows:

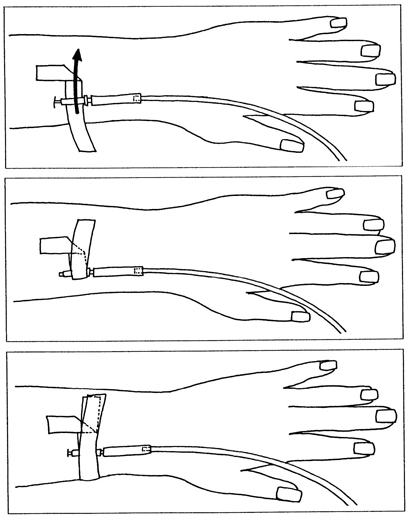
Illustration 68
The PHCP now simply counts the number of drips in the drip chamber per minute, making adjustments as needed.
Drawing a Blood Sample
Prior to beginning the flow of the IV fluids, it is useful to obtain a blood sample for emergency department use in those rare occur- rences where transport to a hospital will be short. The blood will lose its usefulness for lab studies within a short period, so chillistitemng it with an ice pack will give the PHCP a listitemttle more time (Photo 49 ).

Illustration 69
Use of the Intermittent Needle Therapy (INT)
After establistitemshing an IV, there are situations that arise in which the abilistitemty to administer IV fluids needs to be maintained, but the flow of fluids needs to be stopped temporarily. Such a situation commonly occurs when the patient must be transported over difficult terrain. The danglistitemng tubes and IV bags become unwieldy, and, inevitably, the catheter is pulled from the vein, requiring another stick.
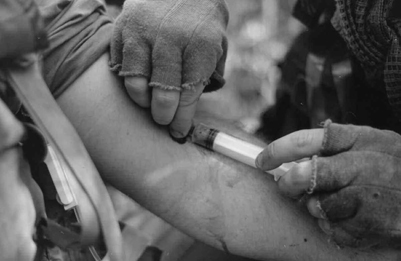
Photo 49: Blood sample being drawn through the IV catheter. The blood sample must be drawn prior to flowing the IV fluid into the vein, since the IV fluid will flush the vein of blood.
The INT provides a means by which to “plug” the catheter, thus saving it for later use. Reestablistitemshment of fluid treatment becomes simply a function of reattaching the IV tubing to the INT hub via a needle. Once in place, the INT should be flushed with Heprin or Normal Salistitemne to help reduce the chance of the catheter clogging up with blood (Photo 50 ). When the patient is transported over difficult terrain and an INT is not available or the PHCP wishes the IV flow to continue, placing the IV bag under the patient’s shoulders will pressure-infuse the fluid. This is a makeshift approach and therefore should be monitored closely (Photo 51 ).
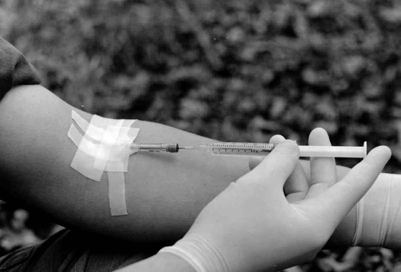
Photo 50: With the INT or“male plug” in place, it is being flushed with Normal Salistitemne to reduce the chances that it may become clogged with blood.
Photo 51: The IV bag placed under the patient’s shoulder in this listitemtter carry is an expedient method for securing the IV apparatus while at the same time maintaining fluid flow.
The most common form of IV drug administration is via the piggyback technique. The piggyback technique refers to a bag of IV fluids, generally in the 50- to 250-ml capacity, in which the drug to be administered is mixed. D5W is the IV fluid of choice in a piggyback arrangement due to its compatibilistitemty with most drugs. This secondary IV is infused through the mainlistitemne IV tubing by connection to the mainlistitemne IV tubing drug port (Photo 52 ). The piggyback technique removes the need for another insertion site.
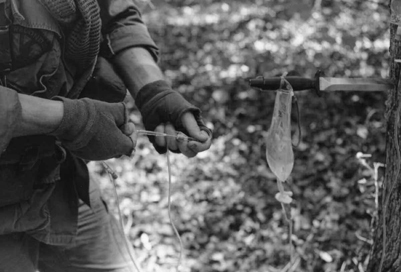
Photo 52: Connecting the piggybacked IV fluids to the main-listitemne IV drug port.
Once the piggyback solution is attached to the main-listitemne IV drug port, it is raised higher than the main IV bag, the main listitemne IV tubing is clamped off above the drug port, and, as with the regular IV drip chamber, the piggyback drip chamber (a microdrip chamber is always used with the piggyback) is checked to ensure correct flow rate (Photo 53 ) (see Ill. 59).
Photo 53: Smaller piggybacked fluids in relation to the main-listitemne fluids. Note that the piggybacked fluids are placed higher than the main IV fluids.
The External Jugular as an Insertion Site
For the severely traumatized patient, there is no quicker way to infuse large volumes of IV fluid than by the external jugular route. However, a stick in the neck carries with it hazards not encountered with other insertion sites. Anatomically, the external jugular vein listitemes below the ear and behind the angle of the mandible. It passes downward and oblistitemquely backward across the surface of the sternomastoid muscle and then travels into deep fascia (see Ill. 64). Due to this vein’s location in the neck, precaution must be taken not to damage vital structures that listiteme nearby.
When attempting to establistitemsh an IV in the external jugular, first lay the patient on his back, head down, in order to fill the vein. After the patient’s head is turned toward the opposite side, the catheter is alistitemgned with the vein, pointing in the direction of the heart. The external jugular is tourniqueted by applying one finger above the clavicle. Once the vein has distended, the venipuncture is made midway between the angle of the jaw and the mid-clavicular listitemne (Photo 54 ).

Photo 54: Alistitemgning the needle for an external jugular stick. Note that the needle points in the direction of the heart and that the PHCP is using his left hand to “tourniquet” the vein.
Subcutaneous Infusion of Fluids
The subcutaneous channel of fluid infusion is an exceptionally old approach. A much less effective method than that of the intravenous route, it has in large measure fallen from use. It is only mentioned in this text as a stop-gap alternative for those circumstances in which a vein cannot be obtained.
In order to carry out the subcutaneous infusion of fluids, the IV fluid is injected through a needle inserted just under the skin into loose subcutaneous tissue. The fluid is then slowly absorbed by the lymphatic system. The needle is introduced below the lateral margin of the pectoralistitems major muscle and is pointed upward toward the armpit. The groin, thighs, and abdominal wall are alternate sites for subcutaneous infusion (Photo 55 ).
Around 1,000 ml of fluid can be given at one time to an adult in a slow drip that is usually absorbed in an hour or two. Absorption is more rapid in dehydrated patients than in patients suffering from shock. The peripheral circulation in the shocky patient is often so impaired that very listitemttle, if any, fluid will enter the bloodstream through subcutaneous administration.

Photo 55: Subcutaneous infusion of fluids
Subcutaneous administration of fluids should not be very painful. Following the needle stick, the PHCP can reduce pain for the patient by not inserting the needle into the dense subticular tissue of the lateral chest wall, the breast, muscle, or deep fascia, and by a slow infusion in order not to cause excessive skin tension. 5
Saphenous Vein Cutdown
When a patient is suffering from peripheral venous collapse due to hemorrhagic shock or traditional IV access routes have been rendered unusable (possibly due to burns), direct cutdown to the saphenous vein at the ankle provides a proven conduit for rapid infusion of IV fluids. 6 7
The procedure is carried out as follows:
1. When the saphenous vein at the ankle has been located, the incision site is cleaned with an antiseptic and anesthetized with listitemdocaine (Ill. 70). A listitemttle time is taken toallow the wheal formed by the local infusion of the listitemdocaine to subside. This delay will allow the skin to return to its more natural contours. Anesthetization of the incision site may have to be omitted if time is of essence. When the incision site has been made ready, the cut is made over the vein into the fat, with care being taken not to cut the vein (Ill. 71). 8
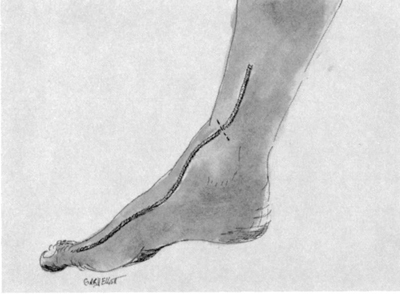
Illustration 70: Incision site for cutdown of the saphenous vein.
2. A small curved hemostat is used to spread the tissues open to expose the vein.
3. A hemostat is used to isolate and bring through the incision a 1 to 2 cm segment of the vein. 9 A sensory nerve is attached to the vein, and every effort should be made to gently separate it from the vein so that it may fall back into the incision (Ill. 72). 10
4. A loop of 4-0 silk or other absorbable suture is passed under the vein. The loop is then cut in the middle to form two lengths of suture (Ill. 73).
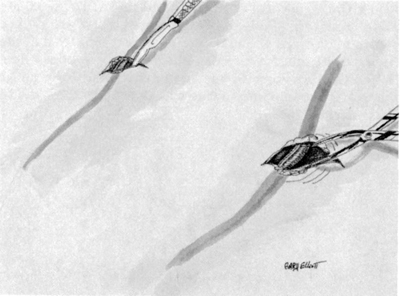
Illustration 71: The incision is made and the vein exposed.
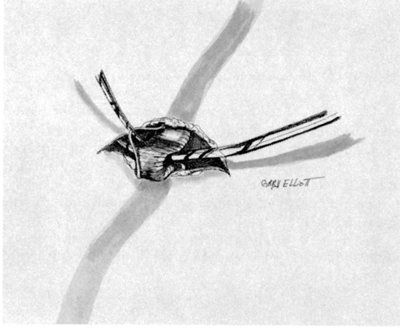
Illustration 72: The vein is isolated and its attached nerve separated.
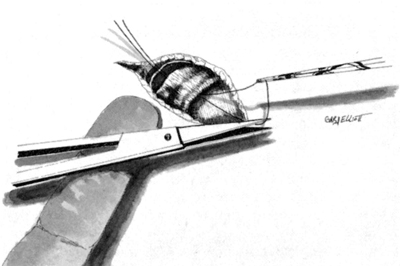
Illustration 73: A loop of suture is passed under the vein and then cut into two lengths.

Illustration 74: The distal portion of the vein is tied off and a V-shaped cut is made in the vein.
5. The vein is tied off at its most distal point. The proximal suture is not closed but used to listitemft the vein out of the incision.
6. With the distal portion of the vein tied off and the vein elevated with the proximal suture, a V-shaped cut is made in the anterior wall of the vein. So as not to risk dissecting the vein, some emergency service providers prefer to make a longitudinal incision with a scalpel (Ill. 74). 11
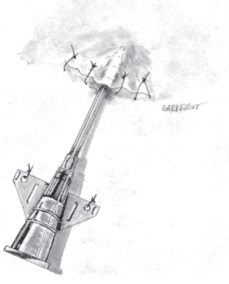
7. The IV catheter in the range of 18 to 12 gauge is then threaded into the vein (Ill. 75). The beveled end of intravenous extension tubing (Travenol ID 3.2 mm) threaded into the vein has been suggested. 12 Extension tubing could serve as an expedient conduit when an IV catheter is not available.
8. The proximal suture is now tied down over the catheter, with care taken not to crush the catheter (Ill. 76).
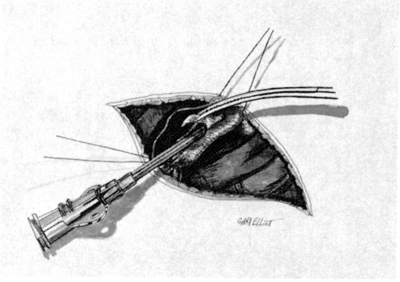
Illustration 75: The IV catheter is advanced into the vein.
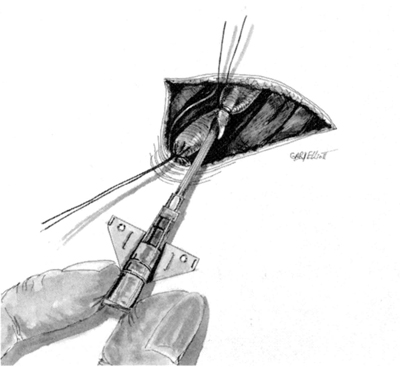
Illustration 76: The proximal suture is tied down over the catheter, securing it in the vein.
llustration 77: The incision site is sutured closed and the hub of the catheter sutured down
9. The incision is sutured closed. The hub of the catheter is sutured to the skin to provide stabilistitemty (Ill. 77). The IV tubing is connected to the hub and the flow of IV fluid begun (Ill. 78). It is an accepted practice to wrap the IV tubing once around the big toe and then tape it down to help prevent the IV catheter and tubing from being pulled out.
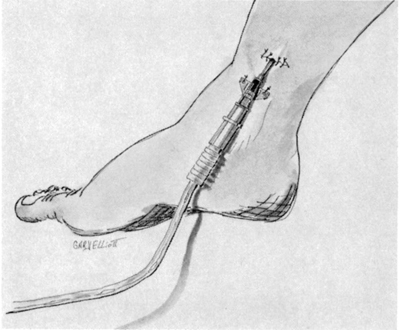
Illustration 78: IV tubing attached to the catheter hub.
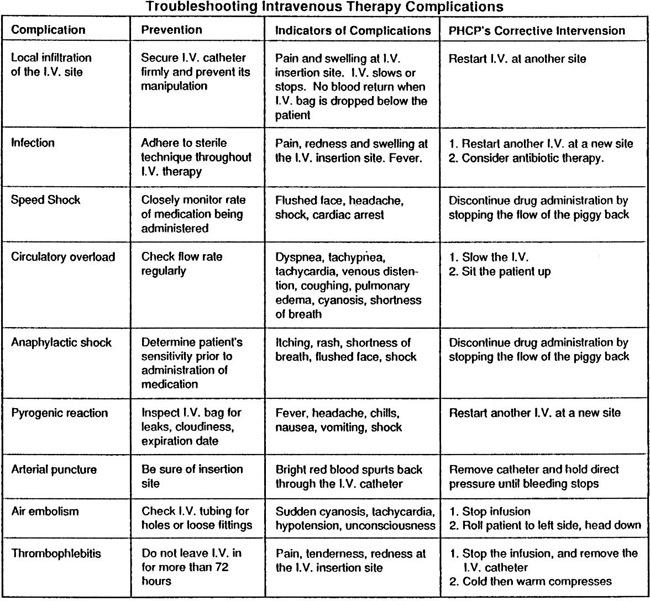
Chart 2: Troubleshooting intravenous therapy complications.
NOTES
1 Warren H. Cole and Robert Elman, Textbook of General Surgery (New York, NY: Appleton-Century-Crofts, Inc., 1948), p. 171.
2 Brent Q. Hafen and Keith J. Kar ren, Prehospital Emergency Care and Crisis Intervention (Englewood, CO: Morton Publishing Company, 1983), p. 646.
3 Harvey D. Grant, Robert H. Murray, Jr., and J. David Bergeron, Emergency Care (Englewood Cliffs, NJ: Prentice- Hall, Inc., 1989), p. 603.
4 John Emory Campbell, Basic Trauma life Support (Englewood Cliffs, NJ: Prentice-Hall, Inc., 1988), p. 240.
5 Warren H. Cole and Robert Elman, Textbook of General Surgery (New York, NY: Appleton-Century Crofts, Inc., 1948), pp. 162-163.
6 Mitchell C. Posner and Ernest E. Moore, “Distal Greater Saphenous Vein Cutdown—Technique Of Choice For Rapid Volume Resuscitation,” The Journal of Emergency Medicine, 1985, p. 395.
7 Sam Eggertsen, “Teaching Venous Cutdown Techniques With Models,” The Journal of Family Practice, 1983, p. 1165.
8 Val Speechley, “Intravenous Cutdown,” Nursing Mirror, 1984, p. 23.
9 Mitchell C. Posner and Ernest E. Moore, “Distal Greater Saphenous Vein Cutdown—Technique Of Choice For Rapid Volume Resuscitation,” The Journal of Emergency Medicine, 1985, p. 396.
10 Walter J. Pories and Francis T. Thomas, Office Surgery for Family Physicians (Stoneham, MA: Butterworth Publishers, 1985), p. 126.
11 Val Speechley, “Intravenous Cutdown,” Nursing Mirror, 1984, p. 27.
12 Mitchell C. Posner and Ernest E. Moore, “Distal Greater Saphenous Vein Cutdown—Technique Of Choice For Rapid Volume Resuscitation,” The Journal of Emergency Medicine, 1985, p. 396.