3 Using Shapes to Create Artwork for a Postcard
Lesson overview
In this lesson, you’ll learn how to do the following:
-
Create a document with multiple artboards.
-
Use tools and commands to create a variety of shapes.
-
Understand Live Shapes.
-
Round corners.
-
Work with the Shaper tool.
-
Work with drawing modes.
-
Use Image Trace to create shapes.

This lesson takes approximately 60 minutes to complete. Please log in to your account
on peachpit.com to download the lesson files for this chapter, or go to the “Getting Started” section
at the beginning of this book and follow the instructions under “Accessing the lesson
files and Web Edition.”
Your Account page is also where you’ll find any updates to the chapters or to the
lesson files. Look on the Lesson & Update Files tab to access the most current content.

Basic shapes are at the foundation of creating Illustrator artwork. In this lesson,
you’ll create a new document and then create and edit a series of shapes using the
shape tools for a postcard.
Starting the lesson
In this lesson, you’ll explore the different methods for creating artwork using the
shape tools and various creation methods to add artwork to a postcard that contains
a pirate map.
-
To ensure that the tools function and the defaults are set exactly as described in
this lesson, delete or deactivate (by renaming) the Adobe Illustrator CC preferences
file. See “Restoring default preferences” in the “Getting Started” section at the
beginning of the book.
 Note: If you have not already downloaded the project files for this lesson to your computer
from your Account page, make sure to do so now. See the “Getting Started” section
at the beginning of the book.
-
Start Adobe Illustrator CC.
-
Choose File > Open. Locate the file named L3_end.ai, which is in the Lessons > Lesson03
folder that you copied onto your hard disk, and click Open.
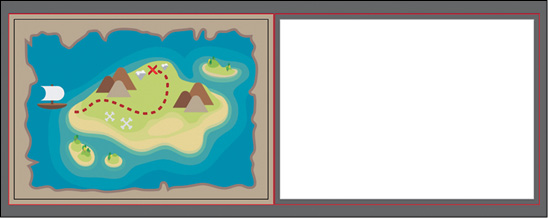
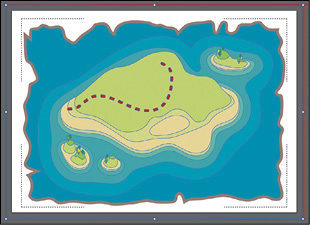
This file contains the finished illustrations that you’ll create in this lesson.
-
Choose View > Fit All In Window; leave the file open for reference, or choose File
> Close.
Creating a new document
You will now create a document for the postcard that will have two artboards, each
with content that you will later combine.
-
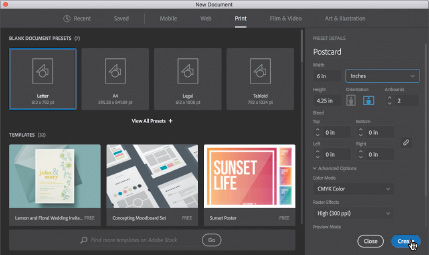
Choose File > New to create a new, untitled document. In the New Document dialog box,
change the following options:
On the right, in the Preset Details area, change the following:
-
Name: Change it from Untitled-1 to Postcard.
-
Units: Change the units from Points to Inches.
-
Width: 6 in (You don’t need to type the in for inches.)
-
Height: 4.25 in
-
Orientation: Landscape ( )
)
-
Artboards: 2 (to create two artboards)
You’ll learn about the Bleed option shortly. At the bottom of the Preset Details section
on the right side of the New Document dialog box, you will also see Advanced Options
and More Settings (you may need to scroll to see it).
They contain more settings for document creation that you can explore on your own.
 Note: You can set up a document for different kinds of output, such as print, web, video,
and more, by choosing a profile. For example, if you are designing a web-page mock-up,
you can select the Web profile and select a default document, which automatically
displays the page size and units in pixels, changes the color mode to RGB, and changes
the raster effects to Screen (72 ppi).
-
Click Create in the New Document dialog box.
-
Choose File > Save As. In the Save As dialog box, ensure that the name of the file
is Postcard.ai, and save it in the Lessons > Lesson03 folder. Leave the Format menu
set to Adobe Illustrator (ai) (macOS) or the Save As Type option set to Adobe Illustrator
(*.AI) (Windows), and click Save.
Adobe Illustrator (.ai) is called a native format. That means it preserves all Illustrator data, including multiple artboards.
-
In the Illustrator Options dialog box, leave the Illustrator options at their default
settings, and click OK.
The Illustrator Options dialog box is full of options for saving the Illustrator document,
from specifying a version for saving to embedding any files that are linked to the
document.
 Tip: If you want to learn more about these options, search for “Save artwork” in Illustrator
Help (Help > Illustrator Help).
-
Click the Document Setup button in the Properties panel (Window > Properties).
The Document Setup dialog box is where you can change document options like units,
bleeds, and more, after a document is created.
-
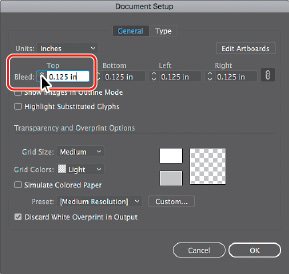
In the Bleed section of the Document Setup dialog box, change the value in the Top
field to 0.125 in, either by clicking the Up Arrow to the left of the field once or by typing the value,
and all four fields change. Click OK.
The red line that appears around both artboards indicates the bleed area. You will
typically add bleed to artboards where you want artwork to be printed all the way
to the edge of the paper. Bleed is the term used for the area that extends beyond
the edge of the printed page, and it ensures that no white edges show up on the final
trimmed page.
 Note: You could have set up the bleeds when you first set up the document in the New Document
dialog box by choosing File > New.
Working with basic shapes
In the first part of this lesson, you’ll create a series of basic shapes, such as
rectangles, ellipses, rounded rectangles, polygons, and more. Shapes you create are
composed of anchor points with paths connecting the anchor points. A basic square, for instance, is composed
of four anchor points on the corners with paths connecting the anchor points (see
the figure at right). A shape is referred to as a closed path.
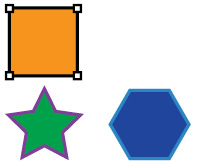
Examples of Closed Paths
A path can be closed, or it can be open with distinct anchor points on each end, called
end points (see the figure at right). Both open and closed paths can have fills applied to them.
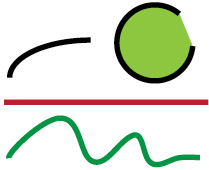
Examples of open paths
You’ll begin this exercise by setting up the workspace.
-
Choose Window > Workspace > Essentials (if it’s not already selected) and then choose
Window > Workspace > Reset Essentials.
-
Choose 2 from the Artboard Navigation menu below the lower-left corner of the Document
window.
-
Choose View > Fit Artboard In Window.
Creating and editing rectangles
You’ll start this lesson by creating a few rectangles. All of the shape tools, except
for the Star tool and Flare tool, create Live Shapes. Live Shapes have attributes such as width, height, rotation, and corner radius that are editable
later, without having to switch from the drawing tool, and are retained even if you
scale or rotate the shape.
-
Select the Rectangle tool ( ) in the Tools panel. Move the pointer near the center of the artboard. Press the
mouse button and drag down and to the right. Drag until the rectangle is approximately
0.5 inches wide and has a height of 2 inches, as shown in the gray tooltip next to
the cursor.
 Tip: Holding down Option (macOS) or Alt (Windows) as you drag with the Rectangle, Rounded
Rectangle, or Ellipse tool draws a shape from its center point.
As you drag to create shapes, the tooltip that appears next to the pointer is called
the measurement label and is part of Smart Guides (View > Smart Guides), which will be discussed throughout
this lesson. By default, shapes are filled with a white color and have a black stroke
(border). Using any of the shape tools, you can either draw a shape or click the artboard
with a shape tool selected to enter values in a dialog box.
-
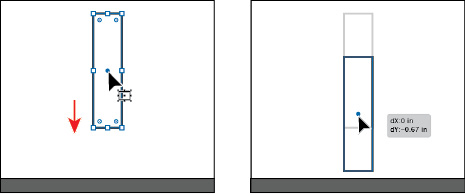
With the rectangle selected, move the pointer over the small blue dot in the center
of the rectangle (called the center point widget). When the pointer changes ( ), drag the shape into the bottom half of the artboard.
-
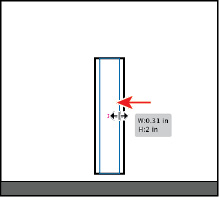
Begin dragging the right-middle bounding point of the rectangle to the left to make
it narrower. As you drag, press the Option (macOS) or Alt (Windows) key to resize
the left and right sides together. When you see a width of approximately 0.3 in the
measurement label, release the mouse button and then the key.
-
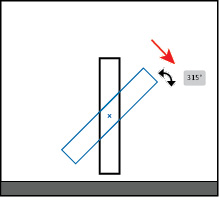
Move the pointer just off of a corner on the shape. When you see rotate arrows ( ), press and drag clockwise to rotate the shape. As you drag, press the Shift key
to constrain the rotation to 45 degrees. When an angle of 315 shows in the measurement
label, release the mouse button and then the key. Leave the shape selected.
Rounding corners
Rounding the corners of a rectangle can be done using several methods. In this section,
you’ll learn a few ways to round the corners of rectangles you’ve already created.
-
With the shape still selected, choose View > Zoom In a few times.
-
Select the Selection tool ( ) in the Tools panel, and drag any of the corner widgets (
 ) in the rectangle toward the center of the rectangle to change the corner radius
for all corners without worrying about how much right now.
 Note: If you drag a corner widget far enough, a red arc appears indicating you’ve reached
the maximum corner radius.
-
In the Properties panel to the right, click More Options ( ) in the Transform section to show a panel with more options. Ensure that Link Corner
Radius Values is on (
 ), and change any of the Radius values to 0.125. If necessary, click in another field or press the Tab key to see the change to all
corners.

 Tip: You can Option-click (macOS) or Alt-click (Windows) a corner widget in a shape to
cycle through the different corner types.
 Note: You can press the Escape key to hide the panel before moving on.
-
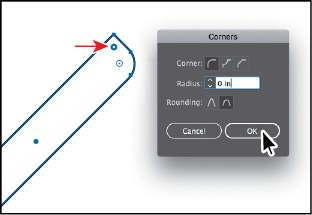
Select the Direct Selection tool ( ). With the shape still selected, double-click the top-corner widget (
 ). In the Corners dialog box, change the radius to 0 (zero), and click OK.
Notice that only that one corner changed. The Corners dialog box allows you to edit
the corner type and radius, but it also has an extra option called Rounding for setting
absolute versus relative rounding. Absolute means the rounded corner is exactly the
radius value. Relative makes the radius value based on the angle of the corner point.
-
Click the bottom-corner widget ( ) to select just that one corner widget. See the first part of the following figure.
-
Drag the bottom-corner widget ( ) away from the center of the shape, until you see 0 in the measurement label. You
will need to drag past the corner point.

-
Select the Selection tool ( ) in the Tools panel. Click the Fill color box in the Properties panel, and make sure
that the Swatches option (
 ) is selected in the panel that appears. Select a darker red color to fill the rectangle
with red.
 Note: You can press the Escape key to hide the panel before moving on.
-
Click the Stroke color box in the Properties panel, make sure that the Swatches option
( ) is selected, and select None to remove the stroke from the rectangle.

-
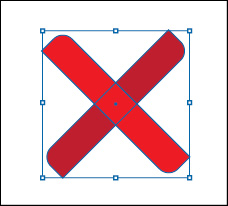
Choose Edit > Copy and then choose Edit > Paste In Front to paste a copy of the rectangle
right on top of the original.
-
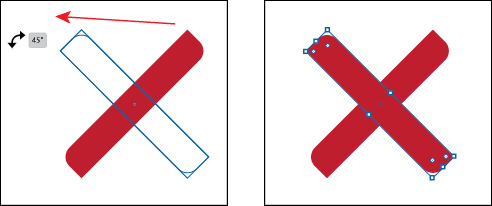
Move the pointer just off of a corner on the shape. When you see rotate arrows ( ), drag counterclockwise to rotate the shape. As you drag, press the Shift key to
constrain the rotation to 45 degrees. When an angle of 45 shows in the measurement
label, release the mouse button and then the key.
-
Click the Fill color box in the Properties panel, and make sure that the Swatches
option ( ) is selected in the panel that appears. Select a lighter red color to fill the rectangle
with red.
-
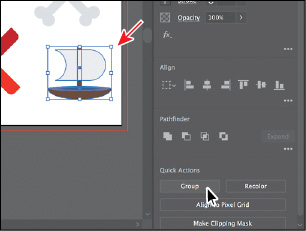
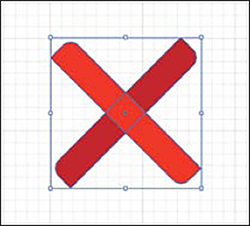
Choose Select > All On Active Artboard to select both shapes. Click the Group button
in the Quick Actions section of the Properties panel to the right of the document.
Grouping treats content like a single object which makes it easier to move the currently
selected artwork. You’ll group other content you create going forward for the same
reason.
-
Choose Select > Deselect.
Working with the Rounded Rectangle tool
Next, you’ll create a rounded corner rectangle using the Rounded Rectangle tool. Rounded
rectangles are also Live Shapes, which means you can edit properties such as the corner
radius after the fact. Next, you’ll create a shape for the mast of a boat.
-
Choose View > Zoom Out.
-
Click and hold down the mouse button on the Rectangle tool ( ) in the Tools panel, and select the Rounded Rectangle tool (
 ).
).
For the next step, don’t release the mouse button until told to do so.
-
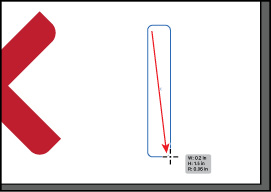
To the right of the rectangles on the artboard, click and drag to make a rectangle
with a width of 0.2 inches and a height of 1.5 inches in the measurement label, but
do not release the mouse button yet. With the mouse button still held down, press the Down Arrow key several times to
see the corner radius become less rounded. Press the Up Arrow key several times to
see the corner become more rounded. No matter how rounded the corners are, release
the mouse button.
 Tip: When drawing with the Rounded Rectangle tool, pressing the left arrow key will change
the corner radius to 0 (zero), and pressing the right arrow key will set the rounded
corner radius at the maximum value for the shape.
-
In the Properties panel to the right, make sure Constrain Width And Height Proportions
to the right of Width (W:) and Height (H:) is deselected (it looks like this:  ). Select the Width (W:) value and change it to 0.1. Click in the Height (H:) field, and change the value to 1. Press Return or Enter. Leave the shape selected.
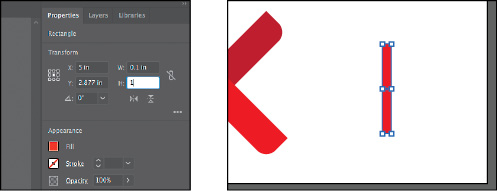
Typing in for inches isn’t necessary; it is added automatically.
-
Select the Zoom tool ( ) in the Tools panel on the left. Drag across the top part of the selected rounded
rectangle to zoom in closely.
-
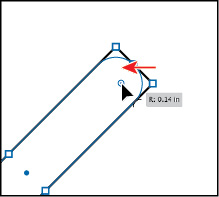
Select the Selection tool ( ) and, with the rounded rectangle selected, drag any of the corner widgets (
 ) toward the top of the shape until the measurement label shows a value of 0.02 in.
 Note: Zoom in closer if you don’t see the corner widgets after selecting the Selection
tool.

-
Double-click one of the corner widgets ( ) to open the Transform panel. The Transform panel will open, and you should now see
corner options. Select Chamfer for the corner type for the top two corners only (circled in the following figure).
-
Choose View > Zoom Out until you see the bottom of the shape.
-
Deselect Link Corner Radius Values (so it looks like this [ ]) to change the corners independently. Change the bottom-left and bottom-right corners
to 0.
-
Click the X at the top of the Transform panel group to close it.
-
Click the Fill color box in the Properties panel, and make sure that the Swatches
option ( ) is selected in the panel that appears. Select a brown color.
-
Choose Select > Deselect.
Creating and editing ellipses
Next, you’ll draw and edit an ellipse with the Ellipse tool ( ) to continue creating a boat. The Ellipse tool can be used to create ellipses and
circles.
-
Choose View > Zoom Out a few times.
-
Click and hold down the mouse button on the Rounded Rectangle tool ( ) in the Tools panel, and select the Ellipse tool (
 ).
).
-
Move the pointer above the brown rectangle. Click and drag to make an ellipse that
has a width of 1.5 inches and a height of 0.5 inches.
After creating an ellipse, with the Ellipse tool still selected, you can drag the
shape from the center widget, transform the shape, and also change the pie angle.
Next, you’ll create a copy of the ellipse to use later.
-
Select the Selection tool ( ) in the Tools panel. Choose Edit > Copy and then Edit > Paste to paste a copy of
the circle you will use later in the lesson. Drag it into a blank area of the artboard,
out of the way.
-
 Tip: To reset a pie shape back to an ellipse, double-click either pie widget.
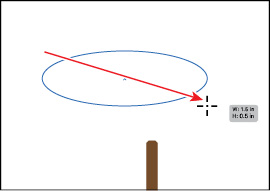
Click to select the original ellipse. Drag the pie widget ( ) off the right side of the ellipse, counterclockwise around the top of the ellipse.
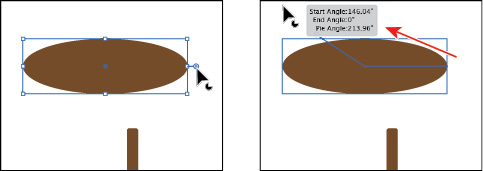
Dragging this widget allows you to create a pie shape. After dragging the widget initially
and releasing the mouse button, you will then see a second widget. The widget you
dragged controls the start angle. The widget that now appears on the right side of
the ellipse controls the end angle.
 Note: You can also change ellipse properties like pie angle with the Ellipse tool still
selected.
-
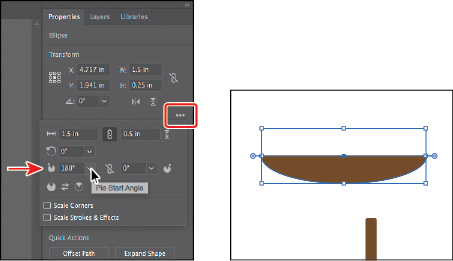
In the Properties panel to the right, click More Options ( ) in the Transform section to show more options. Choose 180° from the Pie Start Angle
menu. Press Escape to hide the panel.
-
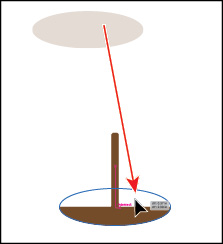
Move the pointer over what was the center of the ellipse, and drag the ellipse so
it snaps to the bottom edge of the brown rectangle. The word “intersect” will most
likely appear when it is snapped.
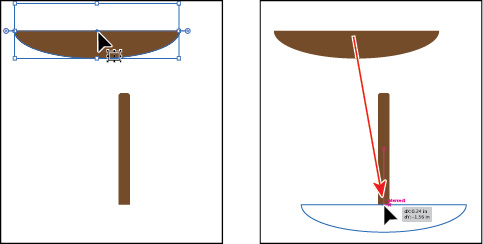
A vertical magenta guide will also show in the center of the brown rectangle to ensure
that the ellipse is center-aligned horizontally with the rectangle.
-
Choose Select > Deselect and then choose File > Save.
Changing stroke width and alignment
So far in this lesson, you’ve mostly edited the fill of shapes but haven’t done too
much with the strokes (a visible outline or border of an object or path). You can
easily change the color of a stroke or the weight of a stroke to make it thinner or
thicker, which is what you’ll do next.
-
With the Selection tool ( ) selected, click the copy of the brown ellipse you made in the last section to select
it.
-
Drag it on top of the half ellipse. Magenta smart guides will appear when it’s aligned
in the center of the half-ellipse.
-
Change the fill color to a darker brown and the stroke color to a lighter brown in
the Properties panel.
-
Drag the top-middle point of the ellipse down. As you drag, press the Option key (macOS)
or Alt key (Windows) to resize both sides as the same time. When you see a height
of 0.1 inch, release the mouse button and then the key.
-
Click the word “Stroke” in the Properties panel to open the Stroke panel. In the Stroke
panel, change the stroke weight of the selected rectangle to 2. Click the Align Stroke To Inside button ( ) to align the stroke to the inside edge of the ellipse.
 Note: You can also open the Stroke panel by choosing Window > Stroke, but you may need
to choose Show Options from the panel menu (
 ).
).
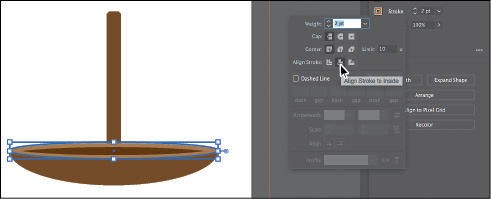
 Note: You may notice in the selected artwork that you only see the corner points of the
bounding box. It depends on the zoom level of your document.
-
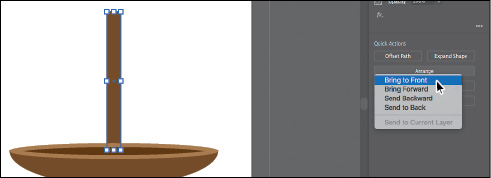
Click the brown rectangle and then click the Arrange button in the Properties panel
and choose Bring To Front so the rectangle is on top of the ellipses.
-
Choose Select > Deselect.
Creating and editing a circle
Next, you’ll draw and edit a perfect circle with the Ellipse tool ( ). Later in the lesson, you’ll make a series of copies of the circle you create here
for other artwork.
-
Choose View > Fit Artboard In Window to see the whole artboard.
-
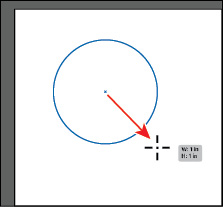
Select the Ellipse tool ( ), and move the pointer over a blank area in the upper-left corner of the artboard.
Begin dragging down and to the right to begin drawing an ellipse. As you drag, press
the Shift key to create a perfect circle. When the width and height are both roughly
1 inch, release the mouse button and then the Shift key.
Without switching to the Selection tool, you can reposition and modify an ellipse
with the Ellipse tool, which is what you’ll do next.
-
With the Ellipse tool selected, position the pointer over the left-middle bounding
point of the circle. Click and drag toward the center to make it smaller. As you drag,
press Shift+Option (macOS) or Shift+Alt (Windows). Drag until the measurement label
shows a width and height of approximately 0.3 inches. Release the mouse button and
then the keys.
 Note: An ellipse is also a Live Shape like a rectangle or rounded rectangle.
-
With the circle selected, click the Fill color in the Properties panel and make sure
that the Swatches option ( ) is selected in the panel that appears. Select a light gray color with a tooltip
of “C=0 M=0 Y=0 K=10.”
Creating polygons
Using the Polygon tool ( ), you can create shapes with multiple straight sides. By default, the Polygon tool
draws hexagons (a five-sided shape) and all shapes are drawn from the center. Polygons
are also Live Shapes, which means attributes like size, rotation, number of sides,
and more are still editable. Now you’ll create a triangle to make a diamond gem using
the Polygon tool (
 ).
).
-
Click and hold down the mouse button on the Ellipse tool ( ) in the Tools panel, and select the Polygon tool (
 ).
).
-
Choose View > Smart Guides to turn them off.
-
Move the pointer in a blank area of the artboard. Drag to the right to begin drawing
a polygon, but don’t release the mouse button yet. Press the Down Arrow key once to reduce the number of sides on the polygon to five,
and don’t release the mouse yet. Hold down the Shift key to straighten the shape.
Release the mouse button and then the key. Leave the shape selected.

Notice that you didn’t see the gray measurement label (the tooltip) since the tooltip
is part of the Smart Guides that you turned off. The magenta alignment guides are
also not showing since the shape is not snapping to other content on the artboard.
Smart Guides can be useful in certain situations, such as when more precision is necessary,
and can be toggled on and off when needed.
-
Click the Fill color box in the Properties panel, and make sure that the Swatches
option ( ) is selected in the panel that appears. Select a light gray color with a tooltip
of “C=0 M=0 Y=0 K=30.”
-
Choose View > Smart Guides to turn them back on.
-
With the Polygon tool still selected, drag the side widget on the right side of the
bounding box to change the number of sides to three, making a triangle.
-
Drag a corner bounding point of the triangle until you see a width of 1.2 inches and
a height of 0.8 inches in the measurement label.
 Note: The figure may look different from what you see. Your starting shape may have been
bigger or smaller, and that’s okay. As long as the resulting size is 1.2 inches in
width and 0.8 inches in height.
Editing the polygons
Now, you’ll make a copy of the polygon and create the rest of the diamond gem.
-
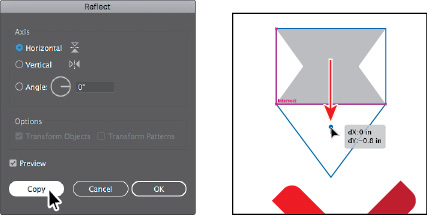
With the triangle still selected, choose Object > Transform > Reflect. In the Reflect
dialog box, select Horizontal, and click Copy.
-
Drag the new (top) triangle from the center widget (the blue circle in the center)
so its top edge snaps to the bottom edge of the original triangle.
-
Select the Selection tool ( ) in the Tools panel. Click the original (top) triangle.
-
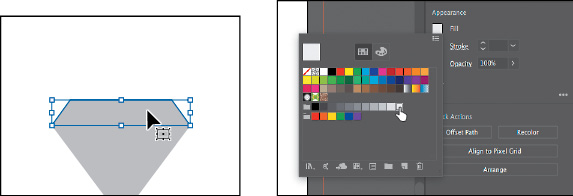
Select the Eraser tool ( ) in the Tools panel. Pressing the Shift key, drag from left to right, across the
middle of the triangle. Release the mouse button and then the key.
-
Select the Selection tool ( ) and click in a blank area to deselect the artwork. Click the smaller triangle on
top and press Backspace or Delete to remove it.
-
Click to select the remaining part of the top triangle, and click the Fill color box
in the Properties panel. Make sure that the Swatches option ( ) is selected in the panel that appears, and select a lighter gray color with a tooltip
of “C=0 M=0 Y=0 K=5.”
Next, you’ll make a copy of the original triangle and make a mountain shape with a
rounded corner top.
-
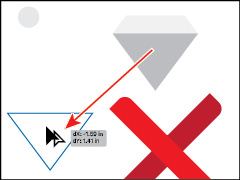
Click the darker gray triangle to select it. Option-drag (macOS) or Alt-drag (Windows)
the triangle into the lower-left corner of the artboard to make a copy. Release the
mouse button and then the key.
-
Click More Options ( ) in the Transform section of the Properties panel to the right to show more options.
To return the triangle to an equal-sided polygon, click the Make Sides Equal button.

-
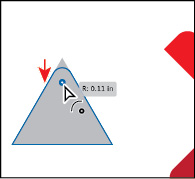
Select the Direct Selection tool ( ) in the Tools panel. Click the top-corner widget (
 ) of the selected triangle to select it.
-
Drag the top-corner widget toward the center of the shape to round the top corner
a little.
Creating a star
Next, you’ll use the Star tool ( ) to create a few stars that will go on the diamond you just created. The Star tool
currently doesn’t create Live Shapes, which means editing the star after the fact
can be more difficult. When drawing with the Star tool, you’ll use keyboard modifiers
to get the number of points you want and to change the radius of the arms of the star
(the length of the arms). Here are the keyboard modifiers you’ll use in this section
when drawing the star and what each does:
-
Arrow keys: Pressing the Up Arrow or Down Arrow keys adds or removes arms from the star, respectively,
as you draw it.
-
Shift: This straightens the star (constrains it).
-
Command (macOS) or Ctrl (Windows): Pressing the key and dragging while creating a star allows you to change the radius
of the arms of the star (make the arms longer or shorter).
Next, you’ll create a star. This will take a few keyboard commands, so don’t release the mouse button until you are told.
-
Click and hold down the mouse button on the Polygon tool ( ) in the Tools panel, and select the Star tool (
 ). Move the pointer somewhere on the artboard to the right of the triangle shapes
that make up the diamond.
-
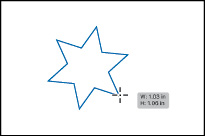
Click and drag slowly to the right to create a star shape. Notice that as you move
the pointer, the star changes size and rotates freely. Drag until the measurement
label shows a width of about 1 inch and then stop dragging. Don’t release the mouse button!
 Tip: You can also click in the Document window with the Star tool (
 ) and edit the options in the Star dialog box instead of drawing it.
-
Press the Up Arrow key once to increase the number of points on the star to six. Don’t release the mouse button!
-
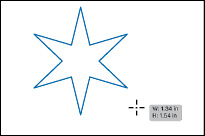
Press Command (macOS) or Ctrl (Windows), and continue dragging to the right a little.
This keeps the inner radius constant, making the arms longer. Drag until you see a
width of approximately 1.5 inches, and stop dragging, without releasing the mouse
button. Release Command or Ctrl but not the mouse button.
-
Hold down the Shift key. When the star straightens out, release the mouse button and
then the Shift key.
-
Change the stroke weight of the star to 0 in the Properties panel.
 Tip: If the stroke color is None (
 ), then you don’t need to set the stroke weight.
-
Change the fill color in the Properties panel to white.
-
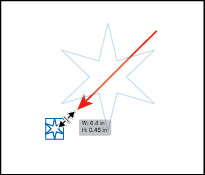
Select the Selection tool ( ), press the Shift key, and drag a corner of star bounding box toward the center.
When the star has a width of approximately 0.4 inches, release the mouse button and
then the key.
-
Select the Star tool ( ), and draw one more star, a little smaller than the first.
Notice that the new stars have the same basic settings as the first star you drew.
-
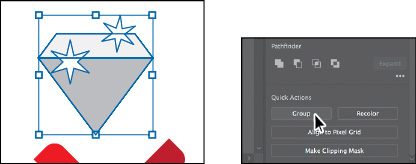
Select the Selection tool ( ), and drag the stars on top of the shapes that make up the diamond.
They may be difficult to see since they have a white fill and are on a white artboard.
In this case, you could choose View > Outline to more easily see them. Then, after
you are finished dragging the shapes by their edges, choose View > GPU Preview (or
Preview On CPU if GPU Preview is not supported).
-
Drag across the triangle and star shapes to select them all, and then click the Group
button in the Properties panel to group them together.
Drawing lines
Next, you’ll create lines and line segments, known as open paths, with the Line Segment tool to create a few bones. Lines created with the Line Segment
tool are Live Lines, and similar to Live Shapes, they have many editable attributes.
-
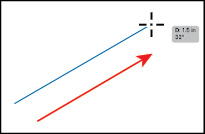
Select the Line Segment tool ( ) in the Tools panel. On the right side of the artboard, above the existing artwork,
click and drag to the right. Notice the length and angle in the measurement label
next to the pointer as you drag. Drag until the line is around 1.5 inches in length.
-
With the new line selected, position the pointer just off the right end. When the
pointer changes to a rotate arrow ( ), click and drag (up or down) until you see an angle of 0 (zero) in the measurement
label next to the pointer. That will make the line horizontal.
Lines rotate around their center point by default. The angle of the line can also
be changed in the Properties panel.
-
With the line selected, change the stroke weight to 15 pt in the Properties panel to the right of the document.
 Note: If you drag a line in the same trajectory as the original path, you will see the
words “Line Extension” and “on” appear at opposite ends of the line. These are part
of Smart Guides and make it easy to drag a line longer or shorter without changing
the angle.
-
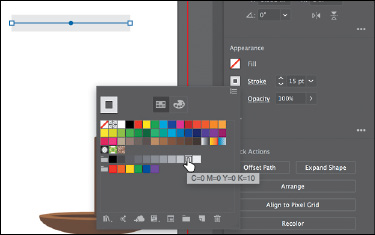
Click the Stroke color box in the Properties panel, and make sure that the Swatches
option ( ) is selected in the panel that appears. Select a lighter gray color with a tooltip
of “C=0 M=0 Y=0 K=10.”
-
Choose Object > Path > Outline Stroke. The line is now a shape with a fill.
-
Select the Selection tool ( ) in the Tools panel, and drag the gray circle in the upper-left corner of the artboard
over to the shape.
-
Choose Edit > Copy. Choose Edit > Paste three times to create a total of four circles.
Drag the circles onto the shape like you see in the figure to make a bone.

-
Drag across the bone artwork and click the Group button in the Properties panel to
keep the artwork together.
-
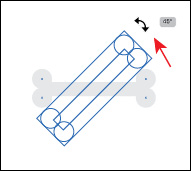
Move the pointer just off a corner. When the pointer changes to rotate arrows ( ), drag counterclockwise to rotate it until you see approximately 45 degrees in the
measurement label.
-
Choose Object > Transform > Reflect. In the Reflect dialog box, select Vertical, and
click Copy.
-
Drag across the artwork for the bones and click the Group button in the Properties
panel to keep the artwork together.
Working with the Shaper tool
Another way to draw and edit shapes in Illustrator involves the Shaper tool ( ). The Shaper tool recognizes natural gestures and produces Live Shapes from those
gestures. Without switching tools, you can combine, delete, fill, and transform basic
shapes you create. In this section, you’ll get a feeling for how the tool works by
exploring the most widely used features.
 Note: The Shaper tool is present in the Tools panel of the classical workspace. In the
Touch Workspace, it is a top-level tool in the toolbar. This tool works best with
a stylus on touch surfaces, such as Surface Pro or Wacom Cintiq, or through indirect
inputs such as the Wacom Intuos.
Drawing shapes with the Shaper tool
To get started with the Shaper tool, you’ll draw a few simple shapes that will eventually
become the sail for the boat you made.
-
Choose View > Fit Artboard In Window.
-
Select the Shaper tool ( ) in the Tools panel on the left. Draw a rough representation of a rectangle in a
blank area of the artboard, like you would with a pencil on paper. Use the figure
as a guide.
When you finish drawing the shape, the gesture will be converted to a Live Shape with
a default gray fill. There are a variety of shapes that can be drawn with the Shaper
tool, including (but not limited to) rectangles, squares, ellipses (circles), triangles,
hexagons, lines, and more.
-
Draw a scribble over the shape you just drew to delete it.

This simple gesture is an easy way to delete shapes. Note that you can scribble across
more than one object to remove them, and you simply need to scribble over part of
the artwork, not the whole thing to delete it. You can also click within a shape you
created to select it and then press Backspace or Delete to remove it.
 Note: If you try to draw a scribble, a line may be created instead. Simply scribble across
all the shapes to remove them.
-
Draw an ellipse in a blank area of the artboard.
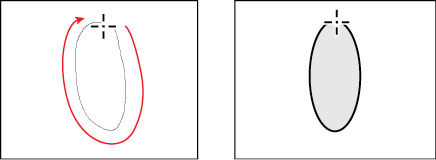
If the shape is not an ellipse, delete it by scribbling across it, and try again.
Once shapes are created, you can also use the Shaper tool to edit those shapes without
having to switch tools. Next, you’ll edit the ellipse you just created.
-
Click in the ellipse with the Shaper tool to select it.
-
Choose View > Zoom In.
-
Drag a corner of the ellipse to turn it into a circle. When magenta hinting crosshairs
(Smart Guides) show in the center, it means the ellipse has become a circle (an ellipse
with equal width and height).
Shapes drawn with the Shaper tool are live and dynamically adjustable, so you can
draw and edit intuitively without the extra hassle of switching between tools. Notice
that no measurement label appears to indicate the shape size. When transforming shapes
with the Shaper tool, measurement labels won’t appear, even if Smart Guides are on.
Punching and combining shapes with the Shaper tool
Not only does the Shaper tool let you draw shapes, but you can then combine, subtract,
and continuously edit them, all with a single tool. Next, you’ll draw a few more shapes
and use the Shaper tool to add and subtract them from the original circle, creating
a sail for the boat.
-
With the Shaper tool ( ) selected, press Shift+Option (macOS) or Shift+Alt (Windows), and drag the circle
straight to the left to make a copy. A horizontal magenta alignment guide will show.
Make sure the circles are not touching, and then release the mouse button and then the keys.
 Note: Don’t worry if the new circle is on or off the edge of the artboard. You’ll reposition
it all shortly.
-
Click and hold down the mouse button on the Star tool ( ), and select the Rectangle tool (
 ) in the Tools panel. Move the pointer over the center top of the circle on the left.
When the word “anchor” appears, drag to create a rectangle. Drag to the bottom-center
point of the circle on the right.

-
Select the Shaper tool ( ) in the Tools panel. Click in a blank area of the artboard to deselect all shapes.
-
Move the pointer to the left of the shapes. Scribble across the circle shape, stopping
just after the left edge of the rectangle. When you release, the circle on the left will be
deleted, and the overlapping area of the shapes will be removed.

-
Move the pointer into the circle on the right, and draw a scribble to the left, into the gray area of the
remaining rectangle shape to combine them.

-
Move the pointer over the gray shape to see the outlines of the original shapes, and
then click to select the merged group, called a Shaper Group. See the first part of the following figure.
 Tip: You can also double-click a Shaper Group to be able to select the underlying shapes.
-
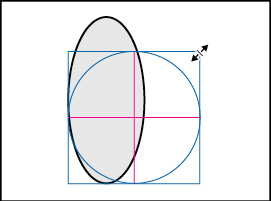
Click the arrow widget ( ) on the right side of the Shaper Group to be able to select the underlying shapes.
After clicking the arrow widget, the Shaper Group is in Construction Mode.

All shapes in a Shaper Group remain editable, even after portions of shapes may have
been punched out or merged.
-
Click the stroke of the left circle to select it. Press the Option (macOS) or Alt (Windows) key and
drag the right-middle bounding point to the left to make the circle a little narrower.
Release the mouse button and then the key.
 Note: If you attempted to select the shape and you deselected instead, repeat the previous
steps. The circle on the left now has no fill, so it cannot be selected by clicking
within.

Notice that the circle you dragged is still punched out from the rectangle. Not only
can you resize individual shapes in a Shaper Group, but you can also reposition them,
rotate them, and more.
-
Press Esc to stop editing the individual shapes, and select the entire Shaper Group.
-
Click the Fill color box in the Properties panel, and make sure that the Swatches
option ( ) is selected in the panel that appears. Select a light gray color with a tooltip
of “C=0 M=0 Y=0 K=5.”
-
Change the stroke weight to 0 in the Properties panel by clicking the down arrow until the stroke is removed.
-
Drag the sail shape onto the boat in the lower-right corner. You may need to zoom
out.
 Note: You can Shift-drag a corner of the sail shape to resize it to fit better with the
boat shapes, if needed.
-
Choose Select > Deselect and then choose File > Save.
Using Image Trace
In this part of the lesson, you’ll learn how to work with the Image Trace command.
Image Trace traces existing artwork, like a raster picture from Adobe Photoshop. You
can then convert the drawing to vector paths or a Live Paint object. This can be useful
for turning a drawing into vector art, tracing raster logos, tracing a pattern or
texture, and much more.
 Tip: Use Adobe Capture CC on your device to photograph any object, design, or shape and
convert it into vector shapes in a few simple steps. Store the resulting vectors in
your Creative Cloud libraries, and access them or refine them in Illustrator or Photoshop.
Adobe Capture is currently available for iOS (iPhone and iPad) and Android.
-
Click the Previous button ( ) below the document in the status bar to show the artboard to the left in the Document
window.
-
Choose File > Place. In the Place dialog box, select the island.png file in the Lessons
> Lesson03 folder on your hard disk, leave the options at their defaults, and click
Place.
-
Move the pointer over the upper-left corner bleed guide (the red guide off the edge
of the artboard), and click to place the image.
-
With the image selected, click the Image Trace button in the Properties panel to the
right of the document, and choose Low Fidelity Photo. The tracing results you see
may differ slightly from the figure, and that’s okay.
 Note: You can also choose Object > Image Trace > Make, with raster content selected, or
begin tracing from the Image Trace panel (Window > Image Trace).
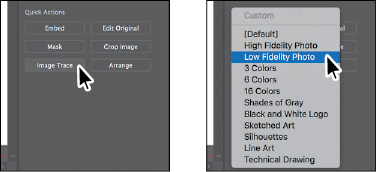
This converts the image into an image tracing object. That means you can’t edit the
vector content yet, but you can change the tracing settings or even the original placed
image and then see the updates.
-
Choose 6 Colors from the Preset menu that’s showing in the Properties panel.

The 6 Colors preset will trace the image, forcing the resulting vector content to
use six colors only. In some cases, in an image with a lot of different color, this
can apply the same color to a lot of content. An image tracing object is made up of
the original source image and the tracing result (which is the vector artwork). By
default, only the tracing result is visible. However, you can change the display of
both the original image and the tracing result to best suit your needs.
-
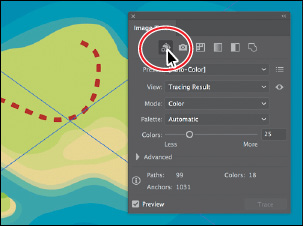
Click the Image Trace Panel button ( ) in the Properties panel. In the Image Trace panel, click the Auto-Color button (
 ) at the top.
The buttons along the top of the Image Trace panel are saved settings for converting
the image to grayscale, black and white, and more. Below the buttons at the top of
the Image Trace panel, you will see the Preset option. This is the same option as
in the Properties panel. The Mode option allows you to change the color mode of resulting
artwork (color, grayscale, or black and white). The Palette option is also useful
for limiting the color palette or for assigning colors from a color group.
 Tip: The Image Trace panel can also be opened by choosing Window > Image Trace.
-
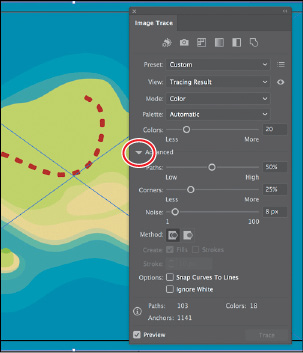
In the Image Trace panel, click the triangle to the left of the Advanced options to
reveal them. Change the following options in the Image Trace panel, using the values
as a starting point:
-
Colors: 20
-
Paths: 50%
-
Corners: 25%
-
Noise: 8 px
-
Close the Image Trace panel.
-
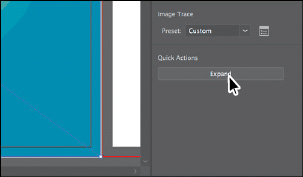
With the map tracing object still selected, click the Expand button in the Properties
panel.
The map is no longer an image tracing object but is composed of shapes and paths that
are grouped together.
-
Choose Object > Hide > Selection to temporarily hide it.
Working with drawing modes
Illustrator has three different drawing modes available that are found at the bottom
of the Tools panel: Draw Normal, Draw Behind, and Draw Inside. Drawing modes allow
you to draw shapes in different ways. The three drawing modes are as follows:
-
Draw Normal mode: You start every document by drawing shapes in Normal mode, which stacks shapes on
top of each other.
-
Draw Behind mode: This mode allows you to draw behind all artwork on a selected layer if no artwork
is selected. If an artwork is selected, the new object is drawn directly beneath the
selected object.
-
Draw Inside mode: This mode lets you draw objects or place images inside other objects, including live
text, automatically creating a clipping mask of the selected object.
Using the Draw Inside mode
Next, you will learn how to add artwork inside of a selected shape using the Draw
Inside drawing mode. This can be useful if you want to hide (mask) part of the artwork.
-
Choose File > Open. In the Open dialog box, select the map_edges.ai file in the Lessons
> Lesson03 folder on your hard disk and click Open.
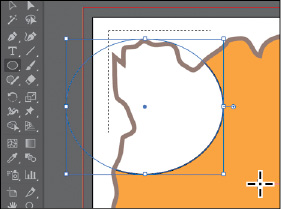
The orange shape you see is just a closed path that was created using the Pencil tool
in the Tools panel. You’ll copy this shape and paste it back in the Postcard.ai file.
-
Select the Selection tool ( ) in the Tools panel, and click the orange map edges shape to select it. Choose Edit
> Copy.
-
Click the Postcard.ai tab to return to the postcard document. Choose Edit > Paste
In Place.
-
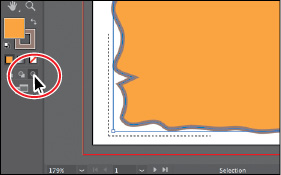
Click the orange shape to select it, if it isn’t, and then click the Draw Inside button
( ), near the bottom of the Tools panel.
This button is active when a single object is selected (path, compound path, or text),
and it allows you to draw within the selected object only. Notice that the orange
shape has a dotted open rectangle around it, indicating that, if you draw, paste,
or place content, it will be inside the orange shape.
 Note: If the Tools panel you see is displayed as a single column, you can click the Drawing
Modes button (
 ) at the bottom of the Tools panel and choose Draw Inside from the menu that appears.
-
Choose Select > Deselect.
Notice that the orange shape still has the dotted open rectangle around it, indicating
that Draw Inside mode is still active. The shape you are about to draw inside of does
not need to be selected.
-
Click and hold down the mouse button on the Rectangle tool ( ) in the Tools panel, and select the Ellipse tool (
 ). Press the letter D to apply the default white fill and black stroke to the shape
you are about to draw. Click and drag to create an ellipse that overlaps the edge
of the orange shape.
The ellipse you just drew is within the orange shape, and part of it is being hidden.
-
Choose Edit > Undo Ellipse to get rid of the ellipse.
You can also place or paste content into a shape with Draw Inside mode active.
-
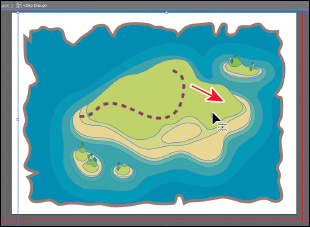
Choose Object > Show All to show the island artwork again, which is now behind the
orange shape.
-
Select the Selection tool ( ) in the Tools panel, and choose Edit > Cut to cut the selected island artwork from
the artboard.
-
Choose Edit > Paste In Place.
The island artwork is placed within the orange shape.
-
Click the Draw Normal button ( ) at the bottom of the Tools panel.
When you are finished adding content inside a shape, you can click the Draw Normal
button so that any new content you create will be drawn normally (stacked rather than
drawn inside).
 Note: If the Tools panel you see is displayed as a single column, you can click the Drawing
Modes button at the bottom of the Tools panel and choose Draw Normal from the menu
that appears.
-
Choose Select > Deselect.
 Tip: You can also toggle between the available drawing modes by pressing Shift+D.
 Tip: You can separate the shapes by choosing Object > Clipping Mask > Release. This would
make two objects, stacked one on another.
Editing content drawn inside
Next, you’ll edit the map artwork inside of the shape to see how you can later edit
content inside.
-
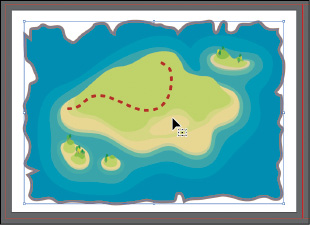
With the Selection tool ( ) selected, click to select the island artwork. Notice that it selects the map edges
shape instead.
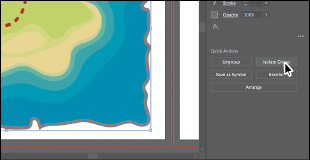
The map edges shape is now a mask, also called a clipping path. The island artwork and the map edges shape, together, make a clip group and are now treated as a single object. If you look at the top of the Properties
panel, you will see Clip Group. Like other groups, if you would like to edit the clipping
path (the object that contains the content drawn inside of it) or the content inside,
you can double-click the Clip Group object.
-
With the Clip Group selected, click the Isolate Group button in the Properties panel
to enter Isolation mode and be able to select the clipping path (map edges shape)
or the island artwork within.
-
Click the map artwork within the map boundaries, and drag it down and to the right
a little.
 Tip: Sometimes it can be helpful to choose View > Outline to more easily see and select
shapes when in Isolation mode.
-
Press Esc to exit Isolation mode.
-
Choose Select > Deselect and then choose File > Save.
Working with Draw Behind mode
Throughout this lesson, you’ve been working in the default Draw Normal mode. Next,
you’ll draw a rectangle that will cover the artboard and go behind the rest of the
content using Draw Behind mode.
-
Click the Draw Behind button ( ) at the bottom of the Tools panel.
As long as this drawing mode is selected, every shape you create using the different
methods you’ve learned will be created behind the other shapes on the page. The Draw
Behind mode also affects placed content (File > Place).
 Note: If the Tools panel you see is displayed as a single column, you can click the Drawing
Modes button (
 ) at the bottom of the Tools panel and choose Draw Behind from the menu that appears.
-
Click and hold down the mouse button on the Ellipse tool ( ) in the Tools panel, and select the Rectangle tool (
 ). Position the pointer off the upper-left corner of the artboard where the red bleed
guides meet. Click and drag to the lower-right corner of the red bleed guides.
 Note: If artwork was selected, clicking the Draw Behind button would allow you to draw
artwork behind the selected artwork.
-
With the new rectangle selected, click the Fill color box in the Properties panel.
Make sure that the Swatches option ( ) is selected, then change the fill color to a tan color with the tooltip “C=25 M=25
Y=40 K=0.” Press the Escape key to hide the panel.
-
Choose Object > Lock > Selection.
Finishing up
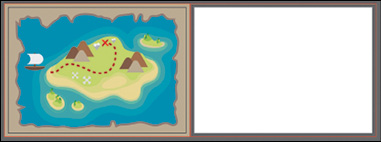
To finish the postcard, you’ll bring the artwork onto the artboard with the island
artwork on it.
-
Choose View > Fit All In Window to see both artboards.
-
Select the Selection tool ( ), and drag across the ship artwork to select it. Click the Group button in the Properties
panel.
-
Choose Select > All On Active Artboard to select all of the shapes. Choose Object
> Arrange > Bring To Front.
You brought the selected artwork to the front because it was created first, which
means it would be behind the artwork on the left artboard, which was created after.
Next, you’ll drag the artwork onto the artboard on the left and resize it.
-
Choose Select > Deselect.
-
Drag each group from the right artboard onto the left artboard, one at a time. To
resize each group to better fit within the map, you can press the Shift key and drag
a corner of the artwork bounding box to scale it. When finished, release the mouse
button and then the key.
In the final artwork, I created copies of a few of the objects by choosing Edit >
Copy and then Edit > Paste. I also selected copies of the mountain shape and changed
the color fill in the Properties panel on the right, for each.

 Note: You may want to zoom in to different artwork by choosing View > Zoom In.
-
Choose File > Save and then File > Close.



 )
)



 ) in the Tools panel. Move the pointer near the center of the artboard. Press the
mouse button and drag down and to the right. Drag until the rectangle is approximately
0.5 inches wide and has a height of 2 inches, as shown in the gray tooltip next to
the cursor.

 ), drag the shape into the bottom half of the artboard.

 ), press and drag clockwise to rotate the shape. As you drag, press the Shift key
to constrain the rotation to 45 degrees. When an angle of 315 shows in the measurement
label, release the mouse button and then the key. Leave the shape selected.
 ) in the Tools panel, and drag any of the corner widgets (
 ) in the rectangle toward the center of the rectangle to change the corner radius
for all corners without worrying about how much right now.
 ) in the Transform section to show a panel with more options. Ensure that Link Corner
Radius Values is on (
 ), and change any of the Radius values to 0.125. If necessary, click in another field or press the Tab key to see the change to all
corners.

 ). With the shape still selected, double-click the top-corner widget (

 ) is selected in the panel that appears. Select a darker red color to fill the rectangle
with red.
 ) is selected, and select None to remove the stroke from the rectangle.


 ) is selected in the panel that appears. Select a lighter red color to fill the rectangle
with red.
 ).
).
 ). Select the Width (W:) value and change it to 0.1. Click in the Height (H:) field, and change the value to 1. Press Return or Enter. Leave the shape selected.

 ) in the Tools panel on the left. Drag across the top part of the selected rounded
rectangle to zoom in closely.
 ) and, with the rounded rectangle selected, drag any of the corner widgets (
 ]) to change the corners independently. Change the bottom-left and bottom-right corners
to 0.

 ) to continue creating a boat. The Ellipse tool can be used to create ellipses and
circles.
 ) off the right side of the ellipse, counterclockwise around the top of the ellipse.



 ) to align the stroke to the inside edge of the ellipse.
 ).
).



 ) is selected in the panel that appears. Select a light gray color with a tooltip
of “C=0 M=0 Y=0 K=10.”
 ), you can create shapes with multiple straight sides. By default, the Polygon tool
draws hexagons (a five-sided shape) and all shapes are drawn from the center. Polygons
are also Live Shapes, which means attributes like size, rotation, number of sides,
and more are still editable. Now you’ll create a triangle to make a diamond gem using
the Polygon tool (
 ) in the Tools panel, and select the Polygon tool (
 ) is selected in the panel that appears. Select a light gray color with a tooltip
of “C=0 M=0 Y=0 K=30.”


 ) in the Tools panel. Pressing the Shift key, drag from left to right, across the
middle of the triangle. Release the mouse button and then the key.

 ) is selected in the panel that appears, and select a lighter gray color with a tooltip
of “C=0 M=0 Y=0 K=5.”


 ) in the Tools panel. Click the top-corner widget (
 ) to create a few stars that will go on the diamond you just created. The Star tool
currently doesn’t create Live Shapes, which means editing the star after the fact
can be more difficult. When drawing with the Star tool, you’ll use keyboard modifiers
to get the number of points you want and to change the radius of the arms of the star
(the length of the arms). Here are the keyboard modifiers you’ll use in this section
when drawing the star and what each does:

 ) and edit the options in the Star dialog box instead of drawing it.

 ), then you don’t need to set the stroke weight.
 ), and draw one more star, a little smaller than the first.

 ) in the Tools panel. On the right side of the artboard, above the existing artwork,
click and drag to the right. Notice the length and angle in the measurement label
next to the pointer as you drag. Drag until the line is around 1.5 inches in length.
 ), click and drag (up or down) until you see an angle of 0 (zero) in the measurement
label next to the pointer. That will make the line horizontal.

 ) is selected in the panel that appears. Select a lighter gray color with a tooltip
of “C=0 M=0 Y=0 K=10.”


 ), drag counterclockwise to rotate it until you see approximately 45 degrees in the
measurement label.

 ). The Shaper tool recognizes natural gestures and produces Live Shapes from those
gestures. Without switching tools, you can combine, delete, fill, and transform basic
shapes you create. In this section, you’ll get a feeling for how the tool works by
exploring the most widely used features.




 ) on the right side of the Shaper Group to be able to select the underlying shapes.
After clicking the arrow widget, the Shaper Group is in Construction Mode.


 ) below the document in the status bar to show the artboard to the left in the Document
window.


 ) in the Properties panel. In the Image Trace panel, click the Auto-Color button (
 ) at the top.

 ), near the bottom of the Tools panel.
 ) at the bottom of the Tools panel and choose Draw Inside from the menu that appears.
 ) at the bottom of the Tools panel.
 ) at the bottom of the Tools panel.

 ) at the bottom of the Tools panel and choose Draw Behind from the menu that appears.


