
Having a well-stocked craft kit at the ready is essential. Once you have the basics you can introduce more unusual supplies and materials to your collection. Keep hold of offcuts of fabric, sample pots of paint and broken jewellery. With the right tools in your craft kit and a little inspiration, you can craft and upcycle almost anything. These must-have basics are easily available from good art and craft shops and online.
Beads, buttons and bows Perfect for adding detail and embellishment to your craft makes.
Craft knife and cutting mat Wonderful for fiddly jobs, when you need a little more precision than scissors can offer. Make sure you keep some spare blades in store, too. A cutting mat with a measuring grid is also extremely useful and protects the table underneath. Craft knife blades are extremely sharp, so be careful!
D-cut squeegee These useful wooden handles with rubber edging are perfect for textile printing, as the shape of the blade ensures a heavier deposit of ink.
Découpage glue Useful for découpage, scrapbooking and paper crafting. Can also be used as a sealant and a varnish.
Disposable cleaning cloths Wet cleaning cloths and bits of old rag are perfect for cleaning or dusting down your vintage finds. It is also important to keep surfaces clean and tidy while you work.
Embroidery hoops These come in different sizes, but an average-sized 15cm (6in) hoop is the most useful.
Hot glue gun and glue sticks Possibly one of the most useful bits of kit you can invest in, a hot glue gun is especially useful for the bigger interiors projects. Make sure you stock up on glue sticks. Always remember to read the manufacturer's guidelines and wear protective clothing – the glue can get very hot.
Masking tape Easy to tear yet durable, masking tape is essential for keeping stencils in place, marking off edges to ensure a clean finish when painting wooden furniture and securing backing.
Paints It is always useful to have a basic range of paints to hand. At the very least, keep a small can of primer, undercoat and your preferred finish for a top coat in your craft kit. Keep an eye open for reduced tester pots at DIY stores; they can be very useful indeed.
Paintbrushes, in all sizes Build a good selection of paintbrushes, ranging from small brushes useful for painting delicate designs to large brushes suitable for painting wooden furniture. I also recommend that you buy the best brushes you can afford, and look after them. Make sure you clean them thoroughly each time you use them and store them somewhere flat. For information about preparing and painting wooden surfaces.
Sewing machine Although most of the projects in this book can be hand sewn, there are times when using a machine may be quicker or give you a better finish. You can buy a new machine or pick up a really good secondhand one relatively affordably. Alternatively, you can pay to use a sewing machine by the hour at some sewing cafés and craft shops.
Staple gun Absolutely essential for furniture projects and handy for woodwork projects. Be careful when using and always read the manufacturer’s instructions.
Sticky tape Single and double-sided tape is essential.
Stippling brush (for stencilling) This is a brilliant specialist brush with short, firmly-packed bristles. Available in a variety of widths, they are the only brushes to use when stencilling because the short, stiff bristles reduce the chance of getting paint under the edge of the stencil.
Tracing paper For transferring images and templates onto paper and fabrics.
Vintage braids, ribbons and trims I keep metres of old braids on cotton spools – they add the perfect finish to so many small craft and furniture projects and also hide a multitude of sins.
Water-soluble markers For making marks on fabrics, glassware, tiles and china that can then be washed off.
Wax and wax brush If you enjoy upcycling furniture, it is worth keeping a tin of wax (in fact, two tins: one light and one dark, depending on what you are waxing) and a wax brush to hand. Wax gives the perfect vintage finish to any piece of painted wood. It also offers a protective layer.
I have all manner of things in my sewing kit. However, these are the essentials you will need, especially if you are new to sewing.
Dressmaker’s chalk A really great way of clearly marking fabric. I recommend having a dark and a light piece of chalk for different colours of fabric. The chalk can be brushed or washed off.
Needles There are many different types of needle, ranging from large blunt tapestry needles to medium-length sharps. I recommend buying a mixed packet from your local haberdashery store to get you started.
Pins Safety pins and straight sewing pins – and plenty of them. You will always need more than you think, particularly when working on larger pieces of fabric. I like to use slightly decorative pins even for simple tasks like hemming as they are easy to spot against a patterned fabric background. Keep in a special tin.
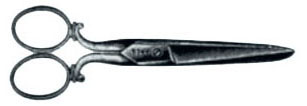
Scissors Small embroidery, general-purpose (ideally a medium size) and dressmaking scissors (ideally large) are invaluable. Keep for sewing only, to avoid blunting the blade too quickly.
Tape measure A non-stretchy canvas one is the best, but for smaller pieces you could use a ruler.
Thimble Perfect for protecting your index finger or thumb when working on sewing projects.
Threads When it comes to choosing a colour for a sewing project, a good tip is to use a shade slightly darker than the fabric when it is a strong colour, and a shade slightly lighter than the fabric for paler patterns.
1 To start (and finish) a row of stitches, sew the thread through the fabric, leaving a few millimetres free at the end (you can trim this off later).
2 Stitch over the stitch you have just made a few times. The stitches you have just created will fasten the loose end.
This is the most basic stitch. It can be used to hem fabric, sew seams, as a decorative embroidery stitch or to gather fabric.
1 Secure the thread and bring the needle through to the right side where you wish your line of stitches to begin.
2 Push the needle back through to the reverse a short distance away. The distance will determine how long your stitch is.
3 Bring the needle back to the right side a short distance from the first stitch. The distance from the end of the first stitch will determine the space between your stitches.
4 Repeat Steps 2 and 3 until you have sewn your row. While it is usual to keep each of the stitches the same size, you can change this for different effects by varying the lengths of the stitches or the gaps as you progress along the row.
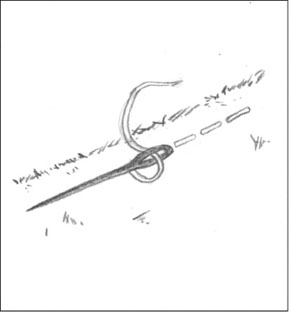
This stitch is very versatile, as it can be used for hemming, appliqué and general mending. The purpose is to stitch one fold of fabric to another nearly invisibly, creating a blind stitch.
1 Secure the thread and slip the needle into the folded fabric, bringing it up through the fabric on the top fold.
2 Put the needle into the folded fabric, gather about four to five of the fabric threads and then bring the thread back through towards the hem edge.
3 Next, point the needle back into the folded fabric, close to where you drew the needle out, evenly picking up the threads of the fabric in the same direction on each stitch.
4 Put the needle into the folded fabric, gather about four to five of the fabric threads and then bring the thread back through.
5 Repeat Steps 2 to 4 until you have sewn your row.
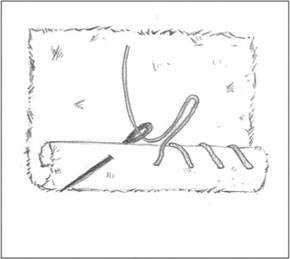
This is a classic edging stitch for blankets and quilts, but it can also be used to hem two pieces of fabric together, and gives a pretty effect when sewn large and in colourful, contrasting thread.
1 Secure the thread and bring the needle through to the right side where you wish your line of stitches to begin.
2 Push the needle through to the wrong side where you wish the loop of your first blanket stitch to finish.
3 Pull the needle through, but before you pull the thread through behind it, thread the needle back towards the front side through the loop. Pull the thread through to form your first blanket stitch.
4 Repeat Steps 2 and 3 along the seam or edge. To finish your row of blanket stitches, complete your last stitch then bring the needle over to the wrong side of the fabric and either secure it neatly (if sewing along an edge) or push the needle back through the last stitch and thread through between the layers of fabric and secure (if sewing a seam).
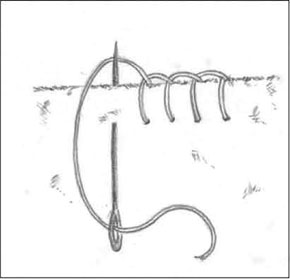
Back stitch forms a continuous line of small end-to-end stitches. It can either be used as a decorative stitch or to hand sew a seam where something a little stronger than running stitch is required.
1 Secure the thread and bring the needle through to the right side where you wish your line of stitches to begin.
2 Return the needle through to the wrong side a short distance away. The distance will determine how long your stitch is.
3 Bring the needle back to the right side, leaving a gap the same size as your initial stitch.
4 Return the needle to the wrong side at the end of the initial stitch, effectively going back on yourself, so you have two stitches of equal length running end to end. There should be no gap between the stitches.
5 Repeat Steps 2 to 4 until you have sewn your row. While it is usual to sew each of the stitches the same size, you can change this to create different effects by varying the lengths as you progress along the row.
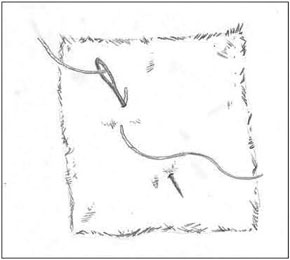
Cross-stitch is a form of embroidery where X-shaped stitches are formed in a tiled pattern to make a picture or design. Fabrics used for cross-stitch include aida and linen, and mixed-content fabrics called ‘evenweave’. These fabrics are categorised by threads per inch (referred to as the ‘count’), which can range from 11- to 40-count. You can also buy soluble canvas that makes working cross-stitch on a fabric such as linen considerably more straightforward.
You can work cross-stitches from left to right or from right to left, but always ensure that the lower half of each cross lies in one direction, starting from the same side for each stitch, or else you will get an uneven finish.
1 Secure the thread.
2 Working on the canvas holes in groups of four, bring the needle up through one of the bottom holes and take it down through the canvas in the hole diagonally opposite (a).
3 Bring the needle back to the front again one hole down. You now have a half-cross.
4 Repeat Steps 2 and 3 along the row of stitches on the chart, and then work your way back to complete the upper section of the crosses (b).
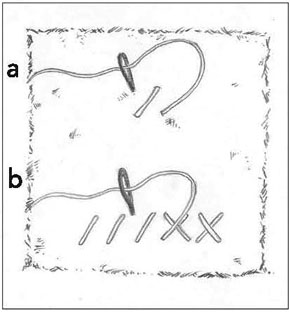
When restoring or repainting any wooden object, whether it be a small crate or a larger piece of furniture such as chest of drawers or a wardrobe, it is always very important to prepare the wood. Here is a step-by-step guide to getting the perfect finish.

Cover up For many of the projects, especially when there is paint involved, you will need to protect your work surface thoroughly with sheets of newspaper or an old sheet. You might want to wear overalls, too – it’s remarkable just how far paint and other splashy liquids travel.
Preparation Start by sanding the wood, first with coarse sandpaper and then moving through medium and fine grades until you achieve a beautifully smooth finish. Wipe over the surfaces with a damp cloth to remove all dust and leave to dry.
Painting For any new wood with knots in, apply some knot sealant before anything else. Leave it to dry. If you are painting onto bare wood, and are looking for the best finish, it is best to apply a coat of primer. Bare wood is very absorbent and this helps further coats of paint go on more smoothly. However, for a more vintage, aged feel, you may want to skip the primer.
Follow with a layer of undercoat (light or dark, depending on the colour you are painting over it) and for the top coat, you can choose between satin- or matt-finish gloss and chalk-based paints. I like to use the latter for a great vintage-style finish. Always let each coat of paint dry thoroughly before applying another coat.
Waxing As most of the paints I use are chalk based, I like to finish them with water-repellent wax in either a light or dark finish, depending on the colour of the paint and the effect I want to create. You can also buy wax brushes, which make applying the wax much easier. After you have waxed the surface, use a lint-free cloth to work the wax into the surface and buff.