PLANNING A REMODELING PROJECT

The origins of the old idioms “Measure twice, cut once” and “An ounce of prevention is worth a pound of cure” are not definitively known, but we suspect they were coined by someone with rueful experience in home remodeling. Likewise for “Where fools rush in, angels fear to tread.” Adequate planning and preparation are crucial to getting good results with home-improvement projects, while hastiness can be the start of disaster.
Planning a major remodeling project is a complex subject that can’t be addressed in a single chapter of any book, but the segments of this chapter outline some key ideas for good preparation for any project. Keep the following in mind as you prepare for your project:
• Understand how your planned work fits in with the overall structure and function of your home—whether it is a carpentry project that integrates with the framework of your home or a heating, cooling, wiring, or plumbing project that will blend into an existing mechanical system.
• Review the codes and acceptable building practices authorized by your community. These exist for your safety, and following them can prevent accidents and expensive do-overs.
• Have a clear visual sense of the work you intend to do. A key step here is to have good, detailed plan drawings and practical schedules to organize the steps of your work.
• Use tools and materials safely; review their proper usage, and make sure your skills are honed before tackling a big project. Don’t get in over your head.
With careful, meticulous planning, even DIYers of average experience can tackle surprisingly complex remodeling projects with great success.
IN THIS CHAPTER:
ANATOMY OF A HOUSE
Before you start a do-it-yourself carpentry project, you should familiarize yourself with a few basic elements of home construction and remodeling. Take some time to get comfortable with the terminology of the models shown on the next few pages. The understanding you will gain in this section will make it easier to plan your project, buy the right materials, and clear up any confusion you might have about the internal design of your home.
If your project includes modifying exterior or load-bearing walls, you must determine if your house was built using platform- or balloon-style framing. The framing style of your home determines what kind of temporary supports you will need to install while the work is in progress. If you have trouble determining what type of framing was used in your home, refer to the original blueprints, if you have them, or consult a building contractor or licensed home inspector.
ANATOMY OF A HOUSE WITH PLATFORM FRAMING

Platform framing (photos, above and below) is identified by the floor-level sole plates and ceiling-level top plates to which the wall studs are attached. Most houses built after 1930 use platform framing. If you do not have access to unfinished areas, you can remove the wall surface at the bottom of a wall to determine what kind of framing was used in your home.
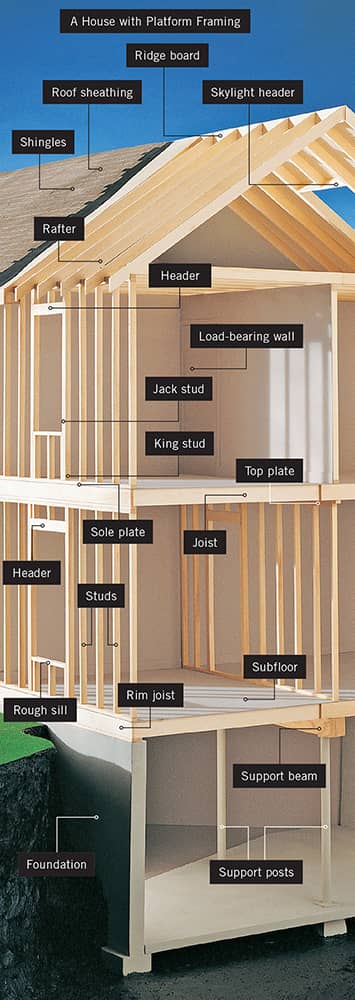
Framing in a new door or window on an exterior wall normally requires installing a header. Make sure that the header you install meets the requirements of your local building code, and always install cripple studs where necessary.
Floors and ceilings consist of sheet materials, joists, and support beams. All floors used as living areas must have joists with at least 2 × 8 construction.
There are two types of walls: load-bearing and partition. Load-bearing walls require temporary supports during wall removal or framing of a door or window. Partition walls carry no structural load and do not require temporary supports.
ANATOMY OF A HOUSE WITH BALLOON FRAMING
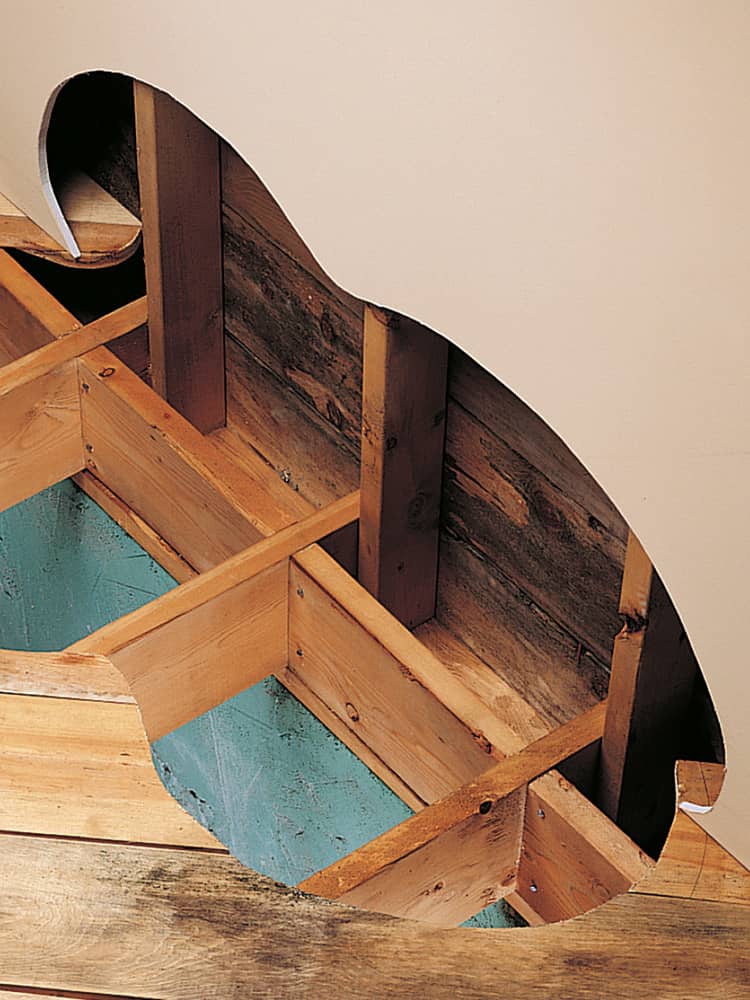
Balloon framing (photos, above and below) is identified by wall studs that run uninterrupted from the roof to a sill plate on the foundation, without the sole plates and top plates found in platform-framed walls (page opposite). Balloon framing was used in houses built before 1930, and it is still used in some new home styles, especially those with high vaulted ceilings.

ANATOMY DETAILS
Many remodeling projects, like adding new doors or windows, require that you remove one or more studs in a load-bearing wall to create an opening. When planning your project, remember that new openings require a permanent support beam called a header, above the removed studs, to carry the structural load directly.
The required size for the header is set by local building codes and varies according to the width of the rough opening. For a window or door opening, a header can be built from two pieces of 2-inch dimensional lumber sandwiched around 3/8-inch plywood (chart, right). When a large portion of a load-bearing wall (or an entire wall) is removed, a laminated beam product can be used to make the new header.
If you will be removing more than one wall stud, make temporary supports to carry the structural load until the header is installed.
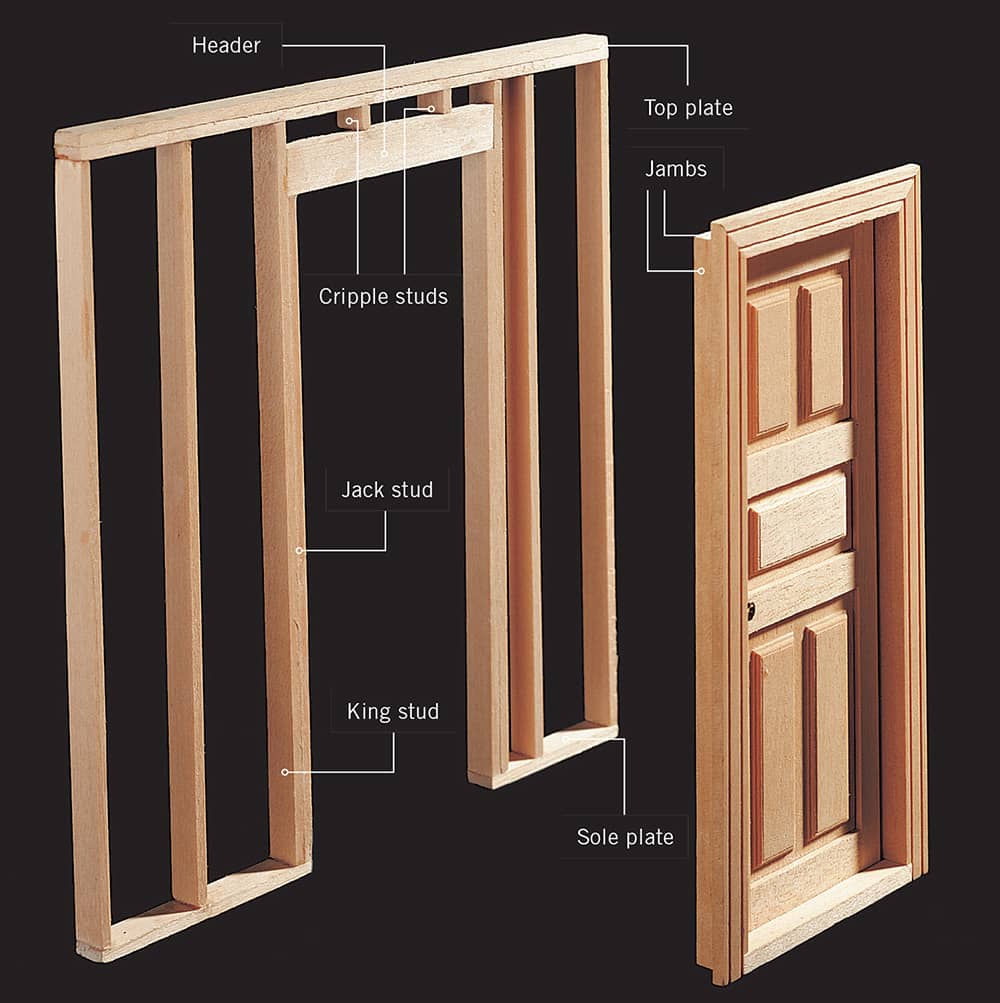
Door opening: The structural load above the door is carried by cripple studs that rest on a header. The ends of the header are supported by jack studs (also known as trimmer studs) and king studs that transfer the load to the sole plate and the foundation of the house. The rough opening for a door should be 1" wider and 1/2" taller than the dimensions of the door unit, including the jambs. This extra space lets you adjust the door unit during installation.
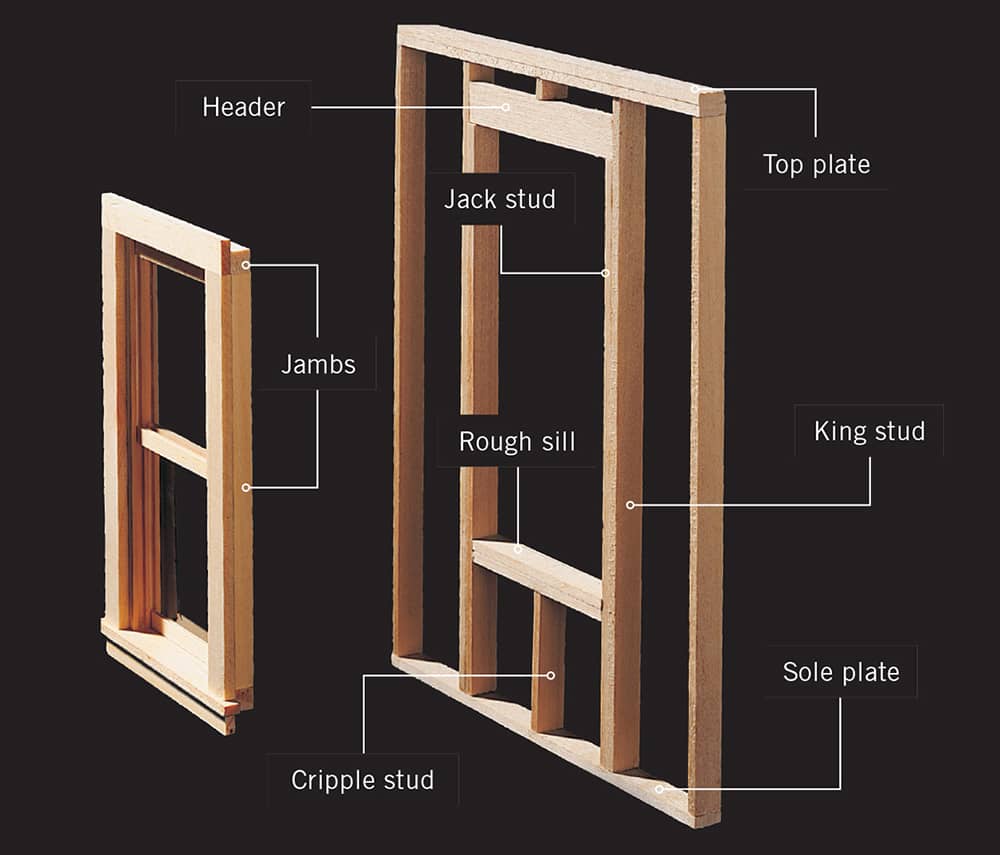
Window opening: The structural load above the window is carried by cripple studs resting on a header. The ends of the header are supported by jack studs and king studs, which transfer the load to the sole plate and the foundation of the house. The rough sill, which helps anchor the window unit but carries no structural weight, is supported by cripple studs. To provide room for adjustments during installation, the rough opening for a window should be 1" wider and 1/2" taller than the window unit, including the jambs.
FRAMING OPTIONS FOR WINDOW & DOOR OPENINGS (NEW LUMBER SHOWN IN YELLOW)

Using an existing opening avoids the need for new framing. This is a good option in homes with masonry exteriors, which are difficult to alter. Order a replacement unit that is 1" narrower and 1/2" shorter than the rough opening.

Framing a new opening is the only solution when you’re installing a window or door where none existed or when you’re replacing a unit with one that is much larger.

Enlarging an existing opening simplifies the framing. In many cases, you can use an existing king stud and jack stud to form one side of the new opening.
BUILDING CODES & PERMITS
Building permits are required for any remodeling project that involves a change or addition to your home’s structure or mechanical systems. Building permits are issued to ensure your remodeling project meets local building codes, which establish material standards, structural requirements, and installation guidelines for your project. In short, they ensure that your (or your contractor’s) work is done properly.
The areas outlined here and here—room dimensions, exits and openings, light and ventilation, and fire protection—are usually covered by general building permits. If your project involves major changes to your plumbing, electrical, or HVAC systems, you may be required to obtain separate permits from the respective administration departments.
Building permits are required by law, and getting caught without them can result in fines from the city and possible trouble with your insurance company. Also, work done without permits can cause problems if you try to sell your house.
Most local building codes follow the national codes, such as the National Electrical Code, but are adapted to meet the demands of local conditions and legislation. Keep in mind that local codes always supersede national codes. Always check with your local building department before finalizing your plans.
Before issuing permits, your local building department will require plans and cost estimates for your project. After your plans have been approved, you must pay permit fees, which are based on the cost of the project. You’ll also learn what inspections are required and when you should call for inspections.
Once issued, a building permit typically is good for 180 days. You can apply for an extension by submitting a written request showing justifiable cause for the delay.

ROOM DIMENSIONS
• Habitable rooms must be at least 7' wide and 7' deep.
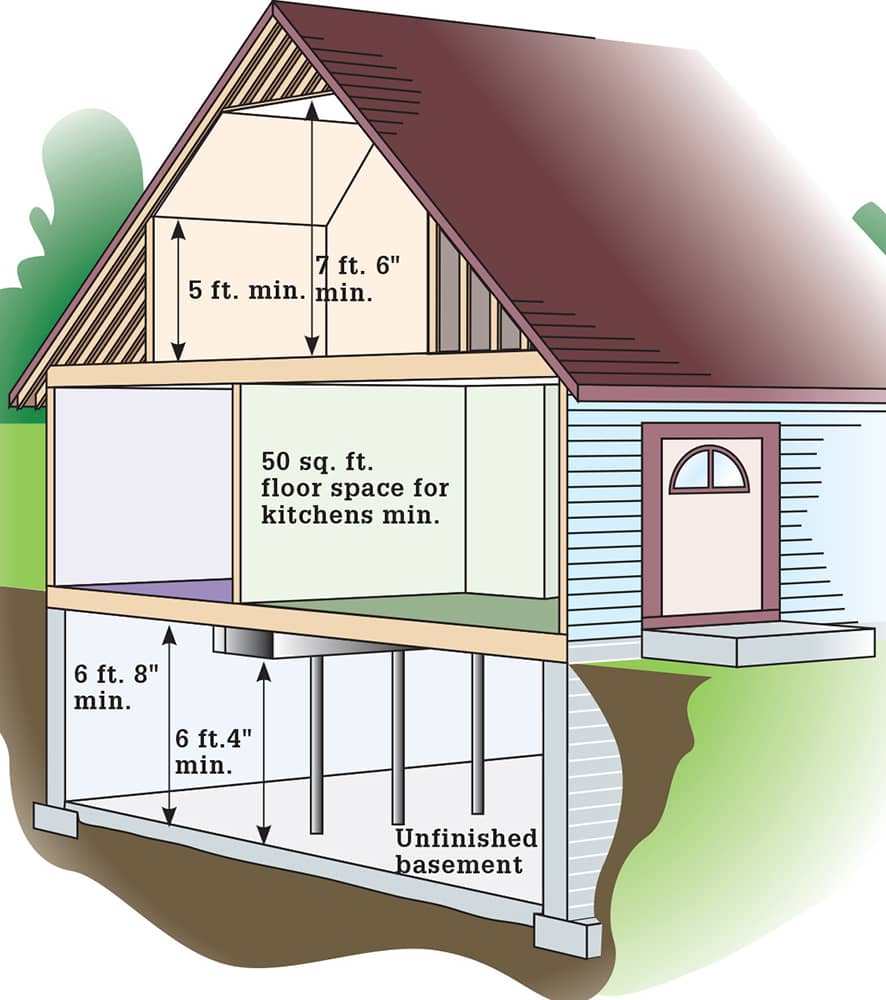
• Ceilings in all habitable rooms, hallways, corridors, bathrooms, toilet rooms, laundry rooms, and basements must be at least 7' 6" high, measured from the finished floor to the lowest part of the ceiling.
• Beams, girders, and other obstructions that are spaced more than 4' apart can extend 6" below the required ceiling height.
• In nonhabitable rooms, such as unfinished basements, ceilings may be 6' 8" from the floor, and beams, girders, and ducts may be within 6' 4" of the floor.
• Habitable rooms cannot have more than 50% of their floor area under sloped ceilings less than 7' 6" high, and no portion of a floor area can be under a ceiling less than 5' high.
• Finished floor is not considered measurable floor area when it is below sloped ceilings less than 5' high or beneath furred ceilings less than 7' 6" high.
• One habitable room in a home must have at least 120 square feet of gross floor area. Other habitable rooms can have gross floor space of 70 sq. ft. minimum.
• Kitchens cannot have less than 50 sq. ft. of gross floor area.
• Hallways must be at least 3' wide.
EXITS & OPENINGS
• Sleeping rooms and habitable basements must have at least one egress window or exterior door for emergency escape. Occupants must be able to open the exit from inside the home, without a key or tool.
• An egress window must have a net clear opening of at least 5.7 sq. ft., with a minimum height of 24" and a minimum width of 20".
• Window sills on egress windows cannot be more than 44" above the floor.
• Egress windows below ground level must have window wells. If the wells are deeper than 44", they must have permanent ladders or steps. The steps can project up to 6" into the well but must be usable when the window is fully opened. Steps must be at least 12" wide and project at least 3" from the wall. Ladder rungs must be less than 18" apart.
• Screens, bars, grills, and covers on emergency exits must open easily and be removable from inside the home, without tools or keys.
• Exit doors must be at least 3' wide and 6' 8" high. They must provide direct outside access and operate without special knowledge or tools.
• Bulkhead enclosures may serve as emergency exits in habitable basements if they provide direct access to the basement and meet the dimension requirements for emergency exits.
NATURAL LIGHT & VENTILATION
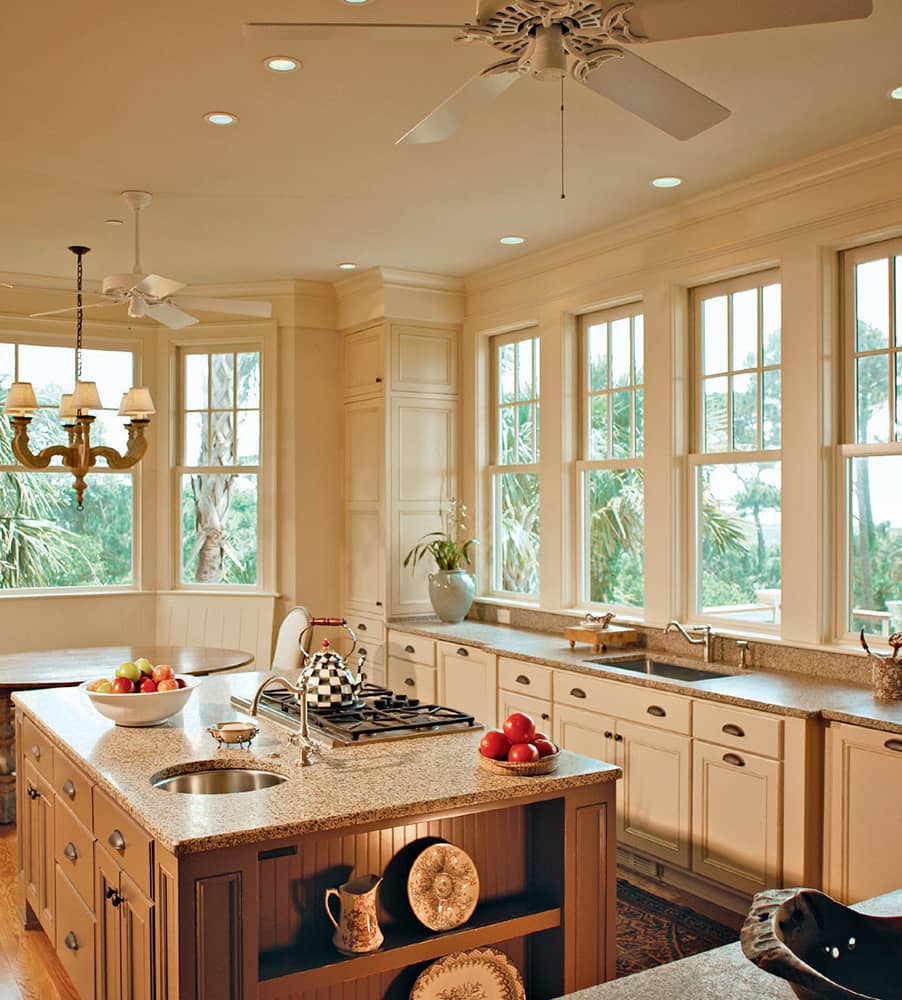
• Ventilation includes windows, doors, louvers, and other approved openings or mechanical systems.
• Windows must equal at least 8% of the floor area in habitable rooms. The minimum openable area of a window must equal at least 4% of the room’s floor area.
• In bathrooms, windows must be at least 3 sq. ft., and at least half of the window must open.
• Windows must open and operate from inside the room, and they must exit to a street, alley, yard, court, or porch.
• Window light can be replaced by an artificial light if it produces 6.46 lux from 30" above the floor.
• Mechanical ventilation can replace operable windows. In bedrooms, ventilation must supply outside air at a rate of 15 cubic ft. per minute (cfm) for each occupant. In primary bedrooms, the rate is based on two occupants. In additional bedrooms, the rate is based on one occupant per room.
• In bathrooms, intermittent mechanical ventilation rates must be 50 cfm, and continuous rates must be 20 cfm. Bathroom ventilation must exhaust to the outside.
FIRE PROTECTION
• All concealed and interconnected spaces, such as soffits, drop and cove ceilings, stair stringers, and areas around vents, pipes, ducts, chimneys, and fireplaces must be fireblocked to prevent fire spread.
• Exterior walls must be constructed to resist fire for at least one hour, with exposure from both sides.
• Batts or blankets of fiberglass, mineral wool, or other approved material must be secured between wall studs and partitions, at the ceiling and floor level, and at 10-ft. intervals both vertically and horizontally.
• Foam insulation installed in interior walls covered with 1/2" wallboard or other approved material must have a flame-spread rating of 75 or less and a smoke-developing index of 450 or less.
• Other insulation, including facings, vapor barriers, and breather papers, must have a flame-spread index of 25 or less and a smoke-developing index of 450 or less.
• Loose-fill insulation mounted with screens or supports must have a flame-spread rating of 25 or less and a smoke-developing index of 450 or less.
• Wall and ceiling finishes must have a flame-classification rating of 200 or less and a smoke-developing index of 450 or less.
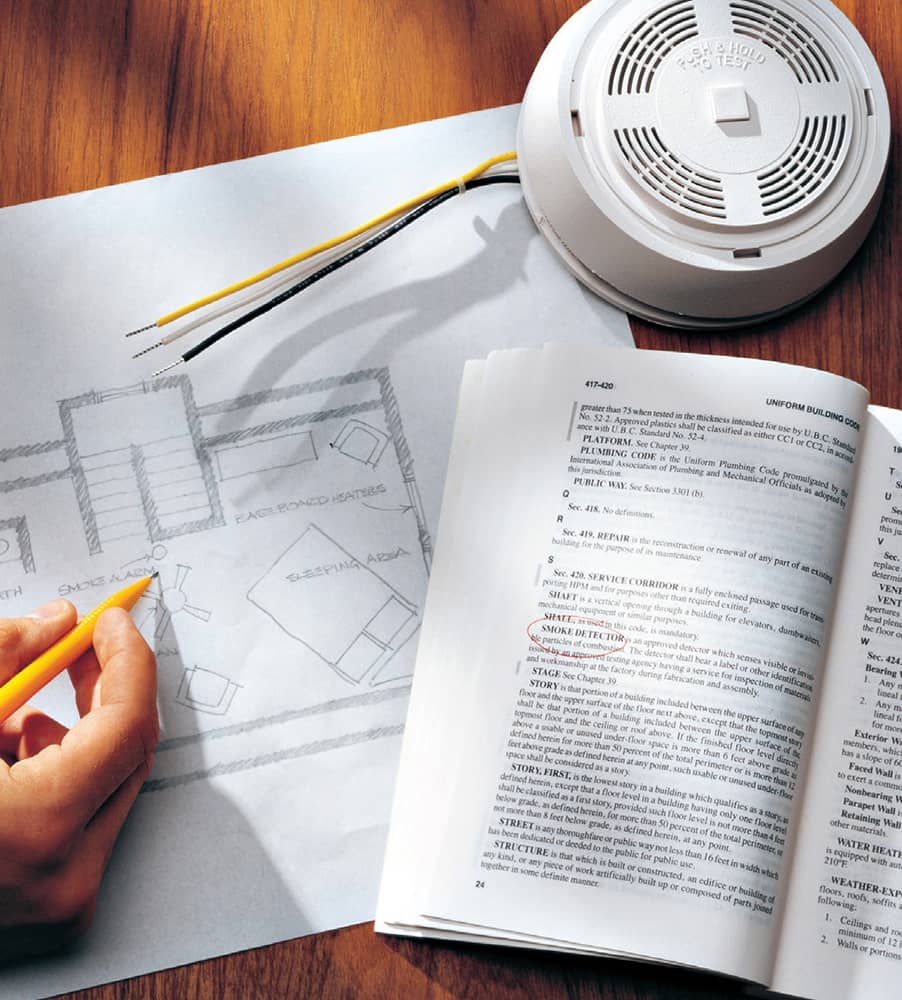
• Smoke alarms must be installed in bedrooms, in hallways near bedrooms, and on each full story of a home. Multiple alarms must be wired together so one activation triggers all alarms.
REMODELING CASE STUDIES
Elevation view of completed two-story bumpout

This two-story room addition is about outdoor spaces as well as indoor spaces. While the new children’s bedroom, Jack & Jill bathroom, and family room were the driving reasons for the addition, the covered patio, balcony, and spa terrace proved to be the real gems created by the project.
Side view of completed two-story bump-out

From the side or from the rear, this carefully planned and meticulously executed room addition meets one of the key tests many designers would put to it: does it look like it has always been there?
Interior view of completed two-story bumpout

A pair of windows in the remodeled master bathroom looks out toward the spa area. The master bath repeats the dark wood tones and buff wall colors featured on the exterior of the house and addition.
Side view of completed wing addition
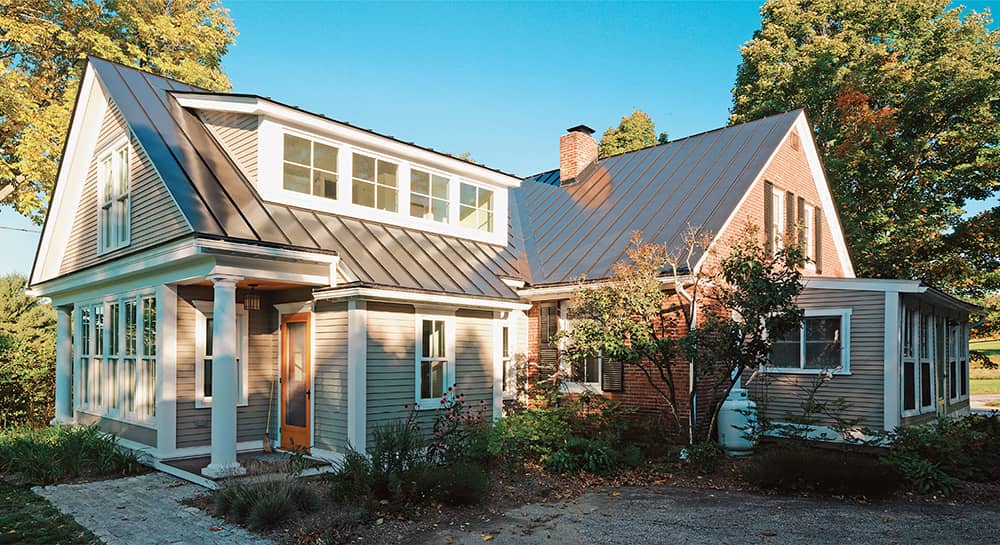
Filled with light-gathering windows, this addition visually opens up an older brick home, modernizing without corrupting the existing historic architecture. The distinctive steel roof effectively unifies the two structures despite different siding styles.
Front view of completed wing addition

The glass-fronted facade of the addition comes to life at night with a cheery, welcoming glow. The planning stage of any addition should consider all aspects, all exposures at all times.
Interior view no. 1 of wing addition
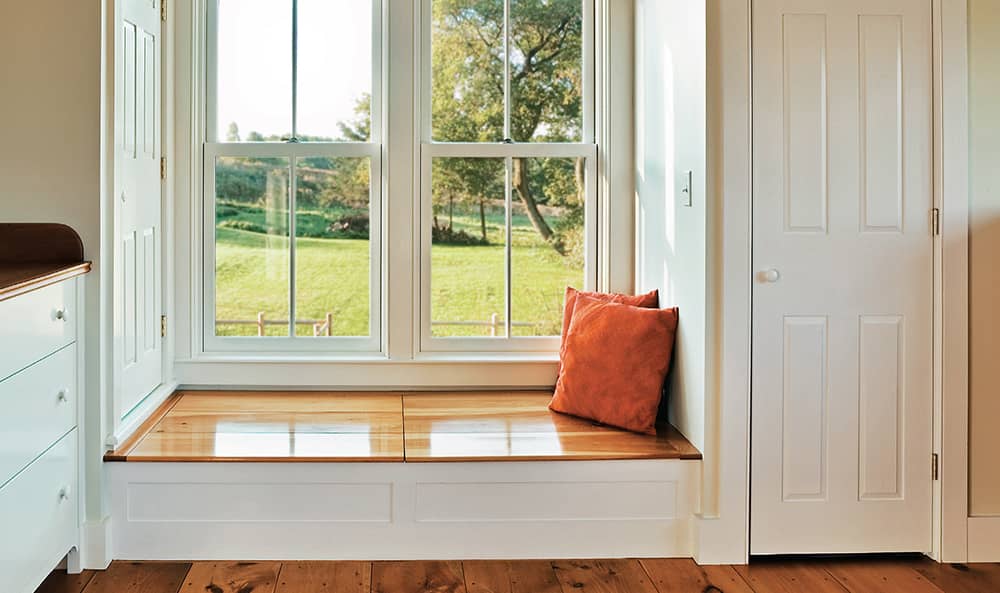
One of the advantages of an addition is that it allows you to incorporate small luxuries you’ve dreamed about over time, like the light-soaked window seat shown here.
Interior view no. 2 of wing addition

This addition’s abundant windows not only let light in, they also exploit the spectacular views surrounding this secluded home. Window placement is key to effectively planning a successful addition.
WORKING SAFELY
Your personal safety when working on carpentry projects depends greatly on what safety measures you take. The power tools sold today offer many safety features, such as blade guards, locks to prevent accidental starts, and double insulation to reduce the risk of shock in the event of a short circuit. It’s up to you to take advantage of these safety features. For example, never operate a saw with the blade guard removed. You risk injury from flying debris as well as from being cut by the blade.
Follow all precautions outlined in the owner’s manuals for your tools and make sure you protect yourself with safety glasses, earplugs, and a dust mask or respirator to filter out dust and debris.
Keep your work environment clean. A cluttered work area is more likely to result in accidents. Clean your tools and put them away at the end of every work period, and sweep up dust and debris.
Some materials emit dangerous fumes or particles. Keep such materials stored away from heat sources and out of the reach of children; always use these products in a well-ventilated area.
Maintaining safety is an ongoing project. Take the time to update your first-aid kit and evaluate your workspace, tools, and safety equipment on a regular basis. To avoid accidents, repair and replace old and worn-out parts before they break.

Read the owner’s manual before operating any power tool. Your tools may differ in many ways from those described in this book, so it’s best to familiarize yourself with the features and capabilities of the tools you own. Always wear eye and ear protection when operating a power tool. Wear a dust mask when the project will produce dust.

Some walls may contain asbestos. Many homes built or remodeled between 1930 and 1950 have older varieties of insulation that included asbestos. Consult a professional for removal of hazardous pollutants like asbestos, and if you find asbestos or materials that may contain asbestos, do not attempt to remove them on your own. Even if you determine that no asbestos is present, it is a good idea to wear a particle mask and other safety gear when doing demolition.
FIRST-AID KITS

Assemble a first-aid kit. Cuts from hand or power tools can be serious and require prompt and thoughtful attention. Be prepared for such situations with a well-equipped first-aid kit that is easy to find. Record any emergency telephone numbers on the first-aid kit or by the nearest phone so they are available in an emergency.
Equip your kit with a variety of items (photo right), including bandages, needles, tweezers, antiseptic ointment, cotton swabs, cotton balls, eye drops, a first-aid handbook, a chemical-filled cold pack, elastic bandages, first-aid tape, and sterile gauze.
For puncture wounds, cuts, burns, and other serious injuries, always seek medical attention as soon as first aid—such as washing and wrapping of cuts—has been provided.
SAFE PRACTICES

Keep your tools sharp and clean. Accidents are more likely when blades are dull and tools are filled with sawdust and dirt.
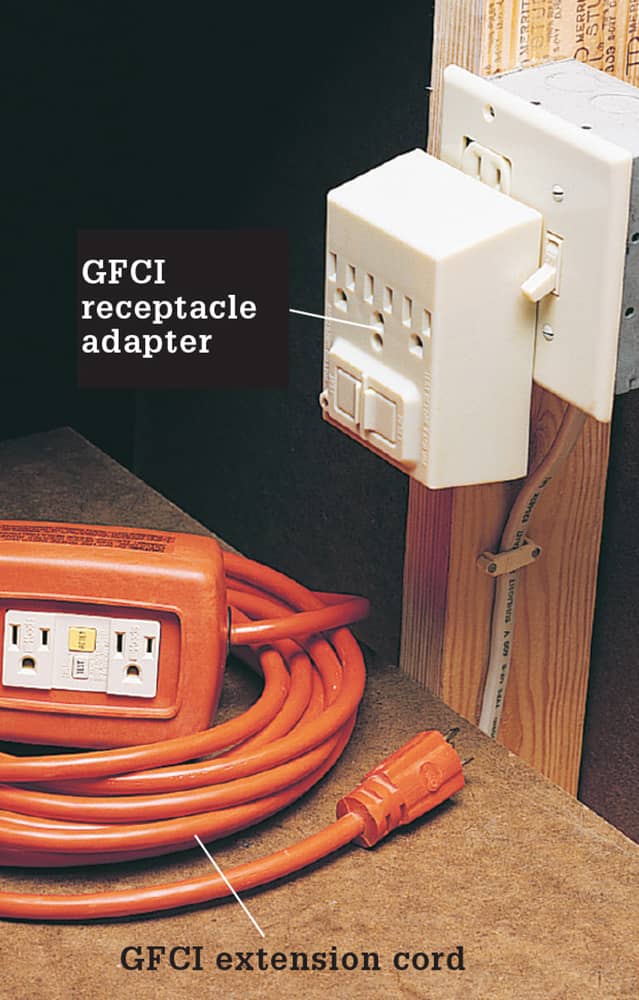
Use a GFCI receptacle, adapter, or extension cord to reduce the risk of shock while operating a power tool outdoors or in wet conditions.

Check with a neon circuit tester to make sure the power is off before removing cover plates, exposing wires, or drilling or cutting into walls that contain wiring.
TOOLS & MATERIALS
Building shelves and built-ins is a challenging job that requires patience, attention to detail, and the right tool for each task. Without these basic requirements, the work will be more difficult and the results will suffer.
Start off right by using high-quality tools. Good tools last longer and are generally more accurate than less expensive versions.
Many people buy tools only as they are needed to avoid purchases they will not use. This rationale should only apply to power tools and higher-priced specialty items. A high-quality basic tool set is important for every do-it-yourselfer to have on hand. Doing so avoids improper tool usage and makes your job easier, with improved results.
The hand tools you will need for most finish carpentry jobs can be broken down into two types: layout tools and construction tools. It is common for most people to own construction tools, but to lack necessary layout tools for basic carpentry jobs. Purchase the highest-quality layout tools you can afford. They are crucial for helping you avoid costly measuring and marking mistakes.
LAYOUT TOOLS
Layout tools help you measure, mark, and set up perfect cuts with accuracy. Many layout tools are inexpensive and simply provide a means of measuring for level, square, and plumb lines. However, recent technologies have incorporated lasers into levels, stud finders, and tape measures, making them more accurate than ever before, though at a slightly higher price. Although these new tools are handy in specific applications, their higher price is not always warranted for the do-it-yourselfer.
• A tape measure is one of the most common tools around. The odds are good that you already own at least one. (If you are making frequent trips for building supplies, invest in a second tape that stays in your car.) Carpentry projects require a sturdy tape measure with a length greater than your longest stock. A 25-foot tape measure has a wider and thicker reading surface than a 16-foot variety, but either is adequate for most carpentry jobs. If you can’t tell the difference between the smaller lines on a standard tape, consider purchasing an “Easy Read” variety. It is important to read the tape accurately.
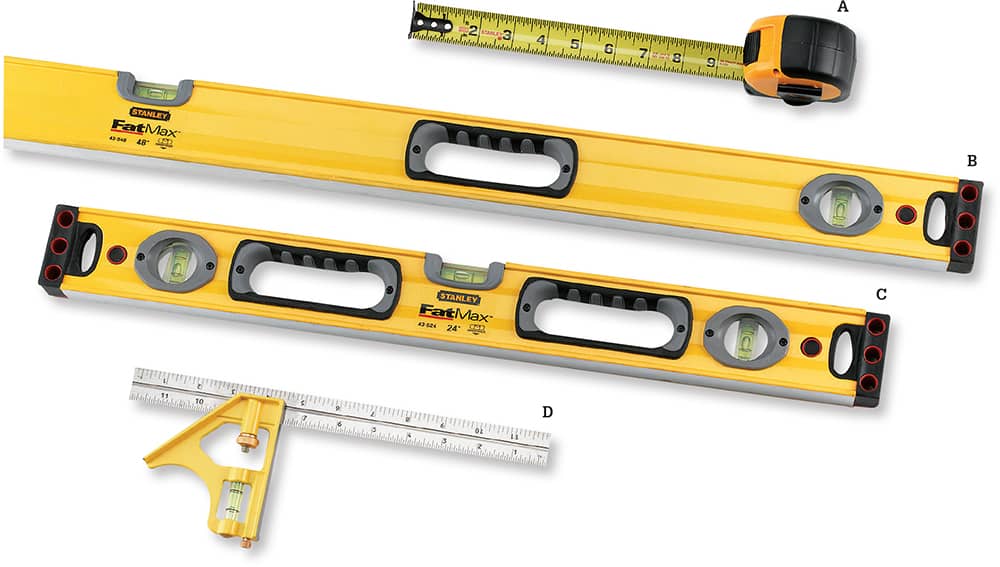
Layout and marking tools for making built-ins include: (above) tape measure (A), 4' level (B), 2' level (C), combination square (D). (below) framing square (E), chalk line (F), stud finder/laser level (G), T-bevel (H), profile gauge (I).
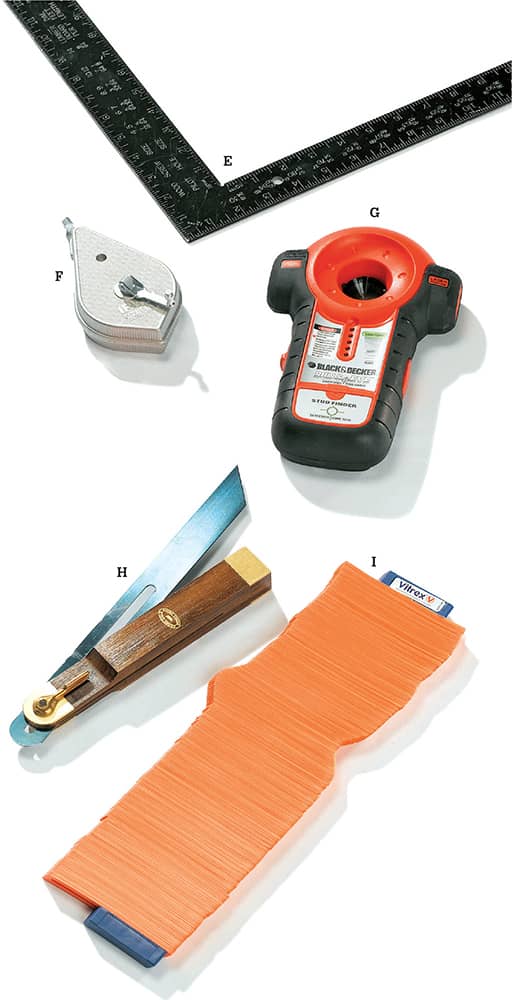
• A framing square, also known as a carpenter’s square, is commonly used to mark wood for cutting and to check for square. Framing squares are also used for laying out stairs and rafters.
• Chalk lines are used to make temporary straight lines anywhere one is needed. The case of a chalk line, or the “box,” is teardrop-shaped so that the tool can double as a plumb bob. Use a chalk line to mark sheet goods for cutting or to establish a level line in a room. Keep in mind that chalk can be difficult to remove from porous surfaces.
• A stud finder is used to locate the framing members in a wall or ceiling. Higher-priced versions also locate plumbing, electrical, or other mechanicals in the wall. Although stud finders are not completely necessary, they are convenient for larger jobs.
• Levels are available in a variety of lengths and price ranges. The longer and more accurate the level, the higher the price. The two most commonly used sizes are 2-foot and 4-foot lengths. A 2-foot level is handy for tight spaces, while the 4-foot variety serves as a better all-purpose level. Laser levels are handy for creating a level line around the perimeter of a room or for establishing level lines over longer lengths. They provide a wide range of line or spot placement, depending on the model.
• A T-bevel is a specialized tool for finding and transferring angles precisely. T-bevels are generally used in conjunction with a power miter saw to find the angle of non-square corners. This tool is especially handy in older homes where the original states of square, plumb, and level may no longer apply.
• A profile gauge uses a series of pins to recreate the profile of any object so that you may transfer it to a work piece. Profile gauges are especially useful when scribing to an irregular wall.
• A combination square is a multifunction square that provides an easy reference for 45- and 90-degree angles, as well as marking reveal lines or a constant specific distance from the edge of a work piece.
CONSTRUCTION TOOLS
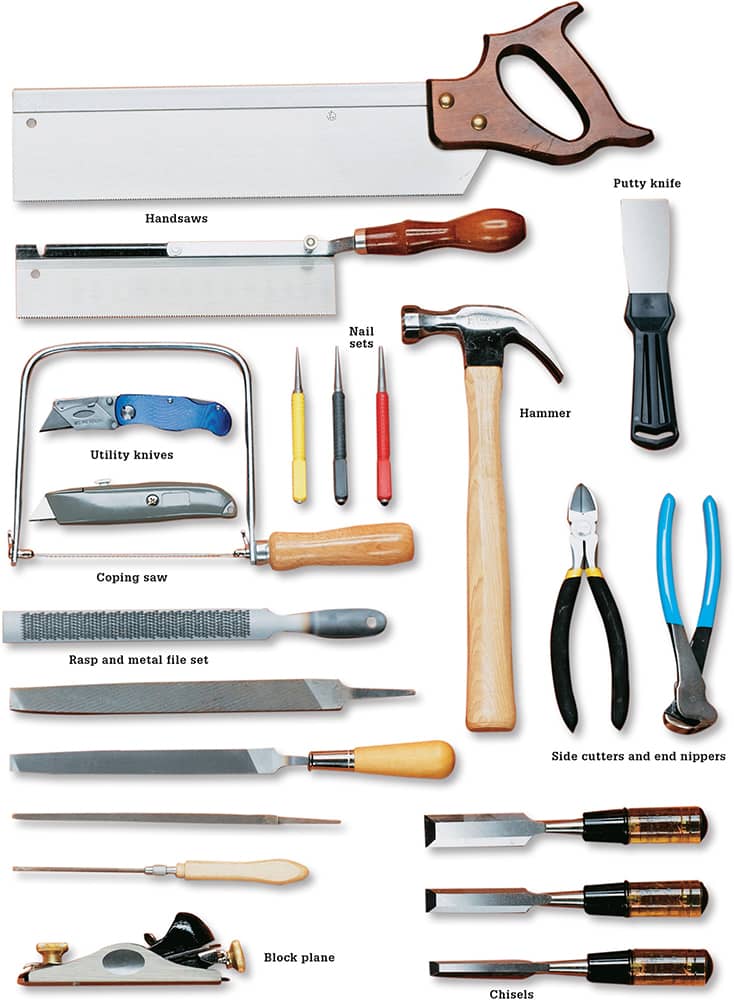
• A good quality hammer is a must for every carpentry project. A 16-ounce curved claw hammer, otherwise known as a finish hammer, is a good all-purpose choice. Some people prefer a larger straight claw hammer for heavy tear-down projects and rough framing, but these hammers are too clumsy and heavy for driving smaller casing and finish nails, and tend to mar the surface of trim.
• Utility knives are available with fixed, folding, or retractable blades. This tool is used for a wide variety of cutting tasks from cutting drywall to back-beveling miter joints. Always have additional blades readily available. Folding fixed-blade utility knives offer the durability and strength of a fixed blade with the protection of a folding handle.
• A set of chisels is necessary for installing door hardware as well as notching trim around obstacles and final fitting of difficult pieces. Keep a set only for use with wood, and do not use them for screwdrivers or demolition.
• Block planes are used to fit doors into openings and remove fine amounts of material from trim. A finely tuned block plane can even be used to clean up a sloppy miter joint.
• A coping saw has a thin, flexible blade designed to cut curves, and is essential for making professional trim joints on inside corners. Coping saw blades should be fine toothed, between 16 and 24 teeth per inch for most hardwoods, and set to cut on the pull stroke of the saw to offer you more blade control.
• A sharp handsaw is convenient for quick cut-offs and in some instances where power saws are difficult to control. Purchase a crosscut saw for general-purpose cutting.

• Protective wear, including safety glasses and ear protection, is required any time you are working with tools. Dust masks are necessary when sanding, doing demolition, or when working around fumes.
• Pry bars come in a variety of sizes and shapes. A quality forged high-carbon steel flat bar is the most common choice. Wrecking bars make lighter work of trim and door removal due to their added weight. No matter what type of pry bar you use, protect finished surfaces from scratches with a block of wood when removing trim.
• Side cutters and end nippers are useful for cutting off and pulling out bent nails. The added handle length and curved head of end nippers makes them ideal for pulling larger casing nails. Pneumatic brad nails and smaller pins will pull out easier with side cutters. Purchase a nail set for countersinking nail heads. Three-piece sets are available for different nail sizes.
• A rasp and metal file set is important for fitting coped joints precisely. The variety of shapes, sizes, and mills allow for faster rough removal of material, or smoother slow removal, depending on the file.
• Use a putty knife to fill nail holes with wood filler and for light scraping tasks.
POWER TOOLS
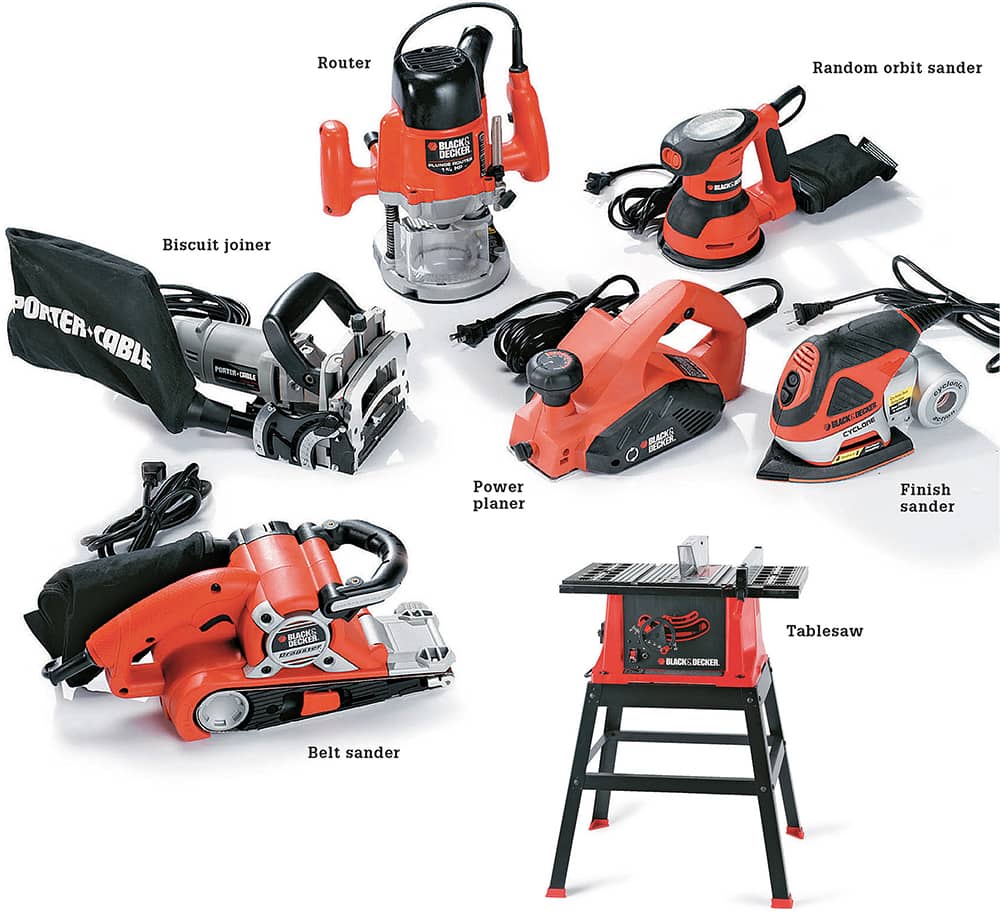
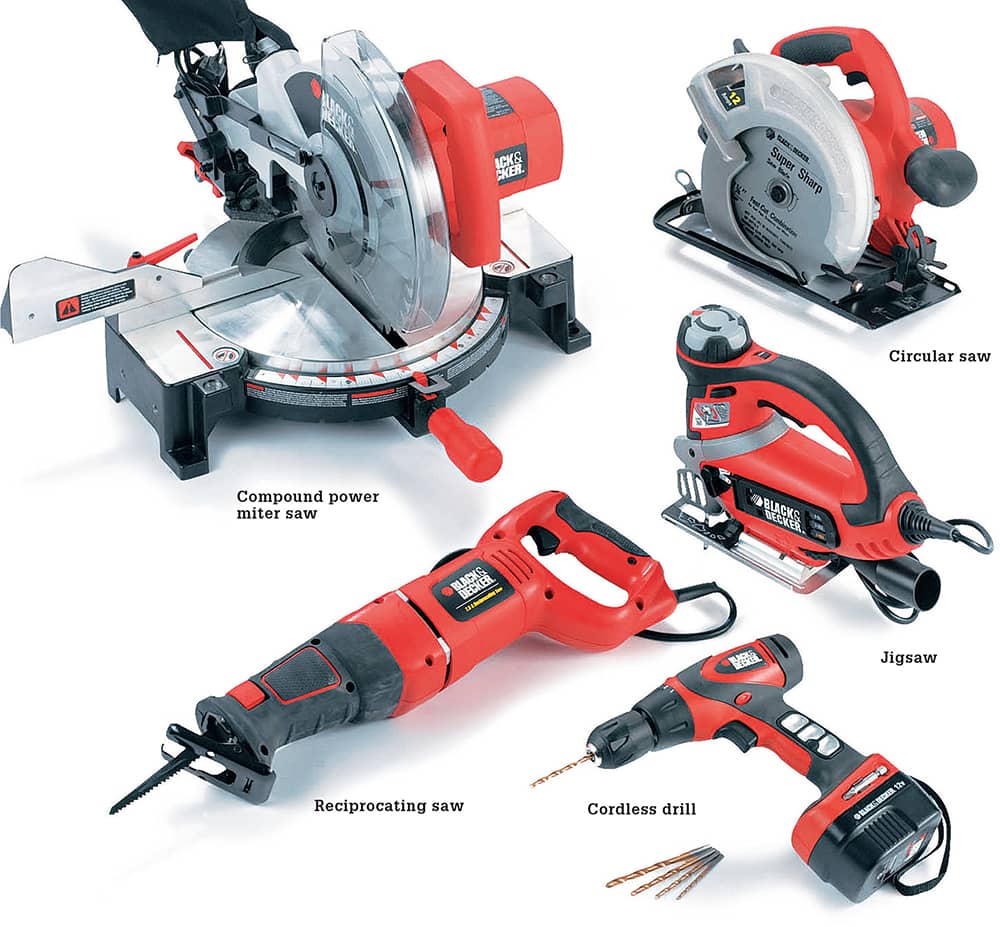
Despite the higher price as compared to hand tools, power tools are a great value. They allow you to work more quickly and accurately than with hand tools and make repetitive tasks like sanding, drilling, and sawing more enjoyable. Basic home carpentry does not require every power tool shown here, but some tools, such as a power miter box, are crucial for professional results. Purchase power tools on an as-needed basis, keeping in mind that while the cheapest tool is not always your best option, the most expensive and powerful is probably not necessary, either. Cheaper tools generally sacrifice precision, while the most expensive tools are made for people who use them every day, not just occasionally.
• A cordless drill is one of the handiest tools available. Although drills are not normally used to install trim, they make quick work of installing structural components. Occasionally, trim-head screws are used to install trim, in metal studs, or where extra holding power is needed.
• A circular saw is ideal for straight cuts in plywood and quick cut-offs of solid material. Purchase a plywood blade to make smooth cuts in plywood, and a general-purpose blade for other cuts.
• A jigsaw is the perfect tool for cutting curves, or notching out trim around obstructions. Jigsaw blades come in an array of designs for different styles of cuts and different types and thicknesses of materials. Always use the right type of blade and do not force the saw during the cut or it may bend or break.
• A biscuit joiner (also called a plate joiner) is a specialty tool used with glue and biscuits to make strong joints between two pieces of stock.
• A reciprocating saw is used for removal and tear-down applications. This tool is especially handy for removing door jambs.
• A compound power miter saw will yield professional results. Most have a 10- or 12-inch-diameter blade. A compound power miter saw has a head that pivots to cut both bevels and miters. Sliding miter saws have more cutting capacity but are less portable. A fine-tooth carbide-tipped blade is best for built-in and shelving projects.
• A belt sander is not essential but is a handy tool for quick removal of material.
• Random-orbit sanders are a good choice for smoothing flat areas, such as plywood, quickly. Random-orbit sanders don’t leave circular markings as disc sanders do, and can sand in any direction regardless of wood grain.
• Finish sanders are available in a variety of sizes and shapes for different light sanding applications.
• A power planer is used to trim doors to fit openings and flatten or straighten out materials. Power planers are faster to use than manual hand planes, but the results are more difficult to control.
• A tablesaw is the best tool for ripping stock to width, and larger models can be fitted with a molding head for cutting profiles.
• A router (plunge router is shown here) has many uses in trim carpentry, especially for cutting edge profiles to make your own custom woodwork.
