Bread, Muffins, Biscuits, Crackers, Focaccia, and Pizza
Bread, for the most part, is simply made of flour and water, maybe some salt, and leavening, which could be yeast, a sourdough left over from a previous baking, or a chemical leavener such as baking powder. Olive oil, while a common topping, seldom enters into the bread itself except when the baker is making pizza or its near cousin focaccia. So these recipes are very simple and reflect my opinion that olive oil makes a magnificent substitute for any other kind of fat (butter, margarine, vegetable oil) that you might use in baking.
A Note About Flour
In the following recipes, I recommend using unbleached all-purpose flour, often mixed with a measure of whole wheat flour. I use the white (all-purpose) and whole wheat flours offered by the King Arthur Flour Company in Vermont (see their website, www.kingarthurflour.com). Experienced bakers know that for breads, quick breads, and crackers, you can play around with the ratio of all-purpose flour to whole wheat flour, and even make breads that are 100 percent whole wheat flour. (This is not true of cakes and fancy pastry, however.)
Semolina, sometimes called semolina flour, is a little different because it comes from hard durum wheat. While regular flour, whether white all-purpose or whole wheat, is made from bread wheat (Triticum aestivum), durum wheat (T. durum or T. turgidum subsp. durum) makes a grittier flour that is considered ideal for pasta making. Semolina is also used for bread making in many parts of the Mediterranean, but especially in southern Italy and North Africa. Semolina can be as gritty as fine cornmeal grits, or it can be ground finer to make semolina flour or durum flour. My preference is for plain semolina, that is, not the finer-textured durum flour, but I should note that King Arthur’s semolina comes with the subtitle “semolina flour.” Just don’t confuse that with the very soft durum flour.
Gluten-Free Olive Oil–Blueberry Muffins
I’m no big advocate of gluten-free, but these muffins are so deliciously nutty and light in texture that I could eat them every morning for breakfast. Don’t feel restricted to blueberries—other types of berries will work as well, or add some chopped dates or dried figs, or a combination of, for instance, dried cranberries and walnuts.
Almond flour, often sold as ground almonds, is available from many health food and whole foods stores.
Makes 6 to 8 muffins
- 2 tablespoons olive oil, plus more for the pan
- 2 cups almond flour (very finely ground blanched almonds)
- ¼ cup sugar
- 1 teaspoon baking soda
- ½ teaspoon salt
- ½ teaspoon ground cinnamon
- 2 large eggs
- 1 teaspoon vanilla extract
- 2 tablespoons plain yogurt
- 1 cup blueberries
Preheat the oven to 425°F. Use a paper towel to wipe 6 to 8 cups of a standard muffin pan with olive oil—or use those little corrugated paper muffin liners.
Combine the almond flour, sugar, baking soda, salt, and cinnamon in a large bowl and toss with a fork to mix well.
In a smaller bowl, mix together the eggs, the 2 tablespoons oil, vanilla, and yogurt, then stir this mixture into the dry ingredients. Don’t worry if there are some lumps in the dough—it makes better muffins than a completely smooth dough. Fold in the blueberries with a rubber spatula.
Spoon the dough into the muffin pan, filling each cup to just below the brim.
Transfer to the oven and bake for 5 minutes, then turn the oven down to 350°F and bake for an additional 15 to 20 minutes, until the muffins are lightly golden and thoroughly dry on top.
Transfer to a rack and let cool slightly, then turn out into a serving basket.
Slow-Rise Olive Oil Bread with Black Olives
A bread like this was renowned on Cyprus when I lived on the north coast of the island in the 1970s. Along with another bread, equally famous, that was covered with sesame seeds and redolent of fennel, it was a specialty of Turkish bakeries in Kyrenia. The fragrance of those breads, coming hot from an oven in a backstreet bakery, lives with me to this day. But while the bread itself is old-fashioned, the method owes a lot to Jim Lahey, New York City’s premier baker, and the no-knead technique he developed at his Sullivan Street Bakery.
Salt-cured black olives are sometimes mistakenly referred to as oil-cured; they are actually cured in salt (see Olives: Curing Your Own), which accounts for their wrinkled, dehydrated look, and then coated with a little oil to give them a nice gloss. I use Greek oil from the island of Crete for this.
I’ve given recommended quantities of flour to be used in the dough, but, as bakers know, flour requirements can vary depending on ambient humidity on any given day in your kitchen.
Makes two 2-pound loaves
- For the starter:
- 1 teaspoon instant yeast
- 1 cup room-temperature water
- 1 cup unbleached all-purpose flour
- For the dough:
- 3 cups whole wheat flour
- 3½ cups unbleached all-purpose flour, plus more as needed for dusting
- Sea salt
- 3 tablespoons olive oil
- 2 cups warm water
- ¾ cup coarsely chopped pitted salt-cured black olives
To make the starter: Combine the yeast, 1 cup room temperature water, and flour in a bowl and stir with a wooden spoon until it is combined. Don’t worry if it’s lumpy. Cover with plastic wrap and set aside for 12 to 18 hours.
To make the dough: The next day, in a large bowl combine the starter with 2 cups of the whole-wheat flour and 3 cups of the all-purpose flour. Add salt to taste, keeping in mind that the olives may contribute quite a lot of salt when they are added. Mix together with a wooden spoon. Add 2 tablespoons of the oil to the warm water, whisking to combine well, and immediately pour it into the bowl with the flours. Mix again, using a wooden spoon. (You may use your hands if you wish, but it will be a very sloppy, wet mixture.)
Add the remaining 1 tablespoon oil to another large bowl and rub it all around the insides. Turn the dough into that bowl, scatter a little more flour, either whole wheat or all-purpose, over the top, cover with plastic wrap, and set aside, again, for 12 hours or more.
Spread 1 cup of the remaining flour, whole-wheat and all-purpose mixed together, on a bread board or wooden countertop. Turn the risen dough out onto the heavily floured board and gently stretch it out into a rough rectangle. Scatter the olives over the surface, then fold half of the dough over on top of the other half. Give the dough a quarter turn and repeat the folding. Do this five or six times, until the dough has picked up quite a bit of the flour from the board and the olives are well distributed throughout.
Now use some of the remaining flour to dust your hands and the board, and shape the dough into one or two round loaves (boules). (Note that, unless you have two ovens, if you make two loaves they must be baked one at a time, in which case you should set the second loaf aside, lightly covered, in a cool place until ready to let it go through its final rise, timing it to be ready to go in the oven when the first loaf is done.)
Set the loaf that is to be baked on a heavily floured kitchen towel. (You may use either whole wheat or all-purpose flour for this.) Cover with a dampened cloth and let rise for another 2 hours. During the last half hour, turn the oven on to very hot (425° to 450°F) and set a heavy covered pot (an enameled cast-iron Dutch oven is perfect for this) in the oven. Let the pot and the oven heat fully for half an hour. Then remove and, working quickly and carefully, lift off the lid and turn the dough from the kitchen towel directly into the pot. Shake it to settle it, clap the lid on, and return the pot to the oven.
Bake for about 40 minutes. Then uncover the pot and let the bread continue baking for another 10 to 15 minutes, or until the top crust is a rich golden brown.
Remove the pot from the oven and turn the bread out onto a wire rack to cool.
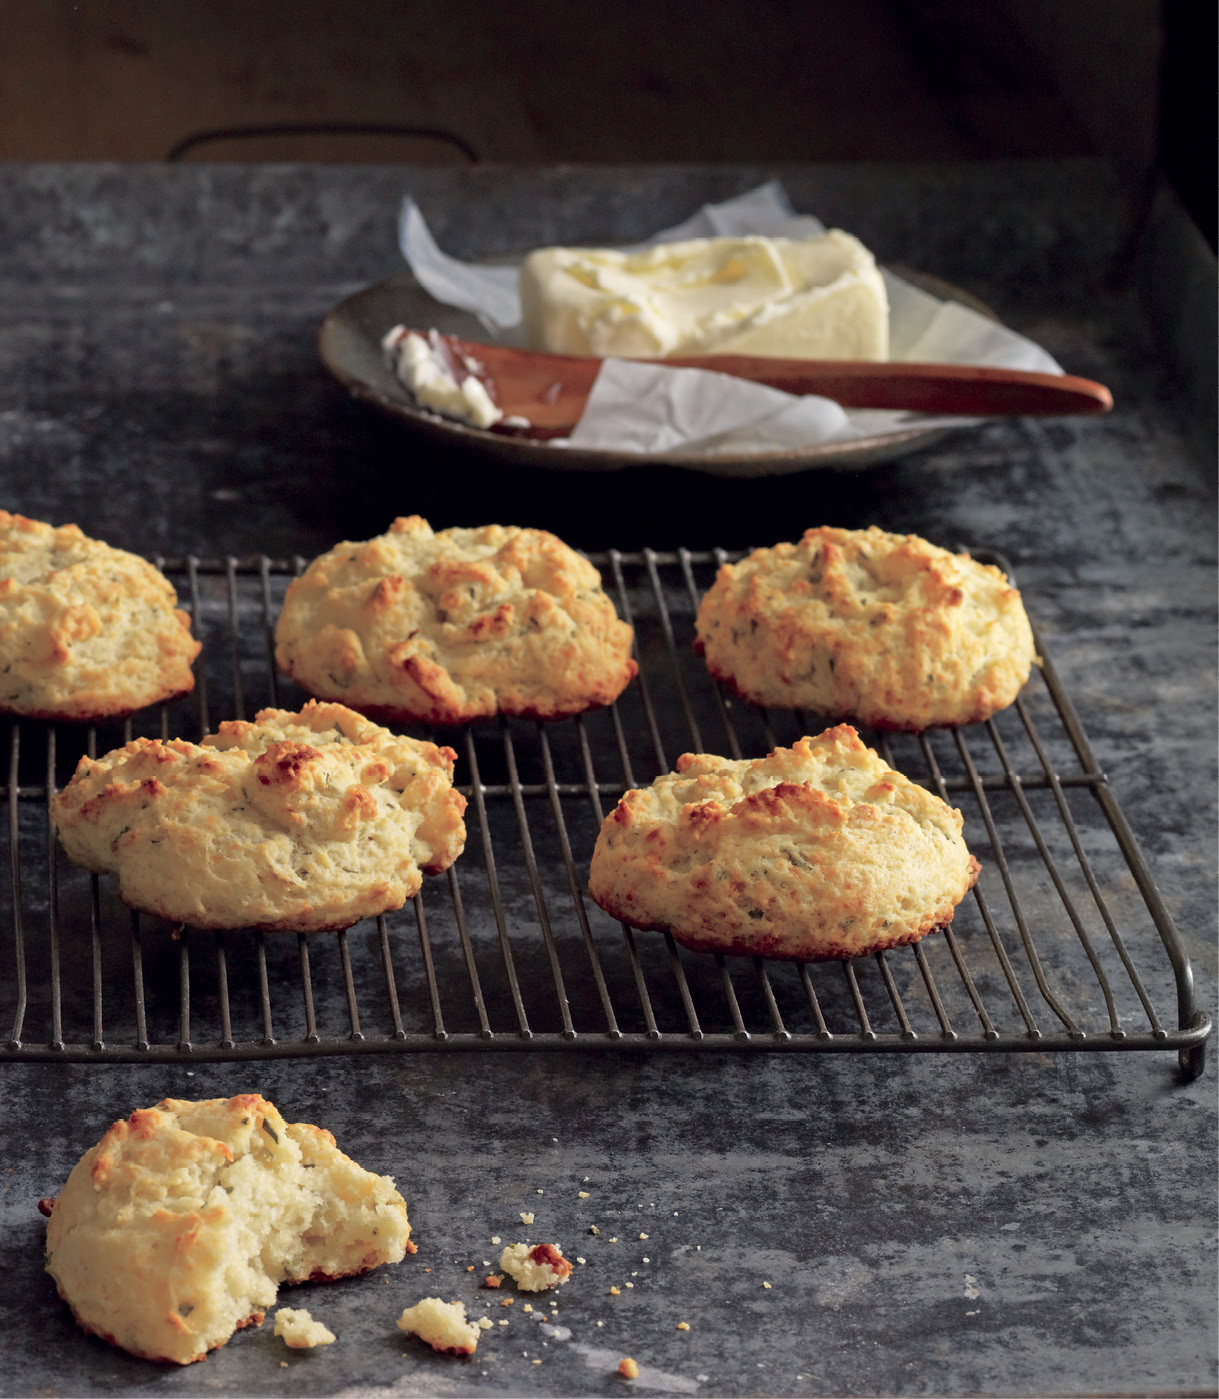
Olive Oil–Baking Powder Biscuits with Fresh Herbs and Parmigiano
Quick and easy, these biscuits are great to serve with any kind of saucy stew, since they do a fine job of sopping up the juices. I like them with bean and pork chili. If you wish, you could use a combination of all-purpose and whole wheat flour. And you could use grated cheddar in place of the parmigiano.
Makes 8 to 10 biscuits
- 1 cup unbleached all-purpose flour, plus a little for the board
- 1 cup whole wheat flour
- 1 tablespoon baking powder
- 1 teaspoon salt
- 2 tablespoons minced fresh green herbs—flat-leaf parsley, rosemary, thyme, chives, or your choice
- 1 cup freshly grated parmigiano reggiano or other cheese
- ⅔ cup milk, or a little more if needed
- ⅓ cup olive oil
Preheat the oven to 450°F.
Have ready a baking sheet lined with parchment paper. Combine the flour, baking powder, and salt and toss with a fork until well mixed. Add the minced herbs and grated cheese and toss again. Pour in the milk and oil and stir with the fork until just moistened. Don’t worry if the dough is a little lumpy. Knead very lightly (biscuits should be handled delicately), just to combine the ingredients. If the dough seems a little dry, add another tablespoon of milk and knead it in.
Gently pat or roll the dough out on a very lightly floured bread board. The layer of dough should not be more than ½ inch thick. Use a 2½-inch biscuit cutter to cut out rounds and set them onto the prepared baking tray. Transfer to the oven and bake for 15 minutes, then lower the heat to 350°F and bake for an additional 5 or 10 minutes, until the biscuits are golden on top.
Serve hot from the oven, or keep warm in a low oven until ready to serve.
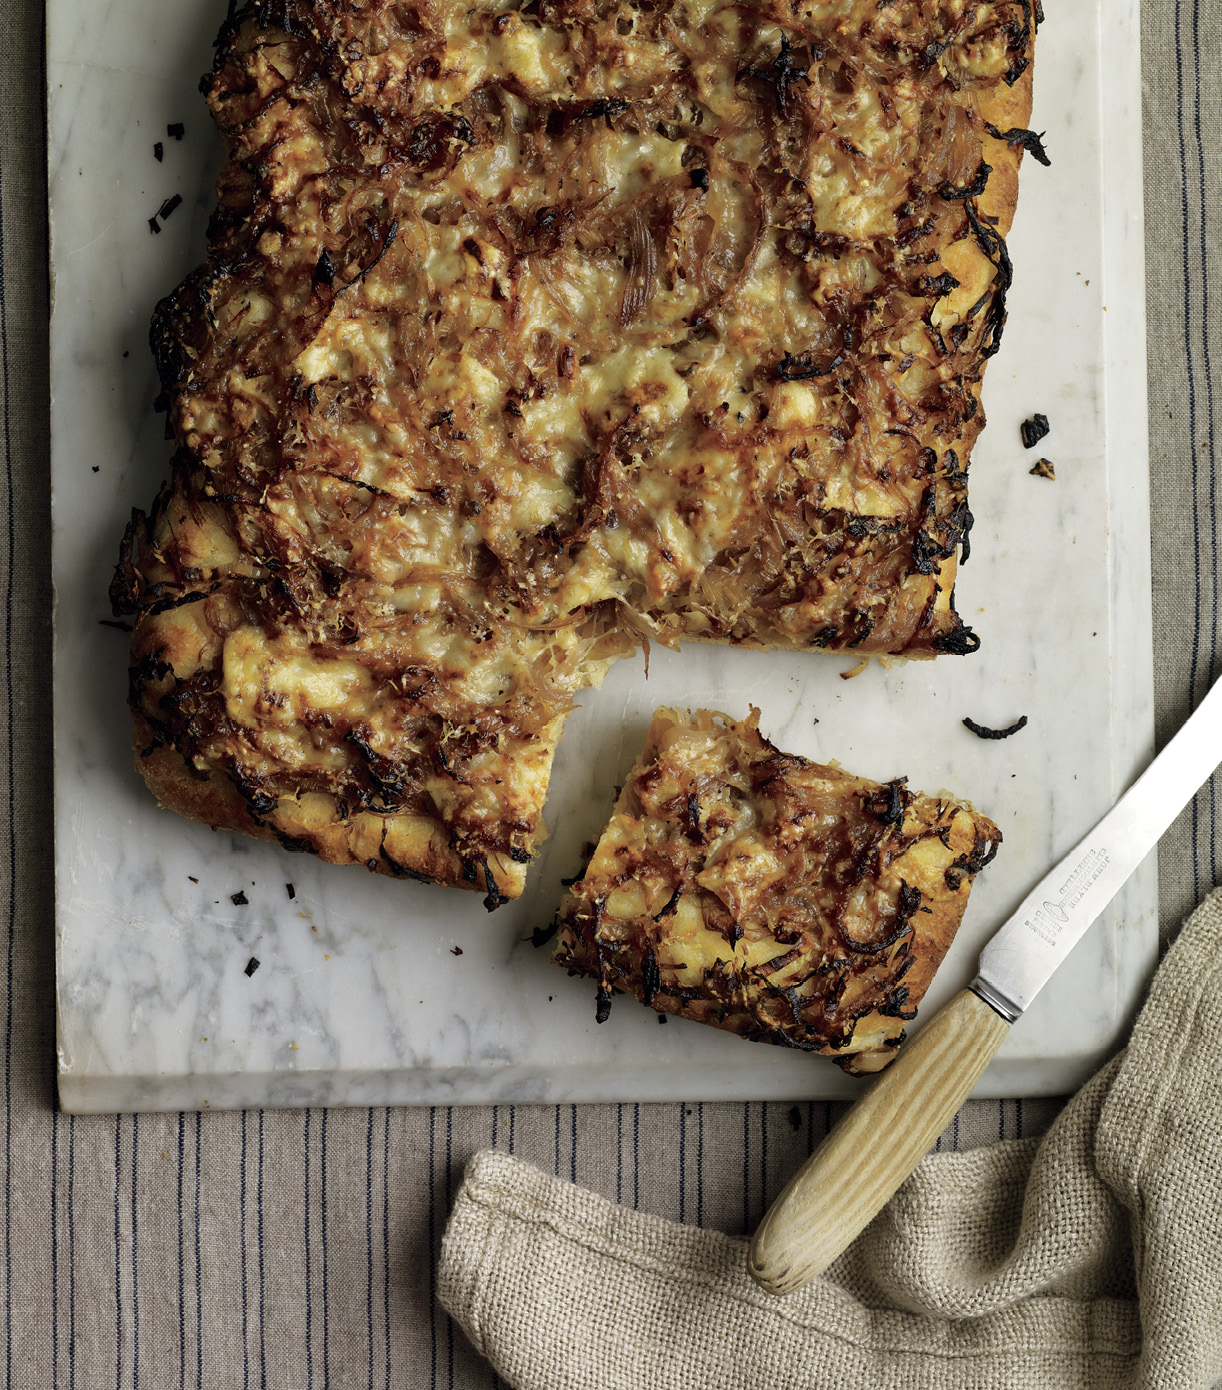
Three-Onion Focaccia or Pizza al Taglio
Gabriele Bonci is Italy’s star pizzaiolo, with a national television show and an amazing following of fans, many of whom flock to his classes at Pizzarium, his Rome studio-outlet-bakery. Neapolitan pizzaioli have sworn to me that they never add olive oil to the dough, so I was especially struck by Bonci’s use of a couple of tablespoons of extra-virgin in his—it adds to the suppleness of the mixture.
This makes an excellent all-purpose dough for pizzas and focaccias. I think of focaccia as a more home-style version of pizza, although like most things Italian, that requires a little stretching of the truth. But one difference between the two surely is that focaccia is almost always baked in a rectangular pan, while pizza is a circle of dough cast directly onto the oven floor or a pizza stone. And the toppings for focaccia tend to be simpler than those for pizza. A favorite is simply olive oil, salt, and rosemary—bathing the top of the dough with several glugs of olive oil and sprinkling on coarse sea salt and coarsely chopped rosemary leaves. But that kind of focaccia is almost always called pizza bianca. So go figure!
In Rome, a big square-pan focaccia like this one is called pizza al taglio, because you buy it by the piece (actually by weight) and it’s cut (tagliato) with a knife. So call it pizza or call it focaccia, and call it delicious anyway!
If you wish, for variety, try substituting a cup of barley flour, whole wheat flour, or semolina for a cup of the all-purpose flour in the recipe.
Note that I use semolina for kneading on the bread board. To my taste, this makes a sturdier and more interesting dough, but if you don’t have semolina handy, by all means use all-purpose flour instead.
Makes two 9 by 13-inch focaccias
- For the dough:
- 3½ cups unbleached all-purpose flour
- ½ teaspoon instant yeast
- About 2 cups very warm water
- 3 tablespoons olive oil, plus more for the bowl
- 1 tablespoon sea salt
- 1 cup plus 2 to 3 tablespoons semolina, for the board, if available (see headnote)
- For the topping:
- 4 to 6 tablespoons olive oil, plus a little more for the pan
- 1 pound red onions, halved and sliced
- ¾ pound yellow onions, halved and sliced
- Sea salt and lots of freshly ground black pepper
- ½ pound trimmed leeks
- 1 tablespoon sugar
- 2 tablespoons balsamic or aged sherry vinegar
- 1 teaspoon crushed red chile pepper, or to taste
- ½ cup slivered Gruyère cheese
- ½ cup freshly grated parmigiano reggiano cheese
To make the dough: In a bowl, combine the flour and yeast and toss with a fork. Add the water, about ½ cup at a time, and mix with the fork. (You may not need all the water; you are aiming for a dough that is quite sloppy and sticky, not like the usual bread dough.) Continue mixing until all the lumps are gone, then mix in the oil and salt. Cover the bowl with plastic wrap and set it aside for about 15 minutes.
Spread the 1 cup semolina thickly over a bread board or other work surface and transfer the dough to the board. Knead it very gently by folding the dough over on itself, like an envelope, then giving it a quarter turn and folding again, continuing like this until most of the semolina on the board is absorbed into the dough, which should be quite springy and elastic and no longer as sticky as it was when you started.
Set the dough aside, in its bowl, covered with plastic wrap, to rest for 15 minutes, and then repeat the previous process, this time using just a couple of tablespoons of semolina on the board. You can do the whole thing a third time too. (This is the only “kneading” the dough will get. It’s reminiscent of baker Jim Lahey’s no-knead bread technique, which went viral when it was described in The New York Times several years ago.)
Rinse out the bowl and rub it lightly with olive oil. Transfer the dough to the bowl, cover it with plastic wrap, and move it to the refrigerator to rise and develop flavor for at least 24 hours. This is the key to the procedure, because it’s where the dough starts to work for you and to develop complex flavor as it continues to ferment.
When ready to continue with the dough, take it out of the refrigerator. Remove the dough from the cold bowl and set it on a bread board. Knead it three or four times, in order to help it warm (you probably will not need any additional flour on the board at this point), then cover with a lightly dampened cloth and let it come to room temperature.
To make the topping: While the dough is warming, in a large saucepan, combine 3 tablespoons of the oil with the red and yellow onions, stirring to mix well. Set over low heat and cook very slowly, stirring from time to time and adding a little more oil when necessary, until the onions have reduced to a soft and rather creamy mass. This will take 20 to 30 minutes. As the onions cook down, add at least 1 tablespoon salt and lots of black pepper.
Cut the leeks in half lengthwise, rinse, and slice very thinly. When the onions are thoroughly reduced, stir the leeks, sugar, and vinegar into the mass. Add the chile pepper. Now raise the heat to medium, and cook for an additional 15 minutes. The onions will start to brown slightly as you do this.
Set the oven on the highest temperature that it will allow—450° to 500°F. Cut the dough in half.
Again, have a well-floured (with semolina) work surface ready. Drop half the dough onto the surface and, with your fingers, gently spread it out.
Oil the surface of a sheet pan on which you will bake the focaccia. (I use two 9 by 13-inch sheet pans; the topping described is sufficient for both pans.) Transfer the dough to the pan and continue to stretch it until it fills the pan. Use your fingers, or the handle of a wooden spoon, to dimple it all over with shallow indentations, then spoon half the onion topping all over the top of the dough, smoothing it right out to the edges. Cover the top of the onions with half of the slivers of Gruyère, then with half of the grated Parmigiano. Continue with the second piece of dough on a second sheet pan.
Transfer the pans to the preheated oven and bake for 15 to 20 minutes, until the crusts are brown, the tops are slightly crisp and starting to brown, and the cheese has melted.
Remove from the oven, cut into squares, and serve immediately.
Note: Other focaccia toppings: Take a dozen or so cherry or grape tomatoes and cut them in half; thinly slice a couple of garlic cloves. Press them all over the top of the focaccia, so they sink slightly into the dough. Then top with olive oil, salt, and, if you wish, about a tablespoon of Greek or Sicilian dried oregano, crumbled between your fingers. Or top the focaccia with the flaked contents, well drained, of a 6-ounce can of oil-packed tuna and about ½ cup of coarsely chopped flat-leaf parsley leaves. Again, add salt and olive oil and several turns of black pepper from the grinder.
And another note: You could, of course, turn this into a more classic Neapolitan round pizza, simply by dividing the dough into four to six balls and stretching each one gently, gently, into a disk.
Top with your favorite tomato sauce, a few slices of real mozzarella (not that rubbery square stuff in the supermarket cheese case), a driblet or two of olive oil, and a sprinkle of grated parmigiano reggiano. Pop into a very hot oven (500°F if you can do it) until done, then immediately throw some fresh basil leaves over the top and serve.
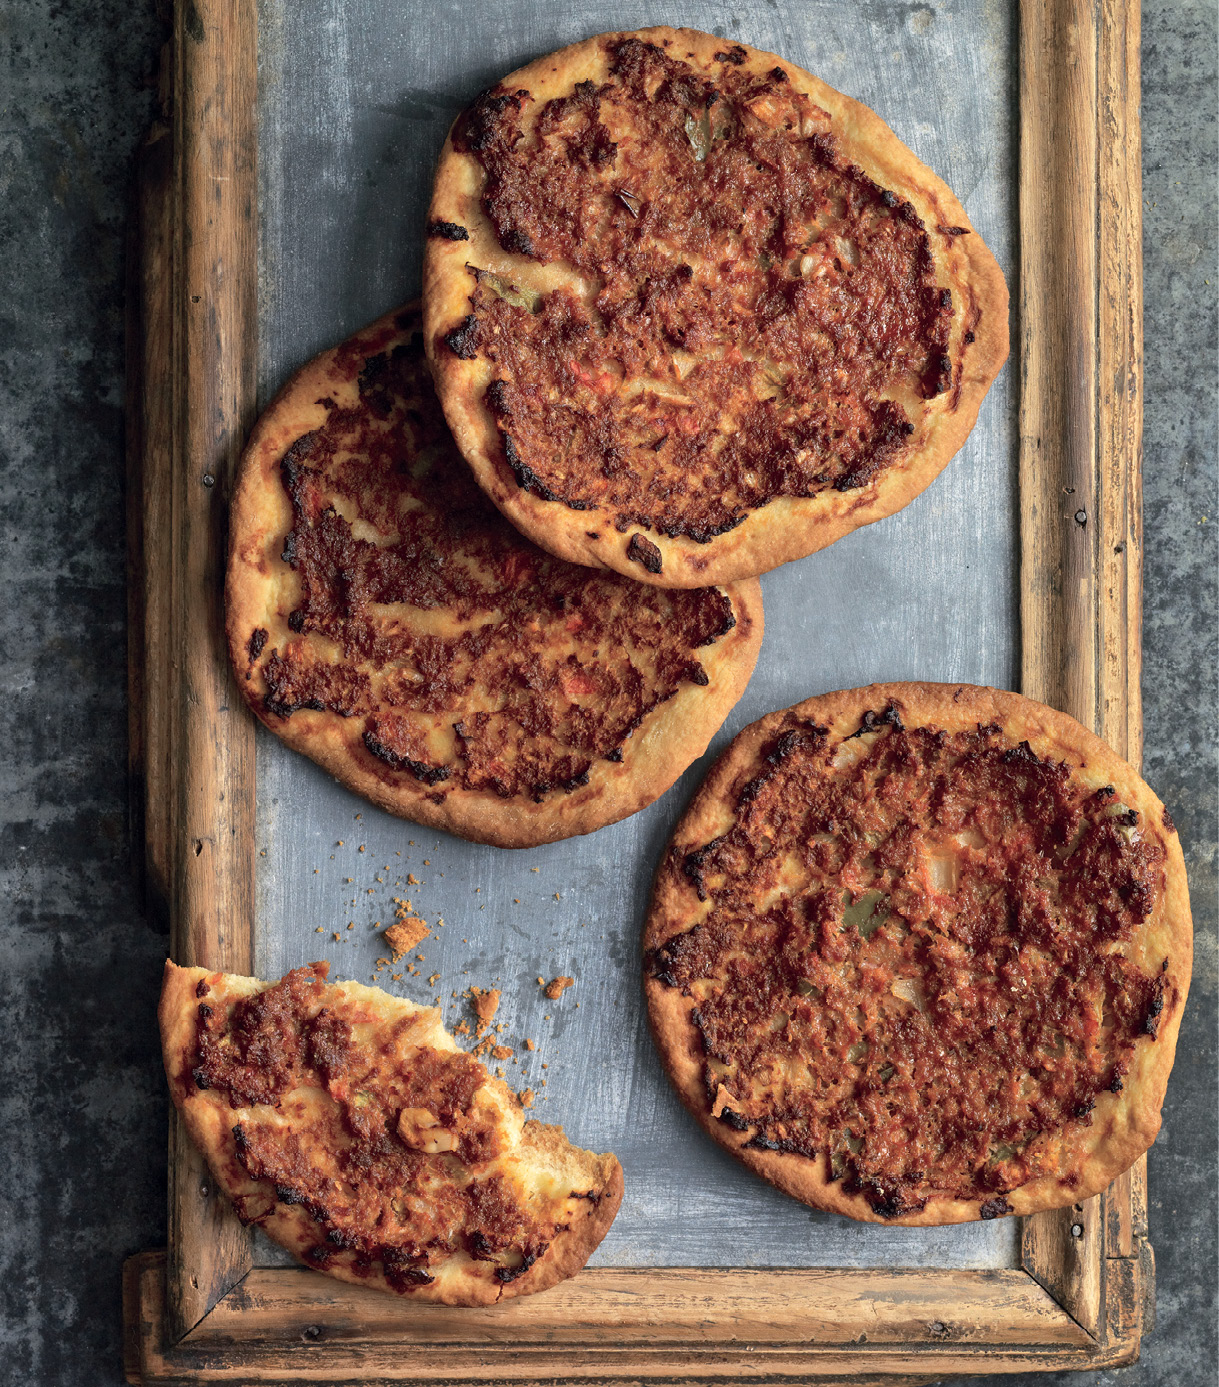
Middle Eastern Pizza Sfiha
Fairouz Shomali, a brilliant cook who also teaches high school history in the Palestinian town of Beit Sahour, near Bethlehem, showed me how to make these delicious pizzas called sfiha. She prepares the topping the day before and lets it sit in the refrigerator overnight to develop flavor. Some cooks add ground allspice to the topping before baking and sprinkle pine nuts over the top when the sfiha come out of the oven. If you serve these for a light lunch, count on 2 sfiha per person—though some hearty eaters can easily down 4 or 5.
Makes 25 to 30 individual sfiha
- For the topping:
- 1 large ripe but firm tomato (about 1 pound)
- 1 medium onion
- 2 green or red sweet peppers
- 1 whole fresh green or red chile pepper, such as jalapeño or serrano
- 3 garlic cloves
- 1 pound lean ground meat, all beef, all lamb, or a mixture of the two
- ½ cup tahini
- 2 to 3 tablespoons tomato paste
- 1 teaspoon Aleppo pepper (red pepper flakes)
- 1 tablespoon sea salt
- Freshly ground black pepper
- For the dough:
- 3 cups unbleached all-purpose flour
- 1 cup semolina
- 1 teaspoon instant yeast
- ⅔ cup olive oil
- 1¼ cups warm water
- 1 tablespoon sea salt, or as desired
To make the topping: Peel, slice, and chunk the tomato, onion, sweet peppers, chile pepper, and garlic and add them to the bowl of a blender or food processor. Process, adding a little cool water if necessary to help with the blending, until the vegetables are very finely minced. You should have about 4 cups of minced vegetables.
Combine the vegetable mixture in a bowl with the ground meat. Add the tahini and tomato paste—more or less as you see fit to give a nice ruddy color to the mix—along with the Aleppo pepper, salt, and a good spoonful or more of black pepper. Using your hands, knead well to mix. Cover the bowl and set in the refrigerator overnight or for at least 8 hours. The next day, turn the meat mixture into a colander in the sink to drain out all excess liquid.
To make the dough: While the meat is draining, combine the all-purpose flour, semolina, and yeast in a large bowl and then stir in the oil, along with the water. Add the salt and knead thoroughly, just as if it were bread (which of course it is).
When the dough is soft and silky, cover the bowl and set it aside in a warm environment (room temperature should be fine) to rise until doubled.
Punch the dough down and shape it, tearing away small lumps to make perfectly smooth balls—larger than golf balls, smaller than tennis balls. You should have between 25 and 30 balls. Set the balls on a tray or wooden board and cover with a lightly dampened towel. Let rise for about 30 minutes.
Preheat the oven to 425°F.
Roll each ball into a thin circle 4 to 5 inches in diameter. Set the circles on baking sheets lined with parchment paper. (You will have to bake in batches.) Smear a generous portion (about 2 tablespoons) of the meat mixture over the top of each circle, extending it out almost to the very edge and smoothing it with the back of a spoon. Prick the sfiha all over with a fork to prevent them from blistering while baking.
Transfer the baking sheets to the oven and bake for 20 to 30 minutes, until the topping is thoroughly cooked and the edges of the dough circles are crisp and golden. Watch carefully toward the end to make sure the little pies don’t get too brown.
Remove and serve immediately. You could also let them cool and serve at room temperature. They’re best hot from the oven but can be kept for several days and warmed up when ready to eat.
Olive Oil Crackers
This recipe comes from a friend, Dawn Woodward, who has a wonderful bakery called Evelyn’s Crackers in Toronto. With her partner, Ed Rek, Dawn makes whole-grain crackers, cookies, granola, and other goodies (www.evelynscrackers.com). When I asked Dawn if she had a recipe for olive oil crackers, she immediately sent me this.
Note that you’ll find this easier if you have a hand-crank pasta machine for rolling out the dough.
Makes 32 to 40 crackers
- 1¾ cups semolina
- ½ cup unbleached all-purpose flour, plus a little more for the board
- ¼ cup stone-ground cornmeal
- 1½ teaspoons sea salt, plus more to sprinkle on top
- 1½ teaspoons fennel seeds
- ¼ cup very finely chopped green olives
- 2 tablespoons olive oil, plus more for brushing the crackers
Mix the semolina, all-purpose flour, cornmeal, and salt together. Crush the fennel seeds lightly in a mortar and toss into the flours, along with the olives. Mix together the olive oil and ⅔ cup water and beat briefly with a fork, then stir into the dry ingredients. Start to knead in the bowl, then transfer to a very lightly floured board and continue kneading to form a stretchy, well-developed dough, about 10 minutes. Let the dough rest, covered, for at least 30 minutes.
Preheat the oven to 375°F.
Roll out half the dough, keeping the other half covered, into a disk that is as thin as you can make it—a little thicker than an ordinary mailing envelope—about 1/16 inch. (If you have a hand-crank pasta machine, cut the dough into smaller pieces and roll each piece until it is 1/16 inch thick.) As you finish each piece, cut it in strips or lozenges and set on a baking sheet (or bake the crackers as long thin rectangles and then break them once they are baked).
Brush the tops lightly with olive oil, then sprinkle with sea salt (Maldon salt will give a nice crunch to these), keeping in mind that the olives may lend a good deal of salt to the crackers. Transfer to the oven and bake for 12 to 15 minutes—but be very attentive. Because they’re so thin, they can burn quickly. Once the crackers are dry and golden but speckled with darker spots, remove from the pan and set on a rack to cool.
Store in a dry tin or cracker box. They’ll keep well for a long time—if you can resist them.
Taralli al Peperoncino e Origano
Down in Puglia, on the heel of Italy’s boot, taralli are a necessity to serve with a glass of wine late in the afternoon or before dinner. They look sort of like pretzels, and indeed they’re made like pretzels (or like bagels), first boiling them before baking them. But the flavor is decidedly different, and the olive oil in the dough gives taralli a crunch and crumbly, crispy texture that pretzels simply lack. Serve these with chilled white wine. Or train your children to expect them for a healthy after-school snack.
Makes 50 to 60 taralli
- 2¾ cups unbleached all-purpose flour, plus a little more for dusting the bowl and the board
- 2 teaspoons sea salt, plus more for the boiling water
- ½ teaspoon sugar
- 1½ teaspoons dried crumbled Greek or Sicilian oregano
- ¾ teaspoon crushed red chile pepper
- ½ cup dry white wine
- ½ cup fruity olive oil, preferably from Puglia
In the bowl of a food processor, combine the flour, salt, sugar, oregano, and chile pepper, and pulse briefly to mix. With the motor running, pour in the wine and oil and mix to a wet dough. Transfer the dough to a well-floured bowl or other container, dust the top of the dough with more flour, and refrigerate, covered, for 2 hours or overnight.
Turn the dough out onto a well-floured board and knead lightly. Working with half the dough at a time, keeping the rest chilled, cut the dough into walnut-size pieces and roll each piece into a snake about ¼ inch in diameter. Shape the snake into a sort-of pretzel shape, a ring with the two ends crossed at the bottom.
Dust a kitchen towel with flour and set the shaped taralli on the towel. Have ready a lightly oiled baking sheet.
Preheat the oven to 350°F.
Bring 5 to 6 quarts of well-salted water to a rolling boil. Drop in the taralli, a few at a time, and boil until they float to the top. (Italian cooks say, “Until they are gallegianti,” which suggests the bubbling, dancing nature of the taralli as they finish cooking.) Use a slotted spoon to extract the taralli and set them on the oiled baking sheet. When the sheet is full, transfer to the oven and bake for 35 to 40 minutes, or until the taralli are burnished gold. Remove from the oven, transfer to a rack to cool, and then store in a sealed tin—they will keep for weeks, months even.
Note: There are several other favorite ways to flavor taralli instead of chile pepper. Fennel seed is popular and so is plain black pepper—in either case, use about 1 tablespoon of the seeds or peppercorns and crush them lightly in a mortar.